Link to this sectionMNN-Export für YOLO26-Modelle und -Bereitstellung#
Link to this sectionMNN#
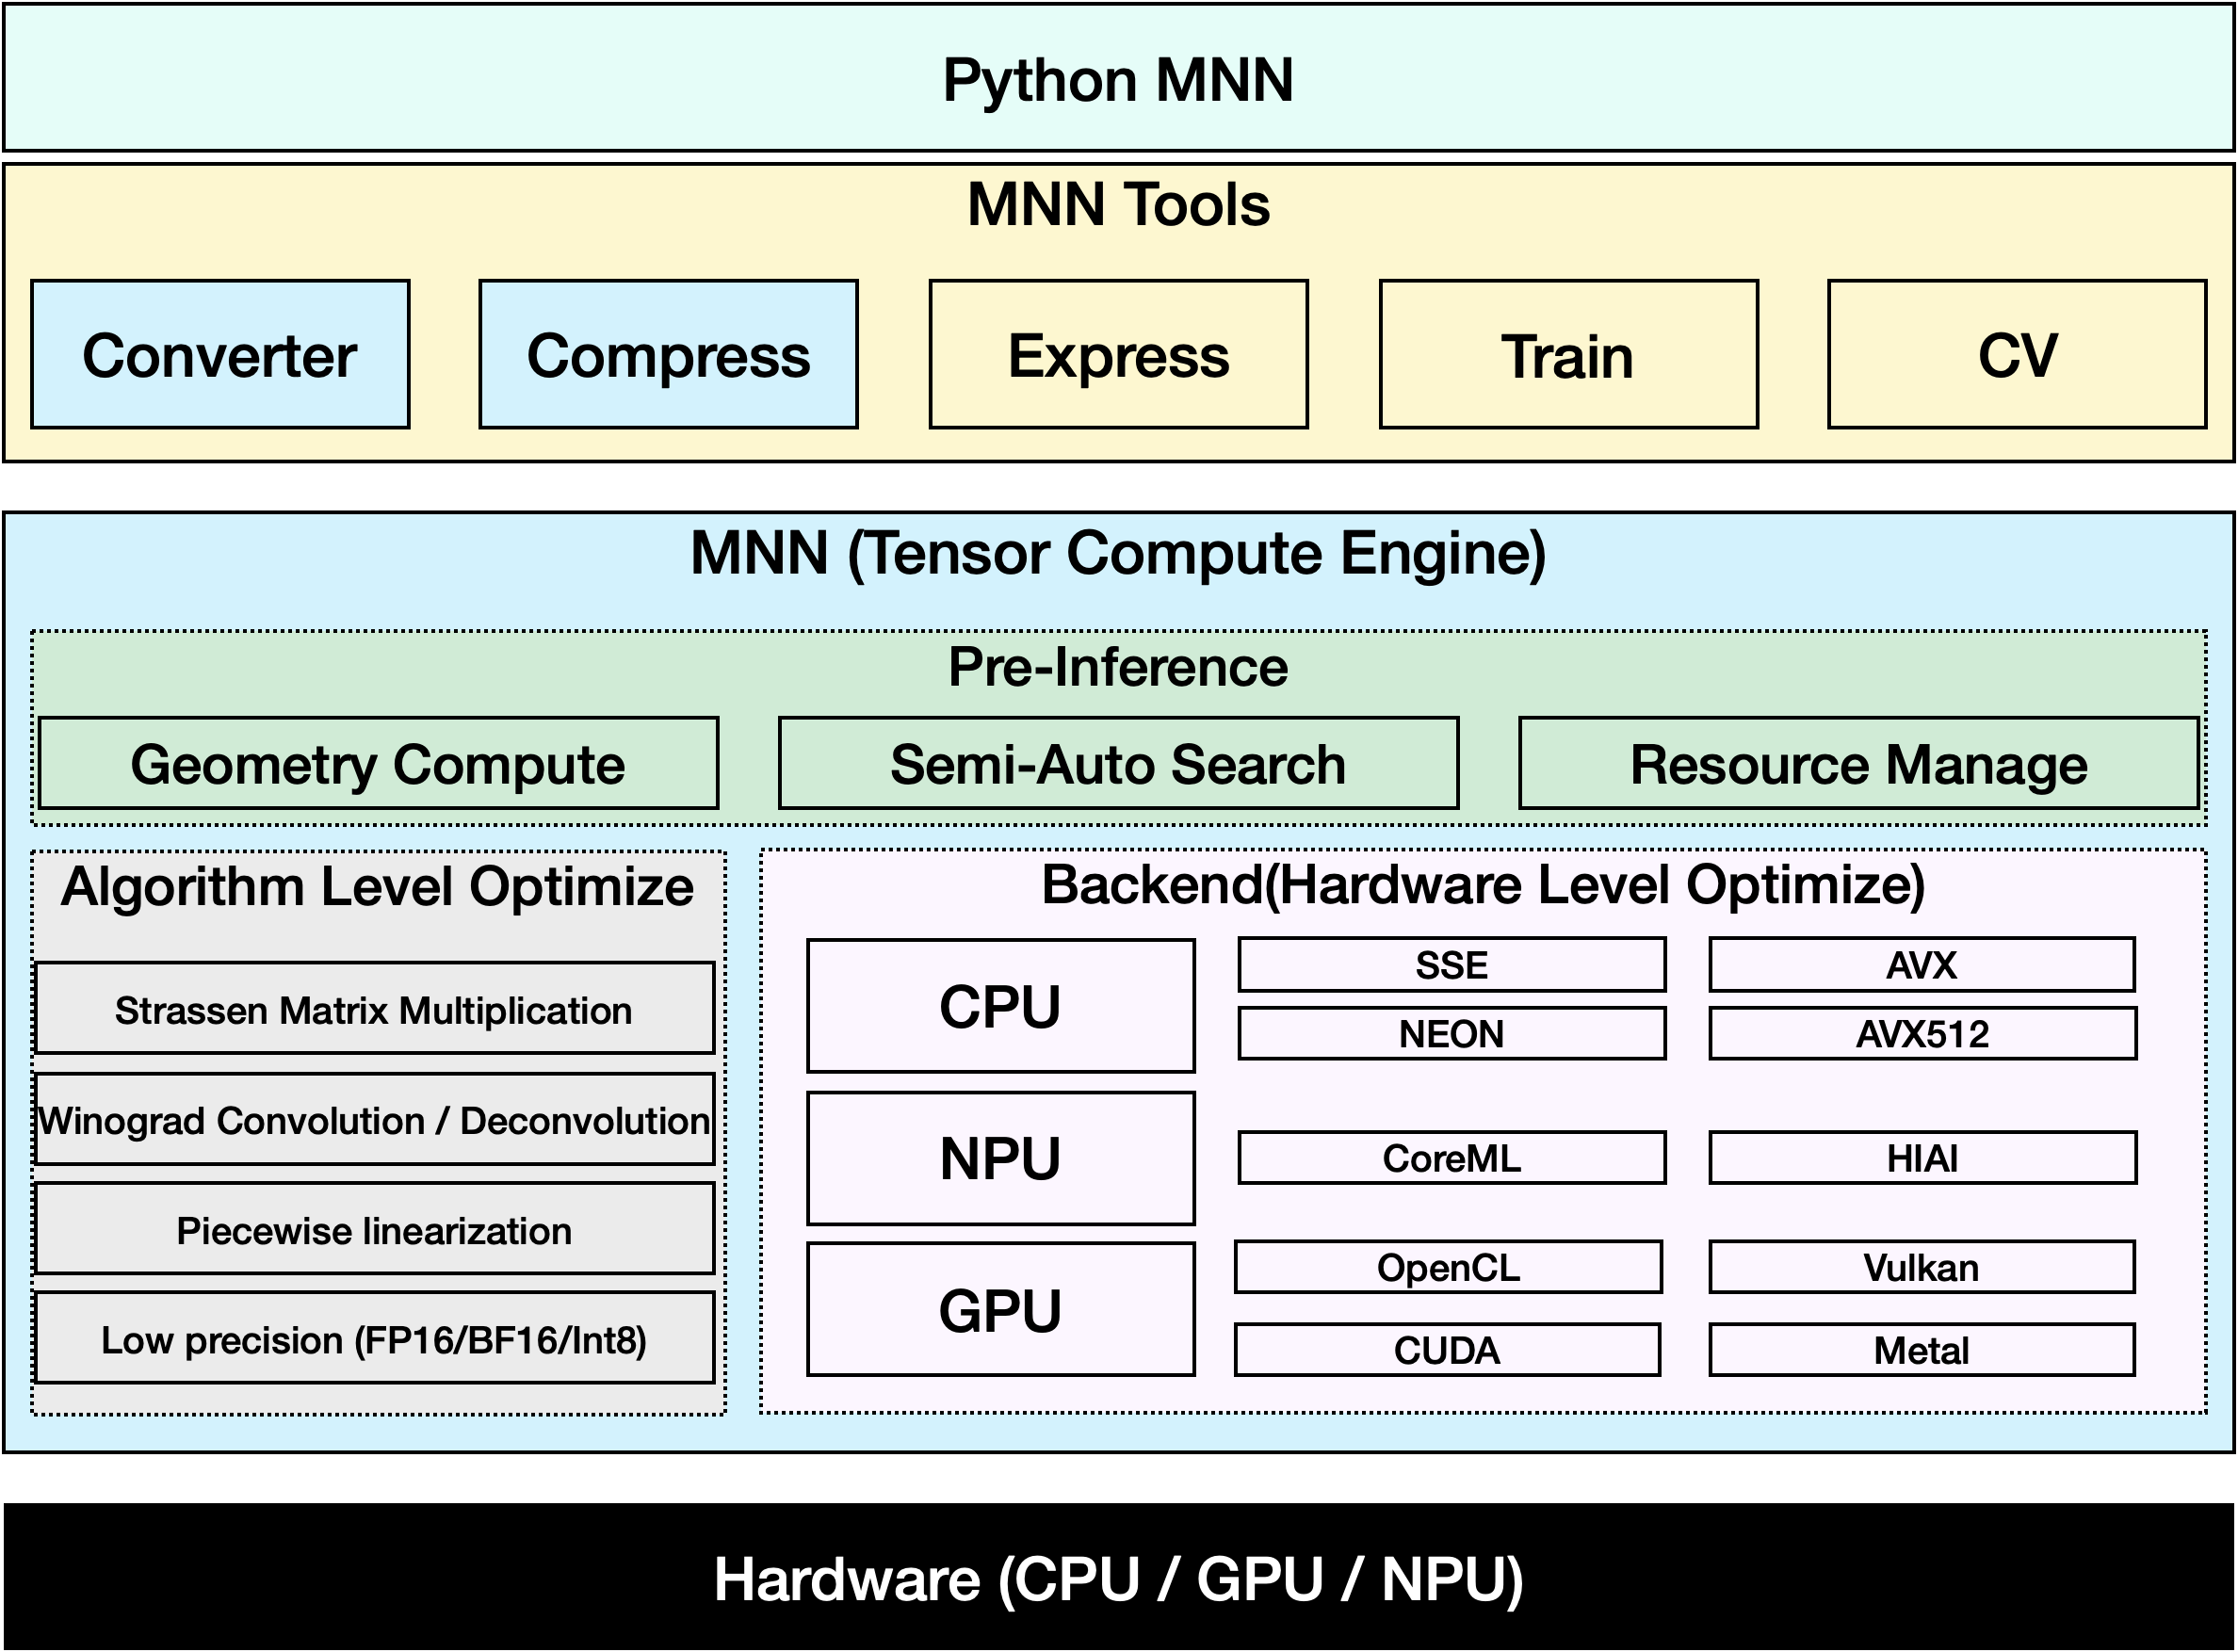
MNN ist ein hocheffizientes und leichtgewichtiges Deep-Learning-Framework. Es unterstützt die Inferenz und das Training von Deep-Learning-Modellen und bietet branchenführende Leistung für Inferenz und Training direkt auf dem Gerät. Derzeit ist MNN in mehr als 30 Apps von Alibaba Inc. integriert, wie z. B. Taobao, Tmall, Youku, DingTalk, Xianyu usw., und deckt über 70 Anwendungsszenarien ab, wie Live-Übertragungen, Kurzvideo-Aufnahmen, Such-Empfehlungen, bildbasierte Produktsuche, interaktives Marketing, Aktienverteilung und Sicherheitsrisikokontrolle. Darüber hinaus wird MNN auch auf eingebetteten Geräten wie IoT eingesetzt.
Watch: How to Export Ultralytics YOLO26 to MNN Format | Speed up Inference on Mobile Devices📱
Link to this sectionExport nach MNN: Konvertierung deines YOLO26-Modells#
Du kannst die Modellkompatibilität und Bereitstellungsflexibilität erweitern, indem du Ultralytics YOLO-Modelle in das MNN-Format konvertierst. Diese Konvertierung optimiert deine Modelle für mobile und eingebettete Umgebungen und stellt eine effiziente Leistung auf ressourcenbeschränkten Geräten sicher.
Link to this sectionInstallation#
Um die erforderlichen Pakete zu installieren, führe aus:
# Install the required package for YOLO26 and MNN
pip install ultralytics
pip install MNN
Link to this sectionVerwendung#
Alle Ultralytics YOLO26 models sind so konzipiert, dass sie den Export sofort unterstützen, was die Integration in deinen bevorzugten Bereitstellungs-Workflow vereinfacht. Du kannst die vollständige Liste der unterstützten Exportformate und Konfigurationsoptionen einsehen, um das beste Setup für deine Anwendung zu wählen.
Das MNN-Format unterstützt die Modi Export, Predict und Validate. Exportiere dein Modell und lade dann das exportierte Modell, um eine Inferenz durchzuführen oder dessen Genauigkeit zu validieren.
from ultralytics import YOLO

# Load a YOLO26 model
model = YOLO("yolo26n.pt")

# Export the model to MNN format
model.export(format="mnn") # creates 'yolo26n.mnn'from ultralytics import YOLO
# Load the exported MNN model
model = YOLO("yolo26n.mnn")
# Run inference
results = model("https://ultralytics.com/images/bus.jpg")from ultralytics import YOLO
# Load the exported MNN model
model = YOLO("yolo26n.mnn")
# Validate accuracy on the COCO8 dataset
metrics = model.val(data="coco8.yaml")Link to this sectionExport-Argumente#
| Argument | Typ | Standard | Beschreibung |
|---|---|---|---|
format | str | 'mnn' | Zielformat für das exportierte Modell, das die Kompatibilität mit verschiedenen Bereitstellungsumgebungen definiert. |
imgsz | int oder tuple | 640 | Gewünschte Bildgröße für den Modelleingang. Kann eine Ganzzahl für quadratische Bilder oder ein Tupel (height, width) für spezifische Dimensionen sein. |
quantize | int oder str | None | Quantisierungspräzision: 16 (FP16), 8 (INT8-Gewichtskwantisierung) oder 32/nicht gesetzt (FP32). Ersetzt die veralteten half/int8-Flags. |
batch | int | 1 | Gibt die Batch-Größe für die Modellausführung oder die maximale Anzahl an Bildern an, die das exportierte Modell gleichzeitig im predict-Modus verarbeitet. |
dynamic | bool | False | Ermöglicht dynamische Eingabebildgrößen. Kann nicht mit nms=True kombiniert werden. |
nms | bool | False | Fügt NMS für Erkennungs- und Pose-Modelle hinzu. Kann nicht mit dynamic=True kombiniert werden. |
device | str | None | Gibt das Gerät für den Export an: GPU (device=0), CPU (device=cpu), MPS für Apple Silicon (device=mps). |
Weitere Details zum Exportprozess findest du auf der Ultralytics-Dokumentationsseite zum Exportieren.
Link to this sectionMNN-only Inferenz#
Eine Funktion, die für YOLO26-Inferenz und -Vorverarbeitung ausschließlich auf MNN setzt, wurde implementiert und bietet sowohl Python- als auch C++-Versionen für eine einfache Bereitstellung in jedem Szenario.
import argparse

import MNN
import MNN.cv as cv2
import MNN.numpy as np

def inference(model, img, precision, backend, thread):
    config = {}
    config["precision"] = precision
    config["backend"] = backend
    config["numThread"] = thread
    rt = MNN.nn.create_runtime_manager((config,))
    # net = MNN.nn.load_module_from_file(model, ['images'], ['output0'], runtime_manager=rt)
    net = MNN.nn.load_module_from_file(model, [], [], runtime_manager=rt)
    original_image = cv2.imread(img)
    ih, iw, _ = original_image.shape
    length = max((ih, iw))
    scale = length / 640
    image = np.pad(original_image, [[0, length - ih], [0, length - iw], [0, 0]], "constant")
    image = cv2.resize(
        image, (640, 640), 0.0, 0.0, cv2.INTER_LINEAR, -1, [0.0, 0.0, 0.0], [1.0 / 255.0, 1.0 / 255.0, 1.0 / 255.0]
    )
    image = image[..., ::-1]  # BGR to RGB
    input_var = image[None]
    input_var = MNN.expr.convert(input_var, MNN.expr.NC4HW4)
    output_var = net.forward(input_var)
    output_var = MNN.expr.convert(output_var, MNN.expr.NCHW)
    output_var = output_var.squeeze()
    # output_var shape: [84, 8400]; 84 means: [cx, cy, w, h, prob * 80]
    cx = output_var[0]
    cy = output_var[1]
    w = output_var[2]
    h = output_var[3]
    probs = output_var[4:]
    # [cx, cy, w, h] -> [y0, x0, y1, x1]
    x0 = cx - w * 0.5
    y0 = cy - h * 0.5
    x1 = cx + w * 0.5
    y1 = cy + h * 0.5
    boxes = np.stack([x0, y0, x1, y1], axis=1)
    # ensure ratio is within the valid range [0.0, 1.0]
    boxes = np.clip(boxes, 0, 1)
    # get max prob and idx
    scores = np.max(probs, 0)
    class_ids = np.argmax(probs, 0)
    result_ids = MNN.expr.nms(boxes, scores, 100, 0.45, 0.25)
    print(result_ids.shape)
    # nms result box, score, ids
    result_boxes = boxes[result_ids]
    result_scores = scores[result_ids]
    result_class_ids = class_ids[result_ids]
    for i in range(len(result_boxes)):
        x0, y0, x1, y1 = result_boxes[i].read_as_tuple()
        y0 = int(y0 * scale)
        y1 = int(y1 * scale)
        x0 = int(x0 * scale)
        x1 = int(x1 * scale)
        # clamp to the original image size to handle cases where padding was applied
        x1 = min(iw, x1)
        y1 = min(ih, y1)
        print(result_class_ids[i])
        cv2.rectangle(original_image, (x0, y0), (x1, y1), (0, 0, 255), 2)
    cv2.imwrite("res.jpg", original_image)

if __name__ == "__main__":
    parser = argparse.ArgumentParser()
    parser.add_argument("--model", type=str, required=True, help="the yolo26 model path")
    parser.add_argument("--img", type=str, required=True, help="the input image path")
    parser.add_argument("--precision", type=str, default="normal", help="inference precision: normal, low, high, lowBF")
    parser.add_argument(
        "--backend",
        type=str,
        default="CPU",
        help="inference backend: CPU, OPENCL, OPENGL, NN, VULKAN, METAL, TRT, CUDA, HIAI",
    )
    parser.add_argument("--thread", type=int, default=4, help="inference using thread: int")
    args = parser.parse_args()
    inference(args.model, args.img, args.precision, args.backend, args.thread)
Link to this sectionZusammenfassung#
In diesem Leitfaden stellen wir vor, wie du das Ultralytics YOLO26-Modell nach MNN exportierst und MNN für die Inferenz nutzt. Das MNN-Format bietet hervorragende Leistung für Edge AI-Anwendungen und ist damit ideal für die Bereitstellung von Computer-Vision-Modellen auf ressourcenbeschränkten Geräten.
Für weitere Informationen zur Nutzung lies bitte die MNN-Dokumentation.
Link to this sectionFAQ#
Link to this sectionWie exportiere ich Ultralytics YOLO26-Modelle in das MNN-Format?#
Um dein Ultralytics YOLO26-Modell in das MNN-Format zu exportieren, befolge diese Schritte:
from ultralytics import YOLO

# Load a YOLO26 model
model = YOLO("yolo26n.pt")

# Export to MNN format
model.export(format="mnn")  # creates 'yolo26n.mnn' with fp32 weight
model.export(format="mnn", quantize=16)  # creates 'yolo26n.mnn' with fp16 weight
model.export(format="mnn", quantize=8)  # creates 'yolo26n.mnn' with int8 weight
Detaillierte Exportoptionen findest du auf der Export-Seite in der Dokumentation.
Link to this sectionWie führe ich eine Vorhersage mit einem exportierten YOLO26 MNN-Modell durch?#
Um mit einem exportierten YOLO26 MNN-Modell Vorhersagen zu treffen, verwende die predict-Funktion der YOLO-Klasse.
from ultralytics import YOLO

# Load the YOLO26 MNN model
model = YOLO("yolo26n.mnn")

# Run inference
results = model("https://ultralytics.com/images/bus.jpg")  # predict with `fp32`
results = model("https://ultralytics.com/images/bus.jpg", quantize=16)  # predict with `fp16` if device support

for result in results:
    result.show()  # display to screen
    result.save(filename="result.jpg")  # save to disk
Link to this sectionWelche Plattformen werden für MNN unterstützt?#
MNN ist vielseitig und unterstützt verschiedene Plattformen:
- Mobil: Android, iOS, Harmony.
- Eingebettete Systeme und IoT-Geräte: Geräte wie Raspberry Pi und NVIDIA Jetson.
- Desktop und Server: Linux, Windows und macOS.
Link to this sectionWie kann ich Ultralytics YOLO26 MNN-Modelle auf Mobilgeräten bereitstellen?#
So stellst du deine YOLO26-Modelle auf Mobilgeräten bereit:
- Build für Android: Folge der MNN Android-Anleitung.
- Build für iOS: Folge der MNN iOS-Anleitung.
- Build für Harmony: Folge der MNN Harmony-Anleitung.