Mapeo de objetos con VisionEye View y Ultralytics YOLO26
¿Qué es el mapeo de objetos de VisionEye?#
VisionEye de Ultralytics YOLO26 permite a los ordenadores identificar y localizar objetos, simulando la precisión de observación del ojo humano. Esta funcionalidad permite a los ordenadores distinguir objetos concretos y centrarse en ellos, de forma similar a como el ojo humano observa los detalles desde un punto de vista determinado.
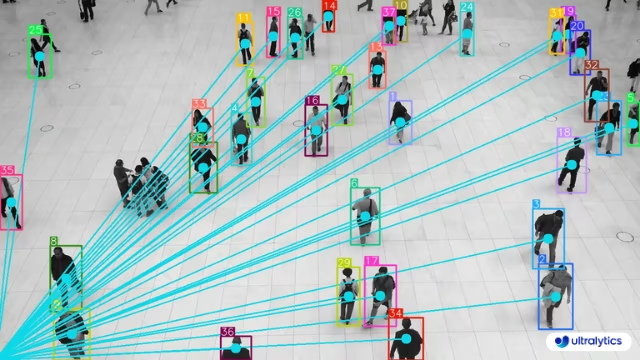
Mapea objetos con YOLO26#
VisionEye fija un único punto de observación en el fotograma y traza una línea desde ese punto hasta cada objeto seguido, para que puedas visualizar cómo se ve una escena desde un punto de vista. Establece vision_point con las coordenadas de píxel del observador y, después, ejecuta la solución en tu vídeo con la API de Python o la CLI.
# Monitor objects position with visioneye
yolo solutions visioneye show=True

# Pass a source video
yolo solutions visioneye source="path/to/video.mp4"

# Monitor the specific classes
yolo solutions visioneye classes="[0, 5]"
Argumentos de VisionEye#
Aquí tienes una tabla con los argumentos de VisionEye:
| Argumento | Tipo | Predeterminado | Descripción |
|---|---|---|---|
model | str | None | Ruta a un archivo de modelo Ultralytics YOLO. |
vision_point | tuple[int, int] | (20, 20) | Punto desde el que la visión artificial seguirá los objetos y dibujará trayectorias mediante VisionEye Solution. |
line_width | int | 2 | Grosor de línea de los cuadros, puntos clave y recuentos que dibuja la solución. |
verbose | bool | True | Activa el registro por fotograma de la forma de entrada, los recuentos por clase y la velocidad de procesamiento de la solución. La llamada de seguimiento en sí siempre es silenciosa. |
También puedes usar varios argumentos track en la solución VisionEye:
| Argumento | Tipo | Predeterminado | Descripción |
|---|---|---|---|
tracker | str | 'tracktrack.yaml' | Especifica el algoritmo de seguimiento que se va a usar. Opciones integradas: botsort.yaml, bytetrack.yaml, ocsort.yaml, deepocsort.yaml, fasttrack.yaml, tracktrack.yaml. |
conf | float | 0.25 | Establece el umbral de confianza de las detecciones; los valores más bajos permiten seguir más objetos, pero pueden incluir falsos positivos. |
iou | float | 0.5 | Establece el umbral de intersección sobre unión (IoU) para filtrar las detecciones solapadas. |
classes | list | None | Filtra los resultados por índice de clase. Por ejemplo, classes=[0, 2, 3] solo sigue las clases especificadas. |
device | str | None | Especifica el dispositivo para la inferencia (p. ej., cpu, cuda:0 o 0). Permite elegir entre CPU, una GPU concreta u otros dispositivos de cálculo para ejecutar el modelo. |
imgsz | int or tuple | 640 | Tamaño de imagen de destino para la inferencia: un entero para una imagen cuadrada o una pareja (height, width). Las dimensiones se ajustan al stride del modelo. |
max_det | int | 300 | Número máximo de detecciones que se conservan por fotograma antes del seguimiento, lo que limita los objetos que procesa una solución en escenas densas. |
quantize | int or str | None | Precisión de inferencia: 16 (FP16) o 32/unset (FP32) para los modelos PyTorch y TorchScript fuera de CPU; los demás formatos usan la precisión que seleccionen el artefacto y el entorno de ejecución. Sustituye al argumento obsoleto half. |
Además, se admiten algunos argumentos de visualización, como los que se indican a continuación:
| Argumento | Tipo | Predeterminado | Descripción |
|---|---|---|---|
show | bool | False | Si True, muestra las imágenes o los vídeos anotados en una ventana. Es útil para obtener información visual inmediata durante el desarrollo o las pruebas. |
show_conf | bool | True | Muestra la puntuación de confianza de cada detección junto a su etiqueta. Permite conocer el grado de certeza del modelo para cada detección. |
show_labels | bool | True | Muestra etiquetas para cada detección en la salida visual. Facilita la identificación inmediata de los objetos detectados. |
Cómo funciona VisionEye#
VisionEye funciona estableciendo un punto de visión fijo en el fotograma y trazando líneas desde ese punto hasta los objetos detectados. Esto simula cómo la visión humana se centra en varios objetos desde un único punto de vista. La solución utiliza el seguimiento de objetos para mantener una identificación coherente de los objetos entre fotogramas y crear una representación visual de la relación espacial entre el observador (punto de visión) y los objetos de la escena.
El método process de la clase VisionEye realiza varias operaciones clave:
- Extrae las trayectorias (cajas delimitadoras, clases e ID de seguimiento) de la imagen de entrada
- Crea un anotador para dibujar cajas delimitadoras y etiquetas
- Para cada objeto detectado, dibuja una etiqueta de caja y traza una línea de visión desde el punto de visión
- Devuelve la imagen anotada con las estadísticas de seguimiento
Este método resulta especialmente útil en aplicaciones que requieren conciencia espacial y visualización de las relaciones entre objetos, como los sistemas de vigilancia, la navegación autónoma y las instalaciones interactivas.
Aplicaciones de VisionEye#
El mapeo de objetos de VisionEye tiene numerosas aplicaciones prácticas en distintos sectores:
- Seguridad y vigilancia: supervisa varios objetos de interés desde una posición fija de cámara
- Analítica para comercios: sigue los patrones de movimiento de los clientes en relación con los expositores de la tienda
- Análisis deportivo: analiza la posición y el movimiento de los jugadores desde la perspectiva del entrenador
- Vehículos autónomos: visualiza cómo un vehículo «ve» y prioriza los objetos de su entorno
- Interacción persona-ordenador: crea interfaces más intuitivas que responden a las relaciones espaciales
Al combinar VisionEye con otras soluciones de Ultralytics, como el cálculo de distancias o la estimación de velocidad, puedes crear sistemas completos que no solo sigan objetos, sino que también comprendan sus relaciones espaciales y comportamientos.
Preguntas frecuentes#
Para empezar a usar VisionEye Object Mapping con Ultralytics YOLO26, primero instala el paquete Ultralytics con pip. Después, puedes usar el código de ejemplo de la documentación para configurar la detección de objetos con VisionEye. Aquí tienes un ejemplo sencillo para empezar:
import cv2 from ultralytics import solutions cap = cv2.VideoCapture("path/to/video.mp4") assert cap.isOpened(), "Error reading video file" # Escritor de vídeo w, h, fps = (int(cap.get(x)) for x in (cv2.CAP_PROP_FRAME_WIDTH, cv2.CAP_PROP_FRAME_HEIGHT, cv2.CAP_PROP_FPS)) video_writer = cv2.VideoWriter("vision-eye-mapping.avi", cv2.VideoWriter_fourcc(*"mp4v"), fps, (w, h)) # Inicializa el objeto VisionEye visioneye = solutions.VisionEye( show=True, # mostrar el resultado model="yolo26n.pt", # usa cualquier modelo compatible con Ultralytics, por ejemplo, yolo26s.pt classes=[0, 2], # genera la vista VisionEye para clases específicas ) # Procesar el vídeo while cap.isOpened(): success, im0 = cap.read() if not success: print("Video frame is empty or video processing has been successfully completed.") break results = visioneye(im0) print(results) # accede a la salida video_writer.write(results.plot_im) # escribir el archivo de vídeo cap.release() video_writer.release() cv2.destroyAllWindows() # cerrar todas las ventanas abiertasUltralytics YOLO26 combina velocidad, precisión y facilidad de integración, por lo que resulta muy adecuado para el mapeo y seguimiento de objetos. Entre sus principales ventajas se incluyen:
- Rendimiento en tiempo real: ofrece una gran precisión en la detección de objetos en tiempo real.
- Flexibilidad: admite la detección, el seguimiento y el cálculo de distancias en una sola canalización.
- Comunidad y asistencia: documentación extensa y una comunidad activa en GitHub para resolver problemas y mejorar el producto.
- Facilidad de uso: su API intuitiva simplifica las tareas complejas y permite iterar y desplegar rápidamente.
Para obtener más información sobre sus aplicaciones y ventajas, consulta la documentación de Ultralytics YOLO26.
Ultralytics YOLO26 se integra con diversas herramientas de aprendizaje automático, como Comet y ClearML, para el seguimiento de experimentos, la colaboración y la reproducibilidad. Sigue las guías detalladas para integrar YOLO26 con Comet y integrar YOLO26 con ClearML para empezar.
Para ver más ejemplos de exploración e integración, consulta nuestra guía de integraciones de Ultralytics.


Comentarios60
Haz una pregunta, comparte tus resultados o ayuda a otra persona.
TranDHoa
Hey, you can adjust the viewing angle of the eyes and make it measure the distance from the center of an object instead of from the edge.
 Glenn JocherUltralytics
VisionEye already draws the ray from
vision_pointto the bounding-box centroid (not the edge) viaSolutionAnnotator.visioneye()as shown in the VisionEye guide and the SolutionAnnotatorvisioneye()reference; there isn’t a separate “viewing angle” parameter today since it’s a 2D overlay, so the intended control is movingvision_point, and if you need an actual distance value (vs just a line), please use the Distance Calculation solution and share your desired behavior here (plus a short clip/frame +vision_point) so the team can advise the cleanest extension.
dixroby
What dependencies are included in the requirements.txt file?
- Glenn JocherUltralytics
@dixroby the
requirements.txtfile typically includes dependencies liketorch,opencv-python, and other libraries necessary for running Ultralytics YOLO models. For a detailed list, please check the file directly in the repository.
FarrelCulbert
Hi, I would like to know if this is only compatible with YOLOv8, or can I use it with all models?
- Glenn JocherUltralytics(editado)
@FarrelCulbert VisionEye Object Mapping is not limited to YOLOv8: it works with the tracking-capable Ultralytics models you pass via
model=, including YOLO26 (recommended) and YOLO11. For more detailed information and examples, you can refer to the VisionEye documentation at https://docs.ultralytics.com/guides/vision-eye/.
skp4595
rather than taking video as input fro testing, I want to test for an image, how can I do that? guide me on this.
- Glenn JocherUltralytics(editado)
Hi there!
Great question! If you want to test an image instead of a video using Ultralytics YOLO, it's quite straightforward. Below is a simple example to guide you through the process:
Testing on an Image
First, ensure you have the latest versions of
torchandultralyticsinstalled. If not, please update them:pip install --upgrade torch ultralyticsNext, you can use the following code to test an image:
import cv2
from ultralytics import YOLO
from ultralytics.utils.plotting import Annotator, colors

# Load the model
model = YOLO("yolo26n.pt")

# Load the image
image_path = "path/to/your/image.jpg"
im0 = cv2.imread(image_path)

# Perform prediction
results = model.predict(im0)
boxes = results[0].boxes.xyxy.cpu()
clss = results[0].boxes.cls.cpu().tolist()

# Annotate the image
annotator = Annotator(im0, line_width=2)
names = model.model.names

for box, cls in zip(boxes, clss):
    annotator.box_label(box, label=names[int(cls)], color=colors(int(cls)))

# Display the annotated image
cv2.imshow("YOLO Image Prediction", im0)
cv2.waitKey(0)
cv2.destroyAllWindows()
Explanation
- Load the Model: We load the YOLO model.
- Load the Image: Read the image using OpenCV.
- Perform Prediction: Use the model to predict objects in the image.
- Annotate the Image: Draw bounding boxes and labels on the image.
- Display the Image: Show the annotated image using OpenCV.
This should help you get started with testing images. If you encounter any issues or have further questions, feel free to ask! 😊
For more detailed information, you can refer to the VisionEye Object Mapping Guide.
Happy coding! 🚀
I want to run VisionEye Object Mapping using YOLOv8 code on KITTI data set. the KITTI dataset is labeled as <class_name1, truncation, occlusion, observation angle alpha, bbox cordinantes, Dimension of object, Location, rotation_y, score > for each image. While model training, I'm getting this error train: WARNING ⚠️ /content/dataset/train/images/005936.png: ignoring corrupt image/label: could not convert string to float: 'Car' train: WARNING ⚠️ /content/dataset/train/images/005937.png: ignoring corrupt image/label: could not convert string to float: 'Pedestrian' train: WARNING ⚠️ /content/dataset/train/images/005938.png: ignoring corrupt image/label: could not convert string to float: 'Truck'
with these args { EPOCHS = 5 !yolo
task=detect
mode=train
model=yolov8s.pt
imgsz=640
data=depth_estimation_using_YOLOv8.yaml
epochs={EPOCHS}
batch=16
name=yolov8s
exist_ok=True
amp=False } how do I fix this?how is this model trained? some details on dataset would be great help
 Paula DerrengerUltralytics(editado)
Hi! The model is trained using the YOLOv8 framework. You can train it on custom datasets like KITTI by converting the dataset to the YOLO format. The dataset should have labels in the format
<class_id> <x_center> <y_center> <width> <height>.For more details on VisionEye Object Mapping, check out the Ultralytics VisionEye guide. If you have any specific questions, feel free to ask! 🚀
Here's a sample training command:
yolo task=detect mode=train model=yolo26s.pt data=your_dataset.yaml epochs=5 batch=16Happy training! 😊
1
what does this mean "It calculates this distance by analyzing the size and position of the object within the frame, using the camera's field of view and other calibration parameters if available"? what do you mean by 'other calibration parameter if possible'? The model is not a blackbox. Is it? there must be some calibration, some ground truth from where model must have learned. please explain this.
- Glenn JocherUltralytics(editado)
Hello! Great questions about the VisionEye Object Mapping using Ultralytics YOLOv8.
-
Distance Calculation: The phrase "It calculates this distance by analyzing the size and position of the object within the frame, using the camera's field of view and other calibration parameters if available" was inaccurate. The VisionEye distance example does not estimate camera-to-object distance from object size or field of view. It computes the pixel distance between the vision point and the bounding-box centroid and divides it by the
pixel_per_metervalue you set, so you calibrate that scale yourself. -
Other Calibration Parameters: The example uses none of these. You would need data such as camera intrinsic parameters (focal length, optical centers), extrinsic parameters (orientation and position of the camera), object size references, or a depth sensor only if you build a true camera-to-object distance estimate yourself.
-
Model Transparency: YOLOv8 models are not black boxes in the sense that their architecture and training processes are open for examination and modification. They learn from labeled data (ground truth) where objects are manually annotated in images, teaching the model how to recognize similar objects in new images.
For further details or specific implementations, feel free to check out our guide on VisionEye Object Mapping at Ultralytics VisionEye Guide. If you have more questions or need clarification, don't hesitate to reach out! 😊
-
mirhasnainsiba
i am getting version incompatiblity issues, tell me your system's python version
- Paula DerrengerUltralytics(editado)
Hey there! 😊 It sounds like you're encountering some version compatibility issues. For Ultralytics YOLOv8, we generally recommend using Python 3.8 or newer as it strikes a good balance between being up-to-date and maintaining compatibility with most dependencies.
If you're using a Python version older than 3.7, you might run into issues, and it's a good idea to update to at least version 3.7 or newer if possible. Here's a quick way to check your current Python version from your terminal:
python --version
# or if you have Python 3 installed as 'python3'
python3 --version
And if you need to update Python, the official Python Downloads page is a great place to start.
If you're still facing issues after checking your Python version, could you please provide more details about the error messages you're seeing? This information can help us pinpoint the problem more accurately. Thanks!
it is telling distance 61m while object is almost 1 m far
- Paula DerrengerUltralytics
@mirhasnainsiba hi there! 👋 It seems there might be a discrepancy with the distance calculation in your setup. Typically, the distance calculated by the model would depend on the scale set in your system (for example,
pixel_per_meterin the example). If the object is being reported as 61m away while it's actually about 1m away, you might want to adjust this scale factor accordingly. Here's a brief example:pixel_per_meter = 100 # Adjust this value based on your actual scaleThis adjustment helps calibrate the distance calculation to more accurately reflect real-world distances. If you continue to experience issues, double-check the calibration process or consider revisiting the portion of your code responsible for calculating distances. If further assistance is needed, feel free to reach out! 🛠️
thanks
- Paula DerrengerUltralytics
Hey there! 😊 Thanks for reaching out. If you're observing an object distance as 61m while it's almost 1m away, you might want to adjust the
pixel_per_meterscaling factor in your VisionEye implementation. This adjustment is crucial for accurate distance calculation.Here's a simplified approach:
pixel_per_meter = 100 # This is just an example value.
# You'll need to calibrate this based on your specific setup and camera properties.
By fine-tuning this variable, you can achieve more accurate distance measurements. Calibration involves comparing known distances with the pixel distances detected by your model to find the most suitable
pixel_per_metervalue. 🛠️Hope this helps! Let us know if you have any further questions or if there are more details you'd like to dive into.
magickoo
where is the dataset(video file)?
- Paula DerrengerUltralytics
Hey there! 🌟
The video files used in our examples are not provided in the repository. You can use any video file that you have access to by placing it in an accessible directory and then modifying the
"path/to/video/file.mp4"placeholder in the code snippets to point to your video file's location.For example:
cap = cv2.VideoCapture("your/video/path/here.mp4")Just replace
"your/video/path/here.mp4"with the actual path to your video. If you're looking for sample videos, online resources like Pexels Video or Pixabay Videos offer free footage that you might find useful for your projects.If you have any more questions or need further assistance, don't hesitate to reach out. Happy coding! 🚀
1 Okay thankyou!
- Paula DerrengerUltralytics
Hey! Thank you for checking out the VisionEye Object Mapping with Ultralytics YOLOv8. 🚀 If you're keen to dive into VisionEye Object Mapping for pinpoint precision or even integrate object tracking and distance calculation, the provided Python examples can guide you seamlessly through the process.
Just remember to replace
"path/to/video/file.mp4"with the specific path to your video file, and you’re all set to explore the amazing capabilities of YOLOv8 with VisionEye!For pinpoint object mapping:
model = YOLO("yolov8n.pt")  # Adjust model as needed
cap = cv2.VideoCapture("your/video/path.mp4")  # Your video path here
For any additional queries or discussions, feel free to drop a message in our GitHub Issue Section. Happy coding! 🎉
AdadAlShabab
Hi, I just wanted to know about "VisionEye View with Distance". What does this 'Distance' means? I mean does it measure the distance from the camera to object? Please let me know. TIA.
- Paula DerrengerUltralytics(editado)
@AdadAlShabab hey there! 👋
No, the "Distance" in the VisionEye example is not a camera-to-object distance. It is the pixel distance between the vision point and the detected object's bounding-box centroid, divided by a
pixel_per_meterscale that you set and calibrate yourself. Here's a simplified example of how you might calculate distance in a custom script:import cv2 import math from ultralytics import YOLO model = YOLO("yolo26s.pt") cap = cv2.VideoCapture("path/to/video.mp4") while True: ret, im0 = cap.read() if not ret: break results = model.track(im0, persist=True) for box in results[0].boxes.xyxy.cpu(): # Example: Calculate distance based on object size or position here # This is a placeholder for actual distance calculation logic distance = calculate_distance(box) print(f"Distance: {distance} meters")In this example,
calculate_distancewould be a function you define based on your specific distance estimation method. Keep in mind, accurate distance measurement might require camera calibration and knowing the actual size of the object or using depth sensors in conjunction with the camera.Hope this helps! Let us know if you have any more questions. 😊
Hi @pderrenger. Thanks a lot for your reply. I just wanted to know how can I divide the results by 10 ( ex: distance/10)? I'm dropping the code, please let me know in which line/lines I should make the changes? TIA.
Code:
if results[0].boxes.id is not None: track_ids = results[0].boxes.id.int().cpu().tolist() for box, track_id in zip(boxes, track_ids): annotator.box_label(box, label=str(track_id), color=bbox_clr) annotator.visioneye(box, center_point) x1, y1 = int((box[0] + box[2]) // 2), int((box[1] + box[3]) // 2) # Bounding box centroid distance = (math.sqrt((x1 - center_point[0]) ** 2 + (y1 - center_point[1]) ** 2))/pixel_per_meter text_size, _ = cv2.getTextSize(f"Distance: {distance:.2f} m", cv2.FONT_HERSHEY_SIMPLEX,1.2, 3) cv2.rectangle(im0, (x1, y1 - text_size[1] - 10),(x1 + text_size[0] + 10, y1), txt_background, -1) cv2.putText(im0, f"Distance: {distance:.2f} m",(x1, y1 - 5), cv2.FONT_HERSHEY_SIMPLEX, 1.2,txt_color, 3)- Paula DerrengerUltralytics
Hi @AdadAlShabab! 👋
To divide the calculated distance by 10, you can adjust the line where
distanceis calculated. Here's how you can modify it:distance = (math.sqrt((x1 - center_point[0]) ** 2 + (y1 - center_point[1]) ** 2)) / pixel_per_meter / 10This change will effectively scale down the calculated distance by a factor of 10. Just add
/ 10at the end of the existing distance calculation line in your code.Hope this helps! Let me know if there's anything else you need. 😊
what does this mean "It calculates this distance by analyzing the size and position of the object within the frame, using the camera's field of view and other calibration parameters if available"? what do you mean by 'other calibration parameter if possible'? The model is not a blackbox. Is it? there must be some calibration, some ground truth from where model must have learned. please explain this.
why are we dividing "distance " by 'pixel_per_meter' ? what is the logic or explaination for this ?
- Paula DerrengerUltralytics
Hey there! 👋
The division by
pixel_per_meteris used to convert the measured pixel distance into real-world units like meters. This conversion factor helps translate the scale of the image to actual distances based on how many pixels represent one meter in the image. It's essential for applications where you need to know the physical separation between objects or from the camera to an object, not just the distance in pixels.If you have more questions or need further clarification, feel free to ask! 😊
you mean to say, if there's 1 unit Euclidean distance between two pixels in an image, than it'd be 10m in real world scenarios? And this scale can be adjusted according to our will as per "pixel_per_meter = 10" this code. Isn't it?
if so, how is this calibration done? where's the ground truth?
- Paula DerrengerUltralytics
Hey there! 👋
Yes, exactly! If the
pixel_per_meteris set to 10, it means that 1 pixel in the image corresponds to 0.1 meters in the real world. You can adjust this scale to fit the specific context or calibration of your camera setup.Calibration is typically done by measuring known distances in the real world and adjusting the
pixel_per_metervalue so that the distances in the image accurately reflect these measurements. Ground truth data for calibration might come from physical measurements or known dimensions within the scene.If you have any more questions or need further clarification, feel free to ask! 😊
Thank you @pderrenger
- Paula DerrengerUltralytics(editado)
You're welcome! 😊
The "VisionEye View with Distance" feature calculates the pixel distance between a reference point and the detected object's centroid, not a true camera-to-object distance. The
pixel_per_metervalue is used to convert pixel measurements to real-world distances. Calibration involves setting this value based on known distances in your scene.To divide the distance by 10, modify the distance calculation line like this:
distance = (math.sqrt((x1 - center_point[0]) ** 2 + (y1 - center_point[1]) ** 2)) / pixel_per_meter / 10For more details, check out the VisionEye guide.
1
leongjy2005
Traceback (most recent call last): File "d:\Random_YOLO8_Tutorials\Human_Detection\visioneye.py", line 28, in annotator.visioneye(box, center_point) ^^^^^^^^^^^^^^^^^^^ AttributeError: 'Annotator' object has no attribute 'visioneye'
I'm facing this issue, PLEASE HELP. Much Appreciated
- Glenn JocherUltralytics(editado)
@leongjy2005
visioneyeis not a method of the baseAnnotator; it lives onSolutionAnnotator. Usefrom ultralytics.solutions.solutions import SolutionAnnotatorandannotator = SolutionAnnotator(im0, line_width=2), or use thesolutions.VisionEyesolution from the VisionEye guide.1 Problem Solved! Thanks!