Cartographie des objets avec VisionEye View et Ultralytics YOLO26
Qu’est-ce que la cartographie des objets VisionEye ?#
VisionEye d’Ultralytics YOLO26 permet aux ordinateurs d’identifier et de localiser les objets, en reproduisant la précision d’observation de l’œil humain. Cette fonctionnalité permet aux ordinateurs de distinguer des objets spécifiques et de s’y concentrer, à la manière dont l’œil humain observe les détails depuis un point de vue particulier.
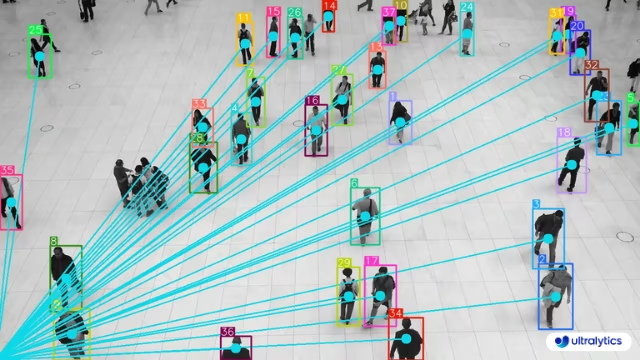
Cartographie des objets avec YOLO26#
VisionEye fixe un point d’observation unique dans l’image et trace un rayon depuis ce point jusqu’à chaque objet suivi, ce qui te permet de visualiser une scène depuis un point de vue donné. Définis vision_point avec les coordonnées en pixels de l’observateur, puis exécute la solution sur ta vidéo avec l’API Python ou la CLI.
# Monitor objects position with visioneye
yolo solutions visioneye show=True

# Pass a source video
yolo solutions visioneye source="path/to/video.mp4"

# Monitor the specific classes
yolo solutions visioneye classes="[0, 5]"
Arguments de VisionEye#
Voici un tableau des arguments de VisionEye :
| Argument | Type | Valeur par défaut | Description |
|---|---|---|---|
model | str | None | Chemin vers un fichier de modèle Ultralytics YOLO. |
vision_point | tuple[int, int] | (20, 20) | Point où la vision suivra les objets et tracera des trajectoires avec la solution VisionEye. |
line_width | int | 2 | Épaisseur des lignes des boîtes, des points clés et des compteurs dessinés par la solution. |
verbose | bool | True | Active le journal de la solution pour chaque image, qui indique la forme de l'entrée, le nombre d'éléments par classe et la vitesse de traitement. L'appel de suivi reste toujours silencieux. |
Tu peux également utiliser différents arguments track dans la solution VisionEye :
| Argument | Type | Valeur par défaut | Description |
|---|---|---|---|
tracker | str | 'tracktrack.yaml' | Indique l'algorithme de suivi à utiliser. Options intégrées : botsort.yaml, bytetrack.yaml, ocsort.yaml, deepocsort.yaml, fasttrack.yaml, tracktrack.yaml. |
conf | float | 0.25 | Définit le seuil de confiance des détections ; des valeurs plus faibles permettent de suivre davantage d'objets, mais peuvent inclure des faux positifs. |
iou | float | 0.5 | Définit le seuil d'intersection sur l'union (IoU) utilisé pour filtrer les détections qui se chevauchent. |
classes | list | None | Filtre les résultats selon l'indice de classe. Par exemple, classes=[0, 2, 3] ne suit que les classes spécifiées. |
device | str | None | Indique le périphérique utilisé pour l'inférence (par exemple, cpu, cuda:0 ou 0). Permet de choisir entre le CPU, un GPU spécifique ou d'autres périphériques de calcul pour l'exécution du modèle. |
imgsz | int or tuple | 640 | Taille cible de l'image pour l'inférence : un entier pour une image carrée ou une paire (height, width). Les dimensions sont ajustées au stride du modèle. |
max_det | int | 300 | Nombre maximal de détections conservées par image avant le suivi, ce qui limite le nombre d'objets qu'une solution traite dans les scènes denses. |
quantize | int or str | None | Précision d’inférence : 16 (FP16) ou 32/unset (FP32) pour les modèles PyTorch et TorchScript hors CPU ; les autres formats utilisent la précision définie par leur artefact et leur environnement d’exécution. Remplace l’argument half obsolète. |
De plus, certains arguments de visualisation sont pris en charge, comme indiqué ci-dessous :
| Argument | Type | Valeur par défaut | Description |
|---|---|---|---|
show | bool | False | Si True, affiche les images ou vidéos annotées dans une fenêtre. Utile pour obtenir un retour visuel immédiat pendant le développement ou les tests. |
show_conf | bool | True | Affiche le score de confiance de chaque détection à côté de son étiquette. Donne une indication du degré de certitude du modèle pour chaque détection. |
show_labels | bool | True | Affiche les étiquettes de chaque détection dans le résultat visuel. Permet d'identifier immédiatement les objets détectés. |
Fonctionnement de VisionEye#
VisionEye fonctionne en définissant un point de vue fixe dans l’image et en traçant des lignes depuis ce point vers les objets détectés. Cela simule la façon dont la vision humaine se concentre sur plusieurs objets depuis un seul point de vue. La solution utilise le suivi d’objets pour identifier les objets de manière cohérente d’une image à l’autre, créant ainsi une représentation visuelle de la relation spatiale entre l’observateur (point de vue) et les objets de la scène.
La méthode process de la classe VisionEye effectue plusieurs opérations clés :
- Extrait les trajectoires (boîtes englobantes, classes et ID de suivi) de l’image d’entrée
- Crée un annotateur pour dessiner les boîtes englobantes et les étiquettes
- Pour chaque objet détecté, dessine une étiquette de boîte et trace une ligne de vision depuis le point de vue
- Renvoie l’image annotée avec les statistiques de suivi
Cette approche est particulièrement utile pour les applications nécessitant une perception spatiale et la visualisation des relations entre objets, comme les systèmes de surveillance, la navigation autonome et les installations interactives.
Applications de VisionEye#
La cartographie des objets avec VisionEye offre de nombreuses applications pratiques dans divers secteurs :
- Sécurité et surveillance : surveiller plusieurs objets d’intérêt depuis une position de caméra fixe
- Analyse du commerce de détail : suivre les déplacements des clients par rapport aux présentoirs du magasin
- Analyse sportive : analyser le positionnement et les déplacements des joueurs du point de vue d’un entraîneur
- Véhicules autonomes : visualiser comment un véhicule « voit » les objets de son environnement et établit ses priorités
- Interaction humain-machine : créer des interfaces plus intuitives qui réagissent aux relations spatiales
En combinant VisionEye à d’autres solutions Ultralytics, comme le calcul de distance ou l’estimation de vitesse, tu peux créer des systèmes complets qui suivent les objets tout en comprenant leurs relations spatiales et leurs comportements.
FAQ#
Pour commencer à utiliser VisionEye Object Mapping avec Ultralytics YOLO26, installe d’abord le package Ultralytics avec pip. Tu peux ensuite utiliser l’exemple de code fourni dans la documentation pour configurer la détection d’objets avec VisionEye. Voici un exemple simple pour commencer :
import cv2 from ultralytics import solutions cap = cv2.VideoCapture("path/to/video.mp4") assert cap.isOpened(), "Error reading video file" # Écriture de la vidéo w, h, fps = (int(cap.get(x)) for x in (cv2.CAP_PROP_FRAME_WIDTH, cv2.CAP_PROP_FRAME_HEIGHT, cv2.CAP_PROP_FPS)) video_writer = cv2.VideoWriter("vision-eye-mapping.avi", cv2.VideoWriter_fourcc(*"mp4v"), fps, (w, h)) # Initialiser l’objet VisionEye visioneye = solutions.VisionEye( show=True, # afficher le résultat model="yolo26n.pt", # utiliser n’importe quel modèle pris en charge par Ultralytics, par exemple yolo26s.pt classes=[0, 2], # générer une vue VisionEye pour des classes spécifiques ) # Traiter la vidéo while cap.isOpened(): success, im0 = cap.read() if not success: print("Video frame is empty or video processing has been successfully completed.") break results = visioneye(im0) print(results) # Accéder à la sortie video_writer.write(results.plot_im) # écrire le fichier vidéo cap.release() video_writer.release() cv2.destroyAllWindows() # fermer toutes les fenêtres ouvertesUltralytics YOLO26 combine rapidité, précision et facilité d’intégration, ce qui le rend particulièrement adapté à la cartographie et au suivi d’objets. Ses principaux avantages sont les suivants :
- Performances en temps réel : offre une grande précision pour la détection d’objets en temps réel.
- Flexibilité : prend en charge la détection, le suivi et le calcul de distance dans un seul pipeline.
- Communauté et assistance : documentation complète et communauté GitHub active pour le dépannage et les améliorations.
- Facilité d’utilisation : son API intuitive simplifie les tâches complexes et permet un déploiement et des itérations rapides.
Pour en savoir plus sur les applications et les avantages, consulte la documentation Ultralytics YOLO26.
Ultralytics YOLO26 s’intègre à divers outils d’apprentissage automatique, comme Comet et ClearML, pour le suivi des expériences, la collaboration et la reproductibilité. Pour commencer, suis les guides détaillés sur l’intégration de YOLO26 à Comet et l’intégration de YOLO26 à ClearML.
Pour découvrir d’autres exemples d’intégration, consulte notre guide des intégrations Ultralytics.


Commentaires60
Pose une question, partage tes résultats ou aide quelqu’un d’autre.
TranDHoa
Hey, you can adjust the viewing angle of the eyes and make it measure the distance from the center of an object instead of from the edge.
 Glenn JocherUltralytics
VisionEye already draws the ray from
vision_pointto the bounding-box centroid (not the edge) viaSolutionAnnotator.visioneye()as shown in the VisionEye guide and the SolutionAnnotatorvisioneye()reference; there isn’t a separate “viewing angle” parameter today since it’s a 2D overlay, so the intended control is movingvision_point, and if you need an actual distance value (vs just a line), please use the Distance Calculation solution and share your desired behavior here (plus a short clip/frame +vision_point) so the team can advise the cleanest extension.
dixroby
What dependencies are included in the requirements.txt file?
- Glenn JocherUltralytics
@dixroby the
requirements.txtfile typically includes dependencies liketorch,opencv-python, and other libraries necessary for running Ultralytics YOLO models. For a detailed list, please check the file directly in the repository.
FarrelCulbert
Hi, I would like to know if this is only compatible with YOLOv8, or can I use it with all models?
- Glenn JocherUltralytics(modifié)
@FarrelCulbert VisionEye Object Mapping is not limited to YOLOv8: it works with the tracking-capable Ultralytics models you pass via
model=, including YOLO26 (recommended) and YOLO11. For more detailed information and examples, you can refer to the VisionEye documentation at https://docs.ultralytics.com/guides/vision-eye/.
skp4595
rather than taking video as input fro testing, I want to test for an image, how can I do that? guide me on this.
- Glenn JocherUltralytics(modifié)
Hi there!
Great question! If you want to test an image instead of a video using Ultralytics YOLO, it's quite straightforward. Below is a simple example to guide you through the process:
Testing on an Image
First, ensure you have the latest versions of
torchandultralyticsinstalled. If not, please update them:pip install --upgrade torch ultralyticsNext, you can use the following code to test an image:
import cv2
from ultralytics import YOLO
from ultralytics.utils.plotting import Annotator, colors

# Load the model
model = YOLO("yolo26n.pt")

# Load the image
image_path = "path/to/your/image.jpg"
im0 = cv2.imread(image_path)

# Perform prediction
results = model.predict(im0)
boxes = results[0].boxes.xyxy.cpu()
clss = results[0].boxes.cls.cpu().tolist()

# Annotate the image
annotator = Annotator(im0, line_width=2)
names = model.model.names

for box, cls in zip(boxes, clss):
    annotator.box_label(box, label=names[int(cls)], color=colors(int(cls)))

# Display the annotated image
cv2.imshow("YOLO Image Prediction", im0)
cv2.waitKey(0)
cv2.destroyAllWindows()
Explanation
- Load the Model: We load the YOLO model.
- Load the Image: Read the image using OpenCV.
- Perform Prediction: Use the model to predict objects in the image.
- Annotate the Image: Draw bounding boxes and labels on the image.
- Display the Image: Show the annotated image using OpenCV.
This should help you get started with testing images. If you encounter any issues or have further questions, feel free to ask! 😊
For more detailed information, you can refer to the VisionEye Object Mapping Guide.
Happy coding! 🚀
I want to run VisionEye Object Mapping using YOLOv8 code on KITTI data set. the KITTI dataset is labeled as <class_name1, truncation, occlusion, observation angle alpha, bbox cordinantes, Dimension of object, Location, rotation_y, score > for each image. While model training, I'm getting this error train: WARNING ⚠️ /content/dataset/train/images/005936.png: ignoring corrupt image/label: could not convert string to float: 'Car' train: WARNING ⚠️ /content/dataset/train/images/005937.png: ignoring corrupt image/label: could not convert string to float: 'Pedestrian' train: WARNING ⚠️ /content/dataset/train/images/005938.png: ignoring corrupt image/label: could not convert string to float: 'Truck'
with these args { EPOCHS = 5 !yolo
task=detect
mode=train
model=yolov8s.pt
imgsz=640
data=depth_estimation_using_YOLOv8.yaml
epochs={EPOCHS}
batch=16
name=yolov8s
exist_ok=True
amp=False } how do I fix this?how is this model trained? some details on dataset would be great help
 Paula DerrengerUltralytics(modifié)
Hi! The model is trained using the YOLOv8 framework. You can train it on custom datasets like KITTI by converting the dataset to the YOLO format. The dataset should have labels in the format
<class_id> <x_center> <y_center> <width> <height>.For more details on VisionEye Object Mapping, check out the Ultralytics VisionEye guide. If you have any specific questions, feel free to ask! 🚀
Here's a sample training command:
yolo task=detect mode=train model=yolo26s.pt data=your_dataset.yaml epochs=5 batch=16Happy training! 😊
1
what does this mean "It calculates this distance by analyzing the size and position of the object within the frame, using the camera's field of view and other calibration parameters if available"? what do you mean by 'other calibration parameter if possible'? The model is not a blackbox. Is it? there must be some calibration, some ground truth from where model must have learned. please explain this.
- Glenn JocherUltralytics(modifié)
Hello! Great questions about the VisionEye Object Mapping using Ultralytics YOLOv8.
-
Distance Calculation: The phrase "It calculates this distance by analyzing the size and position of the object within the frame, using the camera's field of view and other calibration parameters if available" was inaccurate. The VisionEye distance example does not estimate camera-to-object distance from object size or field of view. It computes the pixel distance between the vision point and the bounding-box centroid and divides it by the
pixel_per_metervalue you set, so you calibrate that scale yourself. -
Other Calibration Parameters: The example uses none of these. You would need data such as camera intrinsic parameters (focal length, optical centers), extrinsic parameters (orientation and position of the camera), object size references, or a depth sensor only if you build a true camera-to-object distance estimate yourself.
-
Model Transparency: YOLOv8 models are not black boxes in the sense that their architecture and training processes are open for examination and modification. They learn from labeled data (ground truth) where objects are manually annotated in images, teaching the model how to recognize similar objects in new images.
For further details or specific implementations, feel free to check out our guide on VisionEye Object Mapping at Ultralytics VisionEye Guide. If you have more questions or need clarification, don't hesitate to reach out! 😊
-
mirhasnainsiba
i am getting version incompatiblity issues, tell me your system's python version
- Paula DerrengerUltralytics(modifié)
Hey there! 😊 It sounds like you're encountering some version compatibility issues. For Ultralytics YOLOv8, we generally recommend using Python 3.8 or newer as it strikes a good balance between being up-to-date and maintaining compatibility with most dependencies.
If you're using a Python version older than 3.7, you might run into issues, and it's a good idea to update to at least version 3.7 or newer if possible. Here's a quick way to check your current Python version from your terminal:
python --version
# or if you have Python 3 installed as 'python3'
python3 --version
And if you need to update Python, the official Python Downloads page is a great place to start.
If you're still facing issues after checking your Python version, could you please provide more details about the error messages you're seeing? This information can help us pinpoint the problem more accurately. Thanks!
it is telling distance 61m while object is almost 1 m far
- Paula DerrengerUltralytics
@mirhasnainsiba hi there! 👋 It seems there might be a discrepancy with the distance calculation in your setup. Typically, the distance calculated by the model would depend on the scale set in your system (for example,
pixel_per_meterin the example). If the object is being reported as 61m away while it's actually about 1m away, you might want to adjust this scale factor accordingly. Here's a brief example:pixel_per_meter = 100 # Adjust this value based on your actual scaleThis adjustment helps calibrate the distance calculation to more accurately reflect real-world distances. If you continue to experience issues, double-check the calibration process or consider revisiting the portion of your code responsible for calculating distances. If further assistance is needed, feel free to reach out! 🛠️
thanks
- Paula DerrengerUltralytics
Hey there! 😊 Thanks for reaching out. If you're observing an object distance as 61m while it's almost 1m away, you might want to adjust the
pixel_per_meterscaling factor in your VisionEye implementation. This adjustment is crucial for accurate distance calculation.Here's a simplified approach:
pixel_per_meter = 100 # This is just an example value.
# You'll need to calibrate this based on your specific setup and camera properties.
By fine-tuning this variable, you can achieve more accurate distance measurements. Calibration involves comparing known distances with the pixel distances detected by your model to find the most suitable
pixel_per_metervalue. 🛠️Hope this helps! Let us know if you have any further questions or if there are more details you'd like to dive into.
magickoo
where is the dataset(video file)?
- Paula DerrengerUltralytics
Hey there! 🌟
The video files used in our examples are not provided in the repository. You can use any video file that you have access to by placing it in an accessible directory and then modifying the
"path/to/video/file.mp4"placeholder in the code snippets to point to your video file's location.For example:
cap = cv2.VideoCapture("your/video/path/here.mp4")Just replace
"your/video/path/here.mp4"with the actual path to your video. If you're looking for sample videos, online resources like Pexels Video or Pixabay Videos offer free footage that you might find useful for your projects.If you have any more questions or need further assistance, don't hesitate to reach out. Happy coding! 🚀
1 Okay thankyou!
- Paula DerrengerUltralytics
Hey! Thank you for checking out the VisionEye Object Mapping with Ultralytics YOLOv8. 🚀 If you're keen to dive into VisionEye Object Mapping for pinpoint precision or even integrate object tracking and distance calculation, the provided Python examples can guide you seamlessly through the process.
Just remember to replace
"path/to/video/file.mp4"with the specific path to your video file, and you’re all set to explore the amazing capabilities of YOLOv8 with VisionEye!For pinpoint object mapping:
model = YOLO("yolov8n.pt")  # Adjust model as needed
cap = cv2.VideoCapture("your/video/path.mp4")  # Your video path here
For any additional queries or discussions, feel free to drop a message in our GitHub Issue Section. Happy coding! 🎉
AdadAlShabab
Hi, I just wanted to know about "VisionEye View with Distance". What does this 'Distance' means? I mean does it measure the distance from the camera to object? Please let me know. TIA.
- Paula DerrengerUltralytics(modifié)
@AdadAlShabab hey there! 👋
No, the "Distance" in the VisionEye example is not a camera-to-object distance. It is the pixel distance between the vision point and the detected object's bounding-box centroid, divided by a
pixel_per_meterscale that you set and calibrate yourself. Here's a simplified example of how you might calculate distance in a custom script:import cv2 import math from ultralytics import YOLO model = YOLO("yolo26s.pt") cap = cv2.VideoCapture("path/to/video.mp4") while True: ret, im0 = cap.read() if not ret: break results = model.track(im0, persist=True) for box in results[0].boxes.xyxy.cpu(): # Example: Calculate distance based on object size or position here # This is a placeholder for actual distance calculation logic distance = calculate_distance(box) print(f"Distance: {distance} meters")In this example,
calculate_distancewould be a function you define based on your specific distance estimation method. Keep in mind, accurate distance measurement might require camera calibration and knowing the actual size of the object or using depth sensors in conjunction with the camera.Hope this helps! Let us know if you have any more questions. 😊
Hi @pderrenger. Thanks a lot for your reply. I just wanted to know how can I divide the results by 10 ( ex: distance/10)? I'm dropping the code, please let me know in which line/lines I should make the changes? TIA.
Code:
if results[0].boxes.id is not None: track_ids = results[0].boxes.id.int().cpu().tolist() for box, track_id in zip(boxes, track_ids): annotator.box_label(box, label=str(track_id), color=bbox_clr) annotator.visioneye(box, center_point) x1, y1 = int((box[0] + box[2]) // 2), int((box[1] + box[3]) // 2) # Bounding box centroid distance = (math.sqrt((x1 - center_point[0]) ** 2 + (y1 - center_point[1]) ** 2))/pixel_per_meter text_size, _ = cv2.getTextSize(f"Distance: {distance:.2f} m", cv2.FONT_HERSHEY_SIMPLEX,1.2, 3) cv2.rectangle(im0, (x1, y1 - text_size[1] - 10),(x1 + text_size[0] + 10, y1), txt_background, -1) cv2.putText(im0, f"Distance: {distance:.2f} m",(x1, y1 - 5), cv2.FONT_HERSHEY_SIMPLEX, 1.2,txt_color, 3)- Paula DerrengerUltralytics
Hi @AdadAlShabab! 👋
To divide the calculated distance by 10, you can adjust the line where
distanceis calculated. Here's how you can modify it:distance = (math.sqrt((x1 - center_point[0]) ** 2 + (y1 - center_point[1]) ** 2)) / pixel_per_meter / 10This change will effectively scale down the calculated distance by a factor of 10. Just add
/ 10at the end of the existing distance calculation line in your code.Hope this helps! Let me know if there's anything else you need. 😊
what does this mean "It calculates this distance by analyzing the size and position of the object within the frame, using the camera's field of view and other calibration parameters if available"? what do you mean by 'other calibration parameter if possible'? The model is not a blackbox. Is it? there must be some calibration, some ground truth from where model must have learned. please explain this.
why are we dividing "distance " by 'pixel_per_meter' ? what is the logic or explaination for this ?
- Paula DerrengerUltralytics
Hey there! 👋
The division by
pixel_per_meteris used to convert the measured pixel distance into real-world units like meters. This conversion factor helps translate the scale of the image to actual distances based on how many pixels represent one meter in the image. It's essential for applications where you need to know the physical separation between objects or from the camera to an object, not just the distance in pixels.If you have more questions or need further clarification, feel free to ask! 😊
you mean to say, if there's 1 unit Euclidean distance between two pixels in an image, than it'd be 10m in real world scenarios? And this scale can be adjusted according to our will as per "pixel_per_meter = 10" this code. Isn't it?
if so, how is this calibration done? where's the ground truth?
- Paula DerrengerUltralytics
Hey there! 👋
Yes, exactly! If the
pixel_per_meteris set to 10, it means that 1 pixel in the image corresponds to 0.1 meters in the real world. You can adjust this scale to fit the specific context or calibration of your camera setup.Calibration is typically done by measuring known distances in the real world and adjusting the
pixel_per_metervalue so that the distances in the image accurately reflect these measurements. Ground truth data for calibration might come from physical measurements or known dimensions within the scene.If you have any more questions or need further clarification, feel free to ask! 😊
Thank you @pderrenger
- Paula DerrengerUltralytics(modifié)
You're welcome! 😊
The "VisionEye View with Distance" feature calculates the pixel distance between a reference point and the detected object's centroid, not a true camera-to-object distance. The
pixel_per_metervalue is used to convert pixel measurements to real-world distances. Calibration involves setting this value based on known distances in your scene.To divide the distance by 10, modify the distance calculation line like this:
distance = (math.sqrt((x1 - center_point[0]) ** 2 + (y1 - center_point[1]) ** 2)) / pixel_per_meter / 10For more details, check out the VisionEye guide.
1
leongjy2005
Traceback (most recent call last): File "d:\Random_YOLO8_Tutorials\Human_Detection\visioneye.py", line 28, in annotator.visioneye(box, center_point) ^^^^^^^^^^^^^^^^^^^ AttributeError: 'Annotator' object has no attribute 'visioneye'
I'm facing this issue, PLEASE HELP. Much Appreciated
- Glenn JocherUltralytics(modifié)
@leongjy2005
visioneyeis not a method of the baseAnnotator; it lives onSolutionAnnotator. Usefrom ultralytics.solutions.solutions import SolutionAnnotatorandannotator = SolutionAnnotator(im0, line_width=2), or use thesolutions.VisionEyesolution from the VisionEye guide.1 Problem Solved! Thanks!