YOLOv7: Tập hợp các thủ thuật miễn phí có thể huấn luyện
Ra mắt vào tháng 7 năm 2022, YOLOv7 là bước tiến đáng kể trong phát hiện đối tượng thời gian thực tại thời điểm đó. Khi được giới thiệu, model đạt 56,8% AP, độ chính xác cao nhất trong số các detector thời gian thực chạy ở 30 FPS trở lên trên GPU V100. YOLOv7 vượt trội hơn các detector đối tượng cùng thời như YOLOR, YOLOX, Scaled-YOLOv4 và YOLOv5 về tốc độ và độ chính xác. Model được huấn luyện từ đầu trên dataset MS COCO, không sử dụng dataset nào khác hoặc trọng số huấn luyện trước. Mã nguồn YOLOv7 có trên GitHub. Lưu ý rằng các model mới hơn như YOLO26 và YOLO11 kể từ đó đã đạt độ chính xác cao hơn cùng hiệu quả được cải thiện.
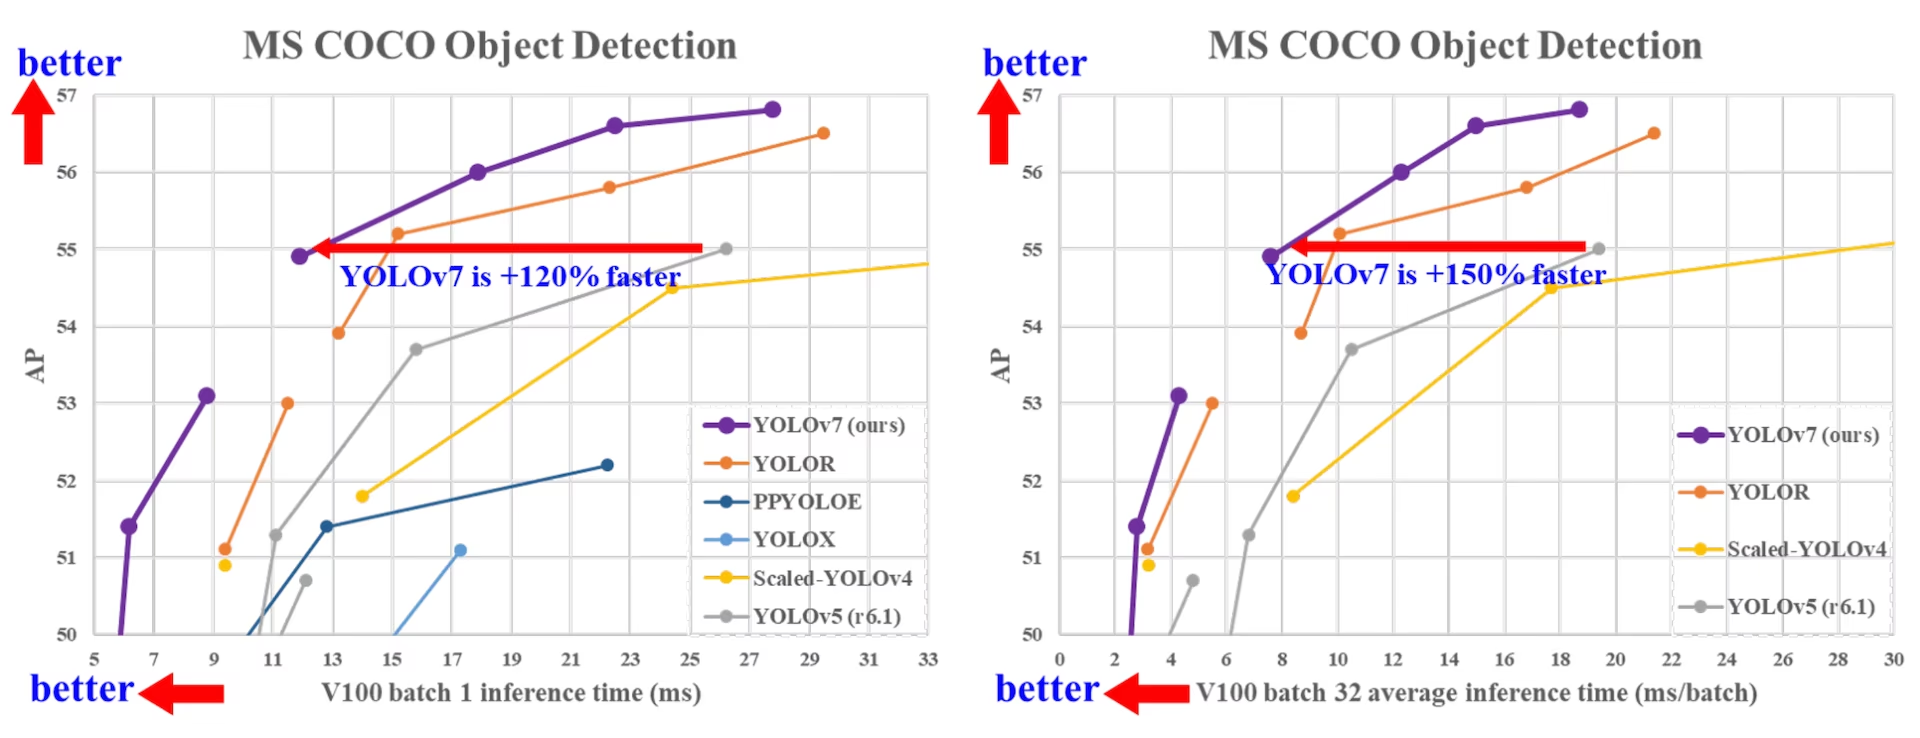
So sánh các bộ phát hiện đối tượng SOTA#
Theo bảng so sánh trong bài báo YOLOv7, YOLOv7 có sự cân bằng tổng thể tốt nhất giữa tốc độ và độ chính xác. So với YOLOv5-N (r6.1), YOLOv7-tiny-SiLU nhanh hơn 127 fps và AP cao hơn 10,7%. Ngoài ra, YOLOv7 đạt 51,4% AP ở 161 fps, trong khi PPYOLOE-L chỉ đạt cùng mức AP ở 78 fps; YOLOv7 cũng sử dụng ít hơn 41% số tham số so với PPYOLOE-L.
So với YOLOv5-L (r6.1) chạy ở 99 fps, YOLOv7-X chạy ở 114 fps và cải thiện AP thêm 3,9%. So với YOLOv5-X (r6.1) có quy mô tương đương, YOLOv7-X nhanh hơn 31 fps, sử dụng ít hơn 22% số tham số và giảm 8% lượng tính toán, đồng thời cải thiện AP thêm 2,2% (Nguồn).
| Model | Params (M) | FLOPs (G) | Kích thước (pixel) | FPS | APtest / val50-95 | APtest50 | APtest75 | APtestS | APtestM | APtestL |
|---|---|---|---|---|---|---|---|---|---|---|
| YOLOX-S | 9.0 | 26.8 | 640 | 102 | 40.5% / 40.5% | - | - | - | - | - |
| YOLOX-M | 25.3 | 73.8 | 640 | 81 | 47.2% / 46.9% | - | - | - | - | - |
| YOLOX-L | 54.2 | 155.6 | 640 | 69 | 50.1% / 49.7% | - | - | - | - | - |
| YOLOX-X | 99.1 | 281.9 | 640 | 58 | 51.5% / 51.1% | - | - | - | - | - |
| PPYOLOE-S | 7.9 | 17.4 | 640 | 208 | 43.1% / 42.7% | 60.5% | 46.6% | 23.2% | 46.4% | 56.9% |
| PPYOLOE-M | 23.4 | 49.9 | 640 | 123 | 48.9% / 48.6% | 66.5% | 53.0% | 28.6% | 52.9% | 63.8% |
| PPYOLOE-L | 52.2 | 110.1 | 640 | 78 | 51.4% / 50.9% | 68.9% | 55.6% | 31.4% | 55.3% | 66.1% |
| PPYOLOE-X | 98.4 | 206.6 | 640 | 45 | 52.2% / 51.9% | 69.9% | 56.5% | 33.3% | 56.3% | 66.4% |
| YOLOv5-N (r6.1) | 1.9 | 4.5 | 640 | 159 | - / 28.0% | - | - | - | - | - |
| YOLOv5-S (r6.1) | 7.2 | 16.5 | 640 | 156 | - / 37.4% | - | - | - | - | - |
| YOLOv5-M (r6.1) | 21.2 | 49.0 | 640 | 122 | - / 45.4% | - | - | - | - | - |
| YOLOv5-L (r6.1) | 46.5 | 109.1 | 640 | 99 | - / 49.0% | - | - | - | - | - |
| YOLOv5-X (r6.1) | 86.7 | 205.7 | 640 | 83 | - / 50.7% | - | - | - | - | - |
| YOLOR-CSP | 52.9 | 120.4 | 640 | 106 | 51.1% / 50.8% | 69.6% | 55.7% | 31.7% | 55.3% | 64.7% |
| YOLOR-CSP-X | 96.9 | 226.8 | 640 | 87 | 53.0% / 52.7% | 71.4% | 57.9% | 33.7% | 57.1% | 66.8% |
| YOLOv7-tiny-SiLU | 6.2 | 13.8 | 640 | 286 | 38.7% / 38.7% | 56.7% | 41.7% | 18.8% | 42.4% | 51.9% |
| YOLOv7 | 36.9 | 104.7 | 640 | 161 | 51.4% / 51.2% | 69.7% | 55.9% | 31.8% | 55.5% | 65.0% |
| YOLOv7-X | 71.3 | 189.9 | 640 | 114 | 53.1% / 52.9% | 71.2% | 57.8% | 33.8% | 57.1% | 67.4% |
| YOLOv5-N6 (r6.1) | 3.2 | 18.4 | 1280 | 123 | - / 36.0% | - | - | - | - | - |
| YOLOv5-S6 (r6.1) | 12.6 | 67.2 | 1280 | 122 | - / 44.8% | - | - | - | - | - |
| YOLOv5-M6 (r6.1) | 35.7 | 200.0 | 1280 | 90 | - / 51.3% | - | - | - | - | - |
| YOLOv5-L6 (r6.1) | 76.8 | 445.6 | 1280 | 63 | - / 53.7% | - | - | - | - | - |
| YOLOv5-X6 (r6.1) | 140.7 | 839.2 | 1280 | 38 | - / 55.0% | - | - | - | - | - |
| YOLOR-P6 | 37.2 | 325.6 | 1280 | 76 | 53.9% / 53.5% | 71.4% | 58.9% | 36.1% | 57.7% | 65.6% |
| YOLOR-W6 | 79.8 | 453.2 | 1280 | 66 | 55.2% / 54.8% | 72.7% | 60.5% | 37.7% | 59.1% | 67.1% |
| YOLOR-E6 | 115.8 | 683.2 | 1280 | 45 | 55.8% / 55.7% | 73.4% | 61.1% | 38.4% | 59.7% | 67.7% |
| YOLOR-D6 | 151.7 | 935.6 | 1280 | 34 | 56.5% / 56.1% | 74.1% | 61.9% | 38.9% | 60.4% | 68.7% |
| YOLOv7-W6 | 70.4 | 360.0 | 1280 | 84 | 54.9% / 54.6% | 72.6% | 60.1% | 37.3% | 58.7% | 67.1% |
| YOLOv7-E6 | 97.2 | 515.2 | 1280 | 56 | 56.0% / 55.9% | 73.5% | 61.2% | 38.0% | 59.9% | 68.4% |
| YOLOv7-D6 | 154.7 | 806.8 | 1280 | 44 | 56.6% / 56.3% | 74.0% | 61.8% | 38.8% | 60.1% | 69.5% |
| YOLOv7-E6E | 151.7 | 843.2 | 1280 | 36 | 56.8% / 56.8% | 74.4% | 62.1% | 39.3% | 60.5% | 69.0% |
Tổng quan#
Phát hiện đối tượng thời gian thực là thành phần quan trọng trong nhiều hệ thống thị giác máy tính, bao gồm theo dõi nhiều đối tượng, lái xe tự hành, robotics và phân tích ảnh y tế. Trong những năm gần đây, quá trình phát triển phát hiện đối tượng thời gian thực tập trung vào thiết kế kiến trúc hiệu quả và cải thiện tốc độ suy luận trên nhiều loại CPU, GPU và bộ xử lý neural (NPU). YOLOv7 hỗ trợ cả GPU di động và thiết bị GPU, từ edge đến cloud.
Không giống các bộ phát hiện đối tượng theo thời gian thực truyền thống vốn tập trung vào tối ưu hóa kiến trúc, YOLOv7 chú trọng tối ưu hóa quy trình huấn luyện. Phương pháp này bao gồm các module và kỹ thuật tối ưu hóa được thiết kế để cải thiện độ chính xác phát hiện đối tượng mà không làm tăng chi phí suy luận; khái niệm này được gọi là "trainable bag-of-freebies".
Tính năng chính#
YOLOv7 giới thiệu một số tính năng chính:
-
Tái tham số hóa model: YOLOv7 đề xuất một model được tái tham số hóa có chủ đích, một chiến lược có thể áp dụng cho các layer trong những mạng khác nhau dựa trên khái niệm đường truyền gradient.
-
Gán nhãn động: Việc huấn luyện model với nhiều layer đầu ra đặt ra một vấn đề mới: "Làm thế nào để gán mục tiêu động cho đầu ra của các nhánh khác nhau?" Để giải quyết vấn đề này, YOLOv7 giới thiệu một phương pháp gán nhãn mới gọi là gán nhãn hướng dẫn từ thô đến tinh.
-
Mở rộng và scaling kết hợp: YOLOv7 đề xuất các phương pháp "mở rộng" và "scaling kết hợp" cho bộ phát hiện đối tượng thời gian thực, giúp tận dụng hiệu quả tham số và năng lực tính toán.
-
Hiệu quả: Phương pháp được YOLOv7 đề xuất giảm khoảng 40% số tham số và 50% lượng tính toán so với các detector đối tượng thời gian thực hiện đại, đồng thời đạt tốc độ suy luận nhanh hơn và độ chính xác phát hiện cao hơn.
Ví dụ sử dụng#
Ultralytics không phát hành trọng số pretrained yolov7.pt hoặc các tệp YAML ultralytics/cfg/models/v7/, và gói Python Ultralytics không hỗ trợ huấn luyện cũng như suy luận YOLOv7 trực tiếp bằng PyTorch. Tuy nhiên, bạn có thể đưa checkpoint YOLOv7 được huấn luyện trong repository YOLOv7 upstream vào Ultralytics bằng cách xuất sang ONNX hoặc TensorRT, như minh họa bên dưới.
Xuất ONNX#
Để sử dụng model ONNX YOLOv7 với Ultralytics:
-
(Tùy chọn) Cài đặt Ultralytics và xuất model ONNX để tự động cài đặt các dependency cần thiết:
pip install ultralytics yolo export model=yolo26n.pt format=onnx -
Xuất model YOLOv7 mong muốn bằng exporter trong repo YOLOv7:
git clone https://github.com/WongKinYiu/yolov7 cd yolov7 python export.py --weights yolov7-tiny.pt --grid --end2end --simplify --topk-all 100 --iou-thres 0.65 --conf-thres 0.35 --img-size 640 640 --max-wh 640 -
Chỉnh sửa graph model ONNX để tương thích với Ultralytics bằng script sau:
import numpy as np import onnx from onnx import helper, numpy_helper # Load the ONNX model model_path = "yolov7/yolov7-tiny.onnx" # Replace with your model path model = onnx.load(model_path) graph = model.graph # Fix input shape to batch size 1 input_shape = graph.input[0].type.tensor_type.shape input_shape.dim[0].dim_value = 1 # Define the output of the original model original_output_name = graph.output[0].name # Create slicing nodes sliced_output_name = f"{original_output_name}_sliced" # Define initializers for slicing (remove the first value) start = numpy_helper.from_array(np.array([1], dtype=np.int64), name="slice_start") end = numpy_helper.from_array(np.array([7], dtype=np.int64), name="slice_end") axes = numpy_helper.from_array(np.array([1], dtype=np.int64), name="slice_axes") steps = numpy_helper.from_array(np.array([1], dtype=np.int64), name="slice_steps") graph.initializer.extend([start, end, axes, steps]) slice_node = helper.make_node( "Slice", inputs=[original_output_name, "slice_start", "slice_end", "slice_axes", "slice_steps"], outputs=[sliced_output_name], name="SliceNode", ) graph.node.append(slice_node) # Define segment slicing seg1_start = numpy_helper.from_array(np.array([0], dtype=np.int64), name="seg1_start") seg1_end = numpy_helper.from_array(np.array([4], dtype=np.int64), name="seg1_end") seg2_start = numpy_helper.from_array(np.array([4], dtype=np.int64), name="seg2_start") seg2_end = numpy_helper.from_array(np.array([5], dtype=np.int64), name="seg2_end") seg3_start = numpy_helper.from_array(np.array([5], dtype=np.int64), name="seg3_start") seg3_end = numpy_helper.from_array(np.array([6], dtype=np.int64), name="seg3_end") graph.initializer.extend([seg1_start, seg1_end, seg2_start, seg2_end, seg3_start, seg3_end]) # Create intermediate tensors for segments segment_1_name = f"{sliced_output_name}_segment1" segment_2_name = f"{sliced_output_name}_segment2" segment_3_name = f"{sliced_output_name}_segment3" # Add segment slicing nodes graph.node.extend( [ helper.make_node( "Slice", inputs=[sliced_output_name, "seg1_start", "seg1_end", "slice_axes", "slice_steps"], outputs=[segment_1_name], name="SliceSegment1", ), helper.make_node( "Slice", inputs=[sliced_output_name, "seg2_start", "seg2_end", "slice_axes", "slice_steps"], outputs=[segment_2_name], name="SliceSegment2", ), helper.make_node( "Slice", inputs=[sliced_output_name, "seg3_start", "seg3_end", "slice_axes", "slice_steps"], outputs=[segment_3_name], name="SliceSegment3", ), ] ) # Concatenate the segments concat_output_name = f"{sliced_output_name}_concat" concat_node = helper.make_node( "Concat", inputs=[segment_1_name, segment_3_name, segment_2_name], outputs=[concat_output_name], axis=1, name="ConcatSwapped", ) graph.node.append(concat_node) # Reshape to [1, -1, 6] reshape_shape = numpy_helper.from_array(np.array([1, -1, 6], dtype=np.int64), name="reshape_shape") graph.initializer.append(reshape_shape) final_output_name = f"{concat_output_name}_batched" reshape_node = helper.make_node( "Reshape", inputs=[concat_output_name, "reshape_shape"], outputs=[final_output_name], name="AddBatchDimension", ) graph.node.append(reshape_node) # Get the shape of the reshaped tensor shape_node_name = f"{final_output_name}_shape" shape_node = helper.make_node( "Shape", inputs=[final_output_name], outputs=[shape_node_name], name="GetShapeDim", ) graph.node.append(shape_node) # Extract the second dimension dim_1_index = numpy_helper.from_array(np.array([1], dtype=np.int64), name="dim_1_index") graph.initializer.append(dim_1_index) second_dim_name = f"{final_output_name}_dim1" gather_node = helper.make_node( "Gather", inputs=[shape_node_name, "dim_1_index"], outputs=[second_dim_name], name="GatherSecondDim", ) graph.node.append(gather_node) # Subtract from 100 to determine how many values to pad target_size = numpy_helper.from_array(np.array([100], dtype=np.int64), name="target_size") graph.initializer.append(target_size) pad_size_name = f"{second_dim_name}_padsize" sub_node = helper.make_node( "Sub", inputs=["target_size", second_dim_name], outputs=[pad_size_name], name="CalculatePadSize", ) graph.node.append(sub_node) # Build the [2, 3] pad array: # 1st row -> [0, 0, 0] (no padding at the start of any dim) # 2nd row -> [0, pad_size, 0] (pad only at the end of the second dim) pad_starts = numpy_helper.from_array(np.array([0, 0, 0], dtype=np.int64), name="pad_starts") graph.initializer.append(pad_starts) zero_scalar = numpy_helper.from_array(np.array([0], dtype=np.int64), name="zero_scalar") graph.initializer.append(zero_scalar) pad_ends_name = "pad_ends" concat_pad_ends_node = helper.make_node( "Concat", inputs=["zero_scalar", pad_size_name, "zero_scalar"], outputs=[pad_ends_name], axis=0, name="ConcatPadEnds", ) graph.node.append(concat_pad_ends_node) pad_values_name = "pad_values" concat_pad_node = helper.make_node( "Concat", inputs=["pad_starts", pad_ends_name], outputs=[pad_values_name], axis=0, name="ConcatPadStartsEnds", ) graph.node.append(concat_pad_node) # Create Pad operator to pad with zeros pad_output_name = f"{final_output_name}_padded" pad_constant_value = numpy_helper.from_array( np.array([0.0], dtype=np.float32), name="pad_constant_value", ) graph.initializer.append(pad_constant_value) pad_node = helper.make_node( "Pad", inputs=[final_output_name, pad_values_name, "pad_constant_value"], outputs=[pad_output_name], mode="constant", name="PadToFixedSize", ) graph.node.append(pad_node) # Update the graph's final output to [1, 100, 6] new_output_type = onnx.helper.make_tensor_type_proto( elem_type=graph.output[0].type.tensor_type.elem_type, shape=[1, 100, 6] ) new_output = onnx.helper.make_value_info(name=pad_output_name, type_proto=new_output_type) # Replace the old output with the new one graph.output.pop() graph.output.extend([new_output]) # Save the modified model onnx.save(model, "yolov7-ultralytics.onnx") -
Sau đó, bạn có thể tải model ONNX đã chỉnh sửa và chạy suy luận với model đó như bình thường trong Ultralytics:
from ultralytics import ASSETS, YOLO

model = YOLO("yolov7-ultralytics.onnx", task="detect")

results = model(ASSETS / "bus.jpg")
Xuất TensorRT#
-
Thực hiện các bước 1–2 trong mục Xuất ONNX.
-
Cài đặt package Python
TensorRT:pip install tensorrt -
Chạy script sau để chuyển đổi model ONNX đã sửa đổi thành TensorRT engine:
from ultralytics.utils.export import onnx2engine onnx2engine("yolov7-ultralytics.onnx", quantize=16) -
Tải và chạy model trong Ultralytics:
from ultralytics import ASSETS, YOLO

model = YOLO("yolov7-ultralytics.engine", task="detect")

results = model(ASSETS / "bus.jpg")
Trích dẫn và lời cảm ơn#
Chúng tôi xin ghi nhận những đóng góp quan trọng của các tác giả YOLOv7 trong lĩnh vực phát hiện đối tượng theo thời gian thực:
@inproceedings{wang2023yolov7,
  title={YOLOv7: Trainable Bag-of-Freebies Sets New State-of-the-Art for Real-Time Object Detectors},
  author={Wang, Chien-Yao and Bochkovskiy, Alexey and Liao, Hong-Yuan Mark},
  booktitle={Proceedings of the IEEE/CVF conference on Computer Vision and Pattern Recognition (CVPR)},
  pages={7464--7475},
  year={2023}
}
Bài báo YOLOv7 chính thức được công bố tại CVPR 2023 và có trên CVF Open Access, cùng bản tiền xuất bản trên arXiv. Các tác giả đã công khai công trình của mình và có thể truy cập codebase trên GitHub. Chúng tôi trân trọng nỗ lực của họ trong việc thúc đẩy lĩnh vực này và giúp cộng đồng rộng lớn hơn tiếp cận công trình.
Câu hỏi thường gặp#
YOLOv7, phát hành vào tháng 7 năm 2022, là model phát hiện đối tượng thời gian thực đạt tốc độ và độ chính xác tiên tiến nhất tại thời điểm ra mắt. Model này vượt trội hơn các model cùng thời như YOLOX, YOLOv5 và PPYOLOE cả về mức sử dụng tham số lẫn tốc độ suy luận. Những đặc điểm nổi bật của YOLOv7 bao gồm tái tham số hóa model và gán nhãn động, giúp tối ưu hóa hiệu năng mà không làm tăng chi phí suy luận.
YOLOv7 giới thiệu một số cải tiến, bao gồm tái tham số hóa model và gán nhãn động, giúp nâng cao quy trình huấn luyện và cải thiện độ chính xác suy luận. So với YOLOv5, YOLOv7 cải thiện đáng kể tốc độ và độ chính xác. Chẳng hạn, YOLOv7-X cải thiện độ chính xác 2,2% và giảm số lượng tham số 22% so với YOLOv5-X. Có thể xem phần so sánh chi tiết trong bảng hiệu năng So sánh YOLOv7 với các bộ phát hiện đối tượng SOTA.
Hiện tại, Ultralytics chỉ hỗ trợ suy luận YOLOv7 ONNX và TensorRT. Để chạy phiên bản YOLOv7 đã xuất sang ONNX và TensorRT với Ultralytics, hãy xem mục Ví dụ sử dụng.
Để cài đặt và huấn luyện model YOLOv7 tùy chỉnh, hãy thực hiện các bước sau:
-
Clone repository YOLOv7:
git clone https://github.com/WongKinYiu/yolov7 -
Chuyển đến thư mục đã clone và cài đặt các dependency:
cd yolov7 pip install -r requirements.txt -
Chuẩn bị dataset và cấu hình các tham số model theo hướng dẫn sử dụng được cung cấp trong repository.
-
Sau khi huấn luyện, bạn có thể xuất model sang ONNX hoặc TensorRT để sử dụng trong Ultralytics như minh họa trong Ví dụ sử dụng.
-
YOLOv7 giới thiệu một số tính năng then chốt cho bài toán phát hiện đối tượng thời gian thực:
- Tái tham số hóa model: Cải thiện hiệu năng của model bằng cách tối ưu hóa các đường truyền gradient.
- Gán nhãn động: Sử dụng phương pháp hướng dẫn từ thô đến tinh để gán mục tiêu động cho đầu ra trên các nhánh khác nhau, qua đó cải thiện độ chính xác.
- Mở rộng và scaling kết hợp: Tận dụng hiệu quả tham số và năng lực tính toán để scaling model cho nhiều ứng dụng thời gian thực khác nhau.
- Hiệu quả: Giảm 40% số lượng tham số và 50% năng lực tính toán so với các model hiện đại nhất khác, đồng thời đạt tốc độ suy luận nhanh hơn.


Bình luận2
Đặt câu hỏi, chia sẻ kết quả hoặc giúp đỡ người khác.
naps22
YOLOv7's approach as a trainable bag-of-freebies really stands out, especially in how it optimizes performance without additional inference cost. It's impressive how techniques like re-parameterization and dynamic label assignment enhance accuracy. However, after doing a YOLOv8 comparison, it’s clear that while YOLOv8 brings some architectural improvements and streamlined workflows, YOLOv7 still holds strong in many real-time detection scenarios due to its training-time flexibility.
 Glenn JocherUltralytics(đã chỉnh sửa)
You're absolutely right about YOLOv7's innovative "trainable bag-of-freebies" approach - it was a game-changing concept that improved accuracy purely through training optimizations rather than architectural changes. The re-parameterization and dynamic label assignment techniques were particularly clever solutions that set new standards for efficiency.
While YOLOv7 remains excellent for real-time detection scenarios, you might want to explore YOLO26 as well - it's our latest model that builds upon these innovations with even better performance across detection, segmentation, and other tasks, all within the streamlined Ultralytics framework.