A Guide on Using Kaggle to Train Your YOLO26 Models
If you are learning about AI and working on small projects, you might not have access to powerful computing resources yet, and high-end hardware can be expensive. Kaggle, a platform owned by Google, provides a free, cloud-based environment where you can access GPU resources, handle large datasets, and collaborate with a diverse community of data scientists and machine learning enthusiasts.
Kaggle is a practical option for training and experimenting with Ultralytics YOLO26 models. Kaggle Notebooks come with popular machine learning libraries and frameworks preinstalled. This guide explores Kaggle's main features and shows how to train YOLO26 models on the platform.
What is Kaggle?#
Kaggle is a platform that brings together data scientists from around the world to collaborate, learn, and compete in solving real-world data science problems. Launched in 2010 by Anthony Goldbloom and Jeremy Howard and acquired by Google in 2017, Kaggle enables users to connect, discover and share datasets, use GPU-powered notebooks, and participate in data science competitions. The platform serves both experienced professionals and learners.
With more than 10 million users as of 2022, Kaggle provides a rich environment for developing and experimenting with machine learning models. You don't need to worry about your local machine's specs or setup; all you need is a Kaggle account and a web browser.
Installation#
Before you can start training YOLO26 models on Kaggle, you need to ensure your notebook environment is properly configured. Follow these steps:
Enable Internet Access#
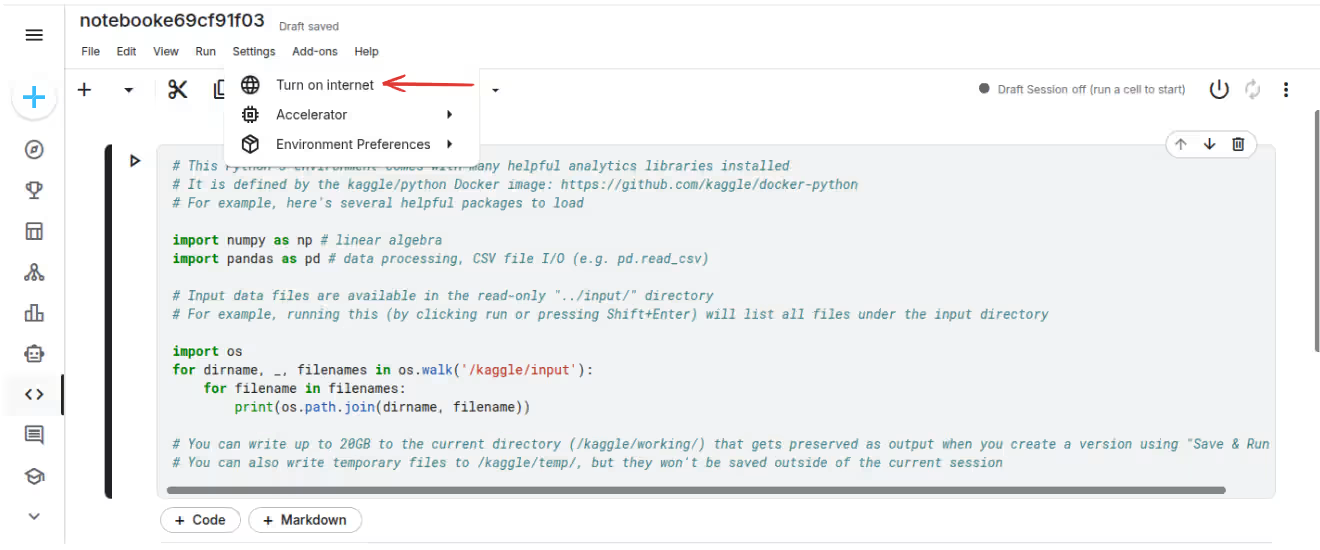
Kaggle notebooks require internet access to download packages and dependencies. To enable internet in your Kaggle notebook:
- Open your Kaggle notebook
- Click on the Settings panel on the right side of the notebook interface
- Scroll down to the Internet section
- Toggle the switch to ON to enable internet connectivity
Note: Internet access is required for installing the Ultralytics package and downloading pretrained models or datasets. Without internet enabled, package installations will fail.
Installing Ultralytics#
Once internet access is enabled, install the Ultralytics package by running the following command in a notebook cell:
!pip install ultralyticsFor the latest development version, you can install directly from GitHub:
!pip install git+https://github.com/ultralytics/ultralytics.gitResolving Dependency Conflicts#
During installation, you may encounter dependency conflicts, especially with packages like opencv-python, numpy, or torch. Here are common solutions:
Method 1: Force Reinstall with --upgrade#
If you encounter conflicts with existing packages, force an upgrade:
!pip install --upgrade --force-reinstall ultralyticsMethod 2: Restart Kernel After Installation#
Sometimes, you need to restart the kernel after installation to resolve import issues:
!pip install ultralytics
# Then click "Restart Kernel" from the notebook menu
Common Error Solutions#
Error: "No module named 'ultralytics'"
- Solution: Ensure internet is enabled and run the installation command again
- Restart the kernel after installation
Error: "ERROR: pip's dependency resolver does not currently take into account..."
- Solution: This is usually a warning and can be safely ignored. The installation typically succeeds despite the message
Error: "ModuleNotFoundError" after installation
- Solution: Restart the kernel using the restart button in the notebook interface
- Re-run the import statements in a new cell
Verifying Installation#
After installation, verify that Ultralytics is properly installed by running:
import ultralytics

ultralytics.checks()
This will display system information and verify that all dependencies are correctly installed.
Training YOLO26 Using Kaggle#
Kaggle's free GPUs make it straightforward to train YOLO26 models.
To get started, open the Ultralytics YOLO26 tutorial notebook in Kaggle. Kaggle's environment comes with pre-installed libraries like TensorFlow and PyTorch, which simplifies setup.
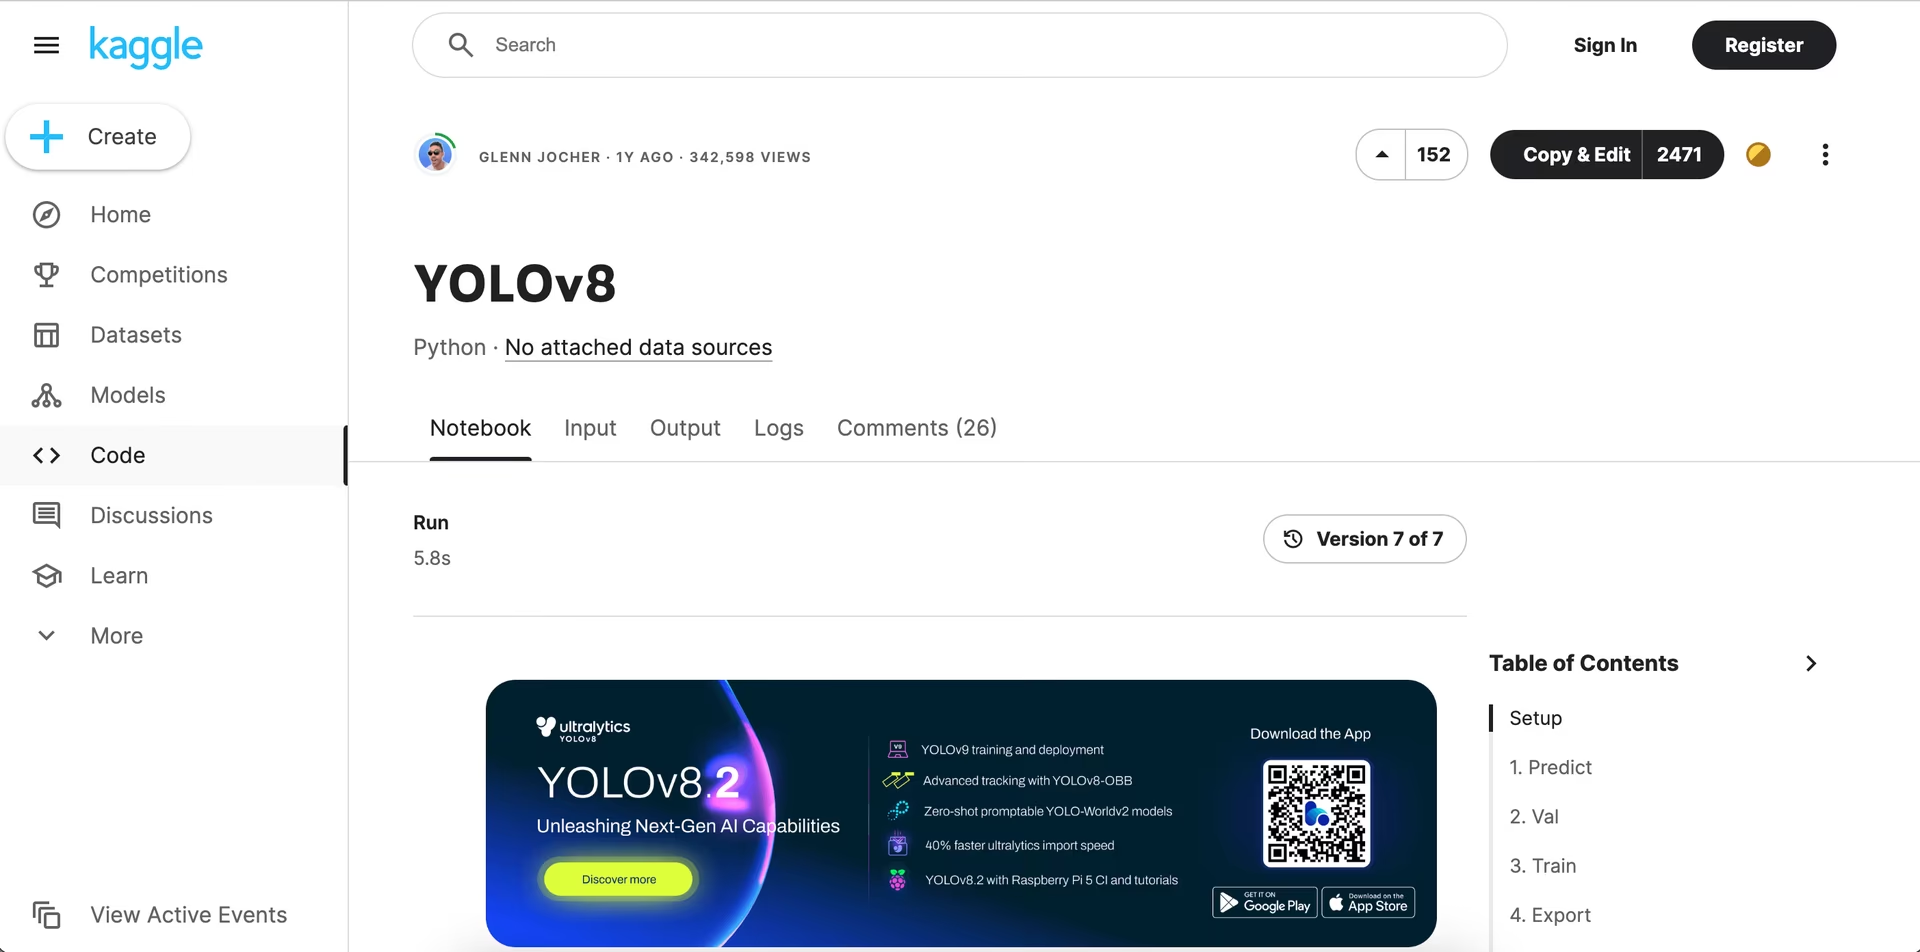
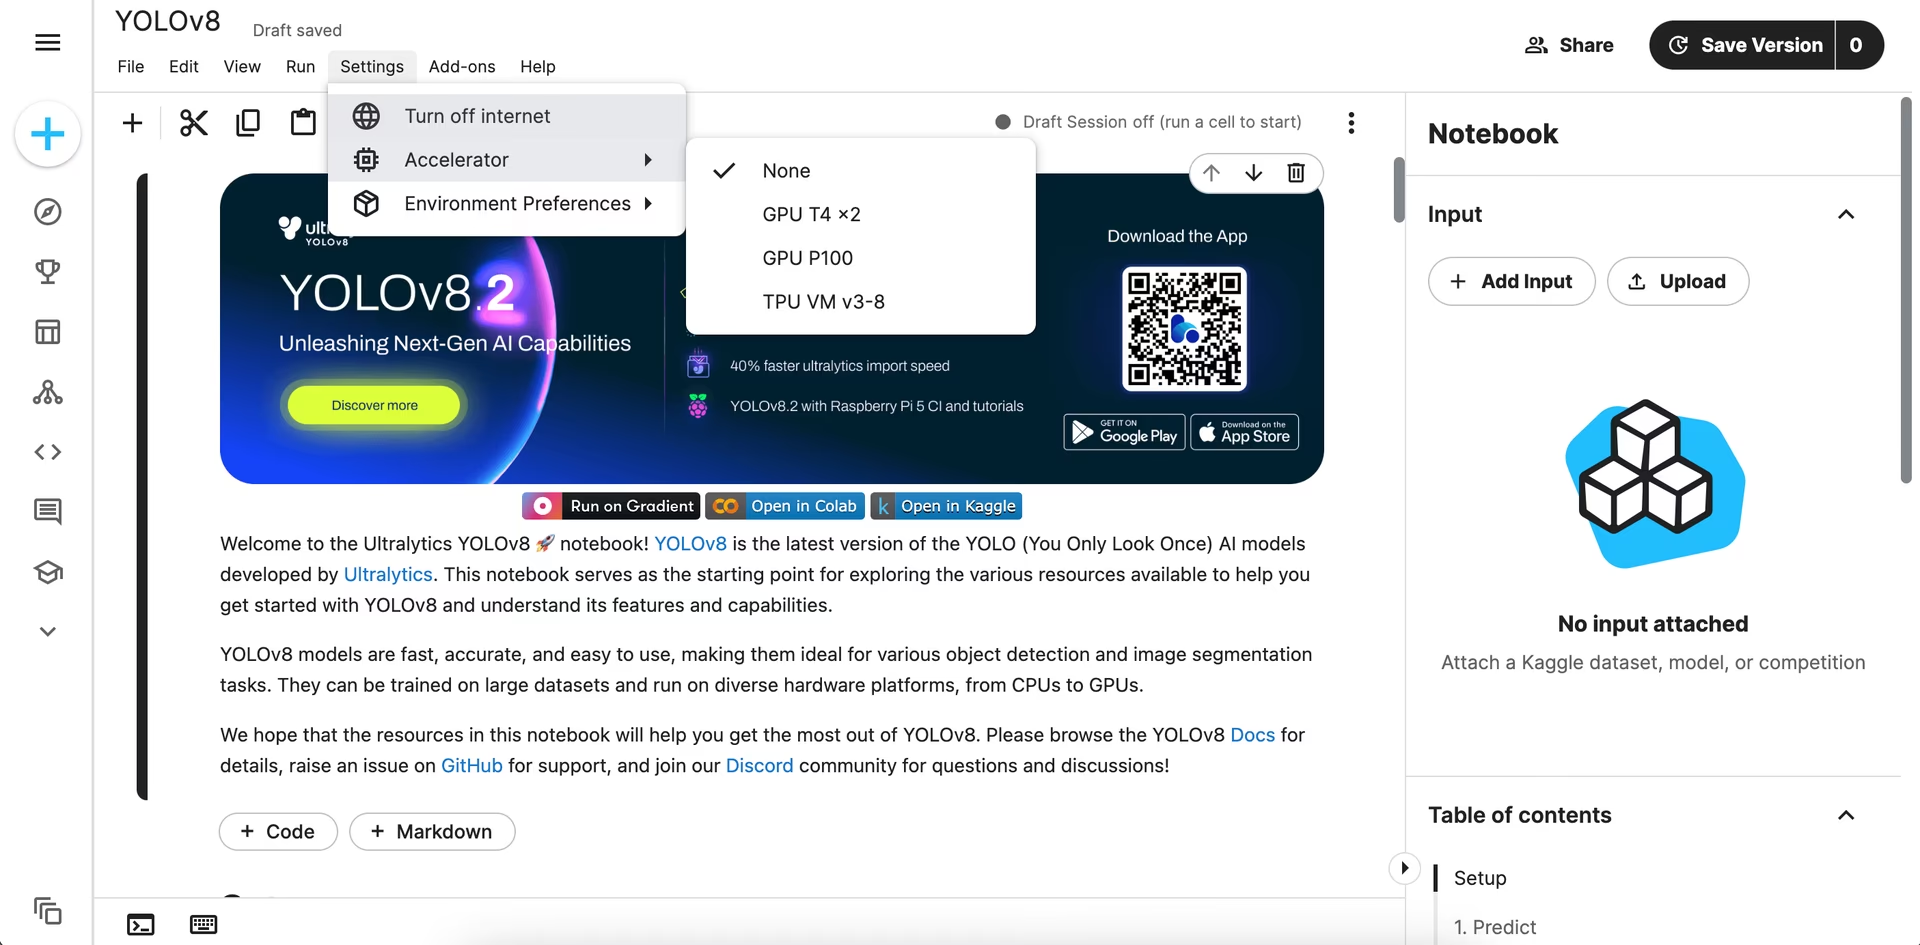
Once you sign in to your Kaggle account, the notebook opens as your own editable copy: select a GPU under the accelerator settings, and run the notebook's cells to begin training your model. For a detailed understanding of the model training process and best practices, refer to our YOLO26 Model Training guide.
Common Issues While Working with Kaggle#
When working with Kaggle, you might encounter some common issues. Here are key points to help you navigate the platform:
- Access to GPUs: In your Kaggle notebooks, you can activate a GPU at any time, with usage allowed for up to 30 hours per week. Kaggle provides the NVIDIA Tesla P100 GPU with 16GB of memory and also offers an NVIDIA T4 x2 option. GPU acceleration makes model training and inference much faster.
- Kaggle Kernels: Kaggle Kernels are free Jupyter notebook servers that can integrate GPUs, allowing you to perform machine learning operations on cloud computers. You don't have to rely on your own computer's CPU, avoiding overload and freeing up your local resources.
- Kaggle Datasets: Kaggle datasets are free to download. However, it's important to check the license for each dataset to understand any usage restrictions. Some datasets may have limitations on academic publications or commercial use. You can download datasets directly to your Kaggle notebook or anywhere else via the Kaggle API.
- Saving and Committing Notebooks: To save and commit a notebook on Kaggle, click "Save Version." This saves the current state of your notebook. Once the background kernel finishes generating the output files, you can access them from the Output tab on the main notebook page.
- Collaboration: Kaggle supports collaboration, but multiple users cannot edit a notebook simultaneously. Collaboration on Kaggle is asynchronous, meaning users can share and work on the same notebook at different times.
- Reverting to a Previous Version: If you need to revert to a previous version of your notebook, open the notebook and click on the three vertical dots in the top right corner to select "View Versions." Find the version you want to revert to, click on the "..." menu next to it, and select "Revert to Version." After the notebook reverts, click "Save Version" to commit the changes.
Key Features of Kaggle#
Here are some of the key features Kaggle offers for data science and machine learning:
- Datasets: Kaggle hosts a large collection of datasets on various topics. You can search and use these datasets in your projects, which is particularly handy for training and testing your YOLO26 models.
- Competitions: Kaggle competitions let data scientists and machine learning practitioners solve real-world problems. Competing helps you improve your skills, learn new techniques, and gain recognition in the community.
- Free Access to TPUs: Kaggle provides free access to TPUs for frameworks that support them. Ultralytics YOLO26 training runs on Kaggle's GPUs or CPU, not on TPUs.
- Integration with GitHub: Kaggle allows you to connect your GitHub repository to upload notebooks and save your work. This integration makes it convenient to manage and access your files.
- Community and Discussions: Kaggle has a large community of data scientists and machine learning practitioners. The discussion forums and shared notebooks are useful resources for learning and troubleshooting. You can find help, share your knowledge, and collaborate with others.
Why Should You Use Kaggle for Your YOLO26 Projects?#
There are multiple platforms for training and evaluating machine learning models. Here are some benefits of using Kaggle for your machine learning projects:
- Public Notebooks: You can make your Kaggle notebooks public, allowing other users to view, vote, fork, and discuss your work. Kaggle promotes collaboration, feedback, and the sharing of ideas, helping you improve your YOLO26 models.
- Comprehensive History of Notebook Commits: Kaggle creates a detailed history of your notebook commits. This allows you to review and track changes over time, making it easier to understand the evolution of your project and revert to previous versions if needed.
- Console Access: Kaggle provides a console, giving you more control over your environment. This feature allows you to perform various tasks directly from the command line.
- Resource Availability: Each notebook editing session on Kaggle is provided with significant resources: 12 hours of execution time for CPU and GPU sessions, 9 hours of execution time for TPU sessions, and 20 gigabytes of auto-saved disk space.
- Notebook Scheduling: Kaggle allows you to schedule your notebooks to run at specific times. You can automate repetitive tasks without manual intervention, such as training your model at regular intervals.
Keep Learning about Kaggle#
If you want to learn more about Kaggle, here are some helpful resources to guide you:
- Kaggle Learn: Discover a variety of free, interactive tutorials on Kaggle Learn. These courses cover essential data science topics with hands-on exercises.
- Getting Started with Kaggle: This guide walks you through the basics of using Kaggle, from joining competitions to creating your first notebook.
- Kaggle Medium Page: Explore tutorials, updates, and community contributions on Kaggle's Medium page.
- Train Ultralytics YOLO Models Using the Kaggle Integration: This blog post shows how to use Kaggle specifically for Ultralytics YOLO models.
Summary#
Kaggle gives your YOLO26 projects free access to GPUs for model training and evaluation, with pre-installed libraries for quick setup. Together, Ultralytics YOLO26 and Kaggle let you develop, train, and deploy computer vision models without expensive hardware.
For more details, visit Kaggle's documentation.
FAQ#
To install Ultralytics YOLO26 on Kaggle:
- Enable Internet: Go to Settings panel and turn ON the Internet toggle
- Install Package: Run
!pip install ultralyticsin a notebook cell - Verify Installation: Run
import ultralytics; ultralytics.checks()to confirm
If you encounter dependency conflicts, try
!pip install --upgrade --force-reinstall ultralyticsor restart the kernel after installation. For detailed troubleshooting, see the Installation section above.Training a YOLO26 model on Kaggle is straightforward. First, open the Ultralytics YOLO26 tutorial notebook in Kaggle. Sign in to your Kaggle account and select a GPU under the accelerator settings. Run the notebook cells to start training. For more detailed steps, refer to our YOLO26 Model Training guide.
Kaggle offers several advantages for training YOLO26 models:
- Free GPU Access: Use GPUs like the NVIDIA Tesla P100 or T4 x2 for up to 30 hours per week.
- Pre-installed Libraries: Libraries like TensorFlow and PyTorch are pre-installed, simplifying the setup.
- Community Collaboration: Engage with a large community of data scientists and machine learning enthusiasts.
- Version Control: Manage different versions of your notebooks and revert to previous versions if needed.
Common issues include:
- Access to GPUs: Ensure you activate a GPU in your notebook settings. Kaggle allows up to 30 hours of GPU usage per week.
- Internet Not Enabled: Make sure to enable internet in the Settings panel before installing packages.
- Dependency Conflicts: Use
!pip install --upgrade --force-reinstall ultralytics. - Dataset Licenses: Check the license of each dataset to understand usage restrictions.
- Saving and Committing Notebooks: Click "Save Version" to save your notebook's state and access output files from the Output tab.
- Collaboration: Kaggle supports asynchronous collaboration; multiple users cannot edit a notebook simultaneously.
For more troubleshooting tips, see the Installation section and our Common Issues guide.
Kaggle offers several features that set it apart from Google Colab:
- Public Notebooks: Share your work with the community for feedback and collaboration.
- Comprehensive History: Track changes over time with a detailed history of notebook commits.
- Resource Availability: Significant resources are provided for each notebook session, including 12 hours of execution time for CPU and GPU sessions.
To revert to a previous version:
- Open the notebook and click on the three vertical dots in the top right corner.
- Select "View Versions."
- Find the version you want to revert to, click on the "..." menu next to it, and select "Revert to Version."
- Click "Save Version" to commit the changes.


Comments3
Ask a question, share your results, or help someone else.
md-jawad-117
Hello, I was using the GPU T4 x2 for training my custom RT-DETR model which is infact was twice as fast compared to P100 GPU with just one of them running.🚀🚀 While the second one was idle. Now when I tried to utilize both GPUs using device=[0, 1] & device=[-1, -1], i received an error which persisted as long as I did not restart the kernel. ⛓️💥⛓️💥
from ultralytics import RTDETR
model = RTDETR('/kaggle/working/rtdr.yaml').load('rtdetr-l.pt')
model.info()
results = model.train(data="/kaggle/working/data.yaml", epochs=30, imgsz=512, optimizer='AdamW', plots=True, batch=32, lr0=0.0001, device=[0,1])
Error Msg: Transferred 725/725 items from pretrained weights DDP: debug command /usr/bin/python3 -m torch.distributed.run --nproc_per_node 2 --master_port 52415 /root/.config/Ultralytics/DDP/_temp_xi8731gh140405119848080.py Traceback (most recent call last): File "/root/.config/Ultralytics/DDP/_temp_xi8731gh140405119848080.py", line 6, in from ultralytics.models.rtdetr.train import RTDETRTrainer ModuleNotFoundError: No module named 'ultralytics' Traceback (most recent call last): File "/root/.config/Ultralytics/DDP/_temp_xi8731gh140405119848080.py", line 6, in from ultralytics.models.rtdetr.train import RTDETRTrainer ModuleNotFoundError: No module named 'ultralytics' E0601 09:54:34.472000 132 torch/distributed/elastic/multiprocessing/api.py:869] failed (exitcode: 1) local_rank: 0 (pid: 134) of binary: /usr/bin/python3 Traceback (most recent call last): File "", line 198, in _run_module_as_main File "", line 88, in _run_code File "/usr/local/lib/python3.11/dist-packages/torch/distributed/run.py", line 922, in main() File "/usr/local/lib/python3.11/dist-packages/torch/distributed/elastic/multiprocessing/errors/init.py", line 355, in wrapper return f(*args, **kwargs) ^^^^^^^^^^^^^^^^^^ File "/usr/local/lib/python3.11/dist-packages/torch/distributed/run.py", line 918, in main run(args) File "/usr/local/lib/python3.11/dist-packages/torch/distributed/run.py", line 909, in run elastic_launch( File "/usr/local/lib/python3.11/dist-packages/torch/distributed/launcher/api.py", line 138, in call return launch_agent(self._config, self._entrypoint, list(args)) ^^^^^^^^^^^^^^^^^^^^^^^^^^^^^^^^^^^^^^^^^^^^^^^^^^^^^^^^ File "/usr/local/lib/python3.11/dist-packages/torch/distributed/launcher/api.py", line 269, in launch_agent raise ChildFailedError( torch.distributed.elastic.multiprocessing.errors.ChildFailedError:
/root/.config/Ultralytics/DDP/_temp_xi8731gh140405119848080.py FAILED
Failures: [1]: time : 2025-06-01_09:54:34 host : 9bca5bb85783 rank : 1 (local_rank: 1) exitcode : 1 (pid: 135) error_file: <N/A> traceback : To enable traceback see: https://pytorch.org/docs/stable/elastic/errors.html
Root Cause (first observed failure): [0]: time : 2025-06-01_09:54:34 host : 9bca5bb85783 rank : 0 (local_rank: 0) exitcode : 1 (pid: 134) error_file: <N/A> traceback : To enable traceback see: https://pytorch.org/docs/stable/elastic/errors.html
CalledProcessError Traceback (most recent call last) /tmp/ipykernel_35/2411087223.py in <cell line: 0>() ----> 1 results = model.train(data="/kaggle/working/data.yaml", epochs=30, imgsz=512, optimizer='AdamW', plots=True, batch=16, lr0=0.0001, device=[0,-1])
/kaggle/working/ultralytics/engine/model.py in train(self, trainer, **kwargs) 795 796 self.trainer.hub_session = self.session # attach optional HUB session --> 797 self.trainer.train() 798 # Update model and cfg after training 799 if RANK in {-1, 0}:
/kaggle/working/ultralytics/engine/trainer.py in train(self) 220 subprocess.run(cmd, check=True) 221 except Exception as e: --> 222 raise e 223 finally: 224 ddp_cleanup(self, str(file))
/kaggle/working/ultralytics/engine/trainer.py in train(self) 218 try: 219 LOGGER.info(f"{colorstr('DDP:')} debug command {' '.join(cmd)}") --> 220 subprocess.run(cmd, check=True) 221 except Exception as e: 222 raise e
/usr/lib/python3.11/subprocess.py in run(input, capture_output, timeout, check, *popenargs, **kwargs) 569 retcode = process.poll() 570 if check and retcode: --> 571 raise CalledProcessError(retcode, process.args, 572 output=stdout, stderr=stderr) 573 return CompletedProcess(process.args, retcode, stdout, stderr)
CalledProcessError: Command '['/usr/bin/python3', '-m', 'torch.distributed.run', '--nproc_per_node', '2', '--master_port', '52415', '/root/.config/Ultralytics/DDP/_temp_xi8731gh140405119848080.py']' returned non-zero exit status 1.
 Glenn JocherUltralytics
Thanks for sharing your multi-GPU training issue with RT-DETR on Kaggle! The error you're encountering is related to DDP (Distributed Data Parallel) not being able to find the Ultralytics module in the spawned processes.
This is a known issue on Kaggle when using multi-GPU training with DDP. The spawned processes don't inherit the current environment properly. Here are a few solutions to try:
- Install Ultralytics system-wide before training:
import subprocess subprocess.run(['pip', 'install', '-U', 'ultralytics'], check=True)- Use single GPU with larger batch size instead:
results = model.train(data="/kaggle/working/data.yaml", epochs=30, imgsz=512, optimizer='AdamW', plots=True, batch=64, lr0=0.0001, device=0)- Try using device='cpu' to verify your setup works, then switch back to single GPU.
Unfortunately, Kaggle's multi-GPU DDP setup can be unreliable due to environment isolation issues. Since you mentioned T4 x2 was already twice as fast as P100 with just one GPU active, you might get better results focusing on optimizing single-GPU training with larger batch sizes or mixed precision training.
Have you tried increasing the batch size on a single T4 GPU to maximize utilization?