Link to this sectionProjects#
Ultralytics Platform projects provide an effective solution for organizing and managing your models. Group related models together to facilitate easier management, comparison, and development.
graph TB
    P[Project]:::start --> M1[Model 1]:::proc
    P --> M2[Model 2]:::proc
    P --> M3[Model 3]:::proc
    M1 --> C[Charts Dashboard]:::out
    M2 --> C
    M3 --> C
    M1 --> T[Comparison Table]:::out
    M2 --> T
    M3 --> T

    classDef start fill:#4CAF50,color:#fff
    classDef proc fill:#2196F3,color:#fff
    classDef out fill:#9C27B0,color:#fff
Link to this sectionCreate Project#
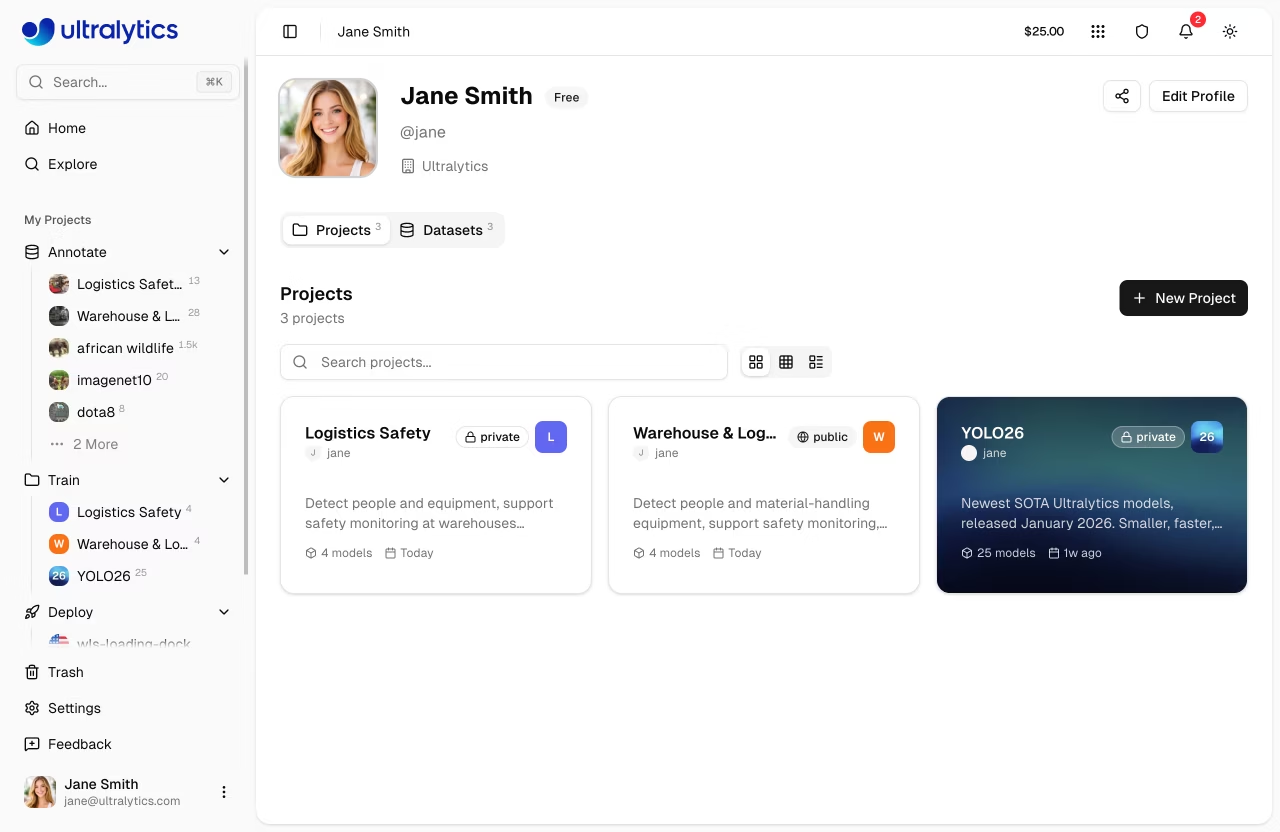
Navigate to Projects in the sidebar and click New Project.

Quick Create
You can also create a project from the Home page quick actions.
Enter your project details:
- Name: A descriptive name for your project (a random name is auto-generated)
- Description: Optional notes about the project purpose
- Visibility: Public (anyone can view) or Private (only you and your team members can access). New projects default to Public; Enterprise workspaces default new projects to Private with the Ultralytics-Enterprise license.
- License: Optional license for your project (AGPL-3.0, Apache-2.0, MIT, GPL-3.0, BSD-3-Clause, LGPL-3.0, MPL-2.0, EUPL-1.1, Unlicense, Ultralytics-Enterprise, and more). The Ultralytics-Enterprise license is for commercial use without AGPL requirements and is available with an Enterprise plan — see Ultralytics Licensing.
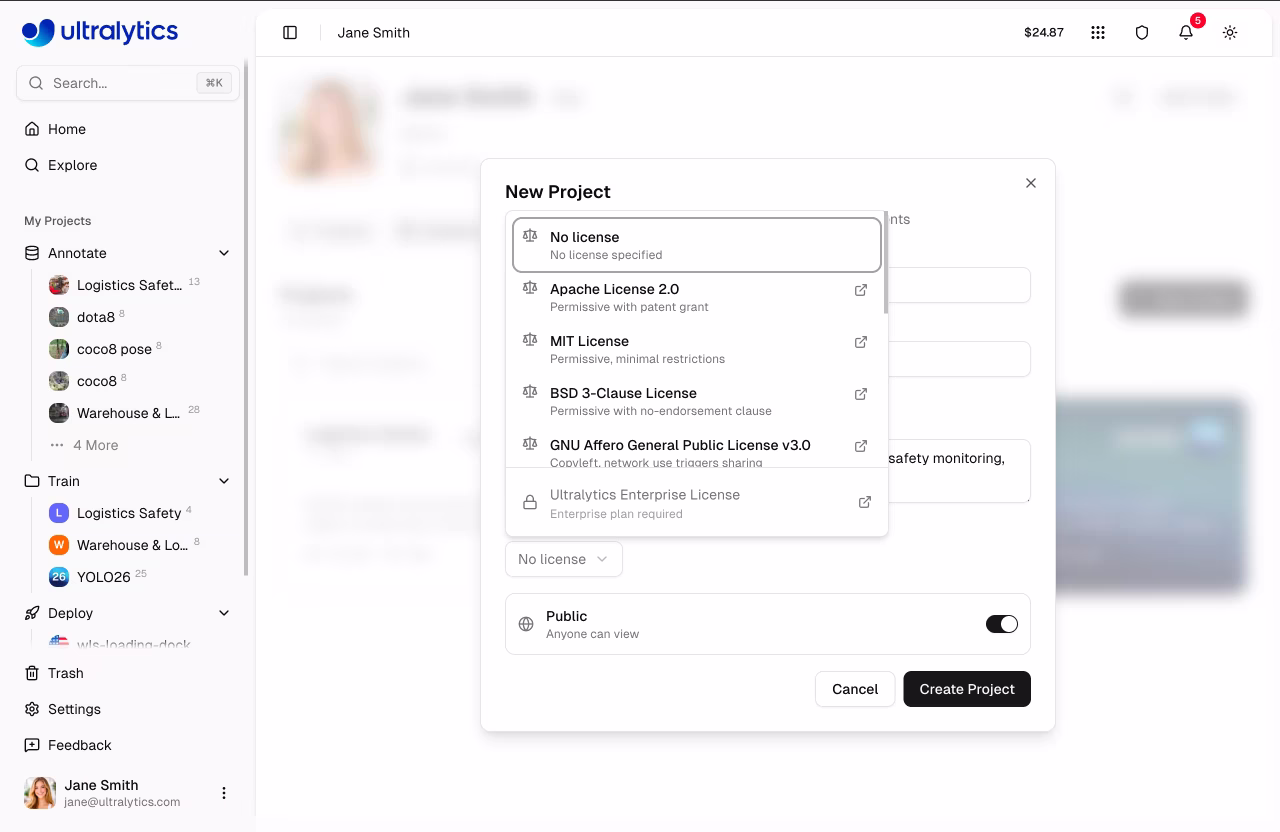
Click Create Project to finalize. Your new project appears in the Projects list and sidebar.
Link to this sectionProject Page#
The project page has two main areas:
| Area | Description |
|---|---|
| Models Sidebar | Resizable list of all models in the project with search, status filters, sort options, and checkboxes for selection |
| Main Panel | Charts dashboard or comparison table (toggle between views) |
Link to this sectionProject Header#
The header displays:
- Project icon (customizable color, letter, or uploaded image)
- Editable name (click to rename; slug auto-updates)
- License badge
- Model count, completed/running/failed counts, total size
- Clone count and last updated timestamp
- Description (click to edit)
Action buttons in the header:
| Button | Description |
|---|---|
| New Model | Opens the training dialog |
| Clone | Clone project and all models (public projects) |
| Star | Star/unstar the project |
| Share | Social sharing for public projects |
| Refresh | Refresh project data |
| Delete | Move project to trash |
Link to this sectionView Modes#
Toggle between three view modes using the view controls:
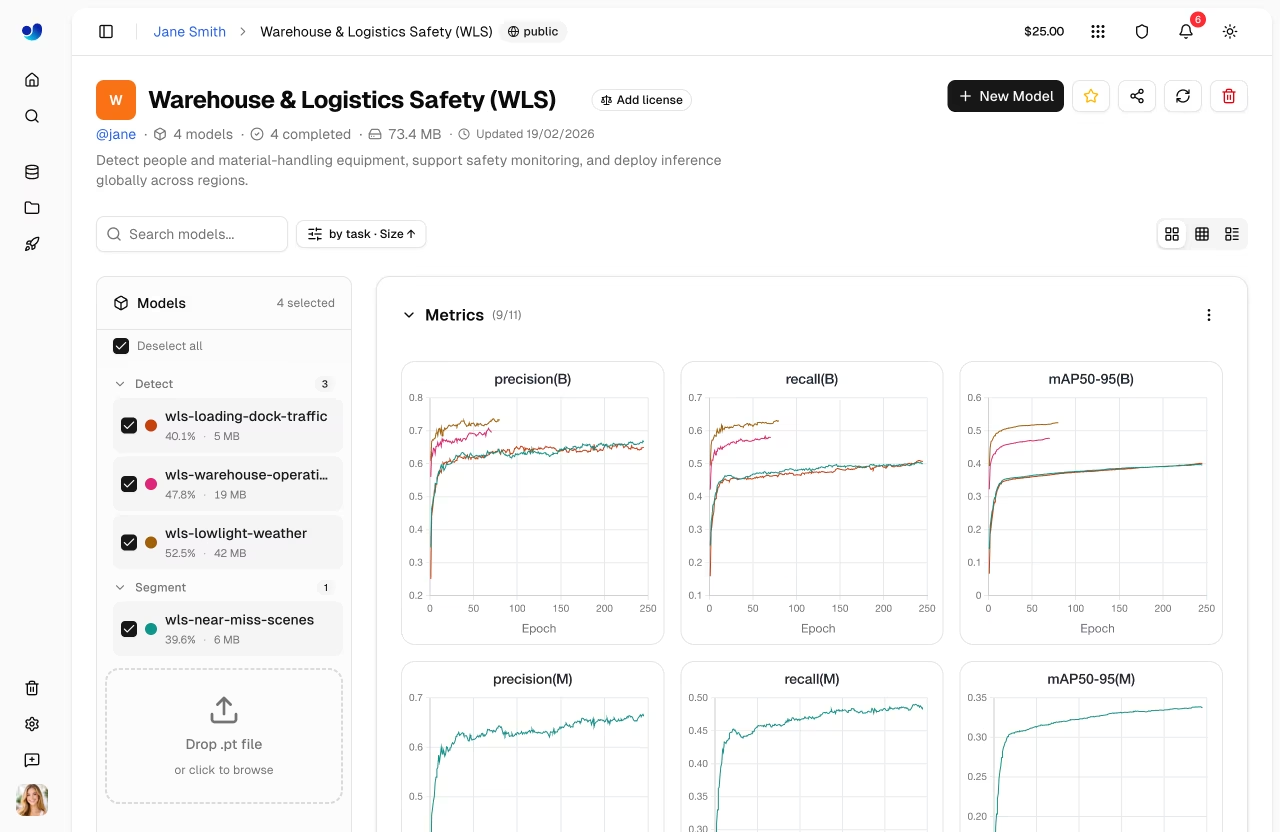
- Cards: Full-width models sidebar with the Charts dashboard on the right — loss curves and metric comparisons for checked models.
- Compact: Condensed models sidebar with the Charts dashboard on the right — more vertical room for models in projects with many experiments.
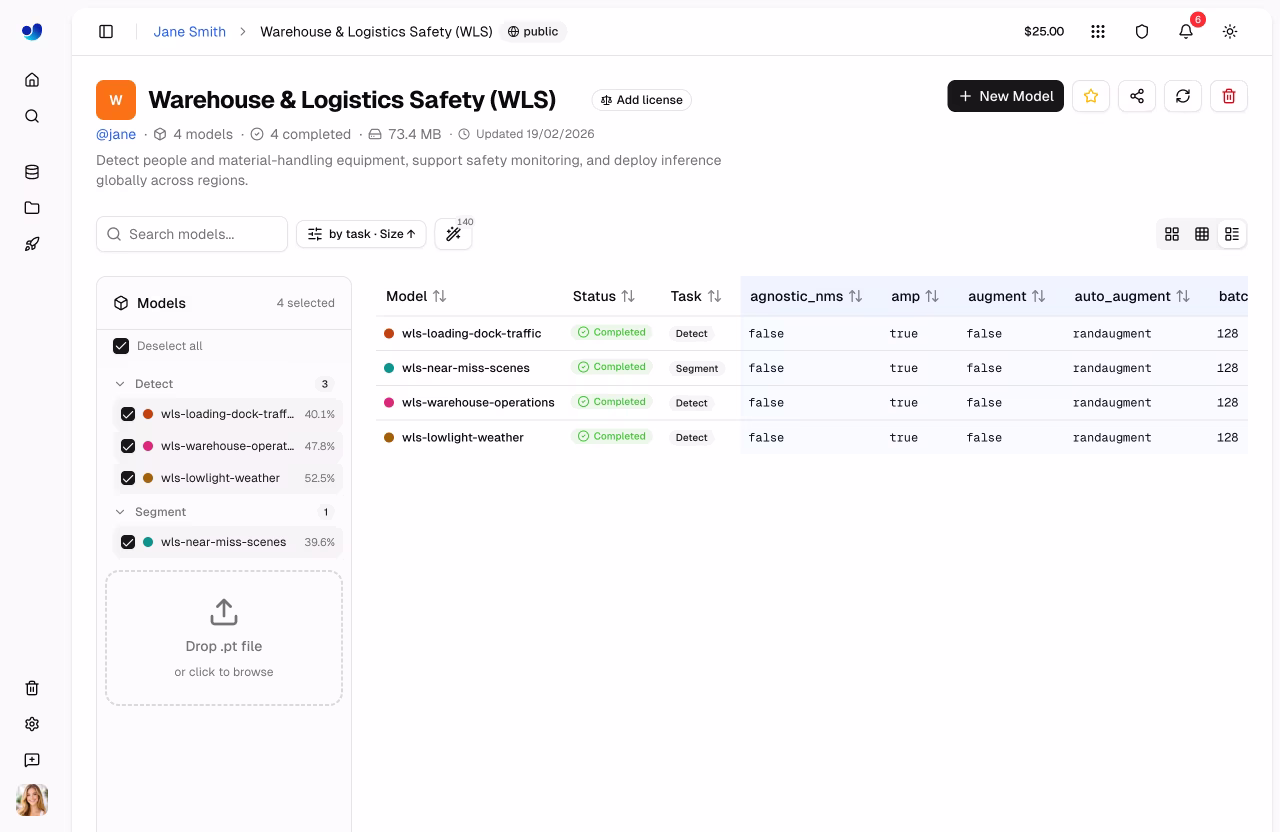
- Table: Comparison table showing training arguments and final metrics side-by-side. Enable Diff to highlight only the columns where values differ across models.
Link to this sectionModels Sidebar#
The resizable sidebar lists all models in the project:
- Checkboxes to select which models appear in charts/table
- Search to filter models by name
- View options for status filter (All, Completed, Untrained, Running, Starting, Failed), grouping by task, and sort order
- Drag and drop
.ptfiles directly onto the sidebar to upload models (model upload details) - Training progress shown for running models (epoch count and progress bar)
Click any model to open its model page.
Link to this sectionProject Icon#
Customize your project icon:
- Click the icon next to the project name
- Choose a color and letter, or upload a custom image
- Changes save automatically
Link to this sectionVisibility Settings#
Control who can see your project:
| Setting | Description |
|---|---|
| Public | Anyone can view on Explore page |
| Private | Only you and your team members |
Link to this sectionShare a Project#
There is no per-project collaborator invite. To share a project with others, use either of these mechanisms:
- Public visibility lets anyone view a project on Explore.
- Teams create a shared workspace where all resources (projects, datasets, models, deployments) are accessible to team members with role-based permissions. Use Teams for ongoing collaboration.
Link to this sectionClone Project#
Clone a public project to your own account:
- Visit the public project page
- Click Clone Project
- The project and its completed models are copied to your workspace; you choose the clone's visibility in the clone dialog
Cloned projects inherit the source project's visibility by default (so cloning a public project creates a public clone), and you can choose Public or Private in the clone dialog before confirming. Enterprise workspaces default new clones to private. The clone count is displayed on the original project. If the original has a copyleft license (e.g., AGPL-3.0), the clone inherits and locks that license.
Link to this sectionCompare Models#
Link to this sectionCharts Dashboard#
Compare model performance using the charts dashboard:
- Select models in the sidebar using checkboxes
- View overlaid metric curves grouped by type (metrics, train loss, validation loss, learning rate)
- Drag charts to rearrange, resize by dragging edges
- Hover to see exact values, click legend items to hide/show models, click a model line to navigate to that model
Available chart groups:
| Group | Charts |
|---|---|
| Metrics | mAP50, mAP50-95, precision, recall |
| Loss | train/box_loss, train/cls_loss, train/dfl_loss, val/box_loss, val/cls_loss, val/dfl_loss |
| Learning Rate | lr/pg0, lr/pg1, lr/pg2 |
- Hover to see exact values
- Click legend items to hide/show models
- Drag to zoom into specific regions
- Click a model line to navigate to that model's page
- Rearrange and resize charts; layout persists across sessions
Link to this sectionComparison Table#
Switch to table view for side-by-side comparison of training arguments and final metrics:
- Click the Table view mode toggle
- See all selected models as rows with training args and metrics as columns
- Use the Diff button to highlight only columns where values differ across models
Link to this sectionUpload Models#
Upload existing .pt model files:
- Drag and drop files onto the project page or models sidebar
- Multiple files can be uploaded simultaneously (up to 3 concurrent uploads)
- Model metadata (task, architecture, class names, training results) is parsed automatically from the
.ptfile - Charts update instantly from locally parsed data while the upload completes in the background
Only PyTorch .pt files from Ultralytics YOLO training are supported. The Platform parses embedded metadata including training results, arguments, task type, and class names. See Models for format details.
Link to this sectionEdit Project#
Update project name, description, or settings:
- Click the project name to edit it inline
- Click the description to edit it inline
- Click the icon to customize it
- Click the license badge to change the license
Link to this sectionDelete Project#
Remove a project you no longer need:
- Click the Delete button (trash icon) in the header
- Confirm deletion
Deleting a project also deletes all models inside it. This action moves items to Trash where they can be restored within 30 days.
Link to this sectionFAQ#
Link to this sectionHow many models can a project contain?#
There's no hard limit on models per project. However, for better organization, we recommend:
- Group related experiments (same dataset/task)
- Archive old experiments
- Use meaningful project names
Link to this sectionCan I restore a deleted project?#
Yes, deleted projects go to Trash and can be restored within 30 days:
- Go to Settings > Trash
- Find the project
- Click Restore
Link to this sectionCan I transfer models between projects?#
Yes, you can clone a model to a different project using the clone model dialog from the model page.