Hızlı Başlangıç Kılavuzu: Ultralytics YOLO26 ile Seeed Studio reCamera
reCamera, Ultralytics tarafından her yıl düzenlenen hibrit etkinlik YOLO Vision 2024 (YV24) kapsamında yapay zekâ topluluğuna tanıtıldı. Öncelikli olarak uç yapay zekâ uygulamaları için tasarlanmış olup cihaz üzerinde yapay zekâ işleme ve kolay dağıtım sunar.
Çeşitli donanım yapılandırmalarını ve açık kaynaklı kaynakları desteklemesi sayesinde, uçta bilgisayarlı görü çözümleri prototiplemek ve dağıtmak için oldukça uygundur.
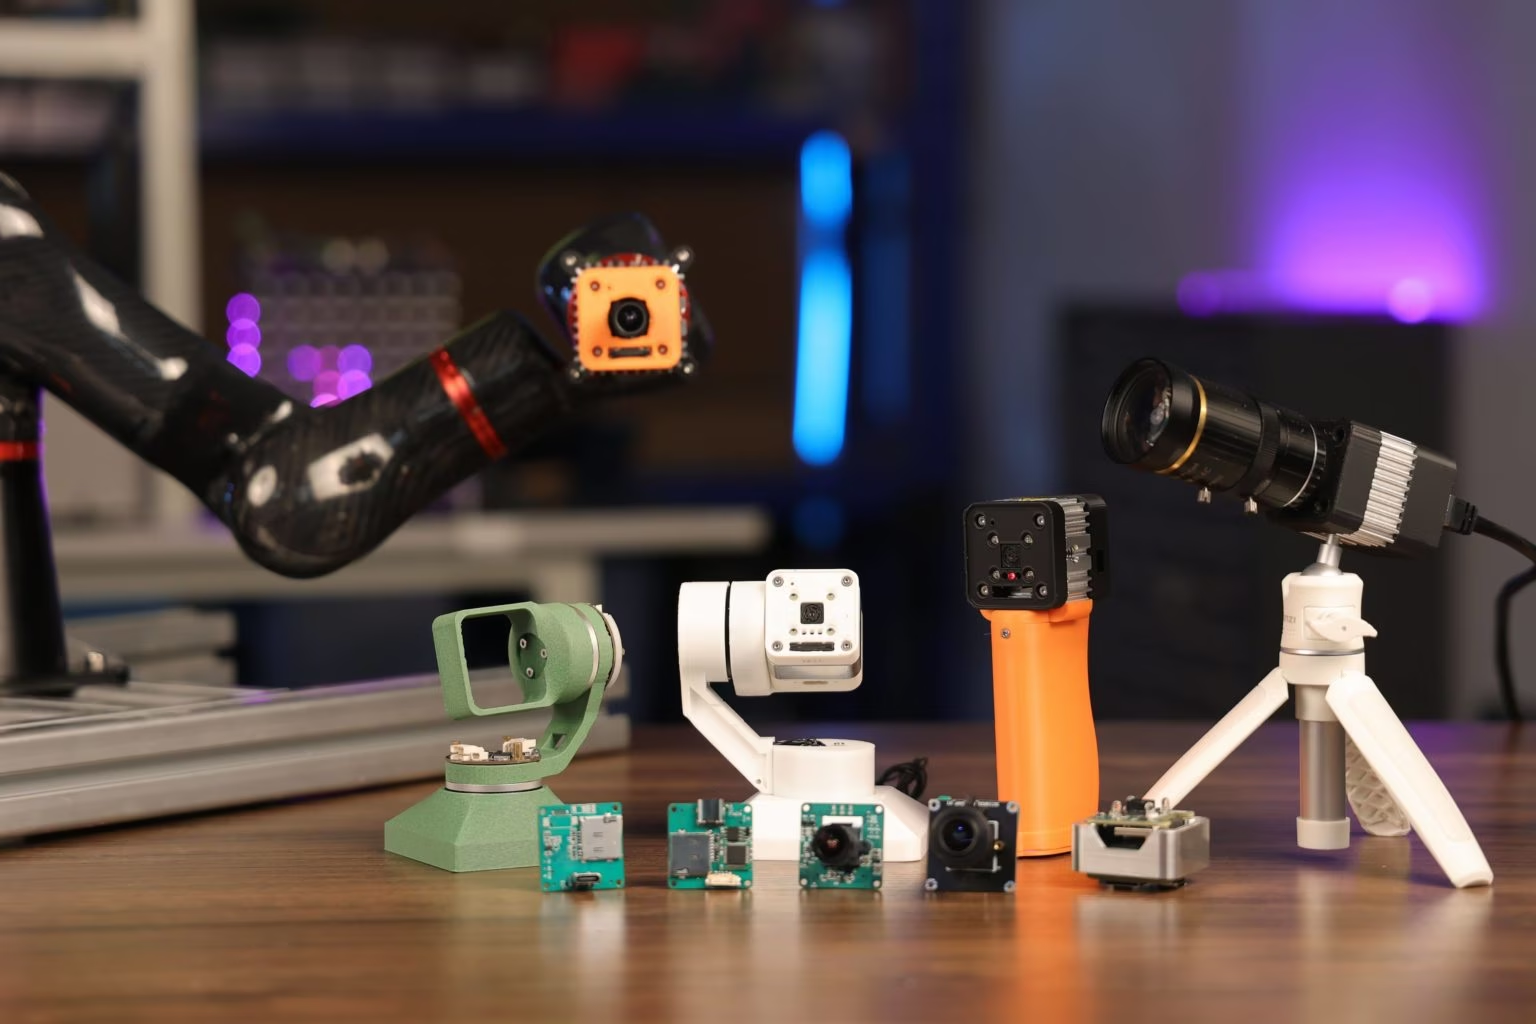
Neden reCamera'yı Seçmelisin?#
reCamera serisi, geliştiricilerin ihtiyaçlarına göre uyarlanmış uç yapay zekâ uygulamaları için özel olarak tasarlanmıştır. Temel özellikleri şunlardır:
-
RISC-V Tabanlı Performans: Temelinde RISC-V mimarisiyle geliştirilmiş SG200X işlemci bulunur ve uç yapay zekâ görevleri için verimli performans sunar. Saniyede 1 trilyon işlem (1 TOPS) gerçekleştirebilme kapasitesiyle gerçek zamanlı nesne algılama gibi görevleri yerine getirir.
-
Optimize Edilmiş Video Teknolojileri: Kaliteden ödün vermeden depolama ve bant genişliği gereksinimlerini azaltmak için H.264 ve H.265 dahil gelişmiş video sıkıştırma standartlarını destekler. HDR görüntüleme, 3D gürültü azaltma ve lens düzeltme gibi özellikler, zorlu ortamlarda bile görüntü kalitesini korur.
-
Enerji Verimli Çift İşlem: SG200X karmaşık yapay zekâ görevlerini yürütürken daha küçük, 8 bitlik bir mikrodenetleyici basit işlemleri yöneterek güç tasarrufu sağlar. Böylece reCamera, pille çalışan veya düşük güç gerektiren kurulumlar için ideal hâle gelir.
-
Modüler ve Yükseltilebilir Tasarım: reCamera, üç ana bileşenden oluşan modüler bir yapıyla tasarlanmıştır: çekirdek kartı, sensör kartı ve taban kartı. Bu tasarım, projeler geliştikçe geliştiricilerin bileşenleri değiştirmesine veya yükseltmesine olanak tanır.
reCamera'nın Hızlı Donanım Kurulumu#
reCamera Başlangıç sayfasını izle ve cihazını (ör. reCamera 2002 Series, Gimbal veya HQ POE) seçerek cihazı ilk kez kurmak, ağa bağlamak ve algılama sonuçlarını hızlıca önizlemek için Node-RED web arayüzüne erişmek gibi işlemleri anlatan Hızlı Başlangıç Kılavuzu'nu aç.
Önceden Yüklenmiş YOLO Modellerini Kullanarak Çıkarım#
reCamera, önceden yüklenmiş dört Ultralytics YOLO modeli ile gelir ve istediğin modeli Node-RED panosundan seçebilirsin.
Adım 1: reCamera'yı bir ağa bağladıysan, Node-RED panosunu açmak için reCamera'nın IP adresini bir web tarayıcısına gir. reCamera'yı USB üzerinden bir bilgisayara bağladıysan 192.168.42.1 girebilirsin. Algılama modeli varsayılan olarak yüklenir.
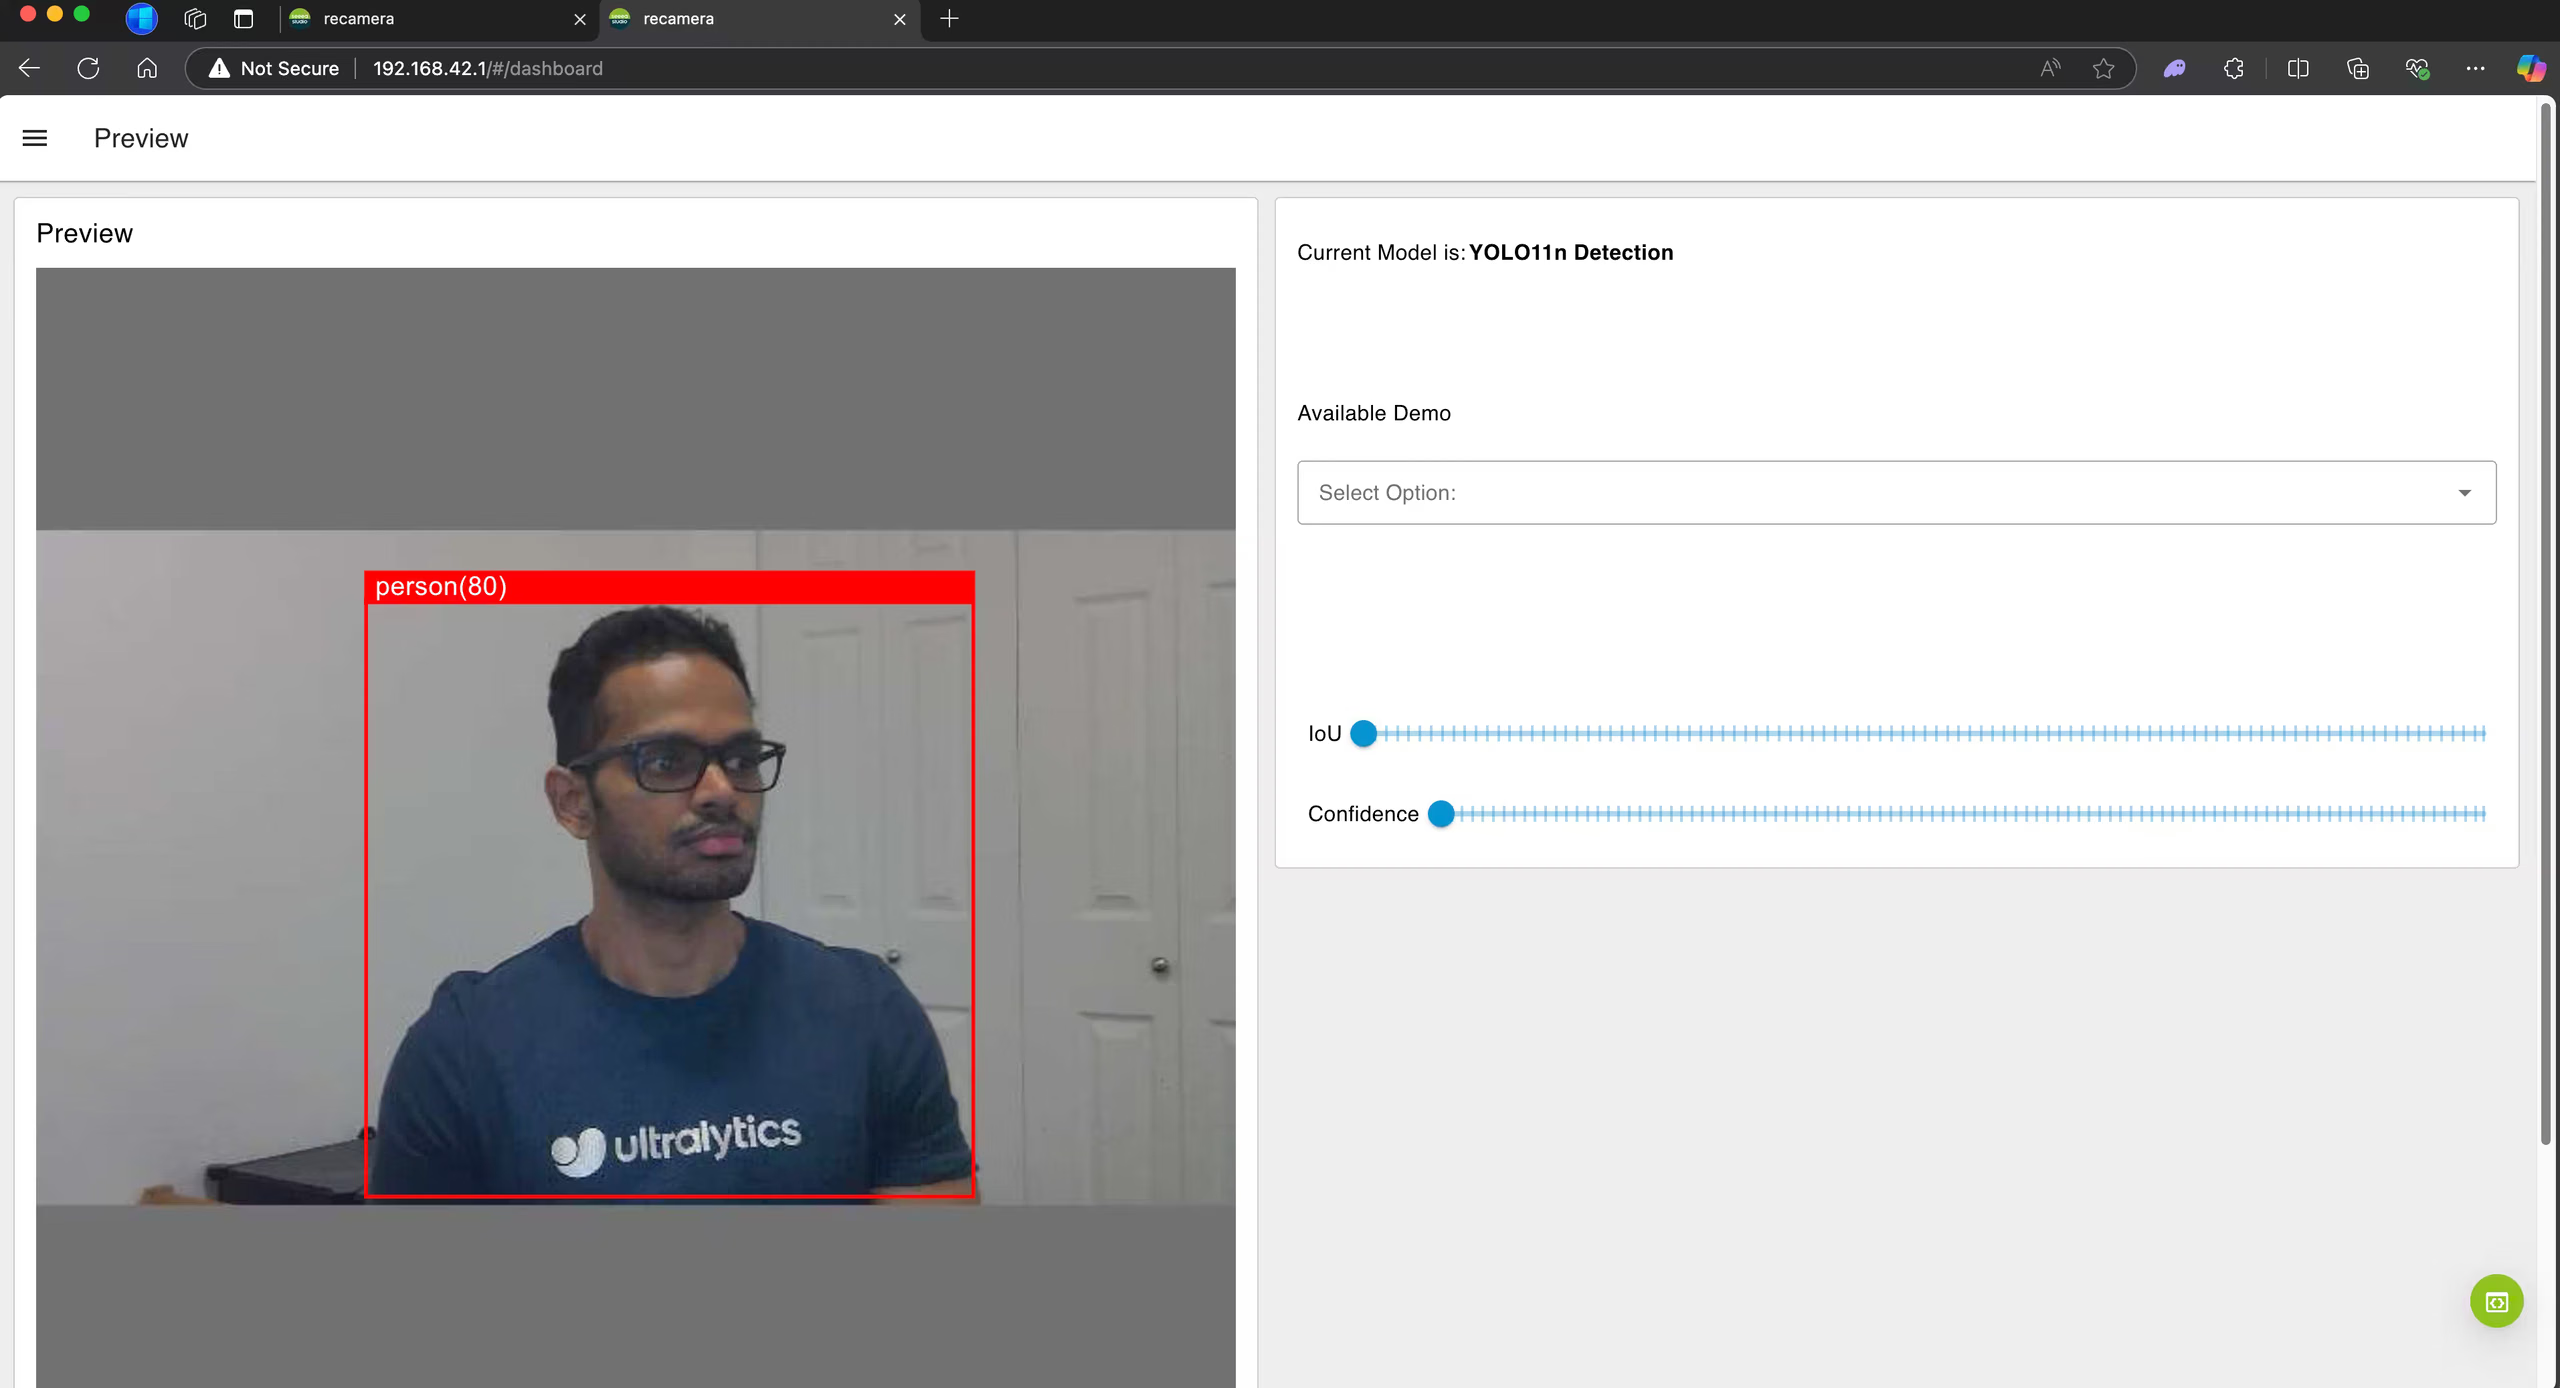
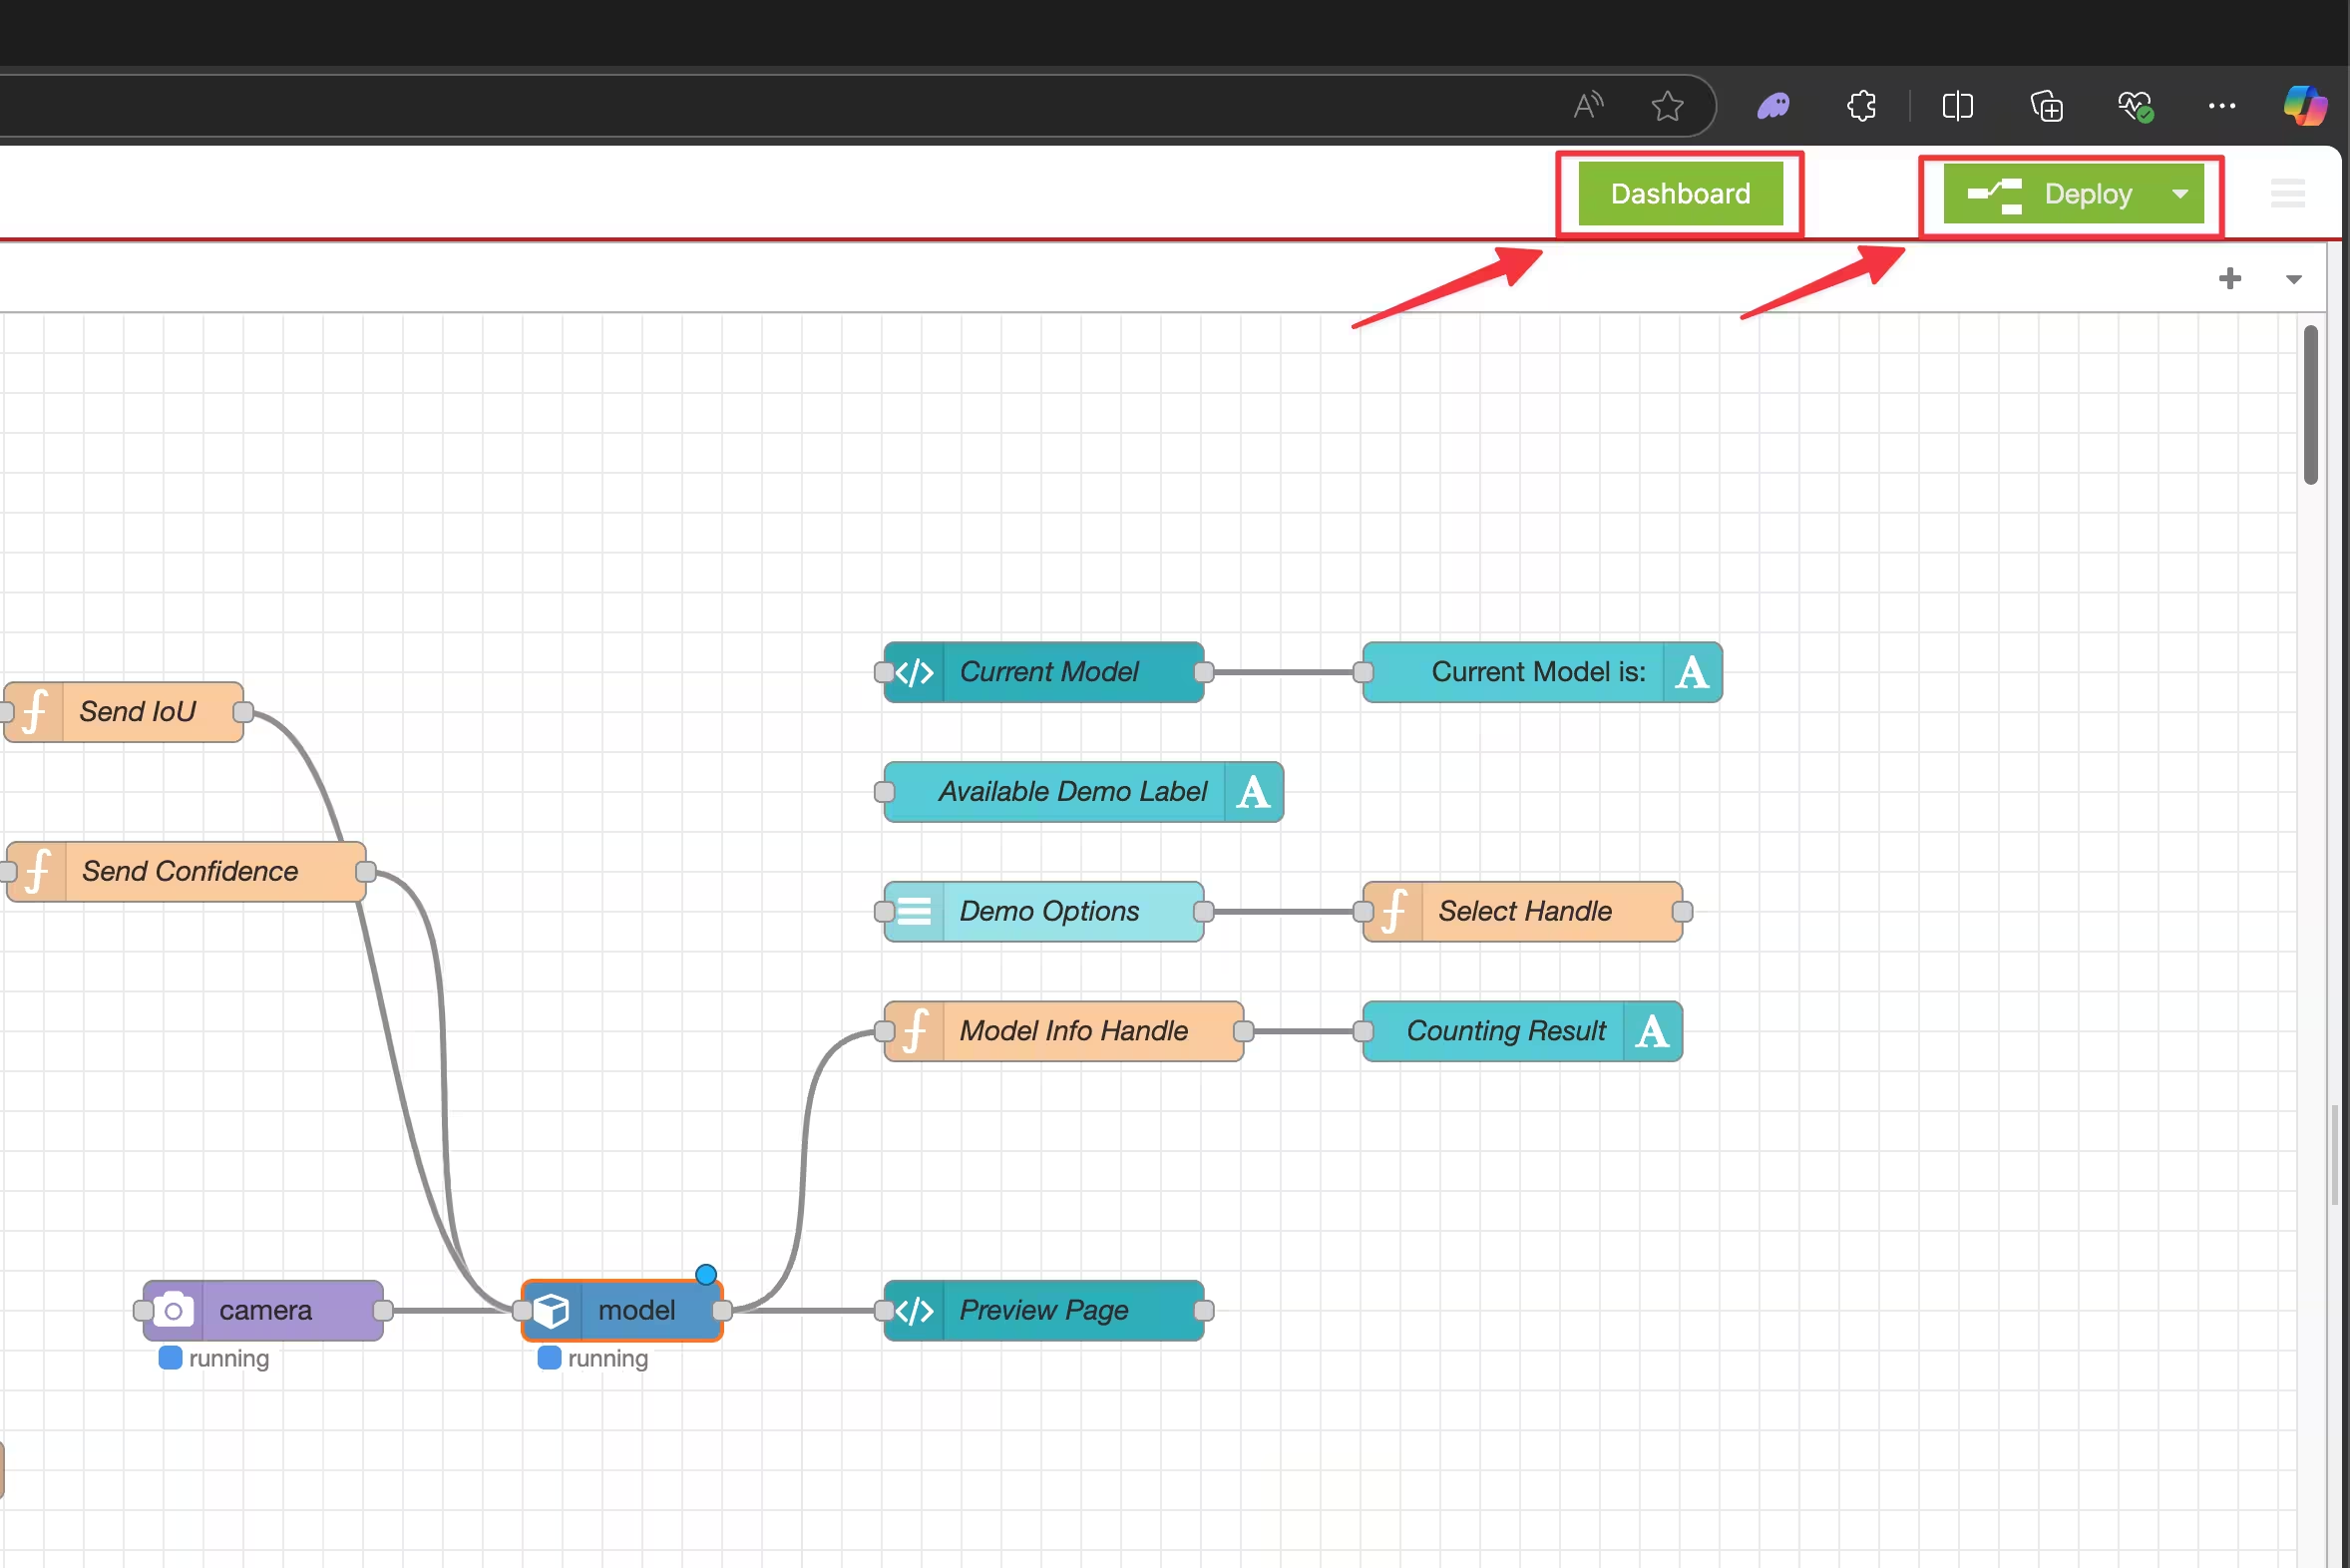
Adım 2: Node-RED akış düzenleyicisine erişmek için sağ alt köşedeki yeşil daireye tıkla.
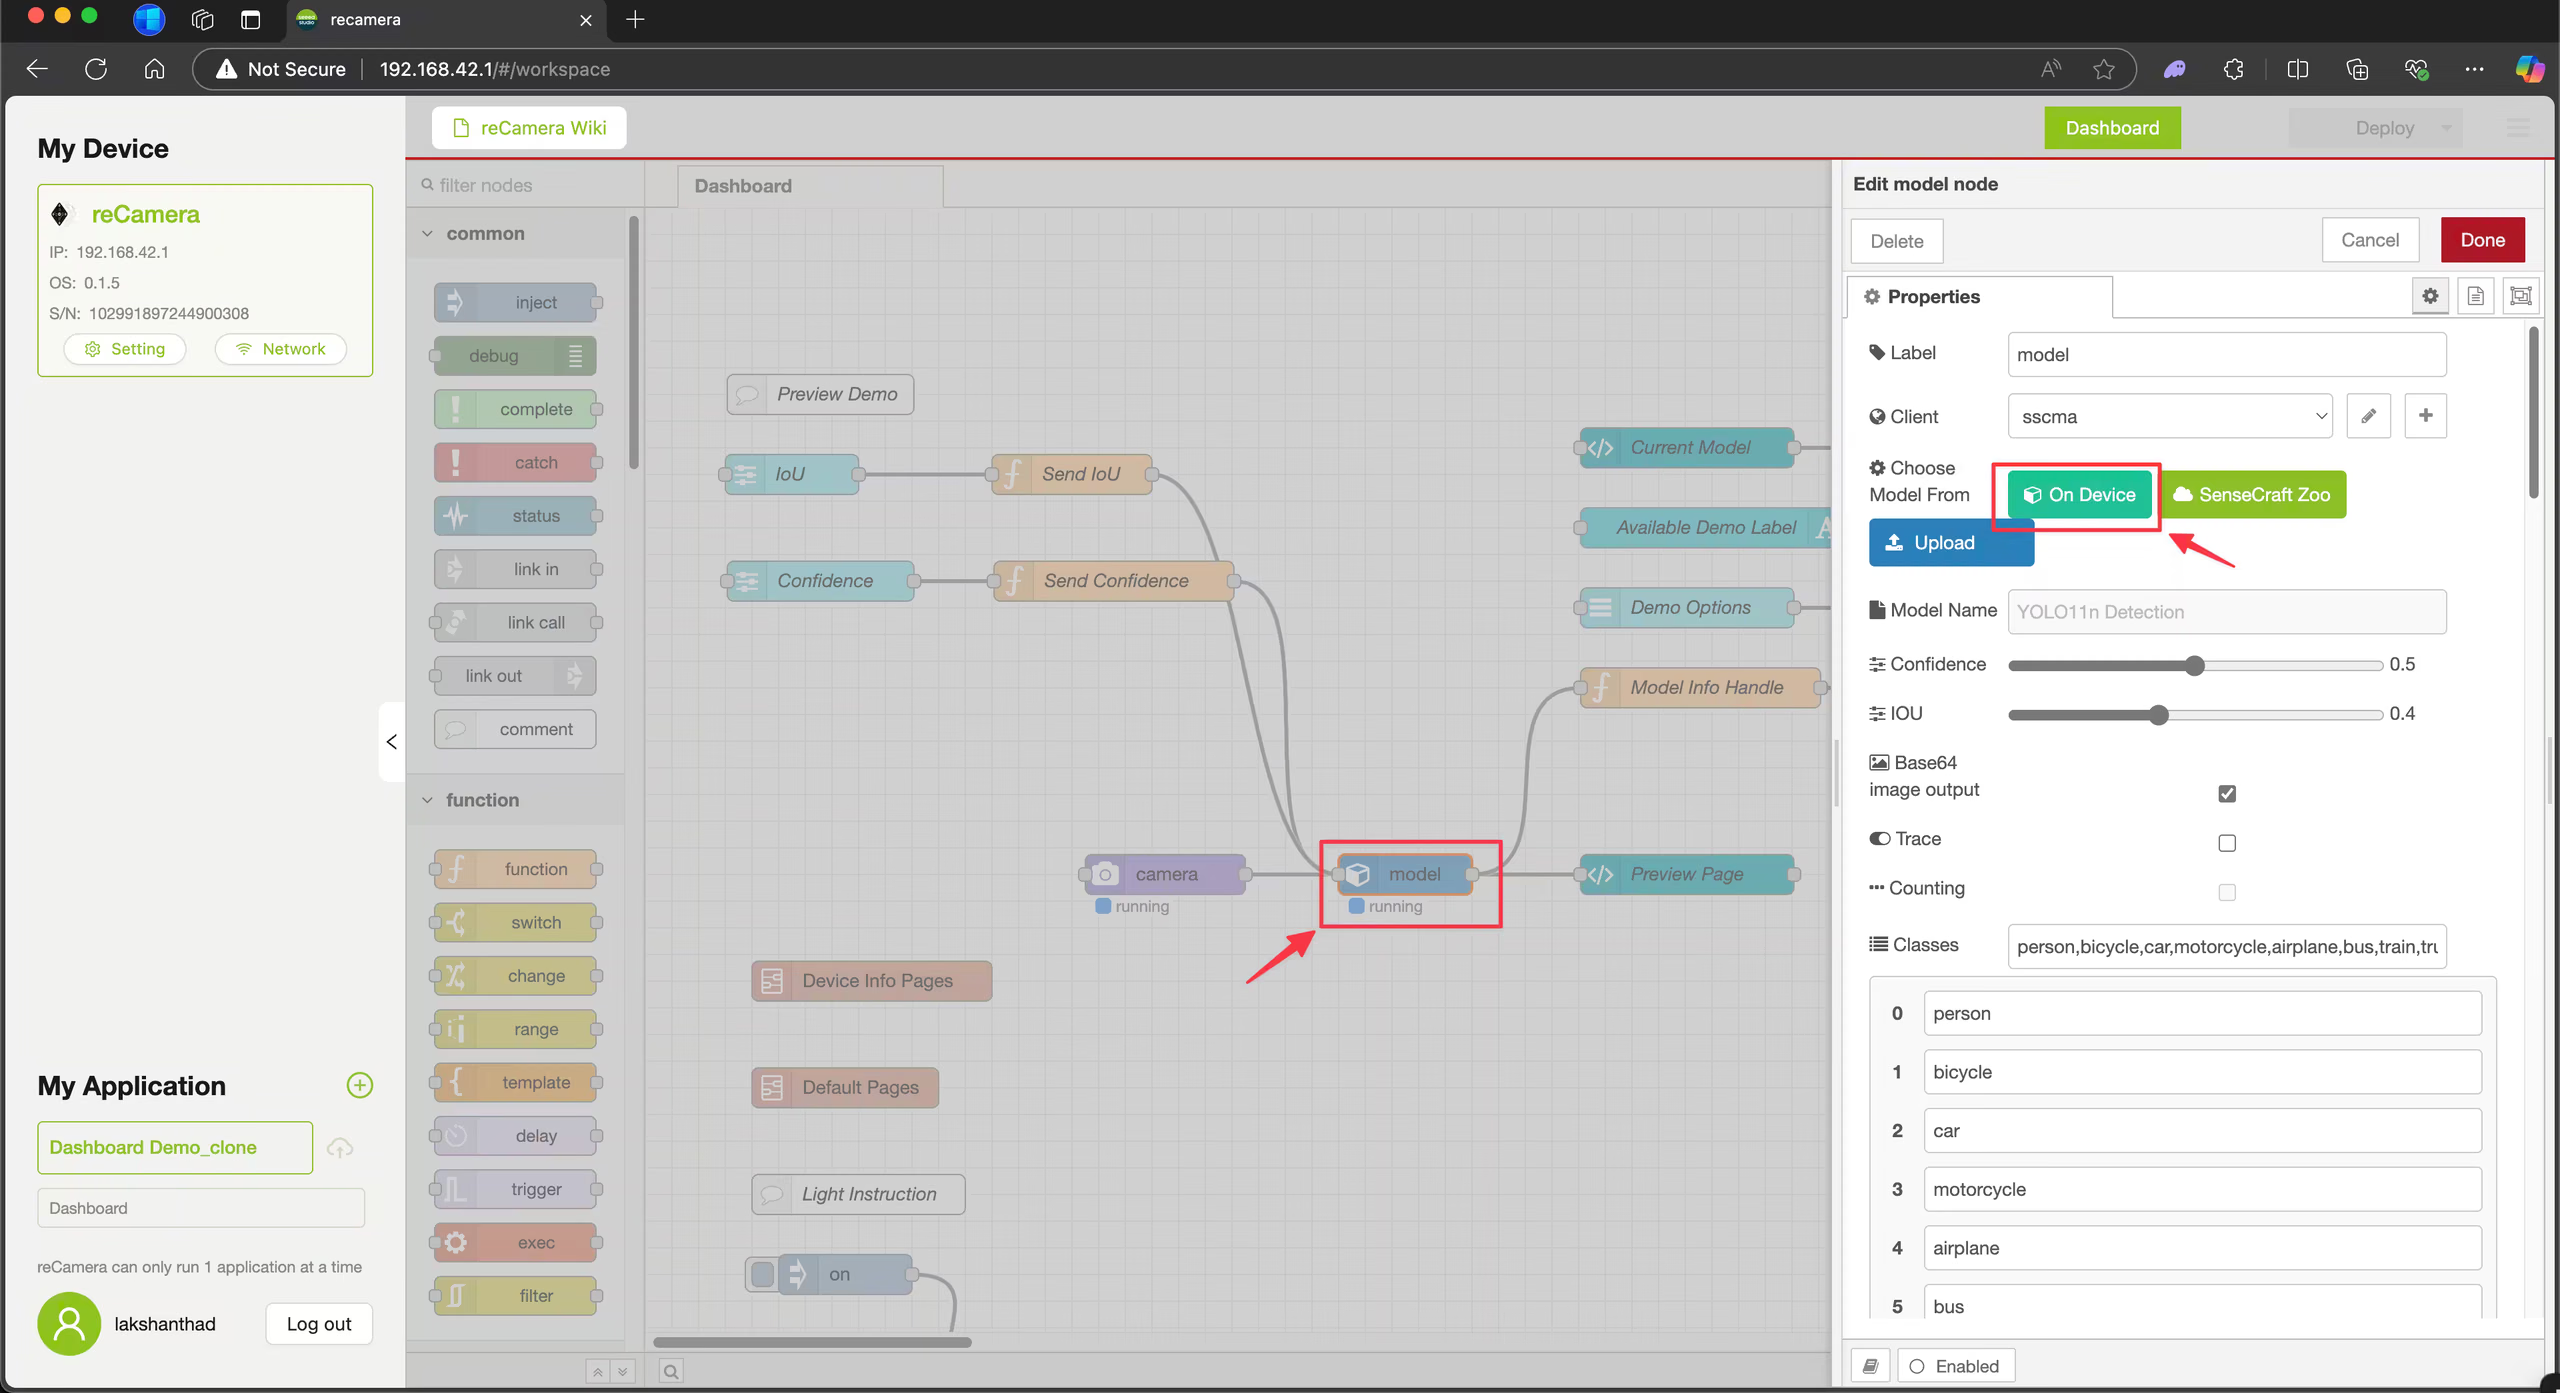
Adım 3: model düğümüne tıkla ve On Device öğesine tıkla.
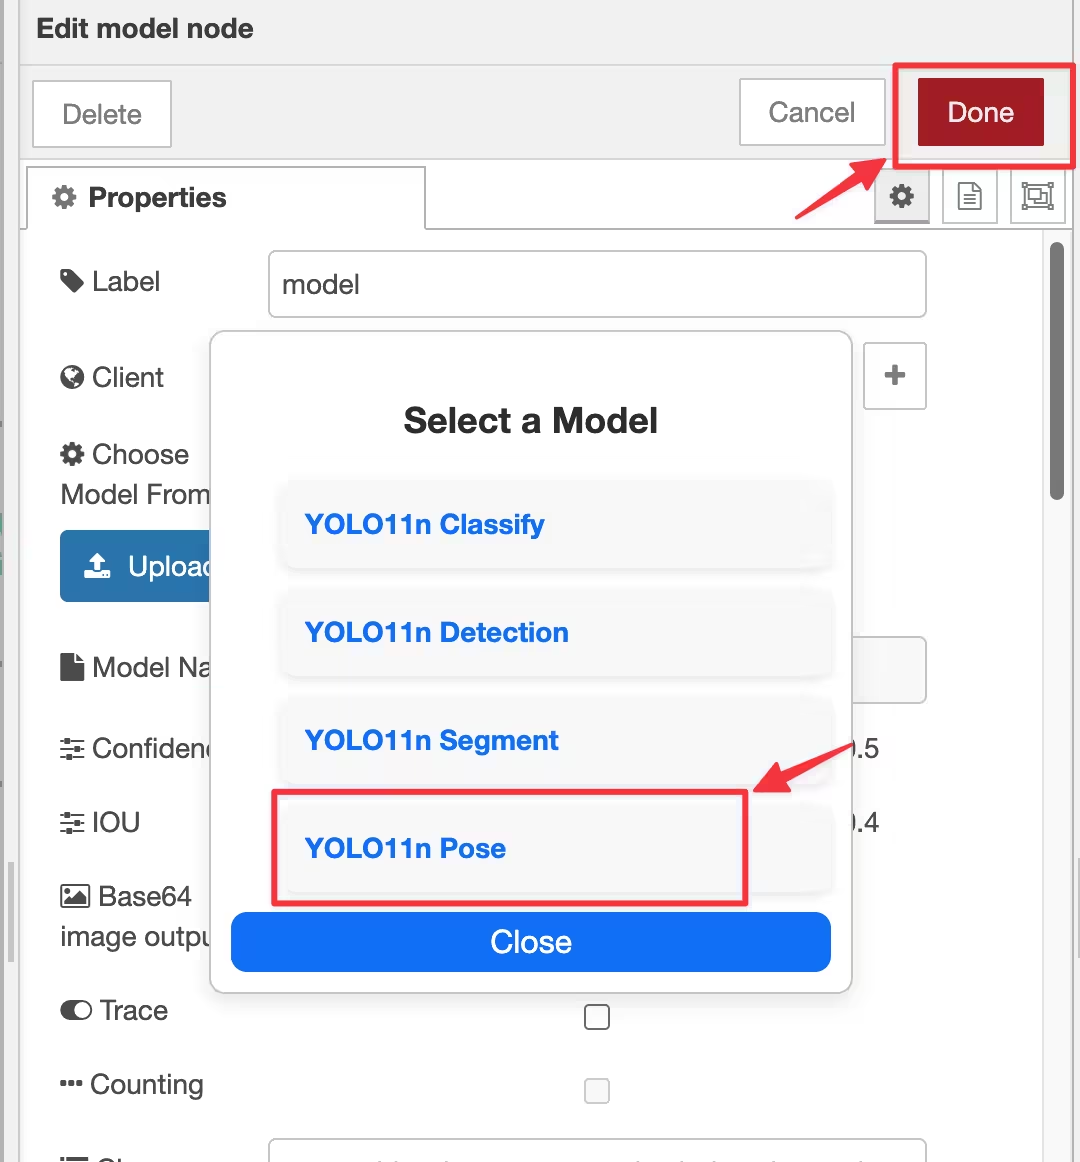
Adım 4: Önceden yüklenmiş dört modelden birini seç ve Done öğesine tıkla. Bu örnekte poz modeli seçilmiştir.
Adım 5: Deploy öğesine tıkla ve dağıtım tamamlandığında Dashboard öğesine tıkla.
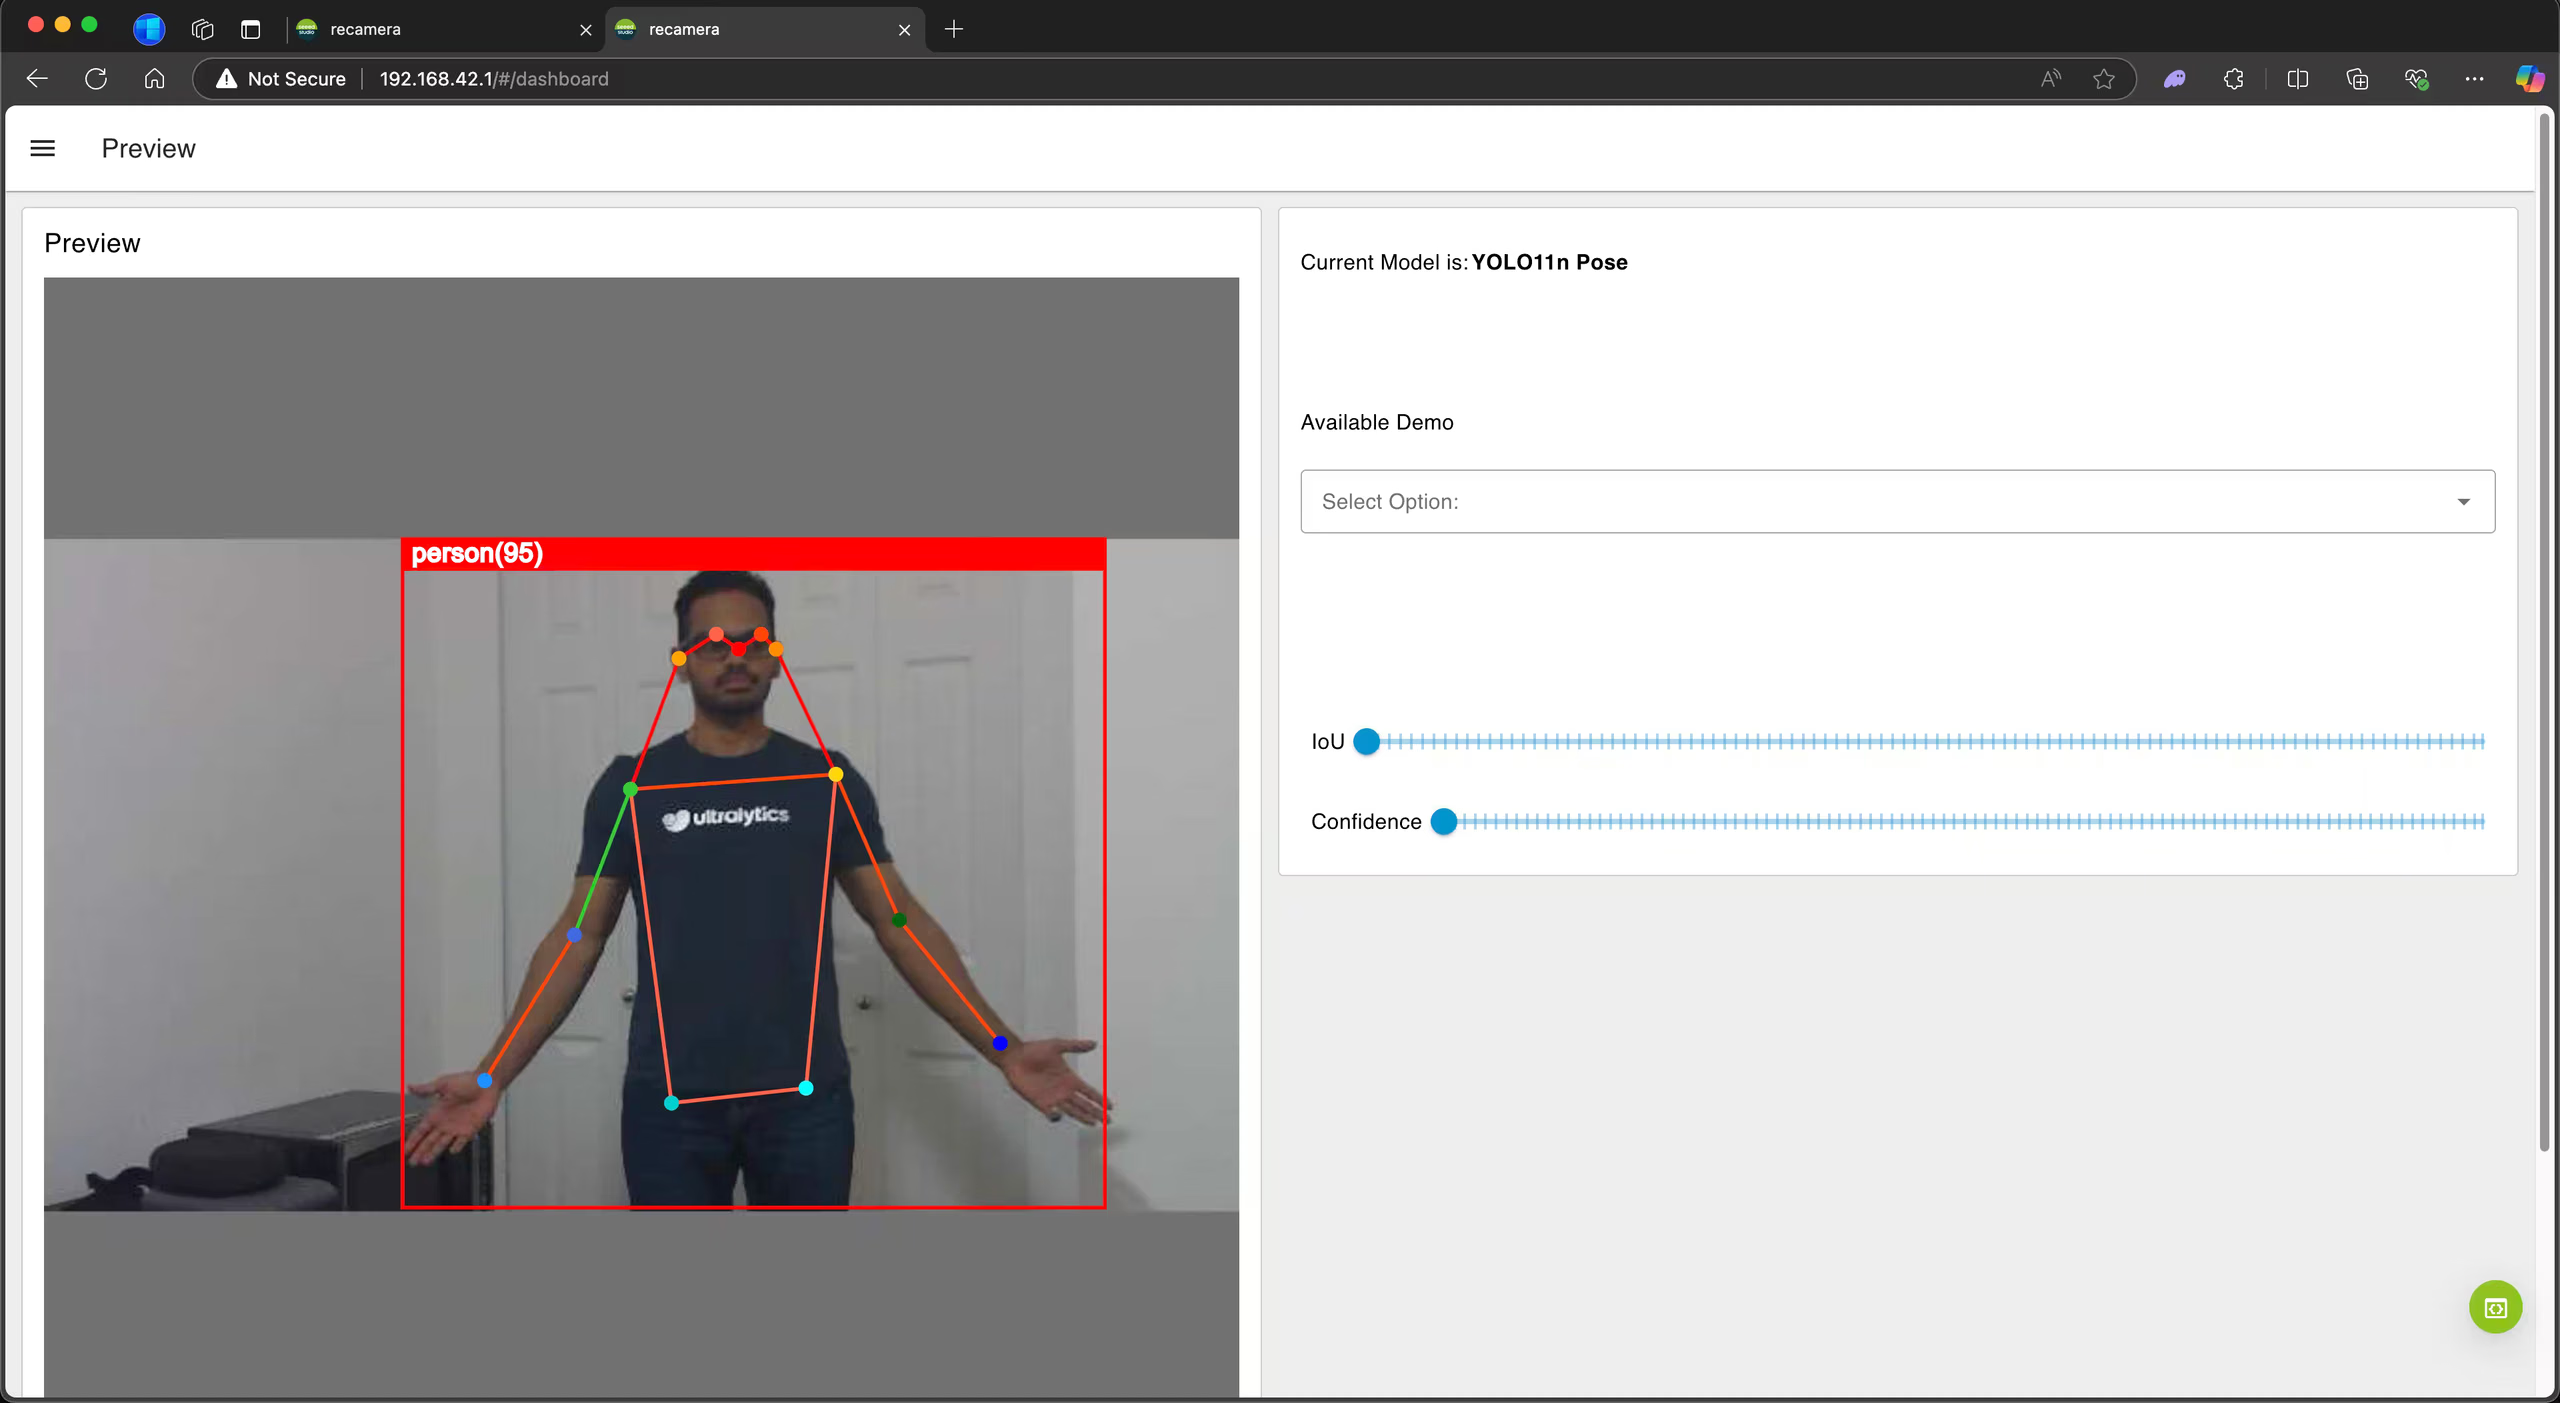
Pano artık kamera görüntüsü üzerinde çalışan poz tahmin modelini gösteriyor.
cvimodel'e Dışa Aktarma: YOLO26 Modelini Dönüştürme#
reCamera ile özel olarak eğitilmiş bir YOLO26 modeli kullanmak istiyorsan aşağıdaki adımları izle.
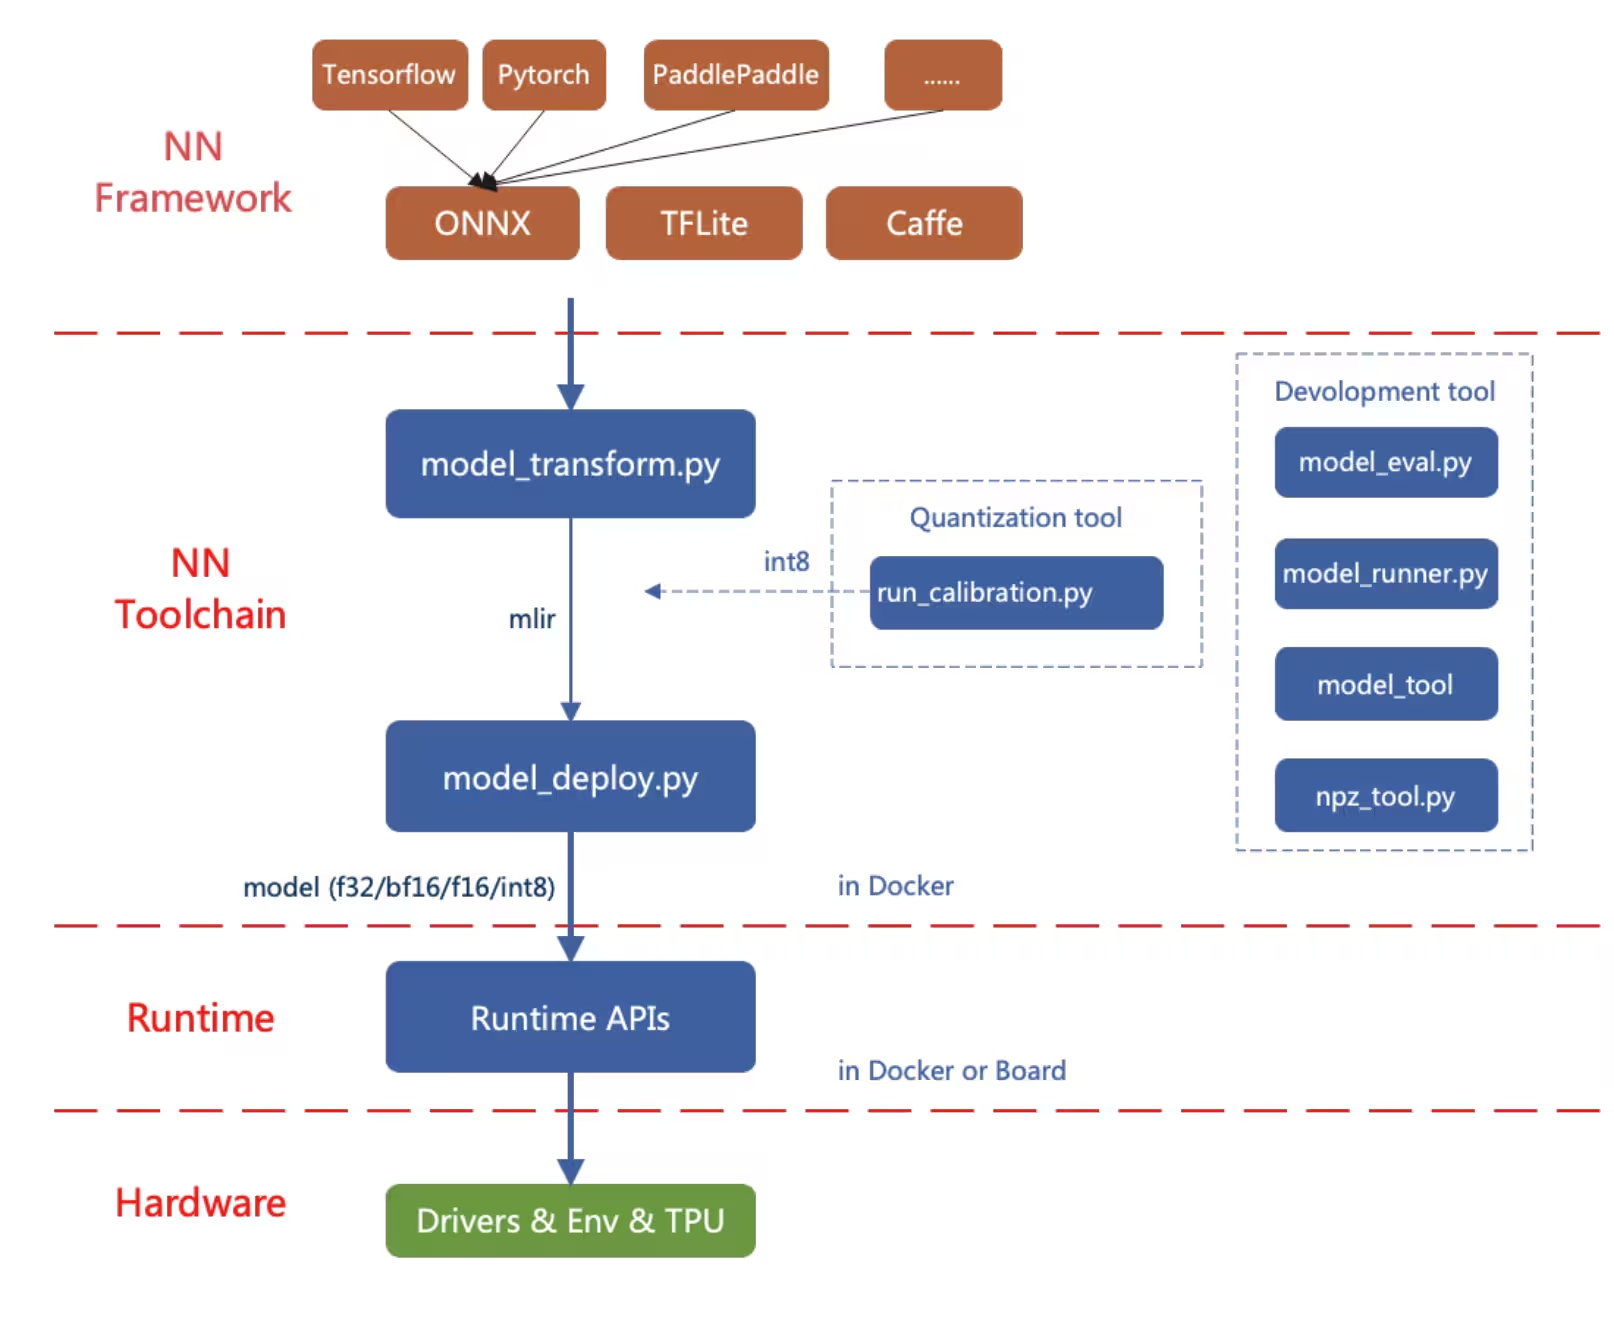
Dönüştürme işlemi önce bir PyTorch modelini ONNX biçimine aktarır, ardından MLIR model biçimine dönüştürür ve son olarak cihaz üzerinde çıkarım yapmak için MLIR öğesini cvimodel biçimine dönüştürür.
ONNX Biçimine Aktarma#
Bir Ultralytics YOLO26 modelini ONNX model biçimine aktar.
Kurulum#
Gerekli paketleri yüklemek için şunu çalıştır:
pip install ultralyticsKurulum süreciyle ilgili ayrıntılı talimatlar ve en iyi uygulamalar için Ultralytics Kurulum kılavuzumuza göz at. YOLO26 için gerekli paketleri yüklerken zorluk yaşarsan çözüm ve ipuçları için Yaygın Sorunlar kılavuzumuza başvur.
Kullanım#
from ultralytics import YOLO

# YOLO26 modelini yükle
model = YOLO("yolo26n.pt")

# Modeli ONNX biçimine aktar
model.export(format="onnx", opset=14)  # 'yolo26n.onnx' oluşturur
Dışa aktarma süreci hakkında daha fazla bilgi için Ultralytics dışa aktarma belgeleri sayfasını ziyaret et.
ONNX'i MLIR ve cvimodel'e Aktarma#
ONNX modelini aldıktan sonra, ONNX modelini MLIR'ye ve ardından cvimodel'e dönüştürmek için Yapay Zekâ Modellerini Dönüştürme ve Nicemleme sayfasına bak.
reCamera'nın Gerçek Dünya Uygulamaları#
reCamera'nın cihaz üzerinde bilgisayarlı görü yetenekleri ve modüler tasarımı, onu çok çeşitli gerçek dünya senaryoları için uygun hâle getirir.
-
Düşme Algılama: Güvenlik ve sağlık hizmetleri uygulamaları için tasarlanan reCamera, düşmeleri gerçek zamanlı olarak algılayabilir. Bu özelliği, hızlı müdahalenin kritik olduğu yaşlı bakımı, hastaneler ve endüstriyel ortamlar için onu çok uygun hâle getirir.
-
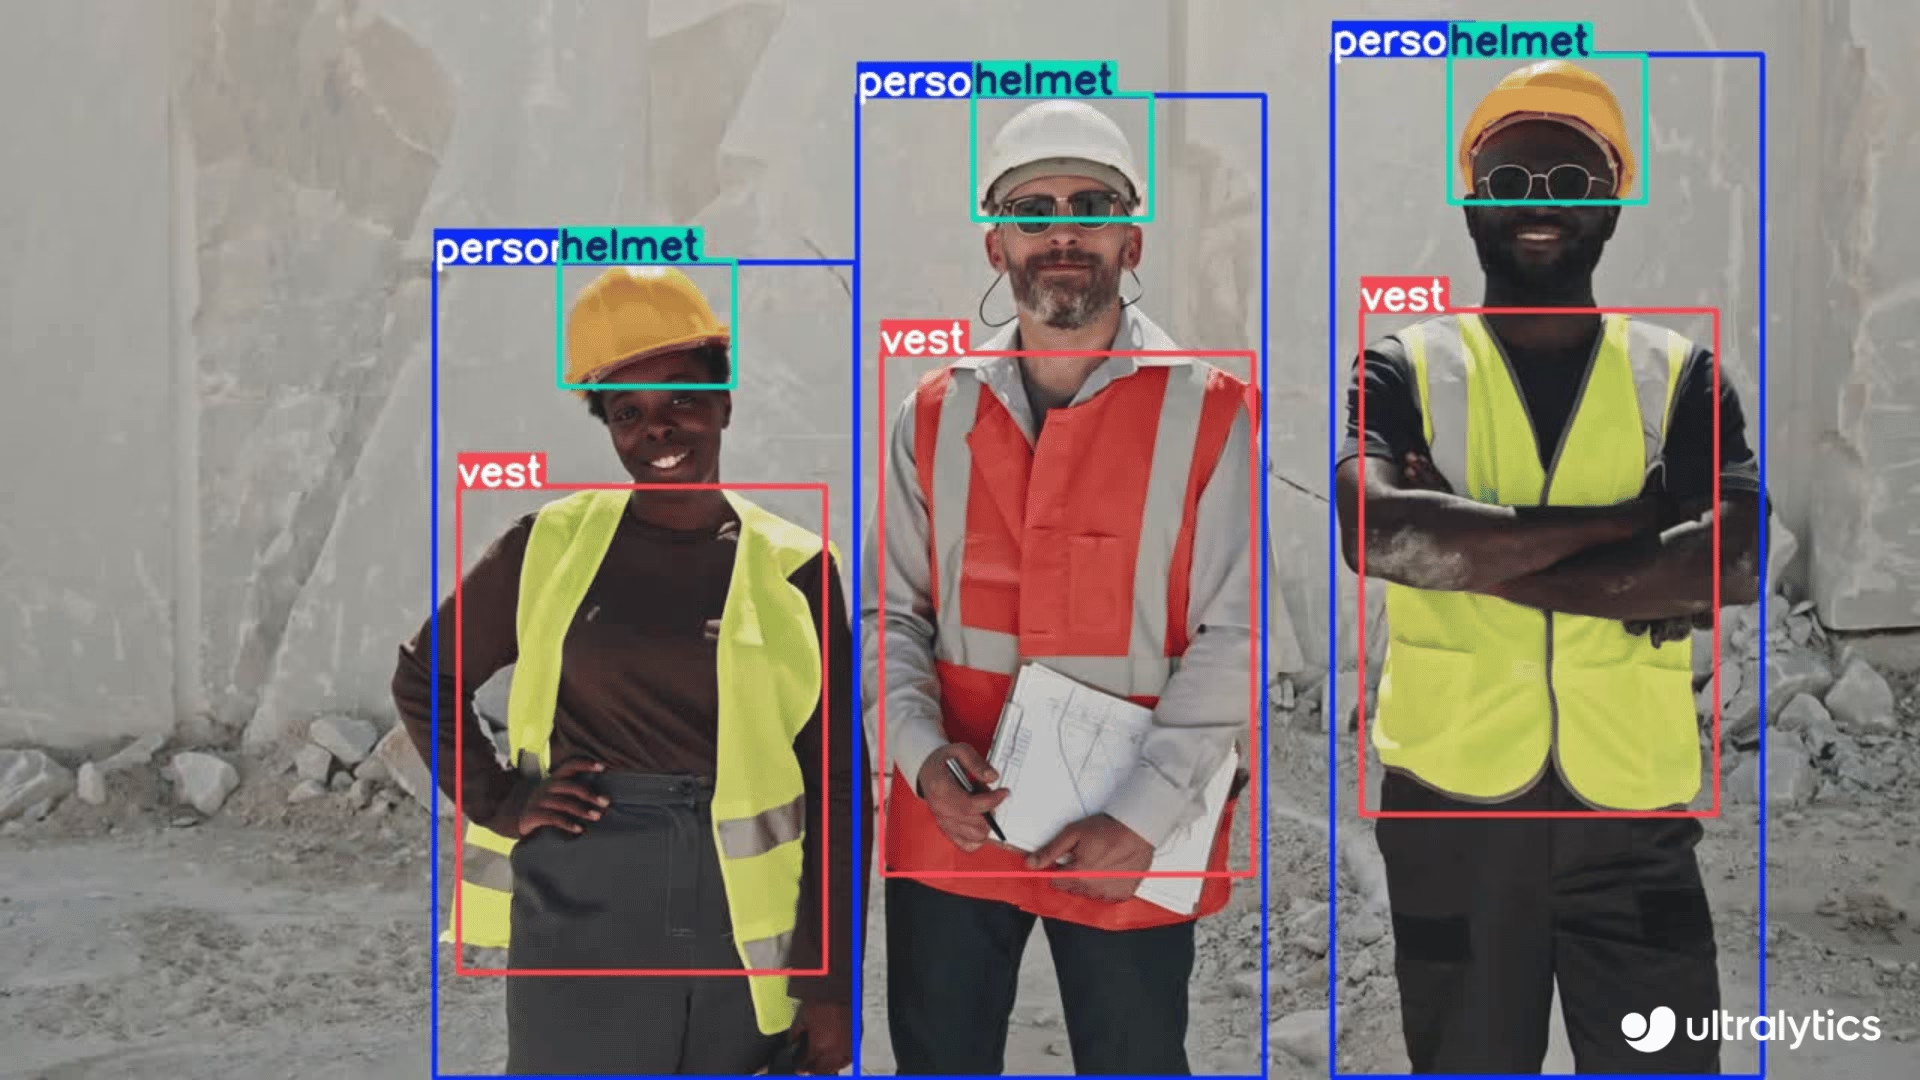
Kişisel Koruyucu Donanım Algılama: reCamera, iş yeri güvenliğini gerçek zamanlı olarak KKD uyumluluğunu algılayarak destekleyebilir. Çalışanların kask, eldiven veya diğer güvenlik donanımlarını takıp takmadığını belirlemeye yardımcı olarak endüstriyel ortamlardaki riskleri azaltır.
-
Yangın Algılama: reCamera'nın gerçek zamanlı işleme yetenekleri, olası felaketleri önlemek için erken uyarılar sağlayarak onu endüstriyel ve yerleşim alanlarında yangın algılama için çok uygun hâle getirir.
-
Ayrıca çevresel izleme ve YOLO11 ile atık yönetimi kapsamında atık algılama için de kullanılabilir.
-
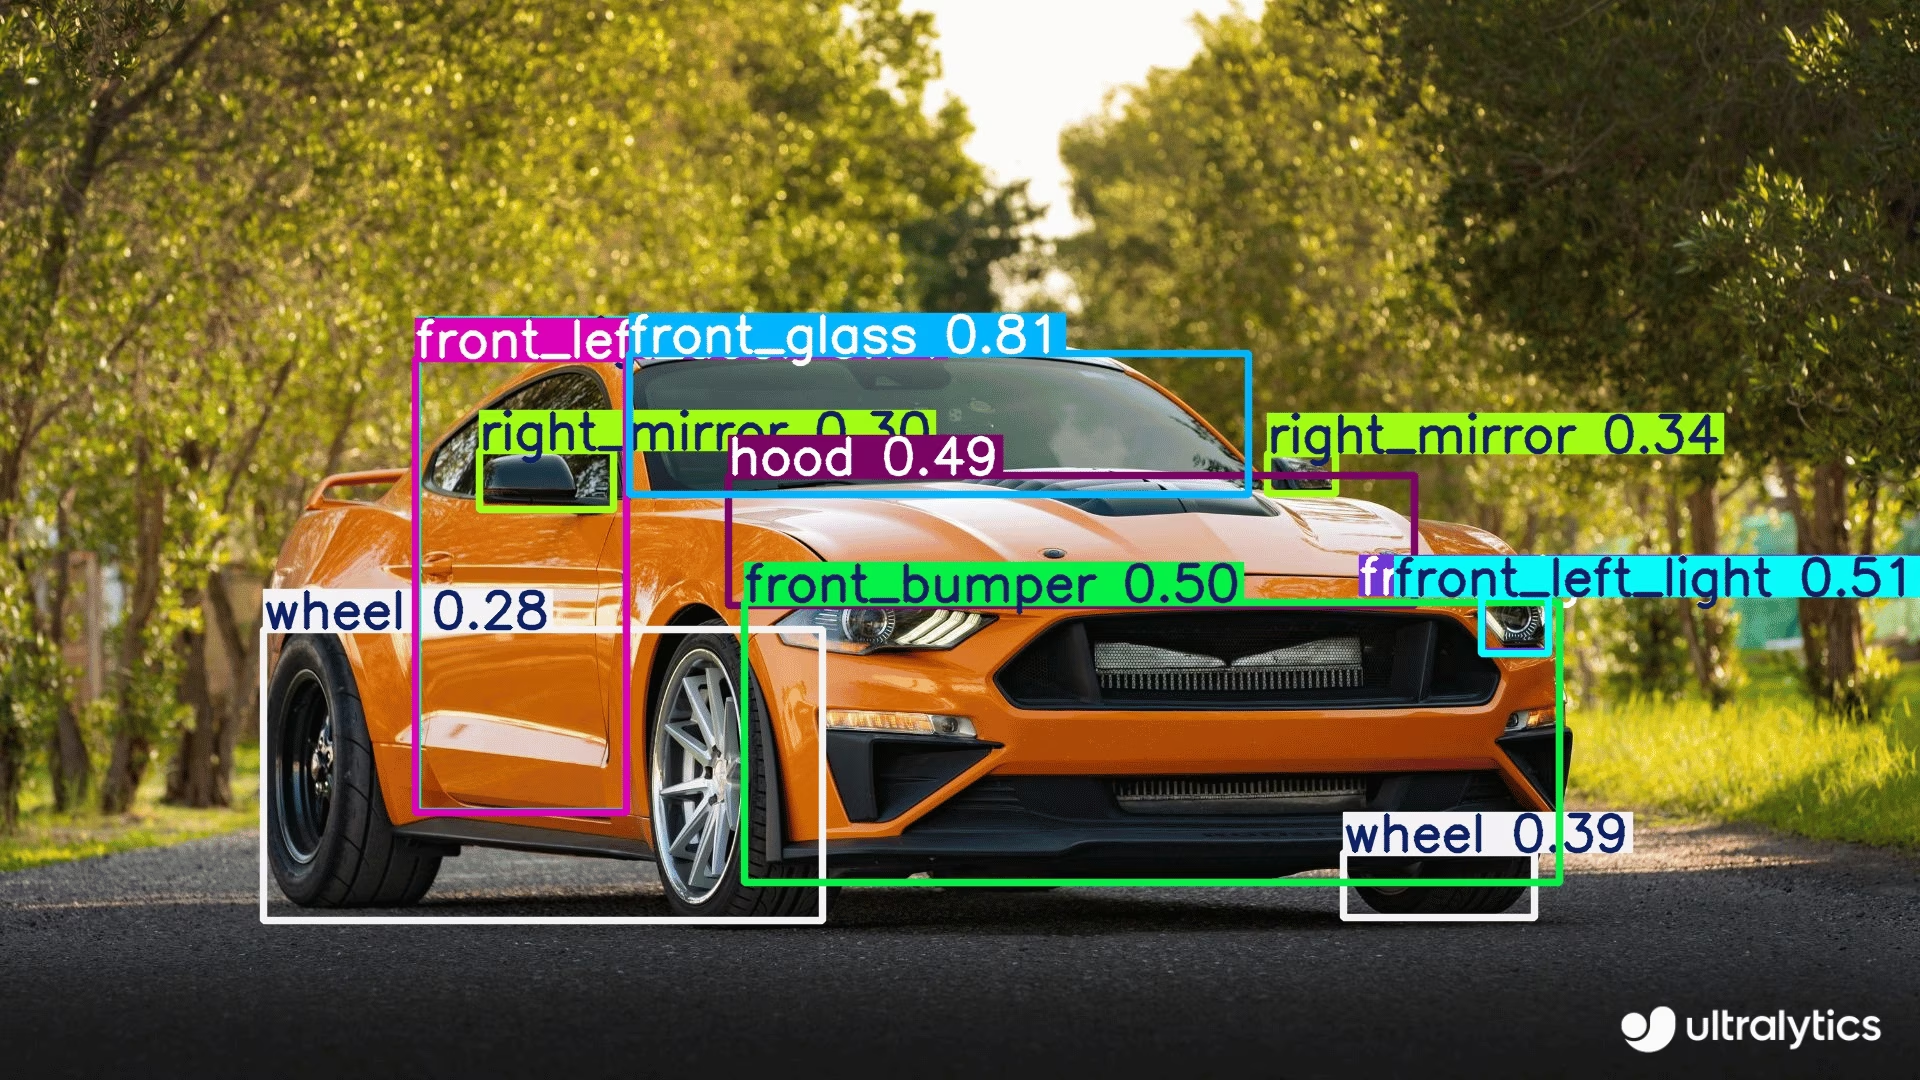
Otomobil Parçalarını Algılama: Üretim ve otomotiv sektörlerinde kalite kontrolü, montaj hattı izleme ve envanter yönetimi amacıyla otomobil parçalarının algılanmasına ve analiz edilmesine yardımcı olur.
Sık Sorulan Sorular#
reCamera'yı ilk kez kurmak için şu adımları izle:
- reCamera'yı bir güç kaynağına bağla
- reCamera Başlangıç sayfasını kullanarak cihazı ağına bağla (Hızlı Başlangıç Kılavuzu'nu açmak için cihazını seç)
- Bir web tarayıcısına cihazın IP adresini girerek Node-RED web arayüzüne eriş (veya USB ile bağlıysan
192.168.42.1kullan) - Önceden yüklenmiş YOLO modellerini kontrol paneli arayüzü üzerinden hemen kullanmaya başla.
Evet, kendi eğittiğin YOLO26 modellerini reCamera ile kullanabilirsin. İşlem şu adımları içerir:
- PyTorch modelini
model.export(format="onnx", opset=14)kullanarak ONNX biçimine aktar - ONNX modelini MLIR biçimine dönüştür
- Cihaz üzerinde çıkarım yapmak için MLIR'ı cvimodel biçimine dönüştür
- Dönüştürülen modeli reCamera'ya yükle
Ayrıntılı talimatlar için Yapay Zekâ Modellerini Dönüştürme ve Nicemleme kılavuzuna bak.
- PyTorch modelini
İşleme için harici donanım gerektiren geleneksel IP kameraların aksine reCamera:
- RISC-V SG200X işlemcisiyle yapay zekâ işlemeyi doğrudan cihaza entegre eder
- Gerçek zamanlı uç yapay zekâ uygulamaları için 1 TOPS işlem gücü sunar
- Bileşen yükseltmelerine ve özelleştirmeye olanak tanıyan modüler bir tasarıma sahiptir
- H.264/H.265 sıkıştırma, HDR görüntüleme ve 3D gürültü azaltma gibi gelişmiş video teknolojilerini destekler
- Hemen kullanabilmen için Ultralytics YOLO modelleri önceden yüklü olarak gelir.
Bu özellikler, reCamera'yı ek harici işleme donanımı gerektirmeyen, uç yapay zekâ uygulamalarına yönelik bağımsız bir çözüm hâline getirir.


Yorumlar50
Bir soru sor, sonuçlarını paylaş veya başka birine yardım et.
tcpipchip
we wrote a book and trainned to yolo26 on ultralytics...i recall that works
 Glenn JocherUltralytics
Yes, a custom-trained
YOLO26model can run onreCamerausing theONNX -> MLIR -> cvimodelworkflow in the reCamera guide; if you hit a blocker, please share the exact step and full error here so the Ultralytics team can help.
HanJammer
This site mentions recamera comes with YOLO26 (which is why I bought two of them) yet YOLO11 is installed (which is visible on screenshots as well) and I can't load YOLO26 - how to do that? I can't find reliable guide :(
Ah nevermind, I think I got it, still it would be better not to advertise the camera "reCamera comes pre-installed with four Ultralytics YOLO26 models" which is basically not true.
I whipped out some 'single click' tool to convert YOLO26 onnx-es which makes it a bit easier... I need to test it a bit, for now it supports the base model. Perhaps I will push it to my github later this week.
This is fantastic.
When you finish it, i will add to the BOOK.
Here is the first version of the converter util (it's just GUI and few scripts over the actual workflow). For now it was tested with a base detection model under Windows. More to come.
https://github.com/HanJammer/reCamera_YOLO26
Video presentation here: https://youtu.be/XgPjyj2U8YQ
Here is the first version of the converter util (it's just GUI and few scripts over the actual workflow). For now it was tested with a base detection model under Windows. More to come.
https://github.com/HanJammer/reCamera_YOLO26
Video presentation here: https://youtu.be/XgPjyj2U8YQ
wow!!!!!!!!!!!!!!!!!!!!!!!!!!!!!!!!!!!!!!!!!!!!!!!!!!!!!!!
i will test soon!
- Glenn JocherUltralytics
Thanks for sharing this; for anyone testing, the supported path today is still the reCamera integration guide together with Seeed’s model conversion guide, and we’ll review the docs wording around preinstalled models since some devices appear to ship with YOLO11 rather than YOLO26.
@glenn-jocher Have you a recamera ?
- Glenn JocherUltralytics
I don’t personally keep a reCamera on my desk, but the workflow in the Seeed Studio reCamera guide is the supported path; if you have a specific setup or export question, please drop it here and the Ultralytics team can take a look.
I tested on recamera with my trainned pose keypoint model... Same problem...no keypoint
Need to test on yolo8 on tdl sdk
- Glenn JocherUltralytics
Thanks for checking this; for custom pose models on reCamera, please drop the exact export and conversion steps here in the discussion so the Ultralytics team can take a look, since keypoints should work only after a correct
ONNX -> MLIR -> cvimodelpipeline as outlined in the reCamera guide and Seeed’s conversion guide, and it’s worth first confirming your exportedONNXmodel still produces keypoints before converting.
did you do calibration ? where the images to me to the calibration :(
- Glenn JocherUltralytics
Calibration isn’t done in the Ultralytics export step; for reCamera, you export to ONNX first with the reCamera guide, then calibration happens during Seeed’s ONNX→MLIR→
cvimodelflow using a small representative set of your own images, as described in Seeed’s Convert and Quantize AI Models guide. If you hit an error in that step, please drop the full log here and we’ll take a look.
still waiting...
send me your cvimodel too...yolo11 and yolo8
please, send me arguments used in your scripts...
did you train keypoints on animals and persons, right ?
tiruvijayakumar
NOO, i didnt train on animals, i trained on these classes for pose detection for persons using yolov11n-pose.pt weights. I fine‑tuned the YOLOv11n‑pose.pt model on my custom classes:
Running Walking Golf Skate Horse riding Kicking Diving I just uploaded animal detection model to justify that custom model deployment with quantization for object detection(yolo11n.pt) on recamera has no issues, it was another cvi model which i had no issues, it worked PERFECTLY. i only issue what i am facing is the pose detection quantized model where i am not able to see the keypoints on the inference output but bounding box is drawn along with predicted class label refer below:
now just trying to train the model for pose detection using yolov8 and then i would try quantizing the model and check if the keypoints are shown in the inference output
- Glenn JocherUltralytics
Thanks, that helps narrow it down — since detection
cvimodels work and only the quantized pose model loses keypoints, this looks more like a pose conversion or postprocessing issue in the ONNX → MLIR →cvimodelstep than a training problem. Please keep the details here so the Ultralytics team can see them, and share the exact conversion commands and full text logs from the reCamera guide and Seeed model conversion guide, plus whether the same pre-quantized ONNX shows keypoints before conversion. i ran predictions on ultralytics hub on the .pt model format, i attached the whole problem scenario and image content :https://github.com/orgs/ultralytics/discussions/22090?sort=new#discussioncomment-16346206 Any ways uploading the prediction on ultralytics hub in this thread also :
so on the model.pt file inference shows this data, this confirms that pose estimation model works. { "images": [ { "shape": [ 426, 640 ], "speed": { "preprocess": 1.41517, "inference": 130.14456, "postprocess": 0.99221 }, "results": [ { "name": "Kicking", "class": 5, "confidence": 0.80929, "box": { "x1": 0.26068, "y1": 0.10738, "x2": 0.55882, "y2": 0.85426 }, "keypoints": { "x": [ 0.41923001408576965, 0.42656999826431274, 0.4166699945926666, 0.45181000232696533, 0.42857998609542847, 0.488209992647171, 0.43380001187324524, 0.543470025062561, 0.41604000329971313, 0.5516700148582458, 0.4164600074291229, 0.46198999881744385, 0.4427199959754944, 0.357340008020401, 0.427839994430542, 0.29197001457214355, 0.43891000747680664 ], "y": [ 0.2315099984407425, 0.21907000243663788, 0.21740999817848206, 0.21602000296115875, 0.21322999894618988, 0.2783600091934204, 0.2824600040912628, 0.3255299925804138, 0.35097000002861023, 0.32879000902175903, 0.3619599938392639, 0.5179499983787537, 0.5104399919509888, 0.6517800092697144, 0.6389099955558777, 0.7586100101470947, 0.7324900031089783 ], "visible": [ 0.9994300007820129, 0.9990299940109253, 0.9990000128746033, 0.999019980430603, 0.9988300204277039, 0.9995700120925903, 0.9996600151062012, 0.998960018157959, 0.9992700219154358, 0.9985499978065491, 0.997439980506897, 0.9995700120925903, 0.9995700120925903, 0.9988800287246704, 0.9989299774169922, 0.982990026473999, 0.9852499961853027 ] } } ] } ], "metadata": { "imageCount": 1, "functionTimeAlive": 78321.917, "functionTimeCall": 0.138, "model": "best.pt", "version": { "ultralytics": "8.4.30", "torch": "2.11.0+cpu", "torchvision": "0.26.0+cpu", "python": "3.14.3" } }, "networkTime": 1.214 }
I didnt capture the conversion commands and text logs during the onnx->mlir->cvimodel, would repeat the same steps and paste the images in this thread itself.
Exported the yolov11n-pose.pt(finetuned) on google colab to onnx format
Uploaded the model on netron to view the structure, onnx is in the format IRv9 ,opset v20(would downgrade it). Classes are running, walking, golf-swing, skateboarding, riding-horse and kicking
Seeed studio guide for downgrading
Initial structure of workspace folder
Step1: pull sopho/tpuc_dev:v3.1
Step2: starting the container
Step3: installing onnx
Step4: Clone Downgrade Script
Step5: Downgrade Script settings IR v8 and Opset v17
Step6: Install TPU-MLIR tools inside container:
Step7: clone tpu-mlir
Step8: setup environment tpu-mlir(long step)
Step9: according to seeed studio guide, i have to include outputs before the model's head as the parameter for this particular step model_transform
--model_name yolo11n
--model_def yolo11n.onnx
--input_shapes "[[1,3,640,640]]"
--mean "0.0,0.0,0.0"
--scale "0.0039216,0.0039216,0.0039216"
--keep_aspect_ratio
--pixel_format rgb
--output_names "/model.23/cv2.0/cv2.0.2/Conv_output_0,/model.23/cv3.0/cv3.0.2/Conv_output_0,/model.23/cv2.1/cv2.1.2/Conv_output_0,/model.23/cv3.1/cv3.1.2/Conv_output_0,/model.23/cv2.2/cv2.2.2/Conv_output_0,/model.23/cv3.2/cv3.2.2/Conv_output_0"
--test_input ../image/dog.jpg
--test_result yolo11n_top_outputs.npz
--mlir yolo11n.mlir i have the onnx file, could someone of the team help me identify the outputs before the model's head? @glenn-jocher here is the onnx file https://drive.google.com/file/d/1UF25DK2zXx0GCWdcx55SPYHL71SylDeg/view?usp=sharing
and some animal pictures...