Mô hình Phân đoạn Mọi thứ (SAM)

Mô hình Segment Anything (SAM) của Meta giới thiệu phân đoạn ảnh có thể điều khiển bằng prompt: khi nhận prompt là điểm, hộp hoặc mask, model trả về mask của đối tượng được chỉ định, với decoder gọn nhẹ đủ nhanh để sử dụng tương tác.
Giới thiệu về SAM: Mô hình Phân đoạn Mọi thứ#
Mô hình Segment Anything, hay SAM, là model phân đoạn ảnh được xây dựng để phân đoạn bằng prompt trong nhiều tác vụ phân tích ảnh. SAM là trọng tâm của dự án Segment Anything của Meta, dự án giới thiệu một model, tác vụ và dataset mới cho phân đoạn ảnh.
Thiết kế của SAM cho phép model thích ứng với các phân phối ảnh và tác vụ mới mà không cần kiến thức trước, một khả năng được gọi là chuyển giao zero-shot. Được huấn luyện trên dataset SA-1B, gồm hơn 1 tỷ mask trên 11 triệu ảnh được tuyển chọn, SAM thể hiện hiệu năng zero-shot cao, thường ngang bằng hoặc vượt kết quả trước đây từ các phương pháp học có giám sát hoàn toàn.
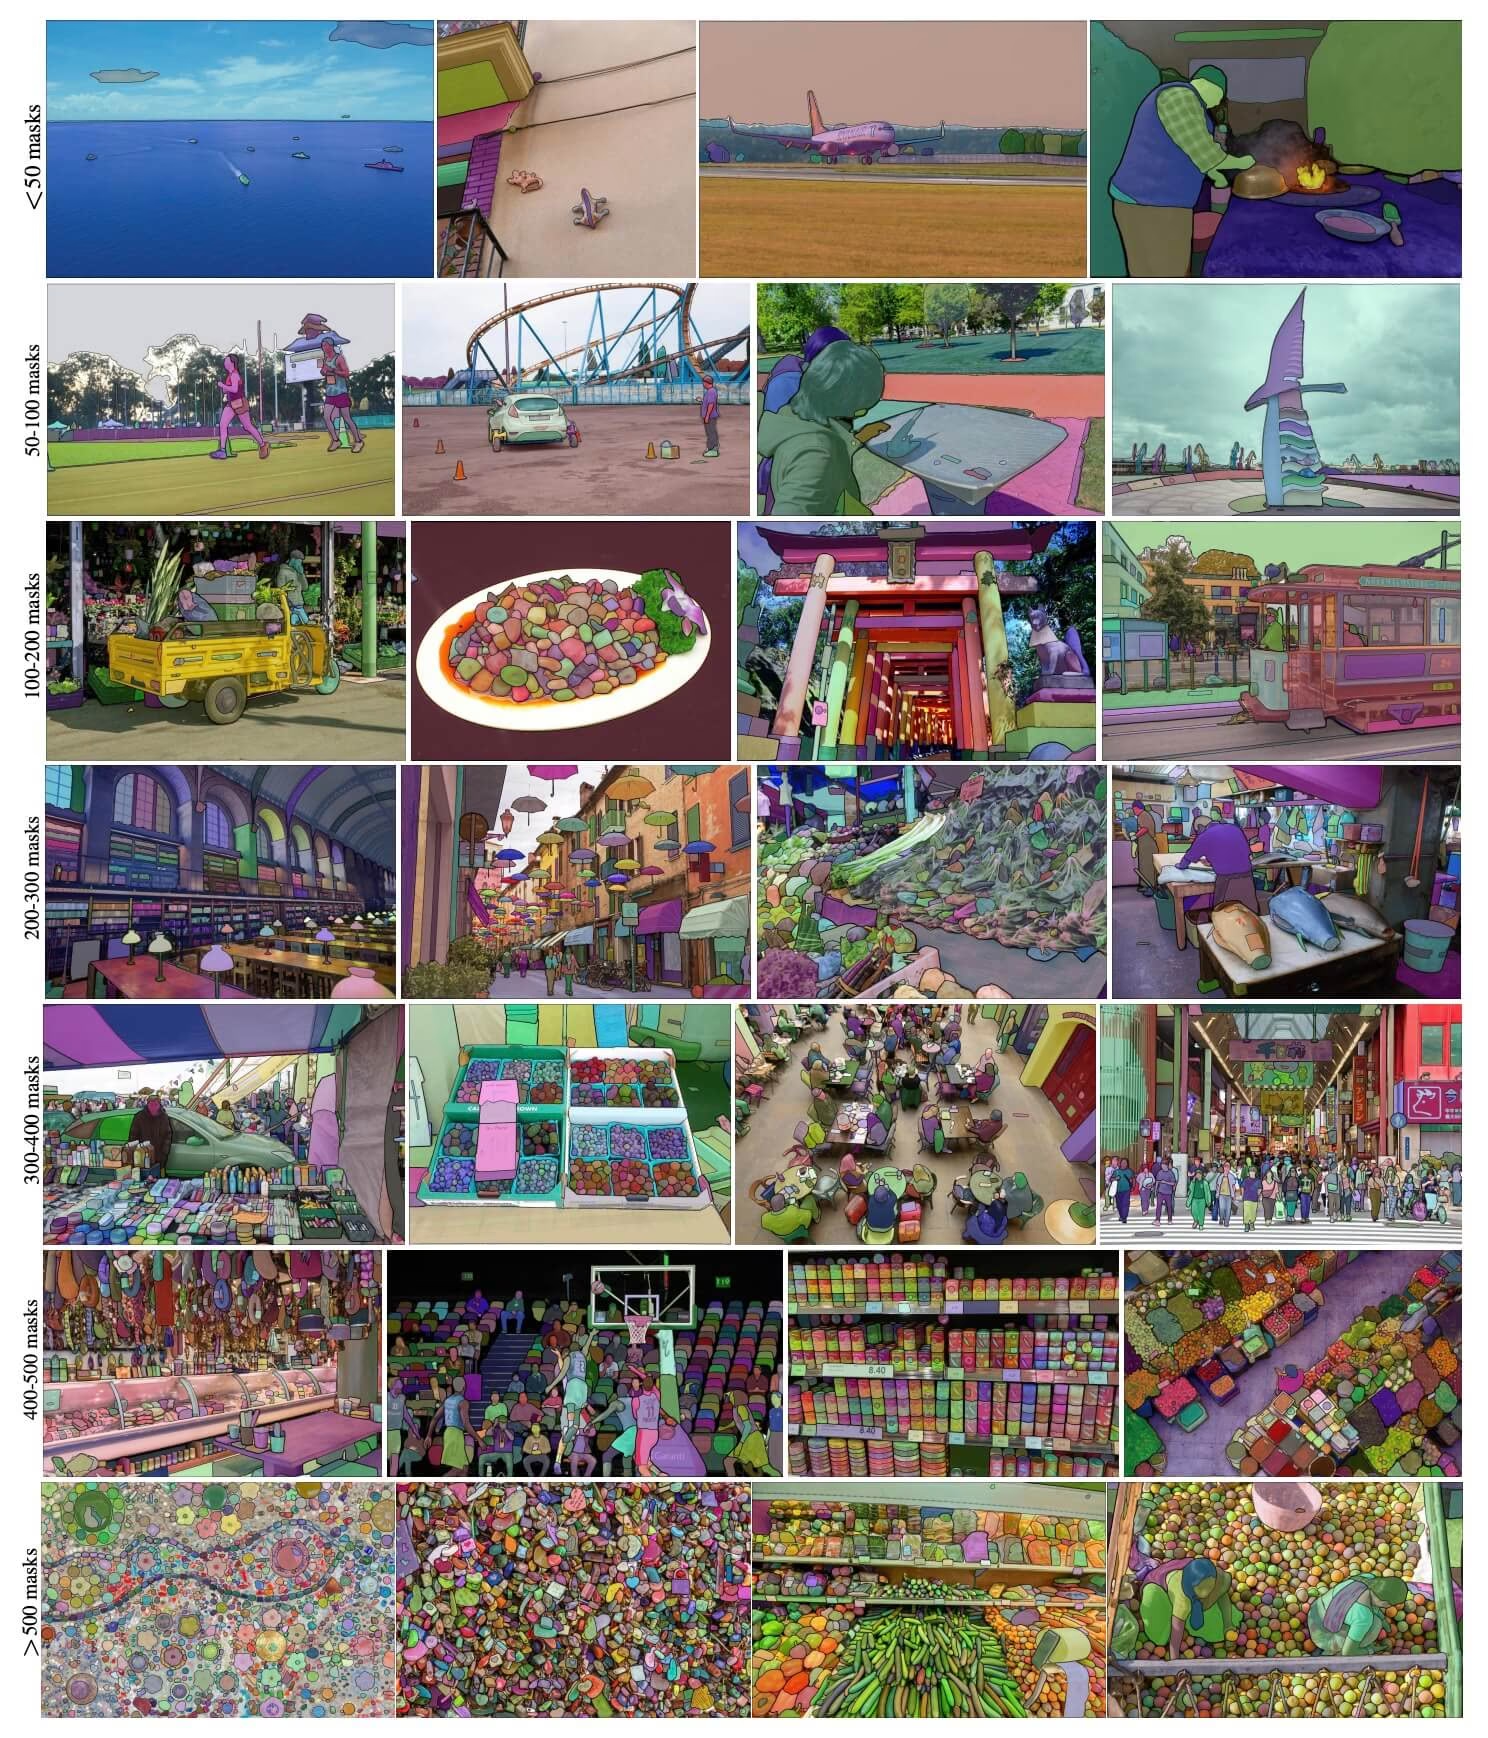 Ảnh ví dụ SA-1B. Ảnh từ dataset SA-1B có phủ mask. SA-1B gồm 11M ảnh đa dạng, độ phân giải cao, được cấp phép và bảo vệ quyền riêng tư, cùng 1.1B mask phân đoạn chất lượng cao. SAM tự động gán nhãn hoàn toàn các mask này; đánh giá của con người và nhiều thử nghiệm xác nhận chúng có chất lượng cao và đa dạng. Ảnh được nhóm theo số lượng mask trên mỗi ảnh để trực quan hóa (trung bình có ∼100 mask mỗi ảnh).
Các tính năng chính của Mô hình Phân đoạn Mọi thứ (SAM)#
- Tác vụ phân đoạn theo prompt: SAM được thiết kế cho tác vụ phân đoạn theo prompt, cho phép tạo mask phân đoạn hợp lệ từ bất kỳ prompt nào, chẳng hạn như gợi ý không gian hoặc văn bản xác định một đối tượng.
- Kiến trúc nâng cao: Mô hình Segment Anything sử dụng image encoder lớn, prompt encoder và mask decoder gọn nhẹ. Kiến trúc này cho phép linh hoạt đưa prompt, tính toán mask theo thời gian thực và nhận biết sự mơ hồ trong các tác vụ phân đoạn.
- Dataset SA-1B: Được giới thiệu trong dự án Segment Anything, dataset SA-1B có hơn 1 tỷ mask trên 11 triệu ảnh. Là dataset phân đoạn lớn nhất tại thời điểm ra mắt, dataset này cung cấp cho SAM nguồn dữ liệu huấn luyện đa dạng và quy mô lớn.
- Hiệu năng zero-shot: SAM thể hiện hiệu năng zero-shot cao trên nhiều tác vụ phân đoạn, trở thành công cụ sẵn sàng sử dụng cho nhiều ứng dụng với nhu cầu thiết kế prompt tối thiểu.
Để tìm hiểu chuyên sâu về Mô hình Phân đoạn Mọi thứ và bộ dữ liệu SA-1B, hãy truy cập GitHub của Segment Anything và xem bài nghiên cứu Segment Anything.
Các model thuộc họ SAM (SAM 2.1, SAM 3 và SAM 3.1) hỗ trợ tính năng gán nhãn thông minh trên Ultralytics Platform, cho phép tạo mask bằng thao tác nhấp để gán nhãn dataset nhanh chóng.
Các model hiện có, tác vụ được hỗ trợ và chế độ hoạt động#
Bảng này trình bày các model hiện có cùng trọng số pretrained cụ thể, các tác vụ được hỗ trợ và khả năng tương thích với các chế độ hoạt động khác nhau như Huấn luyện, Đánh giá, Suy luận và Xuất. Các chế độ được hỗ trợ được đánh dấu ✅, còn chế độ không được hỗ trợ được đánh dấu ❌.
| Loại model | Weights pretrained | Các tác vụ được hỗ trợ | Huấn luyện | Validation | Suy luận | Export |
|---|---|---|---|---|---|---|
| SAM bản cơ sở | sam_b.pt | Phân đoạn đối tượng | ❌ | ❌ | ✅ | ❌ |
| SAM bản lớn | sam_l.pt | Phân đoạn đối tượng | ❌ | ❌ | ✅ | ❌ |
Cách sử dụng SAM: Tính linh hoạt và sức mạnh trong phân đoạn hình ảnh#
Mô hình Segment Anything có thể được sử dụng cho nhiều tác vụ tiếp theo nằm ngoài dữ liệu huấn luyện, bao gồm phát hiện biên, tạo đề xuất đối tượng, phân đoạn instance và dự đoán sơ bộ mask từ văn bản. Với kỹ thuật thiết kế prompt, SAM có thể thích ứng với các tác vụ và phân phối dữ liệu mới theo cách zero-shot.
Ví dụ dự đoán bằng SAM#
Phân đoạn hình ảnh bằng các prompt đã cho.
from ultralytics import SAM

# Tải model
model = SAM("sam_b.pt")

# Hiển thị thông tin model (không bắt buộc)
model.info()

# Chạy suy luận với prompt bboxes
results = model("ultralytics/assets/zidane.jpg", bboxes=[439, 437, 524, 709])

# Chạy suy luận với một điểm đơn
results = model(points=[900, 370], labels=[1])

# Chạy suy luận với nhiều điểm
results = model(points=[[400, 370], [900, 370]], labels=[1, 1])

# Chạy suy luận với prompt gồm nhiều điểm cho mỗi đối tượng
results = model(points=[[[400, 370], [900, 370]]], labels=[[1, 1]])

# Chạy suy luận với prompt gồm các điểm âm
results = model(points=[[[400, 370], [900, 370]]], labels=[[1, 0]])
Phân đoạn toàn bộ hình ảnh.
from ultralytics import SAM

# Tải model
model = SAM("sam_b.pt")

# Hiển thị thông tin model (không bắt buộc)
model.info()

# Chạy suy luận
model("path/to/image.jpg")- SAM phân đoạn toàn bộ ảnh khi bạn không truyền prompt nào (bbox/điểm/mask).
Thiết lập ảnh một lần, sau đó chạy suy luận với prompt nhiều lần mà không cần chạy lại image encoder.
import cv2

from ultralytics.models.sam import Predictor as SAMPredictor

# Tạo SAMPredictor
overrides = {"conf": 0.25, "task": "segment", "mode": "predict", "imgsz": 1024, "model": "mobile_sam.pt"}
predictor = SAMPredictor(overrides=overrides)

# Thiết lập ảnh
predictor.set_image("ultralytics/assets/zidane.jpg")  # đặt bằng tệp hình ảnh
predictor.set_image(cv2.imread("ultralytics/assets/zidane.jpg"))  # đặt bằng np.ndarray
results = predictor(bboxes=[439, 437, 524, 709])

# Chạy suy luận với prompt một điểm
results = predictor(points=[900, 370], labels=[1])

# Chạy suy luận với prompt nhiều điểm
results = predictor(points=[[400, 370], [900, 370]], labels=[1, 1])

# Chạy suy luận với prompt gồm các điểm âm
results = predictor(points=[[[400, 370], [900, 370]]], labels=[[1, 0]])

# Đặt lại hình ảnh
predictor.reset_image()
Phân đoạn toàn bộ với các đối số bổ sung.
from ultralytics.models.sam import Predictor as SAMPredictor

# Tạo SAMPredictor
overrides = {"conf": 0.25, "task": "segment", "mode": "predict", "imgsz": 1024, "model": "mobile_sam.pt"}
predictor = SAMPredictor(overrides=overrides)

# Phân đoạn với các đối số bổ sung
results = predictor(source="ultralytics/assets/zidane.jpg", crop_n_layers=1, points_stride=64, min_mask_region_area=100)Tất cả results được trả về trong các ví dụ trên đều là đối tượng Results, cho phép truy cập các mask được dự đoán và ảnh nguồn.
- Để biết thêm về các đối số
Segment everything, hãy xem Tài liệu tham khảoPredictor/generate.
So sánh SAM với YOLO#
Ở đây, chúng tôi so sánh model SAM-b của Meta với các model phân đoạn của Ultralytics, bao gồm YOLO26:
| Model | Kích thước (MB) | Tham số (M) | Tốc độ (CPU) (ms/ảnh) |
|---|---|---|---|
| Meta SAM-b | 375 | 93.7 | 41703 |
| MobileSAM | 40.7 | 10.1 | 23802 |
| FastSAM-s với backbone YOLOv8 | 23.9 | 11.8 | 58.0 |
| Ultralytics YOLOv8n-seg | 7.1 (nhỏ hơn 52.8 lần) | 3.4 (ít hơn 27.6 lần) | 24.8 (nhanh hơn 1682 lần) |
| Ultralytics YOLO11n-seg | 6.2 (nhỏ hơn 60.5 lần) | 2.9 (ít hơn 32.3 lần) | 24.3 (nhanh hơn 1716 lần) |
| Ultralytics YOLO26n-seg | 6.7 (nhỏ hơn 56.0 lần) | 2.7 (ít hơn 34.7 lần) | 25.2 (nhanh hơn 1655 lần) |
So sánh này cho thấy sự khác biệt đáng kể về kích thước và tốc độ giữa các biến thể SAM và model phân đoạn YOLO. SAM có khả năng phân đoạn tự động độc đáo, nhưng các model YOLO, đặc biệt là YOLOv8n-seg, YOLO11n-seg và YOLO26n-seg, nhỏ hơn, nhanh hơn và hiệu quả tính toán hơn đáng kể.
Tốc độ SAM được đo bằng PyTorch, tốc độ YOLO được đo bằng ONNX Runtime. Các thử nghiệm được chạy trên Apple M4 Air 2025 với RAM 16GB, sử dụng torch==2.10.0, ultralytics==8.4.31 và onnxruntime==1.24.4. Để tái tạo thử nghiệm này:
from ultralytics import ASSETS, SAM, YOLO, FastSAM

# Đánh giá hiệu năng SAM-b, MobileSAM
for file in ["sam_b.pt", "mobile_sam.pt"]:
    model = SAM(file)
    model.info()
    model(ASSETS)

# Lập hồ sơ FastSAM-s
model = FastSAM("FastSAM-s.pt")
model.info()
model(ASSETS)

# Đo hiệu năng các model YOLO (ONNX)
for file_name in ["yolov8n-seg.pt", "yolo11n-seg.pt", "yolo26n-seg.pt"]:
    model = YOLO(file_name)
    model.info()
    onnx_path = model.export(format="onnx", dynamic=True, nms=False)  # Đầu NMS-free của YOLO26; không có tác dụng với YOLOv8/YOLO11
    model = YOLO(onnx_path)
    model(ASSETS)
Gán nhãn tự động: Cách nhanh chóng tạo bộ dữ liệu phân đoạn#
Tự động gán nhãn là một tính năng quan trọng của SAM, cho phép người dùng tạo dataset phân đoạn bằng model phát hiện pretrained. Tính năng này giúp gán nhãn nhanh số lượng lớn ảnh, không cần thực hiện quy trình gán nhãn thủ công tốn thời gian.
Tạo bộ dữ liệu phân đoạn bằng model phát hiện#
Để tự động gán nhãn dataset bằng framework Ultralytics, hãy sử dụng hàm auto_annotate, kết hợp model phát hiện như YOLO26x với SAM:
from ultralytics.data.annotator import auto_annotate

auto_annotate(data="path/to/images", det_model="yolo26x.pt", sam_model="sam_b.pt")| Đối số | Kiểu | Mặc định | Mô tả |
|---|---|---|---|
data | str | bắt buộc | Đường dẫn đến thư mục chứa ảnh mục tiêu cần chú thích hoặc phân đoạn. |
det_model | str | 'yolo26x.pt' | Đường dẫn đến model phát hiện YOLO để phát hiện đối tượng ban đầu. |
sam_model | str | 'sam_b.pt' | Đường dẫn đến model SAM để phân đoạn (hỗ trợ các weight của SAM, SAM 2, MobileSAM và SAM 3). |
device | str | '' | Thiết bị tính toán (ví dụ: 'cuda:0', 'cpu' hoặc '' để tự động phát hiện thiết bị). |
conf | float | 0.25 | Ngưỡng confidence của model phát hiện YOLO để lọc các kết quả phát hiện yếu. |
iou | float | 0.5 | Ngưỡng IoU cho Non-Maximum Suppression để lọc các hộp chồng lấn. |
imgsz | int | 640 | Kích thước đầu vào để thay đổi kích thước ảnh (nếu cần, làm tròn lên bội số của 32). |
max_det | int | 300 | Số lượng kết quả phát hiện tối đa trên mỗi ảnh để tiết kiệm bộ nhớ. |
classes | list[int] | None | Danh sách chỉ số class cần phát hiện (ví dụ: [0, 1] cho người và xe đạp). |
output_dir | str | None | Thư mục lưu chú thích (mặc định: thư mục cùng cấp với <data>_auto_annotate_labels). |
Hàm auto_annotate nhận đường dẫn đến hình ảnh của bạn, cùng các đối số tùy chọn để chỉ định model phát hiện được huấn luyện trước và model phân đoạn SAM, thiết bị chạy các model cũng như thư mục đầu ra để lưu kết quả đã gán nhãn.
Tự động gán nhãn bằng model pretrained giúp giảm đáng kể thời gian và công sức cần thiết để tạo dataset phân đoạn, cho phép các nhóm có bộ sưu tập ảnh lớn tập trung vào phát triển và đánh giá model thay vì gán nhãn thủ công.
Trích dẫn và lời cảm ơn#
Nếu SAM hữu ích cho công việc nghiên cứu hoặc phát triển của bạn, hãy cân nhắc trích dẫn bài báo:
@misc{kirillov2023segment,
      title={Segment Anything},
      author={Alexander Kirillov and Eric Mintun and Nikhila Ravi and Hanzi Mao and Chloe Rolland and Laura Gustafson and Tete Xiao and Spencer Whitehead and Alexander C. Berg and Wan-Yen Lo and Piotr Dollár and Ross Girshick},
      year={2023},
      eprint={2304.02643},
      archivePrefix={arXiv},
      primaryClass={cs.CV}
}
Chúng tôi xin cảm ơn Meta AI đã tạo và duy trì tài nguyên quý giá này cho cộng đồng thị giác máy tính.
Câu hỏi thường gặp#
Mô hình Segment Anything (SAM) của Meta là model phân đoạn ảnh được thiết kế cho các tác vụ phân đoạn có thể điều khiển bằng prompt. Model kết hợp image encoder và prompt encoder với mask decoder gọn nhẹ để tạo mask phân đoạn từ prompt như điểm, hộp hoặc mask. Được huấn luyện trên dataset SA-1B, SAM hoạt động tốt theo phương thức zero-shot, thích ứng với các phân phối ảnh và tác vụ mới mà không cần kiến thức trước.
Bạn có thể sử dụng Mô hình Phân đoạn Mọi thứ (SAM) để phân đoạn hình ảnh bằng cách chạy suy luận với nhiều loại prompt như bounding box hoặc điểm. Sau đây là ví dụ sử dụng Python:
from ultralytics import SAM

# Tải model
model = SAM("sam_b.pt")

# Phân đoạn bằng prompt hộp giới hạn
model("ultralytics/assets/zidane.jpg", bboxes=[439, 437, 524, 709])

# Phân đoạn bằng prompt điểm
model("ultralytics/assets/zidane.jpg", points=[900, 370], labels=[1])

# Phân đoạn bằng prompt nhiều điểm
model("ultralytics/assets/zidane.jpg", points=[[400, 370], [900, 370]], labels=[1, 1])

# Phân đoạn bằng prompt nhiều điểm cho mỗi đối tượng
model("ultralytics/assets/zidane.jpg", points=[[[400, 370], [900, 370]]], labels=[[1, 1]])

# Phân đoạn bằng prompt điểm âm.
model("ultralytics/assets/zidane.jpg", points=[[[400, 370], [900, 370]]], labels=[[1, 0]])
Ngoài ra, bạn có thể chạy suy luận bằng SAM qua giao diện dòng lệnh (CLI):
yolo predict model=sam_b.pt source=path/to/image.jpgSo với các model YOLO, các biến thể SAM như SAM-b, MobileSAM và FastSAM-s thường lớn hơn và chậm hơn, nhưng có khả năng phân đoạn zero-shot độc đáo. Ví dụ, YOLO26n-seg nhỏ hơn 56 lần và nhanh hơn hơn 1650 lần so với model SAM-b gốc của Meta trên CPU. Vì vậy, các model YOLO lý tưởng cho những ứng dụng cần phân đoạn nhanh, gọn nhẹ và hiệu quả tính toán, trong khi các model SAM vượt trội ở các tác vụ phân đoạn linh hoạt, theo prompt và zero-shot.
SAM của Ultralytics có tính năng gán nhãn tự động, cho phép tạo bộ dữ liệu phân đoạn bằng model phát hiện được huấn luyện trước. Sau đây là ví dụ bằng Python:
from ultralytics.data.annotator import auto_annotate

auto_annotate(data="path/to/images", det_model="yolo26x.pt", sam_model="sam_b.pt")
Hàm này nhận đường dẫn đến hình ảnh của bạn cùng các đối số tùy chọn cho model phát hiện và model phân đoạn SAM được huấn luyện trước, cũng như thông số thiết bị và thư mục đầu ra. Để xem hướng dẫn đầy đủ, hãy tham khảo Gán nhãn tự động.
SAM được huấn luyện trên dataset SA-1B, gồm hơn 1 tỷ mask trên 11 triệu ảnh. SA-1B là dataset phân đoạn lớn nhất tại thời điểm ra mắt, cung cấp dữ liệu huấn luyện chất lượng cao và đa dạng, làm nền tảng cho hiệu năng zero-shot của SAM trên các tác vụ phân đoạn.


Bình luận27
Đặt câu hỏi, chia sẻ kết quả hoặc giúp đỡ người khác.
kh-diab
can we use SAM to process labeled images with bounding box to segment the object inside the box and generate new labels files like yolo or coco format if yes how please
1 Paula DerrengerUltralytics
Yes, you can use SAM to process labeled images with bounding boxes to segment the objects inside and generate new label files in formats like YOLO or COCO. You can achieve this by using the
auto_annotatefunction in the Ultralytics framework. This function allows you to auto-annotate your dataset using a pre-trained detection model and SAM for segmentation. For more details, you can refer to the Segment Anything Model documentation. If you need further assistance, feel free to ask!Hello @pderrenger
Thanks I tried to run the below but I face error all the time
import os import cv2 import numpy as np from ultralytics import SAM
Load the SAM model
model = SAM("sam_b.pt") # Update the model path if needed
Function to load YOLO annotations
def load_yolo_annotations(annotation_path, image_width, image_height): bboxes = [] try: with open(annotation_path, 'r') as file: lines = file.readlines() for line in lines: parts = line.strip().split() class_id = int(parts[0]) x_center = float(parts[1]) * image_width y_center = float(parts[2]) * image_height width = float(parts[3]) * image_width height = float(parts[4]) * image_height x = x_center - width / 2 y = y_center - height / 2 bboxes.append((x, y, x + width, y + height)) # Update to [x1, y1, x2, y2] except Exception as e: print(f"Error reading annotation file {annotation_path}: {e}") return bboxes
Paths
images_folder = r'E:\MSc\tesi\20210901_Herrenpuent_Taenikon_Matrice_300_15m_1.6m_s\500 D' annotations_folder = r'C:\Users\Khaled\OneDrive - OST\Study Material\Msc Thesis\dataset\Group D yolo format\obj_train_data' output_folder = r'C:\Users\Khaled\OneDrive - OST\Study Material\Msc Thesis\dataset\test output sam'
if not os.path.exists(output_folder): os.makedirs(output_folder)
Process each image and its corresponding annotation
total_images = len(os.listdir(images_folder)) processed_images = 0
for image_filename in os.listdir(images_folder): if image_filename.endswith(('.JPG', '.jpg', '.png')): image_path = os.path.join(images_folder, image_filename) annotation_path = os.path.join(annotations_folder, image_filename.replace('.JPG', '.txt').replace('.jpg', '.txt').replace('.png', '.txt'))
    print(f"Processing {image_filename}...")

    # Check if annotation file exists
    if not os.path.exists(annotation_path):
        print(f"Annotation file not found for {image_filename}")
        continue

    # Load the image
    image = cv2.imread(image_path)
    if image is None:
        print(f"Failed to load image {image_path}")
        continue

    image_rgb = cv2.cvtColor(image, cv2.COLOR_BGR2RGB)
    height, width, _ = image.shape

    # Load YOLO annotations
    bboxes = load_yolo_annotations(annotation_path, width, height)
    if not bboxes:
        print(f"No bounding boxes found in {annotation_path}")
        continue

    # Perform segmentation using SAM model
    results = model(image_rgb, bboxes=bboxes)

    for idx, result in enumerate(results):
        if hasattr(result, 'masks') and result.masks is not None:
            masks = result.masks.cpu().numpy()  # Convert to numpy array
            for m_idx, mask in enumerate(masks):
                chw_mask = mask.astype(np.uint8)  # Ensure mask is in uint8 format
                hwc_mask = np.transpose(chw_mask, (1, 2, 0))  # Convert CHW to HWC
                contours, _ = cv2.findContours(hwc_mask, cv2.RETR_EXTERNAL, cv2.CHAIN_APPROX_SIMPLE)

                segmented_image = cv2.bitwise_and(image, image, mask=hwc_mask)

                # Save the segmented image
                output_path = os.path.join(output_folder, image_filename.replace('.JPG', f'_segmented_{idx}_{m_idx}.jpg').replace('.jpg', f'_segmented_{idx}_{m_idx}.jpg').replace('.png', f'_segmented_{idx}_{m_idx}.png'))
                cv2.imwrite(output_path, segmented_image)
                print(f"Saved segmented image to {output_path}")

    processed_images += 1
    print(f"Processed {processed_images}/{total_images} images.")
print("Processing completed.")
error is
AttributeError: 'Masks' object has no attribute 'astype'. See valid attributes below.
A class for storing and manipulating detection masks.

    xy (list): A list of segments in pixel coordinates.
    xyn (list): A list of normalized segments.

Methods:
    cpu(): Returns the masks tensor on CPU memory.
    numpy(): Returns the masks tensor as a numpy array.
    cuda(): Returns the masks tensor on GPU memory.
    to(device, dtype): Returns the masks tensor with the specified device and dtype.
PS C:\Users\Khaled> & C:/MSc_Workspace/anaconda3/envs/GenEnv/python.exe "c:/Users/Khaled/OneDrive - OST/Study Material/Msc Thesis/coding/sam segment.py" Processing DJI_20210901122818_0695.JPG...
0: 1024x1024 67330.4ms Speed: 48.0ms preprocess, 67330.4ms inference, 8095.5ms postprocess per image at shape (1, 3, 1024, 1024) Traceback (most recent call last): File "c:\Users\Khaled\OneDrive - OST\Study Material\Msc Thesis\coding\sam segment.py", line 75, in chw_mask = mask.astype(np.uint8) # Ensure mask is in uint8 format File "C:\MSc_Workspace\anaconda3\envs\GenEnv\lib\site-packages\ultralytics\utils_init_.py", line 162, in getattr raise AttributeError(f"'{name}' object has no attribute '{attr}'. See valid attributes below.\n{self.doc}") AttributeError: 'Masks' object has no attribute 'astype'. See valid attributes below.
A class for storing and manipulating detection masks.

Attributes:
    xy (list): A list of segments in pixel coordinates.
    xyn (list): A list of normalized segments.

Methods:
    cpu(): Returns the masks tensor on CPU memory.
    numpy(): Returns the masks tensor as a numpy array.
    cuda(): Returns the masks tensor on GPU memory.
    to(device, dtype): Returns the masks tensor with the specified device and dtype.
do you have idea how to solve it thanks
evans rojas
Hola me gustaría usar SAM para clasificar vegetación a partir de una imagen. ¿Qué recomendaciones me sugieren?
- Paula DerrengerUltralytics
Hola, Evans. SAM puede ayudarte a delimitar la vegetación, pero el SAM original no identifica por sí solo especies ni tipos de cobertura. Te sugiero comenzar con puntos positivos sobre la vegetación y negativos sobre el fondo, revisar las máscaras y asignarles tus clases manualmente. Si buscas automatizar la clasificación en más imágenes, puedes usar esas anotaciones para entrenar un modelo de segmentación por instancias para plantas individuales o de segmentación semántica para coberturas del terreno. ¿Quieres separar vegetación del fondo o distinguir especies, y trabajas con fotografías terrestres, de dron o satelitales?
meenakshi71
I've been trying to export the SAM model (which i had trained on my custom dataset) into ONNX but the output is always wrong. It is just generating a grid instead of a proper segmentation mask every time even after providing multiple kinds of prompts.
 Glenn JocherUltralytics
@meenakshi71 it seems the issue may stem from the export process or configuration. Ensure you are using the correct export parameters and supported formats. SAM models are primarily designed for real-time inference and not all functionalities may transfer seamlessly to ONNX. Refer to the SAM export documentation for guidance. If the problem persists, consider testing the ONNX model with simpler prompts to isolate the issue.
MeenakshiKK236
Why are my segmentation results being automatically saved into this directory while using the SAM model to perform segmentation on my custom dataset? "Results saved to runs/segment/predict4"
- Glenn JocherUltralytics
@MeenakshiKK236 the results are saved to the
runs/segment/predict4directory by default. You can change the save directory by specifying theprojectandnamearguments in your command. For more details, please refer to the SAM documentation.
NasserAlqeifi
Correct me if I'm wrong, when I use the auto_annotate function I will only get labels for my dataset with the classes in Yolo pre-trained? What if I need classes that are not available within Yolo? For example, I want to get a label for the road, and this is not available in any version of Yolo, but it is available in SAM?
- Glenn JocherUltralytics
@NasserAlqeifi you are correct. The
auto_annotatefunction uses YOLO's pre-trained classes for labeling. If you need classes not available in YOLO, like "road," you can use SAM directly for segmentation. For more details, please refer to the Segment Anything Model documentation. - Glenn JocherUltralytics
@NasserAlqeifi but also remember SAM identifies segments but not classes, so it may find a sign or a road, but it won't be able to assign a class to them by itself.
Thank you for your quick response. Indeed, I tried to use SAM directly and found that it does not save the class names in the name, but the class number.
from ultralytics import SAM
Load a model
model = SAM("sam2_l.pt")
Predict results
results = model.predict(source=r"/testSAM/image.png", stream=True, bboxes=None, points=None, labels=None, show=False)
Iterate over results, print names, and save each result to a file
for i, result in enumerate(results): # Print the names detected in the result print(f"Result {i}: Detected Names - {result.names}")
# Save the result as an image file
result.save(f"output_{i}.jpg")
------------- output ---------
image 1/1 /testSAM/image.png: 1024x1024 1 0, 1 1, 1 2, 1 3, 1 4, 1 5, 1 6, 1 7, 1 8, 1 9, 1 10, 1 11, 1 12, 1 13, 1 14, 1 15, 1 16, 1 17, 1 18, 1 19, 1 20, 1 21, 1 22, 1 23, 1 24, 1 25, 1 26, 1 27, 1 28, 1 29, 1 30, 1 31, 1 32, 23758.2ms Result 0: Detected Names - {0: '0', 1: '1', 2: '2', 3: '3', 4: '4', 5: '5', 6: '6', 7: '7', 8: '8', 9: '9', 10: '10', 11: '11', 12: '12', 13: '13', 14: '14', 15: '15', 16: '16', 17: '17', 18: '18', 19: '19', 20: '20', 21: '21', 22: '22', 23: '23', 24: '24', 25: '25', 26: '26', 27: '27', 28: '28', 29: '29', 30: '30', 31: '31', 32: '32'} Speed: 20.3ms preprocess, 23758.2ms inference, 7.1ms postprocess per image at shape (1, 3, 1024, 1024)
- Glenn JocherUltralytics
Thank you for your feedback. Currently, SAM does not assign class names, only class numbers. If you need specific class names, you may need to implement a custom mapping or post-processing step to assign the desired class names based on your requirements.
dreambit
I have images where a single object (such as a car) is partially covered by small trees, resulting in the object being divided into multiple visible fragments. In coco it could look like { "id": 1, "image_id": 1, "category_id": 1, "bbox": [x, y, width, height], "segmentation": [ [polygon1_x1, polygon1_y1, polygon1_x2, polygon1_y2, ...], [polygon2_x1, polygon2_y1, polygon2_x2, polygon2_y2, ...] ], "area": 500, "iscrowd": 0 } Each polygon is an array of coordinates defining a closed shape
Is it possible with auto_annotate and yolo format?
- Glenn JocherUltralytics(đã chỉnh sửa)
@dreambit hi there!
Thank you for your detailed question. Yes, you can use the
auto_annotatefunction in the Ultralytics framework to handle images where objects are partially occluded and appear as multiple fragments. This function can generate segmentation masks for such complex scenarios.Here's how you can achieve this:
- Prepare Your Dataset: Ensure your images are organized in a directory.
- Use the
auto_annotateFunction: This function will use a pre-trained YOLO detection model and the SAM segmentation model to annotate your images.
Here's a code example to get you started:
from ultralytics.data.annotator import auto_annotate

# Path to your images
data_path = "path/to/your/images"

# Auto-annotate using YOLO26 and SAM models
auto_annotate(data=data_path, det_model="yolo26x.pt", sam_model="sam_b.pt")
Explanation:
data: Path to the folder containing your images.det_model: The pre-trained YOLO detection model, which defaults toyolo26x.pt.sam_model: The pre-trained SAM segmentation model, which defaults tosam_b.pt.
This setup will generate segmentation masks for your images, even if the objects are partially occluded.
For more detailed information on using SAM and its capabilities, you can refer to the Segment Anything Model (SAM) documentation.
If you encounter any issues or need further assistance, please provide a reproducible example so we can better understand and address your specific scenario. You can find more information on creating a minimum reproducible example here.
Feel free to update to the latest versions of the packages to ensure you have the latest features and fixes.
Best of luck with your project! 🚀
Glenn thanks, but as I see in docs https://docs.ultralytics.com/datasets/segment/#ultralytics-yolo-format ... In this format, is the index of the class for the object, and ... are the bounding coordinates of the object's segmentation mask. The coordinates are separated by spaces.
So it means that I could have only one segmentation mask?
0 0.681 0.485 0.670 0.487 0.676 0.487 1 0.504 0.000 0.501 0.004 0.498 0.004 0.493 0.010 0.492 0.0104
Glen, i ran the command you specified, and used an image from coco data set to test, as you can see segmentations are not correct, only half of the objects are segmented:
Here is original image from coco with car mask https://ibb.co/RjYyRdk
- Glenn JocherUltralytics(đã chỉnh sửa)
Hi @dreambit,
Thank you for sharing the images and details. I understand the challenge you're facing with partial segmentations. The
auto_annotatefunction should ideally handle such cases, but it seems like the segmentation results are not as expected.Steps to Troubleshoot and Improve Segmentation:
-
Verify Latest Versions: Ensure you are using the latest versions of the Ultralytics and SAM models. This can help avoid any bugs that might have been fixed in recent updates.
-
Reproducible Example: If the issue persists, providing a minimum reproducible example would be very helpful. This allows us to better understand and diagnose the problem. You can find guidance on creating a reproducible example here.
-
Adjusting Prompts: Sometimes, adjusting the prompts (bounding boxes or points) can improve segmentation results. Here’s an example of how you can use different prompts:
from ultralytics import SAM # Load a model model = SAM("sam_b.pt") # Run inference with bounding boxes prompt results = model("path/to/image.jpg", bboxes=[[x1, y1, x2, y2], [x3, y3, x4, y4]]) # Run inference with points prompt results = model("path/to/image.jpg", points=[[x1, y1], [x2, y2]], labels=[1, 1]) -
Segment Everything: If specific prompts are not yielding the desired results, you can try segmenting the entire image without prompts:
from ultralytics import SAM # Load a model model = SAM("sam_b.pt") # Segment the whole image results = model("path/to/image.jpg") -
Multiple Masks Handling: If your object is divided into multiple fragments, ensure that the segmentation model is capable of handling multiple masks per object. The YOLO format typically supports one segmentation mask per object, but you can adapt the output to handle multiple masks by combining them post-processing.
Example of Handling Multiple Masks:
If you need to combine multiple masks into a single annotation, you can do this post-processing:
# `results[0].masks.data` holds all masks of the image, shape (N, H, W)
combined_mask = results[0].masks.data.cpu().numpy().max(axis=0)

# Save or use the combined mask
Documentation and Resources:
For more detailed information on using SAM and its capabilities, please refer to the Segment Anything Model (SAM) documentation.
If you continue to face issues, please share a reproducible example, and we’ll be happy to assist further. Your feedback is valuable, and we aim to provide the best support possible.
-
kshweikeh
is there anyway where I can train YOLO SAM on a custom dataset?
- Paula DerrengerUltralytics(đã chỉnh sửa)
@kshweikeh hi there!
Currently, the Segment Anything Model (SAM) from Ultralytics is designed primarily for inference and does not support training on custom datasets. However, you can leverage SAM's powerful zero-shot capabilities for various segmentation tasks without the need for additional training.
If you're looking to create a segmentation dataset using SAM, you can use the auto-annotation feature. This allows you to generate segmentation masks using a pre-trained detection model. Here's a quick example:
from ultralytics.data.annotator import auto_annotate

auto_annotate(data="path/to/images", det_model="yolo26x.pt", sam_model="sam_b.pt")
This function will help you annotate your images quickly and efficiently, bypassing the need for manual labeling.
For more detailed information on using SAM, you can visit our Segment Anything Model (SAM) documentation.
If you have any further questions or need additional assistance, feel free to ask! 😊
Blessing988
@pderrenger It looks like auto_annotate for SAM only gives out the segmentation masks. What if you want to generate the bounding boxes in additionto the masks to verify if the results are right. Thanks.
Also, how will one visualise the segmentation masks after the auto_annotate which have been saved in a directory of txt files.
- Paula DerrengerUltralytics(đã chỉnh sửa)
Hi @Blessing988,
auto_annotatewrites one YOLO segmentation polygon per line (class_id x1 y1 x2 y2 ..., normalized) to its output folder (output_dir, by default<images folder>_auto_annotate_labels). Here is a script to draw those polygons on the images:from pathlib import Path import cv2 import numpy as np def visualize_annotations(image_dir, label_dir, output_dir): Path(output_dir).mkdir(parents=True, exist_ok=True) for image_path in Path(image_dir).glob("*.jpg"): image = cv2.imread(str(image_path)) h, w = image.shape[:2] label_path = Path(label_dir) / f"{image_path.stem}.txt" if not label_path.exists(): continue for line in label_path.read_text().splitlines(): values = line.split() polygon = (np.array(values[1:], dtype=float).reshape(-1, 2) * [w, h]).astype(np.int32) cv2.polylines(image, [polygon], isClosed=True, color=(0, 255, 0), thickness=2) cv2.imwrite(str(Path(output_dir) / image_path.name), image) visualize_annotations("path/to/images", "path/to/labels", "path/to/output")For more detailed information on using SAM and its features, you can refer to the Segment Anything Model (SAM) documentation.
Feel free to reach out if you have any further questions or need additional assistance! 😊
pabentse
Would be fantastic with support for the "H" size as well!
- Paula DerrengerUltralytics
@pabentse absolutely, the addition of an "H" size model would be a great enhancement to the range of model sizes we offer, catering to different computational needs and use cases. The YOLO community's feedback is invaluable, and suggestions like yours help guide future developments. Keep an eye on our updates! 👀🚀