YOLOv9:目标检测技术的重大突破
YOLOv9 通过引入可编程梯度信息(PGI)和广义高效层聚合网络(GELAN),推动了实时目标检测的发展。发布时,它在 MS COCO 数据集上的效率和精度均优于先前的实时检测器。YOLOv9 项目由独立的开源团队开发,并基于 Ultralytics YOLOv5 代码库构建。
观看: 使用 Ultralytics 在自定义数据上训练 YOLOv9 | 工业包装数据集
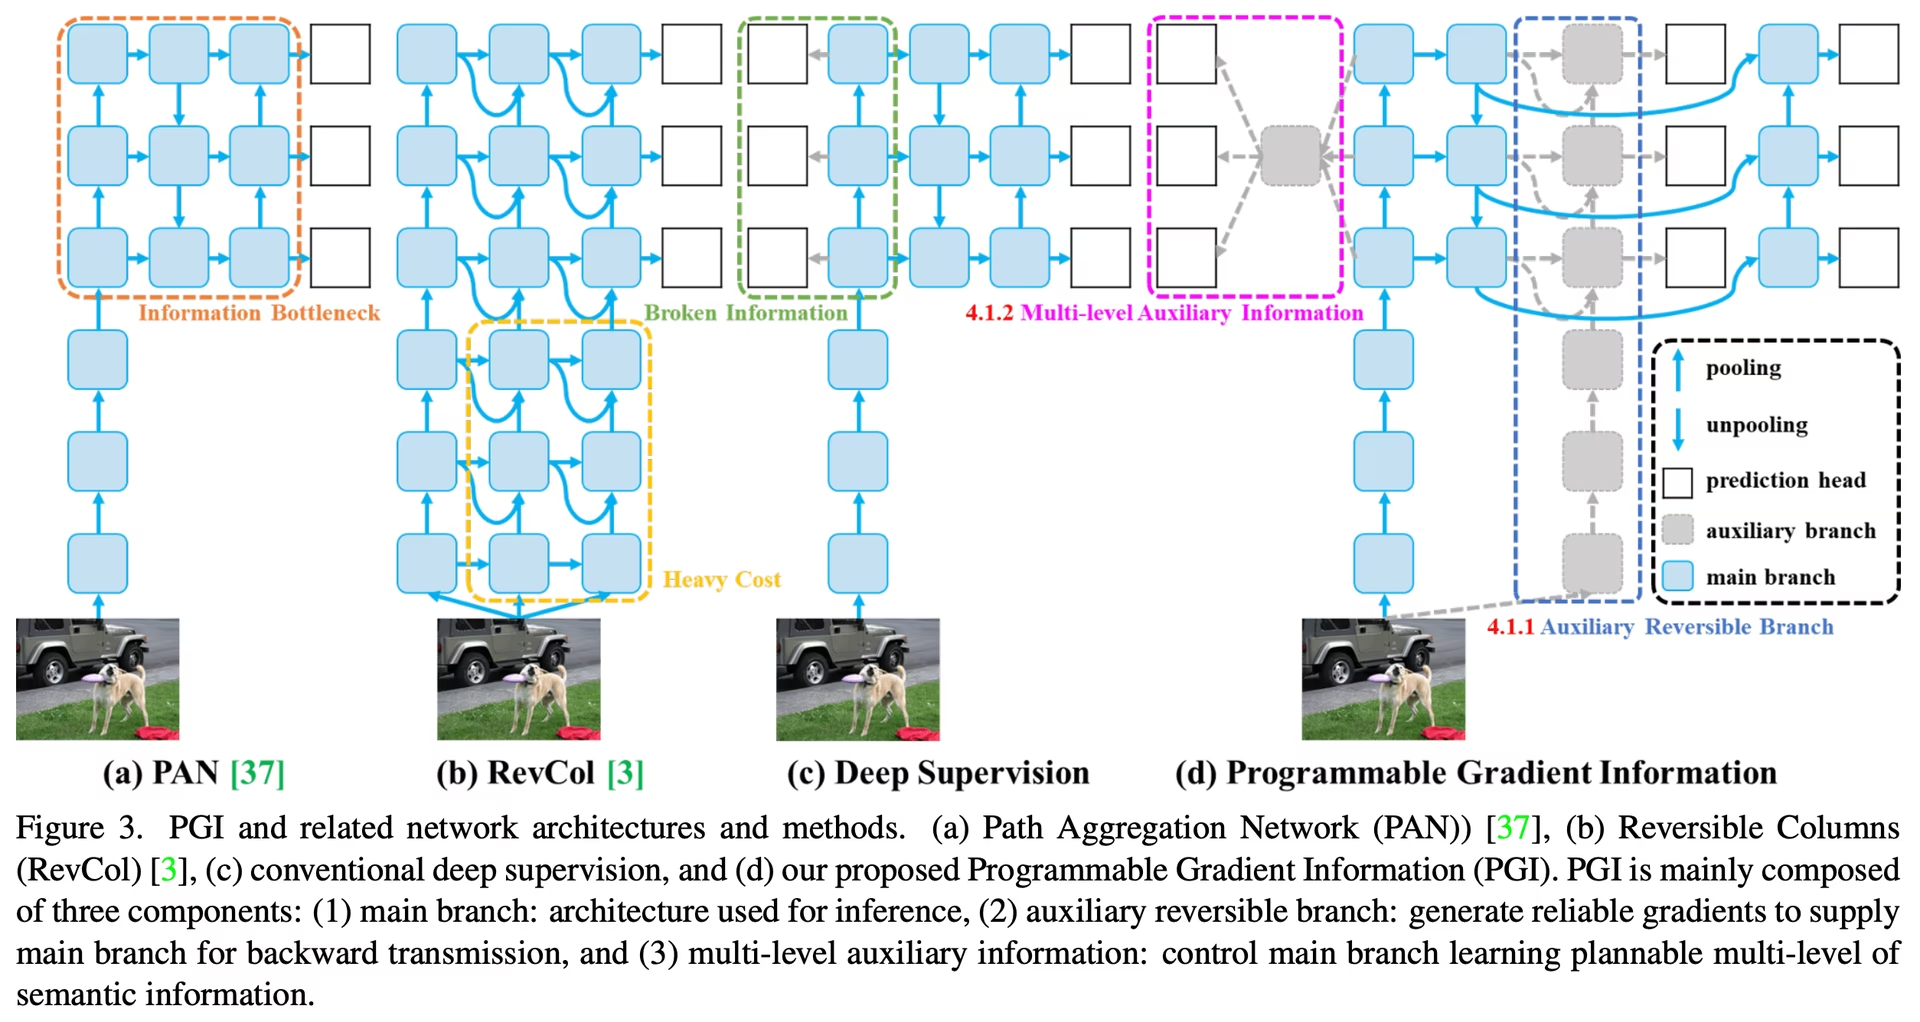
YOLOv9 简介#
YOLOv9 解决了深层神经网络中固有的信息丢失问题。通过整合 PGI 和 GELAN 架构,YOLOv9 提升了模型的学习能力,并在整个检测过程中保留关键信息,从而同时提高精度和效率。
YOLOv9 的核心创新#
YOLOv9 的设计旨在解决深层神经网络中的信息丢失问题。信息瓶颈原理和可逆函数的运用是其设计的核心,有助于 YOLOv9 保持较高的效率和精度。
信息瓶颈原理#
信息瓶颈原理揭示了深度学习中的一个基本难题:随着数据经过网络的多个连续层,信息丢失的可能性会不断增加。这一现象可用数学公式表示为:
I(X, X) >= I(X, f_theta(X)) >= I(X, g_phi(f_theta(X)))其中,I 表示互信息,f 和 g 分别表示参数为 theta 和 phi 的变换函数。YOLOv9 通过实现可编程梯度信息(PGI)来应对这一难题,帮助在网络深度方向保留关键数据,确保生成更可靠的梯度,从而改善模型收敛效果和性能。
可逆函数#
可逆函数也是 YOLOv9 设计的另一项基石。如果一个函数可以在不丢失任何信息的情况下求逆,我们就称它为可逆函数,其表达式如下:
X = v_zeta(r_psi(X))其中 psi 和 zeta 分别是可逆函数及其逆函数的参数。这一特性对深度学习架构至关重要,因为它能让网络保留完整的信息流,从而更准确地更新模型参数。YOLOv9 在其架构中采用可逆函数,以降低信息退化的风险,尤其是在较深层中,从而确保为目标检测任务保留关键数据。
对轻量级模型的影响#
解决信息丢失问题对轻量级模型尤为重要,因为这类模型通常参数不足,在前向传播过程中容易丢失大量信息。YOLOv9 架构通过采用 PGI 和可逆函数,确保即使模型经过精简,准确检测目标所需的关键信息仍能得到保留并得到有效利用。
可编程梯度信息(PGI)#
PGI 是 YOLOv9 引入的一项新概念,旨在解决信息瓶颈问题,确保关键数据在深层网络中得以保留。这样可以生成可靠的梯度,便于准确更新模型,并提升整体检测性能。
广义高效层聚合网络(GELAN)#
GELAN 是一种能够提高 YOLOv9 参数利用率和计算效率的架构。它的设计支持灵活集成各种计算模块,使 YOLOv9 能够适应广泛的应用场景,同时不牺牲速度或精度。
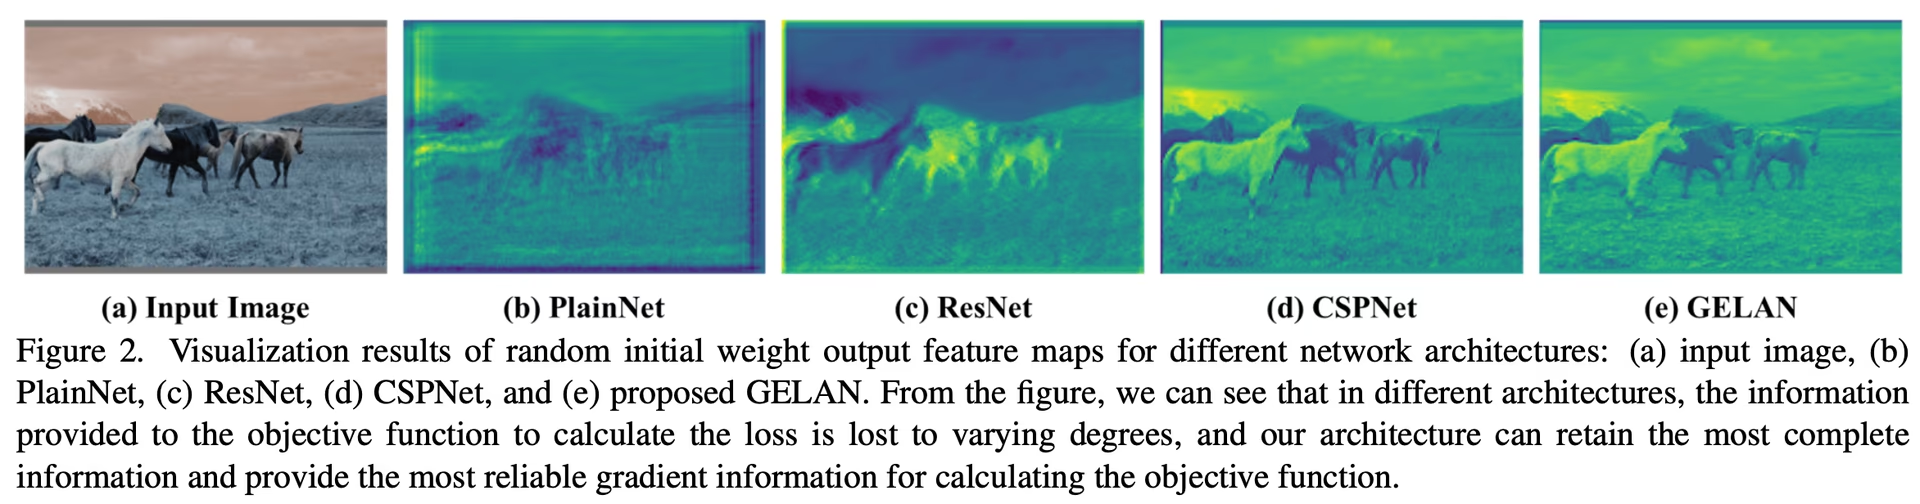
YOLOv9 基准测试#
使用 Ultralytics 基准测试模式对 YOLOv9 进行基准测试,需要在真实场景中评估经过训练和验证的模型性能。此过程包括:
- 性能评估:评估模型的速度和精度。
- 导出格式:在不同的导出格式下测试模型,确保模型符合必要标准,并能在各种环境中良好运行。
- 框架支持:在 Ultralytics Package 中运行这些评估,以获得一致且可靠的结果。
通过基准测试,你可以确保模型不仅在受控测试环境中表现良好,也能在实际应用中保持高性能。
观看: 如何使用 Ultralytics Python Package 对 YOLOv9 模型进行基准测试
在 MS COCO 数据集上的性能#
YOLOv9 发布时,在COCO 数据集的多种模型规模上创下了新的基准。下表列出了 Ultralytics 中每个 YOLOv9 模型的精度、参数量和 FLOPs。
YOLOv9 的变体从小型 t 模型到大型 e 模型不等。与先前版本和竞争模型相比,这些变体在保持或减少参数量与计算量(FLOPs)的同时,提高了精度(mAP)。
与其他实时检测器相比,YOLOv9 展现出以下优势:
- 轻量级模型:YOLOv9s 在参数效率和计算负载方面优于 YOLO MS-S,同时 AP 提高了 0.4∼0.6%。
- 中型到大型模型:YOLOv9m 和 YOLOv9e 改善了模型复杂度与检测性能之间的权衡,在提高精度的同时减少参数量和计算量。
YOLOv9c 的参数量比 YOLOv7 AF 少 42%,计算量少 21%,同时精度相当。YOLOv9e 的参数量比 YOLOv8x 少 15%,计算量少 25%,AP 则提高了 1.7%。
这些结果表明,YOLOv9 在不影响实时目标检测及其他计算机视觉任务所需精度的前提下,提高了计算效率。
结论#
YOLOv9 于 2024 年 2 月发布,提升了实时目标检测的效率和精度。通过借助 PGI 和 GELAN 解决信息丢失问题,YOLOv9 在发布时创下了新的基准。此后,YOLO26 和 YOLO11 等更新的模型带来了更多改进,但 YOLOv9 的架构创新仍持续影响着这一领域。
使用示例#
PyTorch 预训练的 *.pt 模型以及配置 *.yaml 文件都可以传递给 YOLO() 类,从而在 Python 中创建模型实例:
from ultralytics import YOLO

# 从头开始构建 YOLOv9c 模型
model = YOLO("yolov9c.yaml")

# 使用预训练权重构建 YOLOv9c 模型
model = YOLO("yolov9c.pt")

# 显示模型信息(可选)
model.info()

# 使用 COCO8 示例数据集训练模型 100 个 epoch
results = model.train(data="coco8.yaml", epochs=100, imgsz=640)

# 使用 YOLOv9c 模型对“bus.jpg”图像进行推理
results = model("path/to/bus.jpg")支持的任务和模式#
YOLOv9 系列提供多种模型,用于目标检测和实例分割,适用于不同的计算预算和精度要求。
| 模型 | 文件名 | 任务 | 训练 | 验证 | 推理 | 导出 |
|---|---|---|---|---|---|---|
| YOLOv9 | yolov9t.pt yolov9s.pt yolov9m.pt yolov9c.pt yolov9e.pt | 目标检测 | ✅ | ✅ | ✅ | ✅ |
| YOLOv9-seg | yolov9c-seg.pt yolov9e-seg.pt | 实例分割 | ✅ | ✅ | ✅ | ✅ |
本表汇总了 YOLOv9 模型变体,以及它们对训练、验证、推理和导出模式的支持情况。
与同等规模的 YOLOv8 模型相比,训练 YOLOv9 模型需要更多资源,而且耗时更长。
引用与致谢#
我们谨向 YOLOv9 作者在实时目标检测领域作出的重要贡献致谢:
@inproceedings{wang2024yolov9,
  title={YOLOv9: Learning What You Want to Learn Using Programmable Gradient Information},
  author={Wang, Chien-Yao and Yeh, I-Hau and Liao, Hong-Yuan Mark},
  booktitle={Computer Vision -- ECCV 2024},
  pages={1--21},
  year={2024},
  organization={Springer Nature Switzerland}
}
YOLOv9 官方论文发表于 Springer ECCV 2024 论文集,预印本发布于 arXiv。作者已公开其研究成果,代码库可通过 GitHub 访问。感谢他们为推动这一领域的发展并让更广泛的社区能够获取其成果所付出的努力。
常见问题#
YOLOv9 引入了两项主要技术:可编程梯度信息(PGI)和广义高效层聚合网络(GELAN)。这些创新解决了深度神经网络中的信息丢失难题,确保模型具备高效率、高准确率和强适应性。PGI 在网络层之间保留关键信息,而 GELAN 则优化参数利用率和计算效率。
发布时,YOLOv9 在准确率和效率方面优于其他先进的实时目标检测器。在 COCO 数据集上,YOLOv9 模型在多种尺寸下都能取得更高的 mAP 分数,同时保持或降低计算开销。例如,与 YOLOv7 AF 相比,YOLOv9c 的准确率相当,但参数量减少了 42%,计算需求降低了 21%。
你可以使用 Python 和 CLI 命令训练 YOLOv9 模型。使用 Python 时,先通过
YOLO类实例化模型,再调用train方法:from ultralytics import YOLO # 使用预训练权重构建 YOLOv9c 模型并开始训练 model = YOLO("yolov9c.pt") results = model.train(data="coco8.yaml", epochs=100, imgsz=640)使用 CLI 训练时,运行:
yolo train model=yolov9c.yaml data=coco8.yaml epochs=100 imgsz=640详细了解训练和推理的用法示例。
YOLOv9 旨在减少信息丢失,这对容易丢失大量信息的轻量级模型尤为重要。通过整合可编程梯度信息(PGI)和可逆函数,YOLOv9 确保关键信息得以保留,从而提高模型的精度和效率。因此,YOLOv9 非常适合需要紧凑模型且要求高性能的应用场景。如需了解更多详情,请参阅 YOLOv9 对轻量级模型的影响部分。


评论482
提出问题、分享结果,或帮助其他人。
vuvanhieu
to load a YOLOv5 model def load_yolov5_model(yolo_model_path): device = torch.device('cuda' if torch.cuda.is_available() else 'cpu') model = torch.hub.load('ultralytics/yolov5', 'custom', path=yolo_model_path, force_reload=True).to(device) return model
How in yolov8, yolov9?
1 Paula DerrengerUltralytics
To load a YOLOv8 or YOLOv9 model, you can use the
YOLOclass from the Ultralytics package. Here's a concise way to do it:from ultralytics import YOLO # Load a YOLOv8 model model_v8 = YOLO("yolov8n.pt") # Load a YOLOv9 model model_v9 = YOLO("yolov9c.pt")For more details, you can refer to the YOLOv9 documentation: https://docs.ultralytics.com/models/yolov9/.
MoAbbasid
@glenn-jocher @pderrenger any idea of when the lightweight models can be used in ultralytics?
1 Glenn JocherUltralytics(已编辑)
Hi there! 😊
Lightweight models are available in Ultralytics. YOLOv9 ships
yolov9t.pt,yolov9s.ptandyolov9m.ptalongsideyolov9c.ptandyolov9e.pt. For new projects we recommend YOLO26, whose smallest modelyolo26n.ptis built for efficiency.To try a lightweight model:
yolo train model=yolo26n.pt data=coco128.yaml epochs=100If you're tinkering with custom lightweight designs, copy an existing model YAML from the Ultralytics repo and adjust its layers or scales. Contributions or insights are welcome.
Happy detecting!
deepanalyticszlc
Very exciting! Is there a schedule for release of lightweight models?
1- Paula DerrengerUltralytics(已编辑)
@deepanalyticszlc hey there! 😊
Lightweight YOLOv9 models are now available:
yolov9t.pt,yolov9s.ptandyolov9m.pt, alongsideyolov9c.ptandyolov9e.pt. For the latest releases, see the Ultralytics GitHub releases.Here's a little snippet on how to load and use YOLOv9 for predictions:
from ultralytics import YOLO

# Load YOLOv9 model
model = YOLO('yolov9t.pt')  # Replace 'yolov9t.pt' with your model file

# Run inference on an image
results = model('path/to/your/image.jpg')

# Display results
results[0].show()
For new projects, we recommend YOLO26, which also comes in small sizes like
yolo26n.pt. ⏰
DolapoSalim(已编辑)
@glenn-jocher Kindly assist with this TypeError: TypeError: ERROR C:\path_to_custom_model/yolov9c.pt appears to be an Ultralytics YOLOv5 model originally trained with https://github.com/ultralytics/yolov5. This model is NOT forwards compatible with YOLOv8 at https://github.com/ultralytics/ultralytics. Recommend fixes are to train a new model using the latest 'ultralytics' package or to run a command with an official Ultralytics model, i.e. 'yolo predict model=yolo11n.pt'
Here is my code:
from ultralytics import YOLO

model = YOLO(path_to_YOLOV9.pt )

results = model.predict(source="IMAGE_SOURCE", show=True, conf=0.10)
Note, I am actually working with a custom trained YOLOV9
- Glenn JocherUltralytics
@DolapoSalim to resolve the YOLOv5/YOLOv9 compatibility error when using custom-trained models, please ensure you're using the latest
ultralytics>=8.2.0package and retrain your YOLOv9 model using the official YOLOv9 configuration files from our documentation. For custom training guidance, see the YOLOv9 Training section in our docs.This error typically occurs when using older model formats - newer versions maintain full backward compatibility when models are trained with current Ultralytics implementations.
1
gusreic
This article claims that Yolov9 is based on Yolov5. The Yolov9 paper claims that v9 is based on Yolov7 which is also not based on 5. Is there any other way that would explain this claim? Otherwise maybe adjust the article.
- Glenn JocherUltralytics
@gusreic yes that's correct. YOLOv9 repo is a fork of my YOLOv5 repo. I know this because I wrote nearly all the files in the YOLOv9 repo myself. Unfortunately the author has failed to make this clear, though he did include a (hidden) acknowledgement at the bottom of the README.
1 Oh, that is really unfortunate, thank you for clearing it up since it is not directly apparent. Do you think that YOLOv9 is based on YOLOv5 only with respect to the structure of the repository or would you say that the architecture of the model itself is also based on the architecture of YOLOv5?
- Glenn JocherUltralytics
@gusreic thank you for your question! YOLOv9's repository structure is indeed based on Ultralytics YOLOv5, while its architecture introduces novel components like Programmable Gradient Information (PGI) and GELAN as described in the YOLOv9 documentation. The model itself represents an independent advancement building on broader YOLO research. We'll clarify this distinction in our article! 😊
ghost
Hello,
Thanks for the great documentation!
Quick question: Is the code licensed under AGPLv3 (Ultralytics) or GPLv3 (Wang, Chien-Yao and Liao, Hong-Yuan Mark Github)?
Thanks!
- Glenn JocherUltralytics
@ProfessorHT the YOLOv9 project codebase, developed by Wang, Chien-Yao and Liao, Hong-Yuan Mark, is available on GitHub and licensed under GPLv3, while Ultralytics models and software use the AGPL-3.0 license.
Thank you for your quick response. So to be sure if I use Yolov9 from this documentation with the ultralytics library i will be under the AGPLv3 license and i should buy a license?
- Glenn JocherUltralytics
Yes, if you use YOLOv9 models from the Ultralytics library, you are under the AGPL-3.0 license and would need an Enterprise License for commercial use, unless you open-source your entire project under AGPL-3.0.
 liuweiqing
Does it support automatic downloading of pretrained weights?
- Glenn JocherUltralytics
@14790897 yes, YOLOv9 supports automatic downloading of pretrained weights when using the
YOLO()class in Python or CLI commands, as long as the specified weights file (e.g.,yolov9c.pt) is available in the Ultralytics repository. You can find more details in the YOLOv9 documentation.
jane7166
Hello. I have retrained the YOLOv9 model, and I would like to deploy it as an API. How should I proceed?
- Glenn JocherUltralytics
@jane7166 to deploy your retrained YOLOv9 model as an API, you can use frameworks like FastAPI or Flask to build an endpoint and load your model using the Ultralytics Python package. Refer to the YOLOv9 documentation for guidance on inference, which can be integrated into your API logic. Let us know if you have further questions!
Gnoot01
I'm getting the following errors despite latest torch and ultralytics installs. Kindly assist
File "C:\Users\.venv\lib\site-packages\ultralytics\engine\model.py", line 547, in predict self.predictor.setup_model(model=self.model, verbose=is_cli) File "C:\Users\.venv\lib\site-packages\ultralytics\engine\predictor.py", line 303, in setup_model self.model = AutoBackend( File "C:\Users\.venv\lib\site-packages\torch\utils\_contextlib.py", line 116, in decorate_context return func(*args, **kwargs) File "C:\Users\.venv\lib\site-packages\ultralytics\nn\autobackend.py", line 145, in __init__ model = model.fuse(verbose=verbose) TypeError: BaseModel.fuse() got an unexpected keyword argument 'verbose'- Glenn JocherUltralytics
@Gnoot01 it seems like there's a compatibility issue with the
fusemethod. Please ensure you're using the latest version of the Ultralytics package. If the issue persists, consider checking for any updates or changes in the repository that might address this. For further assistance, you can explore the YOLOv9 documentation. @glenn-jocher Hi, I'm using the latest ultralytics 8.3.24 and latest torch. However, still facing this issue. Any suggestions?
- Glenn JocherUltralytics
@Gnoot01 i'm sorry you're experiencing this issue. Please ensure your Ultralytics package is up-to-date. If the problem persists, try reinstalling the package or checking for any recent updates in the repository. For more details, you can refer to the YOLOv9 documentation.
foskyblue
I'm having issues with my Yolov9 model exported to tflite. Model was successfully exported to tflite but I cannot get the right bounding boxes. I'm following the steps listed here: https://stackoverflow.com/questions/76381317/yolov8-tflite-python-predictions-and-interpreting-output (for folov8) to make inference for my yolov9 tflite model.
1Step 1: Resizing and Padding (Letterboxing) Step 2: Non-Maximum Suppression (NMS) Step 3: Rescaling Bounding Boxes
However, when I draw the outputed bounding boxes on my image the boxes don't fit the objects in the image correctly.
The code I'm using can be seen below:
from tflite_runtime.interpreter import Interpreter from PIL import Image import numpy as np from glob import glob from typing import Tuple, List interpreter = None input_shape = (320, 576) # Input tensor dimensions (width, height) in pixels input_index = 0 # Input tensor index (from input details in model signature) output_index = 409 model_path = 'model/saved_model.tflite' def load_model(): interpreter = None interpreter = Interpreter(model_path=model_path, num_threads=2) interpreter.allocate_tensors() input_details = interpreter.get_input_details() global input_shape input_shape = tuple(input_details[0]['shape'][1:3]) global input_index input_index = input_details[0]['index'] output_details = interpreter.get_output_details() global output_index output_index = output_details[0]['index'] return interpreter def letter_box(img: np.ndarray, new_shape: Tuple[int, int]) -> np.ndarray: """ Resizes an image to fit within a new shape while maintaining the aspect ratio, and pads the remaining space with a constant value. Args: img (np.ndarray): The input image as a NumPy array. new_shape (Tuple[int, int]): The desired output shape (height, width). Returns: np.ndarray: The resized and padded image. """ shape = img.shape[:2] # Calculate the scaling ratio to fit the image within the new shape r = min(new_shape[0] / shape[0], new_shape[1] / shape[1]) # Calculate the new unpadded dimensions new_unpad = int(round(shape[1] * r)), int(round(shape[0] * r)) # Calculate the padding required on each side dw, dh = new_shape[1] - new_unpad[0], new_shape[0] - new_unpad[1] dw, dh = dw / 2, dh / 2 # Resize the image if necessary if shape[::-1] != new_unpad: img = Image.fromarray(img).resize(new_unpad, Image.Resampling.BILINEAR) img = np.array(img) # Calculate the top, bottom, left, and right padding values top, bottom = int(round(dh - 0.1)), int(round(dh + 0.1)) left, right = int(round(dw - 0.1)), int(round(dw + 0.1)) # Add padding to the image img = np.pad(img, ((top, bottom), (left, right), (0, 0)), mode='constant', constant_values=114) return img def non_max_suppression( prediction: np.ndarray, conf_thres: float = 0.25, iou_thres: float = 0.45, max_det: int = 300, max_wh: int = 7680, ): """ Perform non-maximum suppression (NMS) on a single image prediction. Args: prediction (np.ndarray): A numpy array of shape (1, num_boxes, num_classes + 4 + num_masks) containing the predicted boxes, classes, and masks. conf_thres (float): Confidence threshold for filtering boxes (0.0 to 1.0). iou_thres (float): IoU threshold for NMS (0.0 to 1.0). max_det (int): Maximum number of boxes to keep after NMS. max_wh (int): Maximum box width and height in pixels. Returns: np.ndarray: Array containing kept boxes with format (x1, y1, x2, y2, confidence, class, mask1, mask2, ...). """ # Input validation (can be removed if you're sure of your input) if 0 > conf_thres > 1: raise ValueError(f"Invalid Confidence threshold {conf_thres}, valid values are between 0.0 and 1.0") if 0 > iou_thres > 1: raise ValueError(f"Invalid IoU {iou_thres}, valid values are between 0.0 and 1.0") # Extract dimensions and metadata directly _, _, dims = prediction.shape nc = dims - 4 - prediction.shape[1] # number of classes nm = dims - nc - 4 # number of masks mi = 4 + nc # mask start index # Process the single image in the batch x = prediction[0] # Extract the single image data # Move class scores to last axis and threshold x = np.transpose(x, (1, 0)) xc = x[..., 4:mi].max(axis=-1) > conf_thres x = x[xc] if not x.shape[0]: # No boxes left after confidence thresholding return np.zeros((0, 6 + nm)) # Convert xywh to xyxy directly on the filtered boxes x[..., :4] = xywh2xyxy(x[..., :4]) # Split and process boxes, classes, and masks # pylint: disable=unbalanced-tuple-unpacking box, cls, mask = np.split(x, (4, mi), 1) conf = cls.max(1) j = cls.argmax(1) x = np.concatenate((box, conf[:, None], j[:, None].astype(float), mask), 1) x = x[conf > conf_thres] n = x.shape[0] if not n: # No boxes left after additional confidence thresholding return np.zeros((0, 6 + nm)) # NMS (simplified since we're dealing with a single image) c = x[:, 5:6] * max_wh boxes, scores = x[:, :4] + c, x[:, 4] i = numpy_nms(boxes, scores, iou_thres) i = i[:max_det] return x[i] def numpy_nms(boxes: np.ndarray, scores: np.ndarray, iou_threshold: float = 0.5) -> np.ndarray: """ Perform Non-Maximum Suppression (NMS) on a set of bounding boxes. Args: boxes (np.ndarray): Array of shape (N, 4) representing N bounding boxes. Each box is [x1, y1, x2, y2]. scores (np.ndarray): Array of shape (N,) representing the confidence scores for each box. iou_threshold (float): IoU threshold for suppressing overlapping boxes. Defaults to 0.5. Returns: np.ndarray: Boolean array of shape (N,) indicating which boxes to keep. """ # Sort boxes by score in descending order order = scores.argsort()[::-1] keep = np.ones(len(boxes), dtype=bool) # Calculate IoU matrix ious = box_iou_batch(boxes, boxes) np.fill_diagonal(ious, 0) # Set self-IoU to 0 for i, idx in enumerate(order): if not keep[idx]: continue # Suppress boxes with IoU > threshold overlap = ious[idx] > iou_threshold keep[order[i + 1:]] &= ~overlap[order[i + 1:]] return keep def box_iou_batch(boxes_a: np.ndarray, boxes_b: np.ndarray) -> np.ndarray: """ Calculate the Intersection over Union (IoU) between two sets of bounding boxes. Args: boxes_a (np.ndarray): Array of shape (N, 4) representing N bounding boxes. boxes_b (np.ndarray): Array of shape (M, 4) representing M bounding boxes. Returns: np.ndarray: Array of shape (N, M) containing IoU values for each pair of boxes. Note: Each bounding box is represented as [x1, y1, x2, y2], where (x1, y1) is the top-left corner and (x2, y2) is the bottom-right corner. """ # Calculate areas of boxes_a area_a = (boxes_a[:, 2] - boxes_a[:, 0]) * (boxes_a[:, 3] - boxes_a[:, 1]) # Calculate areas of boxes_b area_b = (boxes_b[:, 2] - boxes_b[:, 0]) * (boxes_b[:, 3] - boxes_b[:, 1]) # Calculate intersection coordinates top_left = np.maximum(boxes_a[:, None, :2], boxes_b[:, :2]) bottom_right = np.minimum(boxes_a[:, None, 2:], boxes_b[:, 2:]) # Calculate intersection area area_inter = np.prod(np.clip(bottom_right - top_left, a_min=0, a_max=None), 2) # Calculate IoU return area_inter / (area_a[:, None] + area_b - area_inter) def xywh2xyxy(box: np.ndarray) -> np.ndarray: """ Convert bounding box coordinates from (x, y, width, height) format to (x1, y1, x2, y2) format where (x1, y1) is the top-left corner and (x2, y2) is the bottom-right corner. Args: x (np.ndarray): The input bounding box coordinates in (x, y, width, height) format. Returns: np.ndarray: The bounding box coordinates in (x1, y1, x2, y2) format. """ if box.shape[-1] != 4: raise ValueError(f"input shape last dimension expected 4 but input shape is {box.shape}") # pylint: disable=unbalanced-tuple-unpacking xy, wh = np.split(box, [2], axis=-1) wh_half = wh / 2 return np.concatenate([xy - wh_half, xy + wh_half], axis=-1) def preprocess_image(pil_image: Image.Image, input_size: Tuple[int, int]) -> np.ndarray: """ Preprocesses an image for inference with a TFLite model. Args: image_path (str): Path to the image file. input_size (Tuple[int, int]): Desired input size (height, width) for the model. Returns: np.ndarray: Preprocessed image as a NumPy array, ready for inference. """ if pil_image.mode != "RGB": pil_image = pil_image.convert("RGB") im = np.asarray(pil_image) im = letter_box(im, new_shape=input_size) im = np.expand_dims(im, axis=0) # goal is to have the format (number of images, size of image, number of channnels) im = im.astype(np.float32) / 255.0 # Normalize to 0.0 - 1.0 return im def postprocess_results(output: np.ndarray, model_input_size: Tuple[int, int], image_original_size: Tuple[int, int]) -> np.ndarray: """ Postprocesses the raw outputs from a TFLite model, including scaling bounding boxes back to the original image size. Args: output (np.ndarray): List of output tensors from the TFLite model. model_input_size (Tuple[int, int]): Desired input size (height, width) for the model. image_original_size (Tuple[int, int]): Original size (height, width) of the input image. Returns: np.ndarray: Postprocessed results with bounding boxes adjusted to original image size. """ predictions = non_max_suppression(output, conf_thres=0.25, iou_thres=0.45, max_det=300, max_wh=1) return scale_boxes(image_original_size, predictions, model_input_size) def scale_boxes(image_original_size: Tuple[int, int], boxes: np.ndarray, model_input_size: Tuple[int, int]): """ Rescales bounding boxes (in the format of xyxy by default) from the shape of the image they were originally specified in (img1_shape) to the shape of a different image (img0_shape). Args: image_original_size (Tuple[int, int]): The shape of the image that the bounding boxes are for, in the format of (height, width). boxes (np.ndarray): the bounding boxes of the objects in the image, in the format of (x1, y1, x2, y2) model_input_size (Tuple[int, int]): the shape of the target image, in the format of (height, width). Returns: np.ndarray: The scaled bounding boxes, in the format of (x1, y1, x2, y2) """ # calculate from img0_shape gain = min(model_input_size[0] / image_original_size[0], model_input_size[1] / image_original_size[1]) # gain = old / new pad = ( round((model_input_size[1] - image_original_size[1] * gain) / 2 - 0.1) / model_input_size[1], round((model_input_size[0] - image_original_size[0] * gain) / 2 - 0.1) / model_input_size[0], ) # wh padding inner_image_scale = ( (1 - pad[0] * 2), (1 - pad[1] * 2), ) # wh scale boxes[..., 0] = (boxes[..., 0] - pad[0]) / inner_image_scale[0] # x padding boxes[..., 1] = (boxes[..., 1] - pad[1]) / inner_image_scale[1] # y padding boxes[..., 2] = (boxes[..., 2] - pad[0]) / inner_image_scale[0] # x padding boxes[..., 3] = (boxes[..., 3] - pad[1]) / inner_image_scale[1] # y padding boxes[..., [0, 2]] = boxes[..., [0, 2]].clip(0, 1) # x1, x2 boxes[..., [1, 3]] = boxes[..., [1, 3]].clip(0, 1) # y1, y2 return boxes def prepare_input(image_pil): # Input image must match input shape (ex: 640x640 pixels) [note: only use BILINEAR here] resized = image_pil.copy().resize(input_shape, resample=Image.Resampling.BILINEAR) # SSD Mobilenet V2 FPNLite take as input pixels between [-1.0, 1.0] expanded = np.expand_dims(np.asarray(resized, dtype=np.float32) * 2. / 255. - 1., axis=0) del resized # Enforce garbage collection sooner than later return expanded def predict(tmp_images_dir): interpreter = load_model() model_predictions = [] for img_path in tmp_images_dir: pil_image = Image.open(img_path) input_data = preprocess_image(pil_image, input_shape) interpreter.set_tensor(input_index, input_data) interpreter.invoke() output_data = interpreter.get_tensor(output_index) preds = postprocess_results(output_data, input_shape, (pil_image.size[1], pil_image.size[0])) model_predictions.append({ 'detection_classes': (preds[:, 5] + 1).tolist(), # Class values are offset by +1.0 'detection_boxes': preds[:, 0:4].tolist(), 'detection_scores': preds[:, 4].tolist(), }) print(model_predictions) images_path = glob('utilities/images/*.JPG') predict(images_path)- Glenn JocherUltralytics
@foskyblue it seems like the issue might be related to the scaling and padding logic when converting bounding boxes. Ensure that the
scale_boxesfunction correctly rescales the boxes to the original image size. For more detailed guidance, please refer to the YOLOv9 documentation: https://docs.ultralytics.com/models/yolov9/. Hi Glen thanks for your response. Unfortunately I find it difficult to correctly scale the bounding boxes from the example script I mentioned above: https://stackoverflow.com/questions/76381317/yolov8-tflite-python-predictions-and-interpreting-output.
How can I implement the YOLOv9 TFLite model with an input ape of [1, 320, 576, 3] and output shape of [1, 19, 3780] in Python?
- Glenn JocherUltralytics
To correctly scale bounding boxes for your YOLOv9 TFLite model, ensure your
scale_boxesfunction accurately adjusts the coordinates based on the original image size and model input size. Verify that padding and scaling calculations align with your preprocessing steps. For further details, please refer to the YOLOv9 documentation.