Link to this section使用 Ultralytics YOLO 进行模型预测#

Link to this section简介#
在机器学习和计算机视觉领域,解析视觉数据的过程通常被称为推理或预测。Ultralytics YOLO26 提供了一个强大的功能,称为 预测模式(predict mode),专为跨多种数据源的高性能实时推理而定制。
Watch: How to Extract Results from Ultralytics YOLO26 Tasks for Custom Projects 🚀
Link to this section实际应用#
| 制造业 | 体育运动 | 安全防护 |
|---|---|---|
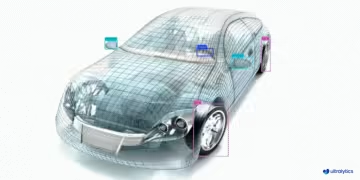 | 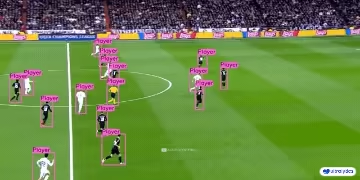 | 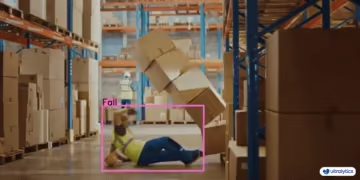 |
| 车辆零件检测 | 足球运动员检测 | 人员跌倒检测 |
Link to this section为何使用 Ultralytics YOLO 进行推理?#
以下是你应当考虑将 YOLO26 的预测模式用于各种推理需求的理由:
- 多功能性: 能够在图像、视频甚至实时流上运行推理。
- 高性能: 专为实时高速处理而设计,且不会牺牲准确率。
- 易用性: 直观的 Python 和 CLI 接口,方便快速部署和测试。
- 高度可定制: 提供多种设置和参数,以便根据你的具体需求调整模型的推理行为。
- 生产就绪: 将模型部署为 Ultralytics Platform 推理端点,支持自动扩缩容和监控,或者在本地运行推理。
Link to this section预测模式的主要特性#
YOLO26 的预测模式旨在实现稳健和多功能,其特性包括:
- 多数据源兼容性: 无论你的数据是单张图像、图像集合、视频文件还是实时视频流,预测模式都能满足你的需求。
- 流式模式: 使用流式功能生成内存高效的
Results对象生成器。通过在预测器的调用方法中设置stream=True来启用此功能。与返回包含所有结果的列表的默认行为(stream=False)不同,stream=True会一次产生一个结果,这对于长视频和实时流媒体特别有用。 - 批量处理: 在单个批次中处理多张图像或视频帧,进一步减少总推理时间。
- 集成友好: 得益于其灵活的 API,可以轻松与现有的数据流水线和其他软件组件集成。
Ultralytics YOLO models return either a Python list of Results objects or a memory-efficient generator of Results objects when stream=True is passed to the model during inference:
from ultralytics import YOLO

# Load a model
model = YOLO("yolo26n.pt")  # pretrained YOLO26n model

# Run batched inference on a list of images
results = model(["image1.jpg", "image2.jpg"])  # return a list of Results objects

# Process results list
for result in results:
    boxes = result.boxes  # Boxes object for bounding box outputs
    masks = result.masks  # Masks object for segmentation masks outputs
    keypoints = result.keypoints  # Keypoints object for pose outputs
    probs = result.probs  # Probs object for classification outputs
    obb = result.obb  # Oriented boxes object for OBB outputs
    result.show()  # display to screen
    result.save(filename="result.jpg")  # save to disk
Link to this section推理源#
YOLO26 可以处理不同类型的推理输入源,如下表所示。输入源包括静态图像、视频流和多种数据格式。下表还标注了每个源是否可以使用 stream=True 参数以流式模式运行 ✅。流式模式对于处理视频或实时流非常有益,因为它会创建一个结果生成器,而不是将所有帧加载到内存中。
在处理长视频或大型数据集时,请使用 stream=True 以高效管理内存。当 stream=False 时,所有帧或数据点的结果都会存储在内存中,这可能会迅速堆积并导致大输入下的内存不足错误。相比之下,stream=True 利用生成器,仅将当前帧或数据点的结果保存在内存中,从而显著降低内存消耗并防止内存不足问题。
| 来源 | 示例 | 类型 | 注意事项 |
|---|---|---|---|
| image | 'image.jpg' | str 或 Path | 单张图像文件。 |
| URL | 'https://ultralytics.com/images/bus.jpg' | str | 图像的 URL 地址。 |
| screenshot | 'screen' | str | 截取屏幕画面。 |
| PIL | Image.open('image.jpg') | PIL.Image | 带 RGB 通道的 HWC 格式。 |
| OpenCV | cv2.imread('image.jpg') | np.ndarray | 带 BGR 通道的 HWC 格式 uint8 (0-255)。 |
| NumPy | np.zeros((640,1280,3)) | np.ndarray | 带 BGR 通道的 HWC 格式 uint8 (0-255)。 |
| torch | torch.zeros(16,3,320,640) | torch.Tensor | 带 RGB 通道的 BCHW 格式 float32 (0.0-1.0)。 |
| CSV | 'sources.csv' | str 或 Path | 包含图像、视频或目录路径的 CSV 文件。 |
| video ✅ | 'video.mp4' | str 或 Path | MP4、AVI 等格式的视频文件。 |
| directory ✅ | 'path/' | str 或 Path | 包含图像或视频的目录路径。 |
| glob ✅ | 'path/*.jpg' | str | 用于匹配多个文件的 Glob 模式。使用 * 字符作为通配符。 |
| YouTube ✅ | 'https://youtu.be/LNwODJXcvt4' | str | YouTube 视频的 URL。 |
| stream ✅ | 'rtsp://example.com/media.mp4' | str | 用于 RTSP、RTMP、TCP 等流媒体协议的 URL 或 IP 地址。 |
| multi-stream ✅ | 'list.streams' | str 或 Path | *.streams 文本文件,每行一个流 URL,例如 8 个流将以 8 的批处理大小运行。 |
| webcam ✅ | 0 | int | 已连接摄像头设备的索引,用于运行推理。 |
以下是使用每种源类型的代码示例:
对图像文件运行推理。
from ultralytics import YOLO

# Load a pretrained YOLO26n model
model = YOLO("yolo26n.pt")

# Define path to the image file
source = "path/to/image.jpg"

# Run inference on the source
results = model(source)  # list of Results objects
Link to this section推理参数#
model.predict() 接受多个参数,这些参数可以在推理时传入以覆盖默认设置:
Link to this section固定尺寸与最小矩形 (rect)#
默认情况下,predict 使用 rect=True,这会在可能的情况下启用 最小矩形 填充。图像被缩放以适合 imgsz,并仅填充到最近的步幅倍数,因此最终张量可能比 imgsz 小。最小矩形填充仅在 批次中所有图像具有相同形状 且后端支持(PyTorch .pt 或动态 ONNX / Triton)时使用。否则,图像将被填充到 完整 的 imgsz 目标尺寸。
使用 rect=False 可始终填充到完整的 imgsz 目标。当你需要固定的输入尺寸以匹配导出的模型(ONNX、TensorRT 等)时,建议使用此项。
整数与元组 imgsz
- 整数
imgsz=640在步幅取整后会成为正方形目标(640, 640)。 - 元组
imgsz=(384, 672)会设置一个矩形目标。在使用rect=True和auto=True时,实际张量可能比此目标更小。
训练与 predict/export 的区别
训练仅接受单个整数 imgsz([h, w] 列表会被强制转换为最大值)。Predict 和 export 接受整数或 (height, width) 元组。
from ultralytics import YOLO

# Load a pretrained YOLO26n model
model = YOLO("yolo26n.pt")

# Run inference on 'bus.jpg' with arguments
model.predict("https://ultralytics.com/images/bus.jpg", save=True, imgsz=320, conf=0.25)
推理参数:
| 参数 | 类型 | 默认值 | 描述 |
|---|---|---|---|
source | str 或 int 或 None | None | 指定推理的数据源。可以是图像路径、视频文件、目录、URL 或实时流的设备 ID。如果省略,将记录警告,模型将回退到内置的演示资源(ultralytics/assets,或用于 OBB 的演示 URL)。支持多种格式和来源,能够在 不同类型的输入 间灵活应用。 |
conf | float | 0.25 | 设置检测的最低置信度阈值。置信度低于此阈值的检测对象将被忽略。调整此值有助于减少误报。 |
iou | float | 0.7 | Intersection Over Union (IoU) 非极大值抑制 (NMS) 阈值。较低的值通过消除重叠框来减少检测数量,有助于减少重复项。 |
imgsz | int 或 tuple | 640 | Letterbox 目标。整数给出方形 N×N;元组给出 (height, width)。设置 rect=True 时,由于最小矩形填充,实际张量可能小于此目标。使用 rect=False 可获得固定大小。请参阅 Fixed shape vs minimum rectangle。 |
rect | bool | True | 如果为 True,则在可能时使用最小矩形填充(相同形状的批次和支持的后端)。如果为 False,则始终填充至完整的 imgsz。请参阅 Fixed shape vs minimum rectangle。 |
quantize | int 或 str | None | 推理精度:16/"fp16" 可在支持的 GPU 上启用 FP16 推理;32/"fp32"/未设置则为 FP32。INT8/PTQ 量化在 export 期间进行配置,并在加载导出模型时使用。取代了已弃用的 half 标志。 |
device | str | None | 指定推理设备(例如 cpu、cuda:0、0、npu 或 npu:0)。允许你选择在 CPU、特定 GPU、华为昇腾 NPU 或其他计算设备上执行模型。 |
batch | int | 1 | 指定推理的批次大小(仅在源为 目录、视频文件或 .txt 文件 时有效)。较大的批次大小可以提供更高的吞吐量,缩短推理所需的总时间。 |
max_det | int | 300 | 每张图像允许的最大检测数。限制模型在单次推理中可检测的对象总数,防止在密集场景中输出过多结果。 |
vid_stride | int | 1 | 视频输入的帧步长。允许跳过视频中的帧以加快处理速度,代价是牺牲时间分辨率。值为 1 处理每一帧,更高的值会跳过帧。 |
stream_buffer | bool | False | 确定是否为视频流排队传入的帧。如果为 False,则丢弃旧帧以适应新帧(针对实时应用程序进行优化)。如果为 True,则将新帧排入缓冲区,确保不跳过任何帧,但如果推理 FPS 低于流 FPS,则会导致延迟。 |
visualize | bool | False | 在推理期间激活模型特征可视化,深入了解模型正在“看到”什么。这对于调试和模型解释非常有用。 |
augment | bool | False | 启用测试时增强 (TTA) 进行预测,可能会提高检测的稳健性,但会以牺牲推理速度为代价。 |
agnostic_nms | bool | False | 启用类别无关的非极大值抑制 (NMS),它会合并不同类别的重叠框。在类别重叠常见的多类检测场景中非常有用。对于端到端模型(YOLO26、YOLOv10),这仅防止相同的检测以多个类别标签出现(IoU=1.0 重复),并且不会在不同框之间执行基于 IoU 阈值的抑制。 |
classes | list[int] | None | 将预测过滤为一组类别 ID。仅返回属于指定类别的检测结果。在多类检测任务中专注于相关对象非常有用。 |
retina_masks | bool | False | 返回高分辨率分割掩码。如果启用,返回的掩码 (masks.data) 将匹配原始图像大小。如果禁用,它们将具有推理期间使用的图像大小。 |
embed | list[int] | None | 指定用于提取特征向量或 embeddings 的层。使用 model.embed(source) 获取倒数第二层的嵌入,或使用 model.predict(source, embed=[layer]) 来选择特定层。这对于聚类或相似度搜索等下游任务非常有用。 |
project | str | None | 如果启用了 save,预测输出将保存到的项目目录名称。 |
name | str | None | 预测运行名称。用于在项目文件夹内创建一个子目录,如果启用了 save,预测输出将存储在该子目录中。 |
stream | bool | False | 通过返回 Results 对象的生成器而不是一次将所有帧加载到内存中,为长视频或大量图像启用内存高效处理。 |
verbose | bool | True | 控制是否在终端中显示详细的推理日志,提供关于预测过程的实时反馈。 |
compile | bool 或 str | False | 启用 PyTorch 2.x 的 torch.compile 图编译,后台使用 backend='inductor'。接受 True -> "default",False -> 禁用,或字符串模式如 "default"、"reduce-overhead"、"max-autotune-no-cudagraphs"。如果不支持,将回退到 eager 模式并发出警告。 |
end2end | bool | None | 覆盖支持免 NMS 推理的 YOLO 模型(YOLO26、YOLOv10)中的端到端模式。将其设置为 False,你可以使用传统的 NMS 管道运行预测,此外还可以利用 iou 参数。有关详细信息,请参阅 End-to-End Detection guide。 |
可视化参数:
| 参数 | 类型 | 默认值 | 描述 |
|---|---|---|---|
show | bool | False | 如果为 True,则在窗口中显示标注后的图像或视频。这对于开发或测试过程中的即时视觉反馈非常有用。 |
save | bool | False or True | 启用将带注释的图像或视频保存到文件。对于文档记录、进一步分析或分享结果非常有用。使用 CLI 时默认为 True,在 Python 中使用时默认为 False。 |
save_frames | bool | False | 处理视频时,将单个帧保存为图像。对于提取特定帧或进行详细的逐帧分析非常有用。 |
save_txt | bool | False | 以 [class] [x_center] [y_center] [width] [height] [confidence] 格式将检测结果保存在文本文件中。对于与其他分析工具集成非常有用。 |
save_conf | bool | False | 在保存的文本文件中包含置信度分数。增强了可用于后续处理和分析的详细信息。 |
save_crop | bool | False | 保存检测对象的裁剪图像。对于数据集增强、分析或创建针对特定对象的聚焦数据集非常有用。 |
show_labels | bool | True | 在视觉输出中显示每次检测的标签。提供对检测到对象的即时理解。 |
show_conf | bool | True | 在标签旁显示每次检测的置信度得分。让你深入了解模型对每次检测的确定性。 |
show_boxes | bool | True | 在检测到的对象周围绘制边界框。对于图像或视频帧中对象的视觉识别和定位至关重要。 |
line_width | int or None | None | 指定边界框的线条宽度。如果为 None,则线条宽度会根据图像尺寸自动调整。提供用于清晰度的视觉自定义功能。 |
Link to this section图像和视频格式#
YOLO26 支持多种图像和视频格式,具体见 ultralytics/data/utils.py。请参阅下表了解有效的后缀和预测命令示例。
Link to this section图像#
下表包含有效的 Ultralytics 图像格式。
HEIC/HEIF 格式需要 pi-heif,它会在首次使用时自动安装。AVIF 由 Pillow 原生支持。
| 图像后缀 | 预测命令示例 | 参考 |
|---|---|---|
.avif | yolo predict source=image.avif | AV1 图像文件格式 |
.bmp | yolo predict source=image.bmp | 微软 BMP 文件格式 |
.dng | yolo predict source=image.dng | Adobe DNG |
.heic | yolo predict source=image.heic | 高效图像格式 |
.heif | yolo predict source=image.heif | 高效图像格式 |
.jp2 | yolo predict source=image.jp2 | JPEG 2000 |
.jpeg | yolo predict source=image.jpeg | JPEG |
.jpg | yolo predict source=image.jpg | JPEG |
.mpo | yolo predict source=image.mpo | 多重图像对象 |
.png | yolo predict source=image.png | 可移植网络图形 |
.tif | yolo predict source=image.tif | 标签图像文件格式 |
.tiff | yolo predict source=image.tiff | 标签图像文件格式 |
.webp | yolo predict source=image.webp | WebP |
Link to this section视频#
下表包含有效的 Ultralytics 视频格式。
| 视频后缀 | 预测命令示例 | 参考 |
|---|---|---|
.asf | yolo predict source=video.asf | 高级系统格式 |
.avi | yolo predict source=video.avi | 音频视频交错格式 |
.gif | yolo predict source=video.gif | 图形交换格式 |
.m4v | yolo predict source=video.m4v | MPEG-4 第 14 部分 |
.mkv | yolo predict source=video.mkv | Matroska |
.mov | yolo predict source=video.mov | QuickTime 文件格式 |
.mp4 | yolo predict source=video.mp4 | MPEG-4 第 14 部分 - 维基百科 |
.mpeg | yolo predict source=video.mpeg | MPEG-1 第 2 部分 |
.mpg | yolo predict source=video.mpg | MPEG-1 第 2 部分 |
.ts | yolo predict source=video.ts | MPEG 传输流 |
.wmv | yolo predict source=video.wmv | Windows 媒体视频 |
.webm | yolo predict source=video.webm | WebM 项目 |
Link to this section处理结果#
所有 Ultralytics predict() 调用都将返回一个 Results 对象列表:
from ultralytics import YOLO

# Load a pretrained YOLO26n model
model = YOLO("yolo26n.pt")

# Run inference on an image
results = model("https://ultralytics.com/images/bus.jpg")
results = model(
    [
        "https://ultralytics.com/images/bus.jpg",
        "https://ultralytics.com/images/zidane.jpg",
    ]
)  # batch inference
Results 对象具有以下属性:
| 属性 | 类型 | 描述 |
|---|---|---|
orig_img | np.ndarray | 作为 NumPy 数组的原始图像。 |
orig_shape | tuple | 以 (高度, 宽度) 格式表示的原始图像形状。 |
boxes | Boxes, optional | 包含检测边界框的 Boxes 对象。 |
masks | Masks, optional | 包含检测掩膜的 Masks 对象。 |
probs | Probs, optional | 包含分类任务中每个类别概率的 Probs 对象。 |
keypoints | Keypoints, optional | 包含每个对象检测到的关键点的 Keypoints 对象。 |
obb | OBB, optional | 包含旋转边界框的 OBB 对象。 |
semantic_mask | SemanticMask, optional | 包含密集逐像素类地图的 SemanticMask 对象。 |
speed | dict | 预处理、推理和后处理速度的字典,单位为每张图像毫秒数。 |
names | dict | 将类别索引映射到类别名称的字典。 |
path | str | 图像文件的路径。 |
save_dir | str, optional | 保存结果的目录。 |
Link to this section各任务的结果#
每次预测都会为每张图像或帧返回一个 Results 对象。上述公共字段始终可用,而特定任务的预测数据存储在下方的字段中。坐标、置信度和概率张量除非使用了半精度,否则均为 torch.float32,使用半精度则为 torch.float16。在执行 result.numpy() 后,张量将变为具有匹配 NumPy 数据类型的 NumPy 数组。实例掩膜是 torch.uint8 二进制张量,而语义掩膜根据类别数量使用最小的实用整数数据类型来存储类 ID:torch.uint8、torch.int16 或 torch.int32。
| 属性 | 类型 | 形状 | 描述 |
|---|---|---|---|
result.boxes | Boxes | (N) | 检测框。 |
result.boxes.data | torch.float32 | (N,6/7) | 原始 [x1,y1,x2,y2,conf,cls],外加可选的追踪 ID。 |
result.boxes.xyxy | torch.float32 | (N,4) | xyxy 像素框。 |
result.boxes.conf | torch.float32 | (N,) | 置信度得分。 |
result.boxes.cls | torch.float32 | (N,) | 类别 ID;转换为 int 即可获取名称。 |
Results 对象具有以下方法:
| 方法 | 返回类型 | 描述 |
|---|---|---|
update() | None | 使用框、掩码、概率、obb、关键点或语义掩码等新数据更新 Results 对象。 |
cpu() | Results | 返回一个将所有张量移至 CPU 内存的 Results 对象副本。 |
numpy() | Results | 返回一个将所有张量转换为 NumPy 数组的 Results 对象副本。 |
cuda() | Results | 返回一个将所有张量移至 GPU 内存的 Results 对象副本。 |
to() | Results | 返回一个将张量移至指定设备和数据类型的 Results 对象副本。 |
new() | Results | 创建一个具有相同图像、路径、名称和速度属性的新 Results 对象。 |
plot() | np.ndarray | 在输入 BGR 图像上绘制检测结果并返回带标注的图像。 |
show() | None | 显示带有标注推理结果的图像。 |
save() | str | 将带标注的推理结果图像保存到文件并返回文件名。 |
verbose() | str | 返回每个任务的日志字符串,详述检测和分类结果。 |
save_txt() | str | 将检测结果保存到文本文件并返回保存文件的路径。 |
save_crop() | None | 将裁剪后的检测图像保存到指定目录。 |
summary() | List[Dict[str, Any]] | 将推理结果转换为带有可选归一化的摘要字典。 |
to_df() | DataFrame | 将检测结果转换为 Polars DataFrame。 |
to_csv() | str | 将检测结果转换为 CSV 格式。 |
to_json() | str | 将检测结果转换为 JSON 格式。 |
有关更多详细信息,请参阅 Results 类文档。
Link to this section框#
Boxes 对象可用于索引、操作和将边界框转换为不同格式。
from ultralytics import YOLO

# Load a pretrained YOLO26n model
model = YOLO("yolo26n.pt")

# Run inference on an image
results = model("https://ultralytics.com/images/bus.jpg")  # results list

# View results
for r in results:
    print(r.boxes)  # print the Boxes object containing the detection bounding boxes
这是 Boxes 类方法和属性表,包括它们的名称、类型和描述:
| 名称 | 类型 | 描述 |
|---|---|---|
cpu() | 方法 | 将对象移动到 CPU 内存。 |
numpy() | 方法 | 将对象转换为 NumPy 数组。 |
cuda() | 方法 | 将对象移动到 CUDA 内存。 |
to() | 方法 | 将对象移动到指定设备。 |
xyxy | 属性 (torch.Tensor) | 以 xyxy 格式返回边界框。 |
conf | 属性 (torch.Tensor) | 返回边界框的置信度值。 |
cls | 属性 (torch.Tensor) | 返回边界框的类别值。 |
id | 属性 (torch.Tensor) | 返回边界框的跟踪 ID(如果可用)。 |
xywh | 属性 (torch.Tensor) | 以 xywh 格式返回边界框。 |
xyxyn | 属性 (torch.Tensor) | 以原始图像大小归一化的 xyxy 格式返回边界框。 |
xywhn | 属性 (torch.Tensor) | 以原始图像大小归一化的 xywh 格式返回边界框。 |
有关更多详细信息,请参阅 Boxes 类文档。
Link to this section掩码#
Masks 对象可用于索引、操作并将掩码转换为分割区域。
from ultralytics import YOLO

# Load a pretrained YOLO26n-seg Segment model
model = YOLO("yolo26n-seg.pt")

# Run inference on an image
results = model("https://ultralytics.com/images/bus.jpg")  # results list

# View results
for r in results:
    print(r.masks)  # print the Masks object containing the detected instance masks
这是 Masks 类方法和属性表,包括它们的名称、类型和描述:
| 名称 | 类型 | 描述 |
|---|---|---|
data | 属性 (torch.Tensor) | torch.uint8 二进制掩码张量,形状为 (N,H,W),数值为 0 或 1。 |
cpu() | 方法 | 在 CPU 内存上返回掩码张量。 |
numpy() | 方法 | 以 NumPy 数组形式返回掩码张量。 |
cuda() | 方法 | 在 GPU 内存上返回掩码张量。 |
to() | 方法 | 以指定设备和数据类型返回掩码张量。 |
xyn | 属性 (list[np.ndarray]) | 归一化掩码多边形列表。 |
xy | 属性 (list[np.ndarray]) | 像素坐标下的掩码多边形列表。 |
有关更多详细信息,请参阅 Masks 类文档。
Link to this section语义掩码#
SemanticMask 为语义分割结果存储一张密集类映射图。与 Masks 不同,它不为每个对象包含一个二进制掩码,也不提供多边形辅助工具。
from ultralytics import YOLO

# Load a pretrained YOLO26n-sem Semantic model
model = YOLO("yolo26n-sem.pt")

# Run inference on an image
results = model("https://ultralytics.com/images/bus.jpg")  # results list

# View results
for r in results:
print(r.semantic_mask.data) # print the H x W class-ID map| 名称 | 类型 | 描述 |
|---|---|---|
data | 属性 (torch.Tensor) | 形状为 (H,W) 的类 ID 映射图。数据类型为 torch.uint8、torch.int16 或 torch.int32,具体取决于类别数量。 |
shape | 属性 (tuple) | 类映射图的形状,通常与 result.orig_shape 匹配。 |
cpu() | 方法 | 在 CPU 内存上返回语义掩码张量。 |
numpy() | 方法 | 以 NumPy 数组形式返回语义掩码张量。 |
cuda() | 方法 | 在 GPU 内存上返回语义掩码张量。 |
to() | 方法 | 以指定设备和数据类型返回语义掩码张量。 |
Link to this section关键点#
Keypoints 对象可用于索引、操作和归一化坐标。
from ultralytics import YOLO

# Load a pretrained YOLO26n-pose Pose model
model = YOLO("yolo26n-pose.pt")

# Run inference on an image
results = model("https://ultralytics.com/images/bus.jpg")  # results list

# View results
for r in results:
    print(r.keypoints)  # print the Keypoints object containing the detected keypoints
这是 Keypoints 类方法和属性表,包括它们的名称、类型和描述:
| 名称 | 类型 | 描述 |
|---|---|---|
cpu() | 方法 | 在 CPU 内存上返回关键点张量。 |
numpy() | 方法 | 以 NumPy 数组形式返回关键点张量。 |
cuda() | 方法 | 在 GPU 内存上返回关键点张量。 |
to() | 方法 | 返回具有指定设备和数据类型的关键点张量。 |
xyn | 属性 (torch.Tensor) | 以张量表示的归一化关键点列表。 |
xy | 属性 (torch.Tensor) | 以张量表示的像素坐标关键点列表。 |
conf | 属性 (torch.Tensor) | 返回关键点的置信度值(若可用),否则返回 None。 |
有关更多详情,请参阅 Keypoints 类文档。
Link to this sectionProbs#
Probs 对象可用于索引,以及获取分类的 top1 和 top5 索引与分数。
from ultralytics import YOLO

# Load a pretrained YOLO26n-cls Classify model
model = YOLO("yolo26n-cls.pt")

# Run inference on an image
results = model("https://ultralytics.com/images/bus.jpg")  # results list

# View results
for r in results:
    print(r.probs)  # print the Probs object containing the detected class probabilities
下表总结了 Probs 类的方法和属性:
| 名称 | 类型 | 描述 |
|---|---|---|
cpu() | 方法 | 返回 CPU 内存中 probs 张量的副本。 |
numpy() | 方法 | 返回作为 NumPy 数组的 probs 张量副本。 |
cuda() | 方法 | 返回 GPU 内存中 probs 张量的副本。 |
to() | 方法 | 返回具有指定设备和数据类型的 probs 张量副本。 |
top1 | 属性 (int) | Top 1 类别的索引。 |
top5 | 属性 (list[int]) | Top 5 类别的索引。 |
top1conf | 属性 (torch.Tensor) | Top 1 类别的置信度。 |
top5conf | 属性 (torch.Tensor) | Top 5 类别的置信度。 |
有关更多详情,请参阅 Probs 类文档。
Link to this sectionOBB#
OBB 对象可用于索引、操作并将旋转边界框转换为不同格式。
from ultralytics import YOLO

# Load a pretrained YOLO26n model
model = YOLO("yolo26n-obb.pt")

# Run inference on an image
results = model("https://ultralytics.com/images/boats.jpg")  # results list

# View results
for r in results:
    print(r.obb)  # print the OBB object containing the oriented detection bounding boxes
下表列出了 OBB 类的方法和属性,包括它们的名称、类型和描述:
| 名称 | 类型 | 描述 |
|---|---|---|
cpu() | 方法 | 将对象移动到 CPU 内存。 |
numpy() | 方法 | 将对象转换为 NumPy 数组。 |
cuda() | 方法 | 将对象移动到 CUDA 内存。 |
to() | 方法 | 将对象移动到指定设备。 |
conf | 属性 (torch.Tensor) | 返回边界框的置信度值。 |
cls | 属性 (torch.Tensor) | 返回边界框的类别值。 |
id | 属性 (torch.Tensor) | 返回边界框的跟踪 ID(如果可用)。 |
xyxy | 属性 (torch.Tensor) | 以 xyxy 格式返回水平框。 |
xywhr | 属性 (torch.Tensor) | 以 xywhr 格式返回旋转框。 |
xyxyxyxy | 属性 (torch.Tensor) | 以 xyxyxyxy 格式返回旋转框。 |
xyxyxyxyn | 属性 (torch.Tensor) | 以图像尺寸归一化的 xyxyxyxy 格式返回旋转框。 |
有关更多详情,请参阅 OBB 类文档。
Link to this section绘制结果#
The plot() method in Results objects facilitates visualization of predictions by overlaying detected objects (such as bounding boxes, masks, keypoints, and probabilities) onto the original image. This method returns the annotated image as a NumPy array, allowing for easy display or saving.
from PIL import Image

from ultralytics import YOLO

# Load a pretrained YOLO26n model
model = YOLO("yolo26n.pt")

# Run inference on 'bus.jpg'
results = model(["https://ultralytics.com/images/bus.jpg", "https://ultralytics.com/images/zidane.jpg"])  # results list

# Visualize the results
for i, r in enumerate(results):
    # Plot results image
    im_bgr = r.plot()  # BGR-order numpy array
    im_rgb = Image.fromarray(im_bgr[..., ::-1])  # RGB-order PIL image

    # Show results to screen (in supported environments)
    r.show()

    # Save results to disk
    r.save(filename=f"results{i}.jpg")
Link to this sectionplot() 方法参数#
plot() 方法支持多种参数以自定义输出:
| 参数 | 类型 | 描述 | 默认值 |
|---|---|---|---|
conf | bool | 包含检测置信度分数。 | True |
line_width | float | 边界框的线宽。如果为 None,则随图像大小缩放。 | None |
font_size | float | 文本字体大小。如果为 None,则随图像大小缩放。 | None |
font | str | 文本标注的字体名称。 | 'Arial.ttf' |
pil | bool | 以 PIL Image 对象形式返回图像。 | False |
img | np.ndarray | 用于绘图的替代图像。如果为 None,则使用原始图像。 | None |
im_gpu | torch.Tensor | 用于更快掩码绘制的 GPU 加速图像。形状: (1, 3, 640, 640)。 | None |
kpt_radius | int | 绘制关键点的半径。 | 5 |
kpt_line | bool | 用线条连接关键点。 | True |
labels | bool | 在标注中包含类标签。 | True |
boxes | bool | 在图像上叠加边界框。 | True |
masks | bool | 在图像上叠加掩码。 | True |
probs | bool | 包含分类概率。 | True |
show | bool | 使用默认图像查看器直接显示标注后的图像。 | False |
save | bool | 将标注后的图像保存到 filename 指定的文件中。 | False |
filename | str | 如果 save 为 True,则为保存标注图像的文件路径和名称。 | None |
color_mode | str | 指定颜色模式,例如 'instance' 或 'class'。 | 'class' |
txt_color | tuple[int, int, int] | 用于边界框和图像分类标签的 BGR 文本颜色。 | (255, 255, 255) |
Link to this section线程安全推理#
当你在不同线程中并行运行多个 YOLO 模型时,确保推理过程中的线程安全至关重要。线程安全推理保证了每个线程的预测是隔离的,且互不干扰,从而避免竞态条件并确保输出的一致性和可靠性。
在多线程应用程序中使用 YOLO 模型时,务必为每个线程实例化单独的模型对象,或采用线程本地存储以防止冲突:
在每个线程内实例化单个模型以实现线程安全推理:
from threading import Thread

from ultralytics import YOLO

def thread_safe_predict(model, image_path):
    """Performs thread-safe prediction on an image using a locally instantiated YOLO model."""
    model = YOLO(model)
    results = model.predict(image_path)
    # Process results

# Starting threads that each have their own model instance
Thread(target=thread_safe_predict, args=("yolo26n.pt", "image1.jpg")).start()
Thread(target=thread_safe_predict, args=("yolo26n.pt", "image2.jpg")).start()
有关 YOLO 模型线程安全推理的深入了解及分步说明,请参阅我们的 YOLO 线程安全推理指南。本指南将为你提供避开常见陷阱并确保多线程推理平稳运行所需的所有必要信息。
Link to this section流式处理源 for 循环#
这是一个使用 OpenCV (cv2) 和 YOLO 对视频帧进行推理的 Python 脚本。该脚本假设你已经安装了必要的包(opencv-python 和 ultralytics)。
import cv2

from ultralytics import YOLO

# Load the YOLO model
model = YOLO("yolo26n.pt")

# Open the video file
video_path = "path/to/your/video/file.mp4"
cap = cv2.VideoCapture(video_path)

# Loop through the video frames
while cap.isOpened():
    # Read a frame from the video
    success, frame = cap.read()

    if success:
        # Run YOLO inference on the frame
        results = model(frame)

        # Visualize the results on the frame
        annotated_frame = results[0].plot()

        # Display the annotated frame
        cv2.imshow("YOLO Inference", annotated_frame)

        # Break the loop if 'q' is pressed
        if cv2.waitKey(1) & 0xFF == ord("q"):
            break
    else:
        # Break the loop if the end of the video is reached
        break

# Release the video capture object and close the display window
cap.release()
cv2.destroyAllWindows()
此脚本将对视频的每一帧运行预测,可视化结果,并在窗口中显示它们。按下 'q' 可退出循环。
Link to this section常见问题解答#
Link to this section什么是 Ultralytics YOLO 及其用于实时推理的预测模式?#
Ultralytics YOLO 是一款用于实时 目标检测、实例分割、语义分割 和 分类 的前沿模型。其 预测模式 允许用户在图像、视频和实时流等各种数据源上执行高速推理。它专为性能和多功能性而设计,还提供了批处理和流处理模式。有关其功能的更多详情,请查看 Ultralytics YOLO 预测模式。
Link to this section如何使用 Ultralytics YOLO 对不同数据源进行推理?#
Ultralytics YOLO 可以处理多种数据源,包括单个图像、视频、目录、URL 和流。你可以在 model.predict() 调用中指定数据源。例如,使用 'image.jpg' 处理本地图像,或使用 'https://ultralytics.com/images/bus.jpg' 处理 URL。查看文档中针对各种 推理源 的详细示例。
Link to this section如何优化 YOLO 的推理速度和内存使用?#
为了优化推理速度并高效管理内存,你可以在预测器的调用方法中设置 stream=True 来使用流处理模式。流处理模式会生成一个内存高效的 Results 对象生成器,而不是将所有帧加载到内存中。对于处理长视频或大数据集,流处理模式特别有用。了解更多关于 流处理模式 的信息。
Link to this sectionUltralytics YOLO 支持哪些推理参数?#
YOLO 中的 model.predict() 方法支持各种参数,如 conf、iou、imgsz、device 等。这些参数允许你自定义推理过程,设置置信度阈值、图像大小和用于计算的设备等参数。这些参数的详细描述可以在 推理参数 部分找到。
Link to this section如何从 YOLO 模型中提取嵌入?#
使用 model.embed(source) 从倒数第二层提取特征嵌入,或者将 embed=[layer_index] 传递给 model.predict() 来选择特定的层。
from ultralytics import YOLO

model = YOLO("yolo26n.pt")
source = "https://ultralytics.com/images/bus.jpg"

results = model.predict(source)  # Results objects
embeddings = model.embed(source)  # list of torch.Tensor embeddings
Link to this section如何可视化并保存 YOLO 预测结果?#
运行 YOLO 推理后,Results 对象包含用于显示和保存标注图像的方法。你可以使用诸如 result.show() 和 result.save(filename="result.jpg") 等方法来可视化和保存结果。文件名路径中任何缺失的父目录都会自动创建(例如 result.save("path/to/result.jpg"))。有关这些方法的完整列表,请参考 使用结果 部分。