YOLOv9: قفزة إلى الأمام في تقنية اكتشاف الكائنات
طوّر YOLOv9 اكتشاف الكائنات الآني من خلال تقديم معلومات التدرج القابلة للبرمجة (PGI) وشبكة تجميع الطبقات الفعالة المعممة (GELAN). وعند إصداره، حسّن الكفاءة والدقة مقارنةً بكواشف الكائنات الآنية السابقة على مجموعة بيانات MS COCO. وقد طوّر مشروع YOLOv9 فريق مستقل من مطوري البرمجيات مفتوحة المصدر، وهو مبني على قاعدة شيفرة Ultralytics YOLOv5.
شاهد: تدريب YOLOv9 على بيانات مخصصة باستخدام Ultralytics | مجموعة بيانات العبوات الصناعية
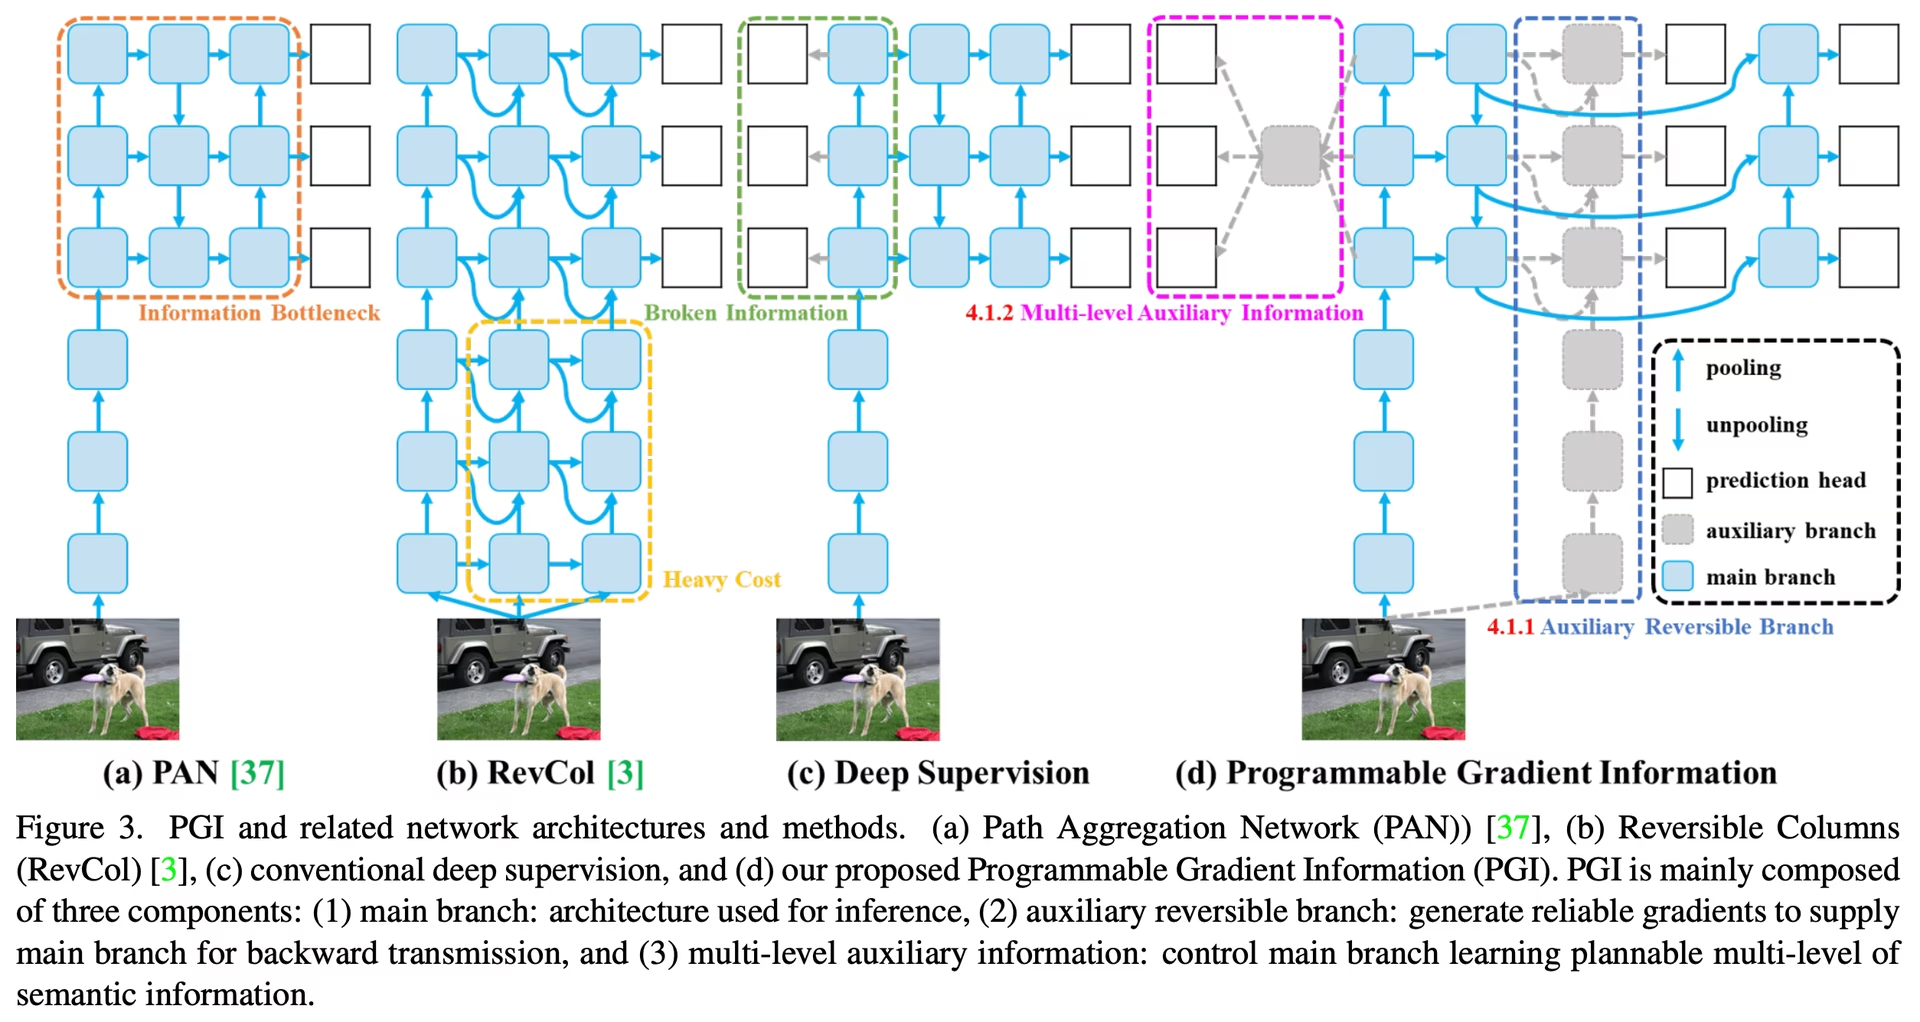
مقدمة إلى YOLOv9#
يعالج YOLOv9 فقدان المعلومات الملازم لـالشبكات العصبية العميقة. ومن خلال دمج PGI وبنية GELAN، يزيد YOLOv9 قدرة النموذج على التعلم ويحافظ على المعلومات المهمة طوال عملية الاكتشاف، مما يحسّن الدقة والكفاءة معًا.
الابتكارات الأساسية في YOLOv9#
يستهدف تصميم YOLOv9 فقدان المعلومات في الشبكات العصبية العميقة. ويشكّل مبدأ عنق الزجاجة للمعلومات واستخدام الدوال القابلة للعكس محورًا أساسيًا في تصميمه، مما يساعد YOLOv9 على الحفاظ على كفاءة ودقة عاليتين.
مبدأ عنق زجاجة المعلومات#
يكشف مبدأ عنق زجاجة المعلومات عن تحدٍ أساسي في التعلم العميق: فكلما مرت البيانات عبر طبقات متتابعة من الشبكة، ازداد احتمال فقدان المعلومات. ويُمثّل هذا الظاهر رياضيًا كما يلي:
I(X, X) >= I(X, f_theta(X)) >= I(X, g_phi(f_theta(X)))حيث يرمز I إلى المعلومات المتبادلة، وتمثل f وg دوال التحويل ذات المعلمتين theta وphi على التوالي. ويتصدى YOLOv9 لهذا التحدي بتطبيق معلومات التدرج القابلة للبرمجة (PGI)، التي تساعد على الحفاظ على البيانات الأساسية عبر عمق الشبكة، ما يضمن توليد تدرجات أكثر موثوقية، وبالتالي تقاربًا وأداءً أفضل للنموذج.
الدوال العكسية#
يُعد مفهوم الدوال العكسية ركيزة أخرى في تصميم YOLOv9. وتُعتبر الدالة عكسية إذا أمكن عكسها من دون فقدان أي معلومات، كما يلي:
X = v_zeta(r_psi(X))باستخدام psi وzeta بوصفهما معلمتين للدالة القابلة للعكس ومعكوسها، على التوالي. وتُعد هذه الخاصية أساسية لبنى التعلم العميق، إذ تتيح للشبكة الحفاظ على تدفق معلومات كامل، مما يسمح بتحديث معلمات النموذج بدقة أكبر. ويضم YOLOv9 دوالًا قابلة للعكس في بنيته للحد من مخاطر تدهور المعلومات، ولا سيما في الطبقات الأعمق، وضمان الحفاظ على البيانات المهمة لمهام اكتشاف الكائنات.
الأثر على النماذج خفيفة الوزن#
تكتسب معالجة فقدان المعلومات أهمية خاصة للنماذج خفيفة الوزن، التي غالبًا ما تكون قليلة المعلمات ومعرضة لفقدان قدر كبير من المعلومات أثناء التمرير الأمامي. وتضمن بنية YOLOv9، من خلال استخدام PGI والدوال العكسية، الاحتفاظ بالمعلومات الأساسية اللازمة لاكتشاف الكائنات بدقة والاستفادة منها بفاعلية، حتى مع نموذج مبسط.
معلومات التدرج القابلة للبرمجة (PGI)#
تُعد PGI مفهومًا جديدًا قدمه YOLOv9 لمواجهة مشكلة عنق زجاجة المعلومات وضمان الحفاظ على البيانات الأساسية عبر طبقات الشبكة العميقة. ويسمح ذلك بتوليد تدرجات موثوقة، ما يسهل تحديثات دقيقة للنموذج ويحسّن أداء الاكتشاف إجمالًا.
شبكة تجميع الطبقات الفعالة المعممة (GELAN)#
GELAN بنية تحسّن الاستفادة من معلمات YOLOv9 وكفاءته الحسابية. ويسمح تصميمها بدمج مرن لكتل حسابية متنوعة، مما يجعل YOLOv9 قابلًا للتكيف مع نطاق واسع من التطبيقات دون التضحية بالسرعة أو الدقة.
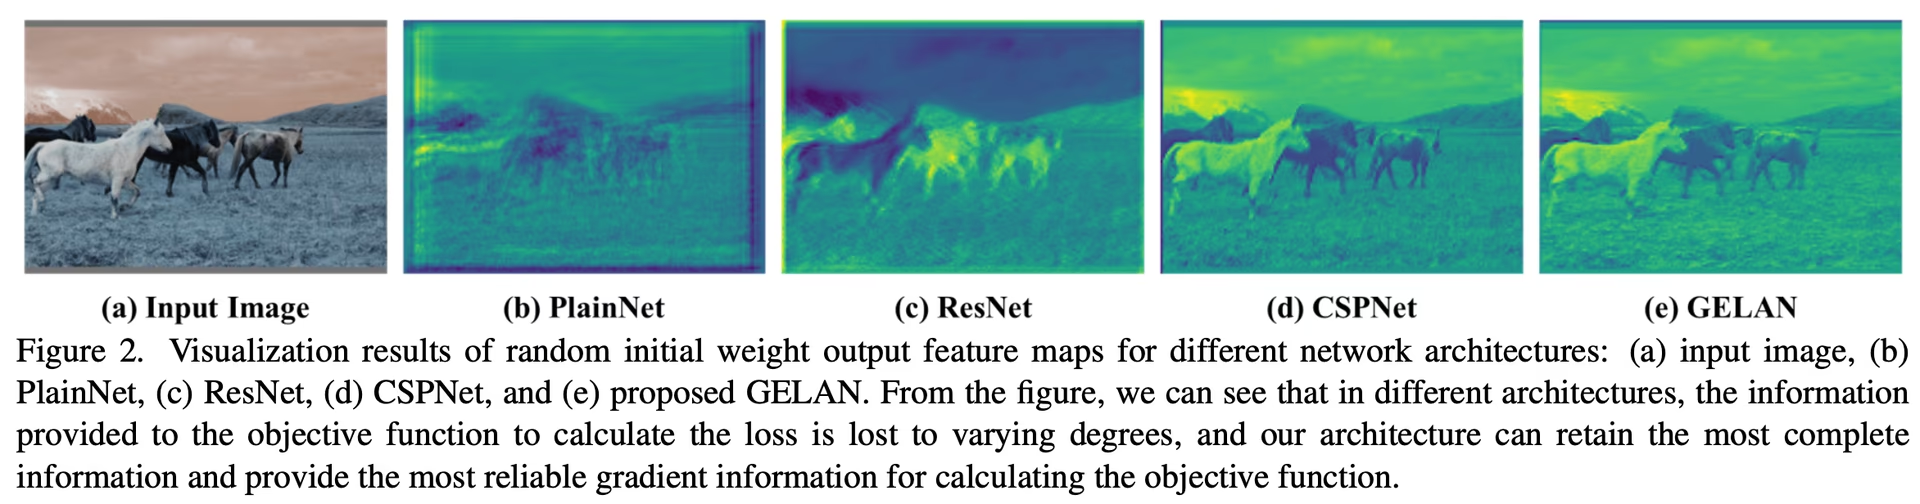
معايير أداء YOLOv9#
يتضمن قياس YOLOv9 معياريًا باستخدام وضع القياس المعياري من Ultralytics تقييم أداء نموذجك المدرّب والخاضع للتحقق في سيناريوهات واقعية. وتشمل هذه العملية ما يلي:
- تقييم الأداء: قياس سرعة النموذج ودقته.
- تنسيقات التصدير: اختبار النموذج عبر تنسيقات تصدير مختلفة لضمان استيفائه المعايير اللازمة وأدائه الجيد في بيئات متنوعة.
- دعم الأطر: إجراء هذه التقييمات ضمن حزمة Ultralytics لضمان نتائج متسقة وموثوقة.
يتيح قياس الأداء التأكد من أن نموذجك لا يؤدي جيدًا في بيئات الاختبار المضبوطة فحسب، بل يحافظ أيضًا على أدائه العالي في التطبيقات العملية الواقعية.
شاهد: كيفية قياس أداء نموذج YOLOv9 باستخدام حزمة Ultralytics Python
الأداء على مجموعة بيانات MS COCO#
عند إصداره، وضع YOLOv9 معايير جديدة على مجموعة بيانات COCO لمختلف أحجام النماذج. ويسرد الجدول أدناه الدقة وعدد المعلمات وFLOPs لكل نموذج YOLOv9 متاح في Ultralytics.
تحسّن إصدارات YOLOv9، بدءًا من نموذج t الصغير جدًا وصولًا إلى نموذج e الكبير، الدقة (mAP) مع الحفاظ على عدد المعلمات والحسابات (FLOPs) أو خفضهما مقارنةً بالإصدارات السابقة والنماذج المنافسة.
مقارنةً بكواشف الكائنات الآنية الأخرى، يحقق YOLOv9 المكاسب التالية:
- النماذج خفيفة الوزن: يتفوق YOLOv9s على YOLO MS-S من حيث كفاءة المعلمات والعبء الحاسوبي، مع تحقيق تحسن قدره 0.4∼0.6% في AP.
- النماذج المتوسطة إلى الكبيرة: يحسّن YOLOv9m وYOLOv9e المفاضلة بين تعقيد النموذج وأداء الاكتشاف، بخفض عدد المعلمات والحسابات مع تحسين الدقة.
يستخدم نموذج YOLOv9c معلمات أقل بنسبة 42% وحسابات أقل بنسبة 21% من YOLOv7 AF، مع تحقيق دقة مماثلة. ويستخدم نموذج YOLOv9e معلمات أقل بنسبة 15% وحسابات أقل بنسبة 25% من YOLOv8x، مع تحسن AP بنسبة 1.7%.
تُظهر هذه النتائج أن YOLOv9 حسّن الكفاءة الحسابية دون المساس بالدقة اللازمة لاكتشاف الكائنات آنيًا ومهام الرؤية الحاسوبية الأخرى.
الخلاصة#
حسّن YOLOv9، الذي أُصدر في فبراير 2024، كفاءة ودقة اكتشاف الكائنات الآني. ومن خلال معالجة فقدان المعلومات باستخدام PGI وGELAN، وضع YOLOv9 معايير جديدة في وقت إصداره. وقد أضافت نماذج أحدث مثل YOLO26 وYOLO11 منذ ذلك الحين تحسينات إضافية، لكن الابتكارات المعمارية في YOLOv9 ما تزال تؤثر في المجال.
أمثلة الاستخدام#
يقدم هذا المثال أمثلة بسيطة على التدريب والاستدلال باستخدام YOLOv9.
يمكن تمرير نماذج *.pt المدربة مسبقًا من PyTorch، وكذلك ملفات الإعداد *.yaml، إلى الصنف YOLO() لإنشاء مثيل نموذج في Python:
from ultralytics import YOLO
# إنشاء نموذج YOLOv9c من الصفر
model = YOLO("yolov9c.yaml")
# إنشاء نموذج YOLOv9c باستخدام أوزان مدرّبة مسبقًا
model = YOLO("yolov9c.pt")
# عرض معلومات النموذج (اختياري)
model.info()
# تدريب النموذج على مجموعة بيانات المثال COCO8 لمدة 100 حقبة
results = model.train(data="coco8.yaml", epochs=100, imgsz=640)
# تشغيل الاستدلال باستخدام نموذج YOLOv9c على الصورة 'bus.jpg'
results = model("path/to/bus.jpg")المهام والأوضاع المدعومة#
تقدم سلسلة YOLOv9 مجموعة من النماذج لـاكتشاف الكائنات وتقسيم الكائنات الفردية، وتغطي متطلبات متنوعة للميزانيات الحسابية ومستويات الدقة.
| النموذج | أسماء الملفات | المهام | التدريب | التحقق | الاستدلال | التصدير |
|---|---|---|---|---|---|---|
| YOLOv9 | yolov9t.pt yolov9s.pt yolov9m.pt yolov9c.pt yolov9e.pt | كشف الكائنات | ✅ | ✅ | ✅ | ✅ |
| YOLOv9-seg | yolov9c-seg.pt yolov9e-seg.pt | تجزئة الكائنات | ✅ | ✅ | ✅ | ✅ |
يلخص هذا الجدول إصدارات نماذج YOLOv9 ومدى دعمها لأوضاع التدريب والتحقق والاستدلال والتصدير.
يتطلب تدريب نماذج YOLOv9 موارد أكثر ويستغرق وقتًا أطول من تدريب نموذج YOLOv8 بالحجم نفسه.
الاستشهادات والشكر والتقدير#
نود الإشادة بمؤلفي YOLOv9 لمساهماتهم المهمة في مجال اكتشاف الكائنات في الزمن الفعلي:
@inproceedings{wang2024yolov9,
  title={YOLOv9: Learning What You Want to Learn Using Programmable Gradient Information},
  author={Wang, Chien-Yao and Yeh, I-Hau and Liao, Hong-Yuan Mark},
  booktitle={Computer Vision -- ECCV 2024},
  pages={1--21},
  year={2024},
  organization={Springer Nature Switzerland}
}
نُشرت الورقة البحثية الرسمية لـYOLOv9 ضمن وقائع مؤتمر Springer ECCV 2024، مع نسخة أولية على arXiv. وأتاح المؤلفون عملهم للجمهور، ويمكن الوصول إلى قاعدة الشيفرة على GitHub. ونقدر جهودهم في تطوير هذا المجال وإتاحة عملهم للمجتمع الأوسع.
الأسئلة الشائعة#
يقدم YOLOv9 تقنيتين أساسيتين: معلومات التدرج القابلة للبرمجة (PGI) وشبكة تجميع الطبقات الفعالة المعممة (GELAN). وتعالج هذه الابتكارات تحديات فقدان المعلومات في الشبكات العصبية العميقة، بما يضمن الكفاءة العالية والدقة والقدرة على التكيف. وتحافظ PGI على البيانات الأساسية عبر طبقات الشبكة، بينما تحسّن GELAN الاستفادة من المعلمات والكفاءة الحسابية.
عند إصداره، تفوق YOLOv9 على غيره من أحدث كواشف الكائنات في الزمن الفعلي من حيث الدقة والكفاءة. وعلى مجموعة بيانات COCO، تحقق نماذج YOLOv9 درجات mAP أعلى عبر أحجام مختلفة، مع الحفاظ على العبء الحسابي أو تقليله. فعلى سبيل المثال، يحقق YOLOv9c دقة مماثلة باستخدام معلمات أقل بنسبة 42% واحتياجات حسابية أقل بنسبة 21% مقارنةً بـ YOLOv7 AF.
يمكنك تدريب نموذج YOLOv9 باستخدام أوامر Python وCLI. لاستخدام Python، أنشئ مثيلًا للنموذج باستخدام الفئة
YOLOواستدعِ الطريقةtrain:from ultralytics import YOLO # إنشاء نموذج YOLOv9c باستخدام أوزان مدرّبة مسبقًا ثم تدريبه model = YOLO("yolov9c.pt") results = model.train(data="coco8.yaml", epochs=100, imgsz=640)للتدريب عبر CLI، نفّذ ما يلي:
yolo train model=yolov9c.yaml data=coco8.yaml epochs=100 imgsz=640تعرّف على المزيد من أمثلة الاستخدام للتدريب والاستدلال.
صُمم YOLOv9 للتخفيف من فقدان المعلومات، وهو أمر مهم بوجه خاص للنماذج خفيفة الوزن التي غالبًا ما تكون عرضة لفقدان قدر كبير من المعلومات. ومن خلال دمج معلومات التدرج القابلة للبرمجة (PGI) والدوال العكسية، يضمن YOLOv9 الاحتفاظ بالبيانات الأساسية، ما يعزز دقة النموذج وكفاءته. وهذا يجعله مناسبًا جدًا للتطبيقات التي تتطلب نماذج مدمجة عالية الأداء. لمزيد من التفاصيل، استكشف قسم أثر YOLOv9 على النماذج خفيفة الوزن.
يدعم YOLOv9 اكتشاف الكائنات وتجزئة المثيلات في أوضاع التدريب والتحقق والاستدلال والتصدير.


التعليقات482
اطرح سؤالًا، وشارك نتائجك، أو ساعد شخصًا آخر.
vuvanhieu
to load a YOLOv5 model def load_yolov5_model(yolo_model_path): device = torch.device('cuda' if torch.cuda.is_available() else 'cpu') model = torch.hub.load('ultralytics/yolov5', 'custom', path=yolo_model_path, force_reload=True).to(device) return model
How in yolov8, yolov9?
1 Paula DerrengerUltralytics
To load a YOLOv8 or YOLOv9 model, you can use the
YOLOclass from the Ultralytics package. Here's a concise way to do it:from ultralytics import YOLO # Load a YOLOv8 model model_v8 = YOLO("yolov8n.pt") # Load a YOLOv9 model model_v9 = YOLO("yolov9c.pt")For more details, you can refer to the YOLOv9 documentation: https://docs.ultralytics.com/models/yolov9/.
MoAbbasid
@glenn-jocher @pderrenger any idea of when the lightweight models can be used in ultralytics?
1 Glenn JocherUltralytics(تم التعديل)
Hi there! 😊
Lightweight models are available in Ultralytics. YOLOv9 ships
yolov9t.pt,yolov9s.ptandyolov9m.ptalongsideyolov9c.ptandyolov9e.pt. For new projects we recommend YOLO26, whose smallest modelyolo26n.ptis built for efficiency.To try a lightweight model:
yolo train model=yolo26n.pt data=coco128.yaml epochs=100If you're tinkering with custom lightweight designs, copy an existing model YAML from the Ultralytics repo and adjust its layers or scales. Contributions or insights are welcome.
Happy detecting!
deepanalyticszlc
Very exciting! Is there a schedule for release of lightweight models?
1- Paula DerrengerUltralytics(تم التعديل)
@deepanalyticszlc hey there! 😊
Lightweight YOLOv9 models are now available:
yolov9t.pt,yolov9s.ptandyolov9m.pt, alongsideyolov9c.ptandyolov9e.pt. For the latest releases, see the Ultralytics GitHub releases.Here's a little snippet on how to load and use YOLOv9 for predictions:
from ultralytics import YOLO

# Load YOLOv9 model
model = YOLO('yolov9t.pt')  # Replace 'yolov9t.pt' with your model file

# Run inference on an image
results = model('path/to/your/image.jpg')

# Display results
results[0].show()
For new projects, we recommend YOLO26, which also comes in small sizes like
yolo26n.pt. ⏰
DolapoSalim(تم التعديل)
@glenn-jocher Kindly assist with this TypeError: TypeError: ERROR C:\path_to_custom_model/yolov9c.pt appears to be an Ultralytics YOLOv5 model originally trained with https://github.com/ultralytics/yolov5. This model is NOT forwards compatible with YOLOv8 at https://github.com/ultralytics/ultralytics. Recommend fixes are to train a new model using the latest 'ultralytics' package or to run a command with an official Ultralytics model, i.e. 'yolo predict model=yolo11n.pt'
Here is my code:
from ultralytics import YOLO

model = YOLO(path_to_YOLOV9.pt )

results = model.predict(source="IMAGE_SOURCE", show=True, conf=0.10)
Note, I am actually working with a custom trained YOLOV9
- Glenn JocherUltralytics
@DolapoSalim to resolve the YOLOv5/YOLOv9 compatibility error when using custom-trained models, please ensure you're using the latest
ultralytics>=8.2.0package and retrain your YOLOv9 model using the official YOLOv9 configuration files from our documentation. For custom training guidance, see the YOLOv9 Training section in our docs.This error typically occurs when using older model formats - newer versions maintain full backward compatibility when models are trained with current Ultralytics implementations.
1
gusreic
This article claims that Yolov9 is based on Yolov5. The Yolov9 paper claims that v9 is based on Yolov7 which is also not based on 5. Is there any other way that would explain this claim? Otherwise maybe adjust the article.
- Glenn JocherUltralytics
@gusreic yes that's correct. YOLOv9 repo is a fork of my YOLOv5 repo. I know this because I wrote nearly all the files in the YOLOv9 repo myself. Unfortunately the author has failed to make this clear, though he did include a (hidden) acknowledgement at the bottom of the README.
1 Oh, that is really unfortunate, thank you for clearing it up since it is not directly apparent. Do you think that YOLOv9 is based on YOLOv5 only with respect to the structure of the repository or would you say that the architecture of the model itself is also based on the architecture of YOLOv5?
- Glenn JocherUltralytics
@gusreic thank you for your question! YOLOv9's repository structure is indeed based on Ultralytics YOLOv5, while its architecture introduces novel components like Programmable Gradient Information (PGI) and GELAN as described in the YOLOv9 documentation. The model itself represents an independent advancement building on broader YOLO research. We'll clarify this distinction in our article! 😊
ghost
Hello,
Thanks for the great documentation!
Quick question: Is the code licensed under AGPLv3 (Ultralytics) or GPLv3 (Wang, Chien-Yao and Liao, Hong-Yuan Mark Github)?
Thanks!
- Glenn JocherUltralytics
@ProfessorHT the YOLOv9 project codebase, developed by Wang, Chien-Yao and Liao, Hong-Yuan Mark, is available on GitHub and licensed under GPLv3, while Ultralytics models and software use the AGPL-3.0 license.
Thank you for your quick response. So to be sure if I use Yolov9 from this documentation with the ultralytics library i will be under the AGPLv3 license and i should buy a license?
- Glenn JocherUltralytics
Yes, if you use YOLOv9 models from the Ultralytics library, you are under the AGPL-3.0 license and would need an Enterprise License for commercial use, unless you open-source your entire project under AGPL-3.0.
 liuweiqing
Does it support automatic downloading of pretrained weights?
- Glenn JocherUltralytics
@14790897 yes, YOLOv9 supports automatic downloading of pretrained weights when using the
YOLO()class in Python or CLI commands, as long as the specified weights file (e.g.,yolov9c.pt) is available in the Ultralytics repository. You can find more details in the YOLOv9 documentation.
jane7166
Hello. I have retrained the YOLOv9 model, and I would like to deploy it as an API. How should I proceed?
- Glenn JocherUltralytics
@jane7166 to deploy your retrained YOLOv9 model as an API, you can use frameworks like FastAPI or Flask to build an endpoint and load your model using the Ultralytics Python package. Refer to the YOLOv9 documentation for guidance on inference, which can be integrated into your API logic. Let us know if you have further questions!
Gnoot01
I'm getting the following errors despite latest torch and ultralytics installs. Kindly assist
File "C:\Users\.venv\lib\site-packages\ultralytics\engine\model.py", line 547, in predict self.predictor.setup_model(model=self.model, verbose=is_cli) File "C:\Users\.venv\lib\site-packages\ultralytics\engine\predictor.py", line 303, in setup_model self.model = AutoBackend( File "C:\Users\.venv\lib\site-packages\torch\utils\_contextlib.py", line 116, in decorate_context return func(*args, **kwargs) File "C:\Users\.venv\lib\site-packages\ultralytics\nn\autobackend.py", line 145, in __init__ model = model.fuse(verbose=verbose) TypeError: BaseModel.fuse() got an unexpected keyword argument 'verbose'- Glenn JocherUltralytics
@Gnoot01 it seems like there's a compatibility issue with the
fusemethod. Please ensure you're using the latest version of the Ultralytics package. If the issue persists, consider checking for any updates or changes in the repository that might address this. For further assistance, you can explore the YOLOv9 documentation. @glenn-jocher Hi, I'm using the latest ultralytics 8.3.24 and latest torch. However, still facing this issue. Any suggestions?
- Glenn JocherUltralytics
@Gnoot01 i'm sorry you're experiencing this issue. Please ensure your Ultralytics package is up-to-date. If the problem persists, try reinstalling the package or checking for any recent updates in the repository. For more details, you can refer to the YOLOv9 documentation.
foskyblue
I'm having issues with my Yolov9 model exported to tflite. Model was successfully exported to tflite but I cannot get the right bounding boxes. I'm following the steps listed here: https://stackoverflow.com/questions/76381317/yolov8-tflite-python-predictions-and-interpreting-output (for folov8) to make inference for my yolov9 tflite model.
1Step 1: Resizing and Padding (Letterboxing) Step 2: Non-Maximum Suppression (NMS) Step 3: Rescaling Bounding Boxes
However, when I draw the outputed bounding boxes on my image the boxes don't fit the objects in the image correctly.
The code I'm using can be seen below:
from tflite_runtime.interpreter import Interpreter from PIL import Image import numpy as np from glob import glob from typing import Tuple, List interpreter = None input_shape = (320, 576) # Input tensor dimensions (width, height) in pixels input_index = 0 # Input tensor index (from input details in model signature) output_index = 409 model_path = 'model/saved_model.tflite' def load_model(): interpreter = None interpreter = Interpreter(model_path=model_path, num_threads=2) interpreter.allocate_tensors() input_details = interpreter.get_input_details() global input_shape input_shape = tuple(input_details[0]['shape'][1:3]) global input_index input_index = input_details[0]['index'] output_details = interpreter.get_output_details() global output_index output_index = output_details[0]['index'] return interpreter def letter_box(img: np.ndarray, new_shape: Tuple[int, int]) -> np.ndarray: """ Resizes an image to fit within a new shape while maintaining the aspect ratio, and pads the remaining space with a constant value. Args: img (np.ndarray): The input image as a NumPy array. new_shape (Tuple[int, int]): The desired output shape (height, width). Returns: np.ndarray: The resized and padded image. """ shape = img.shape[:2] # Calculate the scaling ratio to fit the image within the new shape r = min(new_shape[0] / shape[0], new_shape[1] / shape[1]) # Calculate the new unpadded dimensions new_unpad = int(round(shape[1] * r)), int(round(shape[0] * r)) # Calculate the padding required on each side dw, dh = new_shape[1] - new_unpad[0], new_shape[0] - new_unpad[1] dw, dh = dw / 2, dh / 2 # Resize the image if necessary if shape[::-1] != new_unpad: img = Image.fromarray(img).resize(new_unpad, Image.Resampling.BILINEAR) img = np.array(img) # Calculate the top, bottom, left, and right padding values top, bottom = int(round(dh - 0.1)), int(round(dh + 0.1)) left, right = int(round(dw - 0.1)), int(round(dw + 0.1)) # Add padding to the image img = np.pad(img, ((top, bottom), (left, right), (0, 0)), mode='constant', constant_values=114) return img def non_max_suppression( prediction: np.ndarray, conf_thres: float = 0.25, iou_thres: float = 0.45, max_det: int = 300, max_wh: int = 7680, ): """ Perform non-maximum suppression (NMS) on a single image prediction. Args: prediction (np.ndarray): A numpy array of shape (1, num_boxes, num_classes + 4 + num_masks) containing the predicted boxes, classes, and masks. conf_thres (float): Confidence threshold for filtering boxes (0.0 to 1.0). iou_thres (float): IoU threshold for NMS (0.0 to 1.0). max_det (int): Maximum number of boxes to keep after NMS. max_wh (int): Maximum box width and height in pixels. Returns: np.ndarray: Array containing kept boxes with format (x1, y1, x2, y2, confidence, class, mask1, mask2, ...). """ # Input validation (can be removed if you're sure of your input) if 0 > conf_thres > 1: raise ValueError(f"Invalid Confidence threshold {conf_thres}, valid values are between 0.0 and 1.0") if 0 > iou_thres > 1: raise ValueError(f"Invalid IoU {iou_thres}, valid values are between 0.0 and 1.0") # Extract dimensions and metadata directly _, _, dims = prediction.shape nc = dims - 4 - prediction.shape[1] # number of classes nm = dims - nc - 4 # number of masks mi = 4 + nc # mask start index # Process the single image in the batch x = prediction[0] # Extract the single image data # Move class scores to last axis and threshold x = np.transpose(x, (1, 0)) xc = x[..., 4:mi].max(axis=-1) > conf_thres x = x[xc] if not x.shape[0]: # No boxes left after confidence thresholding return np.zeros((0, 6 + nm)) # Convert xywh to xyxy directly on the filtered boxes x[..., :4] = xywh2xyxy(x[..., :4]) # Split and process boxes, classes, and masks # pylint: disable=unbalanced-tuple-unpacking box, cls, mask = np.split(x, (4, mi), 1) conf = cls.max(1) j = cls.argmax(1) x = np.concatenate((box, conf[:, None], j[:, None].astype(float), mask), 1) x = x[conf > conf_thres] n = x.shape[0] if not n: # No boxes left after additional confidence thresholding return np.zeros((0, 6 + nm)) # NMS (simplified since we're dealing with a single image) c = x[:, 5:6] * max_wh boxes, scores = x[:, :4] + c, x[:, 4] i = numpy_nms(boxes, scores, iou_thres) i = i[:max_det] return x[i] def numpy_nms(boxes: np.ndarray, scores: np.ndarray, iou_threshold: float = 0.5) -> np.ndarray: """ Perform Non-Maximum Suppression (NMS) on a set of bounding boxes. Args: boxes (np.ndarray): Array of shape (N, 4) representing N bounding boxes. Each box is [x1, y1, x2, y2]. scores (np.ndarray): Array of shape (N,) representing the confidence scores for each box. iou_threshold (float): IoU threshold for suppressing overlapping boxes. Defaults to 0.5. Returns: np.ndarray: Boolean array of shape (N,) indicating which boxes to keep. """ # Sort boxes by score in descending order order = scores.argsort()[::-1] keep = np.ones(len(boxes), dtype=bool) # Calculate IoU matrix ious = box_iou_batch(boxes, boxes) np.fill_diagonal(ious, 0) # Set self-IoU to 0 for i, idx in enumerate(order): if not keep[idx]: continue # Suppress boxes with IoU > threshold overlap = ious[idx] > iou_threshold keep[order[i + 1:]] &= ~overlap[order[i + 1:]] return keep def box_iou_batch(boxes_a: np.ndarray, boxes_b: np.ndarray) -> np.ndarray: """ Calculate the Intersection over Union (IoU) between two sets of bounding boxes. Args: boxes_a (np.ndarray): Array of shape (N, 4) representing N bounding boxes. boxes_b (np.ndarray): Array of shape (M, 4) representing M bounding boxes. Returns: np.ndarray: Array of shape (N, M) containing IoU values for each pair of boxes. Note: Each bounding box is represented as [x1, y1, x2, y2], where (x1, y1) is the top-left corner and (x2, y2) is the bottom-right corner. """ # Calculate areas of boxes_a area_a = (boxes_a[:, 2] - boxes_a[:, 0]) * (boxes_a[:, 3] - boxes_a[:, 1]) # Calculate areas of boxes_b area_b = (boxes_b[:, 2] - boxes_b[:, 0]) * (boxes_b[:, 3] - boxes_b[:, 1]) # Calculate intersection coordinates top_left = np.maximum(boxes_a[:, None, :2], boxes_b[:, :2]) bottom_right = np.minimum(boxes_a[:, None, 2:], boxes_b[:, 2:]) # Calculate intersection area area_inter = np.prod(np.clip(bottom_right - top_left, a_min=0, a_max=None), 2) # Calculate IoU return area_inter / (area_a[:, None] + area_b - area_inter) def xywh2xyxy(box: np.ndarray) -> np.ndarray: """ Convert bounding box coordinates from (x, y, width, height) format to (x1, y1, x2, y2) format where (x1, y1) is the top-left corner and (x2, y2) is the bottom-right corner. Args: x (np.ndarray): The input bounding box coordinates in (x, y, width, height) format. Returns: np.ndarray: The bounding box coordinates in (x1, y1, x2, y2) format. """ if box.shape[-1] != 4: raise ValueError(f"input shape last dimension expected 4 but input shape is {box.shape}") # pylint: disable=unbalanced-tuple-unpacking xy, wh = np.split(box, [2], axis=-1) wh_half = wh / 2 return np.concatenate([xy - wh_half, xy + wh_half], axis=-1) def preprocess_image(pil_image: Image.Image, input_size: Tuple[int, int]) -> np.ndarray: """ Preprocesses an image for inference with a TFLite model. Args: image_path (str): Path to the image file. input_size (Tuple[int, int]): Desired input size (height, width) for the model. Returns: np.ndarray: Preprocessed image as a NumPy array, ready for inference. """ if pil_image.mode != "RGB": pil_image = pil_image.convert("RGB") im = np.asarray(pil_image) im = letter_box(im, new_shape=input_size) im = np.expand_dims(im, axis=0) # goal is to have the format (number of images, size of image, number of channnels) im = im.astype(np.float32) / 255.0 # Normalize to 0.0 - 1.0 return im def postprocess_results(output: np.ndarray, model_input_size: Tuple[int, int], image_original_size: Tuple[int, int]) -> np.ndarray: """ Postprocesses the raw outputs from a TFLite model, including scaling bounding boxes back to the original image size. Args: output (np.ndarray): List of output tensors from the TFLite model. model_input_size (Tuple[int, int]): Desired input size (height, width) for the model. image_original_size (Tuple[int, int]): Original size (height, width) of the input image. Returns: np.ndarray: Postprocessed results with bounding boxes adjusted to original image size. """ predictions = non_max_suppression(output, conf_thres=0.25, iou_thres=0.45, max_det=300, max_wh=1) return scale_boxes(image_original_size, predictions, model_input_size) def scale_boxes(image_original_size: Tuple[int, int], boxes: np.ndarray, model_input_size: Tuple[int, int]): """ Rescales bounding boxes (in the format of xyxy by default) from the shape of the image they were originally specified in (img1_shape) to the shape of a different image (img0_shape). Args: image_original_size (Tuple[int, int]): The shape of the image that the bounding boxes are for, in the format of (height, width). boxes (np.ndarray): the bounding boxes of the objects in the image, in the format of (x1, y1, x2, y2) model_input_size (Tuple[int, int]): the shape of the target image, in the format of (height, width). Returns: np.ndarray: The scaled bounding boxes, in the format of (x1, y1, x2, y2) """ # calculate from img0_shape gain = min(model_input_size[0] / image_original_size[0], model_input_size[1] / image_original_size[1]) # gain = old / new pad = ( round((model_input_size[1] - image_original_size[1] * gain) / 2 - 0.1) / model_input_size[1], round((model_input_size[0] - image_original_size[0] * gain) / 2 - 0.1) / model_input_size[0], ) # wh padding inner_image_scale = ( (1 - pad[0] * 2), (1 - pad[1] * 2), ) # wh scale boxes[..., 0] = (boxes[..., 0] - pad[0]) / inner_image_scale[0] # x padding boxes[..., 1] = (boxes[..., 1] - pad[1]) / inner_image_scale[1] # y padding boxes[..., 2] = (boxes[..., 2] - pad[0]) / inner_image_scale[0] # x padding boxes[..., 3] = (boxes[..., 3] - pad[1]) / inner_image_scale[1] # y padding boxes[..., [0, 2]] = boxes[..., [0, 2]].clip(0, 1) # x1, x2 boxes[..., [1, 3]] = boxes[..., [1, 3]].clip(0, 1) # y1, y2 return boxes def prepare_input(image_pil): # Input image must match input shape (ex: 640x640 pixels) [note: only use BILINEAR here] resized = image_pil.copy().resize(input_shape, resample=Image.Resampling.BILINEAR) # SSD Mobilenet V2 FPNLite take as input pixels between [-1.0, 1.0] expanded = np.expand_dims(np.asarray(resized, dtype=np.float32) * 2. / 255. - 1., axis=0) del resized # Enforce garbage collection sooner than later return expanded def predict(tmp_images_dir): interpreter = load_model() model_predictions = [] for img_path in tmp_images_dir: pil_image = Image.open(img_path) input_data = preprocess_image(pil_image, input_shape) interpreter.set_tensor(input_index, input_data) interpreter.invoke() output_data = interpreter.get_tensor(output_index) preds = postprocess_results(output_data, input_shape, (pil_image.size[1], pil_image.size[0])) model_predictions.append({ 'detection_classes': (preds[:, 5] + 1).tolist(), # Class values are offset by +1.0 'detection_boxes': preds[:, 0:4].tolist(), 'detection_scores': preds[:, 4].tolist(), }) print(model_predictions) images_path = glob('utilities/images/*.JPG') predict(images_path)- Glenn JocherUltralytics
@foskyblue it seems like the issue might be related to the scaling and padding logic when converting bounding boxes. Ensure that the
scale_boxesfunction correctly rescales the boxes to the original image size. For more detailed guidance, please refer to the YOLOv9 documentation: https://docs.ultralytics.com/models/yolov9/. Hi Glen thanks for your response. Unfortunately I find it difficult to correctly scale the bounding boxes from the example script I mentioned above: https://stackoverflow.com/questions/76381317/yolov8-tflite-python-predictions-and-interpreting-output.
How can I implement the YOLOv9 TFLite model with an input ape of [1, 320, 576, 3] and output shape of [1, 19, 3780] in Python?
- Glenn JocherUltralytics
To correctly scale bounding boxes for your YOLOv9 TFLite model, ensure your
scale_boxesfunction accurately adjusts the coordinates based on the original image size and model input size. Verify that padding and scaling calculations align with your preprocessing steps. For further details, please refer to the YOLOv9 documentation.