Guida alla regolazione degli iperparametri di Ultralytics YOLO
La regolazione degli iperparametri in Ultralytics YOLO è una ricerca automatizzata e iterativa che ottimizza impostazioni come il tasso di apprendimento, i pesi della loss e l'intensità dell'augmentation, per massimizzare le metriche di prestazione di un modello di machine learning, come accuratezza, precisione e richiamo. Invece di provare questi valori manualmente, Ultralytics YOLO esplora lo spazio degli iperparametri con un algoritmo genetico che modifica e valuta configurazioni candidate durante numerose brevi sessioni di addestramento.
Guarda: Come ottimizzare gli iperparametri per migliorare le prestazioni del modello 🚀
Cosa sono gli iperparametri?#
Gli iperparametri sono impostazioni strutturali di alto livello dell'algoritmo. Vengono definiti prima della fase di addestramento e rimangono costanti durante questa fase. Ecco alcuni degli iperparametri più comunemente ottimizzati in Ultralytics YOLO:
- Tasso di apprendimento
lr0: determina l'ampiezza del passo a ogni iterazione mentre ci si avvicina a un minimo della funzione di loss. - Dimensione del batch
batch: numero di immagini elaborate contemporaneamente in un passaggio in avanti. - Numero di epoche
epochs: un'epoca corrisponde a un passaggio completo in avanti e all'indietro su tutti gli esempi di addestramento. - Dettagli dell'architettura: ad esempio, numero di canali, numero di livelli, tipi di funzioni di attivazione e così via. Questi elementi si trovano nella configurazione YAML del modello, non negli argomenti di addestramento.
Di questi quattro, solo il tasso di apprendimento fa parte dello spazio di ricerca predefinito: batch, epochs e l'architettura restano invariati. Il tuner modifica anche la pianificazione, i coefficienti della loss e le augmentation elencate qui sotto.
Evoluzione genetica e mutazione#
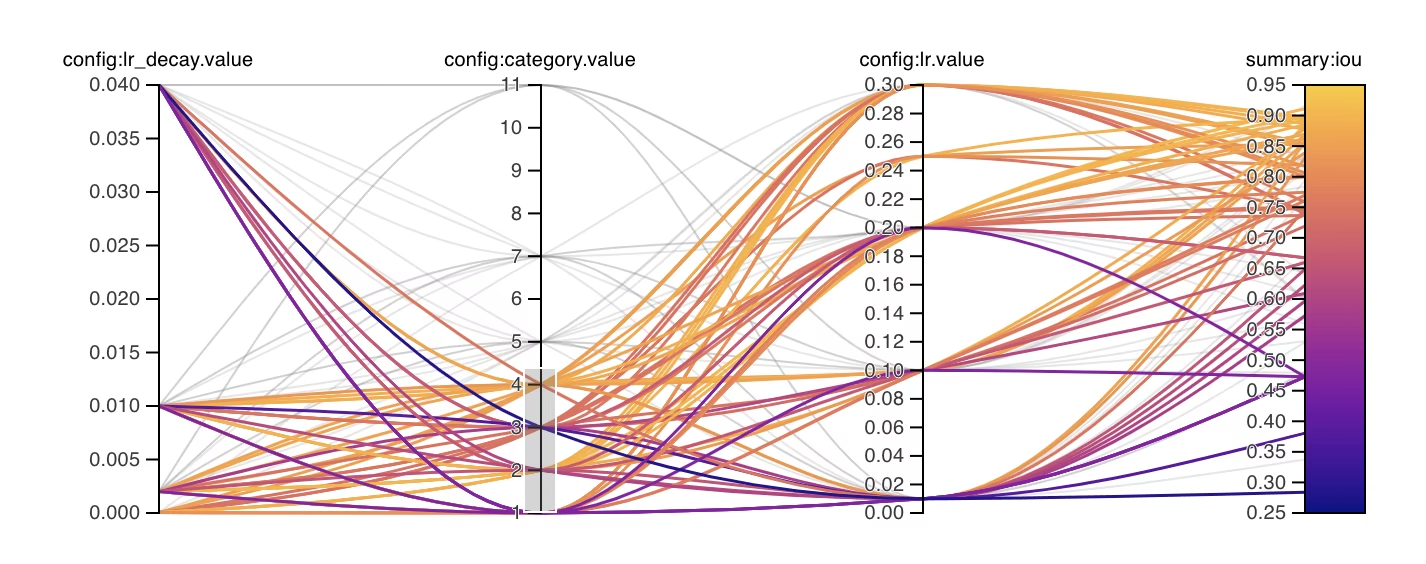
Ultralytics YOLO usa algoritmi genetici, una famiglia di algoritmi evolutivi, per ottimizzare gli iperparametri. Gli algoritmi genetici si ispirano al meccanismo della selezione naturale e alla genetica.
- Selezione: a ogni iterazione viene selezionata una delle configurazioni con il punteggio di fitness più alto, fino a un massimo di nove, con probabilità proporzionale al punteggio di fitness. Dopo 30 risultati, anche il 20% dei risultati migliori (fino a un massimo di 30) contribuisce a stimare la covarianza dei parametri, con un'influenza che aumenta man mano che si accumulano evidenze sulle configurazioni d'élite.
- Mutazione: a ogni iterazione viene modificata circa la metà dei parametri usando passi gaussiani normalizzati in base ai rispettivi intervalli di ricerca. Quando la covarianza è attiva, una quota ponderata in base al livello di confidenza, fino a un massimo del 40%, usa passi correlati; il ripiegamento riporta questi passi entro i limiti senza accumulare valori troncati. Man mano che si accumulano prove senza miglioramenti, le dimensioni dei passi si riducono linearmente fino al 20% nell'arco di 25 prove e vengono ripristinate quando si trova un nuovo risultato migliore. L'iterazione 1 non ha un elemento genitore e usa gli iperparametri di addestramento predefiniti come riferimento.
Preparazione all'ottimizzazione degli iperparametri#
Prima di iniziare il processo di ottimizzazione, è importante:
- Individua le metriche: il tuner integrato (
use_ray=False) ordina le prove in base al punteggiofitnessdella specifica attività, mentreuse_ray=Trueusa la metrica dell'attività. Decidi quali metriche secondarie esaminare, come AP50 o il punteggio F1. - Definisci il budget di tuning: stabilisci quante risorse di calcolo vuoi allocare. La regolazione degli iperparametri può richiedere molte risorse computazionali.
Come funziona il ciclo di ottimizzazione#
A ogni iterazione, l'ottimizzatore integrato ripete il ciclo seguente:
- Inizializzare gli iperparametri — partire da un riferimento ragionevole: gli iperparametri predefiniti impostati da Ultralytics YOLO oppure valori basati sulle tue conoscenze del dominio o su esperimenti precedenti.
- Modificare gli iperparametri — la classe
Tunergenera automaticamente un nuovo insieme di iperparametri a partire da quello esistente usando il metodo_mutate. - Addestrare il modello — addestrare il modello usando gli iperparametri modificati, quindi valutare le prestazioni di addestramento con le metriche scelte.
- Valutare il modello — il processo di valutazione produce il punteggio di fitness dell'iterazione, che viene confrontato con quelli delle iterazioni precedenti per determinare se gli iperparametri correnti rappresentano un miglioramento.
- Registrare i risultati — annotare le metriche di prestazione e i relativi iperparametri per consultarli in futuro. Ultralytics YOLO salva automaticamente questi risultati in formato NDJSON.
- Ripetere — continuare fino a raggiungere il numero di iterazioni stabilito; ogni iterazione si basa sulle conoscenze acquisite nelle esecuzioni precedenti. L'ottimizzatore integrato esegue tutti i
iterations; Ray Tune restituisce le metriche dopo ogni epoca di fit, consentendo ad ASHA di interrompere le prove poco promettenti una volta trascorso il periodo di tolleranza.
Numero di iterazioni e dimensione della popolazione#
Con l'ottimizzatore genetico integrato (use_ray=False), iterations controlla il numero totale di prove sequenziali e il valore predefinito è 300. Ogni prova addestra un modello con una configurazione di iperparametri: ad esempio, iterations=40 con epochs=50 pianifica 40 esecuzioni di addestramento indipendenti di 50 epoche ciascuna, non un'unica esecuzione di 50 epoche con una popolazione separata di 40 candidati.
L'algoritmo genetico integrato non ha un parametro esplicito per la dimensione della popolazione. Quando sono disponibili prove precedenti, seleziona fino a nove configurazioni con i punteggi di fitness più alti e modifica un candidato per iterazione.
Per eseguire prove in parallelo o usare strategie di ricerca più avanzate, imposta use_ray=True per usare Ray Tune, che adotta lo stesso valore predefinito di 300 prove e riceve iterations come num_samples. Per i dettagli, consulta la guida all'integrazione di Ray Tune.
Spazio di ricerca predefinito#
La tabella seguente elenca i parametri dello spazio di ricerca predefinito per l'ottimizzazione degli iperparametri in YOLO26. Ogni parametro ha un intervallo di valori specifico definito da una tupla (min, max).
| Parametro | Tipo | Intervallo di valori | Descrizione |
|---|---|---|---|
lr0 | float | (1e-5, 1e-2) | Tasso di apprendimento iniziale all'avvio dell'addestramento. Valori più bassi rendono l'addestramento più stabile, ma rallentano la convergenza. |
lrf | float | (0.01, 1.0) | Fattore del tasso di apprendimento finale come frazione di lr0. Controlla quanto diminuisce il tasso di apprendimento durante l'addestramento. |
momentum | float | (0.7, 0.98) | Fattore di momentum di SGD. Valori più alti aiutano a mantenere una direzione del gradiente costante e possono accelerare la convergenza. |
weight_decay | float | (0.0, 0.001) | Fattore di regolarizzazione L2 per prevenire l'overfitting. Valori più alti applicano una regolarizzazione più forte. |
warmup_epochs | float | (0.0, 5.0) | Numero di epoche per il riscaldamento lineare del tasso di apprendimento. Aiuta a prevenire l'instabilità nelle fasi iniziali dell'addestramento. |
warmup_momentum | float | (0.0, 0.95) | Momentum iniziale durante la fase di riscaldamento. Aumenta gradualmente fino al valore finale di momentum. |
box | float | (1.0, 20.0) | Peso della perdita dei riquadri di delimitazione nella funzione di perdita totale. Bilancia la regressione dei riquadri e la classificazione. |
cls | float | (0.1, 4.0) | Peso della perdita di classificazione nella funzione di perdita totale. Valori più alti danno maggiore importanza alla corretta previsione delle classi. |
cls_pw | float | (0.0, 1.0) | Esponente di ponderazione delle classi per gestire lo sbilanciamento tra le classi. Valori più alti aumentano il peso delle classi rare. |
dfl | float | (0.4, 12.0) | Peso del termine di regressione della distanza dei riquadri. YOLO26 senza DFL applica questo coefficiente a una perdita L1 sulle distanze normalizzate dei riquadri; valori più alti danno maggiore importanza alla precisione della localizzazione. |
hsv_h | float | (0.0, 0.1) | Intervallo di aumento casuale della tonalità nello spazio colore HSV. Aiuta il modello a generalizzare alle variazioni di colore. |
hsv_s | float | (0.0, 0.9) | Intervallo di aumento casuale della saturazione nello spazio HSV. Simula condizioni di illuminazione diverse. |
hsv_v | float | (0.0, 0.9) | Intervallo di aumento casuale del valore (luminosità). Aiuta il modello a gestire diversi livelli di esposizione. |
degrees | float | (0.0, 45.0) | Rotazione massima dell'aumento dei dati, in gradi. Aiuta il modello a diventare invariante all'orientamento degli oggetti. |
translate | float | (0.0, 0.9) | Traslazione massima dell'aumento dei dati, come frazione delle dimensioni dell'immagine. Migliora la robustezza rispetto alla posizione degli oggetti. |
scale | float | (0.0, 0.95) | Intervallo di ridimensionamento casuale. Aiuta il modello a rilevare oggetti di dimensioni diverse. |
shear | float | (0.0, 10.0) | Inclinazione massima dell'aumento dei dati, in gradi. Aggiunge distorsioni simili a quelle prospettiche alle immagini di addestramento. |
perspective | float | (0.0, 0.001) | Intervallo di prospettiva casuale dell'aumento dei dati. Simula angoli di visualizzazione diversi. |
flipud | float | (0.0, 1.0) | Probabilità di capovolgimento verticale dell'immagine durante l'addestramento. Utile per le immagini aeree o riprese dall'alto. |
fliplr | float | (0.0, 1.0) | Probabilità di capovolgimento orizzontale dell'immagine. Aiuta il modello a diventare invariante alla direzione degli oggetti. |
bgr | float | (0.0, 1.0) | Probabilità di applicare l'aumento BGR, che scambia i canali di colore. Può aiutare a ottenere l'invarianza rispetto ai colori. |
mosaic | float | (0.0, 1.0) | Probabilità di applicare l'aumento mosaic, che combina 4 immagini. Particolarmente utile per il rilevamento di oggetti piccoli. |
mixup | float | (0.0, 1.0) | Probabilità di applicare l'aumento mixup, che fonde due immagini. Può migliorare la robustezza del modello. |
cutmix | float | (0.0, 1.0) | Probabilità di applicare l'aumento cutmix. Combina regioni delle immagini mantenendo le caratteristiche locali. |
copy_paste | float | (0.0, 1.0) | In modalità flip, frazione degli oggetti idonei copiati; in modalità mixup, anche probabilità di applicazione. |
close_mosaic | int | (0.0, 10.0) | Disattiva mosaic nelle ultime N epoche per stabilizzare l'addestramento prima del completamento. Viene modificato come valore float e poi arrotondato a un numero intero di epoche. |
Esempio di spazio di ricerca personalizzato#
L'esempio seguente definisce uno spazio di ricerca e richiama model.tune(), che esegue la classe Tuner, per regolare YOLO26n su COCO8 per 30 epoche con l'ottimizzatore AdamW. La creazione di grafici, il salvataggio dei checkpoint e la convalida prima dell'ultima epoca vengono saltati per velocizzare il tuning.
Questo esempio ha solo scopo dimostrativo. Gli iperparametri ricavati da sessioni di ottimizzazione brevi o su piccola scala raramente sono ottimali per l'addestramento nel mondo reale. In pratica, l'ottimizzazione dovrebbe svolgersi con impostazioni simili a quelle dell'addestramento completo — inclusi dataset, numero di epoche e aumenti dei dati comparabili — per garantire risultati affidabili e trasferibili. Un'ottimizzazione rapida può orientare gli iperparametri verso una convergenza più veloce o miglioramenti a breve termine nella convalida che non si generalizzano.
from ultralytics import YOLO

# Inizializza il modello YOLO
model = YOLO("yolo26n.pt")

# Definisci lo spazio di ricerca
search_space = {
    "lr0": (1e-5, 1e-2),
    "degrees": (0.0, 45.0),
}

# Ottimizza gli iperparametri su COCO8 per 30 epoche
model.tune(
    data="coco8.yaml",
    epochs=30,
    iterations=300,
    optimizer="AdamW",
    space=search_space,
    plots=False,
    save=False,
    val=False,
)
Riprendere una sessione di ottimizzazione degli iperparametri interrotta#
Puoi riprendere una sessione di ottimizzazione degli iperparametri interrotta passando resume=True. Facoltativamente, puoi passare la directory name usata da runs/{task} per riprendere la sessione. Se non specifichi name, la ripresa avviene dalla directory chiamata letteralmente tune, che è il nome predefinito e non quello della sessione eseguita più di recente; quindi, passa name per qualsiasi esecuzione avviata con un nome personalizzato. Devi anche fornire tutti gli argomenti di addestramento precedenti, inclusi data, epochs, iterations e space.
from ultralytics import YOLO

# Definisci un modello YOLO
model = YOLO("yolo26n.pt")

# Definisci lo spazio di ricerca
search_space = {
    "lr0": (1e-5, 1e-2),
    "degrees": (0.0, 45.0),
}

# Riprendi l'esecuzione precedente
results = model.tune(data="coco8.yaml", epochs=50, iterations=300, space=search_space, resume=True)

# Riprendi l'esecuzione di ottimizzazione con il nome 'tune_exp'
results = model.tune(data="coco8.yaml", epochs=50, iterations=300, space=search_space, name="tune_exp", resume=True)Risultati#
Al termine dell'ottimizzazione degli iperparametri, otterrai diversi file e directory che raccolgono i risultati dell'ottimizzazione. Di seguito è descritta ciascuna voce:
Struttura dei file#
Ecco come apparirà la struttura delle directory dei risultati. Le directory delle sessioni di ricerca, come multitrain/ e multitrain-2/, contengono le singole iterazioni di ottimizzazione: una per ogni modello addestrato su ciascun dataset con un insieme di iperparametri, in una sottodirectory denominata in base al dataset. Per risparmiare spazio, l'ottimizzatore elimina le directory delle esecuzioni per dataset delle iterazioni che non sono le migliori correnti. La directory tune/ contiene i risultati dell'ottimizzazione di tutti i singoli addestramenti dei modelli:
runs/
└── detect/
    ├── multitrain/
    │   └── coco8/
    ├── multitrain-2/
    ├── ...
    └── tune/
        ├── best_hyperparameters.yaml
        ├── tune_fitness.png
        ├── tune_results.ndjson
        ├── tune_scatter_plots.png
        └── weights/
            ├── last.pt
            └── best.pt
Descrizione dei file#
best_hyperparameters.yaml#
Questo file YAML contiene i migliori iperparametri individuati durante il processo di ottimizzazione. Puoi usare questo file per inizializzare gli addestramenti futuri con queste impostazioni ottimizzate.
-
Formato: YAML
-
Uso: risultati degli iperparametri
-
Esempio:
# 558/900 iterations complete ✅ (45536.81s)
# Results saved to /usr/src/ultralytics/runs/detect/tune
# Best fitness=0.64297 observed at iteration 498
# Best fitness metrics are {'metrics/precision(B)': 0.87247, 'metrics/recall(B)': 0.71387, 'metrics/mAP50(B)': 0.79106, 'metrics/mAP50-95(B)': 0.62651, 'val/box_loss': 2.79884, 'val/cls_loss': 2.72386, 'val/l1_loss': 0.68503, 'fitness': 0.64297}
# Best fitness model is /usr/src/ultralytics/runs/detect/tune/weights
# Best fitness hyperparameters are printed below.

lr0: 0.00269
lrf: 0.00288
momentum: 0.73375
weight_decay: 0.00015
warmup_epochs: 1.22935
warmup_momentum: 0.1525
box: 18.27875
cls: 1.32899
dfl: 0.56016
hsv_h: 0.01148
hsv_s: 0.53554
hsv_v: 0.13636
degrees: 0.0
translate: 0.12431
scale: 0.07643
shear: 0.0
perspective: 0.0
flipud: 0.0
fliplr: 0.08631
mosaic: 0.42551
mixup: 0.0
copy_paste: 0.0
tune_fitness.png#
Questo grafico mostra il punteggio di fitness in funzione del numero di iterazioni. Ti aiuta a visualizzare l'andamento dell'algoritmo genetico nel tempo.
- Formato: PNG
- Uso: visualizzazione delle prestazioni
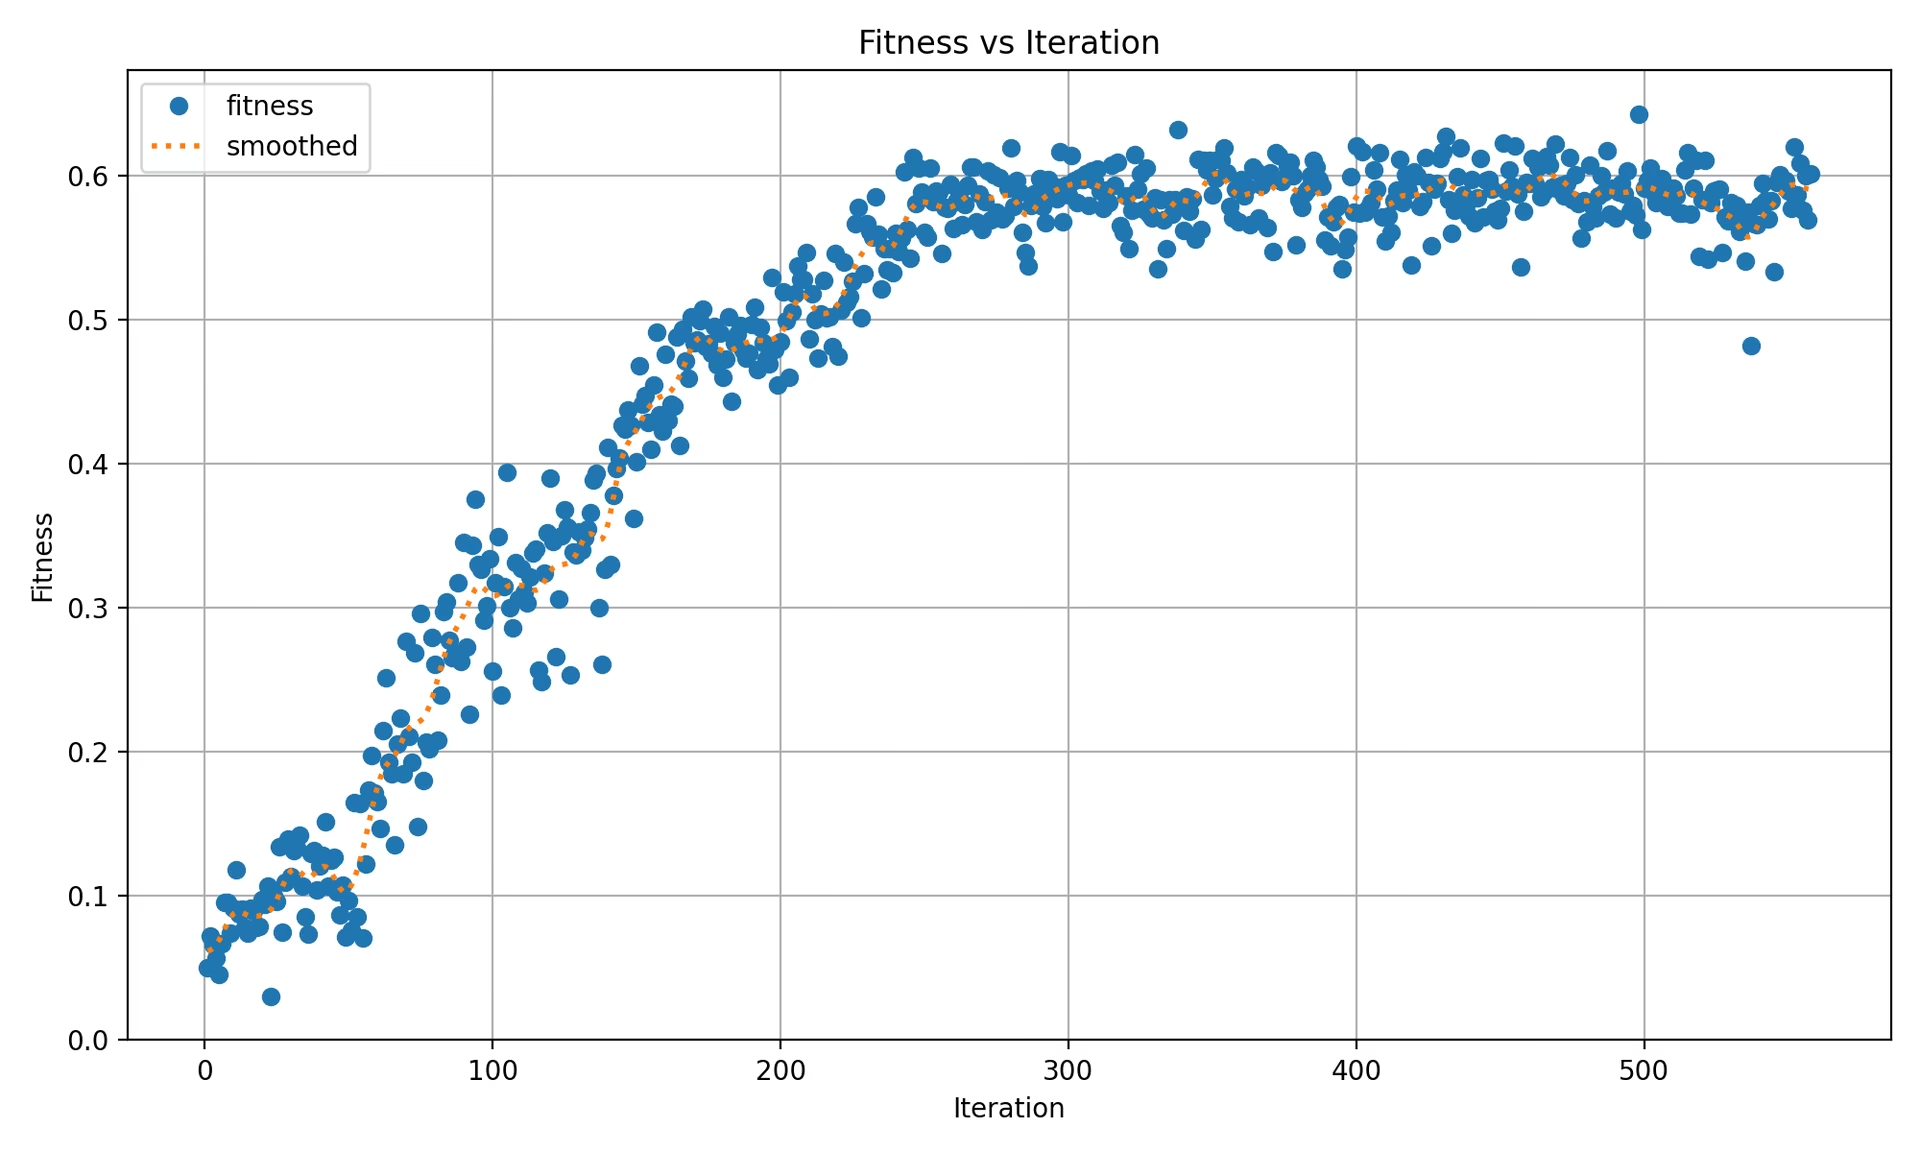
Il grafico contiene:
- Un indicatore per ogni iterazione e per ogni dataset: un'esecuzione con un solo dataset mostra un punto per iterazione, mentre un'esecuzione con più dataset mostra un punto per ciascun dataset a ogni iterazione.
- Una linea tratteggiata della "media smussata", calcolata applicando uno smoothing gaussiano (
sigma=3) ai valori di fitness di primo livello per ogni iterazione.
tune_results.ndjson#
Un file NDJSON che contiene i risultati dettagliati di ogni iterazione di ottimizzazione. Ogni riga è un oggetto JSON con il punteggio di fitness aggregato, gli iperparametri ottimizzati e le metriche per ciascun dataset. L'ottimizzazione con un singolo dataset e quella con più dataset usano lo stesso formato di file.
- Formato: NDJSON
- Uso: monitoraggio dei risultati per iterazione.
- Esempio:
Di seguito è riportato un esempio formattato per facilitarne la lettura; nel file .ndjson effettivo, ogni oggetto è memorizzato su una singola riga.
{
    "iteration": 1,
    "fitness": 0.48628,
    "hyperparameters": {
        "lr0": 0.01,
        "lrf": 0.01,
        "momentum": 0.937,
        "weight_decay": 0.0005
    },
    "datasets": {
        "coco8": {
            "metrics/precision(B)": 0.65666,
            "metrics/recall(B)": 0.85,
            "metrics/mAP50(B)": 0.85086,
            "metrics/mAP50-95(B)": 0.64104,
            "val/box_loss": 1.57958,
            "val/cls_loss": 1.04986,
            "val/l1_loss": 1.32641,
            "fitness": 0.64104
        },
        "coco8-grayscale": {
            "metrics/precision(B)": 0.6582,
            "metrics/recall(B)": 0.51667,
            "metrics/mAP50(B)": 0.59106,
            "metrics/mAP50-95(B)": 0.33152,
            "val/box_loss": 1.95424,
            "val/cls_loss": 1.64059,
            "val/l1_loss": 1.70226,
            "fitness": 0.33152
        }
    },
    "save_dirs": {
        "coco8": "runs/detect/multitrain/coco8",
        "coco8-grayscale": "runs/detect/multitrain/coco8-grayscale"
    }
}
Il valore di primo livello fitness è la media aritmetica dei valori fitness di ciascun dataset. Nell'ottimizzazione con un solo dataset, il dizionario datasets contiene una voce, il cui valore fitness corrisponde al valore fitness di primo livello. Viene registrato un oggetto JSON per ogni iterazione completata. I percorsi save_dirs effettivi sono assoluti; qui sono abbreviati per facilitarne la lettura.
tune_scatter_plots.png#
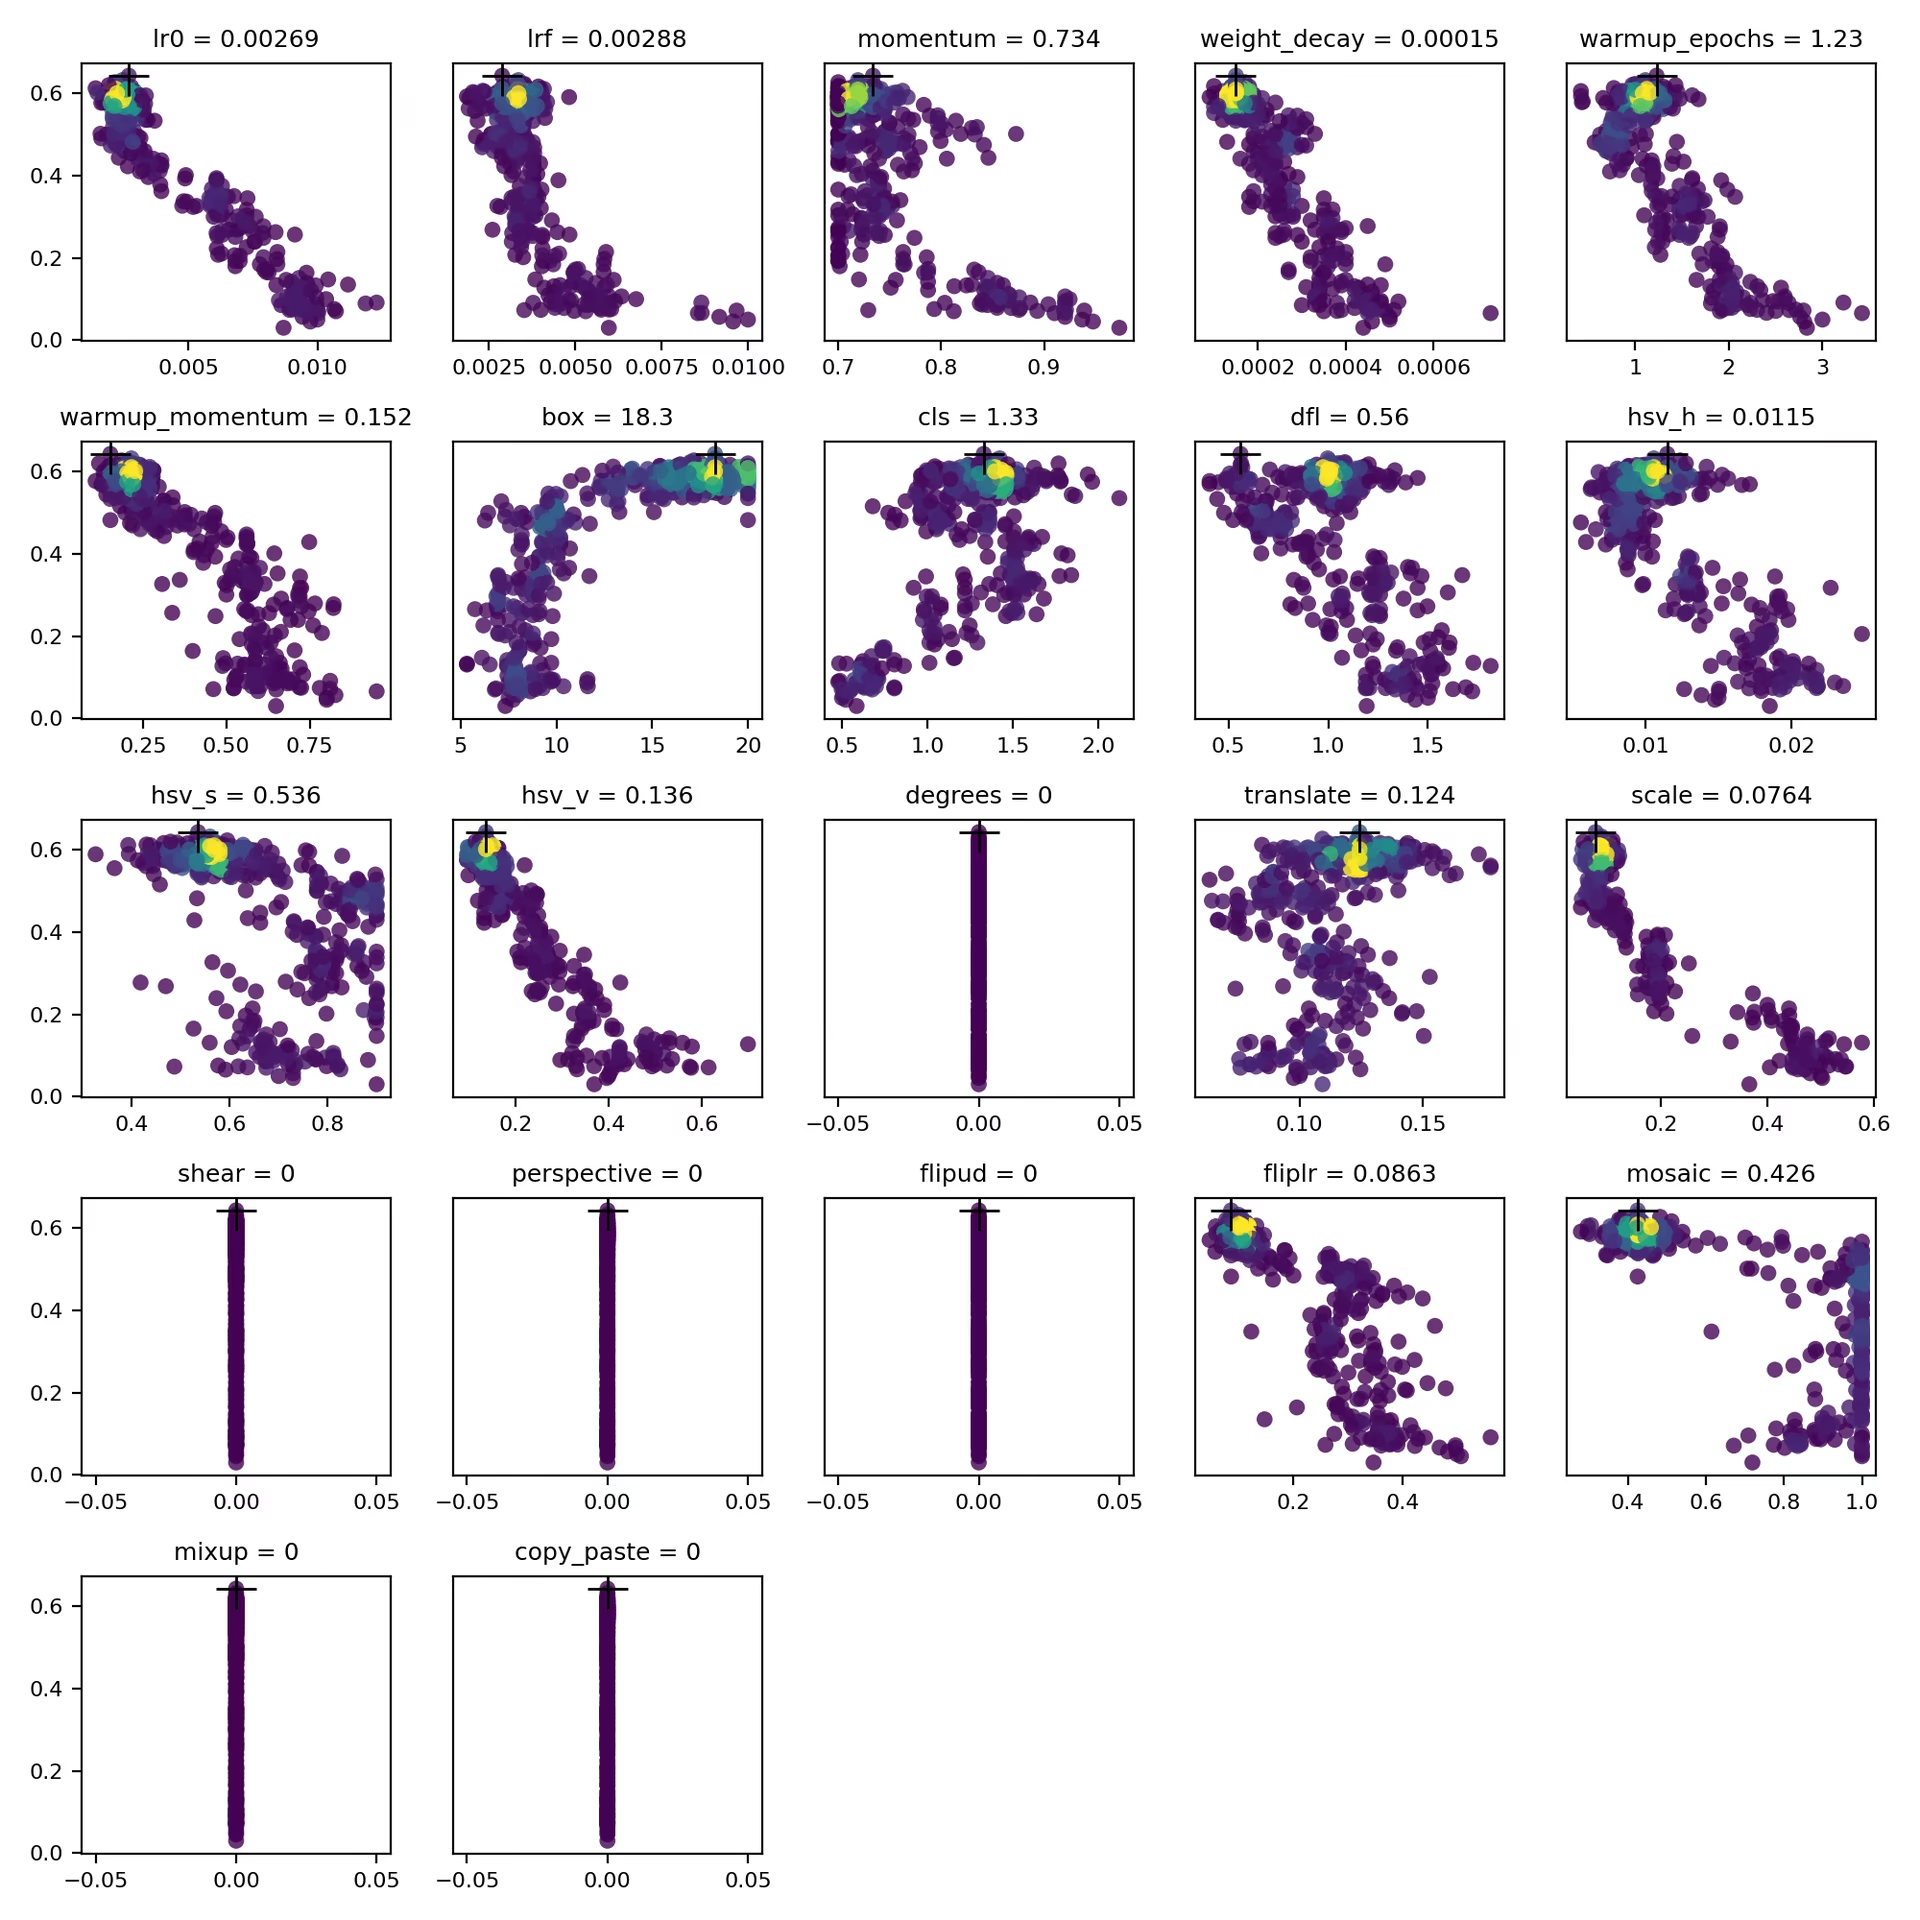
Questo file contiene grafici a dispersione generati da tune_results.ndjson, che ti aiutano a visualizzare le relazioni tra diversi iperparametri e le metriche di prestazione. La mutazione usa l'intervallo configurato per ogni iperparametro, quindi i valori possono evolvere anche da impostazioni predefinite pari a zero come degrees e shear.
- Formato: PNG
- Uso: analisi esplorativa dei dati
weights/#
Questa directory contiene i modelli PyTorch salvati dall'iterazione con il punteggio di fitness migliore dell'esecuzione di ottimizzazione. Entrambi i file provengono dalla stessa iterazione:
last.pt: pesi dell'ultima epoca dell'esecuzione di addestramento di quell'iterazione.best.pt: pesi dell'epoca con il miglior punteggio di fitness dell'esecuzione di addestramento di quell'iterazione.
Usando questi risultati, puoi prendere decisioni più consapevoli per i futuri addestramenti e le analisi dei modelli.
Conclusione#
L'ottimizzazione degli iperparametri in Ultralytics YOLO è semplice da avviare e potente al suo interno: utilizza una selezione ponderata in base alla fitness e una mutazione normalizzata rispetto all'intervallo in un algoritmo genetico. Seguendo il ciclo descritto in questa guida, puoi ottimizzare sistematicamente il tuo modello per ottenere prestazioni migliori e poi riutilizzare il risultato best_hyperparameters.yaml per inizializzare i futuri cicli di addestramento. Per estendere l'ottimizzazione a prove parallele e ad algoritmi di ricerca più avanzati, continua con la guida all'integrazione di Ray Tune, oppure esegui job gestiti con iperparametri configurabili e monitoraggio delle metriche in tempo reale su Ultralytics Platform tramite l'addestramento nel cloud.
Per le impostazioni non esposte da alcun argomento, come i tassi di apprendimento per livello o una metrica di fitness personalizzata, crea una sottoclasse del trainer. Per approfondire, esplora il codice sorgente della classe Tuner. Se hai domande o richieste di funzionalità, contattaci su GitHub o Discord.
Domande frequenti#
Imposta un valore iniziale con il parametro
lr0— i valori comuni vanno da0.001a0.01— e lascia che l'ottimizzazione lo modifichi per trovare il valore ottimale. Puoi automatizzare il processo con il metodomodel.tune(). Per esempio:Esempiofrom ultralytics import YOLO # Inizializza il modello YOLO model = YOLO("yolo26n.pt") # Ottimizza gli iperparametri su COCO8 per 30 epoche model.tune(data="coco8.yaml", epochs=30, iterations=300, optimizer="AdamW", plots=False, save=False, val=False)Per maggiori dettagli, consulta la pagina di configurazione di Ultralytics YOLO.
Gli algoritmi genetici offrono a Ultralytics YOLO26 un metodo efficace per esplorare lo spazio degli iperparametri senza procedere per tentativi manuali. Tra i principali vantaggi:
- Ricerca efficiente: la selezione ponderata in base alla fitness conserva le configurazioni più efficaci, mentre la mutazione normalizzata rispetto all'intervallo esplora nuove candidate.
- Evitare i minimi locali: le mutazioni casuali aiutano la ricerca a uscire dai minimi locali in cui potrebbe bloccarsi una ricerca puramente greedy.
- Metriche di prestazione: si adattano in base a un punteggio di idoneità specifico per l'attività (mAP50-95 per il rilevamento).
Per scoprire come gli algoritmi genetici possono ottimizzare gli iperparametri, consulta la guida all'evoluzione degli iperparametri.
Il tempo necessario per ottimizzare gli iperparametri con Ultralytics YOLO dipende in larga misura da diversi fattori, come le dimensioni del dataset, la complessità dell'architettura del modello, il numero di iterazioni e le risorse di calcolo disponibili. Per esempio, ottimizzare YOLO26n su un dataset come COCO8 per 30 epoche può richiedere da alcune ore a diversi giorni, a seconda dell'hardware.
Per gestire efficacemente i tempi di ottimizzazione, definisci in anticipo un budget chiaro, come spiegato in Prepararsi all'ottimizzazione degli iperparametri. Questo aiuta a bilanciare l'allocazione delle risorse e gli obiettivi di ottimizzazione.
Per valutare le prestazioni del modello durante l'ottimizzazione degli iperparametri in YOLO, puoi usare diverse metriche chiave:
- AP50: la precisione media alla soglia IoU di 0.50.
- Punteggio F1: la media armonica di precisione e richiamo.
- Precisione e richiamo: metriche distinte che indicano l'accuratezza del modello nell'identificare i veri positivi rispetto ai falsi positivi e ai falsi negativi.
Queste metriche ti aiutano a comprendere diversi aspetti delle prestazioni del modello.
Sì, Ultralytics YOLO26 si integra con Ray Tune per l'ottimizzazione avanzata degli iperparametri. Ray Tune offre algoritmi di ricerca come l'ottimizzazione bayesiana e Hyperband, oltre a funzionalità di esecuzione parallela che velocizzano il processo di tuning.
Per usare Ray Tune con YOLO26, imposta il parametro
use_ray=Truenella chiamata al metodomodel.tune().


Commenti152
Fai una domanda, condividi i tuoi risultati o aiuta qualcun altro.
GengBin414(modificato)
I tuned my defect detection dataset ,which are composed of 8000+ images, this is my tune code: model.tune( data="../data/data20260420_line_scan_merged_6ch.yaml", epochs=300, iterations=300, #space=search_space, #optimizer="AdamW", optimizer="MuSGD", lr0=0.01, momentum=0.9, shear=1, degrees=1, perspective=0.0001, mixup=0.1, cutmix=0.1, batch=20 )
I got the best mAP 0.586 at iteration 5 after tuned 30+ iterations, then I retrain the dataset with the following code: model.train( data="../data/data20260420_line_scan_merged_6ch.yaml", epochs=300, batch=20, imgsz=640, device=0, workers=16, optimizer="MuSGD", lr0=0.00721, lrf=0.01267, momentum=0.81816, weight_decay=0.00077, warmup_epochs=3.31429, warmup_momentum=0.95, box=7.11682, cls=0.48318, dfl=0.9397, hsv_h=0.00364, hsv_s=0.9, hsv_v=0.29751, degrees=0.99922, translate=0.07662, scale=0.51303, shear=0.76723, perspective=0.0, flipud=0.00019, fliplr=0.57639, bgr=0.00634, mosaic=0.62424, mixup=0.11307, cutmix=0.13007, copy_paste=0.00583, close_mosaic=10 #cfg="best_hyperparameters_map0.586.yaml" )
I copied the hyperparameters from best_hyperparameters_map0.586.yaml, but I got the best mAP 0.568, what cause the discrepancy?Can sb help me out? Thanks.
 Glenn JocherUltralytics
A small gap like
0.586 -> 0.568is usually expected becausetune()saves the best single stochastic run, while your latertrain()is a fresh run with different randomness and augmentation order; please first validate the tuning checkpointruns/detect/tune/weights/best.pt, then retrain with the exact same args plusseed=0anddeterministic=True, and make sure you are comparing the same metric (fitness/mAP50-95) described in the Hyperparameter Tuning guide. If the gap still looks too large, please share the text output from validating that checkpoint and the matching row fromtune_results.ndjsonhere in Discussions so the team can compare them directly.Thank you for your timely reply, I validated the tuning checkpoint, here is the text output from validating that checkpoint: (yolo26) ps@ps:~/Desktop/GB/ultralytics$ python val.py Ultralytics 8.4.26 🚀 Python-3.11.15 torch-2.5.1 CUDA:0 (NVIDIA GeForce RTX 4090 D, 24208MiB) YOLO26x summary (fused): 190 layers, 55,645,380 parameters, 0 gradients, 193.9 GFLOPs val: Fast image access ✅ (ping: 0.0±0.0 ms, read: 10744.4±1424.6 MB/s, size: 734.1 KB) val: Scanning /home/ps/Desktop/GB/ultralytics/datasets/Merged_6Chanel_20260420/imagesH/val.cache... 786 images, 47 backgrounds, 0 corrupt: 100% ━━━━━━━━━━━━ 786/786 412.1Mit/s 0.0s Class Images Instances Box(P R mAP50 mAP50-95): 100% ━━━━━━━━━━━━ 50/50 6.9it/s 7.2s all 786 1363 0.843 0.69 0.765 0.585 black 45 47 0.914 0.677 0.828 0.648 crack 120 145 0.681 0.517 0.55 0.334 edge 184 195 0.916 0.899 0.94 0.833 line 116 147 0.809 0.646 0.736 0.544 pit 73 89 0.775 0.543 0.642 0.447 raw 279 318 0.861 0.745 0.81 0.644 white 95 106 0.9 0.623 0.712 0.46 yellow 299 316 0.884 0.873 0.9 0.773 Speed: 0.9ms preprocess, 7.3ms inference, 0.0ms loss, 0.0ms postprocess per image Results saved to /home/ps/Desktop/GB/ultralytics/runs/detect/val81
I checked my retrain args, it show that seed=0 and deterministic=True already set: python train.py New https://pypi.org/project/ultralytics/8.4.53 available 😃 Update with 'pip install -U ultralytics' Ultralytics 8.4.26 🚀 Python-3.11.15 torch-2.5.1 CUDA:0 (NVIDIA GeForce RTX 4090 D, 24208MiB) engine/trainer: agnostic_nms=False, amp=True, angle=1.0, augment=False, auto_augment=randaugment, batch=20, bgr=0.00634, box=7.11682, cache=False, cfg=None, classes=None, close_mosaic=10, cls=0.48318, compile=False, conf=None, copy_paste=0.00583, copy_paste_mode=flip, cos_lr=False, cutmix=0.13007, data=../data/data20260420_line_scan_merged_6ch.yaml, degrees=0.99922, deterministic=True, device=0, dfl=0.9397, dnn=False, dropout=0.0, dynamic=False, embed=None, end2end=None, epochs=500, erasing=0.4, exist_ok=False, fliplr=0.57639, flipud=0.00019, format=torchscript, fraction=1.0, freeze=None, half=False, hsv_h=0.00364, hsv_s=0.9, hsv_v=0.29751, imgsz=640, int8=False, iou=0.7, keras=False, kobj=1.0, line_width=None, lr0=0.00721, lrf=0.01267, mask_ratio=4, max_det=300, mixup=0.11307, mode=train, model=yolo26x.pt, momentum=0.81816, mosaic=0.62424, multi_scale=0.0, name=train137, nbs=64, nms=False, opset=None, optimize=False, optimizer=MuSGD, overlap_mask=True, patience=100, perspective=0.0, plots=True, pose=12.0, pretrained=True, profile=False, project=None, rect=False, resume=False, retina_masks=False, rle=1.0, save=True, save_conf=False, save_crop=False, save_dir=/home/ps/Desktop/GB/ultralytics/runs/detect/train137, save_frames=False, save_json=False, save_period=-1, save_txt=False, scale=0.51303, seed=0, shear=0.76723, show=False, show_boxes=True, show_conf=True, show_labels=True, simplify=True, single_cls=False, source=None, split=val, stream_buffer=False, task=detect, time=None, tracker=botsort.yaml, translate=0.07662, val=True, verbose=True, vid_stride=1, visualize=False, warmup_bias_lr=0.1, warmup_epochs=3.31429, warmup_momentum=0.95, weight_decay=0.00077, workers=16, workspace=None
And here is the train output: Epoch GPU_mem box_loss cls_loss dfl_loss Instances Size 260/300 20.8G 0.4503 0.4947 0.004246 50 640: 100% ━━━━━━━━━━━━ 354/354 2.7it/s 2:10 Class Images Instances Box(P R mAP50 mAP50-95): 100% ━━━━━━━━━━━━ 20/20 4.5it/s 4.4s all 786 1363 0.841 0.682 0.751 0.564 EarlyStopping: Training stopped early as no improvement observed in last 100 epochs. Best results observed at epoch 160, best model saved as best.pt. To update EarlyStopping(patience=100) pass a new patience value, i.e.
patience=300or usepatience=0to disable EarlyStopping.260 epochs completed in 9.792 hours. Optimizer stripped from /home/ps/Desktop/GB/ultralytics/runs/detect/train138/weights/last.pt, 118.4MB Optimizer stripped from /home/ps/Desktop/GB/ultralytics/runs/detect/train138/weights/best.pt, 118.4MB
Validating /home/ps/Desktop/GB/ultralytics/runs/detect/train138/weights/best.pt... Ultralytics 8.4.26 🚀 Python-3.11.15 torch-2.5.1 CUDA:0 (NVIDIA GeForce RTX 4090 D, 24208MiB) YOLO26x summary (fused): 190 layers, 55,645,380 parameters, 0 gradients, 193.9 GFLOPs Class Images Instances Box(P R mAP50 mAP50-95): 100% ━━━━━━━━━━━━ 20/20 4.9it/s 4.1s all 786 1363 0.826 0.685 0.758 0.568 black 45 47 0.882 0.634 0.773 0.579 crack 120 145 0.675 0.559 0.577 0.314 edge 184 195 0.925 0.885 0.949 0.824 line 116 147 0.785 0.667 0.714 0.52 pit 73 89 0.84 0.528 0.662 0.447 raw 279 318 0.812 0.72 0.804 0.638 white 95 106 0.802 0.611 0.674 0.434 yellow 299 316 0.888 0.877 0.911 0.787 Speed: 0.1ms preprocess, 4.4ms inference, 0.0ms loss, 0.0ms postprocess per image Results saved to /home/ps/Desktop/GB/ultralytics/runs/detect/train138
And I don't know where to find tune_results.ndjson mentioned in your reply. I guess you mean the matching row from tune_results.csv then here is: fitness lr0 lrf momentum weight_decay warmup_epochs warmup_momentum box cls dfl hsv_h hsv_s hsv_v degrees translate scale shear perspective flipud fliplr bgr mosaic mixup cutmix copy_paste close_mosaic 0.58582 0.00721 0.01267 0.81816 0.00077 3.31429 0.95 7.11682 0.48318 0.9397 0.00364 0.9 0.29751 0.99922 0.07662 0.51303 0.76723 0 0.00019 0.57639 0.00634 0.62424 0.11307 0.13007 0.00583 10
- Glenn JocherUltralytics
The main issue I see is that your retrain is not matching the tuned trial: the runtime log shows
epochs=500rather than300, so the schedule driven bylr0andlrfis different and that alone can explain0.585 -> 0.568; the current Hyperparameter Tuning guide writestune_results.ndjsonunderruns/detect/tune/, but in your older8.4.26install the equivalent may betune_results.csv, so please rerun with the exact runtime args from the best trial, especiallyepochs=300and the samepatience, and if it still printsepochs=500then another override is being applied. Sorry, after hyperparameter tuning, I retrained first with epochs=500, observed mAP=0.57, then I changed epochs=300, observed mAP=0.568. In the previous reply, I mistakenly copied the retrain args from the epochs=500 run. But the train output is correctly copied from the epochs=300 run, you can tell this out from the EarlyStopping output: Epoch GPU_mem box_loss cls_loss dfl_loss Instances Size 260/300 20.8G 0.4503 0.4947 0.004246 50 640: 100% ━━━━━━━━━━━━ 354/354 2.7it/s 2:10 Class Images Instances Box(P R mAP50 mAP50-95): 100% ━━━━━━━━━━━━ 20/20 4.5it/s 4.4s all 786 1363 0.841 0.682 0.751 0.564 EarlyStopping: Training stopped early as no improvement observed in last 100 epochs. Best results observed at epoch 160, best model saved as best.pt. To update EarlyStopping(patience=100) pass a new patience value, i.e. patience=300 or use patience=0 to disable EarlyStopping.
And the retrain args of the epochs=300 run, it shows that seed=0 and deterministic=True already set: python train.py New https://pypi.org/project/ultralytics/8.4.53 available 😃 Update with 'pip install -U ultralytics' Ultralytics 8.4.26 🚀 Python-3.11.15 torch-2.5.1 CUDA:0 (NVIDIA GeForce RTX 4090 D, 24208MiB) engine/trainer: agnostic_nms=False, amp=True, angle=1.0, augment=False, auto_augment=randaugment, batch=20, bgr=0.00634, box=7.11682, cache=False, cfg=None, classes=None, close_mosaic=10, cls=0.48318, compile=False, conf=None, copy_paste=0.00583, copy_paste_mode=flip, cos_lr=False, cutmix=0.13007, data=../data/data20260420_line_scan_merged_6ch.yaml, degrees=0.99922, deterministic=True, device=0, dfl=0.9397, dnn=False, dropout=0.0, dynamic=False, embed=None, end2end=None, epochs=300, erasing=0.4, exist_ok=False, fliplr=0.57639, flipud=0.00019, format=torchscript, fraction=1.0, freeze=None, half=False, hsv_h=0.00364, hsv_s=0.9, hsv_v=0.29751, imgsz=640, int8=False, iou=0.7, keras=False, kobj=1.0, line_width=None, lr0=0.00721, lrf=0.01267, mask_ratio=4, max_det=300, mixup=0.11307, mode=train, model=yolo26x.pt, momentum=0.81816, mosaic=0.62424, multi_scale=0.0, name=train138, nbs=64, nms=False, opset=None, optimize=False, optimizer=MuSGD, overlap_mask=True, patience=100, perspective=0.0, plots=True, pose=12.0, pretrained=True, profile=False, project=None, rect=False, resume=False, retina_masks=False, rle=1.0, save=True, save_conf=False, save_crop=False, save_dir=/home/ps/Desktop/GB/ultralytics/runs/detect/train138, save_frames=False, save_json=False, save_period=-1, save_txt=False, scale=0.51303, seed=0, shear=0.76723, show=False, show_boxes=True, show_conf=True, show_labels=True, simplify=True, single_cls=False, source=None, split=val, stream_buffer=False, task=detect, time=None, tracker=botsort.yaml, translate=0.07662, val=True, verbose=True, vid_stride=1, visualize=False, warmup_bias_lr=0.1, warmup_epochs=3.31429, warmup_momentum=0.95, weight_decay=0.00077, workers=16, workspace=None
 Murat Raimbekov
quick check on what is likely going on, framed generally: tune saves the best of N stochastic trials, and a single retrain is one new stochastic draw with the same hyperparameters. bit-exact reproduction between the two is not guaranteed even with
seed=0, deterministic=True. ourinit_seeds(deterministic=True)setstorch.use_deterministic_algorithms(True, warn_only=True)inultralytics/utils/torch_utils.py, matching the pytorch reproducibility notes - cuda ops without a deterministic alternative still run non-deterministically with just a warning. over many epochs on a real dataset that variance can compound.a few practical takeaways before assuming the gap is a tuning bug:
- your trial weights at
runs/detect/tune/weights/best.ptalready validate to 0.585, so the trial result is real and reusable - if you need exactly that performance for deployment, use that checkpoint directly. - the recommended way to reuse tuned hyperparameters in a fresh train run is
cfg="runs/detect/tune/best_hyperparameters.yaml"(the commented-out line in your script). that file contains the exact values the trial used and matches the workflow described in the hyperparameter tuning guide. - to bound run-to-run variance, retrain a few times with
seed=0,seed=1,seed=2and compare the mean against the tune's reported best, not a single retrain.
unrelated, you are on ultralytics 8.4.26 and the current release is 8.4.53; for new tuning runs it is worth updating.
- your trial weights at
 User
Hi, I have a question about Hyperparameter Tuning. What value of
epochsanditerationsshould I pass to model.tune(). Default value of epochs is 100, and iterations is 10. Are the default values OK, or should I change them ? My dataset is about 10,000 images.- Glenn JocherUltralytics
For a 10k-image dataset, the defaults are fine for a quick sanity check, but for useful tuning you should set
epochsclose to your real training length becauseepochsis per trial, whileiterationsis how many different trials are tested; a practical starting point isepochs=50to100withiterations=30to100depending on your compute budget, then retrain once with the best settings frombest_hyperparameters.yamlas shown in the Hyperparameter Tuning guide.1 - User
Thank you very much ! I will try to search the best hyperparameters !
- Glenn JocherUltralytics
You're welcome — sounds good; if anything looks off during tuning, please share your
model.tune()call plus the resultingbest_hyperparameters.yamlortune_results.ndjsonhere, and we can help compare it against the expected outputs in the Hyperparameter Tuning guide.
harunemrekiran61
You’ve shown the box range as 0.02 to 0.2, but the default value appears to be 7.5. Is there a mistake here? Could you please check?
- Glenn JocherUltralytics
Good catch —
boxis a loss gain (default7.5during training), so the0.02–0.2range shown in the docs table is outdated/incorrect; the current built-in tuner boundsboxto1.0–20.0(see the Tuner class reference), and you can always override it viaspace={...}as shown in the Hyperparameter Tuning guide.
Larry-zhai
How can I directly apply the optimized best_hyperparameters.yaml to my training? In fact, when I use code similar to the following: from ultralytics import YOLO model = YOLO("yolov8n.pt") model.train(data="data.yaml", hyp="hyp.yaml") an error occurs: SyntaxError: 'hyp' is not a valid YOLO argument.
 J.Q. Pan
Hi I have used the above code to apply the tuning but neither the diagram nor the models will be saved. I only get a single tune folder with all tuning details. I may ask if someone else has also the same problem.
BrianNieuwenhuis
When running the code below the model.tune() call does not recognize my model specification. Could someone explain to me what I am doing wrong. I am using model.overrides so that I can also tune the shear and perspective parameters that are otherwise initialized at 0.
from ultralytics import YOLO import wandb from ultralytics import settings settings.update({"wandb": True})
import argparse
def main(): # parse command-line args if needed parser = argparse.ArgumentParser() parser.add_argument("--gpus", type=int, default=1) parser.add_argument("--workers", type=int, default=4) args = parser.parse_args()
# Define a YOLO model
model = YOLO("yolo11x.pt")

# Dynamically assign GPUs based on --gpus argument
device = list(range(args.gpus))  # e.g., [0, 1, 2, 3] if args.gpus = 4

# Define search space
search_space = {
    "lr0": (1e-5, 1e-1),
    "lrf": (0.01, 1.0),
    "momentum": (0.6, 0.98),
    "weight_decay": (0.0, 0.001),
    "warmup_epochs": (0, 5),
    "warmup_momentum": (0.0,0.95),
    "box": (0.02, 0.2),
    "cls": (0.2, 4.0),
    "hsv_h": (0.0, 0.1),
    "hsv_s": (0.0, 0.9),
    "hsv_v": (0.0, 0.9),
    "translate":(0.0, 0.9),
    "scale": (0.0, 0.9),
    "shear": (0.0, 10.0),
    "perspective": (0.0, 0.001),
    "mosaic": (0.0,1.0),
    "mixup": (0.0, 1.0),
    "copy_paste": (0.0, 1.0)
}

# Manually initialize certain hperparameters that would not be tuned otherwise
model.overrides = {
    'shear': 1,
    'perspective': 0.001,
    'mixup': 0.01,
    'copy_paste' : 0.01,

}

# tune the model
results = model.tune(project='./tune/crop1344',name="tune_default_batch16_v100", use_ray = False,
    data="data.yaml",
    #hyp="custom_hyp.yaml", # this does not seem to work work for tune scripts!!
    batch = 16,
    imgsz = 1344,
    device = device,
    workers = args.workers,

    degrees = 180, #these parameters are fixed in the model tune
    flipud = 0.5,
    fliplr = 0.5,
    bgr = 0,
    auto_augment = None,
    #erasing = 0,

    epochs = 100,
    iterations=10,
    space=search_space,
    optimizer="AdamW",
    resume=False,  #start over or resume previous checkpoint
    plots=False,  # don't make plots etc to save time until last timepoint
    save=False,
    val=False,
    verbose=False)
if name == "main": main()
yyagmurkyaa
Hello again, I have trained new models using the parameters you provided and by organizing my datasets. However, a common issue across all of them is that the models mistakenly classify objects like myself or nearby computer screens as the traffic sign "turn right ahead" (which is one of the labeled classes in my dataset). I have checked my dataset and confirmed that there are no such unrelated objects in the background.
Additionally, the models sometimes confuse left and right directional signs.
Why might these errors be occurring, and how can I fix them? Thank you in advance for your help.
- Glenn JocherUltralytics(modificato)
@Fatima-khanjar to balance precision and recall in your over-predicting model, try these adjustments:
- Increase confidence threshold during inference (not training) to filter out low-confidence predictions
- Adjust IoU threshold in NMS to reduce duplicate detections
- Increase classification loss weight with
cls=1.0or higher to improve class discrimination - Check annotation quality in your dataset, especially for small or ambiguous objects
- Add hard negative examples to your dataset - images with objects similar to your classes but not actually part of them
These changes should help improve precision without significantly sacrificing your excellent recall. For implementation details, see our NMS documentation for confidence thresholding examples.
@yyagmurkyaa for your traffic sign confusion issues:
-
For the model detecting unrelated objects as "turn right ahead" signs:
- Add "hard negative" examples to your training set (images with computers, people, but no traffic signs)
- Increase
cls=1.0or higher to improve classification accuracy - Check if the "turn right ahead" sign has visual similarities to these false positives
-
For left/right confusion:
- Create specific augmentations for directional signs without flipping (as you noted)
- Ensure balanced examples of both directional types
- Consider using a slightly larger model like YOLO26m for better feature discrimination
These targeted adjustments should help address the specific confusion patterns you're seeing.
Fatima-khanjar
Hello again!!
First of all, thank you so much for your help @glenn-jocher __ you've truly helped me a lot, and I really appreciate it!
I have a question regarding fine-tuning a pre-trained YOLO model (e.g., trained on the COCO dataset) for my custom use case. My dataset includes a combination of both new classes (not present in COCO) and some of the existing COCO classes , but with different layouts or contexts.
What I’d like to do is the following:
Add my new classes starting from index 80, while still leveraging the pre-trained weights for the existing COCO classes.
Ideally, I want to preserve the learned knowledge for the COCO classes (especially the ones shared with my dataset), and only train the model further on the new classes.
Is it possible to:
Fine-tune the model in such a way that it uses the pre-trained weights for the common classes, and only learns new classes from scratch starting from a different index?
Retain and benefit from the original COCO knowledge while introducing and training on new class definitions?
Also, I’ve noticed that when I fine-tune a pre-trained model and define my own data.yaml file — completely different from coco.yaml — I redefine the class names and indexes based on my custom dataset, completely removing the COCO classes not present in my data. In this case, what really happens during fine-tuning or transfer learning under the hood? Is the model discarding unused class weights? Are shared class weights still used effectively?
I'd greatly appreciate any clarification or guidance on how to approach this setup properly.
Best regards,
- Glenn JocherUltralytics
@Fatima-khanjar great question about fine-tuning with mixed COCO and custom classes!
Yes, you can leverage pre-trained COCO weights while adding new classes. Here's how:
-
When fine-tuning a YOLO model, the model's detection head is automatically resized to accommodate your new class count. The weights for existing classes are preserved where possible.
-
For classes that overlap with COCO, the model will leverage transfer learning from those pre-trained weights, while new classes will be initialized with random weights.
-
You don't need to explicitly start from index 80 - just define your classes in your data.yaml file, and the model will handle the mapping automatically.
-
During fine-tuning, the model doesn't discard unused class weights but rather reshapes the classification head to match your class count. Weights for classes that exist in both datasets are transferred and further optimized for your specific data.
For best results with mixed classes, I recommend using a smaller learning rate initially (e.g.,
lr0=0.001) to preserve the knowledge in the pre-trained weights while allowing the model to adapt to your new classes. -
Hello! @glenn-jocher thank you so much for your explanation!
I have a follow-up question regarding class index matching. Let's say the person class in the COCO dataset is indexed as 0, but in my data.yaml file, I assign person to index 5. In this case, the model will not treat the person at index 5 as the same class as COCO’s index 0, correct?
So, to benefit from the pretrained weights of shared classes, do the class indices in my custom dataset need to match the COCO indices exactly?
Best regards,
- Glenn JocherUltralytics(modificato)
@Fatima-khanjar you're asking a crucial question about class mapping during transfer learning!
You no longer need to keep COCO's class indices. With
cls_remap=True(the default), training copies the pretrained classification-head rows by class name, so a class such aspersonkeeps its pretrained weights at whatever index it has in your dataset, while new classes such astraffic_signstart from fresh weights. Training printsRemapped N/M cls head rows from pretrained weights by class namewhen rows are copied, andcls_remap=Falsedisables it. For example, thisdata.yamlworks:names: 0: person 1: car 2: traffic_signJust make sure the shared classes use the same names as in COCO. See the Fine-Tuning Guide for details.
@glenn-jocher Hello again!!!
Thank you so much for your clarification! I have a quick follow-up question.
Let’s say the COCO dataset defines the following class indices in its YAML file: 0: person, 2: car, 3: cat.
In my own dataset, I share only the person and car classes with COCO — I don’t want to include cat. If I define my shared classes using the same indices as COCO (i.e., 0: person, 2: car), but then replace the COCO class cat at index 3 with a new class (e.g., 3: animal), will I still benefit from the pretrained weights for the shared classes (person and car)?
Or will assigning a new class at an index previously used by COCO (like 3) cause any issues?
best regards,
- Glenn JocherUltralytics(modificato)
@Fatima-khanjar great question about reusing COCO indices for new classes!
With
cls_remap=True(the default), pretrained classification-head rows are matched by class name, not by index. Shared classes such aspersonandcarkeep their pretrained weights wherever they sit in your dataset. A new class like "animal" at index 3 does not inherit the pretrained "cat" row, because the names do not match, so it starts from fresh weights. Reusing a COCO index therefore neither helps nor hurts the shared classes.If a new class is close to a pretrained one, give it that class's name so its row is copied. Using a lower learning rate initially (e.g.,
lr0=0.001) also helps preserve the pretrained features while the model adapts to your new classes.1
Thank you for your feedback. I trained my dataset using YOLOv11s. Although I didn’t experience severe overfitting with the current parameters, I couldn’t achieve optimal performance either. Some traffic signs were misclassified or not detected at all.
While searching for the best hyperparameters, I realized that I hadn't applied data augmentation—except for the flip parameter. I have an example parameter file, and I plan to include all relevant augmentation options except for flipping.
I would really appreciate your help in finding the most suitable parameters for my dataset, as I’m planning to participate in a competition soon. I need to enhance my model by adjusting the parameters properly to achieve the best possible performance.
Thank you in advance for your support.
On Sun, Apr 20, 2025 at 1:51 PM phatima khanjar @.***> wrote:
Hello,
I hope this message finds you well.
image.png (view on web) https://github.com/user-attachments/assets/be6db84b-fe0d-4356-ba77-9b4426c253ee
I fine-tuned YOLOv11s on my custom dataset, which is relatively small (1,156 images split into 75% training, 15% validation, and 10% test). The dataset consists of 41 classes, with each class containing between 200 and 300 images. I experimented with three different sets of hyperparameters: the default values, those optimized using Ray Tune, and others obtained through a Genetic Algorithm. In all cases, I observed oscillations in the validation dfl and box losses, which may indicate signs of overfitting. I would appreciate any suggestions or insights on how to address this issue, particularly given the small size of the dataset, and how to improve model generalization.
best regards,
— Reply to this email directly, view it on GitHub https://github.com/orgs/ultralytics/discussions/9536#discussioncomment-12889695, or unsubscribe https://github.com/notifications/unsubscribe-auth/BPQ7ZLAQ2G7ZL434FN3WFYD22N345AVCNFSM6AAAAABFVXPSL2VHI2DSMVQWIX3LMV43URDJONRXK43TNFXW4Q3PNVWWK3TUHMYTEOBYHE3DSNI . You are receiving this because you were mentioned.Message ID: @.*** com>
- Glenn JocherUltralytics(modificato)
@yyagmurkyaa for traffic sign detection and classification with YOLO26s, I recommend focusing on these specific augmentation and training parameters:
from ultralytics import YOLO

model = YOLO("yolo26s.pt")
model.train(
    data="your_traffic_signs.yaml",
    epochs=100,
    patience=25,
    batch=16,
    imgsz=640,  # Consider 800+ for small traffic signs
    hsv_h=0.015,  # Color augmentation helps with varying lighting conditions
    hsv_s=0.7,
    hsv_v=0.4,
    scale=0.5,  # Scale augmentation critical for varying distances
    translate=0.1,  # Helps with signs at different positions
    mosaic=1.0,  # Excellent for object detection tasks
    mixup=0.1,  # Light mixup can help with generalization
    perspective=0.0005,  # Slight perspective change for different viewing angles
    weight_decay=0.0005,  # Regularization to reduce overfitting
    optimizer="AdamW",
    lr0=0.001,
    lrf=0.01,
    cos_lr=True  # Cosine learning rate scheduler
)
For traffic sign detection specifically:
- Increase image size to better detect small signs
- Focus on color-preserving augmentations as colors are critical for traffic signs
- Use perspective transformations to simulate different viewing angles
- Enable strong scale/translate augmentations to handle varying distances
Consider running
model.tune()with these parameters as starting points to find the optimal configuration for your competition. You might also need to address class imbalance if some signs appear less frequently in your dataset. You're very welcome! I wasn't expecting such a quick response either. I'm excited to hear that you'll be training with these parameters and look forward to seeing the results as soon as possible. Thank you again for your support!
- Glenn JocherUltralytics(modificato)
@Fatima-khanjar for a small dataset (1,156 images) with 41 classes, oscillations in validation losses often indicate overfitting. Here are specific recommendations to improve generalization:
-
Strengthen regularization:
- Increase
weight_decayto 0.001-0.003 - Add dropout with
dropout=0.1to reduce co-adaptation
- Increase
-
Enhance data augmentation:
- Maximize augmentations:
mosaic=1.0,mixup=0.2,copy_paste=0.1 - Use strong geometric transforms:
translate=0.2,scale=0.5
- Maximize augmentations:
-
Training modifications:
- Reduce model complexity by using YOLO26n instead of YOLO26s
- Implement gradual unfreezing (
freezelayers at first) - Enable
cos_lr=Truefor smoother learning rate decay
-
Consider transfer learning modifications:
- Start with a model pre-trained on a domain similar to yours
- Use fewer epochs with higher
patiencefor early stopping
With 41 classes and limited samples per class, these techniques should help stabilize training and improve generalization. You might also benefit from training ensembles of multiple models if computational resources allow. For more details, refer to our Model Training Tips.
-
Hello,
Thank you for your advice! Your instructions have improved my model’s performance compared to before. I have now achieved the following metrics:
Mean Precision: 0.794 Mean Recall: 0.99 Mean F1 Score: 0.881 mAP@0.5: 0.938 mAP@0.5-0.95: 0.827
After analyzing these results, it seems that the model is over-predicting. Do you have any suggestions on how I can better balance precision and recall?
best regards,
Hello,
I hope this message finds you well.
I fine-tuned YOLOv11s on my custom dataset, which is relatively small (1,156 images split into 75% training, 15% validation, and 10% test). The dataset consists of 41 classes, with each class containing between 200 and 300 images. I experimented with three different sets of hyperparameters: the default values, those optimized using Ray Tune, and others obtained through a Genetic Algorithm. In all cases, I observed oscillations in the validation dfl and box losses, which may indicate signs of overfitting. I would appreciate any suggestions or insights on how to address this issue, particularly given the small size of the dataset, and how to improve model generalization.
best regards,
Hello, I am training a model using YOLOv11, and the dataset consists of traffic signs. There are 22 classes, and each class has 400 labeled images. I’m not sure what parameters I should use for training. What parameters should I set to prevent overfitting, and what are the correct values? Could you help me with this?
- Glenn JocherUltralytics(modificato)
@yyagmurkyaa your dataset of 22 classes with 400 images per class should provide a good foundation for traffic sign detection. To prevent overfitting with YOLO26, I'd recommend:
- Start with hyperparameter tuning using the
model.tune()method to find optimal values:
from ultralytics import YOLO model = YOLO("yolo26n.pt") # Start with a smaller model for faster tuning model.tune( data="your_traffic_signs.yaml", epochs=30, iterations=100, weight_decay=0.0005, # Try higher values like 0.001-0.005 to increase regularization patience=15, # Early stopping val=True )-
Key hyperparameters to prevent overfitting:
- Increase
weight_decay(0.001-0.005) - Enable strong data augmentation (
hsv_h,hsv_s,translate,scale,fliplr,mosaic) - Use early stopping with reasonable
patience - Consider reducing model capacity (use n or s model variants)
- Increase
-
Monitor validation metrics to detect overfitting (when training accuracy continues improving but validation metrics plateau or decline)
The automated tuning process should help identify the optimal parameter values for your specific dataset. For more details, check out our Hyperparameter Tuning Guide.
- Start with hyperparameter tuning using the
Thank you for your feedback. I trained my dataset using YOLOv11s. Although I didn’t experience severe overfitting with the current parameters, I couldn’t achieve optimal performance either. Some traffic signs were misclassified or not detected at all.
While searching for the best hyperparameters, I realized that I hadn't applied data augmentation—except for the flip parameter. I have an example parameter file, and I plan to include all relevant augmentation options except for flipping.
I would really appreciate your help in finding the most suitable parameters for my dataset, as I’m planning to participate in a competition soon. I need to enhance my model by adjusting the parameters properly to achieve the best possible performance.
Thank you in advance for your support.