Link to this sectionTrain YOLOv5 on Custom Data#
📚 This guide explains how to train your own custom dataset using the YOLOv5 model 🚀. Training custom models is a fundamental step in tailoring computer vision solutions to specific real-world applications beyond generic object detection.
Link to this sectionBefore You Start#
First, ensure you have the necessary environment set up. Clone the YOLOv5 repository and install the required dependencies from requirements.txt. A Python>=3.8.0 environment with PyTorch>=1.8 is essential. Models and datasets are automatically downloaded from the latest YOLOv5 release if they are not found locally.
git clone https://github.com/ultralytics/yolov5 # Clone the repository
cd yolov5
pip install -r requirements.txt # Install dependencies
Link to this sectionTrain On Custom Data#
Developing a custom object detection model is an iterative process:
- Collect & Organize Images: Gather images relevant to your specific task. High-quality, diverse data is crucial. See our guide on Data Collection and Annotation.
- Label Objects: Annotate the objects of interest within your images accurately.
- Train a Model: Use the labeled data to train your YOLOv5 model. Leverage transfer learning by starting with pretrained weights.
- Deploy & Predict: Utilize the trained model for inference on new, unseen data.
- Collect Edge Cases: Identify scenarios where the model performs poorly (edge cases) and add similar data to your dataset to improve robustness. Repeat the cycle.
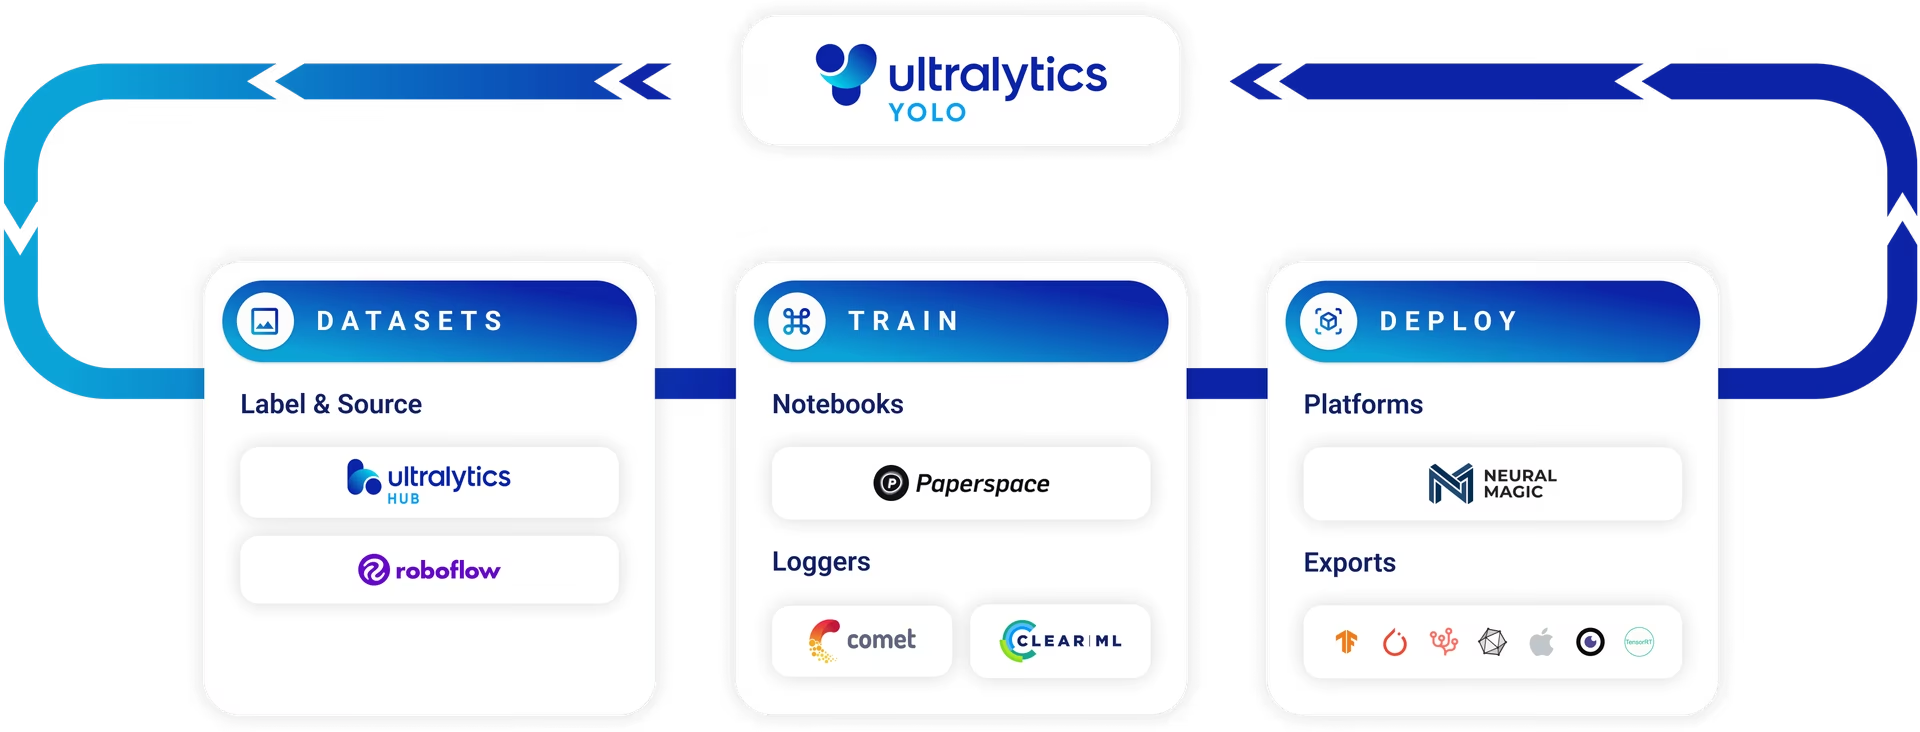
Ultralytics Platform offers a streamlined, no-code solution for this entire machine learning operations (MLOps) cycle, including dataset management, model training, and deployment.
Ultralytics provides two licensing options to accommodate diverse usage scenarios:
- AGPL-3.0 License: This OSI-approved open-source license is ideal for students, researchers, and enthusiasts passionate about open collaboration and knowledge sharing. It requires derived works to be shared under the same license. See the LICENSE file for full details.
- Enterprise License: For development and production use, this license enables seamless integration of Ultralytics software and AI models into business products and services, including internal tools, automated workflows, and production deployments, bypassing the open-source requirements of AGPL-3.0. To get started, please contact us via Ultralytics Licensing.
Explore our licensing options further on the Ultralytics Licensing page.
Before initiating the training, dataset preparation is essential.
Link to this section1. Create a Dataset#
YOLOv5 models require labeled data to learn the visual characteristics of object classes. Organizing your dataset correctly is key.
Link to this section1.1 Create dataset.yaml#
The dataset configuration file (e.g., coco128.yaml) outlines the dataset's structure, class names, and paths to image directories. COCO128 serves as a small example dataset, comprising the first 128 images from the extensive COCO dataset. It's useful for quickly testing the training pipeline and diagnosing potential issues like overfitting.
The dataset.yaml file structure includes:
path: The root directory containing the dataset.train,val,test: Relative paths frompathto directories containing images or text files listing image paths for training, validation, and testing sets.names: A dictionary mapping class indices (starting from 0) to their corresponding class names.
You can set path to either an absolute directory (e.g., /home/user/datasets/coco128) or a relative path such as ../datasets/coco128 when launching training from the YOLOv5 repository root.
Below is the structure for coco128.yaml (view on GitHub):
# Dataset root directory relative to the yolov5 directory
path: coco128

# Train/val/test sets: specify directories, *.txt files, or lists
train: images/train2017 # 128 images for training
val: images/train2017 # 128 images for validation
test: # Optional path to test images

# Classes (example using 80 COCO classes)
names:
    0: person
    1: bicycle
    2: car
    # ... (remaining COCO classes)
    77: teddy bear
    78: hair drier
    79: toothbrush
Link to this section1.2 Leverage Models for Automated Labeling#
Manual labeling is the common approach but is time-consuming. Foundation models can automate or semi-automate annotation and speed up dataset creation. Examples of models that can help generate labels:
- Google Gemini: Large multimodal models like Gemini possess powerful image understanding capabilities. They can be prompted to identify and locate objects within images, generating bounding boxes or descriptions that can be converted into YOLO format labels. Explore its potential in the provided tutorial notebook.
- SAM2 (Segment Anything Model 2): Foundation models focused on segmentation, like SAM2, can identify and delineate objects with high precision. While primarily for segmentation, the resulting masks can often be converted into bounding box annotations suitable for object detection tasks.
- YOLOWorld: This model offers open-vocabulary detection capabilities. You can provide text descriptions of the objects you're interested in, and YOLOWorld can locate them in images without prior training on those specific classes. This can be used as a starting point for generating initial labels, which can then be refined.
Using these models can provide a "pre-labeling" step, reducing the manual effort required. However, it's crucial to review and refine automatically generated labels to ensure accuracy and consistency, as the quality directly impacts the performance of your trained YOLOv5 model. After generating (and potentially refining) your labels, ensure they adhere to the YOLO format: one *.txt file per image, with each line representing an object as class_index x_center y_center width height (normalized coordinates, zero-indexed class). If an image has no objects of interest, no corresponding *.txt file is needed.
The YOLO format *.txt file specifications are precise:
- One row per object bounding box.
- Each row must contain:
class_index x_center y_center width height. - Coordinates must be normalized to a range between 0 and 1. To achieve this, divide the pixel values of
x_centerandwidthby the image's total width, and dividey_centerandheightby the image's total height. - Class indices are zero-indexed (i.e., the first class is represented by
0, the second by1, and so forth).
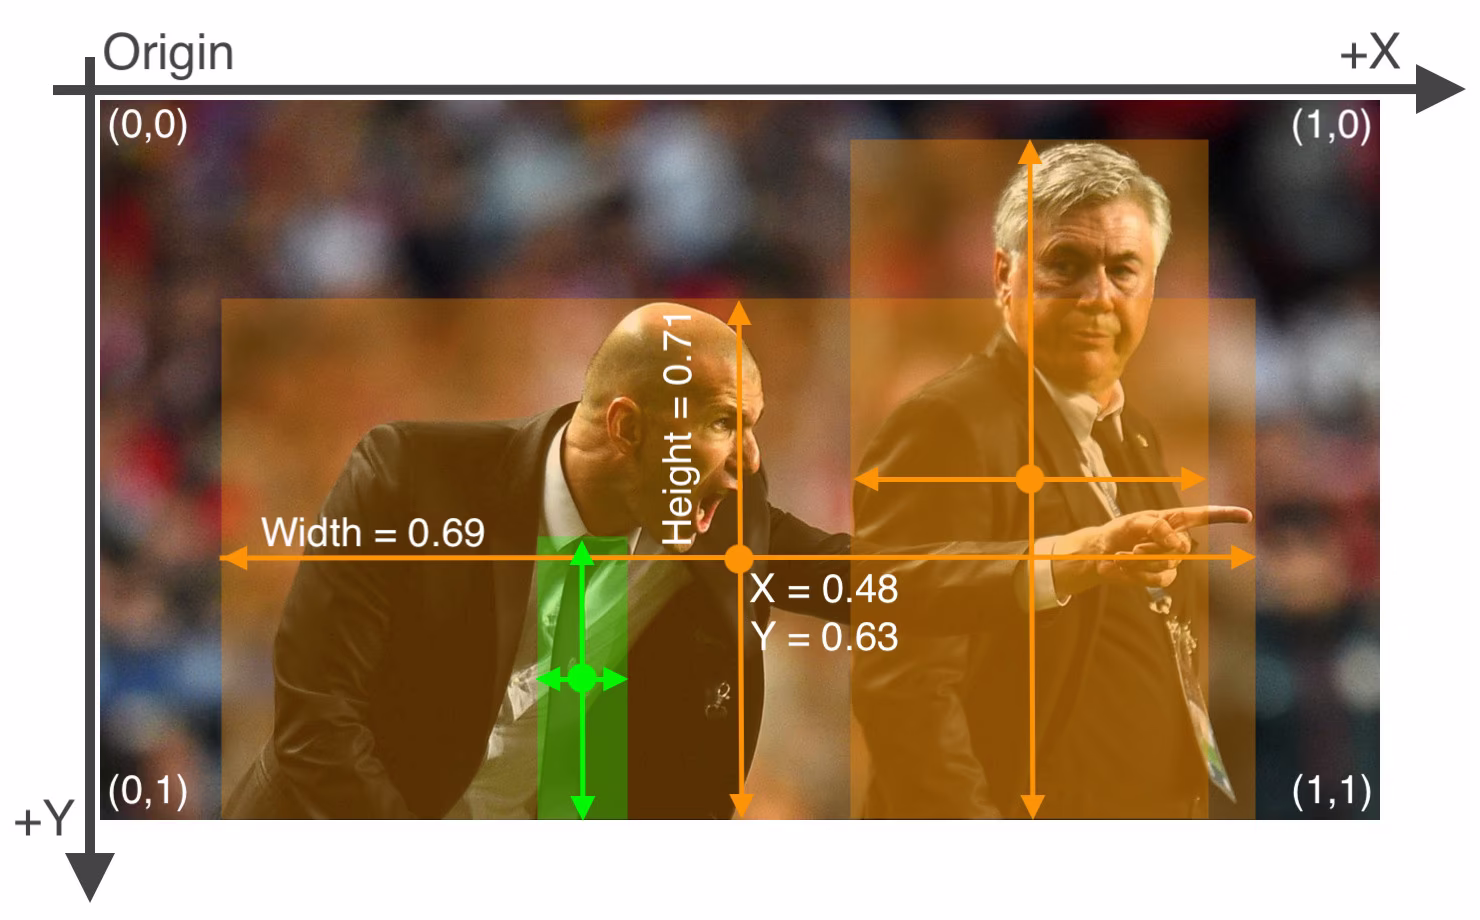
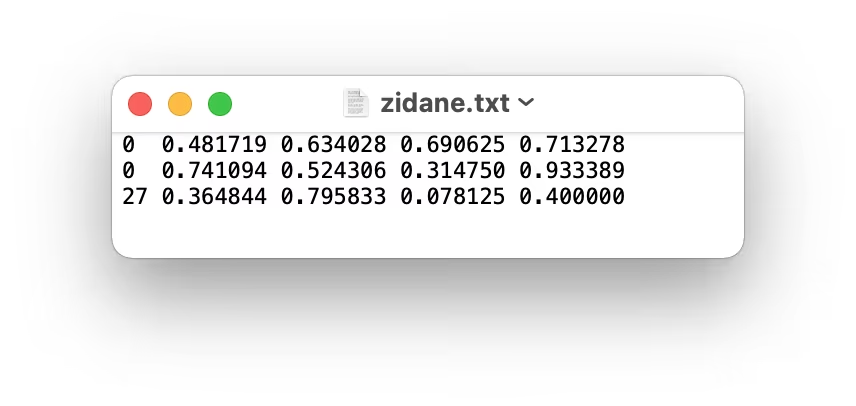
The label file corresponding to the image above, containing two 'person' objects (class index 0) and one 'tie' object (class index 27), would look like this:
Link to this section1.3 Organize Directories#
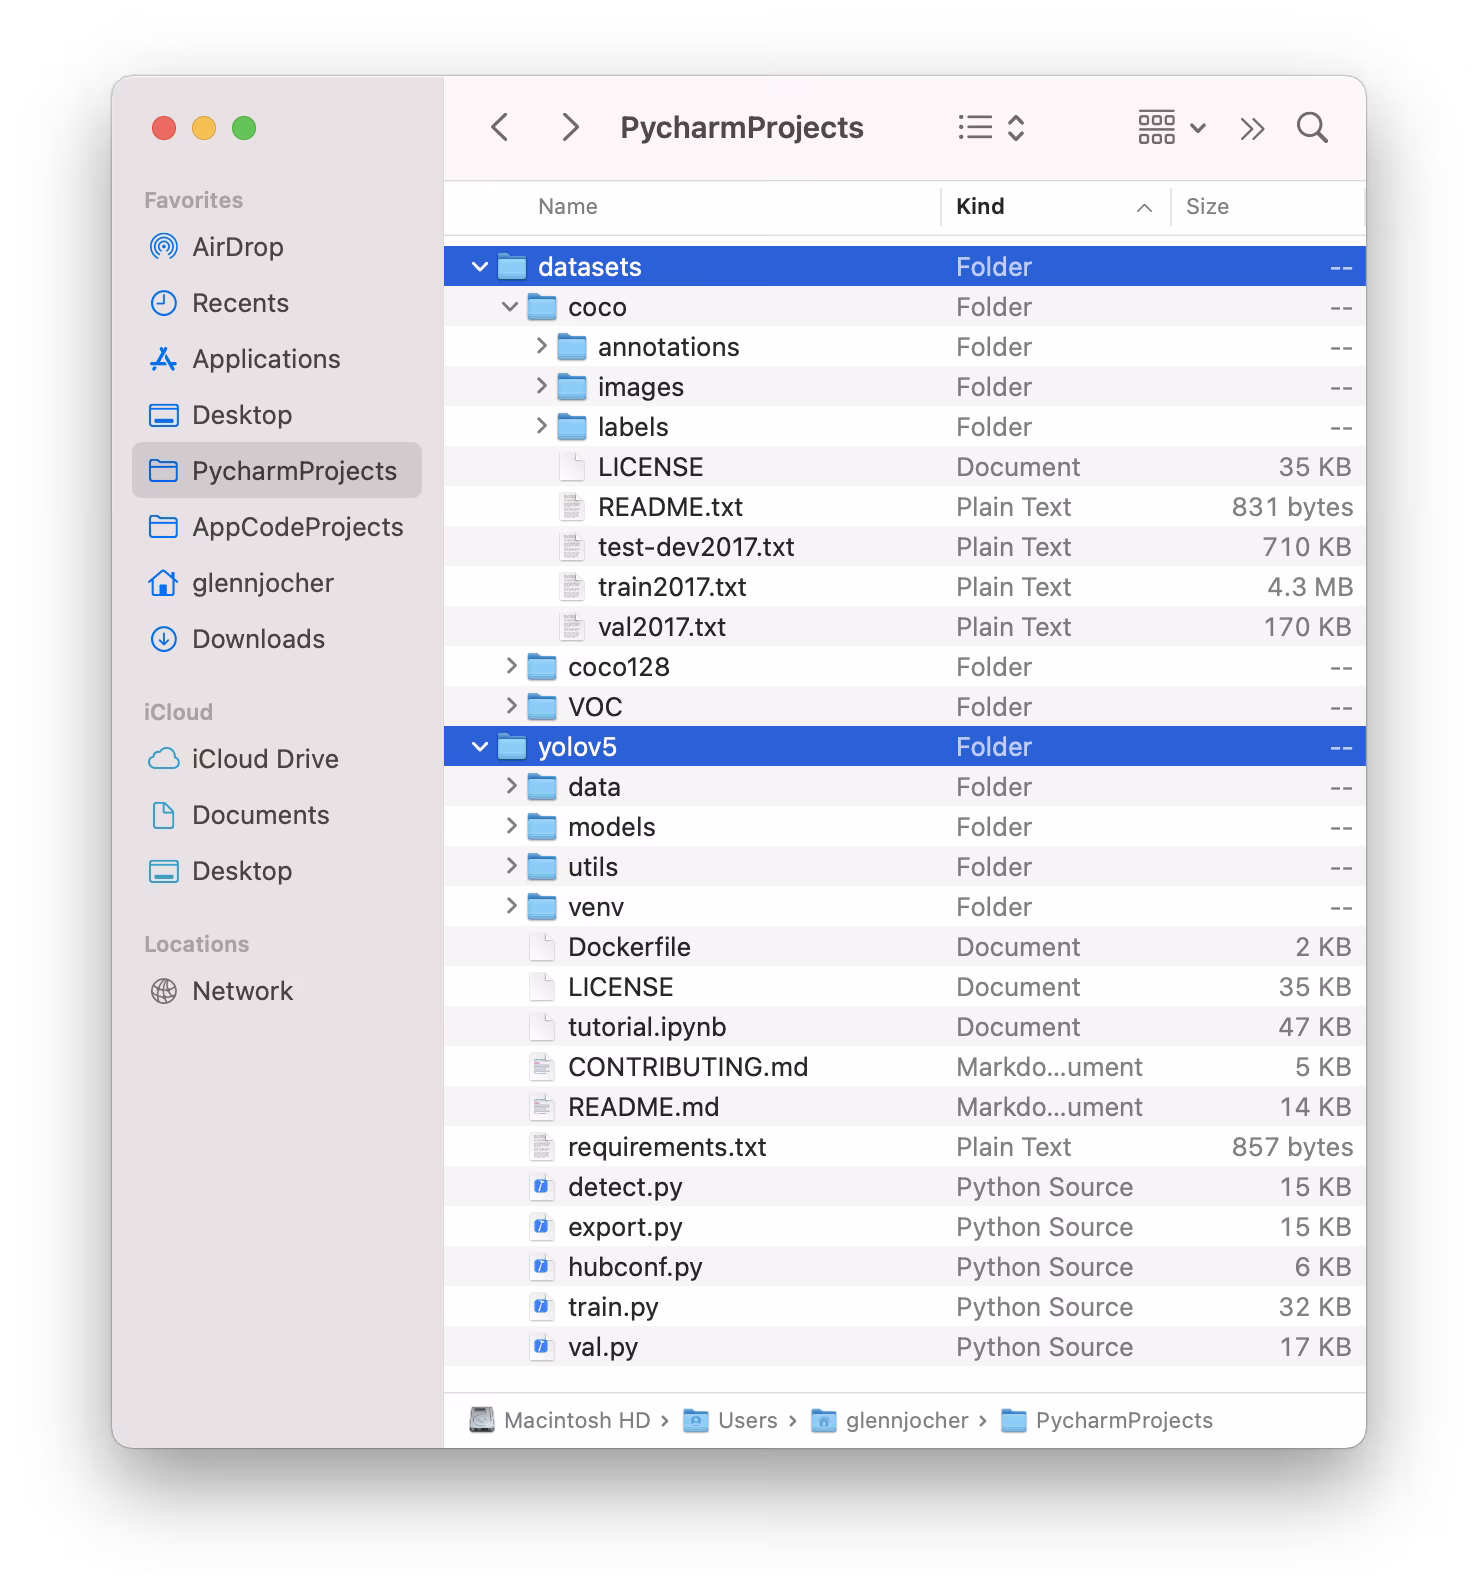
Structure your datasets directory as illustrated below. By default, YOLOv5 anticipates the dataset directory (e.g., /coco128) to reside within a /datasets folder located adjacent to the /yolov5 repository directory.
YOLOv5 automatically locates the labels for each image by substituting the last instance of /images/ in the image path with /labels/. For example:
../datasets/coco128/images/im0.jpg # Path to the image file
../datasets/coco128/labels/im0.txt # Path to the corresponding label file
The recommended directory structure is:
/datasets/
└── coco128/  # Dataset root
    ├── images/
    │   ├── train2017/  # Training images
    │   │   ├── 000000000009.jpg
    │   │   └── ...
    │   └── val2017/    # Validation images (optional if using same set for train/val)
    │       └── ...
    └── labels/
        ├── train2017/  # Training labels
        │   ├── 000000000009.txt
        │   └── ...
        └── val2017/    # Validation labels (optional if using same set for train/val)
            └── ...
Link to this section2. Select a Model#
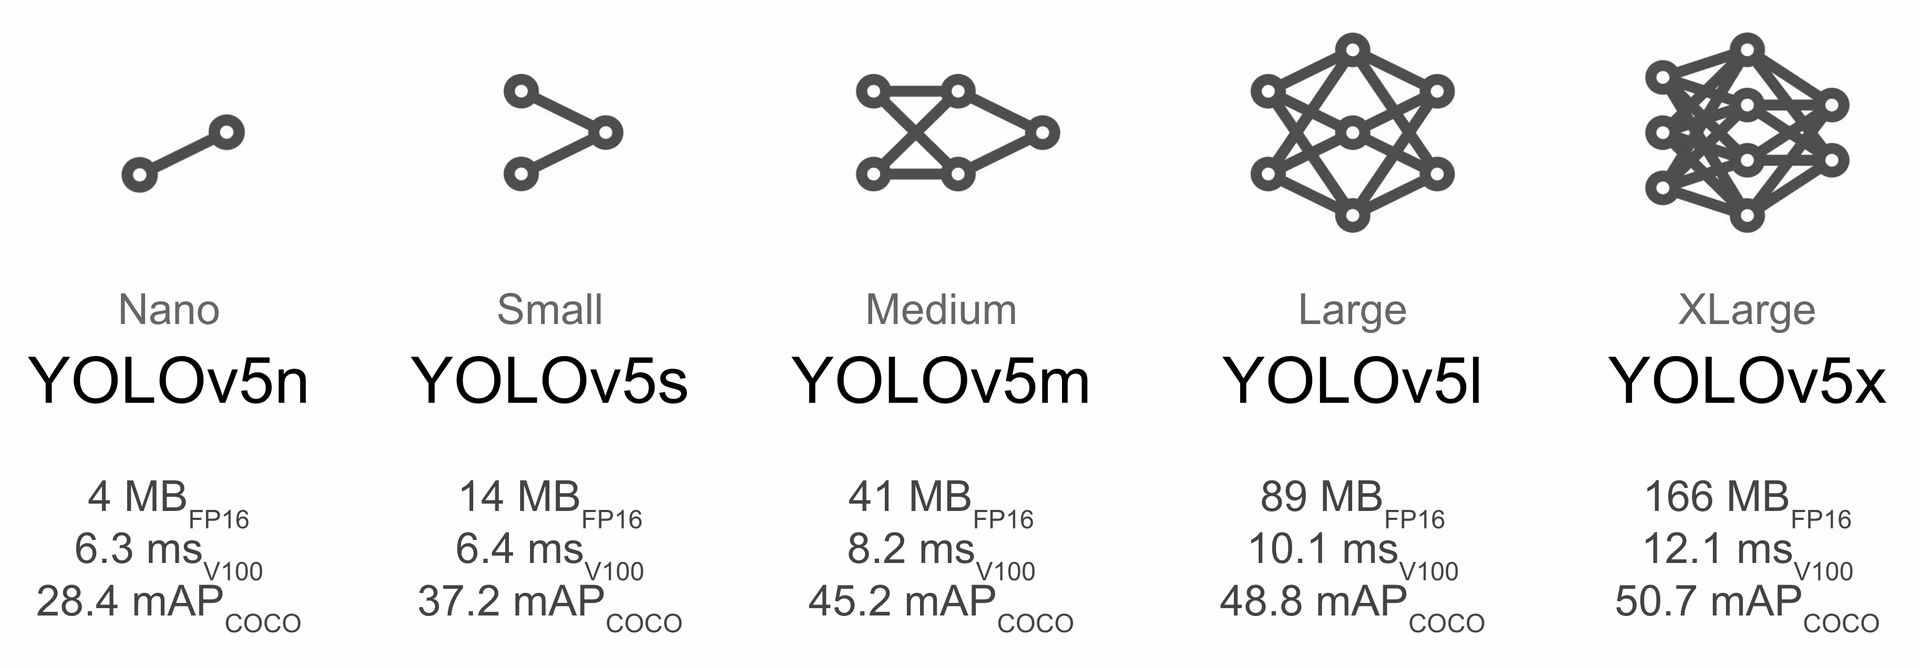
Choose a pretrained model to initiate the training process. Starting with pretrained weights significantly accelerates learning and improves performance compared to training from scratch. YOLOv5 offers various model sizes, each balancing speed and accuracy differently. For example, YOLOv5s is the second-smallest and fastest model, suitable for resource-constrained environments. Consult the README table for a detailed comparison of all available models.
Link to this section3. Train#
Begin the model training using the train.py script. Essential arguments include:
--img: Defines the input image size (e.g.,--img 640). Larger sizes generally yield better accuracy but require more GPU memory.--batch: Determines the batch size (e.g.,--batch 16). Choose the largest size your GPU can handle.--epochs: Specifies the total number of training epochs (e.g.,--epochs 100). One epoch represents a full pass over the entire training dataset.--data: Path to yourdataset.yamlfile (e.g.,--data coco128.yaml).--weights: Path to the initial weights file. Using pretrained weights (e.g.,--weights yolov5s.pt) is highly recommended for faster convergence and superior results. To train from scratch (not advised unless you have a very large dataset and specific needs), use--weights '' --cfg yolov5s.yaml.
Pretrained weights are automatically downloaded from the latest YOLOv5 release if not found locally.
# Example: Train YOLOv5s on the COCO128 dataset for 3 epochs
python train.py --img 640 --batch 16 --epochs 3 --data coco128.yaml --weights yolov5s.pt💡 Employ --cache ram or --cache disk to cache dataset images in RAM or local disk, respectively. This dramatically accelerates training, particularly when dataset I/O (Input/Output) operations are a bottleneck. Note that this requires substantial RAM or disk space.
💡 Always train using datasets stored locally. Accessing data from network drives (like Google Drive) or remote storage can be significantly slower and impede training performance. Copying your dataset to a local SSD is often the best practice.
All training outputs, including weights and logs, are saved in the runs/train/ directory. Each training session creates a new subdirectory (e.g., runs/train/exp, runs/train/exp2, etc.). For an interactive, hands-on experience, explore the training section in our official tutorial notebooks: ![]()

Link to this section4. Visualize#
YOLOv5 seamlessly integrates with various tools for visualizing training progress, evaluating results, and monitoring performance in real-time.
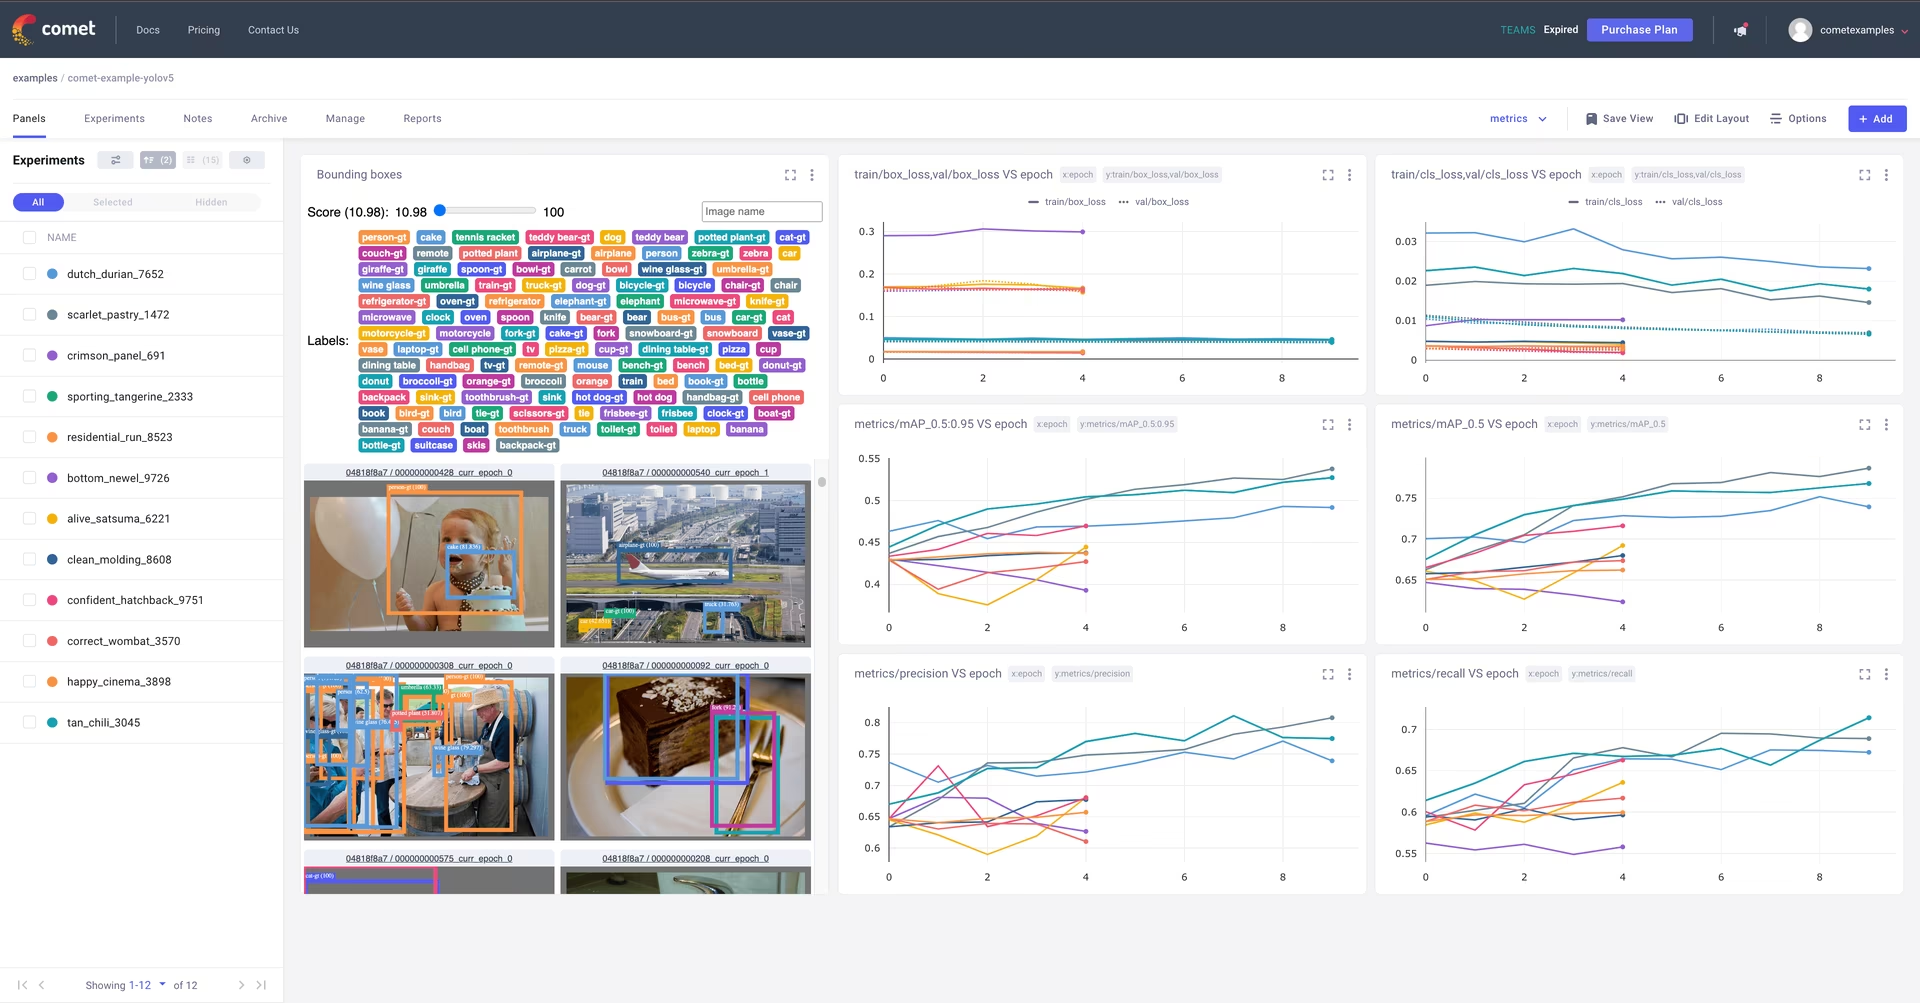
Link to this sectionComet Logging and Visualization#
Comet is fully integrated for comprehensive experiment tracking. Visualize metrics live, save hyperparameters, manage datasets and model checkpoints, and analyze model predictions using interactive Comet Custom Panels.
Getting started is straightforward:
pip install comet_ml                                                          # 1. Install Comet library
export COMET_API_KEY=YOUR_API_KEY_HERE                                        # 2. Set your Comet API key (create a free account at Comet.ml)
python train.py --img 640 --epochs 3 --data coco128.yaml --weights yolov5s.pt # 3. Train your model - Comet automatically logs everything!
Dive deeper into the supported features in our Comet Integration Guide. Learn more about Comet's capabilities from their official documentation. Try the Comet Colab Notebook for a live demo: ![]()
Link to this sectionClearML Logging and Automation#
ClearML integration enables detailed experiment tracking, dataset version management, and even remote execution of training runs. Activate ClearML with these simple steps:
- Install the package:
pip install clearml - Initialize ClearML: Run
clearml-initonce to connect to your ClearML server (either self-hosted or the free tier).
ClearML automatically captures experiment details, model uploads, comparisons, uncommitted code changes, and installed packages, ensuring full reproducibility. You can easily schedule training tasks on remote agents and manage dataset versions using ClearML Data. Explore the ClearML Integration Guide for comprehensive details.

Link to this sectionLocal Logging#
Training results are automatically logged using TensorBoard and saved as CSV files within the specific experiment directory (e.g., runs/train/exp). Logged data includes:
- Training and validation loss and performance metrics.
- Sample images showing applied augmentations (like mosaics).
- Ground truth labels alongside model predictions for visual inspection.
- Key evaluation metrics such as Precision-Recall (PR) curves.
- Confusion matrices for detailed class-wise performance analysis.
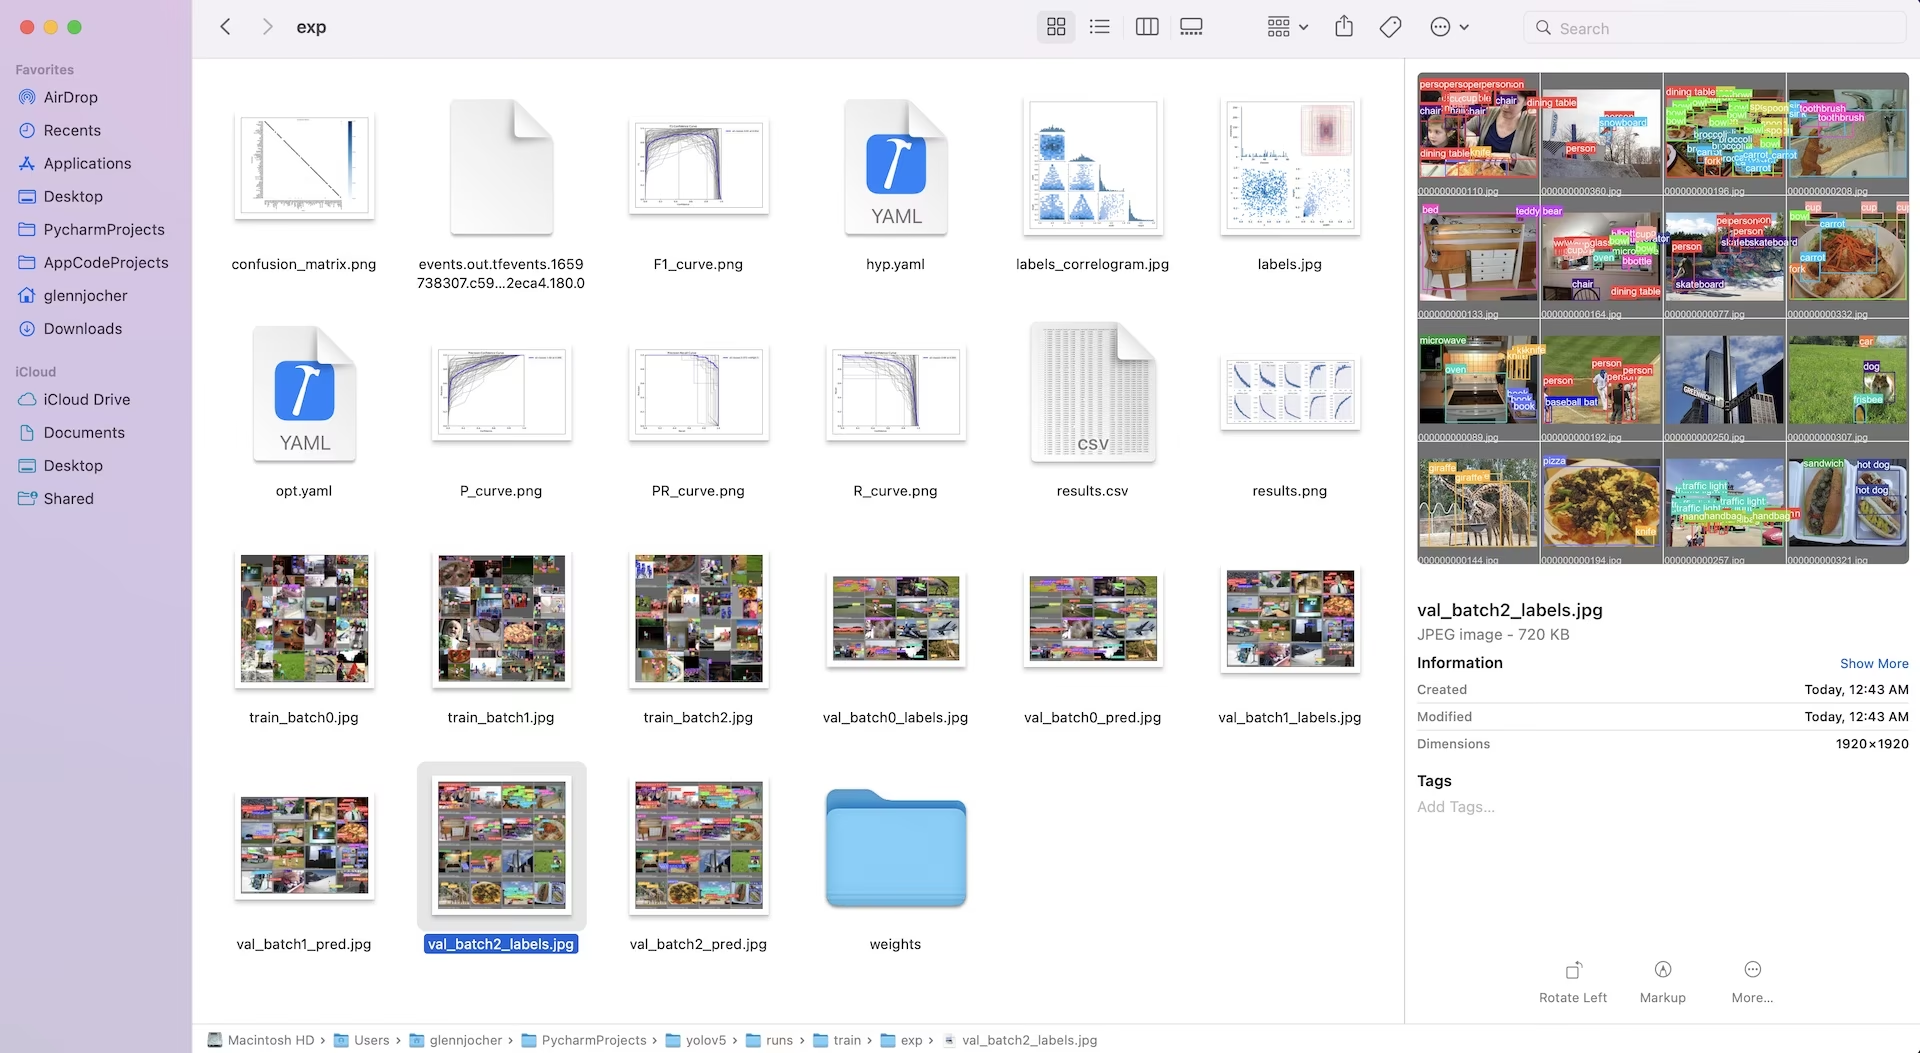
The results.csv file is updated after every epoch and is plotted as results.png once training concludes. You can also plot any results.csv file manually using the provided utility function:
from utils.plots import plot_results

# Plot results from a specific training run directory
plot_results("runs/train/exp/results.csv")  # This will generate 'results.png' in the same directory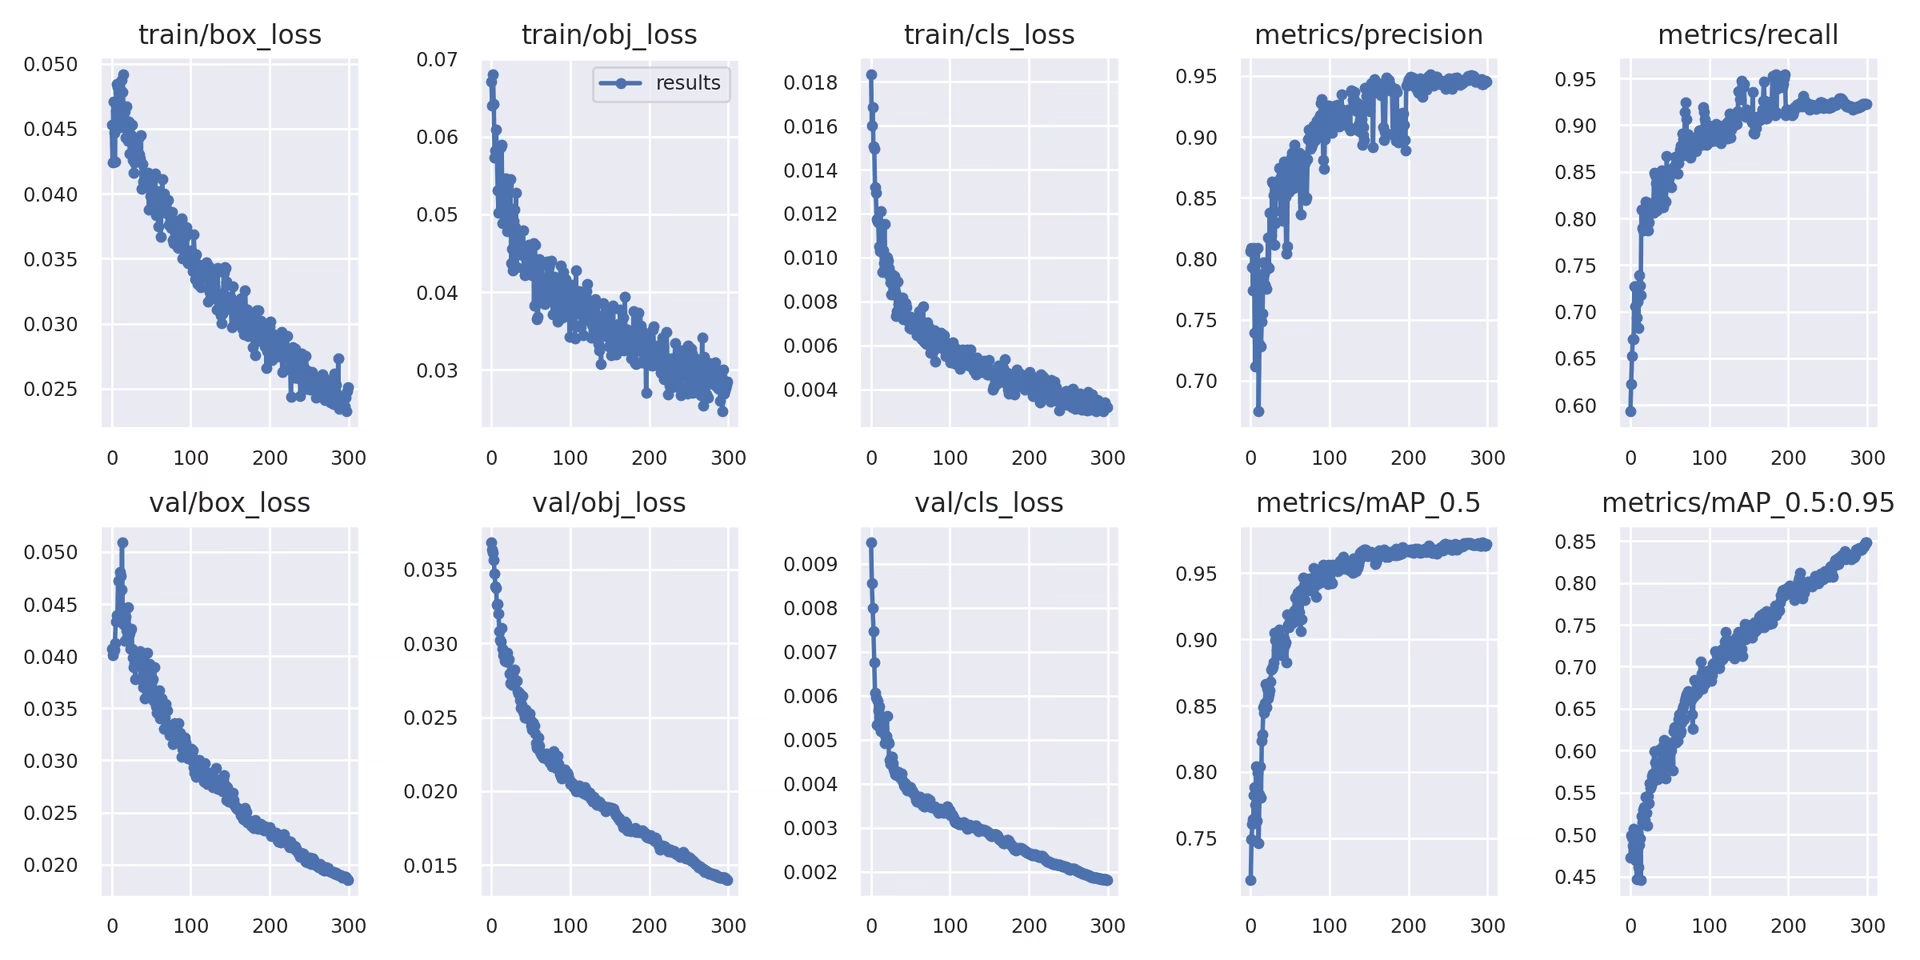
Link to this section5. Next Steps#
Upon successful completion of training, the best performing model checkpoint (best.pt) is saved and ready for deployment or further refinement. Potential next steps include:
- Run inference on new images or videos using the trained model via the CLI or Python.
- Perform validation to evaluate the model's accuracy and generalization capabilities on different data splits (e.g., a held-out test set).
- Export the model to various deployment formats like ONNX, TensorFlow SavedModel, or TensorRT for optimized inference on diverse platforms.
- Employ hyperparameter tuning techniques to potentially squeeze out additional performance gains.
- Continue improving your model by following our Tips for Best Training Results and iteratively adding more diverse and challenging data based on performance analysis.
Link to this sectionSupported Environments#
Ultralytics provides ready-to-use environments equipped with essential dependencies like CUDA, cuDNN, Python, and PyTorch, facilitating a smooth start.
- Free GPU Notebooks:
- Cloud Platforms:
- Google Cloud: GCP Quickstart Guide
- Amazon AWS: AWS Quickstart Guide
- Microsoft Azure: AzureML Quickstart Guide
- Local Setup:
- Docker: Docker Quickstart Guide
- Docker: Docker Quickstart Guide

Link to this sectionProject Status#
![]()
This badge indicates that all YOLOv5 GitHub Actions Continuous Integration (CI) tests are passing successfully. These rigorous CI tests cover the core functionalities, including training, validation, inference, export, and benchmarks, across macOS, Windows, and Ubuntu operating systems. Tests are executed automatically every 24 hours and upon each code commit, ensuring consistent stability and optimal performance.
Link to this sectionFAQ#
Link to this sectionHow do I train YOLOv5 on my custom dataset?#
Training YOLOv5 on a custom dataset involves several key steps:
- Prepare Your Dataset: Collect images and annotate them. Ensure annotations are in the required YOLO format. Organize images and labels into
train/andval/(and optionallytest/) directories. Consider using models like Google Gemini, SAM2, or YOLOWorld to assist with or automate the labeling process (see Section 1.2). - Set Up Your Environment: Clone the YOLOv5 repository and install dependencies using
pip install -r requirements.txt.git clone https://github.com/ultralytics/yolov5 cd yolov5 pip install -r requirements.txt - Create Dataset Configuration: Define dataset paths, number of classes, and class names in a
dataset.yamlfile. - Start Training: Execute the
train.pyscript, providing paths to yourdataset.yaml, desired pretrained weights (e.g.,yolov5s.pt), image size, batch size, and the number of epochs.python train.py --img 640 --batch 16 --epochs 100 --data path/to/your/dataset.yaml --weights yolov5s.pt
Link to this sectionWhy should I use Ultralytics Platform for training my YOLO models?#
Ultralytics Platform is a comprehensive platform designed to streamline the entire YOLO model development lifecycle, often without needing to write any code. Key benefits include:
- Simplified Training: Easily train models using pre-configured environments and an intuitive user interface.
- Integrated Data Management: Upload, version control, and manage your datasets efficiently within the platform.
- Real-time Monitoring: Track training progress and visualize performance metrics using integrated tools like Comet or TensorBoard.
- Collaboration Features: Facilitates teamwork through shared resources, project management tools, and easy model sharing.
- No-Code Deployment: Deploy trained models directly to various targets.
For a practical walkthrough, check out our blog post: How to Train Your Custom Models with Ultralytics Platform.
Link to this sectionHow do I convert my annotated data to the YOLOv5 format?#
Whether you annotate manually or use automated tools (like those mentioned in Section 1.2), the final labels must be in the specific YOLO format required by YOLOv5:
- Create one
.txtfile for each image. The filename should match the image filename (e.g.,image1.jpgcorresponds toimage1.txt). Place these files in alabels/directory parallel to yourimages/directory (e.g.,../datasets/mydataset/labels/train/). - Each line within a
.txtfile represents one object annotation and follows the format:class_index center_x center_y width height. - Coordinates (
center_x,center_y,width,height) must be normalized (values between 0.0 and 1.0) relative to the image's dimensions. - Class indices are zero-based (the first class is
0, the second is1, etc.).
Many manual annotation tools offer direct export to YOLO format. If using automated models, you will need scripts or processes to convert their output (e.g., bounding box coordinates, segmentation masks) into this specific normalized text format. Ensure your final dataset structure adheres to the example provided in the guide. For more details, see our Data Collection and Annotation Guide.
Link to this sectionWhat are the licensing options for using YOLOv5 in commercial applications?#
Ultralytics provides flexible licensing tailored to different needs:
- AGPL-3.0 License: This open-source license is suitable for academic research, personal projects, and situations where open-source compliance is acceptable. It mandates that modifications and derivative works also be open-sourced under AGPL-3.0. Review the AGPL-3.0 License details.
- Enterprise License: A commercial license designed for businesses integrating YOLOv5 into proprietary products or services. This license removes the open-source obligations of AGPL-3.0, allowing for closed-source distribution. Visit our Licensing page for further details or to request an Enterprise License.
Select the license that aligns best with your project's requirements and distribution model.