Quick Start Guide: NVIDIA Jetson with Ultralytics YOLO26
This comprehensive guide provides a detailed walkthrough for deploying Ultralytics YOLO26 on NVIDIA Jetson devices. Additionally, it showcases performance benchmarks to demonstrate the capabilities of YOLO26 on these small and powerful devices.
New product support
We have updated this guide with the latest NVIDIA Jetson AGX Thor Developer Kit which delivers up to 2070 FP4 TFLOPS of AI compute and 128 GB of memory with power configurable between 40 W and 130 W. It delivers over 7.5x higher AI compute than NVIDIA Jetson AGX Orin, with 3.5x better energy efficiency to seamlessly run the most popular AI models.
Watch: How to use Ultralytics YOLO26 on NVIDIA Jetson Devices
Note
This guide has been tested with NVIDIA Jetson AGX Thor Developer Kit (Jetson T5000) running the latest stable JetPack release of JP7.0, NVIDIA Jetson AGX Orin Developer Kit (64GB) running JetPack release of JP6.2, NVIDIA Jetson Orin Nano Super Developer Kit running JetPack release of JP6.1, Seeed Studio reComputer J4012 which is based on NVIDIA Jetson Orin NX 16GB running JetPack release of JP6.0/ JetPack release of JP5.1.3 and Seeed Studio reComputer J1020 v2 which is based on NVIDIA Jetson Nano 4GB running JetPack release of JP4.6.1. It is expected to work across all the NVIDIA Jetson hardware lineup, including the latest and legacy devices.
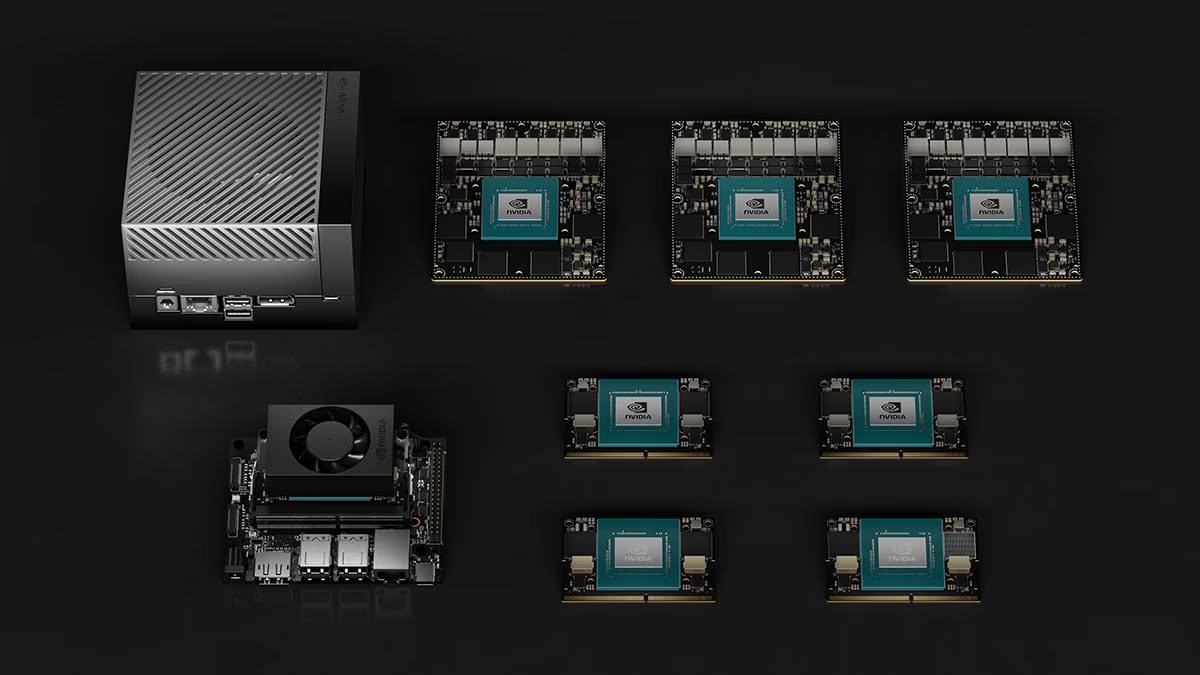
What is NVIDIA Jetson?
NVIDIA Jetson is a series of embedded computing boards designed to bring accelerated AI (artificial intelligence) computing to edge devices. These compact and powerful devices are built around NVIDIA's GPU architecture and can run complex AI algorithms and deep learning models directly on the device, without relying on cloud computing resources. Jetson boards are often used in robotics, autonomous vehicles, industrial automation, and other applications where AI inference needs to be performed locally with low latency and high efficiency. Additionally, these boards are based on the ARM64 architecture and run at lower power compared to traditional GPU computing devices.
NVIDIA Jetson Series Comparison
NVIDIA Jetson AGX Thor is the latest iteration of the NVIDIA Jetson family based on NVIDIA Blackwell architecture which brings drastically improved AI performance when compared to the previous generations. The table below compares a few of the Jetson devices in the ecosystem.
| Jetson AGX Thor(T5000) | Jetson AGX Orin 64GB | Jetson Orin NX 16GB | Jetson Orin Nano Super | Jetson AGX Xavier | Jetson Xavier NX | Jetson Nano | |
|---|---|---|---|---|---|---|---|
| AI Performance | 2070 TFLOPS | 275 TOPS | 100 TOPS | 67 TOPS | 32 TOPS | 21 TOPS | 472 GFLOPS |
| GPU | 2560-core NVIDIA Blackwell architecture GPU with 96 Tensor Cores | 2048-core NVIDIA Ampere architecture GPU with 64 Tensor Cores | 1024-core NVIDIA Ampere architecture GPU with 32 Tensor Cores | 1024-core NVIDIA Ampere architecture GPU with 32 Tensor Cores | 512-core NVIDIA Volta architecture GPU with 64 Tensor Cores | 384-core NVIDIA Volta™ architecture GPU with 48 Tensor Cores | 128-core NVIDIA Maxwell™ architecture GPU |
| GPU Max Frequency | 1.57 GHz | 1.3 GHz | 918 MHz | 1020 MHz | 1377 MHz | 1100 MHz | 921MHz |
| CPU | 14-core Arm® Neoverse®-V3AE 64-bit CPU 1MB L2 + 16MB L3 | 12-core NVIDIA Arm® Cortex A78AE v8.2 64-bit CPU 3MB L2 + 6MB L3 | 8-core NVIDIA Arm® Cortex A78AE v8.2 64-bit CPU 2MB L2 + 4MB L3 | 6-core Arm® Cortex®-A78AE v8.2 64-bit CPU 1.5MB L2 + 4MB L3 | 8-core NVIDIA Carmel Arm®v8.2 64-bit CPU 8MB L2 + 4MB L3 | 6-core NVIDIA Carmel Arm®v8.2 64-bit CPU 6MB L2 + 4MB L3 | Quad-Core Arm® Cortex®-A57 MPCore processor |
| CPU Max Frequency | 2.6 GHz | 2.2 GHz | 2.0 GHz | 1.7 GHz | 2.2 GHz | 1.9 GHz | 1.43GHz |
| Memory | 128GB 256-bit LPDDR5X 273GB/s | 64GB 256-bit LPDDR5 204.8GB/s | 16GB 128-bit LPDDR5 102.4GB/s | 8GB 128-bit LPDDR5 102 GB/s | 32GB 256-bit LPDDR4x 136.5GB/s | 8GB 128-bit LPDDR4x 59.7GB/s | 4GB 64-bit LPDDR4 25.6GB/s |
For a more detailed comparison table, please visit the Compare Specifications section of official NVIDIA Jetson page.
What is NVIDIA JetPack?
NVIDIA JetPack SDK powering the Jetson modules is the most comprehensive solution and provides full development environment for building end-to-end accelerated AI applications and shortens time to market. JetPack includes Jetson Linux with bootloader, Linux kernel, Ubuntu desktop environment, and a complete set of libraries for acceleration of GPU computing, multimedia, graphics, and computer vision. It also includes samples, documentation, and developer tools for both host computer and developer kit, and supports higher level SDKs such as DeepStream for streaming video analytics, Isaac for robotics, and Riva for conversational AI.
Flash JetPack to NVIDIA Jetson
The first step after getting your hands on an NVIDIA Jetson device is to flash NVIDIA JetPack to the device. There are several different ways of flashing NVIDIA Jetson devices.
- If you own an official NVIDIA Development Kit such as the Jetson AGX Thor Developer Kit, you can download an image and prepare a bootable USB stick to flash JetPack to the included SSD.
- If you own an official NVIDIA Development Kit such as the Jetson Orin Nano Developer Kit, you can download an image and prepare an SD card with JetPack for booting the device.
- If you own any other NVIDIA Development Kit, you can flash JetPack to the device using SDK Manager.
- If you own a Seeed Studio reComputer J4012 device, you can flash JetPack to the included SSD and if you own a Seeed Studio reComputer J1020 v2 device, you can flash JetPack to the eMMC/ SSD.
- If you own any other third-party device powered by the NVIDIA Jetson module, it is recommended to follow command-line flashing.
Note
For methods 1, 4 and 5 above, after flashing the system and booting the device, please enter "sudo apt update && sudo apt install nvidia-jetpack -y" on the device terminal to install all the remaining JetPack components needed.
JetPack Support Based on Jetson Device
The below table highlights NVIDIA JetPack versions supported by different NVIDIA Jetson devices.
| JetPack 4 | JetPack 5 | JetPack 6 | JetPack 7 | |
|---|---|---|---|---|
| Jetson Nano | ✅ | ❌ | ❌ | ❌ |
| Jetson TX2 | ✅ | ❌ | ❌ | ❌ |
| Jetson Xavier NX | ✅ | ✅ | ❌ | ❌ |
| Jetson AGX Xavier | ✅ | ✅ | ❌ | ❌ |
| Jetson AGX Orin | ❌ | ✅ | ✅ | ❌ |
| Jetson Orin NX | ❌ | ✅ | ✅ | ❌ |
| Jetson Orin Nano | ❌ | ✅ | ✅ | ❌ |
| Jetson AGX Thor | ❌ | ❌ | ❌ | ✅ |
Quick Start with Docker
The fastest way to get started with Ultralytics YOLO26 on NVIDIA Jetson is to run with pre-built docker images for Jetson. Refer to the table above and choose the JetPack version according to the Jetson device you own.
t=ultralytics/ultralytics:latest-jetson-jetpack4
sudo docker pull $t && sudo docker run -it --ipc=host --runtime=nvidia $t
t=ultralytics/ultralytics:latest-jetson-jetpack5
sudo docker pull $t && sudo docker run -it --ipc=host --runtime=nvidia $t
t=ultralytics/ultralytics:latest-jetson-jetpack6
sudo docker pull $t && sudo docker run -it --ipc=host --runtime=nvidia $t
t=ultralytics/ultralytics:latest-nvidia-arm64
sudo docker pull $t && sudo docker run -it --ipc=host --runtime=nvidia $t
After this is done, skip to Use TensorRT on NVIDIA Jetson section.
Start with Native Installation
For a native installation without Docker, please refer to the steps below.
Run on JetPack 7.0
Install Ultralytics Package
Here we will install Ultralytics package on the Jetson with optional dependencies so that we can export the PyTorch models to other different formats. We will mainly focus on NVIDIA TensorRT exports because TensorRT will make sure we can get the maximum performance out of the Jetson devices.
Update packages list, install pip and upgrade to latest
sudo apt update
sudo apt install python3-pip -y
pip install -U pip
Install
ultralyticspip package with optional dependenciespip install ultralytics[export]Reboot the device
sudo reboot
Install PyTorch and Torchvision
The above ultralytics installation will install Torch and Torchvision. However, these 2 packages installed via pip are not compatible to run on Jetson AGX Thor which comes with JetPack 7.0 and CUDA 13. Therefore, we need to manually install them.
Install torch and torchvision according to JP7.0
pip install torch torchvision --index-url https://download.pytorch.org/whl/cu130
Install onnxruntime-gpu
The onnxruntime-gpu package hosted in PyPI does not have aarch64 binaries for the Jetson. So we need to manually install this package. This package is needed for some of the exports.
Here we will download and install onnxruntime-gpu 1.24.0 with Python3.12 support.
pip install https://github.com/ultralytics/assets/releases/download/v0.0.0/onnxruntime_gpu-1.24.0-cp312-cp312-linux_aarch64.whl
Run on JetPack 6.1
Install Ultralytics Package
Here we will install Ultralytics package on the Jetson with optional dependencies so that we can export the PyTorch models to other different formats. We will mainly focus on NVIDIA TensorRT exports because TensorRT will make sure we can get the maximum performance out of the Jetson devices.
Update packages list, install pip and upgrade to latest
sudo apt update
sudo apt install python3-pip -y
pip install -U pip
Install
ultralyticspip package with optional dependenciespip install ultralytics[export]Reboot the device
sudo reboot
Install PyTorch and Torchvision
The above ultralytics installation will install Torch and Torchvision. However, these two packages installed via pip are not compatible with the Jetson platform, which is based on ARM64 architecture. Therefore, we need to manually install a pre-built PyTorch pip wheel and compile or install Torchvision from source.
Install torch 2.10.0 and torchvision 0.25.0 according to JP6.1
pip install https://github.com/ultralytics/assets/releases/download/v0.0.0/torch-2.10.0-cp310-cp310-linux_aarch64.whl
pip install https://github.com/ultralytics/assets/releases/download/v0.0.0/torchvision-0.25.0-cp310-cp310-linux_aarch64.whl
Note
Visit the PyTorch for Jetson page to access all different versions of PyTorch for different JetPack versions. For a more detailed list on the PyTorch, Torchvision compatibility, visit the PyTorch and Torchvision compatibility page.
Install cuDSS to fix a dependency issue with torch 2.10.0
wget https://developer.download.nvidia.com/compute/cudss/0.7.1/local_installers/cudss-local-tegra-repo-ubuntu2204-0.7.1_0.7.1-1_arm64.deb
sudo dpkg -i cudss-local-tegra-repo-ubuntu2204-0.7.1_0.7.1-1_arm64.deb
sudo cp /var/cudss-local-tegra-repo-ubuntu2204-0.7.1/cudss-*-keyring.gpg /usr/share/keyrings/
sudo apt-get update
sudo apt-get -y install cudss
Install onnxruntime-gpu
The onnxruntime-gpu package hosted in PyPI does not have aarch64 binaries for the Jetson. So we need to manually install this package. This package is needed for some of the exports.
You can find all available onnxruntime-gpu packages—organized by JetPack version, Python version, and other compatibility details—in the Jetson Zoo ONNX Runtime compatibility matrix.
For JetPack 6 with Python 3.10 support, you can install onnxruntime-gpu 1.23.0:
pip install https://github.com/ultralytics/assets/releases/download/v0.0.0/onnxruntime_gpu-1.23.0-cp310-cp310-linux_aarch64.whl
Alternatively, for onnxruntime-gpu 1.20.0:
pip install https://github.com/ultralytics/assets/releases/download/v0.0.0/onnxruntime_gpu-1.20.0-cp310-cp310-linux_aarch64.whl
Run on JetPack 5.1.2
Install Ultralytics Package
Here we will install Ultralytics package on the Jetson with optional dependencies so that we can export the PyTorch models to other different formats. We will mainly focus on NVIDIA TensorRT exports because TensorRT will make sure we can get the maximum performance out of the Jetson devices.
Update packages list, install pip and upgrade to latest
sudo apt update
sudo apt install python3-pip -y
pip install -U pip
Install
ultralyticspip package with optional dependenciespip install ultralytics[export]Reboot the device
sudo reboot
Install PyTorch and Torchvision
The above ultralytics installation will install Torch and Torchvision. However, these two packages installed via pip are not compatible with the Jetson platform, which is based on ARM64 architecture. Therefore, we need to manually install a pre-built PyTorch pip wheel and compile or install Torchvision from source.
Uninstall currently installed PyTorch and Torchvision
pip uninstall torch torchvisionInstall
torch 2.1.0andtorchvision 0.16.2according to JP5.1.2pip install https://github.com/ultralytics/assets/releases/download/v0.0.0/torch-2.1.0a0+41361538.nv23.06-cp38-cp38-linux_aarch64.whl pip install https://github.com/ultralytics/assets/releases/download/v0.0.0/torchvision-0.16.2+c6f3977-cp38-cp38-linux_aarch64.whl
Note
Visit the PyTorch for Jetson page to access all different versions of PyTorch for different JetPack versions. For a more detailed list on the PyTorch, Torchvision compatibility, visit the PyTorch and Torchvision compatibility page.
Install onnxruntime-gpu
The onnxruntime-gpu package hosted in PyPI does not have aarch64 binaries for the Jetson. So we need to manually install this package. This package is needed for some of the exports.
You can find all available onnxruntime-gpu packages—organized by JetPack version, Python version, and other compatibility details—in the Jetson Zoo ONNX Runtime compatibility matrix. Here we will download and install onnxruntime-gpu 1.17.0 with Python3.8 support.
wget https://nvidia.box.com/shared/static/zostg6agm00fb6t5uisw51qi6kpcuwzd.whl -O onnxruntime_gpu-1.17.0-cp38-cp38-linux_aarch64.whl
pip install onnxruntime_gpu-1.17.0-cp38-cp38-linux_aarch64.whl
Note
onnxruntime-gpu will automatically revert back the numpy version to latest. So we need to reinstall numpy to 1.23.5 to fix an issue by executing:
pip install numpy==1.23.5
Use TensorRT on NVIDIA Jetson
Among all the model export formats supported by Ultralytics, TensorRT offers the highest inference performance on NVIDIA Jetson devices, making it our top recommendation for Jetson deployments. For setup instructions and advanced usage, see our dedicated TensorRT integration guide.
Convert Model to TensorRT and Run Inference
The YOLO26n model in PyTorch format is converted to TensorRT to run inference with the exported model.
Example
from ultralytics import YOLO

# Load a YOLO26n PyTorch model
model = YOLO("yolo26n.pt")

# Export the model to TensorRT
model.export(format="engine")  # creates 'yolo26n.engine'

# Load the exported TensorRT model
trt_model = YOLO("yolo26n.engine")

# Run inference
results = trt_model("https://ultralytics.com/images/bus.jpg")
# Export a YOLO26n PyTorch model to TensorRT format
yolo export model=yolo26n.pt format=engine # creates 'yolo26n.engine'

# Run inference with the exported model
yolo predict model=yolo26n.engine source='https://ultralytics.com/images/bus.jpg'
Note
Visit the Export page to access additional arguments when exporting models to different model formats
Use NVIDIA Deep Learning Accelerator (DLA)
NVIDIA Deep Learning Accelerator (DLA) is a specialized hardware component built into NVIDIA Jetson devices that optimizes deep learning inference for energy efficiency and performance. By offloading tasks from the GPU (freeing it up for more intensive processes), DLA enables models to run with lower power consumption while maintaining high throughput, ideal for embedded systems and real-time AI applications.
The following Jetson devices are equipped with DLA hardware:
| Jetson Device | DLA Cores | DLA Max Frequency |
|---|---|---|
| Jetson AGX Orin Series | 2 | 1.6 GHz |
| Jetson Orin NX 16GB | 2 | 614 MHz |
| Jetson Orin NX 8GB | 1 | 614 MHz |
| Jetson AGX Xavier Series | 2 | 1.4 GHz |
| Jetson Xavier NX Series | 2 | 1.1 GHz |
Example
from ultralytics import YOLO

# Load a YOLO26n PyTorch model
model = YOLO("yolo26n.pt")

# Export the model to TensorRT with DLA enabled (only works with FP16 or INT8)
model.export(format="engine", device="dla:0", half=True)  # dla:0 or dla:1 corresponds to the DLA cores

# Load the exported TensorRT model
trt_model = YOLO("yolo26n.engine")

# Run inference
results = trt_model("https://ultralytics.com/images/bus.jpg")
# Export a YOLO26n PyTorch model to TensorRT format with DLA enabled (only works with FP16 or INT8)
# Once DLA core number is specified at export, it will use the same core at inference
yolo export model=yolo26n.pt format=engine device="dla:0" half=True # dla:0 or dla:1 corresponds to the DLA cores

# Run inference with the exported model on the DLA
yolo predict model=yolo26n.engine source='https://ultralytics.com/images/bus.jpg'
Note
When using DLA exports, some layers may not be supported to run on DLA and will fall back to the GPU for execution. This fallback can introduce additional latency and impact the overall inference performance. Therefore, DLA is not primarily designed to reduce inference latency compared to TensorRT running entirely on the GPU. Instead, its primary purpose is to increase throughput and improve energy efficiency.
NVIDIA Jetson YOLO11/ YOLO26 Benchmarks
YOLO11/ YOLO26 benchmarks were run by the Ultralytics team on 11 different model formats measuring speed and accuracy: PyTorch, TorchScript, ONNX, OpenVINO, TensorRT, TF SavedModel, TF GraphDef, TF Lite, MNN, NCNN, ExecuTorch. Benchmarks were run on NVIDIA Jetson AGX Thor Developer Kit, NVIDIA Jetson AGX Orin Developer Kit (64GB), NVIDIA Jetson Orin Nano Super Developer Kit and Seeed Studio reComputer J4012 powered by Jetson Orin NX 16GB device at FP32 precision with default input image size of 640.
Comparison Charts
Even though all model exports work on NVIDIA Jetson, we have only included PyTorch, TorchScript, TensorRT for the comparison chart below because they make use of the GPU on the Jetson and are guaranteed to produce the best results. All the other exports only utilize the CPU and the performance is not as good as the above three. You can find benchmarks for all exports in the section after this chart.
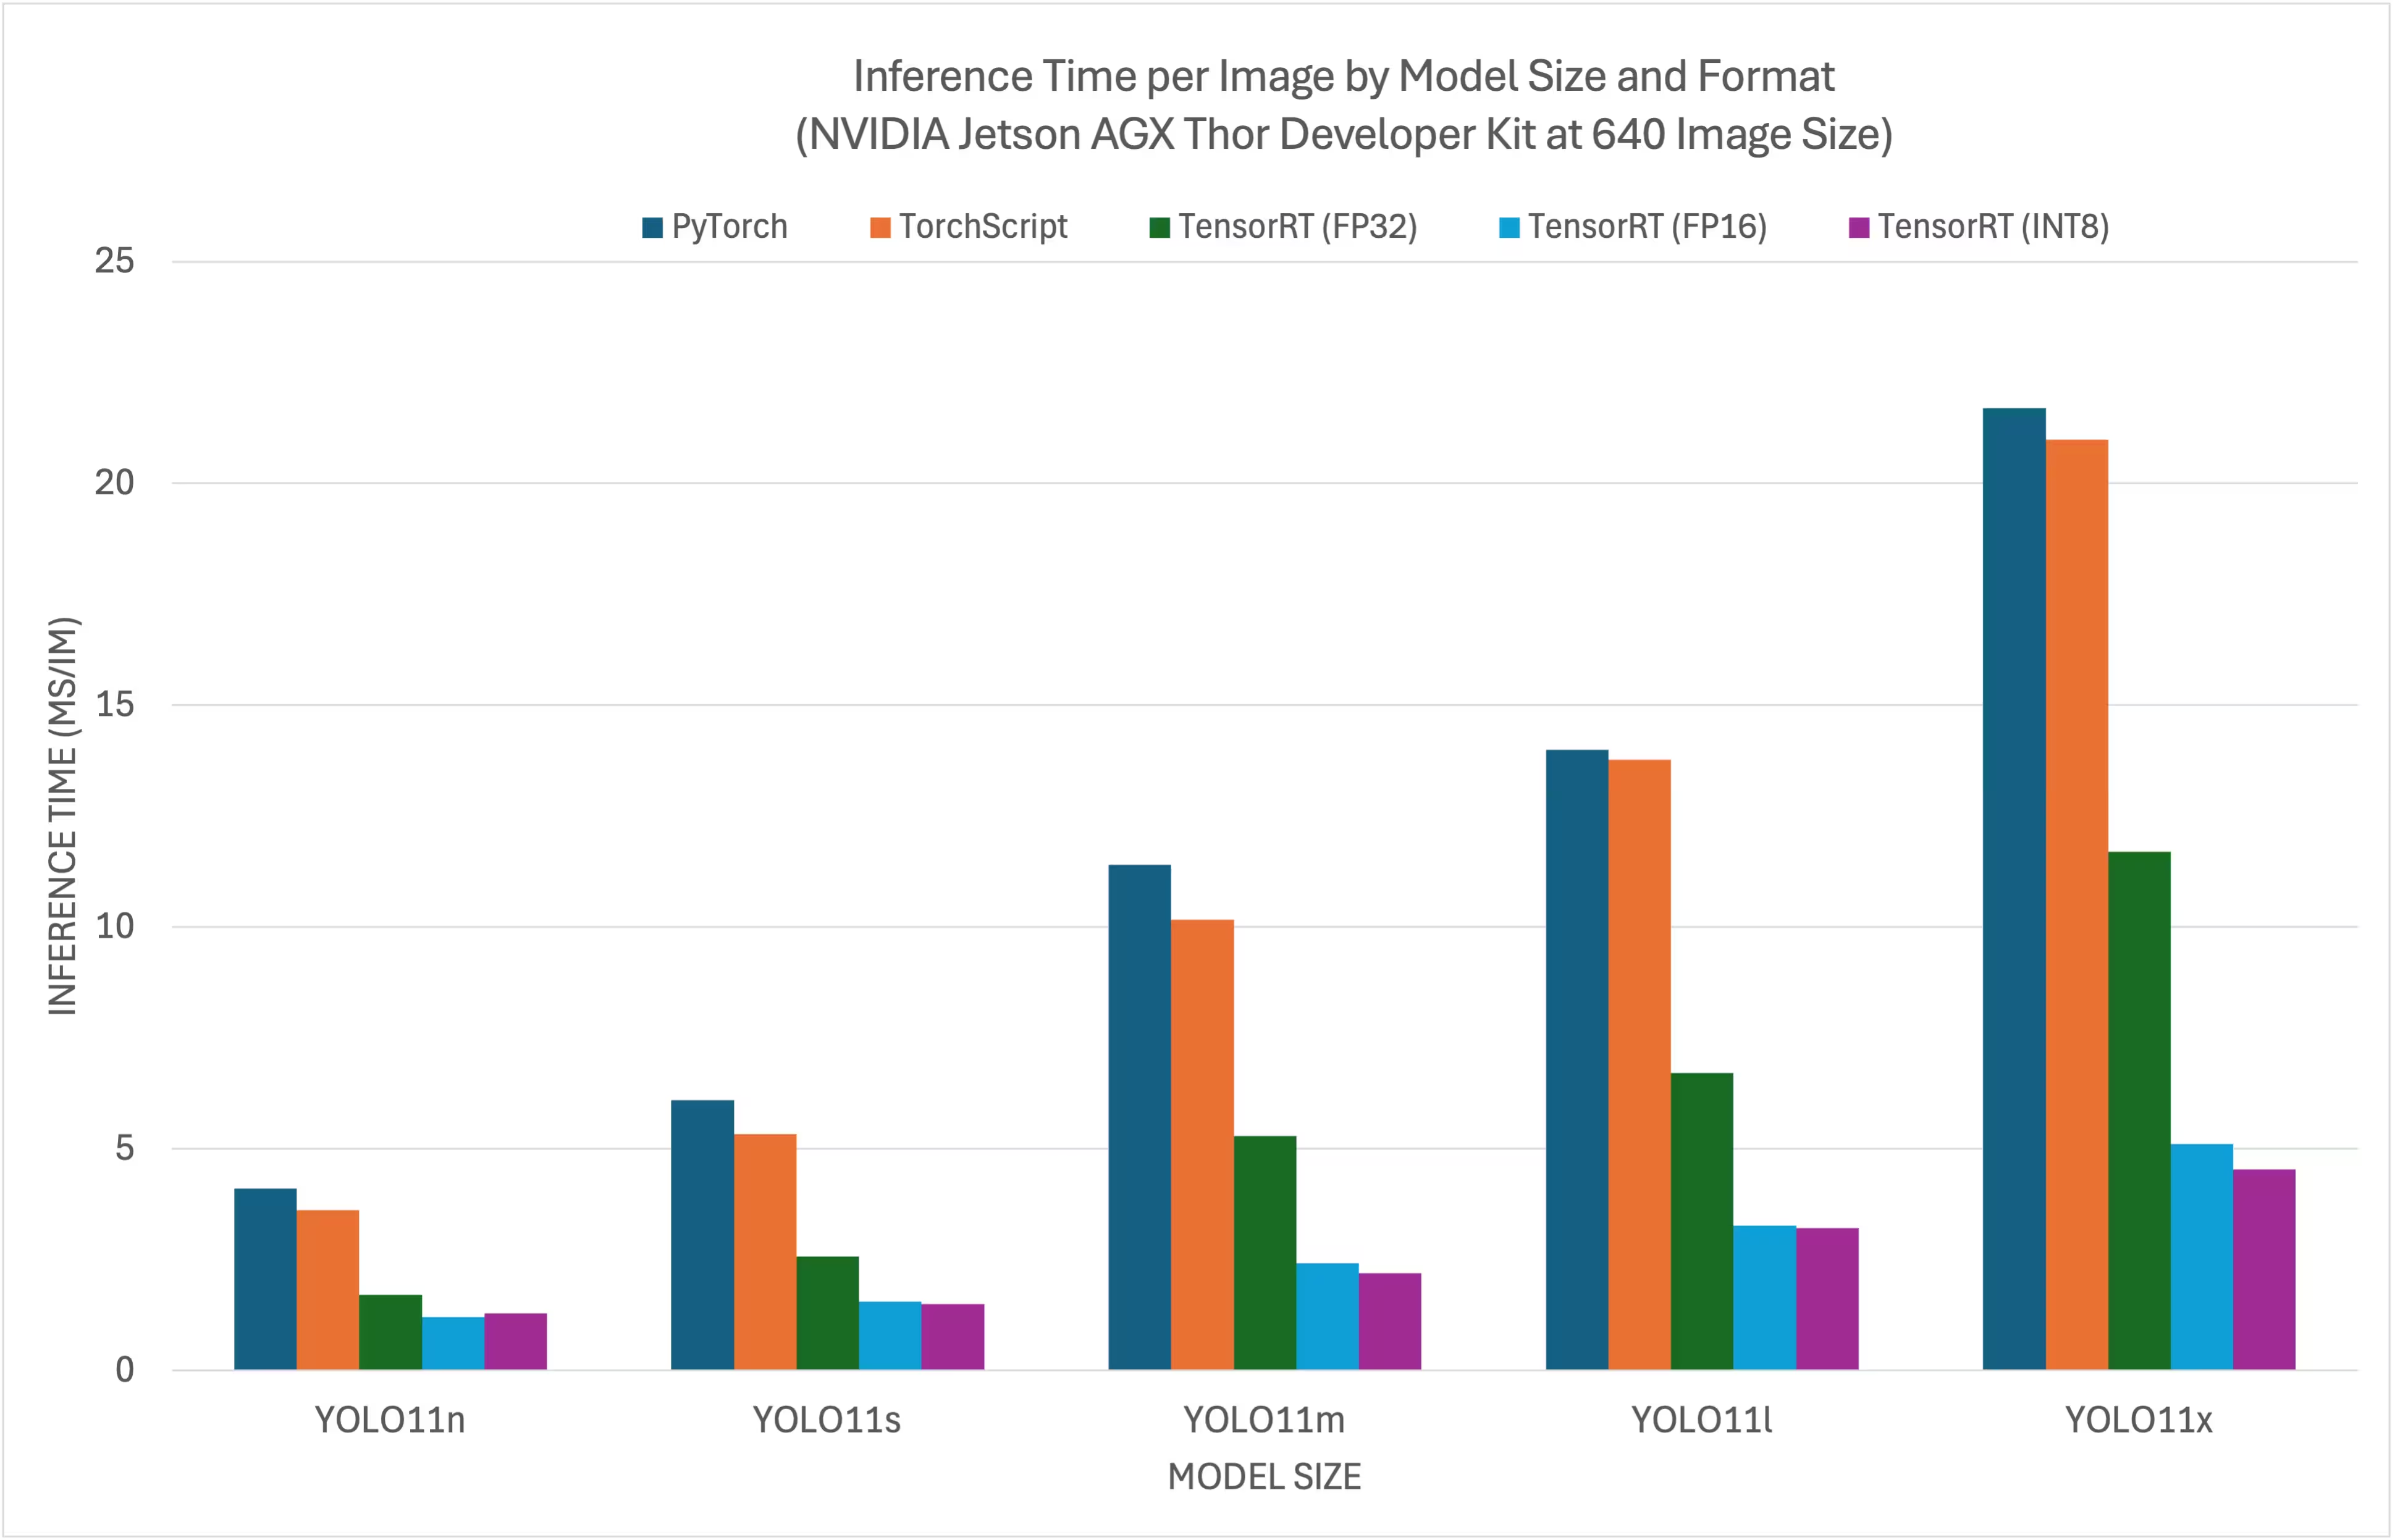
NVIDIA Jetson AGX Thor Developer Kit
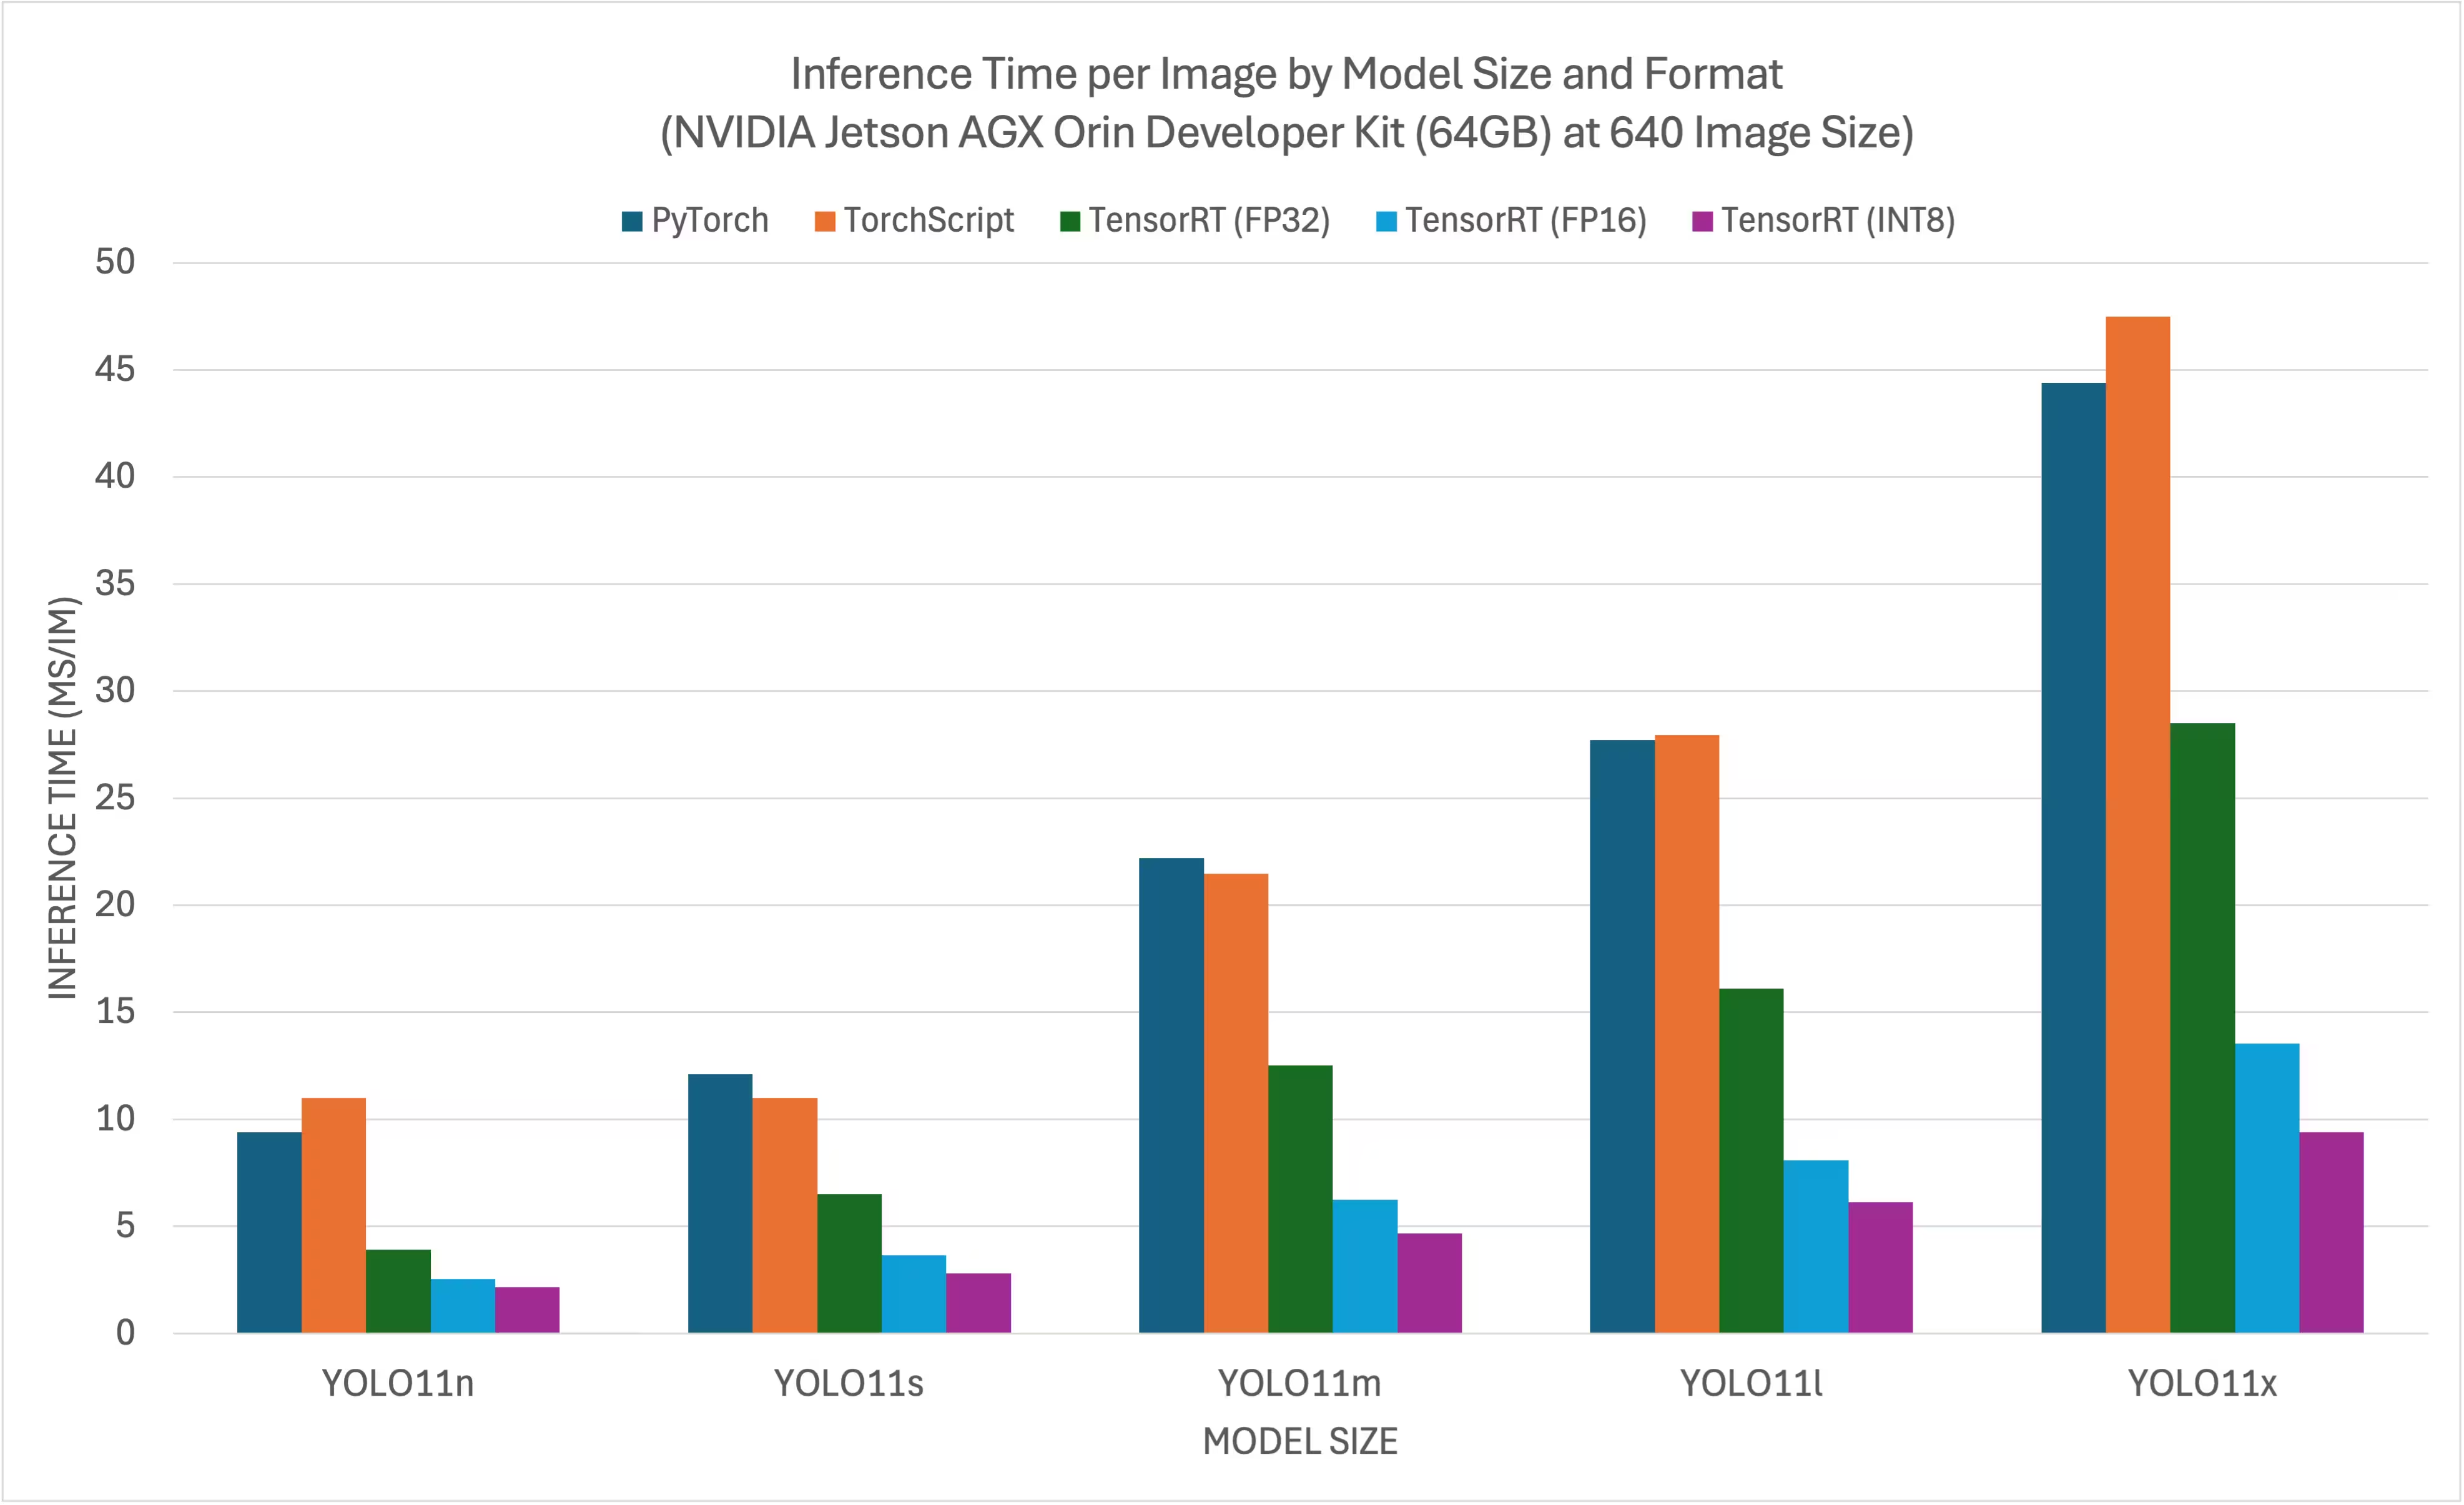
NVIDIA Jetson AGX Orin Developer Kit (64GB)
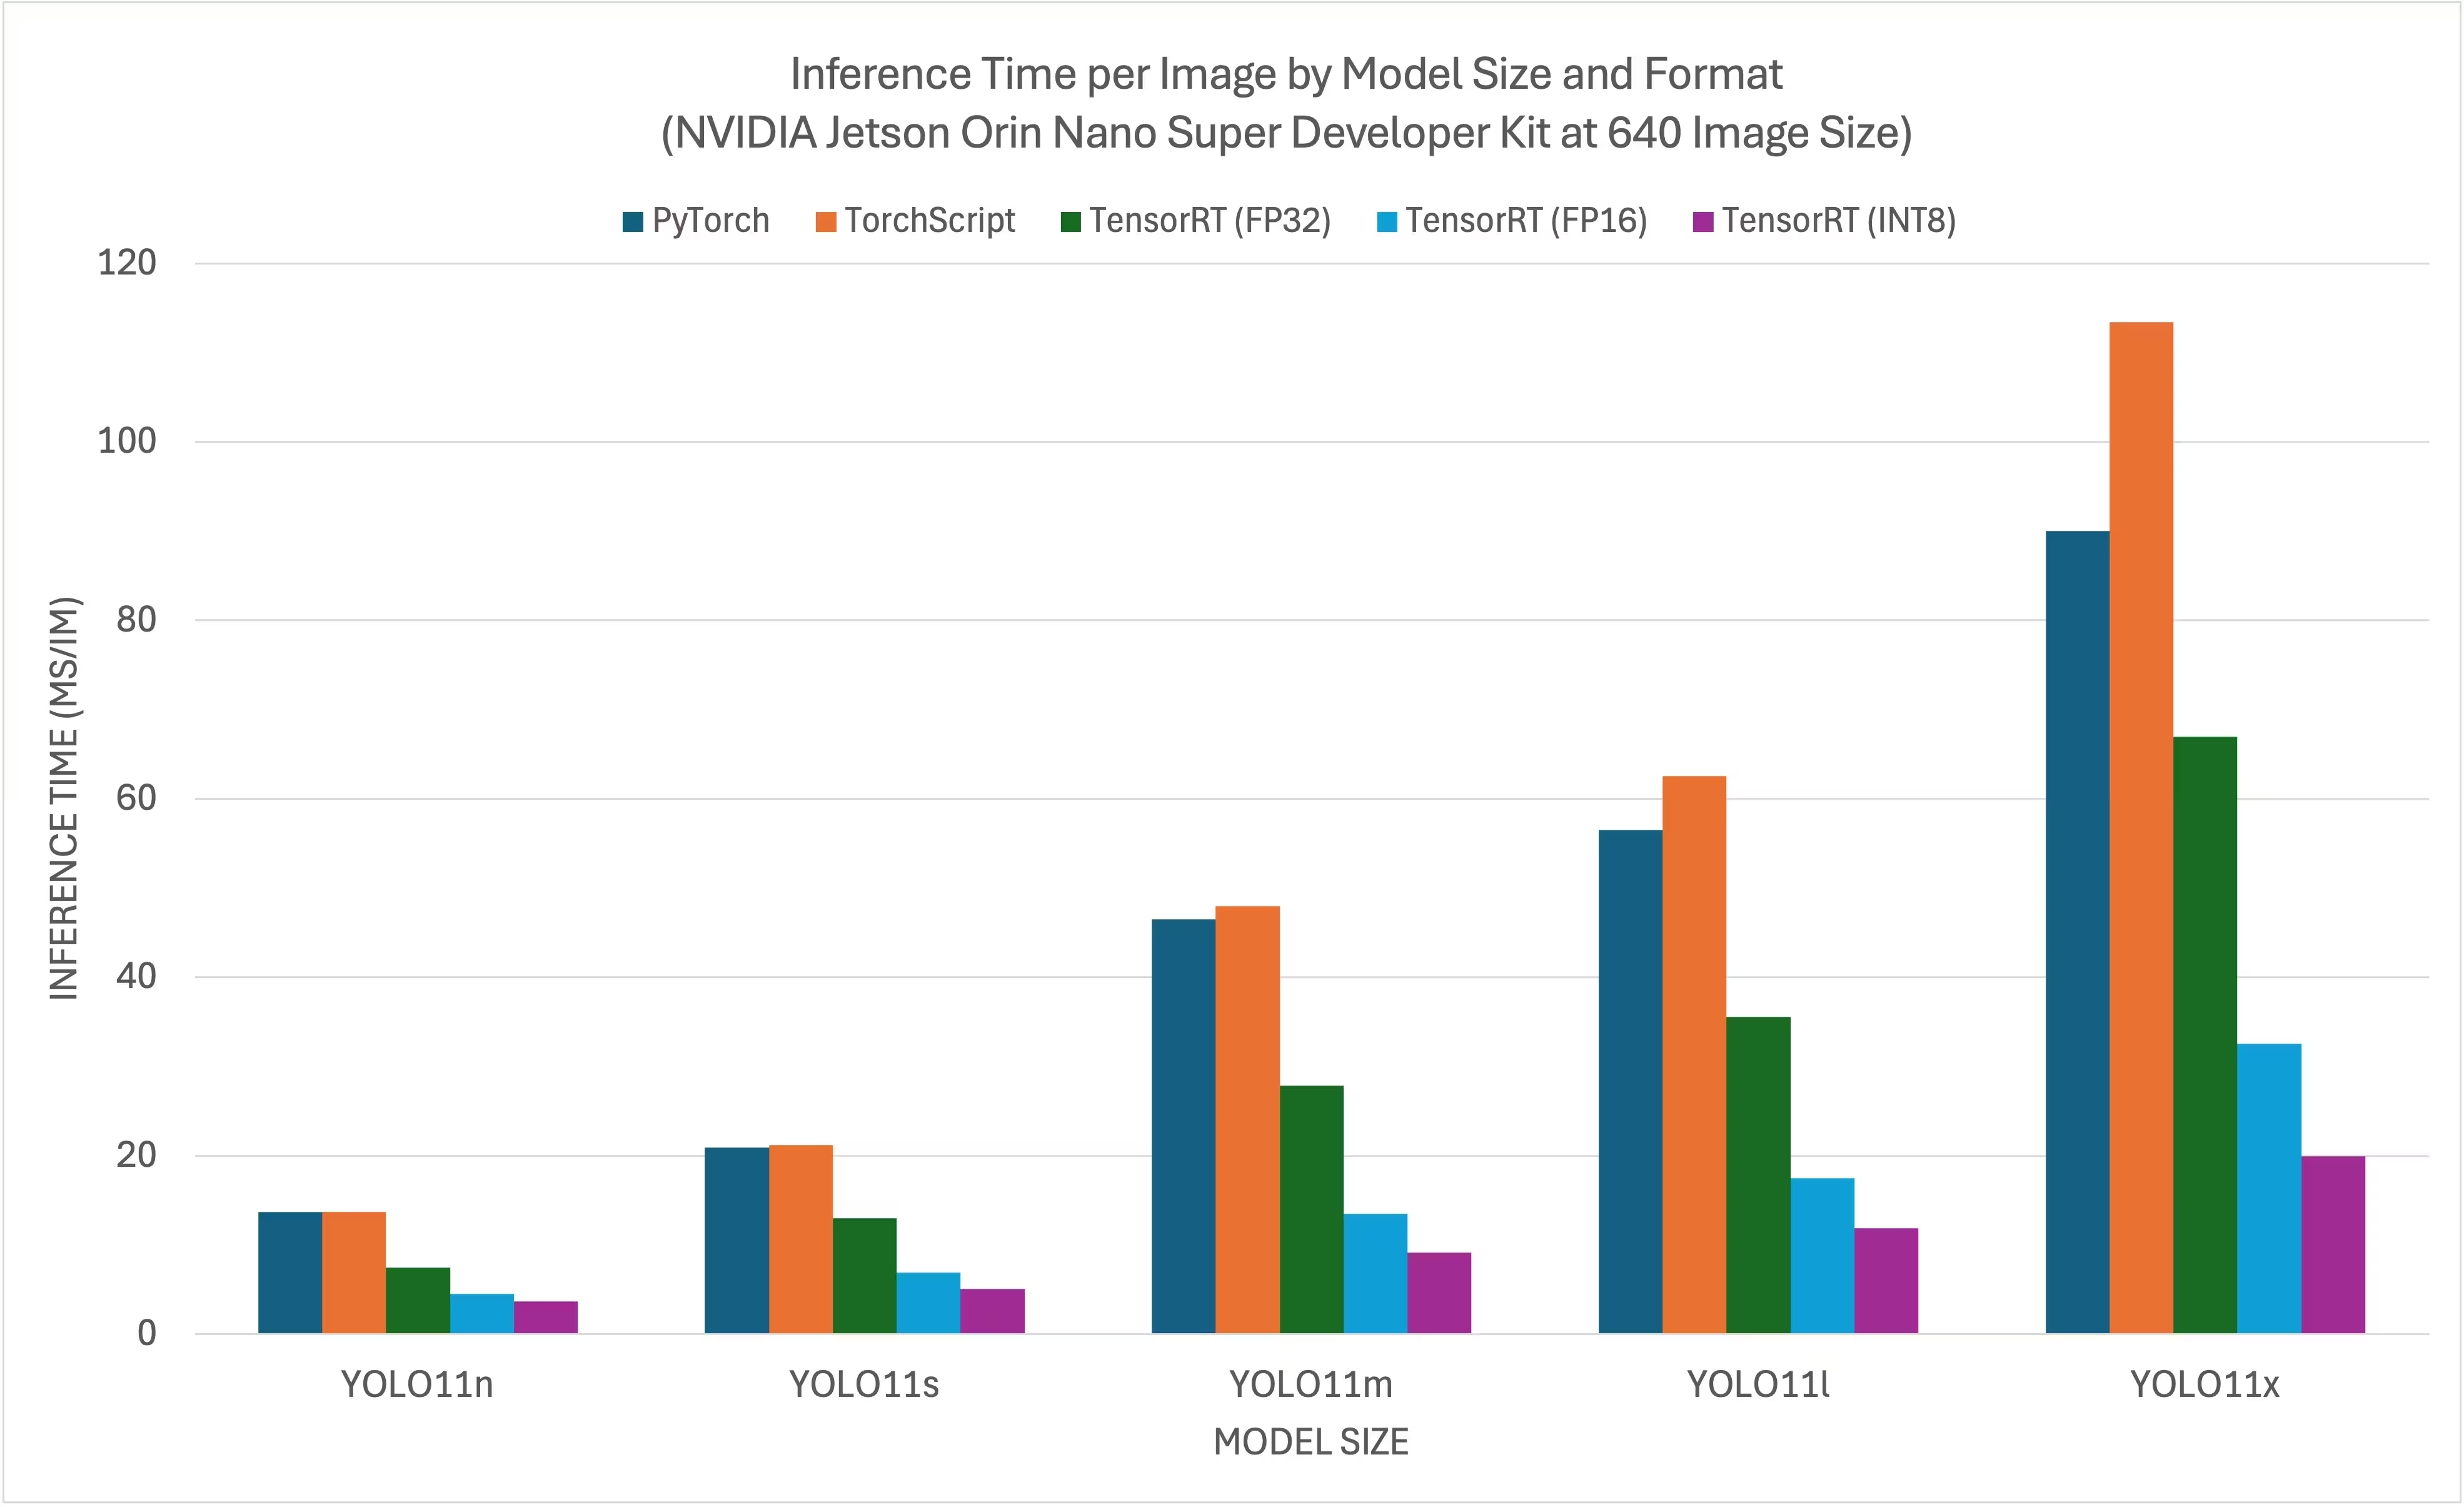
NVIDIA Jetson Orin Nano Super Developer Kit
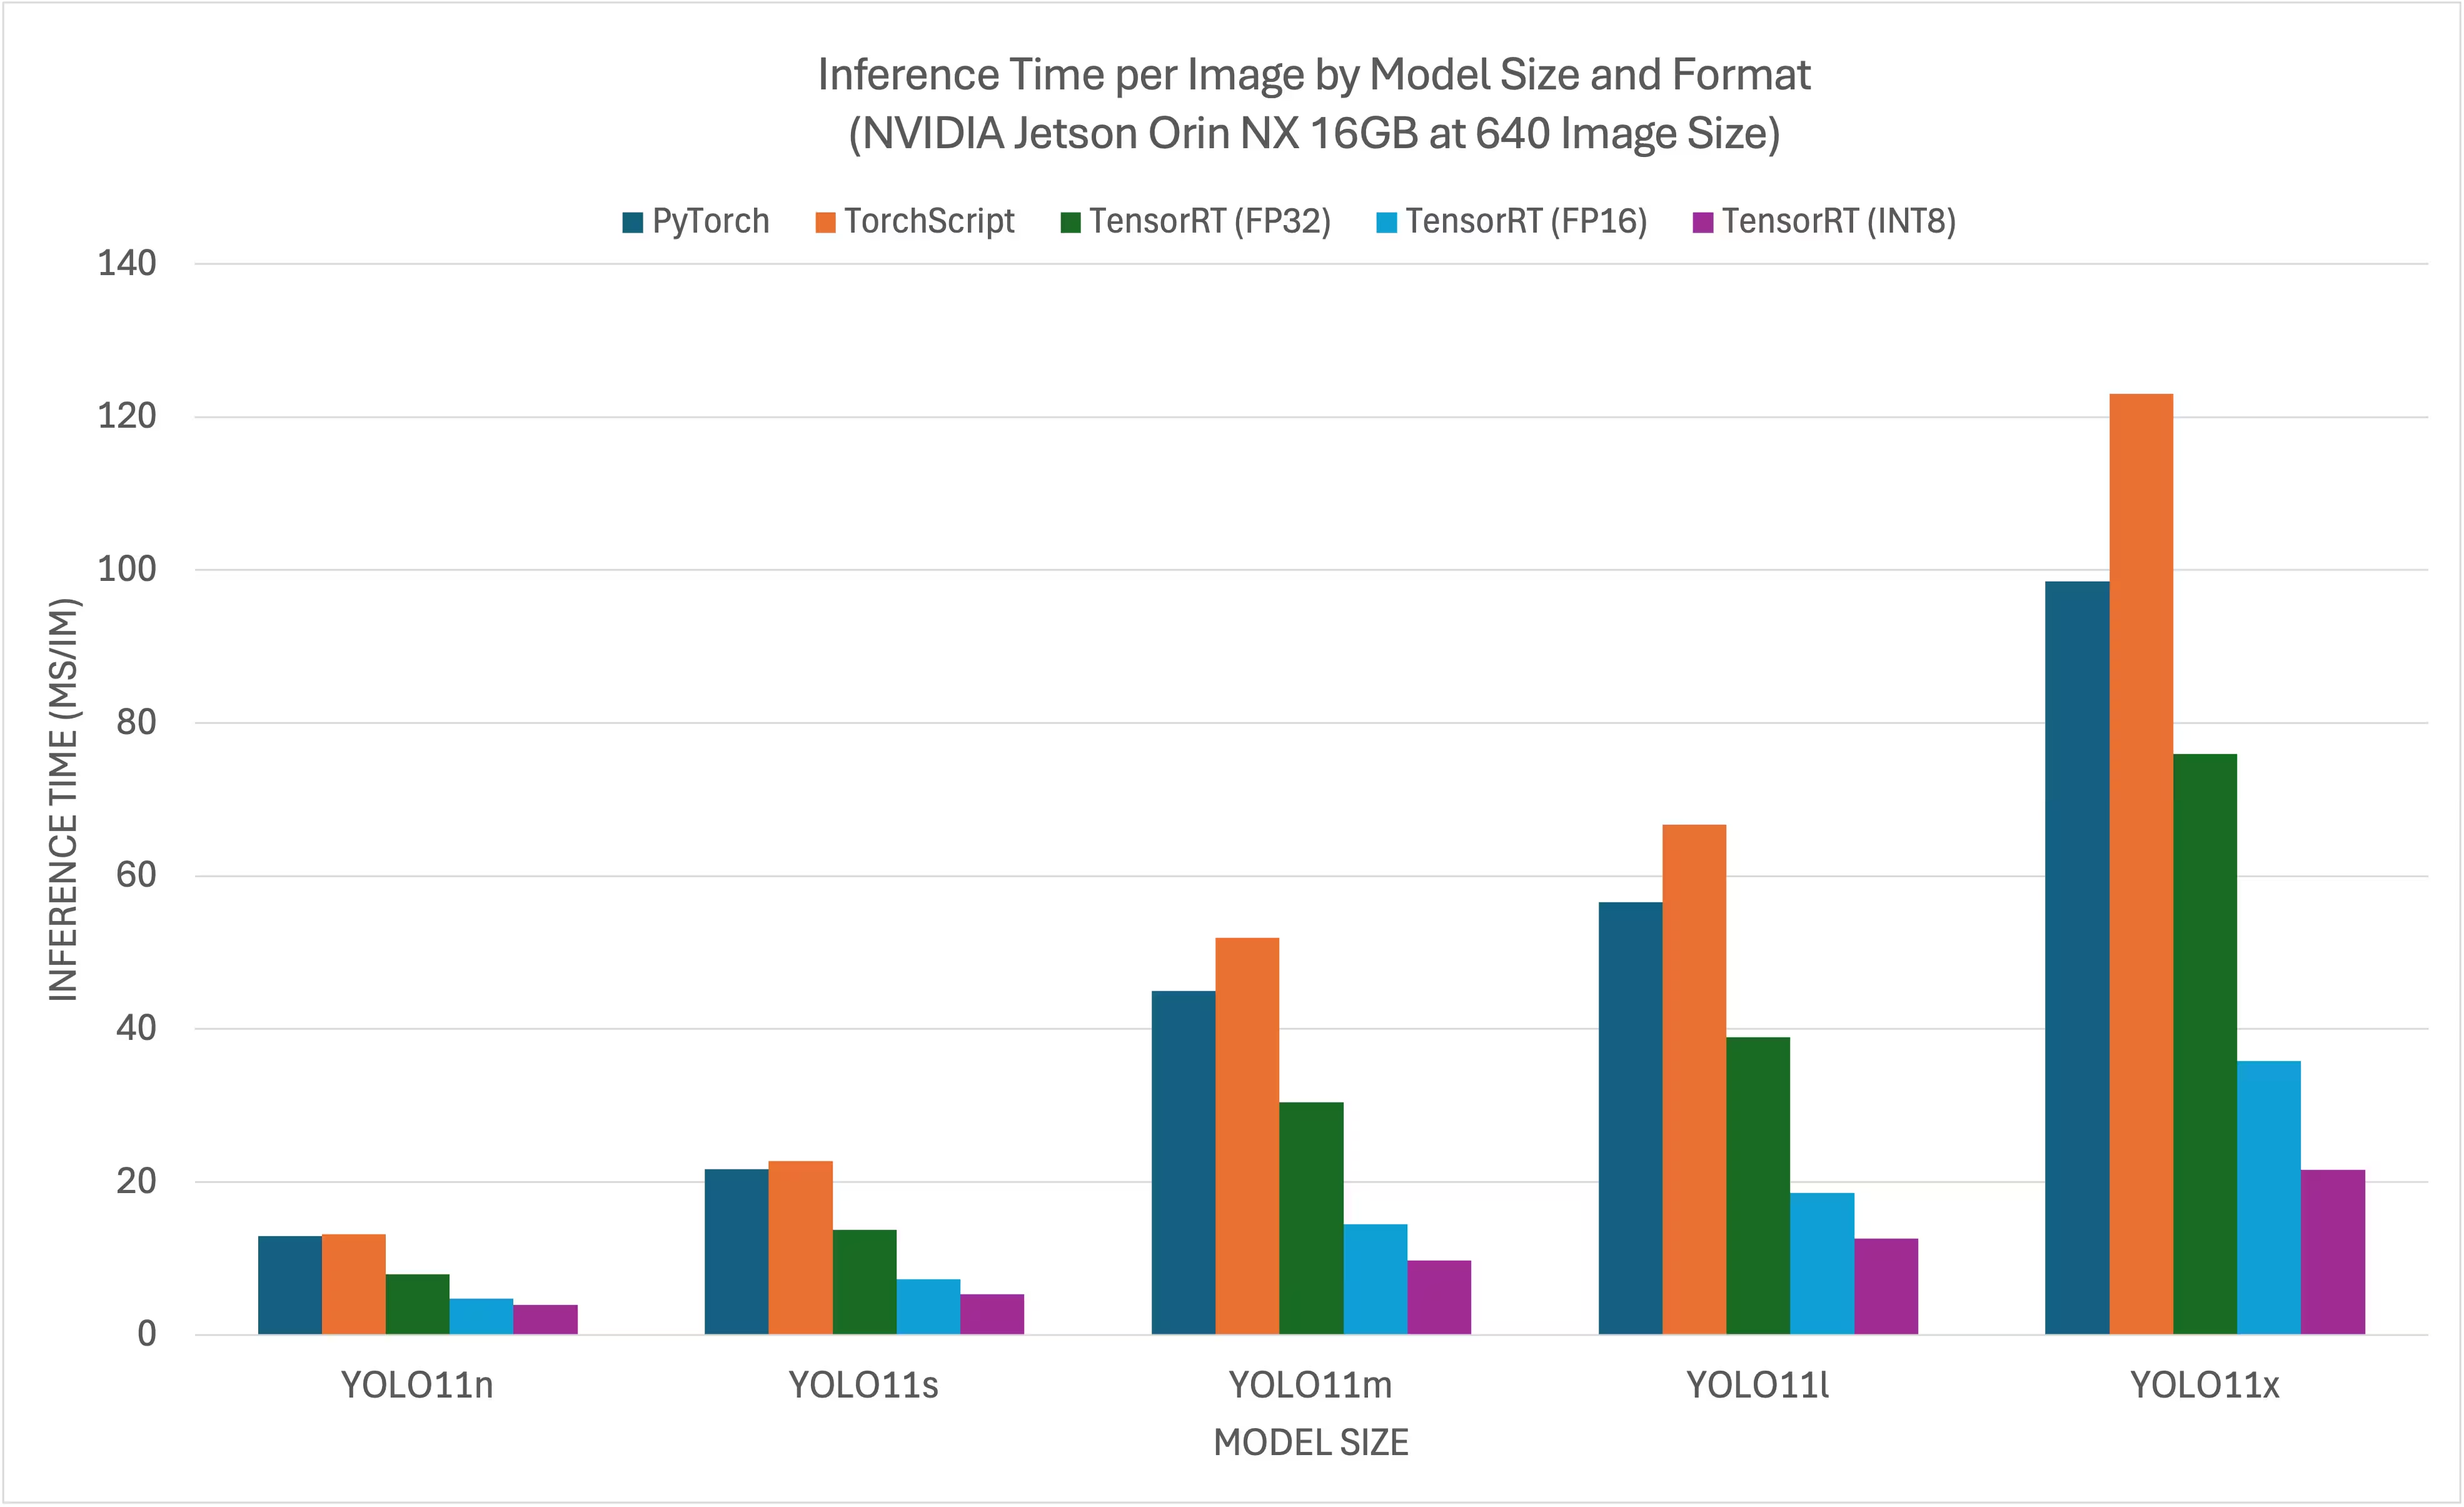
NVIDIA Jetson Orin NX 16GB
Detailed Comparison Tables
The below table represents the benchmark results for five different models (YOLO11n, YOLO11s, YOLO11m, YOLO11l, YOLO11x) across 11 different formats (PyTorch, TorchScript, ONNX, OpenVINO, TensorRT, TF SavedModel, TF GraphDef, TF Lite, MNN, NCNN, ExecuTorch), giving us the status, size, mAP50-95(B) metric, and inference time for each combination.
NVIDIA Jetson AGX Thor Developer Kit
Performance
| Format | Status | Size on disk (MB) | mAP50-95(B) | Inference time (ms/im) |
|---|---|---|---|---|
| PyTorch | ✅ | 5.3 | 0.4798 | 7.39 |
| TorchScript | ✅ | 9.8 | 0.4789 | 4.21 |
| ONNX | ✅ | 9.5 | 0.4767 | 6.58 |
| OpenVINO | ✅ | 10.1 | 0.4794 | 17.50 |
| TensorRT (FP32) | ✅ | 13.9 | 0.4791 | 1.90 |
| TensorRT (FP16) | ✅ | 7.6 | 0.4797 | 1.39 |
| TensorRT (INT8) | ✅ | 6.5 | 0.4273 | 1.52 |
| TF SavedModel | ✅ | 25.7 | 0.4764 | 47.24 |
| TF GraphDef | ✅ | 9.5 | 0.4764 | 45.98 |
| TF Lite | ✅ | 9.9 | 0.4764 | 182.04 |
| MNN | ✅ | 9.4 | 0.4784 | 21.83 |
| Format | Status | Size on disk (MB) | mAP50-95(B) | Inference time (ms/im) |
|---|---|---|---|---|
| PyTorch | ✅ | 19.5 | 0.5738 | 7.99 |
| TorchScript | ✅ | 36.8 | 0.5664 | 6.01 |
| ONNX | ✅ | 36.5 | 0.5666 | 9.31 |
| OpenVINO | ✅ | 38.5 | 0.5656 | 35.56 |
| TensorRT (FP32) | ✅ | 38.9 | 0.5664 | 2.95 |
| TensorRT (FP16) | ✅ | 21.0 | 0.5650 | 1.77 |
| TensorRT (INT8) | ✅ | 13.5 | 0.5010 | 1.75 |
| TF SavedModel | ✅ | 96.6 | 0.5665 | 88.87 |
| TF GraphDef | ✅ | 36.5 | 0.5665 | 89.20 |
| TF Lite | ✅ | 36.9 | 0.5665 | 604.25 |
| MNN | ✅ | 36.4 | 0.5651 | 53.75 |
| Format | Status | Size on disk (MB) | mAP50-95(B) | Inference time (ms/im) |
|---|---|---|---|---|
| PyTorch | ✅ | 42.2 | 0.6237 | 10.76 |
| TorchScript | ✅ | 78.5 | 0.6217 | 10.57 |
| ONNX | ✅ | 78.2 | 0.6211 | 14.91 |
| OpenVINO | ✅ | 82.2 | 0.6204 | 86.27 |
| TensorRT (FP32) | ✅ | 82.2 | 0.6230 | 5.56 |
| TensorRT (FP16) | ✅ | 41.6 | 0.6209 | 2.58 |
| TensorRT (INT8) | ✅ | 24.3 | 0.5595 | 2.49 |
| TF SavedModel | ✅ | 205.8 | 0.6229 | 200.96 |
| TF GraphDef | ✅ | 78.2 | 0.6229 | 203.00 |
| TF Lite | ✅ | 78.6 | 0.6229 | 1867.12 |
| MNN | ✅ | 78.0 | 0.6176 | 142.00 |
| Format | Status | Size on disk (MB) | mAP50-95(B) | Inference time (ms/im) |
|---|---|---|---|---|
| PyTorch | ✅ | 50.7 | 0.6258 | 13.34 |
| TorchScript | ✅ | 95.5 | 0.6248 | 13.86 |
| ONNX | ✅ | 95.0 | 0.6247 | 18.44 |
| OpenVINO | ✅ | 99.9 | 0.6238 | 106.67 |
| TensorRT (FP32) | ✅ | 99.0 | 0.6249 | 6.74 |
| TensorRT (FP16) | ✅ | 50.3 | 0.6243 | 3.34 |
| TensorRT (INT8) | ✅ | 29.0 | 0.5708 | 3.24 |
| TF SavedModel | ✅ | 250.0 | 0.6245 | 259.74 |
| TF GraphDef | ✅ | 95.0 | 0.6245 | 263.42 |
| TF Lite | ✅ | 95.4 | 0.6245 | 2367.83 |
| MNN | ✅ | 94.8 | 0.6272 | 174.39 |
| Format | Status | Size on disk (MB) | mAP50-95(B) | Inference time (ms/im) |
|---|---|---|---|---|
| PyTorch | ✅ | 113.2 | 0.6565 | 20.92 |
| TorchScript | ✅ | 213.5 | 0.6595 | 21.76 |
| ONNX | ✅ | 212.9 | 0.6590 | 26.72 |
| OpenVINO | ✅ | 223.6 | 0.6620 | 205.27 |
| TensorRT (FP32) | ✅ | 217.2 | 0.6593 | 12.29 |
| TensorRT (FP16) | ✅ | 112.1 | 0.6611 | 5.16 |
| TensorRT (INT8) | ✅ | 58.9 | 0.5222 | 4.72 |
| TF SavedModel | ✅ | 559.2 | 0.6593 | 498.85 |
| TF GraphDef | ✅ | 213.0 | 0.6593 | 507.43 |
| TF Lite | ✅ | 213.3 | 0.6593 | 5134.22 |
| MNN | ✅ | 212.8 | 0.6625 | 347.84 |
Benchmarked with Ultralytics 8.4.7
Note
Inference time does not include pre/ post-processing.
NVIDIA Jetson AGX Orin Developer Kit (64GB)
Performance
| Format | Status | Size on disk (MB) | mAP50-95(B) | Inference time (ms/im) |
|---|---|---|---|---|
| PyTorch | ✅ | 5.3 | 0.4790 | 11.58 |
| TorchScript | ✅ | 9.8 | 0.4770 | 4.60 |
| ONNX | ✅ | 9.5 | 0.4770 | 9.87 |
| OpenVINO | ✅ | 9.6 | 0.4820 | 28.80 |
| TensorRT (FP32) | ✅ | 11.5 | 0.0450 | 4.18 |
| TensorRT (FP16) | ✅ | 7.9 | 0.0450 | 2.62 |
| TensorRT (INT8) | ✅ | 5.4 | 0.4640 | 2.30 |
| TF SavedModel | ✅ | 24.6 | 0.4760 | 71.10 |
| TF GraphDef | ✅ | 9.5 | 0.4760 | 70.02 |
| TF Lite | ✅ | 9.9 | 0.4760 | 227.94 |
| MNN | ✅ | 9.4 | 0.4760 | 32.46 |
| NCNN | ✅ | 9.3 | 0.4810 | 29.93 |
| Format | Status | Size on disk (MB) | mAP50-95(B) | Inference time (ms/im) |
|---|---|---|---|---|
| PyTorch | ✅ | 20.0 | 0.5730 | 13.18 |
| TorchScript | ✅ | 36.8 | 0.5670 | 11.48 |
| ONNX | ✅ | 36.5 | 0.5660 | 13.47 |
| OpenVINO | ✅ | 36.7 | 0.5650 | 58.30 |
| TensorRT (FP32) | ✅ | 38.5 | 0.5660 | 6.82 |
| TensorRT (FP16) | ✅ | 21.9 | 0.5660 | 3.76 |
| TensorRT (INT8) | ✅ | 12.5 | 0.5480 | 2.98 |
| TF SavedModel | ✅ | 92.2 | 0.5660 | 145.62 |
| TF GraphDef | ✅ | 36.5 | 0.5660 | 146.26 |
| TF Lite | ✅ | 36.9 | 0.5660 | 753.52 |
| MNN | ✅ | 36.4 | 0.5650 | 79.50 |
| NCNN | ✅ | 36.4 | 0.5700 | 58.73 |
| Format | Status | Size on disk (MB) | mAP50-95(B) | Inference time (ms/im) |
|---|---|---|---|---|
| PyTorch | ✅ | 43.0 | 0.6220 | 19.36 |
| TorchScript | ✅ | 78.5 | 0.6230 | 20.02 |
| ONNX | ✅ | 78.2 | 0.6230 | 25.40 |
| OpenVINO | ✅ | 78.3 | 0.6190 | 130.76 |
| TensorRT (FP32) | ✅ | 80.2 | 0.6220 | 12.60 |
| TensorRT (FP16) | ✅ | 42.5 | 0.6220 | 6.24 |
| TensorRT (INT8) | ✅ | 23.4 | 0.5820 | 4.72 |
| TF SavedModel | ✅ | 196.3 | 0.6230 | 306.76 |
| TF GraphDef | ✅ | 78.2 | 0.6230 | 314.23 |
| TF Lite | ✅ | 78.5 | 0.6230 | 2331.63 |
| MNN | ✅ | 78.0 | 0.6220 | 206.93 |
| NCNN | ✅ | 78.0 | 0.6220 | 143.03 |
| Format | Status | Size on disk (MB) | mAP50-95(B) | Inference time (ms/im) |
|---|---|---|---|---|
| PyTorch | ✅ | 51.0 | 0.6230 | 23.53 |
| TorchScript | ✅ | 95.5 | 0.6250 | 24.23 |
| ONNX | ✅ | 95.0 | 0.6250 | 31.73 |
| OpenVINO | ✅ | 95.3 | 0.6240 | 162.80 |
| TensorRT (FP32) | ✅ | 97.3 | 0.6250 | 15.90 |
| TensorRT (FP16) | ✅ | 51.4 | 0.6240 | 7.93 |
| TensorRT (INT8) | ✅ | 29.9 | 0.5920 | 5.97 |
| TF SavedModel | ✅ | 238.4 | 0.6250 | 394.30 |
| TF GraphDef | ✅ | 95.0 | 0.6250 | 398.63 |
| TF Lite | ✅ | 95.4 | 0.6250 | 2925.27 |
| MNN | ✅ | 94.8 | 0.6250 | 255.87 |
| NCNN | ✅ | 94.8 | 0.6320 | 177.70 |
| Format | Status | Size on disk (MB) | mAP50-95(B) | Inference time (ms/im) |
|---|---|---|---|---|
| PyTorch | ✅ | 114 | 0.6610 | 38.37 |
| TorchScript | ✅ | 213.5 | 0.6590 | 41.23 |
| ONNX | ✅ | 212.9 | 0.6590 | 52.03 |
| OpenVINO | ✅ | 213.2 | 0.6590 | 300.40 |
| TensorRT (FP32) | ✅ | 215.2 | 0.6590 | 28.43 |
| TensorRT (FP16) | ✅ | 110.3 | 0.6570 | 13.50 |
| TensorRT (INT8) | ✅ | 59.9 | 0.6080 | 9.33 |
| TF SavedModel | ✅ | 533.3 | 0.6590 | 738.60 |
| TF GraphDef | ✅ | 212.9 | 0.6590 | 785.70 |
| TF Lite | ✅ | 217.6 | 0.6900 | 6476.80 |
| MNN | ✅ | 213.3 | 0.6590 | 519.77 |
| NCNN | ✅ | 212.8 | 0.6670 | 300.00 |
Benchmarked with Ultralytics 8.4.32
Note
Inference time does not include pre/ post-processing.
NVIDIA Jetson Orin Nano Super Developer Kit
Performance
| Format | Status | Size on disk (MB) | mAP50-95(B) | Inference time (ms/im) |
|---|---|---|---|---|
| PyTorch | ✅ | 5.3 | 0.4790 | 15.60 |
| TorchScript | ✅ | 9.8 | 0.4770 | 12.60 |
| ONNX | ✅ | 9.5 | 0.4760 | 15.76 |
| OpenVINO | ✅ | 9.6 | 0.4820 | 56.23 |
| TensorRT (FP32) | ✅ | 11.3 | 0.4770 | 7.53 |
| TensorRT (FP16) | ✅ | 8.1 | 0.4800 | 4.57 |
| TensorRT (INT8) | ✅ | 5.3 | 0.4490 | 3.80 |
| TF SavedModel | ✅ | 24.6 | 0.4760 | 118.33 |
| TF GraphDef | ✅ | 9.5 | 0.4760 | 116.30 |
| TF Lite | ✅ | 9.9 | 0.4760 | 286.00 |
| MNN | ✅ | 9.4 | 0.4760 | 68.77 |
| NCNN | ✅ | 9.3 | 0.4810 | 47.50 |
| Format | Status | Size on disk (MB) | mAP50-95(B) | Inference time (ms/im) |
|---|---|---|---|---|
| PyTorch | ✅ | 20.0 | 0.5730 | 22.83 |
| TorchScript | ✅ | 36.8 | 0.5670 | 21.83 |
| ONNX | ✅ | 36.5 | 0.5664 | 26.29 |
| OpenVINO | ✅ | 36.7 | 0.5653 | 127.09 |
| TensorRT (FP32) | ✅ | 38.2 | 0.5664 | 13.60 |
| TensorRT (FP16) | ✅ | 21.3 | 0.5649 | 7.17 |
| TensorRT (INT8) | ✅ | 12.7 | 0.5468 | 5.25 |
| TF SavedModel | ✅ | 92.2 | 0.5665 | 263.69 |
| TF GraphDef | ✅ | 36.5 | 0.5665 | 268.21 |
| TF Lite | ✅ | 36.9 | 0.5665 | 949.63 |
| MNN | ✅ | 36.4 | 0.5644 | 184.68 |
| NCNN | ✅ | 36.4 | 0.5697 | 107.48 |
| Format | Status | Size on disk (MB) | mAP50-95(B) | Inference time (ms/im) |
|---|---|---|---|---|
| PyTorch | ✅ | 43.0 | 0.6220 | 44.43 |
| TorchScript | ✅ | 78.5 | 0.6230 | 44.00 |
| ONNX | ✅ | 78.2 | 0.6225 | 53.44 |
| OpenVINO | ✅ | 78.3 | 0.6186 | 303.26 |
| TensorRT (FP32) | ✅ | 80.0 | 0.6217 | 28.19 |
| TensorRT (FP16) | ✅ | 42.6 | 0.6225 | 13.59 |
| TensorRT (INT8) | ✅ | 23.4 | 0.5817 | 9.30 |
| TF SavedModel | ✅ | 196.3 | 0.6229 | 636.03 |
| TF GraphDef | ✅ | 78.2 | 0.6229 | 659.57 |
| TF Lite | ✅ | 78.5 | 0.6229 | 2905.17 |
| MNN | ✅ | 78.0 | 0.6168 | 500.09 |
| NCNN | ✅ | 78.0 | 0.6224 | 332.39 |
| Format | Status | Size on disk (MB) | mAP50-95(B) | Inference time (ms/im) |
|---|---|---|---|---|
| PyTorch | ✅ | 51.0 | 0.6230 | 60.97 |
| TorchScript | ✅ | 95.5 | 0.6250 | 56.20 |
| ONNX | ✅ | 95.0 | 0.6247 | 68.12 |
| OpenVINO | ✅ | 95.3 | 0.6238 | 397.84 |
| TensorRT (FP32) | ✅ | 97.1 | 0.6250 | 35.88 |
| TensorRT (FP16) | ✅ | 51.4 | 0.6225 | 17.42 |
| TensorRT (INT8) | ✅ | 30.0 | 0.5923 | 11.83 |
| TF SavedModel | ✅ | 238.4 | 0.6245 | 835.83 |
| TF GraphDef | ✅ | 95.0 | 0.6245 | 852.16 |
| TF Lite | ✅ | 95.4 | 0.6245 | 3650.85 |
| MNN | ✅ | 94.8 | 0.6257 | 612.37 |
| NCNN | ✅ | 94.8 | 0.6323 | 405.45 |
| Format | Status | Size on disk (MB) | mAP50-95(B) | Inference time (ms/im) |
|---|---|---|---|---|
| PyTorch | ✅ | 113.2 | 0.6561 | 98.44 |
| TorchScript | ✅ | 214.0 | 0.6593 | 98.0 |
| ONNX | ✅ | 212.9 | 0.6595 | 122.43 |
| OpenVINO | ✅ | 213.2 | 0.6592 | 760.72 |
| TensorRT (FP32) | ✅ | 215.1 | 0.6593 | 67.17 |
| TensorRT (FP16) | ✅ | 110.2 | 0.6637 | 32.60 |
| TensorRT (INT8) | ✅ | 59.9 | 0.6170 | 19.99 |
| TF SavedModel | ✅ | 533.3 | 0.6593 | 1647.06 |
| TF GraphDef | ✅ | 212.9 | 0.6593 | 1670.30 |
| TF Lite | ✅ | 213.3 | 0.6590 | 8066.30 |
| MNN | ✅ | 212.8 | 0.6600 | 1227.90 |
| NCNN | ✅ | 212.8 | 0.6666 | 782.24 |
Benchmarked with Ultralytics 8.4.33
Note
Inference time does not include pre/ post-processing.
NVIDIA Jetson Orin NX 16GB
Performance
| Format | Status | Size on disk (MB) | mAP50-95(B) | Inference time (ms/im) |
|---|---|---|---|---|
| PyTorch | ✅ | 5.3 | 0.4799 | 13.90 |
| TorchScript | ✅ | 9.8 | 0.4787 | 11.60 |
| ONNX | ✅ | 9.5 | 0.4763 | 14.18 |
| OpenVINO | ✅ | 9.6 | 0.4819 | 40.19 |
| TensorRT (FP32) | ✅ | 11.4 | 0.4770 | 7.01 |
| TensorRT (FP16) | ✅ | 8.0 | 0.4789 | 4.13 |
| TensorRT (INT8) | ✅ | 5.5 | 0.4489 | 3.49 |
| TF SavedModel | ✅ | 24.6 | 0.4764 | 92.34 |
| TF GraphDef | ✅ | 9.5 | 0.4764 | 92.06 |
| TF Lite | ✅ | 9.9 | 0.4764 | 254.43 |
| MNN | ✅ | 9.4 | 0.4760 | 48.55 |
| NCNN | ✅ | 9.3 | 0.4805 | 34.31 |
| Format | Status | Size on disk (MB) | mAP50-95(B) | Inference time (ms/im) |
|---|---|---|---|---|
| PyTorch | ✅ | 19.5 | 0.5738 | 20.40 |
| TorchScript | ✅ | 36.8 | 0.5664 | 19.20 |
| ONNX | ✅ | 36.5 | 0.5664 | 24.35 |
| OpenVINO | ✅ | 36.7 | 0.5653 | 88.18 |
| TensorRT (FP32) | ✅ | 38.5 | 0.5664 | 12.62 |
| TensorRT (FP16) | ✅ | 21.5 | 0.5652 | 6.41 |
| TensorRT (INT8) | ✅ | 12.6 | 0.5468 | 4.78 |
| TF SavedModel | ✅ | 92.2 | 0.5665 | 195.16 |
| TF GraphDef | ✅ | 36.5 | 0.5665 | 197.57 |
| TF Lite | ✅ | 36.9 | 0.5665 | 827.48 |
| MNN | ✅ | 36.4 | 0.5649 | 123.47 |
| NCNN | ✅ | 36.4 | 0.5697 | 74.04 |
| Format | Status | Size on disk (MB) | mAP50-95(B) | Inference time (ms/im) |
|---|---|---|---|---|
| PyTorch | ✅ | 42.2 | 0.6237 | 38.60 |
| TorchScript | ✅ | 78.5 | 0.6227 | 40.50 |
| ONNX | ✅ | 78.2 | 0.6225 | 48.87 |
| OpenVINO | ✅ | 78.3 | 0.6186 | 205.69 |
| TensorRT (FP32) | ✅ | 80.1 | 0.6217 | 24.69 |
| TensorRT (FP16) | ✅ | 42.6 | 0.6225 | 11.66 |
| TensorRT (INT8) | ✅ | 23.4 | 0.5817 | 8.22 |
| TF SavedModel | ✅ | 196.3 | 0.6229 | 451.48 |
| TF GraphDef | ✅ | 78.2 | 0.6229 | 460.94 |
| TF Lite | ✅ | 78.5 | 0.6229 | 2555.53 |
| MNN | ✅ | 78.0 | 0.6217 | 333.33 |
| NCNN | ✅ | 78.0 | 0.6224 | 214.60 |
| Format | Status | Size on disk (MB) | mAP50-95(B) | Inference time (ms/im) |
|---|---|---|---|---|
| PyTorch | ✅ | 50.7 | 0.6258 | 48.60 |
| TorchScript | ✅ | 95.5 | 0.6249 | 51.60 |
| ONNX | ✅ | 95.0 | 0.6247 | 61.95 |
| OpenVINO | ✅ | 95.3 | 0.6238 | 272.47 |
| TensorRT (FP32) | ✅ | 97.1 | 0.6250 | 31.64 |
| TensorRT (FP16) | ✅ | 51.4 | 0.6225 | 14.77 |
| TensorRT (INT8) | ✅ | 30.0 | 0.5923 | 10.49 |
| TF SavedModel | ✅ | 238.4 | 0.6245 | 596.46 |
| TF GraphDef | ✅ | 95.0 | 0.6245 | 606.10 |
| TF Lite | ✅ | 95.4 | 0.6245 | 3275.55 |
| MNN | ✅ | 94.8 | 0.6247 | 408.15 |
| NCNN | ✅ | 94.8 | 0.6323 | 262.99 |
| Format | Status | Size on disk (MB) | mAP50-95(B) | Inference time (ms/im) |
|---|---|---|---|---|
| PyTorch | ✅ | 113.2 | 0.6561 | 84.40 |
| TorchScript | ✅ | 213.5 | 0.6594 | 91.20 |
| ONNX | ✅ | 212.9 | 0.6595 | 109.34 |
| OpenVINO | ✅ | 213.2 | 0.6592 | 520.88 |
| TensorRT (FP32) | ✅ | 215.1 | 0.6593 | 57.18 |
| TensorRT (FP16) | ✅ | 109.7 | 0.6632 | 26.76 |
| TensorRT (INT8) | ✅ | 60.0 | 0.6170 | 17.32 |
| TF SavedModel | ✅ | 533.3 | 0.6593 | 1170.50 |
| TF GraphDef | ✅ | 212.9 | 0.6593 | 1217.87 |
| TF Lite | ✅ | 213.3 | 0.6593 | 7247.11 |
| MNN | ✅ | 212.8 | 0.6591 | 820.90 |
| NCNN | ✅ | 212.8 | 0.6666 | 534.30 |
Benchmarked with Ultralytics 8.4.33
Note
Inference time does not include pre/ post-processing.
Explore more benchmarking efforts by Seeed Studio running on different versions of NVIDIA Jetson hardware.
Reproduce Our Results
To reproduce the above Ultralytics benchmarks on all export formats run this code:
Example
from ultralytics import YOLO

# Load a YOLO11n PyTorch model
model = YOLO("yolo11n.pt")

# Benchmark YOLO11n speed and accuracy on the COCO128 dataset for all export formats
results = model.benchmark(data="coco128.yaml", imgsz=640)
# Benchmark YOLO11n speed and accuracy on the COCO128 dataset for all export formats
yolo benchmark model=yolo11n.pt data=coco128.yaml imgsz=640
Note that benchmarking results might vary based on the exact hardware and software configuration of a system, as well as the current workload of the system at the time the benchmarks are run. For the most reliable results, use a dataset with a large number of images, e.g., data='coco.yaml' (5000 val images).
Best Practices when using NVIDIA Jetson
When using NVIDIA Jetson, there are a couple of best practices to follow in order to enable maximum performance on the NVIDIA Jetson running YOLO26.
Enable MAX Power Mode
Enabling MAX Power Mode on the Jetson will make sure all CPU, GPU cores are turned on.
sudo nvpmodel -m 0Enable Jetson Clocks
Enabling Jetson Clocks will make sure all CPU, GPU cores are clocked at their maximum frequency.
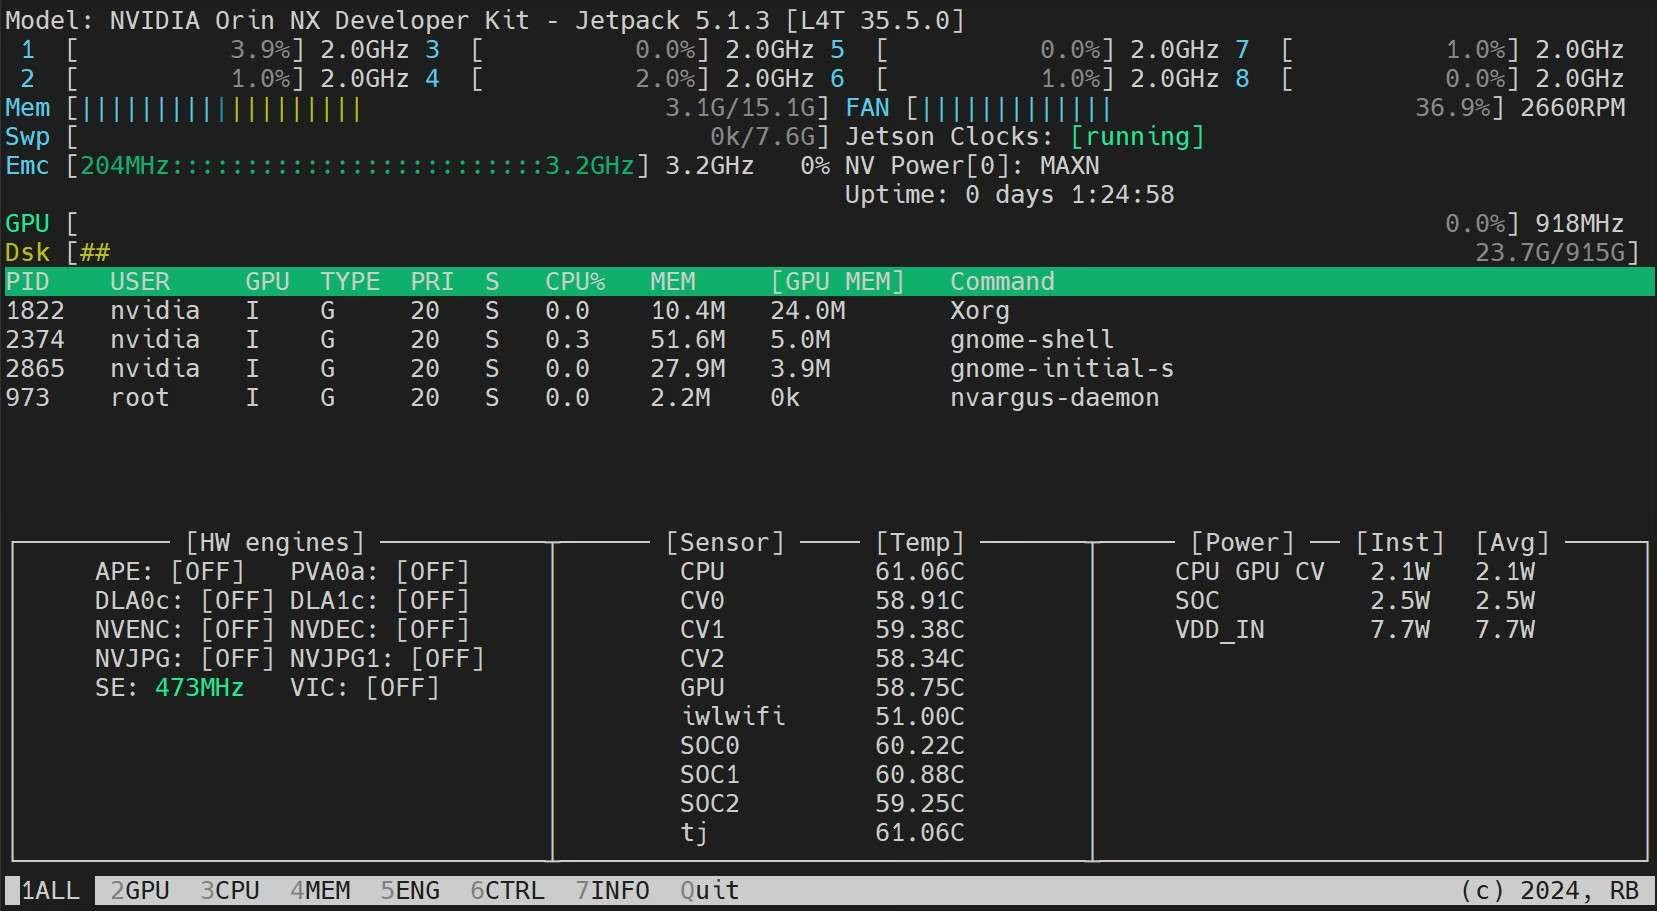
sudo jetson_clocksInstall Jetson Stats Application
We can use jetson stats application to monitor the temperatures of the system components and check other system details such as view CPU, GPU, RAM utilization, change power modes, set to max clocks, check JetPack information
sudo apt update
sudo pip install jetson-stats
sudo reboot
jtop
Memory Optimization Tips for NVIDIA Jetson
Available memory is often the limiting factor on Jetson devices, particularly on lower-memory variants such as the Jetson Orin Nano (8 GB) or Orin NX 8 GB. The tips below are practical, low-risk changes that can collectively free several hundred megabytes and let you run larger YOLO models or support additional parallel workloads. For a comprehensive treatment see the NVIDIA blog on maximizing memory efficiency on Jetson.
1. Switch to Headless (No-GUI) Boot
If your Jetson is connected over SSH or running as a production appliance without a display attached, eliminating the desktop environment and display server can recover up to 865 MB of RAM:
sudo systemctl set-default multi-user.target
sudo reboot
To restore the desktop later:
sudo systemctl set-default graphical.target
sudo reboot
2. Disable Unused System Services
Non-essential background services (Bluetooth, connectivity managers, unused hardware daemons) consume around 32 MB combined. List active services and disable anything your deployment doesn't require:
# List running services
systemctl list-units --type=service --state=running

# Disable a service
sudo systemctl disable <service-name>
3. Profile Memory Usage
Before optimizing, identify which processes are actually consuming RAM. procrank sorts processes by PSS (Proportional Set Size), which reflects the true per-process memory footprint more accurately than RSS (Resident Set Size, the total physical RAM pages mapped by a process, including pages shared with other processes):
git clone https://github.com/csimmonds/procrank_linux.git
cd procrank_linux && make
sudo ./procrank
To see per-process GPU and NvMap (CUDA/video pipeline) allocations:
sudo cat /sys/kernel/debug/nvmap/iovmm/clients
4. Run Inference Without a Display in Production
For inference pipelines that have no live-preview requirement, disabling display-related components (Tiler, OSD, DisplaySink) can save 200+ MB from the pipeline alone. With Ultralytics YOLO, suppress the viewer and write results to disk instead:
Example
from ultralytics import YOLO

model = YOLO("yolo11n.engine")

# show=False prevents any display window; save=True writes annotated output to disk
results = model.predict(source="video.mp4", show=False, save=True)
yolo predict model=yolo11n.engine source=video.mp4 show=False save=True
Cumulative Impact
| Optimization | Approx. Memory Saved |
|---|---|
| Disable desktop GUI | ~865 MB |
| Disable unused OS services | ~32 MB |
| Headless inference pipeline (no display) | ~200+ MB |
| Total (easy wins) | ~1 GB+ |
Combining these changes is especially valuable when targeting TensorRT INT8 models on memory-constrained devices — it can be the difference between fitting a larger model variant in memory or not.
Next Steps
For further learning and support, see the Ultralytics YOLO26 Docs.
FAQ
How do I deploy Ultralytics YOLO26 on NVIDIA Jetson devices?
Deploying Ultralytics YOLO26 on NVIDIA Jetson devices is a straightforward process. First, flash your Jetson device with the NVIDIA JetPack SDK. Then, either use a pre-built Docker image for quick setup or manually install the required packages. Detailed steps for each approach can be found in sections Quick Start with Docker and Start with Native Installation.
What performance benchmarks can I expect from YOLO11 models on NVIDIA Jetson devices?
YOLO11 models have been benchmarked on various NVIDIA Jetson devices showing significant performance improvements. For example, the TensorRT format delivers the best inference performance. The table in the Detailed Comparison Tables section provides a comprehensive view of performance metrics like mAP50-95 and inference time across different model formats.
Why should I use TensorRT for deploying YOLO26 on NVIDIA Jetson?
TensorRT is highly recommended for deploying YOLO26 models on NVIDIA Jetson due to its optimal performance. It accelerates inference by leveraging the Jetson's GPU capabilities, ensuring maximum efficiency and speed. Learn more about how to convert to TensorRT and run inference in the Use TensorRT on NVIDIA Jetson section.
How can I install PyTorch and Torchvision on NVIDIA Jetson?
To install PyTorch and Torchvision on NVIDIA Jetson, first uninstall any existing versions that may have been installed via pip. Then, manually install the compatible PyTorch and Torchvision versions for the Jetson's ARM64 architecture. Detailed instructions for this process are provided in the Install PyTorch and Torchvision section.
What are the best practices for maximizing performance on NVIDIA Jetson when using YOLO26?
To maximize performance on NVIDIA Jetson with YOLO26, follow these best practices:
- Enable MAX Power Mode to utilize all CPU and GPU cores.
- Enable Jetson Clocks to run all cores at their maximum frequency.
- Install the Jetson Stats application for monitoring system metrics.
For commands and additional details, refer to the Best Practices when using NVIDIA Jetson section.
How do I free up memory on NVIDIA Jetson to run larger YOLO models?
Available RAM is often the bottleneck on lower-memory Jetson devices. Three easy wins that together can recover over 1 GB:
- Switch to headless boot (
sudo systemctl set-default multi-user.target) to eliminate the desktop GUI (~865 MB saved). - Disable unused services such as Bluetooth or connectivity managers (~32 MB saved).
- Run inference without a display by setting
show=Falsein your YOLOpredictcall, which avoids allocating display pipeline memory (~200+ MB saved).
Use procrank to profile per-process RAM usage and sudo cat /sys/kernel/debug/nvmap/iovmm/clients to inspect GPU allocations. See the Memory Optimization Tips section for full details.
Why does my TensorRT INT8 export disable end2end on JetPack 6?
TensorRT 10.3.0 shipped with JetPack 6 has a known issue that prevents INT8 engine builds when end2end=True is enabled. When Ultralytics detects this combination, it automatically disables the end2end branch to ensure the export succeeds.
To restore end2end INT8 exports, upgrade TensorRT to a newer version (e.g., 10.7.0+):
wget https://developer.download.nvidia.com/compute/cuda/repos/ubuntu2204/arm64/cuda-keyring_1.1-1_all.deb
sudo dpkg -i cuda-keyring_1.1-1_all.deb
sudo apt-get update
sudo apt-get install -y tensorrt
After upgrading, re-run your export. For more details, see GitHub issue #23841.


