YOLO26 🚀 on AzureML
What is Azure?
Azure is Microsoft's cloud computing platform, designed to help organizations move their workloads to the cloud from on-premises data centers. With the full spectrum of cloud services including those for computing, databases, analytics, machine learning, and networking, users can pick and choose from these services to develop and scale new applications, or run existing applications, in the public cloud.
What is Azure Machine Learning (AzureML)?
Azure Machine Learning, commonly referred to as AzureML, is a fully managed cloud service that enables data scientists and developers to efficiently embed predictive analytics into their applications, helping organizations use massive data sets and bring all the benefits of the cloud to machine learning. AzureML offers a variety of services and capabilities aimed at making machine learning accessible, easy to use, and scalable. It provides capabilities like automated machine learning, drag-and-drop model training, as well as a robust Python SDK so that developers can make the most out of their machine learning models.
How Does AzureML Benefit YOLO Users?
For users of YOLO (You Only Look Once), AzureML provides a robust, scalable, and efficient platform to both train and deploy machine learning models. Whether you are looking to run quick prototypes or scale up to handle more extensive data, AzureML's flexible and user-friendly environment offers various tools and services to fit your needs. You can leverage AzureML to:
- Easily manage large datasets and computational resources for training.
- Utilize built-in tools for data preprocessing, feature selection, and model training.
- Collaborate more efficiently with capabilities for MLOps (Machine Learning Operations), including but not limited to monitoring, auditing, and versioning of models and data.
In the subsequent sections, you will find a quickstart guide detailing how to run YOLO26 object detection models using AzureML, either from a compute terminal or a notebook.
Prerequisites
Before you can get started, make sure you have access to an AzureML workspace. If you don't have one, you can create a new AzureML workspace by following Azure's official documentation. This workspace acts as a centralized place to manage all AzureML resources.
Create a compute instance
From your AzureML workspace, select Compute > Compute instances > New, select the instance with the resources you need.
![]()
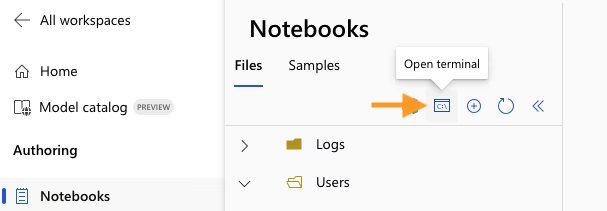
Quickstart from Terminal
Start your compute and open a Terminal:
Create virtualenv
Create a conda virtual environment with your preferred Python version and install pip in it. Python 3.13.1 currently has dependency issues in AzureML, so use Python 3.12 instead.
conda create --name yolo26env -y python=3.12
conda activate yolo26env
conda install pip -y
Install the required dependencies:
cd ultralytics
pip install -r requirements.txt
pip install ultralytics
pip install onnx
Perform YOLO26 tasks
Predict:
yolo predict model=yolo26n.pt source='https://ultralytics.com/images/bus.jpg'
Train a detection model for 10 epochs with an initial learning_rate of 0.01:
yolo train data=coco8.yaml model=yolo26n.pt epochs=10 lr0=0.01
You can find more instructions to use the Ultralytics CLI here.
Quickstart from a Notebook
Create a new IPython kernel
Open the compute Terminal.
From your compute terminal, create a new ipykernel using Python 3.12 that will be used by your notebook to manage dependencies:
conda create --name yolo26env -y python=3.12
conda activate yolo26env
conda install pip -y
conda install ipykernel -y
python -m ipykernel install --user --name yolo26env --display-name "yolo26env"
Close your terminal and create a new notebook. From your notebook, select the newly created kernel.
Then open a notebook cell and install the required dependencies:
%%bash
source activate yolo26env
cd ultralytics
pip install -r requirements.txt
pip install ultralytics
pip install onnx
Note that you need to run source activate yolo26env in every %%bash cell to ensure the cell uses the intended environment.
Run some predictions using the Ultralytics CLI:
%%bash
source activate yolo26env
yolo predict model=yolo26n.pt source='https://ultralytics.com/images/bus.jpg'
Or with the Ultralytics Python interface, for example to train the model:
from ultralytics import YOLO

# Load a model
model = YOLO("yolo26n.pt")  # load an official YOLO26n model

# Use the model
model.train(data="coco8.yaml", epochs=3)  # train the model
metrics = model.val()  # evaluate model performance on the validation set
results = model("https://ultralytics.com/images/bus.jpg")  # predict on an image
path = model.export(format="onnx")  # export the model to ONNX format
You can use either the Ultralytics CLI or Python interface for running YOLO26 tasks, as described in the terminal section above.
By following these steps, you should be able to get YOLO26 running quickly on AzureML for quick trials. For more advanced uses, you may refer to the full AzureML documentation linked at the beginning of this guide.
Explore More with AzureML
This guide serves as an introduction to get you up and running with YOLO26 on AzureML. However, it only scratches the surface of what AzureML can offer. To delve deeper and unlock the full potential of AzureML for your machine learning projects, consider exploring the following resources:
- Create a Data Asset: Learn how to set up and manage your data assets effectively within the AzureML environment.
- Initiate an AzureML Job: Get a comprehensive understanding of how to kickstart your machine learning training jobs on AzureML.
- Register a Model: Familiarize yourself with model management practices including registration, versioning, and deployment.
- Train YOLO26 with AzureML Python SDK: Explore a step-by-step guide on using the AzureML Python SDK to train your YOLO26 models.
- Train YOLO26 with AzureML CLI: Discover how to utilize the command-line interface for streamlined training and management of YOLO26 models on AzureML.
FAQ
How do I run YOLO26 on AzureML for model training?
Running YOLO26 on AzureML for model training involves several steps:
Create a Compute Instance: From your AzureML workspace, navigate to Compute > Compute instances > New, and select the required instance.
Set Up the Environment: Start your compute instance, open a terminal, and create a Conda environment. Set your Python version (Python 3.13.1 is not supported yet):
conda create --name yolo26env -y python=3.12
conda activate yolo26env
conda install pip -y
pip install ultralytics onnx
Run YOLO26 Tasks: Use the Ultralytics CLI to train your model:
yolo train data=coco8.yaml model=yolo26n.pt epochs=10 lr0=0.01
For more details, you can refer to the instructions to use the Ultralytics CLI.
What are the benefits of using AzureML for YOLO26 training?
AzureML provides a robust and efficient ecosystem for training YOLO26 models:
- Scalability: Easily scale your compute resources as your data and model complexity grows.
- MLOps Integration: Utilize features like versioning, monitoring, and auditing to streamline ML operations.
- Collaboration: Share and manage resources within teams, enhancing collaborative workflows.
These advantages make AzureML an ideal platform for projects ranging from quick prototypes to large-scale deployments. For more tips, check out AzureML Jobs.
How do I troubleshoot common issues when running YOLO26 on AzureML?
Troubleshooting common issues with YOLO26 on AzureML can involve the following steps:
- Dependency Issues: Ensure all required packages are installed. Refer to the
requirements.txtfile for dependencies. - Environment Setup: Verify that your conda environment is correctly activated before running commands.
- Resource Allocation: Make sure your compute instances have sufficient resources to handle the training workload.
For additional guidance, review our YOLO Common Issues documentation.
Can I use both the Ultralytics CLI and Python interface on AzureML?
Yes, AzureML allows you to use both the Ultralytics CLI and the Python interface seamlessly:
CLI: Ideal for quick tasks and running standard scripts directly from the terminal.
yolo predict model=yolo26n.pt source='https://ultralytics.com/images/bus.jpg'Python Interface: Useful for more complex tasks requiring custom coding and integration within notebooks.
from ultralytics import YOLO

model = YOLO("yolo26n.pt")
model.train(data="coco8.yaml", epochs=3)
For step-by-step instructions, refer to the CLI quickstart guide and the Python quickstart guide.
What is the advantage of using Ultralytics YOLO26 over other object detection models?
Ultralytics YOLO26 offers several unique advantages over competing object detection models:
- Speed: Faster inference and training times compared to models like Faster R-CNN and SSD.
- Accuracy: High accuracy in detection tasks with features like anchor-free design and enhanced augmentation strategies.
- Ease of Use: Intuitive API and CLI for quick setup, making it accessible both to beginners and experts.
To explore more about YOLO26's features, visit the Ultralytics YOLO page for detailed insights.


