Quick Start Guide: Raspberry Pi with Ultralytics YOLO26
This comprehensive guide provides a detailed walkthrough for deploying Ultralytics YOLO26 on Raspberry Pi devices. Additionally, it showcases performance benchmarks to demonstrate the capabilities of YOLO26 on these small and powerful devices.
Watch: Raspberry Pi 5 updates and improvements.
Note
This guide has been tested with Raspberry Pi 4 and Raspberry Pi 5 running the latest Raspberry Pi OS Bookworm (Debian 12). Using this guide for older Raspberry Pi devices such as the Raspberry Pi 3 is expected to work as long as the same Raspberry Pi OS Bookworm is installed.
What is Raspberry Pi?
Raspberry Pi is a small, affordable, single-board computer. It has become popular for a wide range of projects and applications, from hobbyist home automation to industrial uses. Raspberry Pi boards are capable of running a variety of operating systems, and they offer GPIO (General Purpose Input/Output) pins that allow for easy integration with sensors, actuators, and other hardware components. They come in different models with varying specifications, but they all share the same basic design philosophy of being low-cost, compact, and versatile.
Raspberry Pi Series Comparison
| Raspberry Pi 3 | Raspberry Pi 4 | Raspberry Pi 5 | |
|---|---|---|---|
| CPU | Broadcom BCM2837, Cortex-A53 64Bit SoC | Broadcom BCM2711, Cortex-A72 64Bit SoC | Broadcom BCM2712, Cortex-A76 64Bit SoC |
| CPU Max Frequency | 1.4GHz | 1.8GHz | 2.4GHz |
| GPU | Videocore IV | Videocore VI | VideoCore VII |
| GPU Max Frequency | 400Mhz | 500Mhz | 800Mhz |
| Memory | 1GB LPDDR2 SDRAM | 1GB, 2GB, 4GB, 8GB LPDDR4-3200 SDRAM | 4GB, 8GB LPDDR4X-4267 SDRAM |
| PCIe | N/A | N/A | 1xPCIe 2.0 Interface |
| Max Power Draw | 2.5A@5V | 3A@5V | 5A@5V (PD enabled) |
What is Raspberry Pi OS?
Raspberry Pi OS (formerly known as Raspbian) is a Unix-like operating system based on the Debian GNU/Linux distribution for the Raspberry Pi family of compact single-board computers distributed by the Raspberry Pi Foundation. Raspberry Pi OS is highly optimized for the Raspberry Pi with ARM CPUs and uses a modified LXDE desktop environment with the Openbox stacking window manager. Raspberry Pi OS is under active development, with an emphasis on improving the stability and performance of as many Debian packages as possible on Raspberry Pi.
Flash Raspberry Pi OS to Raspberry Pi
The first thing to do after getting your hands on a Raspberry Pi is to flash a micro-SD card with Raspberry Pi OS, insert into the device and boot into the OS. Follow along with detailed Getting Started Documentation by Raspberry Pi to prepare your device for first use.
Set Up Ultralytics
There are two ways of setting up Ultralytics package on Raspberry Pi to build your next Computer Vision project. You can use either of them.
Start with Docker
The fastest way to get started with Ultralytics YOLO26 on Raspberry Pi is to run with pre-built docker image for Raspberry Pi.
Execute the below command to pull the Docker container and run on Raspberry Pi. This is based on arm64v8/debian docker image which contains Debian 12 (Bookworm) in a Python3 environment.
t=ultralytics/ultralytics:latest-arm64
sudo docker pull $t && sudo docker run -it --ipc=host $t
After this is done, skip to Use NCNN on Raspberry Pi section.
Start without Docker
Install Ultralytics Package
Here we will install Ultralytics package on the Raspberry Pi with optional dependencies so that we can export the PyTorch models to other different formats.
Update packages list, install pip and upgrade to latest
sudo apt update
sudo apt install python3-pip -y
pip install -U pip
Install
ultralyticspip package with optional dependenciespip install ultralytics[export]Reboot the device
sudo reboot
Use NCNN on Raspberry Pi
Out of all the model export formats supported by Ultralytics, NCNN delivers the best inference performance when working with Raspberry Pi devices because NCNN is highly optimized for mobile/ embedded platforms (such as ARM architecture).
Convert Model to NCNN and Run Inference
The YOLO26n model in PyTorch format is converted to NCNN to run inference with the exported model.
Example
from ultralytics import YOLO

# Load a YOLO26n PyTorch model
model = YOLO("yolo26n.pt")

# Export the model to NCNN format
model.export(format="ncnn")  # creates 'yolo26n_ncnn_model'

# Load the exported NCNN model
ncnn_model = YOLO("yolo26n_ncnn_model")

# Run inference
results = ncnn_model("https://ultralytics.com/images/bus.jpg")
# Export a YOLO26n PyTorch model to NCNN format
yolo export model=yolo26n.pt format=ncnn # creates 'yolo26n_ncnn_model'

# Run inference with the exported model
yolo predict model='yolo26n_ncnn_model' source='https://ultralytics.com/images/bus.jpg'
Tip
For more details about supported export options, visit the Ultralytics documentation page on deployment options.
YOLO26 Performance Improvements over YOLO11
YOLO26 is specifically designed to run on hardware-constrained devices such as the Raspberry Pi 5. Compared to YOLO11n, YOLO26n achieves a ~15% increase in FPS (6.79 → 7.79) while also delivering higher mAP (40.1 vs 39.5) at 640 input size with ONNX-exported models on the Raspberry Pi 5. The table and chart below showcase this comparison.

Performance
| Model | mAP50-95(B) | Inference time (ms/im) |
|---|---|---|
| YOLO26n | 40.1 | 128.42 |
| YOLO26s | 47.8 | 352.84 |
| YOLO26m | 52.5 | 993.78 |
| YOLO26l | 54.4 | 1259.46 |
| YOLO26x | 56.9 | 2636.26 |
| Model | mAP50-95(B) | Inference time (ms/im) |
|---|---|---|
| YOLO11n | 39.5 | 147.20 |
| YOLO11s | 47.0 | 366.83 |
| YOLO11m | 51.5 | 997.46 |
| YOLO11l | 53.4 | 1274.95 |
| YOLO11x | 54.7 | 2646.76 |
Benchmarked with Ultralytics 8.4.14.
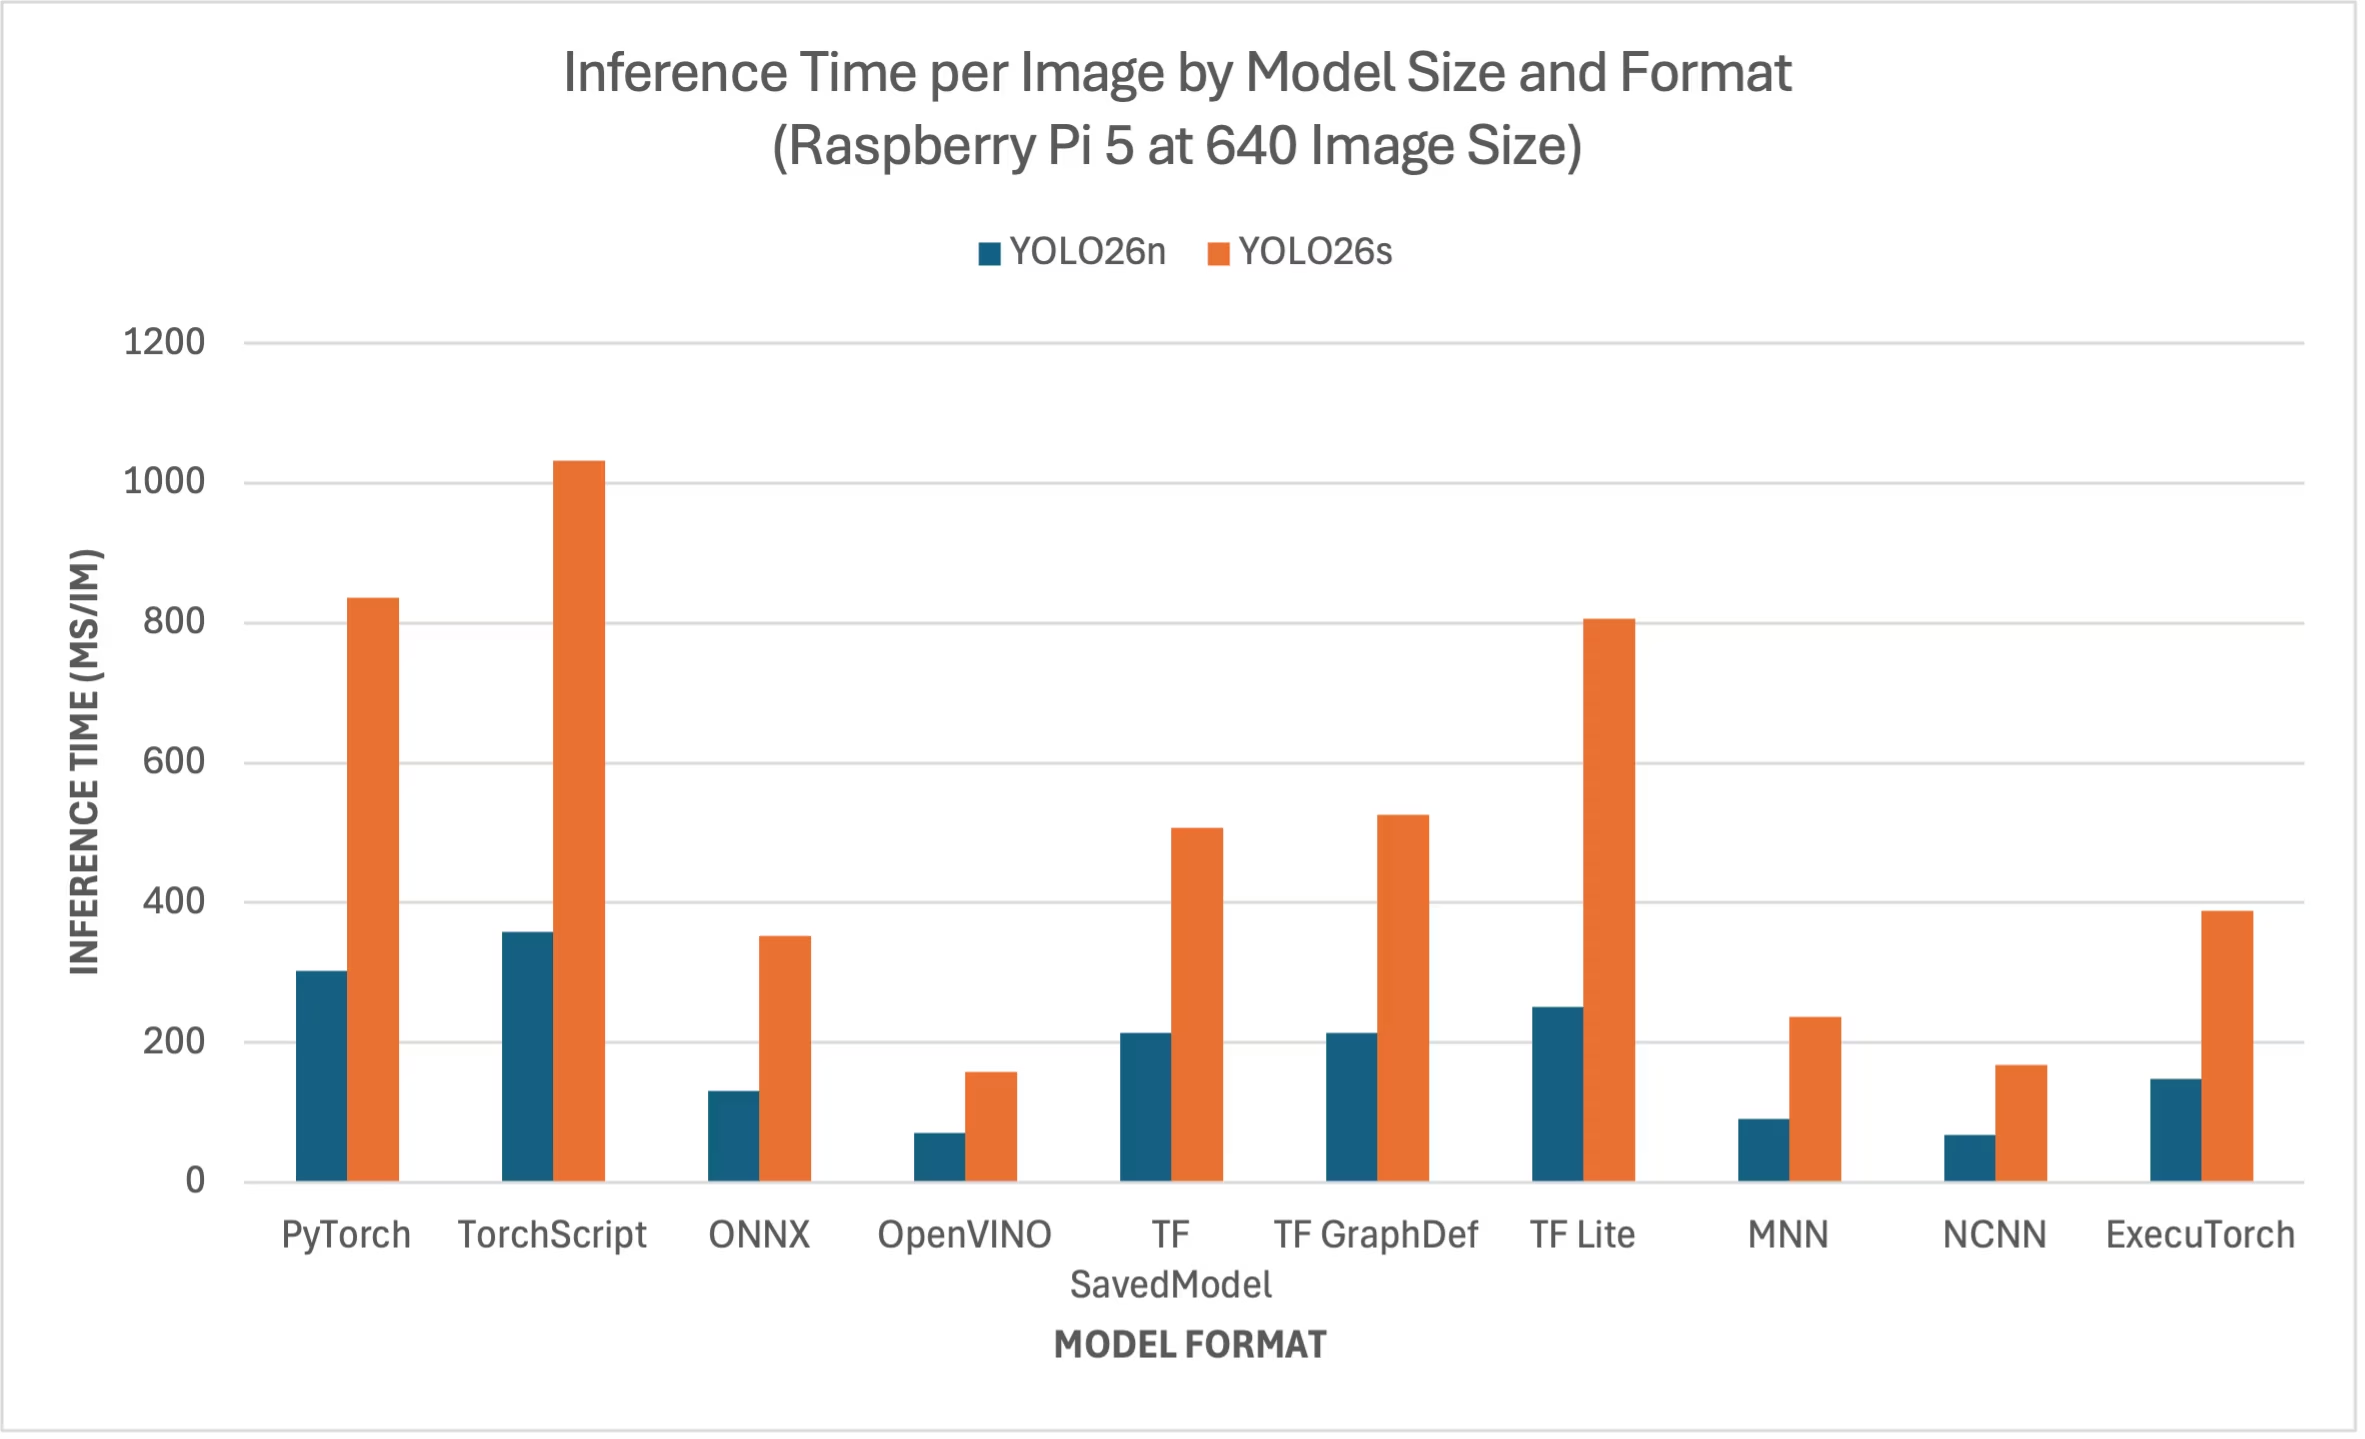
Raspberry Pi 5 YOLO26 Benchmarks
YOLO26 benchmarks were run by the Ultralytics team on ten different model formats measuring speed and accuracy: PyTorch, TorchScript, ONNX, OpenVINO, TF SavedModel, TF GraphDef, TF Lite, MNN, NCNN, ExecuTorch. Benchmarks were run on a Raspberry Pi 5 at FP32 precision with default input image size of 640.
Comparison Chart
We have only included benchmarks for YOLO26n and YOLO26s models because other model sizes are too big to run on the Raspberry Pis and do not offer decent performance.
Detailed Comparison Table
The below table represents the benchmark results for two different models (YOLO26n, YOLO26s) across ten different formats (PyTorch, TorchScript, ONNX, OpenVINO, TF SavedModel, TF GraphDef, TF Lite, MNN, NCNN, ExecuTorch), running on a Raspberry Pi 5, giving us the status, size, mAP50-95(B) metric, and inference time for each combination.
Performance
| Format | Status | Size on disk (MB) | mAP50-95(B) | Inference time (ms/im) |
|---|---|---|---|---|
| PyTorch | ✅ | 5.3 | 0.4798 | 302.15 |
| TorchScript | ✅ | 9.8 | 0.4764 | 357.58 |
| ONNX | ✅ | 9.5 | 0.4764 | 130.33 |
| OpenVINO | ✅ | 9.6 | 0.4818 | 70.74 |
| TF SavedModel | ✅ | 24.6 | 0.4764 | 213.58 |
| TF GraphDef | ✅ | 9.5 | 0.4764 | 213.5 |
| TF Lite | ✅ | 9.9 | 0.4764 | 251.41 |
| MNN | ✅ | 9.4 | 0.4784 | 90.89 |
| NCNN | ✅ | 9.4 | 0.4805 | 67.69 |
| ExecuTorch | ✅ | 9.4 | 0.4764 | 148.36 |
| Format | Status | Size on disk (MB) | mAP50-95(B) | Inference time (ms/im) |
|---|---|---|---|---|
| PyTorch | ✅ | 19.5 | 0.5740 | 836.54 |
| TorchScript | ✅ | 36.8 | 0.5665 | 1032.25 |
| ONNX | ✅ | 36.5 | 0.5665 | 351.96 |
| OpenVINO | ✅ | 36.7 | 0.5654 | 158.6 |
| TF SavedModel | ✅ | 92.2 | 0.5665 | 507.6 |
| TF GraphDef | ✅ | 36.5 | 0.5665 | 525.64 |
| TF Lite | ✅ | 36.9 | 0.5665 | 805.3 |
| MNN | ✅ | 36.4 | 0.5644 | 236.47 |
| NCNN | ✅ | 36.4 | 0.5697 | 168.47 |
| ExecuTorch | ✅ | 36.5 | 0.5665 | 388.72 |
Benchmarked with Ultralytics 8.4.1
Note
Inference time does not include pre/ post-processing.
Reproduce Our Results
To reproduce the above Ultralytics benchmarks on all export formats, run this code:
Example
from ultralytics import YOLO

# Load a YOLO26n PyTorch model
model = YOLO("yolo26n.pt")

# Benchmark YOLO26n speed and accuracy on the COCO128 dataset for all export formats
results = model.benchmark(data="coco128.yaml", imgsz=640)
# Benchmark YOLO26n speed and accuracy on the COCO128 dataset for all export formats
yolo benchmark model=yolo26n.pt data=coco128.yaml imgsz=640
Note that benchmarking results might vary based on the exact hardware and software configuration of a system, as well as the current workload of the system at the time the benchmarks are run. For the most reliable results, use a dataset with a large number of images, e.g., data='coco.yaml' (5000 val images).
Use Raspberry Pi Camera
When using Raspberry Pi for Computer Vision projects, it can be essential to grab real-time video feeds to perform inference. The onboard MIPI CSI connector on the Raspberry Pi allows you to connect official Raspberry PI camera modules. In this guide, we have used a Raspberry Pi Camera Module 3 to grab the video feeds and perform inference using YOLO26 models.
Tip
Learn more about the different camera modules offered by Raspberry Pi and also how to get started with the Raspberry Pi camera modules.
Note
Raspberry Pi 5 uses smaller CSI connectors than the Raspberry Pi 4 (15-pin vs 22-pin), so you will need a 15-pin to 22-pin adapter cable to connect to a Raspberry Pi Camera.
Test the Camera
Execute the following command after connecting the camera to the Raspberry Pi. You should see a live video feed from the camera for about 5 seconds.
rpicam-hello
Tip
Learn more about rpicam-hello usage on official Raspberry Pi documentation
Inference with Camera
There are 2 methods of using the Raspberry Pi Camera to run inference on YOLO26 models.
Usage
We can use picamera2 which comes pre-installed with Raspberry Pi OS to access the camera and run inference on YOLO26 models.
Example
import cv2
from picamera2 import Picamera2

from ultralytics import YOLO

# Initialize the Picamera2
picam2 = Picamera2()
picam2.preview_configuration.main.size = (1280, 720)
picam2.preview_configuration.main.format = "RGB888"
picam2.preview_configuration.align()
picam2.configure("preview")
picam2.start()

# Load the YOLO26 model
model = YOLO("yolo26n.pt")

while True:
    # Capture frame-by-frame
    frame = picam2.capture_array()

    # Run YOLO26 inference on the frame
    results = model(frame)

    # Visualize the results on the frame
    annotated_frame = results[0].plot()

    # Display the resulting frame
    cv2.imshow("Camera", annotated_frame)

    # Break the loop if 'q' is pressed
    if cv2.waitKey(1) == ord("q"):
        break

# Release resources and close windows
cv2.destroyAllWindows()
We need to initiate a TCP stream with rpicam-vid from the connected camera so that we can use this stream URL as an input when we are inferencing later. Execute the following command to start the TCP stream.
rpicam-vid -n -t 0 --inline --listen -o tcp://127.0.0.1:8888
Learn more about rpicam-vid usage on official Raspberry Pi documentation
Example
from ultralytics import YOLO

# Load a YOLO26n PyTorch model
model = YOLO("yolo26n.pt")

# Run inference
results = model("tcp://127.0.0.1:8888")
yolo predict model=yolo26n.pt source="tcp://127.0.0.1:8888"
Tip
Check our document on Inference Sources if you want to change the image/video input type
Best Practices when using Raspberry Pi
There are a couple of best practices to follow in order to enable maximum performance on Raspberry Pis running YOLO26.
Use an SSD
When using Raspberry Pi for 24x7 continued usage, it is recommended to use an SSD for the system because an SD card will not be able to withstand continuous writes and might get broken. With the onboard PCIe connector on the Raspberry Pi 5, now you can connect SSDs using an adapter such as the NVMe Base for Raspberry Pi 5.
Flash without GUI
When flashing Raspberry Pi OS, you can choose to not install the Desktop environment (Raspberry Pi OS Lite) and this can save a bit of RAM on the device, leaving more space for computer vision processing.
Overclock Raspberry Pi
If you want a little boost in performance while running Ultralytics YOLO26 models on Raspberry Pi 5, you can overclock the CPU from its base 2.4GHz to 2.9GHz and the GPU from 800MHz to 1GHz. If the system becomes unstable or crashes, reduce the overclock values by 100MHz increments. Ensure proper cooling is in place, as overclocking increases heat generation and may lead to thermal throttling.
a. Upgrade the software
sudo apt update && sudo apt dist-upgradeb. Open to edit the configuration file
sudo nano /boot/firmware/config.txtc. Add the following lines at the bottom
arm_freq=3000
gpu_freq=1000
force_turbo=1
d. Save and exit by pressing CTRL + X, then Y, and hit ENTER
e. Reboot the Raspberry Pi
Next Steps
You have successfully set up YOLO on your Raspberry Pi. For further learning and support, visit Ultralytics YOLO26 Docs and Kashmir World Foundation.
Acknowledgments and Citations
This guide was initially created by Daan Eeltink for Kashmir World Foundation, an organization dedicated to the use of YOLO for the conservation of endangered species. We acknowledge their pioneering work and educational focus in the realm of object detection technologies.
For more information about Kashmir World Foundation's activities, you can visit their website.
FAQ
How do I set up Ultralytics YOLO26 on a Raspberry Pi without using Docker?
To set up Ultralytics YOLO26 on a Raspberry Pi without Docker, follow these steps:
- Update the package list and install
pip:sudo apt update sudo apt install python3-pip -y pip install -U pip - Install the Ultralytics package with optional dependencies:
pip install ultralytics[export] - Reboot the device to apply changes:
sudo reboot
For detailed instructions, refer to the Start without Docker section.
Why should I use Ultralytics YOLO26's NCNN format on Raspberry Pi for AI tasks?
Ultralytics YOLO26's NCNN format is highly optimized for mobile and embedded platforms, making it ideal for running AI tasks on Raspberry Pi devices. NCNN maximizes inference performance by leveraging ARM architecture, providing faster and more efficient processing compared to other formats. For more details on supported export options, visit the Ultralytics documentation page on deployment options.
How can I convert a YOLO26 model to NCNN format for use on Raspberry Pi?
You can convert a PyTorch YOLO26 model to NCNN format using either Python or CLI commands:
Example
from ultralytics import YOLO

# Load a YOLO26n PyTorch model
model = YOLO("yolo26n.pt")

# Export the model to NCNN format
model.export(format="ncnn")  # creates 'yolo26n_ncnn_model'

# Load the exported NCNN model
ncnn_model = YOLO("yolo26n_ncnn_model")

# Run inference
results = ncnn_model("https://ultralytics.com/images/bus.jpg")
# Export a YOLO26n PyTorch model to NCNN format
yolo export model=yolo26n.pt format=ncnn # creates 'yolo26n_ncnn_model'

# Run inference with the exported model
yolo predict model='yolo26n_ncnn_model' source='https://ultralytics.com/images/bus.jpg'
For more details, see the Use NCNN on Raspberry Pi section.
What are the hardware differences between Raspberry Pi 4 and Raspberry Pi 5 relevant to running YOLO26?
Key differences include:
- CPU: Raspberry Pi 4 uses Broadcom BCM2711, Cortex-A72 64-bit SoC, while Raspberry Pi 5 uses Broadcom BCM2712, Cortex-A76 64-bit SoC.
- Max CPU Frequency: Raspberry Pi 4 has a max frequency of 1.8GHz, whereas Raspberry Pi 5 reaches 2.4GHz.
- Memory: Raspberry Pi 4 offers up to 8GB of LPDDR4-3200 SDRAM, while Raspberry Pi 5 features LPDDR4X-4267 SDRAM, available in 4GB and 8GB variants.
These enhancements contribute to better performance benchmarks for YOLO26 models on Raspberry Pi 5 compared to Raspberry Pi 4. Refer to the Raspberry Pi Series Comparison table for more details.
How can I set up a Raspberry Pi Camera Module to work with Ultralytics YOLO26?
There are two methods to set up a Raspberry Pi Camera for YOLO26 inference:
Using
picamera2:import cv2 from picamera2 import Picamera2 from ultralytics import YOLO picam2 = Picamera2() picam2.preview_configuration.main.size = (1280, 720) picam2.preview_configuration.main.format = "RGB888" picam2.preview_configuration.align() picam2.configure("preview") picam2.start() model = YOLO("yolo26n.pt") while True: frame = picam2.capture_array() results = model(frame) annotated_frame = results[0].plot() cv2.imshow("Camera", annotated_frame) if cv2.waitKey(1) == ord("q"): break cv2.destroyAllWindows()Using a TCP Stream:
rpicam-vid -n -t 0 --inline --listen -o tcp://127.0.0.1:8888from ultralytics import YOLO model = YOLO("yolo26n.pt") results = model("tcp://127.0.0.1:8888")
For detailed setup instructions, visit the Inference with Camera section.


