ClearML Integration


About ClearML
ClearML is an open-source MLOps platform designed to streamline your machine learning workflow and save you time ⏱️.
🔨 Track every YOLOv5 training run in the experiment manager
🔧 Version and easily access your custom training data with the integrated ClearML Data Versioning Tool
🔦 Remotely train and monitor your YOLOv5 training runs using ClearML Agent
🔬 Get the very best mAP using ClearML Hyperparameter Optimization
🔭 Turn your newly trained YOLOv5 model into an API with just a few commands using ClearML Serving
And so much more. It's up to you how many of these tools you want to use, you can stick to the experiment manager, or chain them all together into an impressive pipeline!
🦾 Setting Things Up
To keep track of your experiments and/or data, ClearML needs to communicate with a server. You have 2 options to get one:
Either sign up for free to the ClearML Hosted Service or you can set up your own ClearML server. Even the server is open-source, so even if you're dealing with sensitive data, you should be good to go!
Install the
clearmlpython package:pip install clearmlConnect the ClearML SDK to the server by creating credentials (go right top to Settings -> Workspace -> Create new credentials), then execute the command below and follow the instructions:
clearml-init
That's it! You're done 😎
🚀 Training YOLOv5 With ClearML
To enable ClearML experiment tracking, simply install the ClearML pip package as shown earlier (or run the command below if you skipped that step).
pip install clearml
This will enable integration with the YOLOv5 training script. Every training run from now on will be captured and stored by the ClearML experiment manager.
If you want to change the project_name or task_name, use the --project and --name arguments of the train.py script, by default the project will be called YOLOv5 and the task Training. PLEASE NOTE: ClearML uses / as a delimiter for subprojects, so be careful when using / in your project name!
python train.py --img 640 --batch 16 --epochs 3 --data coco8.yaml --weights yolov5s.pt --cache
or with custom project and task name:
python train.py --project my_project --name my_training --img 640 --batch 16 --epochs 3 --data coco8.yaml --weights yolov5s.pt --cache
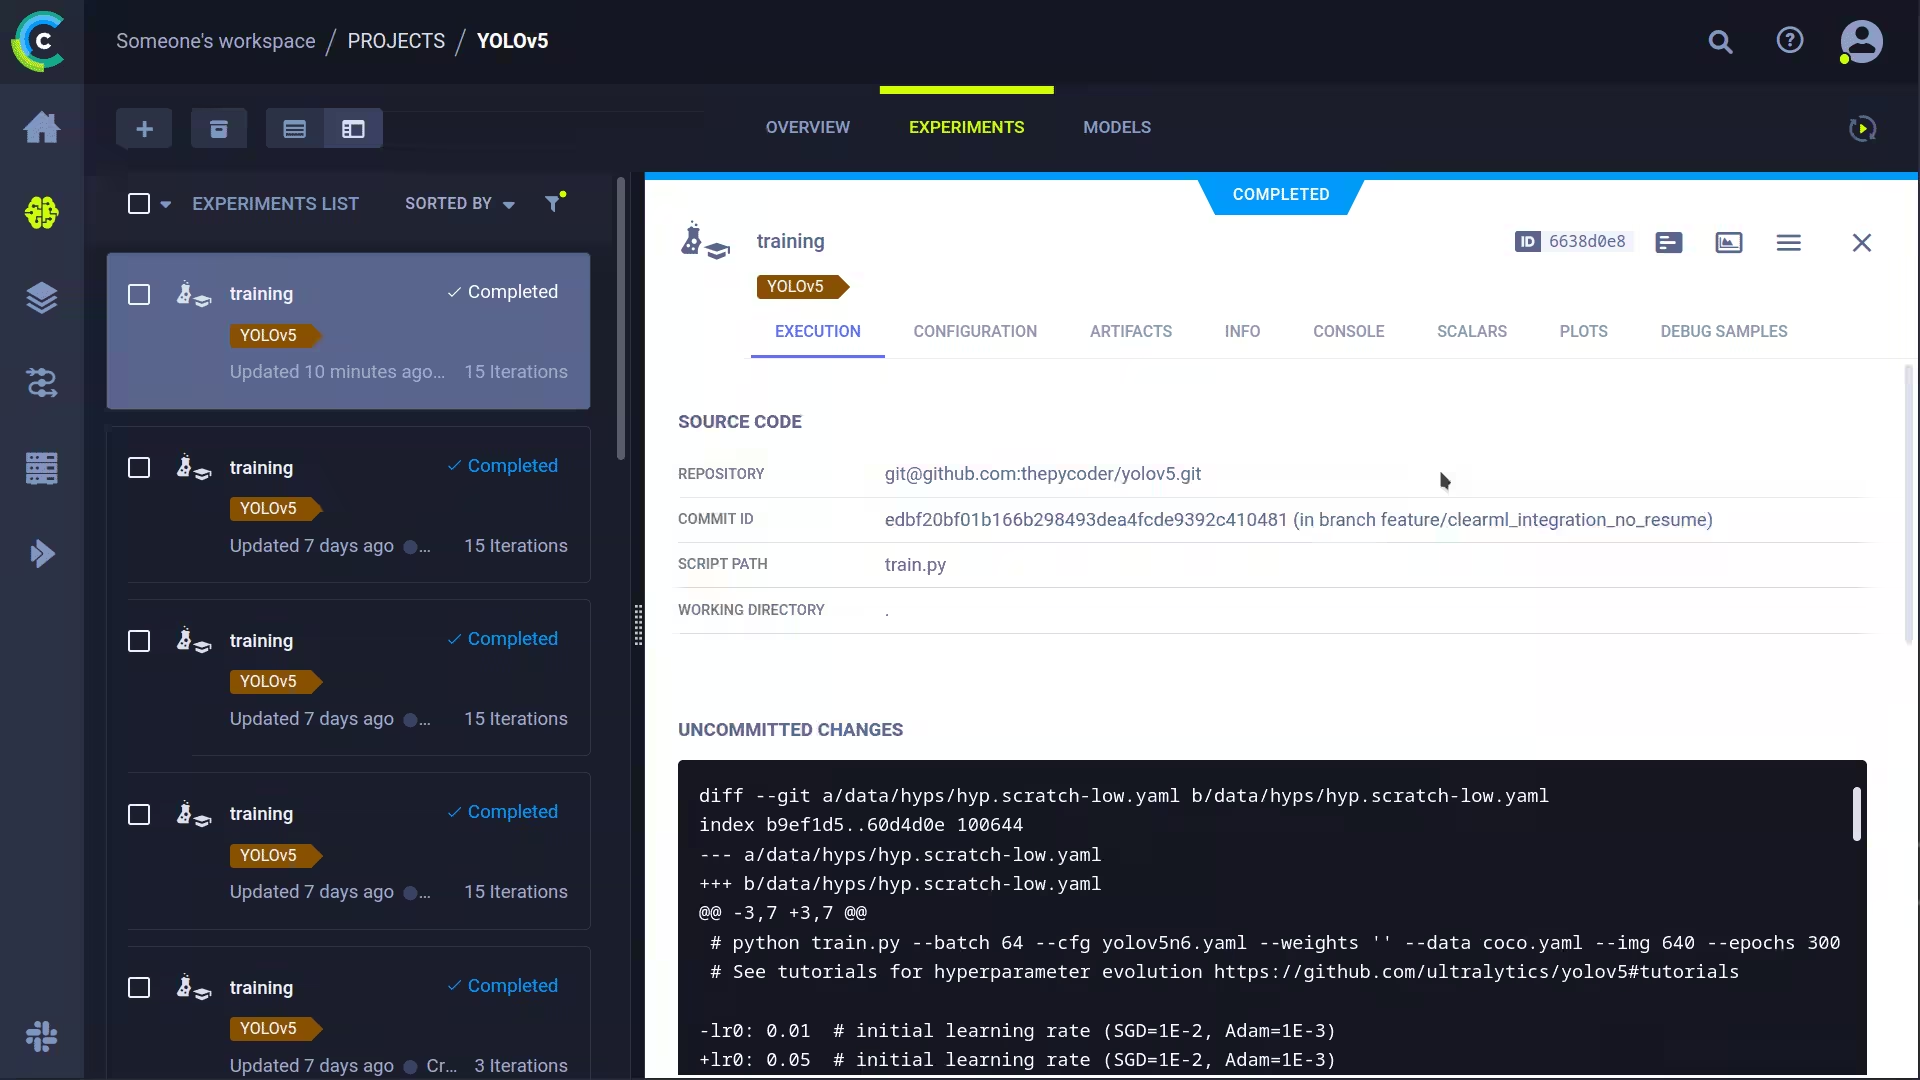
This will capture:
- Source code + uncommitted changes
- Installed packages
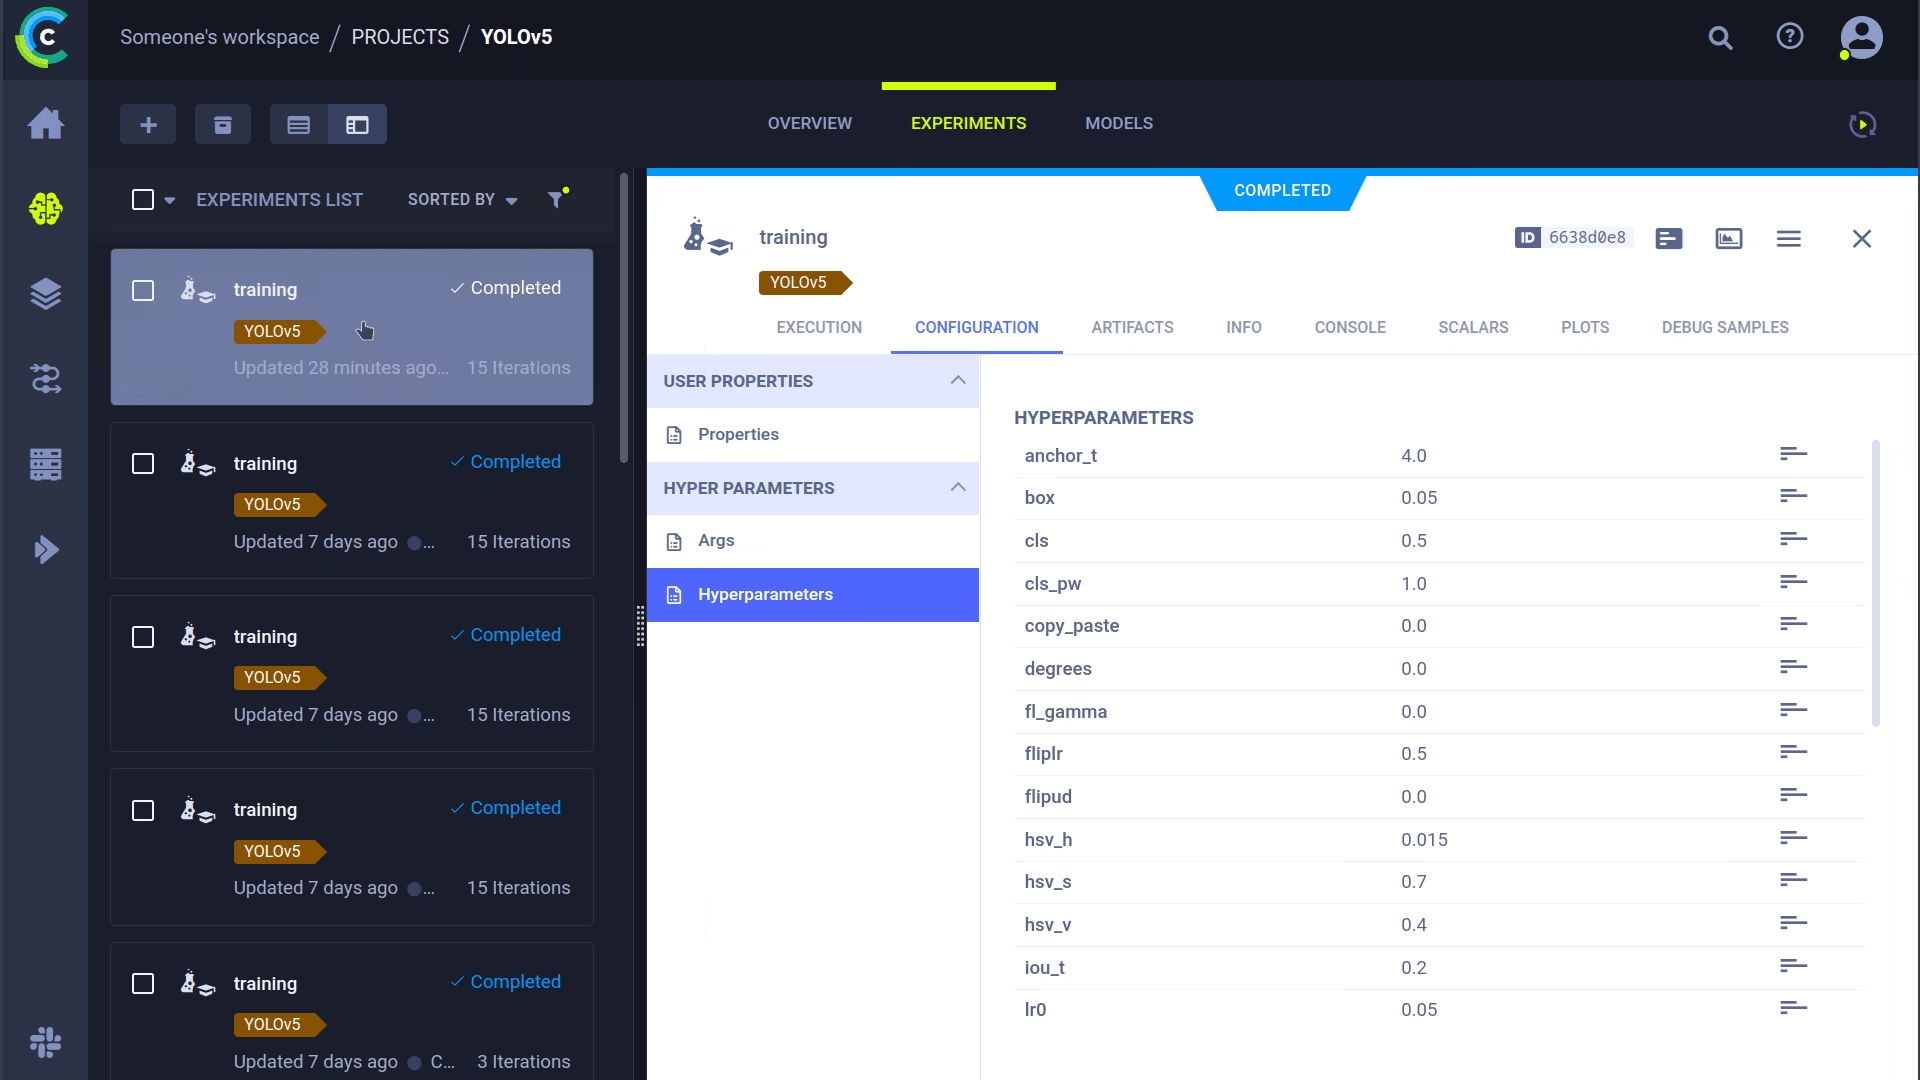
- (Hyper)parameters
- Model files (use
--save-period nto save a checkpoint every n epochs) - Console output
- Scalars (mAP_0.5, mAP_0.5:0.95, precision, recall, losses, learning rates, ...)
- General info such as machine details, runtime, creation date etc.
- All produced plots such as label correlogram and confusion matrix
- Images with bounding boxes per epoch
- Mosaic per epoch
- Validation images per epoch
That's a lot right? 🤯 Now, we can visualize all of this information in the ClearML UI to get an overview of our training progress. Add custom columns to the table view (such as e.g. mAP_0.5) so you can easily sort on the best performing model. Or select multiple experiments and directly compare them!
There's even more we can do with all of this information, like hyperparameter optimization and remote execution, so keep reading if you want to see how that works!
🔗 Dataset Version Management
Versioning your data separately from your code is generally a good idea and makes it easy to acquire the latest version too. This repository supports supplying a dataset version ID, and it will make sure to get the data if it's not there yet. Next to that, this workflow also saves the used dataset ID as part of the task parameters, so you will always know for sure which data was used in which experiment!
Prepare Your Dataset
The YOLOv5 repository supports a number of different datasets by using YAML files containing their information. By default, datasets are downloaded to the ../datasets folder in relation to the repository root folder. So if you downloaded the coco128 dataset using the link in the YAML or with the scripts provided by yolov5, you get this folder structure:
..
|_ yolov5
|_ datasets
    |_ coco128
        |_ images
        |_ labels
        |_ LICENSE
        |_ README.txt
But this can be any dataset you wish. Feel free to use your own, as long as you keep to this folder structure.
Next, ⚠️copy the corresponding YAML file to the root of the dataset folder⚠️. This YAML file contains the information ClearML will need to properly use the dataset. You can make this yourself too, of course, just follow the structure of the example YAMLs.
Basically we need the following keys: path, train, test, val, nc, names.
..
|_ yolov5
|_ datasets
    |_ coco128
        |_ images
        |_ labels
        |_ coco128.yaml  # <---- HERE!
        |_ LICENSE
        |_ README.txt
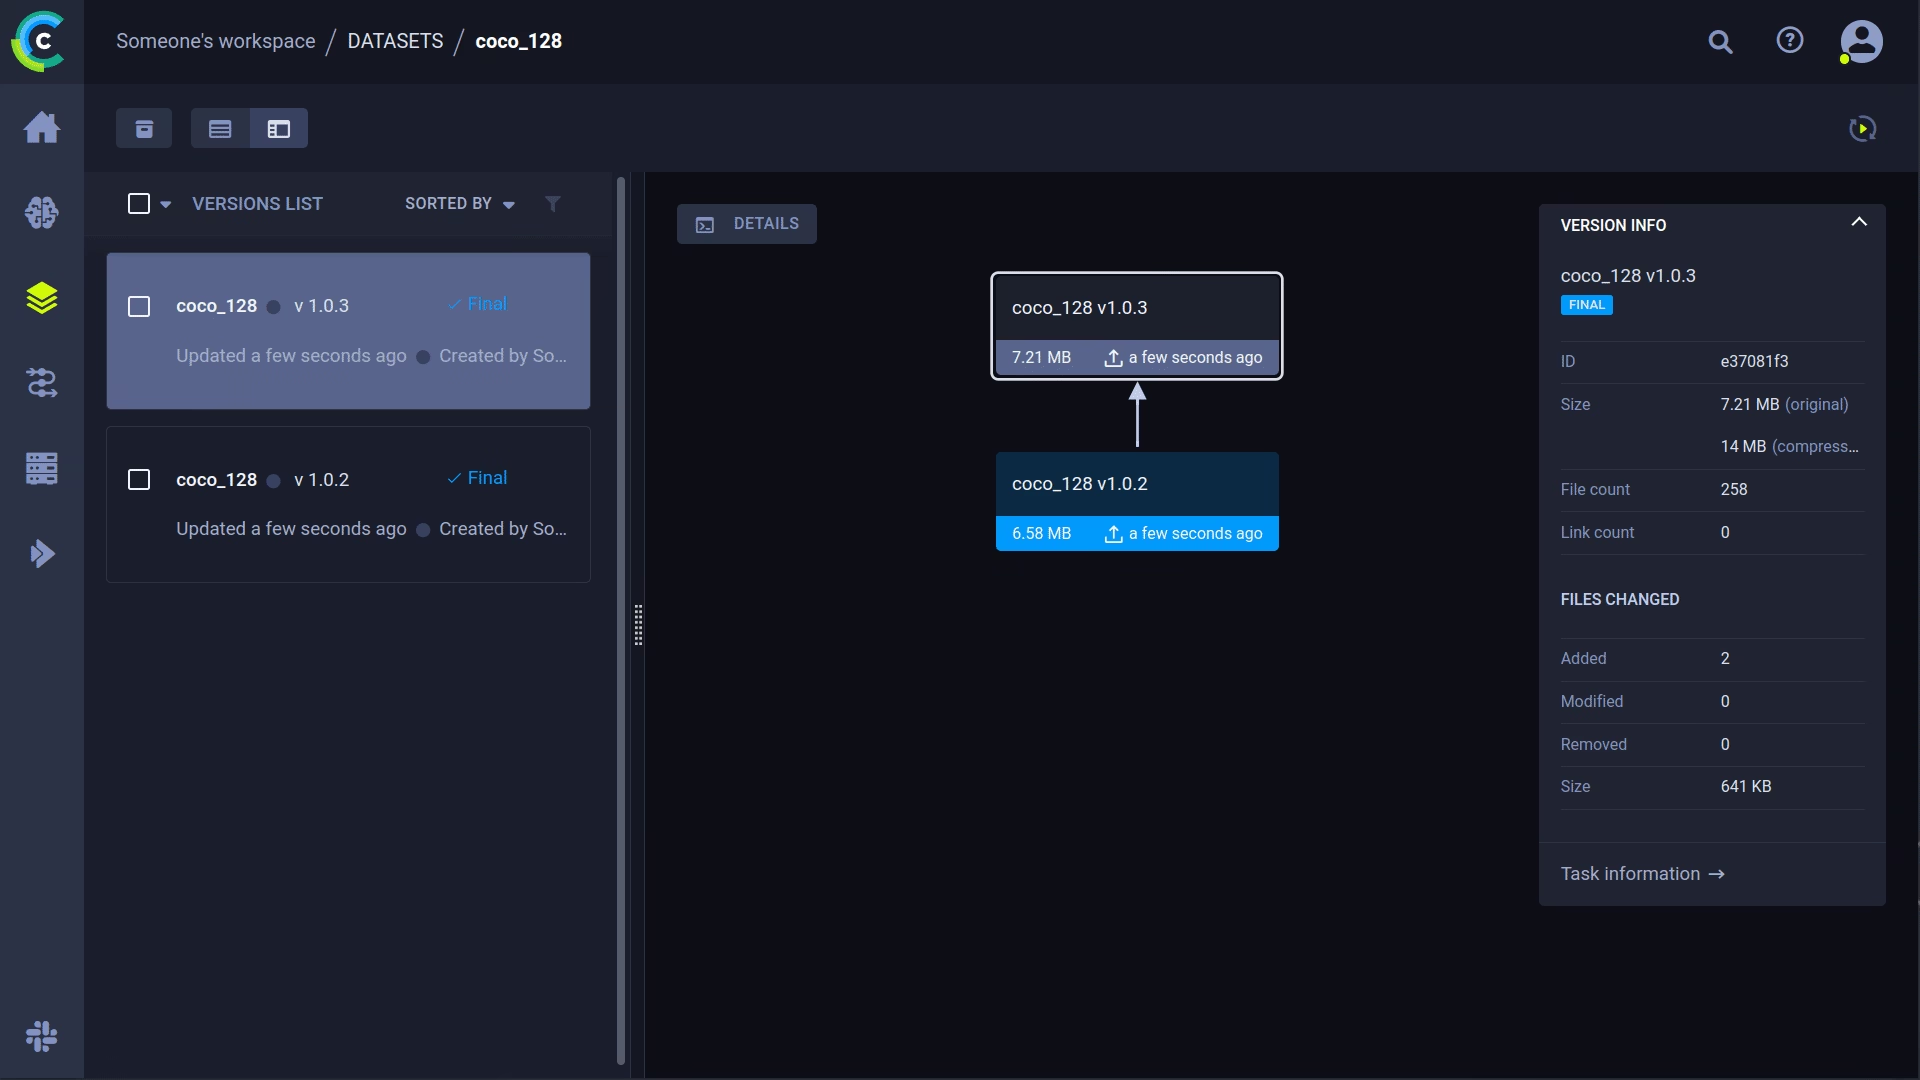
Upload Your Dataset
To get this dataset into ClearML as a versioned dataset, go to the dataset root folder (for example ../datasets/coco128 when working from the YOLOv5 repository) and run the following command:
cd ../datasets/coco128
clearml-data sync --project YOLOv5 --name coco128 --folder .
The command clearml-data sync is actually a shorthand command. You could also run these commands one after the other:
# Optionally add --parent <parent_dataset_id> if you want to base
# this version on another dataset version, so no duplicate files are uploaded!
clearml-data create --name coco128 --project YOLOv5
clearml-data add --files .
clearml-data close
Run Training Using A ClearML Dataset
Now that you have a ClearML dataset, you can very simply use it to train custom YOLOv5 🚀 models!
python train.py --img 640 --batch 16 --epochs 3 --data clearml://YOUR_DATASET_ID --weights yolov5s.pt --cache
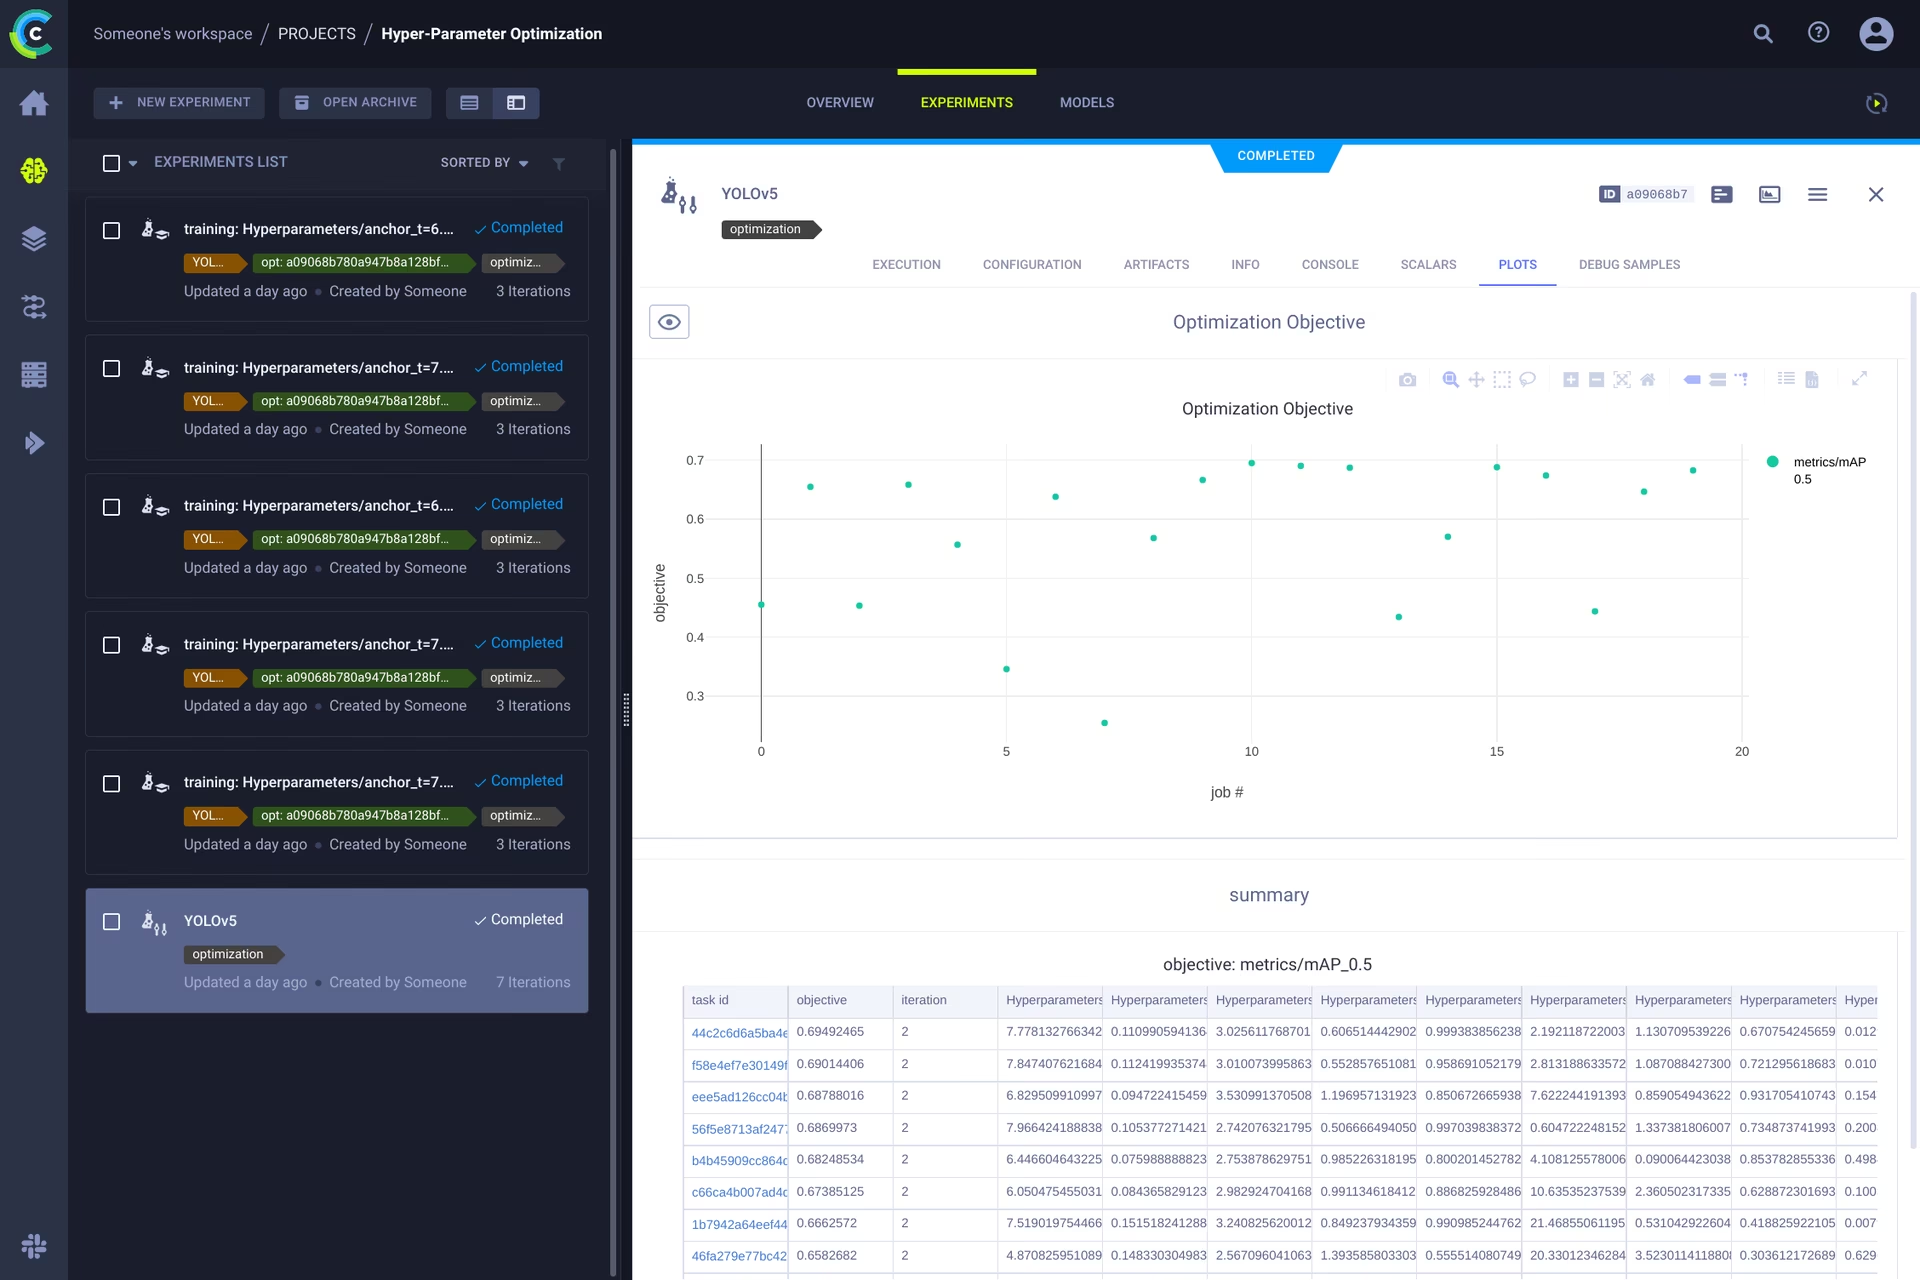
👀 Hyperparameter Optimization
Now that we have our experiments and data versioned, it's time to take a look at what we can build on top!
Using the code information, installed packages and environment details, the experiment itself is now completely reproducible. In fact, ClearML allows you to clone an experiment and even change its parameters. We can then just rerun it with these new parameters automatically, this is basically what HPO does!
To run hyperparameter optimization locally, we've included a pre-made script for you. Just make sure a training task has been run at least once, so it is in the ClearML experiment manager, we will essentially clone it and change its hyperparameters.
You'll need to fill in the ID of this template task in the script found at utils/loggers/clearml/hpo.py and then just run it. You can change task.execute_locally() to task.execute() to put it in a ClearML queue and have a remote agent work on it instead.
# To use optuna, install it first, otherwise you can change the optimizer to just be RandomSearch
pip install optuna
python utils/loggers/clearml/hpo.py
🤯 Remote Execution (advanced)
Running HPO locally is really handy, but what if we want to run our experiments on a remote machine instead? Maybe you have access to a very powerful GPU machine on-site, or you have some budget to use cloud GPUs. This is where the ClearML Agent comes into play. Check out what the agent can do here:
In short: every experiment tracked by the experiment manager contains enough information to reproduce it on a different machine (installed packages, uncommitted changes etc.). So a ClearML agent does just that: it listens to a queue for incoming tasks and when it finds one, it recreates the environment and runs it while still reporting scalars, plots etc. to the experiment manager.
You can turn any machine (a cloud VM, a local GPU machine, your own laptop...) into a ClearML agent by simply running:
clearml-agent daemon --queue QUEUES_TO_LISTEN_TO [--docker]
Cloning, Editing And Enqueuing
With our agent running, we can give it some work. Remember from the HPO section that we can clone a task and edit the hyperparameters? We can do that from the interface too!
🪄 Clone the experiment by right-clicking it
🎯 Edit the hyperparameters to what you wish them to be
⏳ Enqueue the task to any of the queues by right-clicking it
Executing A Task Remotely
Now you can clone a task like we explained above, or simply mark your current script by adding task.execute_remotely() and on execution it will be put into a queue, for the agent to start working on!
To run the YOLOv5 training script remotely, all you have to do is add this line to the training.py script after the clearml logger has been instantiated:
# ...
# Loggers
data_dict = None
if RANK in {-1, 0}:
    loggers = Loggers(save_dir, weights, opt, hyp, LOGGER)  # loggers instance
    if loggers.clearml:
        loggers.clearml.task.execute_remotely(queue="my_queue")  # <------ ADD THIS LINE
        # Data_dict is either None if user did not choose for ClearML dataset or is filled in by ClearML
        data_dict = loggers.clearml.data_dict
# ...
When running the training script after this change, python will run the script up until that line, after which it will package the code and send it to the queue instead!
Autoscaling workers
ClearML comes with autoscalers too! This tool will automatically spin up new remote machines in the cloud of your choice (AWS, GCP, Azure) and turn them into ClearML agents for you whenever there are experiments detected in the queue. Once the tasks are processed, the autoscaler will automatically shut down the remote machines, and you stop paying!
Check out the autoscalers getting started video below.
Learn More
For more information about integrating ClearML with Ultralytics models, check out our ClearML integration guide and explore how you can enhance your MLOps workflow with other experiment tracking tools.


