Amazon SageMaker 엔드포인트에 YOLO26을 배포하는 가이드
Amazon SageMaker Endpoints는 프로덕션 머신러닝 애플리케이션에서 Ultralytics YOLO26과 같은 컴퓨터 비전 모델을 관리형으로 확장 가능하게 호스팅합니다. 성공적인 모델 배포를 위해서는 모델과 AWS 양쪽의 설정, 구성, 배포 단계를 이해해야 합니다.
이 가이드에서는 YOLO26 PyTorch 모델을 Amazon SageMaker 엔드포인트에 배포하는 과정을 단계별로 안내합니다. AWS 환경 준비, 모델의 적절한 구성, AWS CloudFormation 및 배포에 사용하는 AWS 클라우드 개발 키트(CDK)와 같은 도구의 사용 방법을 알아봅니다.
Amazon SageMaker#
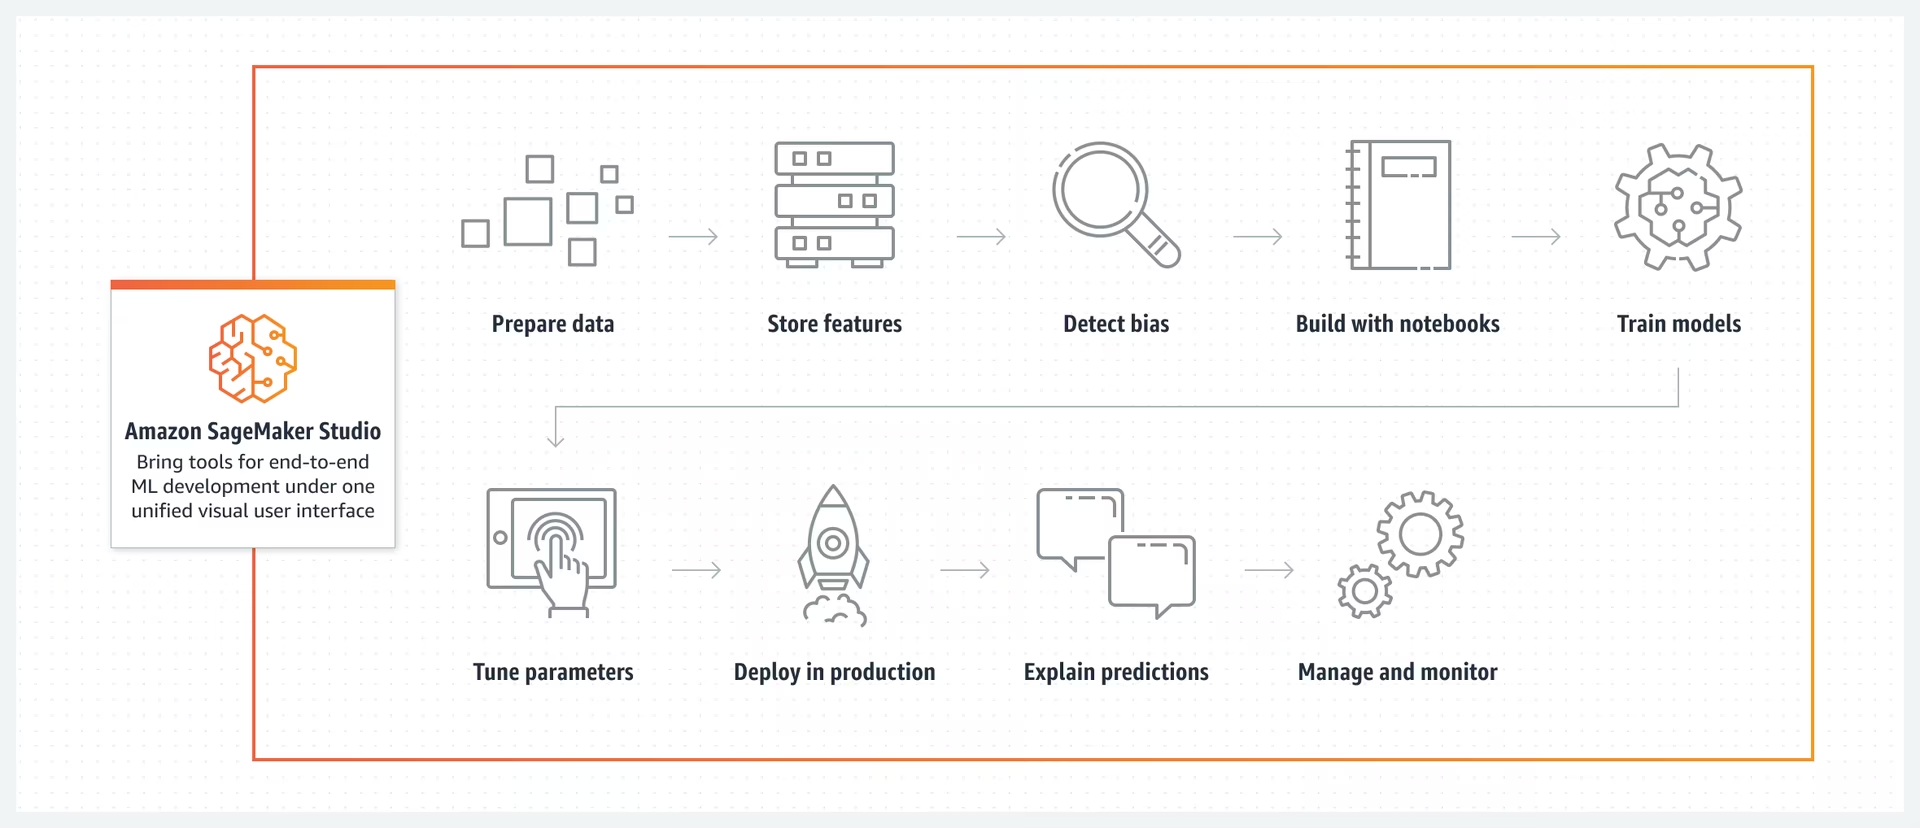
Amazon SageMaker는 머신러닝 모델을 구축, 학습, 배포하는 과정을 간소화하는 Amazon Web Services(AWS)의 머신러닝 서비스입니다. 머신러닝 워크플로의 다양한 측면을 처리하는 폭넓은 도구를 제공합니다. 여기에는 모델 튜닝 자동화 기능, 대규모 모델 학습 옵션, 모델을 프로덕션에 간편하게 배포하는 방법이 포함됩니다. SageMaker는 널리 사용되는 머신러닝 프레임워크를 지원하여 다양한 프로젝트에 필요한 유연성을 제공합니다. 데이터 레이블링, 워크플로 관리, 성능 분석 기능도 제공합니다.
Amazon SageMaker 엔드포인트에 YOLO26 배포#
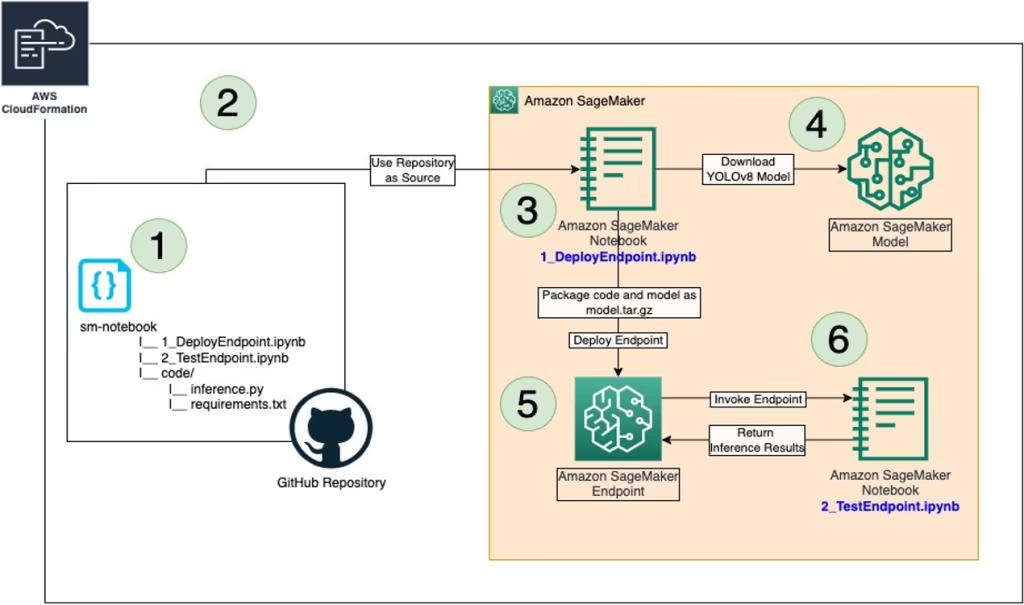
Amazon SageMaker에서 YOLO26을 배포하면 관리형 환경에서 실시간 추론을 수행하고 오토스케일링과 같은 기능을 활용할 수 있습니다. 아래 AWS 아키텍처를 살펴보세요.
1단계: AWS 환경 설정#
먼저 다음 사전 요구 사항이 갖춰져 있는지 확인하세요.
-
AWS 계정: 아직 AWS 계정이 없다면 가입하여 계정을 만드세요.
-
구성된 IAM 역할: Amazon SageMaker, AWS CloudFormation, Amazon S3에 필요한 권한이 있는 IAM 역할이 필요합니다. 이 역할에는 해당 서비스에 액세스할 수 있도록 허용하는 정책이 포함되어야 합니다.
-
AWS CLI: 아직 설치하지 않았다면 AWS 명령줄 인터페이스(CLI)를 다운로드하여 설치하고 계정 세부 정보로 구성하세요. 설치 방법은 AWS CLI 안내를 참조하세요.
-
AWS CDK: 아직 설치하지 않았다면 배포 스크립트 작성에 사용할 AWS 클라우드 개발 키트(CDK)를 설치하세요. 설치 방법은 AWS CDK 안내를 참조하세요.
-
충분한 서비스 할당량: Amazon SageMaker에서 서로 다른 두 리소스에 대한 할당량이 충분한지 확인하세요. 하나는 엔드포인트 사용을 위한
ml.m5.4xlarge이고, 다른 하나는 노트북 인스턴스 사용을 위한ml.m5.4xlarge입니다. 각 리소스에는 최소 하나의 할당량 값이 필요합니다. 현재 할당량이 이 요건보다 낮다면 각각 증액을 요청해야 합니다. 할당량 증액은 AWS 서비스 할당량 문서에 나온 자세한 안내에 따라 요청할 수 있습니다.
2단계: YOLO26 SageMaker 저장소 복제#
다음 단계는 SageMaker에 YOLO26을 배포하는 데 필요한 리소스가 포함된 AWS 전용 저장소를 복제하는 것입니다. GitHub에서 호스팅되는 이 저장소에는 필요한 CDK 스크립트와 구성 파일이 포함되어 있습니다.
-
GitHub 저장소 복제: 터미널에서 다음 명령을 실행하여 host-yolov8-on-sagemaker-endpoint 저장소를 복제하세요.
git clone https://github.com/aws-samples/host-yolov8-on-sagemaker-endpoint.git -
복제한 디렉터리로 이동: 디렉터리를 복제된 저장소로 변경하세요.
cd host-yolov8-on-sagemaker-endpoint/yolov8-pytorch-cdk
3단계: CDK 환경 설정#
필요한 코드를 준비했으므로 이제 AWS CDK를 사용해 배포할 환경을 설정하세요.
-
Python 가상 환경 생성: Python 환경과 종속 항목을 격리합니다. 다음을 실행하세요.
python3 -m venv .venv -
가상 환경 활성화:
source .venv/bin/activate -
종속 항목 설치: 프로젝트에 필요한 Python 종속 항목을 설치하세요.
pip3 install -r requirements.txt -
AWS CDK 라이브러리 업그레이드: 최신 버전의 AWS CDK 라이브러리가 설치되어 있는지 확인하세요.
pip install --upgrade aws-cdk-lib
4단계: AWS CloudFormation 스택 생성#
-
CDK 애플리케이션 합성: CDK 코드에서 AWS CloudFormation 템플릿을 생성하세요.
cdk synth -
CDK 애플리케이션 부트스트랩: CDK 배포를 위해 AWS 환경을 준비하세요.
cdk bootstrap -
스택 배포: 필요한 AWS 리소스를 생성하고 모델을 배포합니다.
cdk deploy
5단계: YOLO 모델 배포#
AWS CloudFormation 스택을 생성한 다음 단계는 YOLO26을 배포하는 것입니다.
-
노트북 인스턴스 열기: AWS 콘솔에서 Amazon SageMaker 서비스로 이동하세요. 대시보드에서 "Notebook Instances"를 선택한 다음 CDK 배포 스크립트로 생성된 노트북 인스턴스를 찾으세요. 노트북 인스턴스를 열어 Jupyter 환경에 액세스하세요.
-
inference.py에 액세스하고 수정하기: Jupyter에서 SageMaker 노트북 인스턴스를 연 후 inference.py 파일을 찾으세요. 아래와 같이 inference.py의 output_fn 함수를 편집하고, 구문 오류가 없는지 확인한 다음 스크립트를 저장하세요.
import json def output_fn(prediction_output, content_type): """Formats model outputs as JSON string, extracting attributes like boxes, masks, keypoints.""" print("Executing output_fn from inference.py ...") infer = {} for result in prediction_output: if result.boxes is not None: infer["boxes"] = result.boxes.numpy().data.tolist() if result.masks is not None: infer["masks"] = result.masks.numpy().data.tolist() if result.keypoints is not None: infer["keypoints"] = result.keypoints.numpy().data.tolist() if result.obb is not None: infer["obb"] = result.obb.numpy().data.tolist() if result.probs is not None: infer["probs"] = result.probs.numpy().data.tolist() return json.dumps(infer) -
1_DeployEndpoint.ipynb를 사용해 엔드포인트를 배포합니다. Jupyter 환경에서 sm-notebook 디렉터리에 있는 1_DeployEndpoint.ipynb 노트북을 엽니다. 노트북에서
model_name을yolo26n.pt과 같은 YOLO26 체크포인트로 설정합니다(기본값은 YOLOv8 모델임). 그런 다음 셀을 실행하여 모델을 다운로드하고, 업데이트된 추론 코드와 함께 패키징한 뒤, Amazon S3 버킷에 업로드합니다. 노트북의 안내에 따라 YOLO26 모델용 SageMaker 엔드포인트를 생성하고 배포할 수 있습니다.
6단계: 배포 테스트#
YOLO26 모델 배포가 완료되었으므로 성능과 기능을 테스트하는 것이 중요합니다.
-
테스트 노트북 열기: 동일한 Jupyter 환경에서 sm-notebook 디렉터리에 있는 2_TestEndpoint.ipynb 노트북을 찾아 여세요.
-
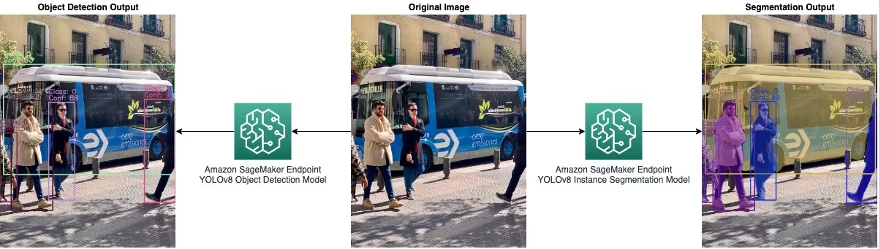
테스트 노트북 실행: 노트북의 안내에 따라 배포된 SageMaker 엔드포인트를 테스트하세요. 여기에는 엔드포인트로 이미지를 전송하고 추론을 실행하는 과정이 포함됩니다. 그런 다음 아래와 같이 출력을 플롯으로 표시하여 모델의 성능과 정확도를 시각화합니다.
- 리소스 정리: 테스트 노트북은 엔드포인트와 호스팅된 모델을 정리하는 과정도 안내합니다. 비용과 리소스를 효율적으로 관리하는 데 중요한 단계이며, 특히 배포된 모델을 바로 사용할 계획이 없다면 반드시 수행해야 합니다.
7단계: 모니터링 및 관리#
테스트 후에는 배포된 모델을 지속적으로 모니터링하고 관리해야 합니다.
-
Amazon CloudWatch로 모니터링: Amazon CloudWatch를 사용하여 SageMaker 엔드포인트의 성능과 상태를 정기적으로 확인하세요.
-
엔드포인트 관리: SageMaker 콘솔을 사용하여 엔드포인트를 지속적으로 관리하세요. 여기에는 필요에 따라 모델을 확장, 업데이트 또는 재배포하는 작업이 포함됩니다.
이 단계를 완료하면 Amazon SageMaker Endpoints에 YOLO26 모델을 배포하고 테스트할 수 있습니다. 동일한 워크플로를 AWS의 다른 모델 배포에도 적용할 수 있습니다.
요약#
이 가이드에서는 AWS CloudFormation과 AWS Cloud Development Kit (CDK)를 사용해 Amazon SageMaker Endpoints에 YOLO26을 배포하는 과정을 단계별로 설명했습니다. 이 과정에는 Amazon SageMaker Endpoints에서 YOLOv8 PyTorch 모델 호스팅에 관한 AWS Machine Learning Blog 게시물에서 AWS 샘플 저장소를 복제하고, CDK 환경을 설정하고, AWS 서비스를 사용해 모델을 배포하고, SageMaker에서 성능을 테스트하는 작업이 포함됩니다.
자주 묻는 질문#
Amazon SageMaker Endpoints에 Ultralytics YOLO26 모델을 배포하려면 다음 단계를 따르세요:
- AWS 환경 설정: AWS 계정, 필요한 권한이 부여된 IAM 역할, 구성된 AWS CLI가 있는지 확인하세요. 아직 설치하지 않았다면 AWS CDK를 설치하세요(AWS CDK 지침 참조).
- YOLO26 SageMaker 저장소 복제:
git clone https://github.com/aws-samples/host-yolov8-on-sagemaker-endpoint.git cd host-yolov8-on-sagemaker-endpoint/yolov8-pytorch-cdk - CDK 환경 설정: Python 가상 환경을 만들고 활성화한 다음, 종속 항목을 설치하고 AWS CDK 라이브러리를 업그레이드하세요.
python3 -m venv .venv source .venv/bin/activate pip3 install -r requirements.txt pip install --upgrade aws-cdk-lib - AWS CDK를 사용하여 배포: CloudFormation 스택을 합성하고 배포한 뒤 환경을 부트스트랩하세요.
cdk synth
cdk bootstrap
cdk deploy
Amazon SageMaker에 YOLO26을 배포하려면 다음 사전 요구 사항을 확인하세요.
- AWS 계정: 활성 AWS 계정(AWS에 가입)이 필요합니다.
- IAM 역할: SageMaker, CloudFormation, Amazon S3에 대한 권한이 구성된 IAM 역할.
- AWS CLI: AWS Command Line Interface를 설치하고 구성해야 합니다(AWS CLI 설치 가이드).
- AWS CDK: AWS Cloud Development Kit를 설치해야 합니다(CDK 설정 가이드).
- 서비스 할당량: 엔드포인트 및 노트북 사용을 위한
ml.m5.4xlarge인스턴스 할당량이 충분해야 합니다(할당량 증액 요청).
Amazon SageMaker에서 Ultralytics YOLO26을 사용하면 다음과 같은 이점이 있습니다:
- 확장성 및 관리: SageMaker는 자동 확장과 같은 기능을 제공하는 관리형 환경으로, 실시간 추론 요구 사항을 충족하는 데 도움이 됩니다.
- AWS 서비스 통합: 데이터 저장을 위한 S3, 코드형 인프라를 위한 CloudFormation, 모니터링을 위한 CloudWatch 등 다른 AWS 서비스와 통합합니다.
- 간편한 배포: AWS CDK 스크립트를 사용해 설정을 간소화하고 배포 절차를 효율화할 수 있습니다.
- 성능: Amazon SageMaker의 관리형 인프라를 사용해 대규모 추론 워크로드를 실행합니다.
예, Amazon SageMaker에서 YOLO26의 추론 로직을 사용자 지정할 수 있습니다:
-
inference.py수정: 출력 형식을 조정하려면inference.py파일에서output_fn함수를 찾아 사용자 지정하세요.import json def output_fn(prediction_output, content_type): """Formats model outputs as JSON string, extracting attributes like boxes, masks, keypoints.""" infer = {} for result in prediction_output: if result.boxes is not None: infer["boxes"] = result.boxes.numpy().data.tolist() # 필요한 경우 처리 로직을 더 추가하세요 return json.dumps(infer) -
업데이트된 모델 배포: 변경 사항을 적용하려면 제공된 Jupyter 노트북(
1_DeployEndpoint.ipynb)을 사용해 모델을 다시 배포해야 합니다.
수정된 모델을 배포하는 방법은 자세한 단계를 참조하세요.
-
Amazon SageMaker에 배포한 YOLO26 모델을 테스트하려면 다음을 수행하세요:
- 테스트 노트북 열기: SageMaker Jupyter 환경에서
2_TestEndpoint.ipynb노트북을 찾으세요. - 노트북 실행: 노트북의 지침에 따라 엔드포인트로 이미지를 전송하고 추론을 수행한 다음 결과를 표시하세요.
- 결과 시각화: 노트북의 플로팅 코드를 사용해 테스트 이미지에 예측된 바운딩 박스를 그립니다.
테스트 방법에 관한 자세한 지침은 테스트 섹션을 방문하세요.
- 테스트 노트북 열기: SageMaker Jupyter 환경에서


댓글10
질문을 하거나 결과를 공유하거나 다른 사람을 도와주세요.
 User
I want to upload the YOLOv8 model I trained on my own dataset to Jupyter, and then compress it into a
model.tar.gzfile following the officialdeployendpointsteps. However, when I usetestendpoint, I encounter an error. If I rename my trained model toyolov8, the test succeeds, but it uses the original model from the official website instead of my custom one. How should I modifyinference.pyto ensure it loads my trained model?1 Glenn JocherUltralytics
@lijoe123 to ensure your custom YOLOv8 model is used, modify the
inference.pyto load your model by specifying its path directly. Ensure the model name in your deployment matches your custom model's name. For detailed steps, refer to the Ultralytics documentation on Amazon SageMaker.- User
Thank you for your answer. I had followed the
1_DeployEndpoint.ipynbto delpoy my own model. In the 1.4 Create the SageMaker PyTorchModel, I had set theenv={'TS_MAX_RESPONSE_SIZE':'20000000', 'MY_MODEL': 'my_own_model'}. And in theinference.py:def model_fn(model_dir): print("Executing model_fn from inference.py ...") env = os.environ model = YOLO(os.path.join(model_dir, env['MY_MODEL'])) return modelI think it will be use my own model directly. But it failed, and it occur this problem:
ModelError: An error occurred (ModelError) when calling the InvokeEndpoint operation: Received server error (0)from primary with message "Your invocation timed out while waiting for a response from container primary. Reviewthe latency metrics for each container in Amazon Cloudatch, resolve the issue, and try again.". See https://useast-1. console. aws. aazon. com/cloudwatch/home?region=us-east-1#logEventViewer: group=/aws/sagemaker Endpoints/yolov8-pytorch-2024-09-06-11-33-49-418696 in account 211125332801 for more information.Could you tell me how to modify the
inference.pyto load my own model. Thank you so much. - Glenn JocherUltralytics
To ensure your custom YOLOv8 model is used, verify that the
model_fnininference.pycorrectly points to your model's path. Ensure theMY_MODELenvironment variable matches your model's filename. If issues persist, check CloudWatch logs for detailed error messages. For further guidance, refer to the Ultralytics documentation on Amazon SageMaker.
SJTUPanda
Thanks for your sharing, it's very clear and useful. My own deployment workflow on AWS has already built but the test result is not so satisfying. The performance of detection result of yolo11-xl on AWS is worse than on my own laptop. I not sure if there is some default quantization when it's deployed to the AWS(I did not modified much to host-yolov8-on-sagemaker-endpoint), or do you have some other ideas about which would bring this significant performance differences?
- Glenn JocherUltralytics
@SJTUPanda thank you for your feedback! The performance difference could stem from several factors like hardware disparities (AWS instance vs laptop GPU), inference settings, or environment configurations. First, verify that your SageMaker instance type matches your local hardware capabilities, and ensure identical inference parameters (e.g.,
imgsz,batch). Check our Amazon SageMaker deployment guide for optimization tips and consider profiling both environments withyolo valto isolate bottlenecks. Let us know if specific metrics differ! 🚀 Thanks for your quick reply. The issue is fixed after I comment out resize related code. Although the model is trained with (640,640) and the input image size is (720,440), using the raw images directly as input is better than resized it. I am curious the input images would be auto-resized by the model just as in the training/testing part? And why resized by myself has so much impact on the results? If these part code should be update because yolo version updating?
image_height, image_width, _ = orig_image.shape model_height, model_width = 640, 640 x_ratio = image_width/model_width y_ratio = image_height/model_height # Resize the image as numpy array resized_image = cv2.resize(orig_image, (model_height, model_width)) # Conver the array into jpeg resized_jpeg = cv2.imencode('.jpg', resized_image)[1] # Serialize the jpg using base 64 payload = base64.b64encode(resized_jpeg).decode('utf-8')- Glenn JocherUltralytics
Thank you for sharing your findings! YOLO models do automatically resize inputs to match their training dimensions while preserving aspect ratio with letterboxing. Manual resizing can distort aspect ratios or introduce artifacts, potentially degrading performance. We recommend using the model's native preprocessing by feeding full-size images directly, as this maintains proper scaling and aspect ratio handling. For implementation details, refer to our model deployment best practices regarding input consistency.
NikoXanthidis
Gostaria de saber se esses recursos são pagos.
- Glenn JocherUltralytics
Olá! 👋 Os recursos mencionados para implementar o YOLOv8 no Amazon SageMaker não são pagos por si só. No entanto, o uso do Amazon SageMaker e outros serviços da AWS associados à implementação e execução do modelo podem incorrer em custos conforme o uso. A AWS oferece uma camada gratuita que você pode aproveitar para experimentar alguns serviços sem custo, mas é sempre bom verificar a página de preços do SageMaker para detalhes específicos. Se precisar de ajuda para estimar os custos ou tiver outras dúvidas, estou aqui para ajudar! 🚀