Guia de ajuste de hiperparâmetros do Ultralytics YOLO
O ajuste de hiperparâmetros no Ultralytics YOLO é uma pesquisa automatizada e iterativa que otimiza configurações — como a taxa de aprendizagem, os pesos das perdas e a intensidade das aumentações — para maximizar métricas de desempenho do modelo de aprendizagem automática, como a exatidão, a precisão e a revocação. Em vez de testar estes valores manualmente, o Ultralytics YOLO explora o espaço de hiperparâmetros com um algoritmo genético que altera e avalia configurações candidatas ao longo de muitas execuções de treino curtas.
Assista: Como ajustar hiperparâmetros para melhorar o desempenho do modelo 🚀
O que são hiperparâmetros?#
Hiperparâmetros são configurações estruturais de alto nível do algoritmo. Eles são definidos antes da fase de treinamento e permanecem constantes durante ela. Veja alguns hiperparâmetros comumente ajustados no Ultralytics YOLO:
- Taxa de aprendizagem
lr0: Determina o tamanho do passo em cada iteração enquanto se avança para um mínimo na função de perda. - Tamanho do lote
batch: número de imagens processadas simultaneamente em uma passagem direta. - Número de épocas
epochs: uma época é uma passagem direta e retropropagação completas por todos os exemplos de treinamento. - Detalhes da arquitetura: como o número de canais, o número de camadas, os tipos de funções de ativação etc. Esses elementos ficam na configuração YAML do modelo, e não nos argumentos de treinamento.
Destes quatro elementos, apenas a taxa de aprendizagem faz parte do espaço de pesquisa predefinido: batch, epochs e a arquitetura permanecem fixos. O afinador também altera o agendamento, os ganhos de perda e as aumentações listadas abaixo.
Evolução genética e mutação#
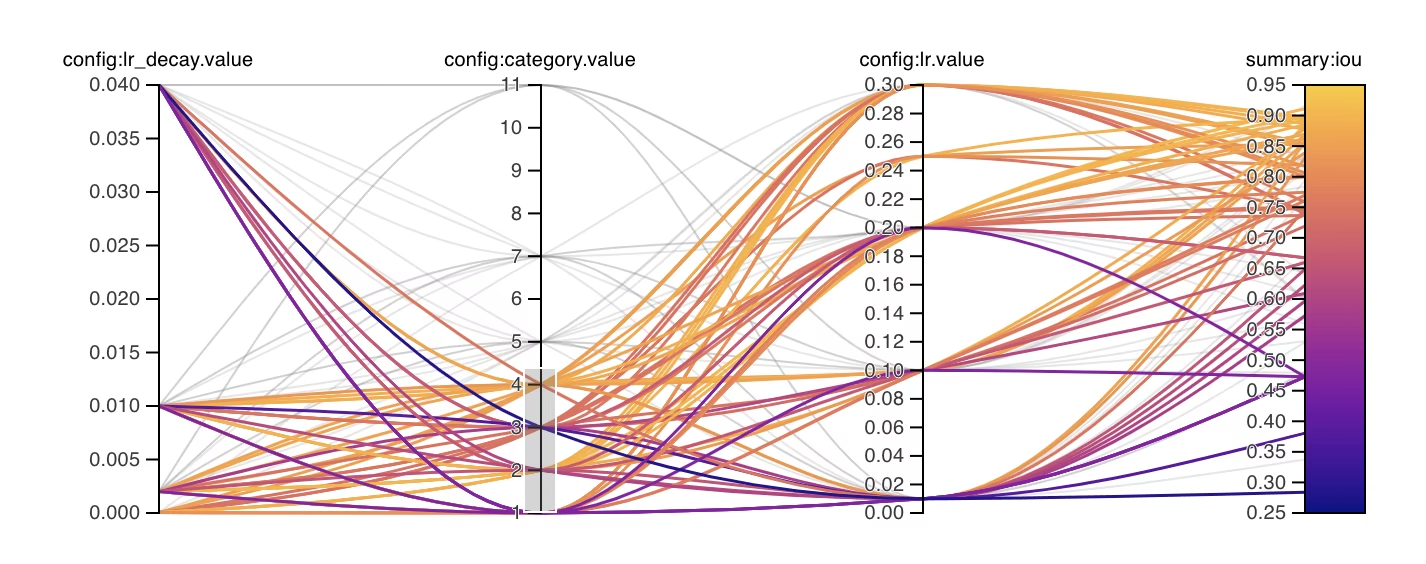
O Ultralytics YOLO usa algoritmos genéticos, uma família de algoritmos evolutivos, para otimizar hiperparâmetros. Os algoritmos genéticos inspiram-se no mecanismo da seleção natural e da genética.
- Seleção: cada iteração seleciona uma entre até nove configurações com maior aptidão, ponderadas pela aptidão. Após 30 resultados, os 20% melhores resultados (até 30) também são usados para estimar a covariância dos parâmetros, cuja influência aumenta à medida que se acumulam evidências das configurações de elite.
- Mutação: cada iteração altera aproximadamente metade dos parâmetros usando passos gaussianos normalizados pelos respectivos intervalos de busca. Quando a covariância está ativa, uma parcela ponderada pela confiança, de no máximo 40%, usa passos correlacionados; a reflexão mantém esses passos dentro dos limites sem acumular valores truncados. À medida que se acumulam tentativas sem melhora, os tamanhos dos passos diminuem linearmente em até 20% ao longo de 25 tentativas e são redefinidos quando um novo melhor resultado é encontrado. A iteração 1 não tem configuração-pai e usa os hiperparâmetros de treinamento padrão como linha de base.
Preparação para o ajuste de hiperparâmetros#
Antes de começar o processo de ajuste, é importante:
- Identifica as métricas: o otimizador integrado (
use_ray=False) ordena as tentativas pela pontuaçãofitnessda tarefa, enquantouse_ray=Trueusa a métrica da tarefa. Decide quais métricas secundárias vais analisar, como AP50 ou pontuação F1. - Define o orçamento de ajuste: Decide quantos recursos computacionais estás disposto a alocar. O ajuste de hiperparâmetros pode exigir muitos recursos computacionais.
Como funciona o ciclo de ajuste#
Em cada iteração, o ajustador integrado repete o seguinte ciclo:
- Inicializar os hiperparâmetros — começar com uma linha de base razoável, usando os hiperparâmetros padrão definidos pelo Ultralytics YOLO ou valores baseados no seu conhecimento do domínio ou em experimentos anteriores.
- Alterar os hiperparâmetros — a classe
Tunergera automaticamente um novo conjunto de hiperparâmetros a partir do conjunto existente com o método_mutate. - Treinar o modelo — treinar usando os hiperparâmetros alterados e, em seguida, avaliar o desempenho do treinamento com as métricas escolhidas.
- Avaliar o modelo — o processo de avaliação gera a pontuação de aptidão da iteração, que é comparada às iterações anteriores para determinar se os hiperparâmetros atuais representam uma melhoria.
- Registrar os resultados — registrar as métricas de desempenho e os hiperparâmetros correspondentes para consulta futura. O Ultralytics YOLO salva automaticamente esses resultados no formato NDJSON.
- Repetir — continuar até atingir o número definido de iterações, cada uma aproveitando o conhecimento obtido nas execuções anteriores. O ajustador integrado executa todos os
iterations; o Ray Tune informa as métricas após cada época de ajuste, permitindo que o ASHA interrompa tentativas com baixo desempenho após o período de tolerância.
Iterações e tamanho da população#
Com o ajustador integrado (use_ray=False), iterations controla o número total de tentativas sequenciais e tem o valor padrão 300. Cada tentativa treina um modelo com uma configuração de hiperparâmetros — por exemplo, iterations=40 com epochs=50 agenda 40 execuções de treinamento independentes de 50 épocas, e não uma execução de 50 épocas com uma população separada de 40 candidatos.
O algoritmo genético integrado não tem um parâmetro explícito de tamanho da população. Quando já existem tentativas anteriores, ele seleciona entre até nove das configurações com maior aptidão e altera um candidato por iteração.
Para executar tentativas em paralelo ou usar estratégias de busca mais avançadas, defina use_ray=True para usar o Ray Tune, que também tem 300 tentativas como padrão e recebe iterations como num_samples. Consulte o guia de integração do Ray Tune para obter detalhes.
Espaço de busca padrão#
A tabela a seguir lista os parâmetros padrão do espaço de busca para o ajuste de hiperparâmetros no YOLO26. Cada parâmetro tem um intervalo de valores específico definido por uma tupla (min, max).
| Parâmetro | Tipo | Intervalo de valores | Descrição |
|---|---|---|---|
lr0 | float | (1e-5, 1e-2) | Taxa de aprendizado inicial no começo do treinamento. Valores menores proporcionam um treinamento mais estável, mas uma convergência mais lenta |
lrf | float | (0.01, 1.0) | Fator da taxa de aprendizado final como fração de lr0. Controla o quanto a taxa de aprendizado diminui durante o treinamento |
momentum | float | (0.7, 0.98) | Fator de momentum do SGD. Valores maiores ajudam a manter uma direção de gradiente consistente e podem acelerar a convergência |
weight_decay | float | (0.0, 0.001) | Fator de regularização L2 para evitar sobreajuste. Valores maiores impõem uma regularização mais intensa |
warmup_epochs | float | (0.0, 5.0) | Número de épocas de aquecimento linear da taxa de aprendizado. Ajuda a evitar instabilidade no início do treinamento |
warmup_momentum | float | (0.0, 0.95) | Momentum inicial durante a fase de aquecimento. Aumenta gradualmente até o valor final do momentum |
box | float | (1.0, 20.0) | Peso da perda da caixa delimitadora na função de perda total. Equilibra a regressão da caixa e a classificação |
cls | float | (0.1, 4.0) | Peso da perda de classificação na função de perda total. Valores maiores dão mais ênfase à previsão correta da classe |
cls_pw | float | (0.0, 1.0) | Potência de ponderação de classes para lidar com o desequilíbrio entre classes. Valores maiores aumentam o peso das classes raras |
dfl | float | (0.4, 12.0) | Peso do termo de regressão da distância da caixa. O YOLO26 sem DFL aplica esse ganho a uma perda L1 sobre as distâncias normalizadas da caixa; valores maiores dão mais ênfase à localização precisa |
hsv_h | float | (0.0, 0.1) | Intervalo de aumento aleatório de matiz no espaço de cores HSV. Ajuda o modelo a generalizar diante de variações de cor |
hsv_s | float | (0.0, 0.9) | Intervalo de aumento aleatório de saturação no espaço HSV. Simula diferentes condições de iluminação |
hsv_v | float | (0.0, 0.9) | Intervalo de aumento aleatório de valor (brilho). Ajuda o modelo a lidar com diferentes níveis de exposição |
degrees | float | (0.0, 45.0) | Aumento máximo de rotação em graus. Ajuda o modelo a se tornar invariante à orientação dos objetos |
translate | float | (0.0, 0.9) | Aumento máximo de translação como fração do tamanho da imagem. Melhora a robustez a diferentes posições dos objetos |
scale | float | (0.0, 0.95) | Intervalo de aumento aleatório de escala. Ajuda o modelo a detectar objetos de diferentes tamanhos |
shear | float | (0.0, 10.0) | Aumento máximo de cisalhamento em graus. Adiciona distorções semelhantes às de perspectiva às imagens de treinamento |
perspective | float | (0.0, 0.001) | Intervalo de aumento aleatório de perspectiva. Simula diferentes ângulos de visualização |
flipud | float | (0.0, 1.0) | Probabilidade de inversão vertical da imagem durante o treinamento. Útil para imagens aéreas e capturadas de cima |
fliplr | float | (0.0, 1.0) | Probabilidade de inversão horizontal da imagem. Ajuda o modelo a se tornar invariante à direção dos objetos |
bgr | float | (0.0, 1.0) | Probabilidade de usar aumento BGR, que troca os canais de cor. Pode ajudar na invariância de cor |
mosaic | float | (0.0, 1.0) | Probabilidade de usar aumento mosaic, que combina 4 imagens. Especialmente útil para a detecção de objetos pequenos |
mixup | float | (0.0, 1.0) | Probabilidade de usar aumento mixup, que combina duas imagens. Pode melhorar a robustez do modelo |
cutmix | float | (0.0, 1.0) | Probabilidade de usar aumento cutmix. Combina regiões de imagens preservando as características locais |
copy_paste | float | (0.0, 1.0) | No modo flip, a fração de objetos elegíveis copiados; no modo mixup, também a probabilidade de aplicar o aumento |
close_mosaic | int | (0.0, 10.0) | Desativa o mosaic nas últimas N épocas para estabilizar o treinamento antes de terminar. O valor é alterado como um número decimal e, em seguida, arredondado para um número inteiro de épocas |
Exemplo de espaço de busca personalizado#
O exemplo abaixo define um espaço de pesquisa e chama model.tune(), que executa a classe Tuner, para ajustar YOLO26n com COCO8 durante 30 épocas, usando o otimizador AdamW. Para acelerar o ajuste, ignoram-se a criação de gráficos, a gravação de checkpoints e a validação em épocas que não sejam a última.
Este exemplo serve apenas para demonstração. Os hiperparâmetros obtidos em execuções de ajuste curtas ou em pequena escala raramente são ideais para o treinamento no mundo real. Na prática, o ajuste deve ser realizado com configurações semelhantes às do treinamento completo — incluindo conjuntos de dados, épocas e aumentações comparáveis — para garantir resultados confiáveis e transferíveis. Um ajuste rápido pode favorecer parâmetros que aceleram a convergência ou melhoram a validação no curto prazo, mas que não generalizam.
from ultralytics import YOLO

# Inicializa o modelo YOLO
model = YOLO("yolo26n.pt")

# Define o espaço de busca
search_space = {
    "lr0": (1e-5, 1e-2),
    "degrees": (0.0, 45.0),
}

# Ajusta os hiperparâmetros no COCO8 por 30 épocas
model.tune(
    data="coco8.yaml",
    epochs=30,
    iterations=300,
    optimizer="AdamW",
    space=search_space,
    plots=False,
    save=False,
    val=False,
)
Retomar uma sessão interrompida de ajuste de hiperparâmetros#
Você pode retomar uma sessão interrompida de ajuste de hiperparâmetros passando resume=True. Opcionalmente, você pode passar o diretório name usado em runs/{task} para retomar a sessão. Sem um name, o processo retoma o diretório chamado literalmente tune, que é o nome padrão, e não a sessão executada mais recentemente; por isso, passe name para qualquer execução iniciada com um nome personalizado. Você também precisa fornecer todos os argumentos de treinamento anteriores, incluindo data, epochs, iterations e space.
from ultralytics import YOLO

# Define um modelo YOLO
model = YOLO("yolo26n.pt")

# Define o espaço de busca
search_space = {
    "lr0": (1e-5, 1e-2),
    "degrees": (0.0, 45.0),
}

# Retoma a execução anterior
results = model.tune(data="coco8.yaml", epochs=50, iterations=300, space=search_space, resume=True)

# Retoma a execução de ajuste com o nome 'tune_exp'
results = model.tune(data="coco8.yaml", epochs=50, iterations=300, space=search_space, name="tune_exp", resume=True)Resultados#
Depois de concluir o processo de ajuste de hiperparâmetros, você terá vários arquivos e diretórios com os resultados do ajuste. Veja a seguir a descrição de cada um:
Estrutura de arquivos#
Veja como será a estrutura de diretórios dos resultados. Diretórios de varredura, como multitrain/ e multitrain-2/, contêm iterações individuais de ajuste: um modelo treinado por conjunto de dados com um conjunto de hiperparâmetros, em um subdiretório nomeado de acordo com cada conjunto de dados. Para economizar espaço de armazenamento, o ajustador exclui os diretórios de execução por conjunto de dados das iterações que não são as melhores atuais. O diretório tune/ contém os resultados do ajuste de todos os treinamentos individuais de modelos:
runs/
└── detect/
    ├── multitrain/
    │   └── coco8/
    ├── multitrain-2/
    ├── ...
    └── tune/
        ├── best_hyperparameters.yaml
        ├── tune_fitness.png
        ├── tune_results.ndjson
        ├── tune_scatter_plots.png
        └── weights/
            ├── last.pt
            └── best.pt
Descrições dos arquivos#
best_hyperparameters.yaml#
Este arquivo YAML contém os hiperparâmetros de melhor desempenho encontrados durante o processo de ajuste. Você pode usar este arquivo para inicializar treinamentos futuros com essas configurações otimizadas.
-
Formato: YAML
-
Uso: resultados dos hiperparâmetros
-
Exemplo:
# 558/900 iterations complete ✅ (45536.81s)
# Results saved to /usr/src/ultralytics/runs/detect/tune
# Best fitness=0.64297 observed at iteration 498
# Best fitness metrics are {'metrics/precision(B)': 0.87247, 'metrics/recall(B)': 0.71387, 'metrics/mAP50(B)': 0.79106, 'metrics/mAP50-95(B)': 0.62651, 'val/box_loss': 2.79884, 'val/cls_loss': 2.72386, 'val/l1_loss': 0.68503, 'fitness': 0.64297}
# Best fitness model is /usr/src/ultralytics/runs/detect/tune/weights
# Best fitness hyperparameters are printed below.

lr0: 0.00269
lrf: 0.00288
momentum: 0.73375
weight_decay: 0.00015
warmup_epochs: 1.22935
warmup_momentum: 0.1525
box: 18.27875
cls: 1.32899
dfl: 0.56016
hsv_h: 0.01148
hsv_s: 0.53554
hsv_v: 0.13636
degrees: 0.0
translate: 0.12431
scale: 0.07643
shear: 0.0
perspective: 0.0
flipud: 0.0
fliplr: 0.08631
mosaic: 0.42551
mixup: 0.0
copy_paste: 0.0
tune_fitness.png#
Este gráfico mostra a aptidão em função do número de iterações. Ele ajuda você a visualizar o desempenho do algoritmo genético ao longo do tempo.
- Formato: PNG
- Uso: visualização do desempenho
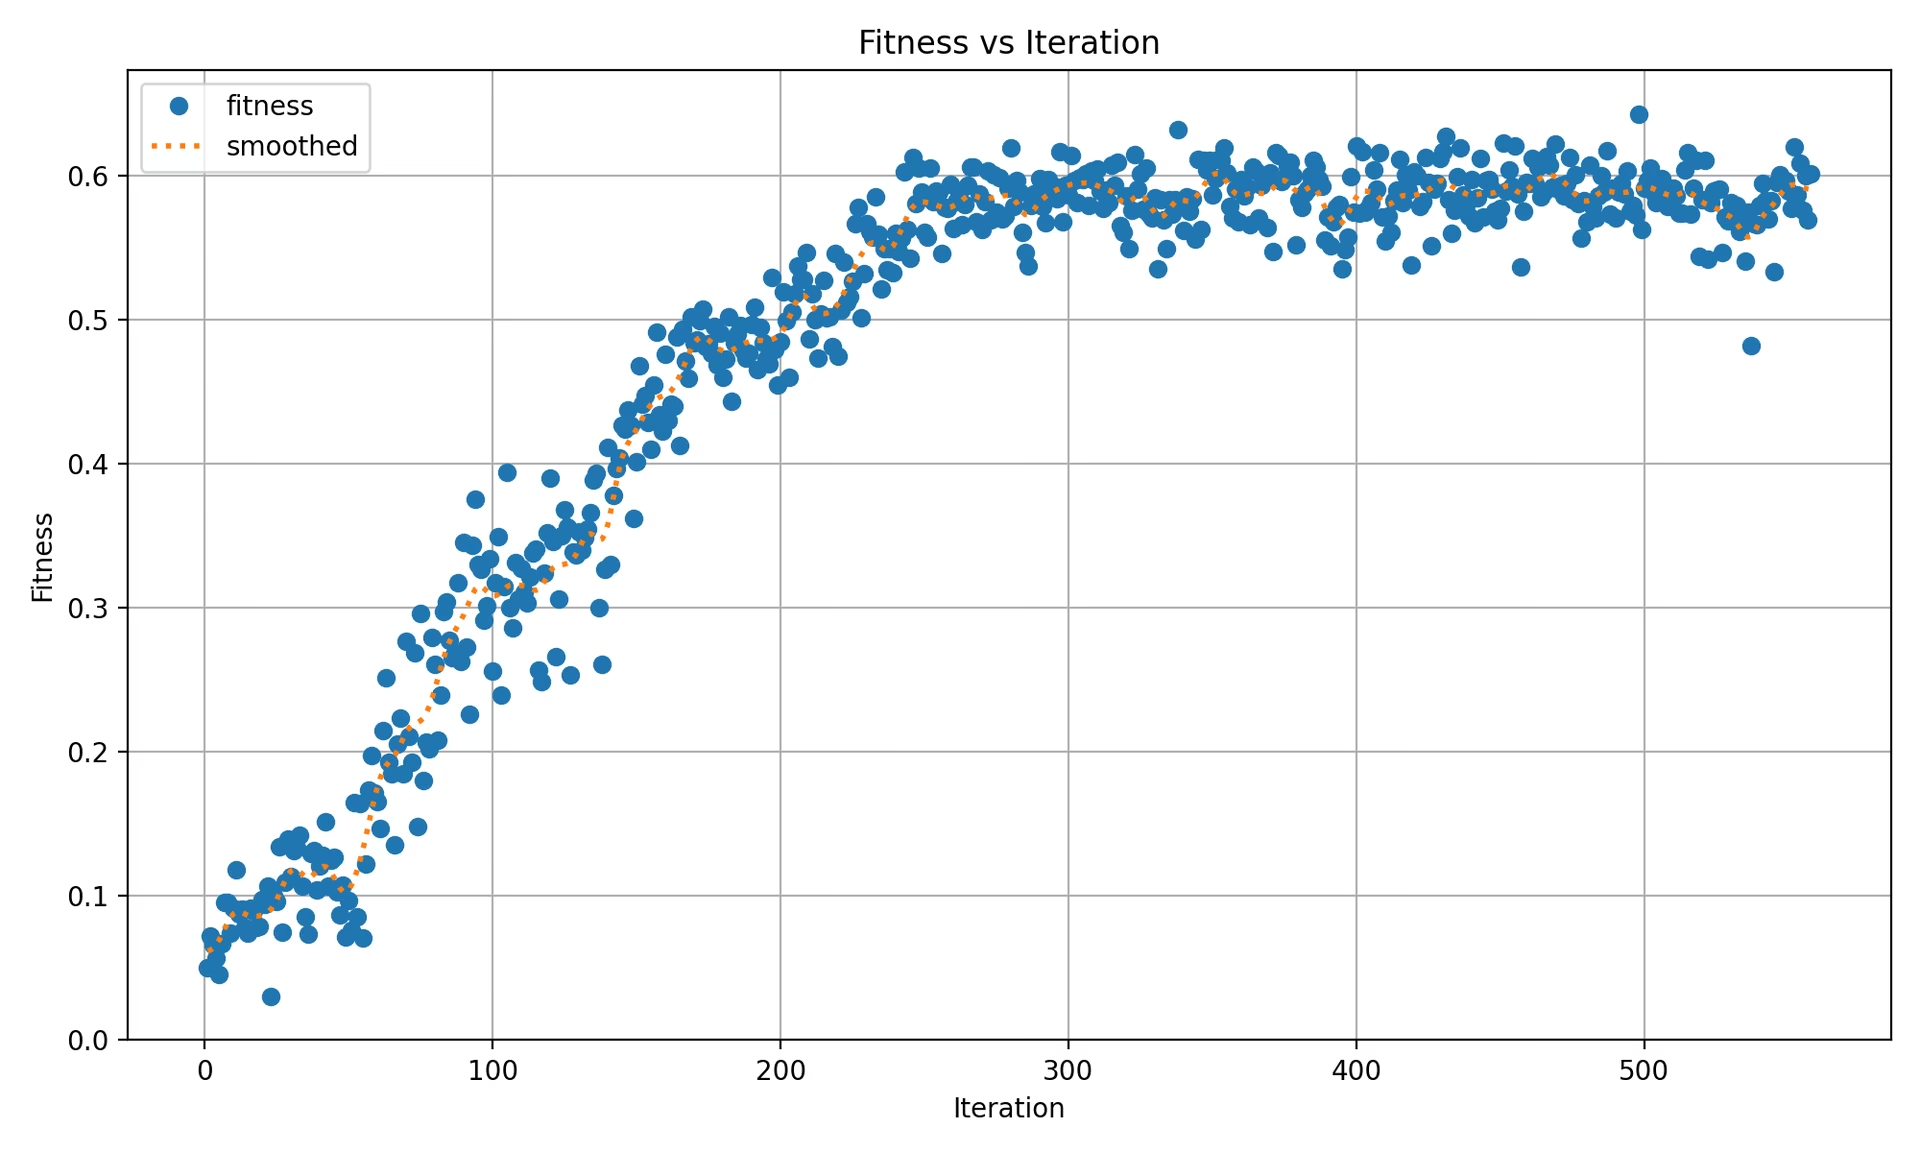
O gráfico contém:
- Um marcador por iteração e por conjunto de dados, ou seja, uma execução com um único conjunto de dados mostra um ponto por iteração, e uma execução com vários conjuntos de dados mostra um ponto por conjunto de dados em cada iteração.
- Uma linha pontilhada de "média suavizada" calculada por suavização gaussiana (
sigma=3) dos valores de aptidão de nível superior por iteração.
tune_results.ndjson#
Um arquivo NDJSON com resultados detalhados de cada iteração de ajuste. Cada linha é um objeto JSON com a aptidão agregada, os hiperparâmetros ajustados e as métricas por conjunto de dados. O ajuste com um único conjunto de dados e com vários conjuntos de dados usa o mesmo formato de arquivo.
- Formato: NDJSON
- Uso: acompanhamento dos resultados por iteração.
- Exemplo:
A seguir, um exemplo formatado para facilitar a leitura; no arquivo .ndjson real, cada objeto é armazenado em uma única linha.
{
    "iteration": 1,
    "fitness": 0.48628,
    "hyperparameters": {
        "lr0": 0.01,
        "lrf": 0.01,
        "momentum": 0.937,
        "weight_decay": 0.0005
    },
    "datasets": {
        "coco8": {
            "metrics/precision(B)": 0.65666,
            "metrics/recall(B)": 0.85,
            "metrics/mAP50(B)": 0.85086,
            "metrics/mAP50-95(B)": 0.64104,
            "val/box_loss": 1.57958,
            "val/cls_loss": 1.04986,
            "val/l1_loss": 1.32641,
            "fitness": 0.64104
        },
        "coco8-grayscale": {
            "metrics/precision(B)": 0.6582,
            "metrics/recall(B)": 0.51667,
            "metrics/mAP50(B)": 0.59106,
            "metrics/mAP50-95(B)": 0.33152,
            "val/box_loss": 1.95424,
            "val/cls_loss": 1.64059,
            "val/l1_loss": 1.70226,
            "fitness": 0.33152
        }
    },
    "save_dirs": {
        "coco8": "runs/detect/multitrain/coco8",
        "coco8-grayscale": "runs/detect/multitrain/coco8-grayscale"
    }
}
O valor de nível superior fitness é a média aritmética dos valores fitness por conjunto de dados. No ajuste com um único conjunto de dados, o dicionário datasets tem uma entrada cujo fitness é igual ao fitness de nível superior. É registrado um objeto JSON por iteração concluída. Os caminhos reais save_dirs são absolutos; eles foram abreviados acima para facilitar a leitura.
tune_scatter_plots.png#
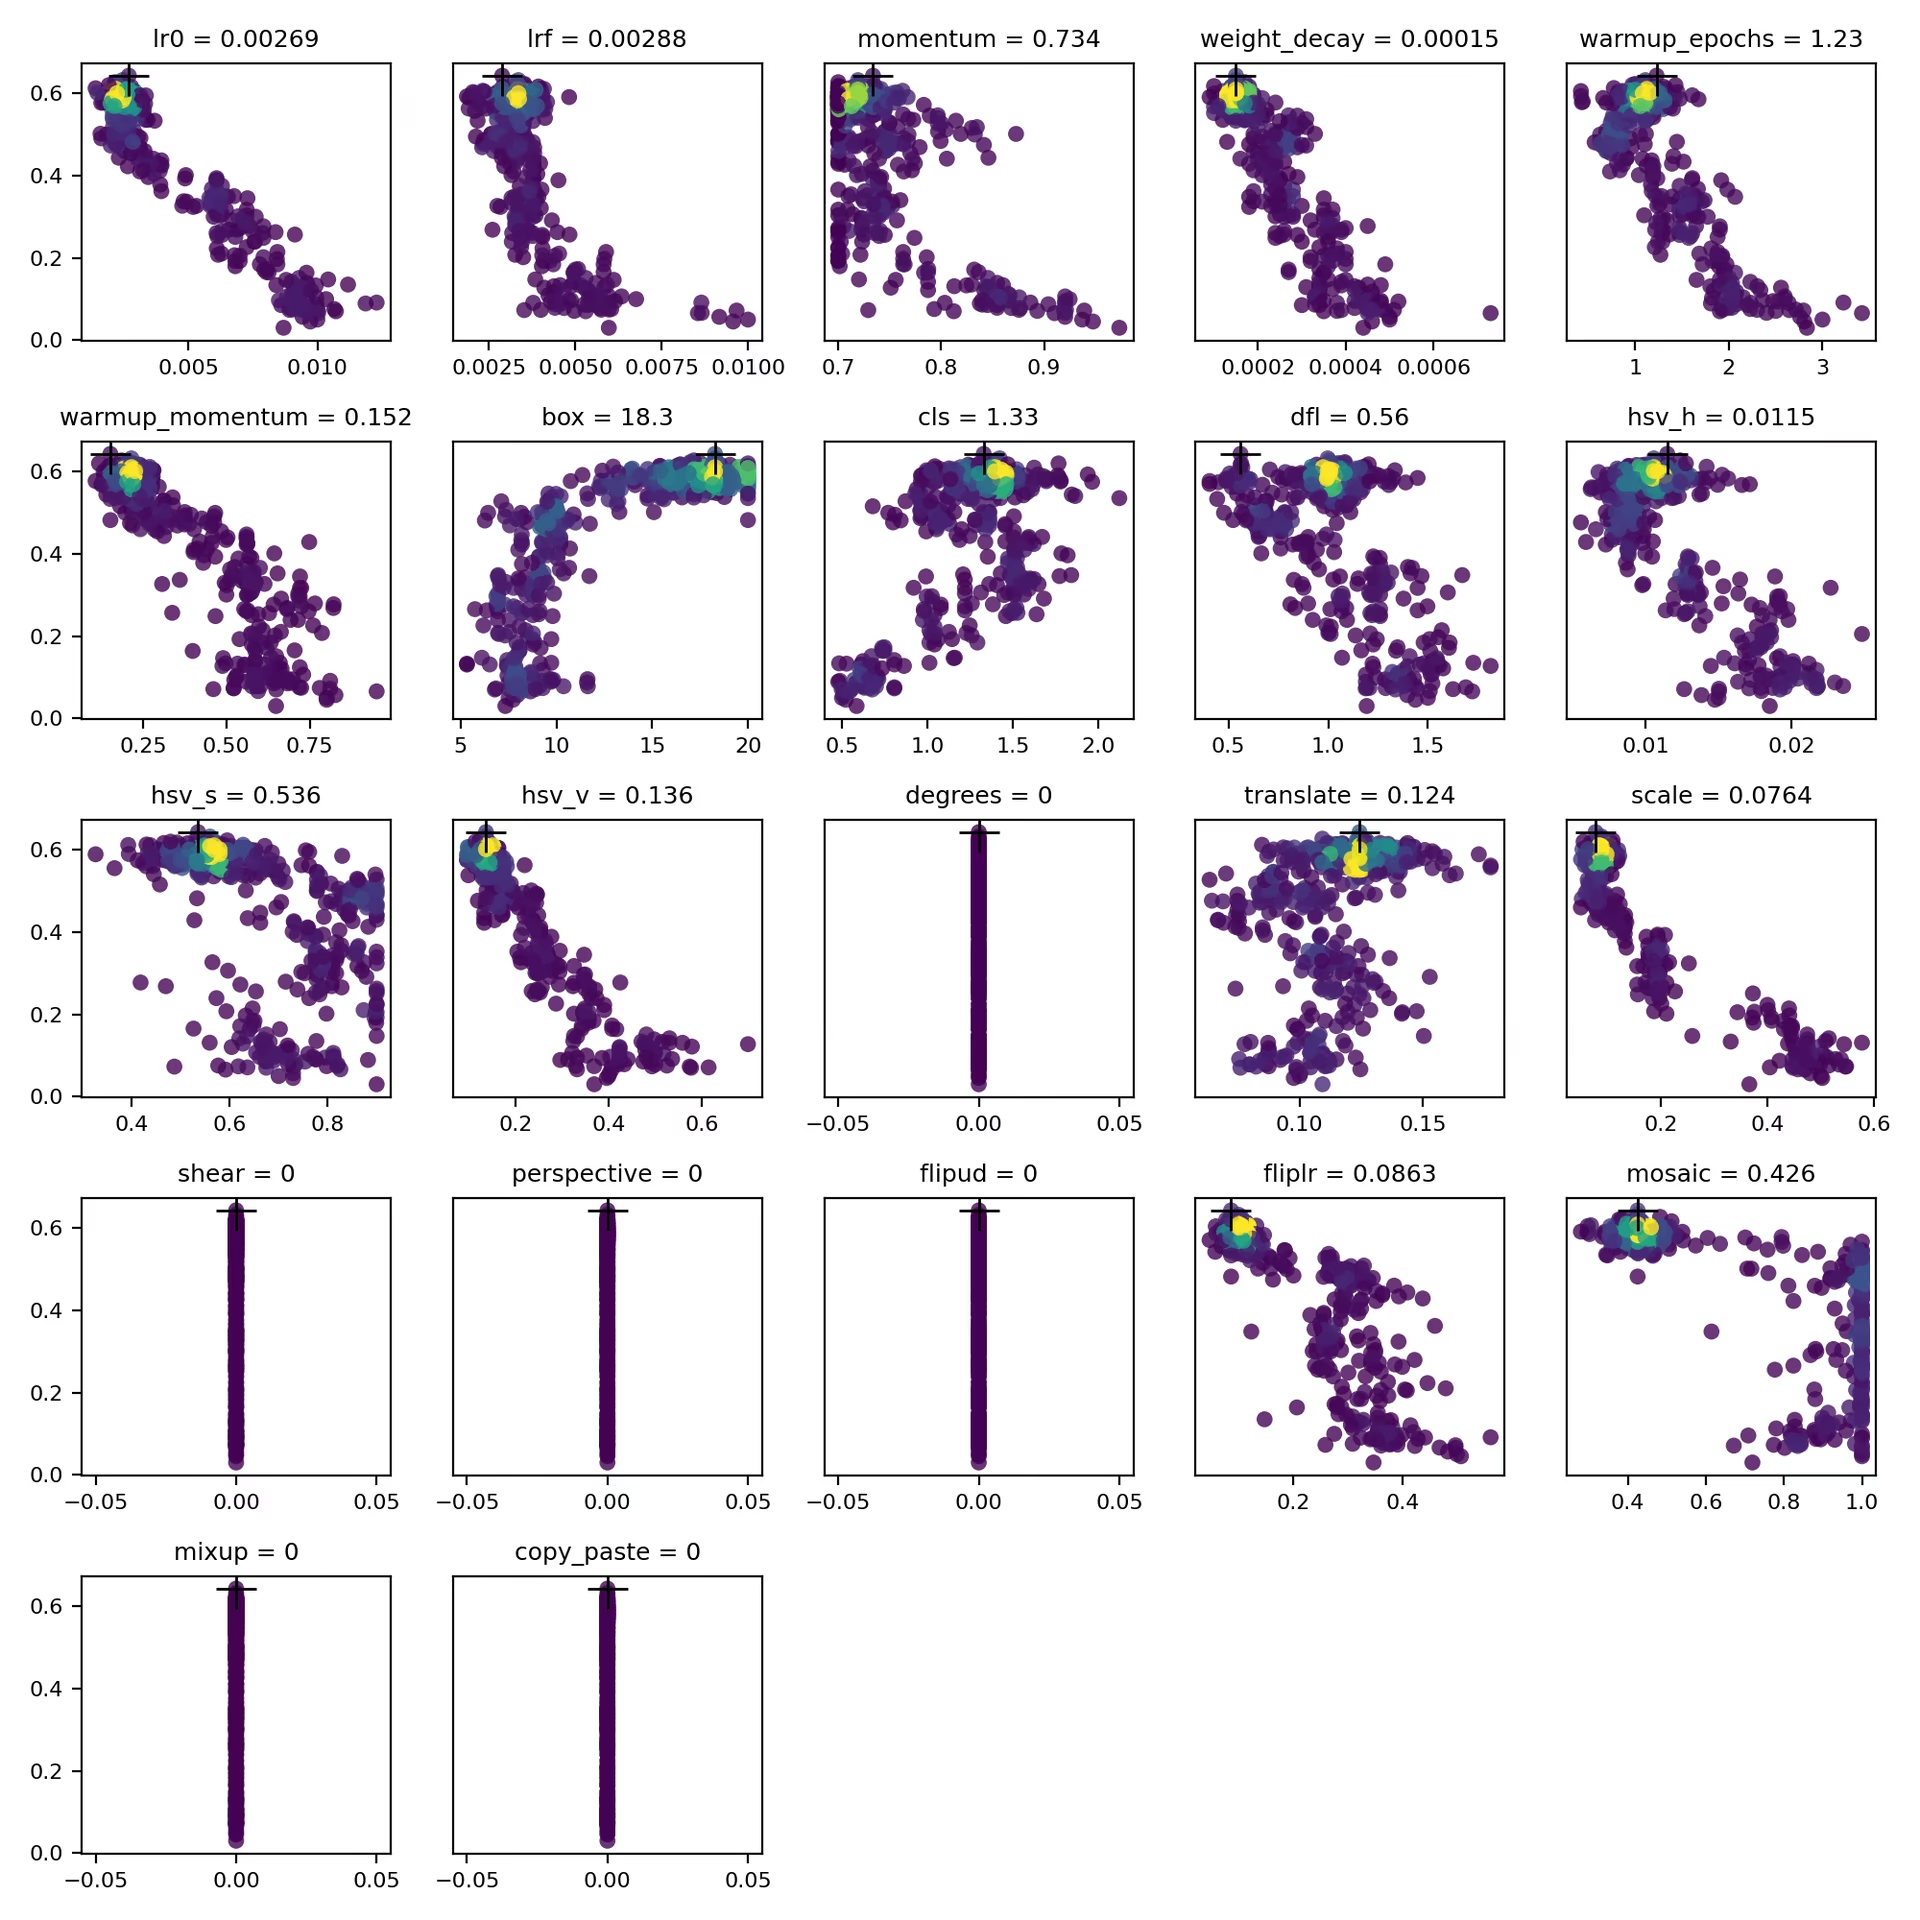
Este arquivo contém gráficos de dispersão gerados a partir de tune_results.ndjson, que ajudam você a visualizar as relações entre diferentes hiperparâmetros e métricas de desempenho. A mutação usa o intervalo configurado para cada hiperparâmetro, portanto, os valores podem evoluir a partir de padrões iguais a zero, como degrees e shear.
- Formato: PNG
- Uso: análise exploratória de dados
weights/#
Este diretório contém os modelos PyTorch salvos da iteração com melhor aptidão na execução de ajuste. Os dois arquivos vêm dessa mesma iteração:
last.pt: Pesos da última época da execução de treino dessa iteração.best.pt: Pesos da época com melhor aptidão da execução de treino dessa iteração.
Com esses resultados, você pode tomar decisões mais informadas em treinamentos e análises futuros de modelos.
Conclusão#
O ajuste de hiperparâmetros no Ultralytics YOLO é simples de iniciar e poderoso nos bastidores, usando seleção ponderada pela aptidão e mutação normalizada por intervalo em um algoritmo genético. Seguir o ciclo descrito neste guia permite ajustar sistematicamente o teu modelo para obter melhor desempenho e, em seguida, reutilizar o best_hyperparameters.yaml resultante para inicializar futuras execuções de treino. Para expandir o ajuste a testes paralelos e algoritmos de pesquisa mais avançados, continua com o guia de integração do Ray Tune ou executa tarefas geridas com hiperparâmetros configuráveis e monitorização de métricas em tempo real na Ultralytics Platform através do treino na nuvem.
Para definições que nenhum argumento expõe, como taxas de aprendizagem por camada ou uma métrica de aptidão personalizada, cria uma subclasse do treinador. Para conhecer melhor a implementação, explora o código-fonte da classe Tuner. Se tiveres perguntas ou pedidos de funcionalidades, contacta-nos no GitHub ou no Discord.
Perguntas frequentes#
Define um valor inicial com o parâmetro
lr0— os valores comuns vão de0.001a0.01— e deixa o ajuste modificá-lo para encontrar o valor ideal. Podes automatizar este processo com o métodomodel.tune(). Por exemplo:Exemplofrom ultralytics import YOLO # Inicializa o modelo YOLO model = YOLO("yolo26n.pt") # Ajusta os hiperparâmetros no COCO8 por 30 épocas model.tune(data="coco8.yaml", epochs=30, iterations=300, optimizer="AdamW", plots=False, save=False, val=False)Para mais detalhes, consulta a página de configuração do Ultralytics YOLO.
Os algoritmos genéticos permitem ao Ultralytics YOLO26 explorar o espaço de hiperparâmetros de forma robusta, sem tentativa e erro manual. As principais vantagens incluem:
- Pesquisa eficiente: a seleção ponderada pela aptidão preserva configurações eficazes, enquanto a mutação normalizada por intervalo explora novos candidatos.
- Evitar mínimos locais: As mutações aleatórias ajudam a pesquisa a escapar de mínimos locais nos quais uma pesquisa puramente gulosa poderia ficar presa.
- Métricas de desempenho: adaptam-se com base numa pontuação de aptidão específica da tarefa (mAP50-95 para deteção).
Para ver como os algoritmos genéticos podem otimizar os hiperparâmetros, consulta o guia de evolução de hiperparâmetros.
O tempo necessário para ajustar hiperparâmetros com o Ultralytics YOLO depende, em grande medida, de vários fatores, como o tamanho do conjunto de dados, a complexidade da arquitetura do modelo, o número de iterações e os recursos computacionais disponíveis. Por exemplo, ajustar o YOLO26n num conjunto de dados como o COCO8 durante 30 épocas pode demorar várias horas ou dias, consoante o hardware.
Para gerir eficazmente o tempo de ajuste, define previamente um orçamento claro, conforme explicado em Preparar o ajuste de hiperparâmetros. Isto ajuda a equilibrar a alocação de recursos e os objetivos de otimização.
Ao avaliar o desempenho do modelo durante o ajuste de hiperparâmetros no YOLO, podes usar várias métricas importantes:
- AP50: precisão média no limiar IoU de 0.50.
- Pontuação F1: a média harmónica da precisão e da revocação.
- Precisão e revocação: métricas individuais que indicam a exatidão do modelo ao identificar verdadeiros positivos em comparação com falsos positivos e falsos negativos.
Estas métricas ajudam-te a compreender diferentes aspetos do desempenho do modelo.
Sim, o Ultralytics YOLO26 integra-se com Ray Tune para otimização avançada de hiperparâmetros. O Ray Tune disponibiliza algoritmos de pesquisa como a otimização bayesiana e o Hyperband, além de recursos de execução paralela que aceleram o processo de ajuste.
Para usar o Ray Tune com YOLO26, defina o parâmetro
use_ray=Truena chamada do métodomodel.tune().


Comentários152
Faz uma pergunta, partilha os teus resultados ou ajuda alguém.
GengBin414(editado)
I tuned my defect detection dataset ,which are composed of 8000+ images, this is my tune code: model.tune( data="../data/data20260420_line_scan_merged_6ch.yaml", epochs=300, iterations=300, #space=search_space, #optimizer="AdamW", optimizer="MuSGD", lr0=0.01, momentum=0.9, shear=1, degrees=1, perspective=0.0001, mixup=0.1, cutmix=0.1, batch=20 )
I got the best mAP 0.586 at iteration 5 after tuned 30+ iterations, then I retrain the dataset with the following code: model.train( data="../data/data20260420_line_scan_merged_6ch.yaml", epochs=300, batch=20, imgsz=640, device=0, workers=16, optimizer="MuSGD", lr0=0.00721, lrf=0.01267, momentum=0.81816, weight_decay=0.00077, warmup_epochs=3.31429, warmup_momentum=0.95, box=7.11682, cls=0.48318, dfl=0.9397, hsv_h=0.00364, hsv_s=0.9, hsv_v=0.29751, degrees=0.99922, translate=0.07662, scale=0.51303, shear=0.76723, perspective=0.0, flipud=0.00019, fliplr=0.57639, bgr=0.00634, mosaic=0.62424, mixup=0.11307, cutmix=0.13007, copy_paste=0.00583, close_mosaic=10 #cfg="best_hyperparameters_map0.586.yaml" )
I copied the hyperparameters from best_hyperparameters_map0.586.yaml, but I got the best mAP 0.568, what cause the discrepancy?Can sb help me out? Thanks.
 Glenn JocherUltralytics
A small gap like
0.586 -> 0.568is usually expected becausetune()saves the best single stochastic run, while your latertrain()is a fresh run with different randomness and augmentation order; please first validate the tuning checkpointruns/detect/tune/weights/best.pt, then retrain with the exact same args plusseed=0anddeterministic=True, and make sure you are comparing the same metric (fitness/mAP50-95) described in the Hyperparameter Tuning guide. If the gap still looks too large, please share the text output from validating that checkpoint and the matching row fromtune_results.ndjsonhere in Discussions so the team can compare them directly.Thank you for your timely reply, I validated the tuning checkpoint, here is the text output from validating that checkpoint: (yolo26) ps@ps:~/Desktop/GB/ultralytics$ python val.py Ultralytics 8.4.26 🚀 Python-3.11.15 torch-2.5.1 CUDA:0 (NVIDIA GeForce RTX 4090 D, 24208MiB) YOLO26x summary (fused): 190 layers, 55,645,380 parameters, 0 gradients, 193.9 GFLOPs val: Fast image access ✅ (ping: 0.0±0.0 ms, read: 10744.4±1424.6 MB/s, size: 734.1 KB) val: Scanning /home/ps/Desktop/GB/ultralytics/datasets/Merged_6Chanel_20260420/imagesH/val.cache... 786 images, 47 backgrounds, 0 corrupt: 100% ━━━━━━━━━━━━ 786/786 412.1Mit/s 0.0s Class Images Instances Box(P R mAP50 mAP50-95): 100% ━━━━━━━━━━━━ 50/50 6.9it/s 7.2s all 786 1363 0.843 0.69 0.765 0.585 black 45 47 0.914 0.677 0.828 0.648 crack 120 145 0.681 0.517 0.55 0.334 edge 184 195 0.916 0.899 0.94 0.833 line 116 147 0.809 0.646 0.736 0.544 pit 73 89 0.775 0.543 0.642 0.447 raw 279 318 0.861 0.745 0.81 0.644 white 95 106 0.9 0.623 0.712 0.46 yellow 299 316 0.884 0.873 0.9 0.773 Speed: 0.9ms preprocess, 7.3ms inference, 0.0ms loss, 0.0ms postprocess per image Results saved to /home/ps/Desktop/GB/ultralytics/runs/detect/val81
I checked my retrain args, it show that seed=0 and deterministic=True already set: python train.py New https://pypi.org/project/ultralytics/8.4.53 available 😃 Update with 'pip install -U ultralytics' Ultralytics 8.4.26 🚀 Python-3.11.15 torch-2.5.1 CUDA:0 (NVIDIA GeForce RTX 4090 D, 24208MiB) engine/trainer: agnostic_nms=False, amp=True, angle=1.0, augment=False, auto_augment=randaugment, batch=20, bgr=0.00634, box=7.11682, cache=False, cfg=None, classes=None, close_mosaic=10, cls=0.48318, compile=False, conf=None, copy_paste=0.00583, copy_paste_mode=flip, cos_lr=False, cutmix=0.13007, data=../data/data20260420_line_scan_merged_6ch.yaml, degrees=0.99922, deterministic=True, device=0, dfl=0.9397, dnn=False, dropout=0.0, dynamic=False, embed=None, end2end=None, epochs=500, erasing=0.4, exist_ok=False, fliplr=0.57639, flipud=0.00019, format=torchscript, fraction=1.0, freeze=None, half=False, hsv_h=0.00364, hsv_s=0.9, hsv_v=0.29751, imgsz=640, int8=False, iou=0.7, keras=False, kobj=1.0, line_width=None, lr0=0.00721, lrf=0.01267, mask_ratio=4, max_det=300, mixup=0.11307, mode=train, model=yolo26x.pt, momentum=0.81816, mosaic=0.62424, multi_scale=0.0, name=train137, nbs=64, nms=False, opset=None, optimize=False, optimizer=MuSGD, overlap_mask=True, patience=100, perspective=0.0, plots=True, pose=12.0, pretrained=True, profile=False, project=None, rect=False, resume=False, retina_masks=False, rle=1.0, save=True, save_conf=False, save_crop=False, save_dir=/home/ps/Desktop/GB/ultralytics/runs/detect/train137, save_frames=False, save_json=False, save_period=-1, save_txt=False, scale=0.51303, seed=0, shear=0.76723, show=False, show_boxes=True, show_conf=True, show_labels=True, simplify=True, single_cls=False, source=None, split=val, stream_buffer=False, task=detect, time=None, tracker=botsort.yaml, translate=0.07662, val=True, verbose=True, vid_stride=1, visualize=False, warmup_bias_lr=0.1, warmup_epochs=3.31429, warmup_momentum=0.95, weight_decay=0.00077, workers=16, workspace=None
And here is the train output: Epoch GPU_mem box_loss cls_loss dfl_loss Instances Size 260/300 20.8G 0.4503 0.4947 0.004246 50 640: 100% ━━━━━━━━━━━━ 354/354 2.7it/s 2:10 Class Images Instances Box(P R mAP50 mAP50-95): 100% ━━━━━━━━━━━━ 20/20 4.5it/s 4.4s all 786 1363 0.841 0.682 0.751 0.564 EarlyStopping: Training stopped early as no improvement observed in last 100 epochs. Best results observed at epoch 160, best model saved as best.pt. To update EarlyStopping(patience=100) pass a new patience value, i.e.
patience=300or usepatience=0to disable EarlyStopping.260 epochs completed in 9.792 hours. Optimizer stripped from /home/ps/Desktop/GB/ultralytics/runs/detect/train138/weights/last.pt, 118.4MB Optimizer stripped from /home/ps/Desktop/GB/ultralytics/runs/detect/train138/weights/best.pt, 118.4MB
Validating /home/ps/Desktop/GB/ultralytics/runs/detect/train138/weights/best.pt... Ultralytics 8.4.26 🚀 Python-3.11.15 torch-2.5.1 CUDA:0 (NVIDIA GeForce RTX 4090 D, 24208MiB) YOLO26x summary (fused): 190 layers, 55,645,380 parameters, 0 gradients, 193.9 GFLOPs Class Images Instances Box(P R mAP50 mAP50-95): 100% ━━━━━━━━━━━━ 20/20 4.9it/s 4.1s all 786 1363 0.826 0.685 0.758 0.568 black 45 47 0.882 0.634 0.773 0.579 crack 120 145 0.675 0.559 0.577 0.314 edge 184 195 0.925 0.885 0.949 0.824 line 116 147 0.785 0.667 0.714 0.52 pit 73 89 0.84 0.528 0.662 0.447 raw 279 318 0.812 0.72 0.804 0.638 white 95 106 0.802 0.611 0.674 0.434 yellow 299 316 0.888 0.877 0.911 0.787 Speed: 0.1ms preprocess, 4.4ms inference, 0.0ms loss, 0.0ms postprocess per image Results saved to /home/ps/Desktop/GB/ultralytics/runs/detect/train138
And I don't know where to find tune_results.ndjson mentioned in your reply. I guess you mean the matching row from tune_results.csv then here is: fitness lr0 lrf momentum weight_decay warmup_epochs warmup_momentum box cls dfl hsv_h hsv_s hsv_v degrees translate scale shear perspective flipud fliplr bgr mosaic mixup cutmix copy_paste close_mosaic 0.58582 0.00721 0.01267 0.81816 0.00077 3.31429 0.95 7.11682 0.48318 0.9397 0.00364 0.9 0.29751 0.99922 0.07662 0.51303 0.76723 0 0.00019 0.57639 0.00634 0.62424 0.11307 0.13007 0.00583 10
- Glenn JocherUltralytics
The main issue I see is that your retrain is not matching the tuned trial: the runtime log shows
epochs=500rather than300, so the schedule driven bylr0andlrfis different and that alone can explain0.585 -> 0.568; the current Hyperparameter Tuning guide writestune_results.ndjsonunderruns/detect/tune/, but in your older8.4.26install the equivalent may betune_results.csv, so please rerun with the exact runtime args from the best trial, especiallyepochs=300and the samepatience, and if it still printsepochs=500then another override is being applied. Sorry, after hyperparameter tuning, I retrained first with epochs=500, observed mAP=0.57, then I changed epochs=300, observed mAP=0.568. In the previous reply, I mistakenly copied the retrain args from the epochs=500 run. But the train output is correctly copied from the epochs=300 run, you can tell this out from the EarlyStopping output: Epoch GPU_mem box_loss cls_loss dfl_loss Instances Size 260/300 20.8G 0.4503 0.4947 0.004246 50 640: 100% ━━━━━━━━━━━━ 354/354 2.7it/s 2:10 Class Images Instances Box(P R mAP50 mAP50-95): 100% ━━━━━━━━━━━━ 20/20 4.5it/s 4.4s all 786 1363 0.841 0.682 0.751 0.564 EarlyStopping: Training stopped early as no improvement observed in last 100 epochs. Best results observed at epoch 160, best model saved as best.pt. To update EarlyStopping(patience=100) pass a new patience value, i.e. patience=300 or use patience=0 to disable EarlyStopping.
And the retrain args of the epochs=300 run, it shows that seed=0 and deterministic=True already set: python train.py New https://pypi.org/project/ultralytics/8.4.53 available 😃 Update with 'pip install -U ultralytics' Ultralytics 8.4.26 🚀 Python-3.11.15 torch-2.5.1 CUDA:0 (NVIDIA GeForce RTX 4090 D, 24208MiB) engine/trainer: agnostic_nms=False, amp=True, angle=1.0, augment=False, auto_augment=randaugment, batch=20, bgr=0.00634, box=7.11682, cache=False, cfg=None, classes=None, close_mosaic=10, cls=0.48318, compile=False, conf=None, copy_paste=0.00583, copy_paste_mode=flip, cos_lr=False, cutmix=0.13007, data=../data/data20260420_line_scan_merged_6ch.yaml, degrees=0.99922, deterministic=True, device=0, dfl=0.9397, dnn=False, dropout=0.0, dynamic=False, embed=None, end2end=None, epochs=300, erasing=0.4, exist_ok=False, fliplr=0.57639, flipud=0.00019, format=torchscript, fraction=1.0, freeze=None, half=False, hsv_h=0.00364, hsv_s=0.9, hsv_v=0.29751, imgsz=640, int8=False, iou=0.7, keras=False, kobj=1.0, line_width=None, lr0=0.00721, lrf=0.01267, mask_ratio=4, max_det=300, mixup=0.11307, mode=train, model=yolo26x.pt, momentum=0.81816, mosaic=0.62424, multi_scale=0.0, name=train138, nbs=64, nms=False, opset=None, optimize=False, optimizer=MuSGD, overlap_mask=True, patience=100, perspective=0.0, plots=True, pose=12.0, pretrained=True, profile=False, project=None, rect=False, resume=False, retina_masks=False, rle=1.0, save=True, save_conf=False, save_crop=False, save_dir=/home/ps/Desktop/GB/ultralytics/runs/detect/train138, save_frames=False, save_json=False, save_period=-1, save_txt=False, scale=0.51303, seed=0, shear=0.76723, show=False, show_boxes=True, show_conf=True, show_labels=True, simplify=True, single_cls=False, source=None, split=val, stream_buffer=False, task=detect, time=None, tracker=botsort.yaml, translate=0.07662, val=True, verbose=True, vid_stride=1, visualize=False, warmup_bias_lr=0.1, warmup_epochs=3.31429, warmup_momentum=0.95, weight_decay=0.00077, workers=16, workspace=None
 Murat Raimbekov
quick check on what is likely going on, framed generally: tune saves the best of N stochastic trials, and a single retrain is one new stochastic draw with the same hyperparameters. bit-exact reproduction between the two is not guaranteed even with
seed=0, deterministic=True. ourinit_seeds(deterministic=True)setstorch.use_deterministic_algorithms(True, warn_only=True)inultralytics/utils/torch_utils.py, matching the pytorch reproducibility notes - cuda ops without a deterministic alternative still run non-deterministically with just a warning. over many epochs on a real dataset that variance can compound.a few practical takeaways before assuming the gap is a tuning bug:
- your trial weights at
runs/detect/tune/weights/best.ptalready validate to 0.585, so the trial result is real and reusable - if you need exactly that performance for deployment, use that checkpoint directly. - the recommended way to reuse tuned hyperparameters in a fresh train run is
cfg="runs/detect/tune/best_hyperparameters.yaml"(the commented-out line in your script). that file contains the exact values the trial used and matches the workflow described in the hyperparameter tuning guide. - to bound run-to-run variance, retrain a few times with
seed=0,seed=1,seed=2and compare the mean against the tune's reported best, not a single retrain.
unrelated, you are on ultralytics 8.4.26 and the current release is 8.4.53; for new tuning runs it is worth updating.
- your trial weights at
 User
Hi, I have a question about Hyperparameter Tuning. What value of
epochsanditerationsshould I pass to model.tune(). Default value of epochs is 100, and iterations is 10. Are the default values OK, or should I change them ? My dataset is about 10,000 images.- Glenn JocherUltralytics
For a 10k-image dataset, the defaults are fine for a quick sanity check, but for useful tuning you should set
epochsclose to your real training length becauseepochsis per trial, whileiterationsis how many different trials are tested; a practical starting point isepochs=50to100withiterations=30to100depending on your compute budget, then retrain once with the best settings frombest_hyperparameters.yamlas shown in the Hyperparameter Tuning guide.1 - User
Thank you very much ! I will try to search the best hyperparameters !
- Glenn JocherUltralytics
You're welcome — sounds good; if anything looks off during tuning, please share your
model.tune()call plus the resultingbest_hyperparameters.yamlortune_results.ndjsonhere, and we can help compare it against the expected outputs in the Hyperparameter Tuning guide.
harunemrekiran61
You’ve shown the box range as 0.02 to 0.2, but the default value appears to be 7.5. Is there a mistake here? Could you please check?
- Glenn JocherUltralytics
Good catch —
boxis a loss gain (default7.5during training), so the0.02–0.2range shown in the docs table is outdated/incorrect; the current built-in tuner boundsboxto1.0–20.0(see the Tuner class reference), and you can always override it viaspace={...}as shown in the Hyperparameter Tuning guide.
Larry-zhai
How can I directly apply the optimized best_hyperparameters.yaml to my training? In fact, when I use code similar to the following: from ultralytics import YOLO model = YOLO("yolov8n.pt") model.train(data="data.yaml", hyp="hyp.yaml") an error occurs: SyntaxError: 'hyp' is not a valid YOLO argument.
 J.Q. Pan
Hi I have used the above code to apply the tuning but neither the diagram nor the models will be saved. I only get a single tune folder with all tuning details. I may ask if someone else has also the same problem.
BrianNieuwenhuis
When running the code below the model.tune() call does not recognize my model specification. Could someone explain to me what I am doing wrong. I am using model.overrides so that I can also tune the shear and perspective parameters that are otherwise initialized at 0.
from ultralytics import YOLO import wandb from ultralytics import settings settings.update({"wandb": True})
import argparse
def main(): # parse command-line args if needed parser = argparse.ArgumentParser() parser.add_argument("--gpus", type=int, default=1) parser.add_argument("--workers", type=int, default=4) args = parser.parse_args()
# Define a YOLO model
model = YOLO("yolo11x.pt")

# Dynamically assign GPUs based on --gpus argument
device = list(range(args.gpus))  # e.g., [0, 1, 2, 3] if args.gpus = 4

# Define search space
search_space = {
    "lr0": (1e-5, 1e-1),
    "lrf": (0.01, 1.0),
    "momentum": (0.6, 0.98),
    "weight_decay": (0.0, 0.001),
    "warmup_epochs": (0, 5),
    "warmup_momentum": (0.0,0.95),
    "box": (0.02, 0.2),
    "cls": (0.2, 4.0),
    "hsv_h": (0.0, 0.1),
    "hsv_s": (0.0, 0.9),
    "hsv_v": (0.0, 0.9),
    "translate":(0.0, 0.9),
    "scale": (0.0, 0.9),
    "shear": (0.0, 10.0),
    "perspective": (0.0, 0.001),
    "mosaic": (0.0,1.0),
    "mixup": (0.0, 1.0),
    "copy_paste": (0.0, 1.0)
}

# Manually initialize certain hperparameters that would not be tuned otherwise
model.overrides = {
    'shear': 1,
    'perspective': 0.001,
    'mixup': 0.01,
    'copy_paste' : 0.01,

}

# tune the model
results = model.tune(project='./tune/crop1344',name="tune_default_batch16_v100", use_ray = False,
    data="data.yaml",
    #hyp="custom_hyp.yaml", # this does not seem to work work for tune scripts!!
    batch = 16,
    imgsz = 1344,
    device = device,
    workers = args.workers,

    degrees = 180, #these parameters are fixed in the model tune
    flipud = 0.5,
    fliplr = 0.5,
    bgr = 0,
    auto_augment = None,
    #erasing = 0,

    epochs = 100,
    iterations=10,
    space=search_space,
    optimizer="AdamW",
    resume=False,  #start over or resume previous checkpoint
    plots=False,  # don't make plots etc to save time until last timepoint
    save=False,
    val=False,
    verbose=False)
if name == "main": main()
yyagmurkyaa
Hello again, I have trained new models using the parameters you provided and by organizing my datasets. However, a common issue across all of them is that the models mistakenly classify objects like myself or nearby computer screens as the traffic sign "turn right ahead" (which is one of the labeled classes in my dataset). I have checked my dataset and confirmed that there are no such unrelated objects in the background.
Additionally, the models sometimes confuse left and right directional signs.
Why might these errors be occurring, and how can I fix them? Thank you in advance for your help.
- Glenn JocherUltralytics(editado)
@Fatima-khanjar to balance precision and recall in your over-predicting model, try these adjustments:
- Increase confidence threshold during inference (not training) to filter out low-confidence predictions
- Adjust IoU threshold in NMS to reduce duplicate detections
- Increase classification loss weight with
cls=1.0or higher to improve class discrimination - Check annotation quality in your dataset, especially for small or ambiguous objects
- Add hard negative examples to your dataset - images with objects similar to your classes but not actually part of them
These changes should help improve precision without significantly sacrificing your excellent recall. For implementation details, see our NMS documentation for confidence thresholding examples.
@yyagmurkyaa for your traffic sign confusion issues:
-
For the model detecting unrelated objects as "turn right ahead" signs:
- Add "hard negative" examples to your training set (images with computers, people, but no traffic signs)
- Increase
cls=1.0or higher to improve classification accuracy - Check if the "turn right ahead" sign has visual similarities to these false positives
-
For left/right confusion:
- Create specific augmentations for directional signs without flipping (as you noted)
- Ensure balanced examples of both directional types
- Consider using a slightly larger model like YOLO26m for better feature discrimination
These targeted adjustments should help address the specific confusion patterns you're seeing.
Fatima-khanjar
Hello again!!
First of all, thank you so much for your help @glenn-jocher __ you've truly helped me a lot, and I really appreciate it!
I have a question regarding fine-tuning a pre-trained YOLO model (e.g., trained on the COCO dataset) for my custom use case. My dataset includes a combination of both new classes (not present in COCO) and some of the existing COCO classes , but with different layouts or contexts.
What I’d like to do is the following:
Add my new classes starting from index 80, while still leveraging the pre-trained weights for the existing COCO classes.
Ideally, I want to preserve the learned knowledge for the COCO classes (especially the ones shared with my dataset), and only train the model further on the new classes.
Is it possible to:
Fine-tune the model in such a way that it uses the pre-trained weights for the common classes, and only learns new classes from scratch starting from a different index?
Retain and benefit from the original COCO knowledge while introducing and training on new class definitions?
Also, I’ve noticed that when I fine-tune a pre-trained model and define my own data.yaml file — completely different from coco.yaml — I redefine the class names and indexes based on my custom dataset, completely removing the COCO classes not present in my data. In this case, what really happens during fine-tuning or transfer learning under the hood? Is the model discarding unused class weights? Are shared class weights still used effectively?
I'd greatly appreciate any clarification or guidance on how to approach this setup properly.
Best regards,
- Glenn JocherUltralytics
@Fatima-khanjar great question about fine-tuning with mixed COCO and custom classes!
Yes, you can leverage pre-trained COCO weights while adding new classes. Here's how:
-
When fine-tuning a YOLO model, the model's detection head is automatically resized to accommodate your new class count. The weights for existing classes are preserved where possible.
-
For classes that overlap with COCO, the model will leverage transfer learning from those pre-trained weights, while new classes will be initialized with random weights.
-
You don't need to explicitly start from index 80 - just define your classes in your data.yaml file, and the model will handle the mapping automatically.
-
During fine-tuning, the model doesn't discard unused class weights but rather reshapes the classification head to match your class count. Weights for classes that exist in both datasets are transferred and further optimized for your specific data.
For best results with mixed classes, I recommend using a smaller learning rate initially (e.g.,
lr0=0.001) to preserve the knowledge in the pre-trained weights while allowing the model to adapt to your new classes. -
Hello! @glenn-jocher thank you so much for your explanation!
I have a follow-up question regarding class index matching. Let's say the person class in the COCO dataset is indexed as 0, but in my data.yaml file, I assign person to index 5. In this case, the model will not treat the person at index 5 as the same class as COCO’s index 0, correct?
So, to benefit from the pretrained weights of shared classes, do the class indices in my custom dataset need to match the COCO indices exactly?
Best regards,
- Glenn JocherUltralytics(editado)
@Fatima-khanjar you're asking a crucial question about class mapping during transfer learning!
You no longer need to keep COCO's class indices. With
cls_remap=True(the default), training copies the pretrained classification-head rows by class name, so a class such aspersonkeeps its pretrained weights at whatever index it has in your dataset, while new classes such astraffic_signstart from fresh weights. Training printsRemapped N/M cls head rows from pretrained weights by class namewhen rows are copied, andcls_remap=Falsedisables it. For example, thisdata.yamlworks:names: 0: person 1: car 2: traffic_signJust make sure the shared classes use the same names as in COCO. See the Fine-Tuning Guide for details.
@glenn-jocher Hello again!!!
Thank you so much for your clarification! I have a quick follow-up question.
Let’s say the COCO dataset defines the following class indices in its YAML file: 0: person, 2: car, 3: cat.
In my own dataset, I share only the person and car classes with COCO — I don’t want to include cat. If I define my shared classes using the same indices as COCO (i.e., 0: person, 2: car), but then replace the COCO class cat at index 3 with a new class (e.g., 3: animal), will I still benefit from the pretrained weights for the shared classes (person and car)?
Or will assigning a new class at an index previously used by COCO (like 3) cause any issues?
best regards,
- Glenn JocherUltralytics(editado)
@Fatima-khanjar great question about reusing COCO indices for new classes!
With
cls_remap=True(the default), pretrained classification-head rows are matched by class name, not by index. Shared classes such aspersonandcarkeep their pretrained weights wherever they sit in your dataset. A new class like "animal" at index 3 does not inherit the pretrained "cat" row, because the names do not match, so it starts from fresh weights. Reusing a COCO index therefore neither helps nor hurts the shared classes.If a new class is close to a pretrained one, give it that class's name so its row is copied. Using a lower learning rate initially (e.g.,
lr0=0.001) also helps preserve the pretrained features while the model adapts to your new classes.1
Thank you for your feedback. I trained my dataset using YOLOv11s. Although I didn’t experience severe overfitting with the current parameters, I couldn’t achieve optimal performance either. Some traffic signs were misclassified or not detected at all.
While searching for the best hyperparameters, I realized that I hadn't applied data augmentation—except for the flip parameter. I have an example parameter file, and I plan to include all relevant augmentation options except for flipping.
I would really appreciate your help in finding the most suitable parameters for my dataset, as I’m planning to participate in a competition soon. I need to enhance my model by adjusting the parameters properly to achieve the best possible performance.
Thank you in advance for your support.
On Sun, Apr 20, 2025 at 1:51 PM phatima khanjar @.***> wrote:
Hello,
I hope this message finds you well.
image.png (view on web) https://github.com/user-attachments/assets/be6db84b-fe0d-4356-ba77-9b4426c253ee
I fine-tuned YOLOv11s on my custom dataset, which is relatively small (1,156 images split into 75% training, 15% validation, and 10% test). The dataset consists of 41 classes, with each class containing between 200 and 300 images. I experimented with three different sets of hyperparameters: the default values, those optimized using Ray Tune, and others obtained through a Genetic Algorithm. In all cases, I observed oscillations in the validation dfl and box losses, which may indicate signs of overfitting. I would appreciate any suggestions or insights on how to address this issue, particularly given the small size of the dataset, and how to improve model generalization.
best regards,
— Reply to this email directly, view it on GitHub https://github.com/orgs/ultralytics/discussions/9536#discussioncomment-12889695, or unsubscribe https://github.com/notifications/unsubscribe-auth/BPQ7ZLAQ2G7ZL434FN3WFYD22N345AVCNFSM6AAAAABFVXPSL2VHI2DSMVQWIX3LMV43URDJONRXK43TNFXW4Q3PNVWWK3TUHMYTEOBYHE3DSNI . You are receiving this because you were mentioned.Message ID: @.*** com>
- Glenn JocherUltralytics(editado)
@yyagmurkyaa for traffic sign detection and classification with YOLO26s, I recommend focusing on these specific augmentation and training parameters:
from ultralytics import YOLO

model = YOLO("yolo26s.pt")
model.train(
    data="your_traffic_signs.yaml",
    epochs=100,
    patience=25,
    batch=16,
    imgsz=640,  # Consider 800+ for small traffic signs
    hsv_h=0.015,  # Color augmentation helps with varying lighting conditions
    hsv_s=0.7,
    hsv_v=0.4,
    scale=0.5,  # Scale augmentation critical for varying distances
    translate=0.1,  # Helps with signs at different positions
    mosaic=1.0,  # Excellent for object detection tasks
    mixup=0.1,  # Light mixup can help with generalization
    perspective=0.0005,  # Slight perspective change for different viewing angles
    weight_decay=0.0005,  # Regularization to reduce overfitting
    optimizer="AdamW",
    lr0=0.001,
    lrf=0.01,
    cos_lr=True  # Cosine learning rate scheduler
)
For traffic sign detection specifically:
- Increase image size to better detect small signs
- Focus on color-preserving augmentations as colors are critical for traffic signs
- Use perspective transformations to simulate different viewing angles
- Enable strong scale/translate augmentations to handle varying distances
Consider running
model.tune()with these parameters as starting points to find the optimal configuration for your competition. You might also need to address class imbalance if some signs appear less frequently in your dataset. You're very welcome! I wasn't expecting such a quick response either. I'm excited to hear that you'll be training with these parameters and look forward to seeing the results as soon as possible. Thank you again for your support!
- Glenn JocherUltralytics(editado)
@Fatima-khanjar for a small dataset (1,156 images) with 41 classes, oscillations in validation losses often indicate overfitting. Here are specific recommendations to improve generalization:
-
Strengthen regularization:
- Increase
weight_decayto 0.001-0.003 - Add dropout with
dropout=0.1to reduce co-adaptation
- Increase
-
Enhance data augmentation:
- Maximize augmentations:
mosaic=1.0,mixup=0.2,copy_paste=0.1 - Use strong geometric transforms:
translate=0.2,scale=0.5
- Maximize augmentations:
-
Training modifications:
- Reduce model complexity by using YOLO26n instead of YOLO26s
- Implement gradual unfreezing (
freezelayers at first) - Enable
cos_lr=Truefor smoother learning rate decay
-
Consider transfer learning modifications:
- Start with a model pre-trained on a domain similar to yours
- Use fewer epochs with higher
patiencefor early stopping
With 41 classes and limited samples per class, these techniques should help stabilize training and improve generalization. You might also benefit from training ensembles of multiple models if computational resources allow. For more details, refer to our Model Training Tips.
-
Hello,
Thank you for your advice! Your instructions have improved my model’s performance compared to before. I have now achieved the following metrics:
Mean Precision: 0.794 Mean Recall: 0.99 Mean F1 Score: 0.881 mAP@0.5: 0.938 mAP@0.5-0.95: 0.827
After analyzing these results, it seems that the model is over-predicting. Do you have any suggestions on how I can better balance precision and recall?
best regards,
Hello,
I hope this message finds you well.
I fine-tuned YOLOv11s on my custom dataset, which is relatively small (1,156 images split into 75% training, 15% validation, and 10% test). The dataset consists of 41 classes, with each class containing between 200 and 300 images. I experimented with three different sets of hyperparameters: the default values, those optimized using Ray Tune, and others obtained through a Genetic Algorithm. In all cases, I observed oscillations in the validation dfl and box losses, which may indicate signs of overfitting. I would appreciate any suggestions or insights on how to address this issue, particularly given the small size of the dataset, and how to improve model generalization.
best regards,
Hello, I am training a model using YOLOv11, and the dataset consists of traffic signs. There are 22 classes, and each class has 400 labeled images. I’m not sure what parameters I should use for training. What parameters should I set to prevent overfitting, and what are the correct values? Could you help me with this?
- Glenn JocherUltralytics(editado)
@yyagmurkyaa your dataset of 22 classes with 400 images per class should provide a good foundation for traffic sign detection. To prevent overfitting with YOLO26, I'd recommend:
- Start with hyperparameter tuning using the
model.tune()method to find optimal values:
from ultralytics import YOLO model = YOLO("yolo26n.pt") # Start with a smaller model for faster tuning model.tune( data="your_traffic_signs.yaml", epochs=30, iterations=100, weight_decay=0.0005, # Try higher values like 0.001-0.005 to increase regularization patience=15, # Early stopping val=True )-
Key hyperparameters to prevent overfitting:
- Increase
weight_decay(0.001-0.005) - Enable strong data augmentation (
hsv_h,hsv_s,translate,scale,fliplr,mosaic) - Use early stopping with reasonable
patience - Consider reducing model capacity (use n or s model variants)
- Increase
-
Monitor validation metrics to detect overfitting (when training accuracy continues improving but validation metrics plateau or decline)
The automated tuning process should help identify the optimal parameter values for your specific dataset. For more details, check out our Hyperparameter Tuning Guide.
- Start with hyperparameter tuning using the
Thank you for your feedback. I trained my dataset using YOLOv11s. Although I didn’t experience severe overfitting with the current parameters, I couldn’t achieve optimal performance either. Some traffic signs were misclassified or not detected at all.
While searching for the best hyperparameters, I realized that I hadn't applied data augmentation—except for the flip parameter. I have an example parameter file, and I plan to include all relevant augmentation options except for flipping.
I would really appreciate your help in finding the most suitable parameters for my dataset, as I’m planning to participate in a competition soon. I need to enhance my model by adjusting the parameters properly to achieve the best possible performance.
Thank you in advance for your support.