YOLOv9: Bước tiến đột phá trong công nghệ phát hiện đối tượng
YOLOv9 thúc đẩy phát hiện đối tượng thời gian thực bằng cách giới thiệu Programmable Gradient Information (PGI) và Generalized Efficient Layer Aggregation Network (GELAN). Tại thời điểm ra mắt, model cải thiện hiệu quả và độ chính xác so với các detector thời gian thực trước đó trên dataset MS COCO. Dự án YOLOv9 được phát triển bởi một nhóm mã nguồn mở độc lập và xây dựng dựa trên codebase Ultralytics YOLOv5.
Xem: Huấn luyện YOLOv9 trên dữ liệu tùy chỉnh bằng Ultralytics | Dataset gói hàng công nghiệp
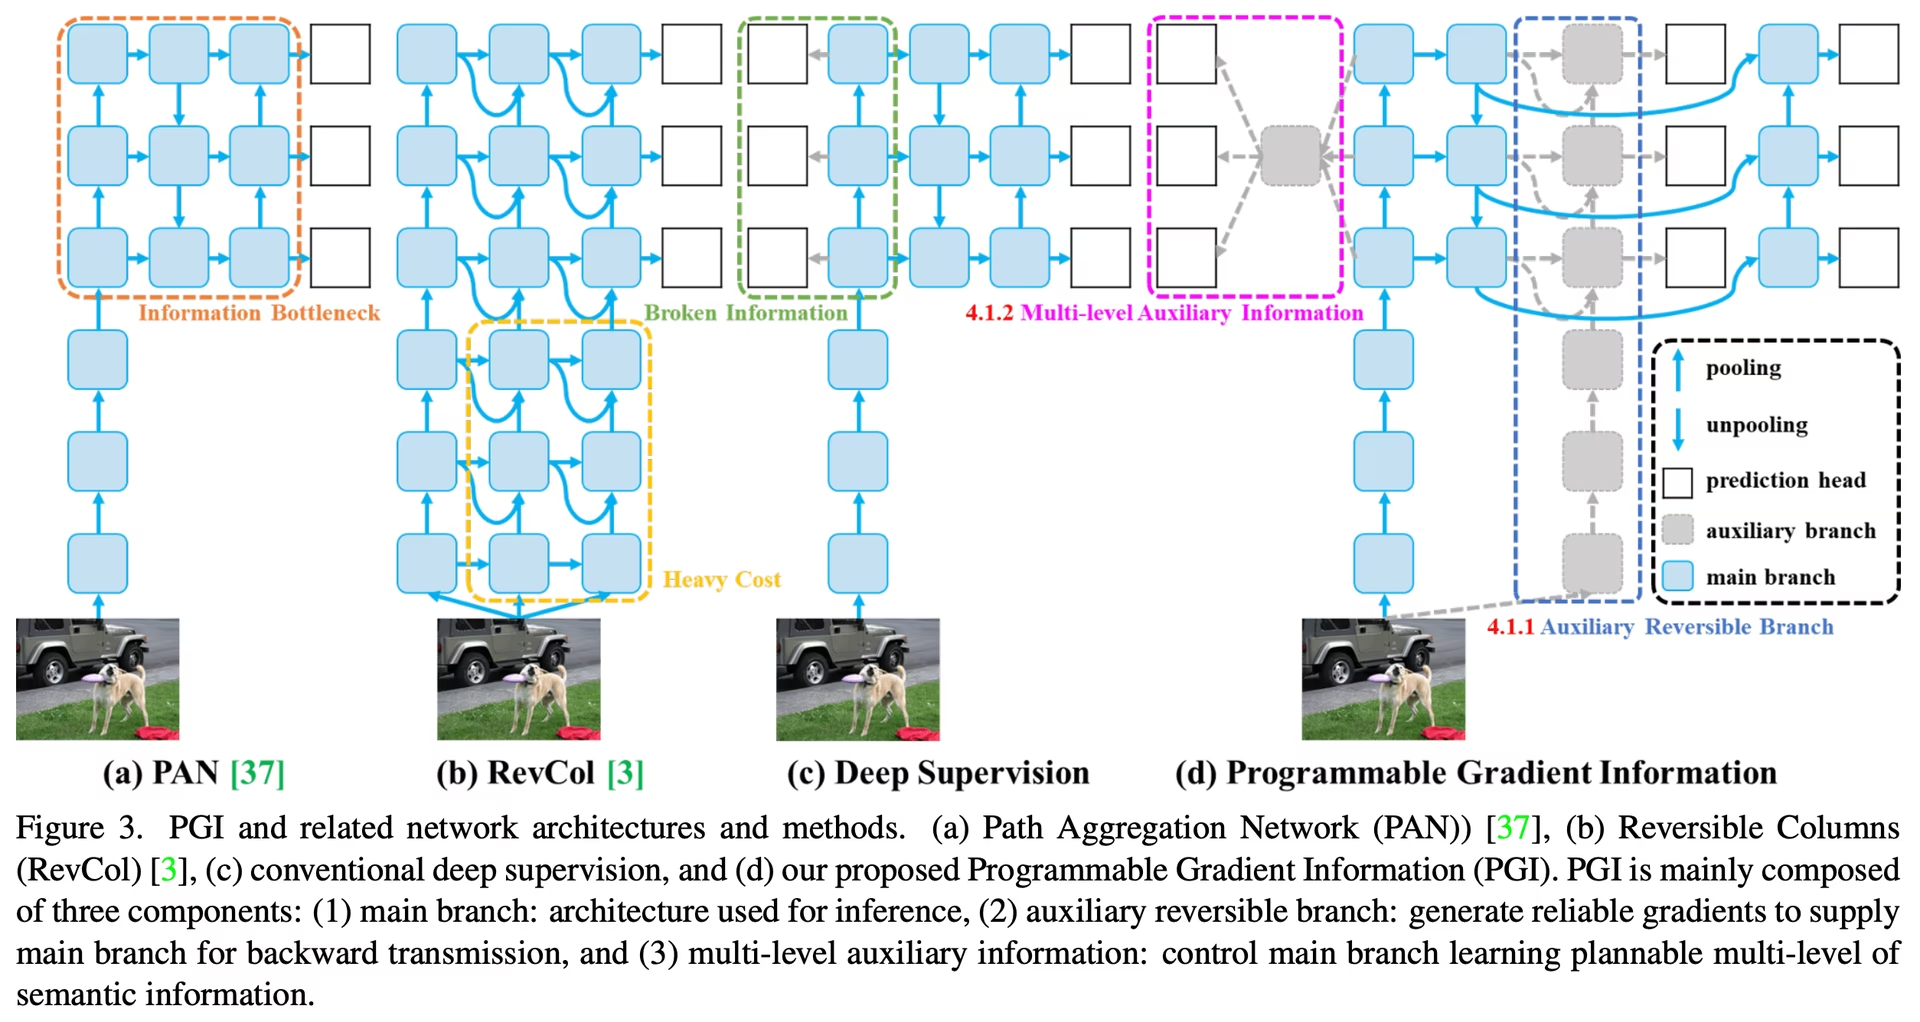
Giới thiệu về YOLOv9#
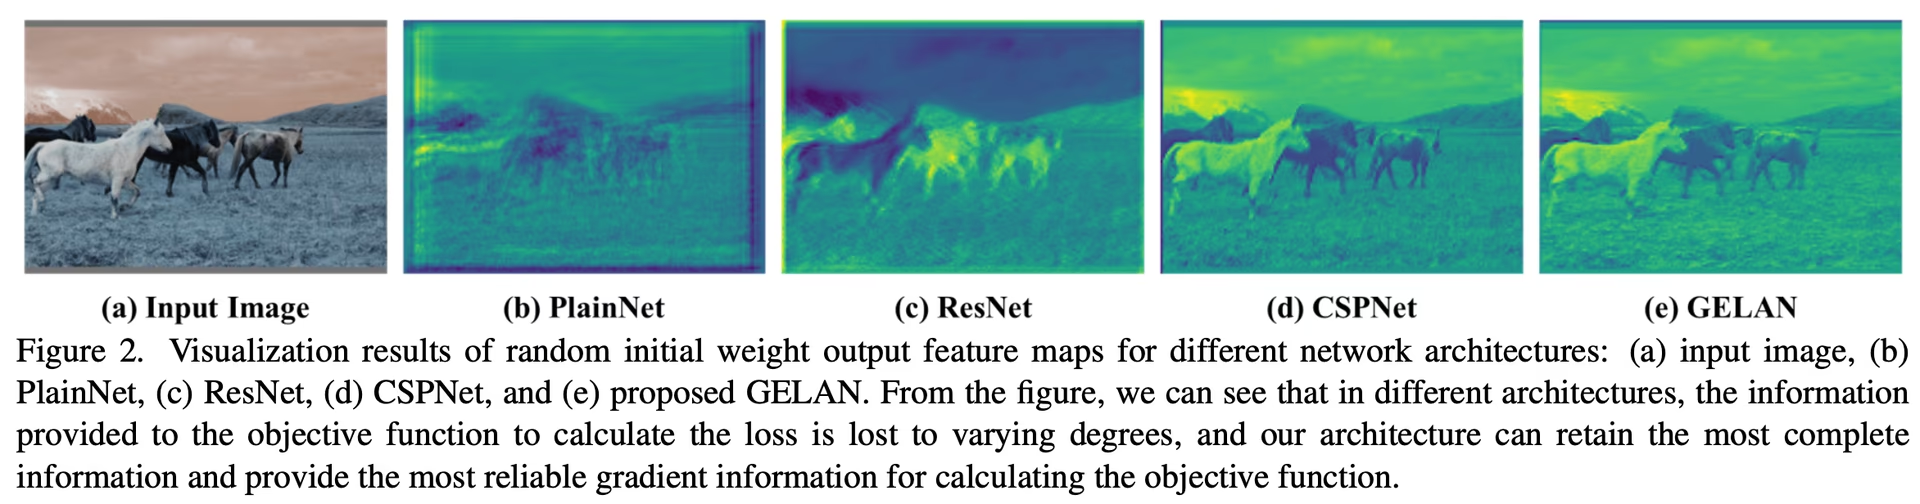
YOLOv9 giải quyết tình trạng mất thông tin vốn có trong các mạng neural sâu. Bằng cách tích hợp PGI và kiến trúc GELAN, YOLOv9 tăng khả năng học của model và giữ lại thông tin quan trọng trong suốt quá trình phát hiện, qua đó cải thiện cả độ chính xác lẫn hiệu quả.
Những đổi mới cốt lõi của YOLOv9#
Thiết kế của YOLOv9 hướng đến giải quyết tình trạng mất thông tin trong mạng neural sâu. Nguyên lý nút thắt thông tin và việc sử dụng các hàm khả nghịch là những yếu tố cốt lõi trong thiết kế, giúp YOLOv9 duy trì hiệu quả và độ chính xác cao.
Nguyên lý Nút thắt Thông tin#
Nguyên lý Nút thắt Thông tin cho thấy một thách thức căn bản trong học sâu: khi dữ liệu đi qua các lớp liên tiếp của mạng, nguy cơ mất thông tin tăng lên. Hiện tượng này được biểu diễn bằng công thức:
I(X, X) >= I(X, f_theta(X)) >= I(X, g_phi(f_theta(X)))trong đó I biểu thị thông tin tương hỗ, còn f và g lần lượt biểu thị các hàm biến đổi với tham số theta và phi. YOLOv9 khắc phục thách thức này bằng cách triển khai Thông tin Gradient Có thể Lập trình (PGI), giúp bảo toàn dữ liệu thiết yếu xuyên suốt chiều sâu mạng, đảm bảo tạo gradient đáng tin cậy hơn và nhờ đó cải thiện hội tụ cũng như hiệu năng của model.
Hàm khả nghịch#
Khái niệm Hàm khả nghịch là một nền tảng khác trong thiết kế của YOLOv9. Một hàm được xem là khả nghịch nếu có thể đảo ngược mà không làm mất thông tin, như biểu thức sau:
X = v_zeta(r_psi(X))với psi và zeta lần lượt là tham số cho hàm khả nghịch và hàm nghịch đảo của hàm đó. Đặc tính này rất quan trọng đối với các kiến trúc deep learning, vì cho phép mạng duy trì luồng thông tin đầy đủ, từ đó cập nhật tham số model chính xác hơn. YOLOv9 tích hợp các hàm khả nghịch trong kiến trúc để giảm thiểu nguy cơ suy giảm thông tin, đặc biệt ở các layer sâu hơn, đảm bảo bảo toàn dữ liệu quan trọng cho tác vụ phát hiện đối tượng.
Tác động đến model gọn nhẹ#
Giải quyết vấn đề mất thông tin đặc biệt quan trọng đối với các model gọn nhẹ, vốn thường có quá ít tham số và dễ mất một lượng thông tin đáng kể trong quá trình truyền xuôi. Kiến trúc YOLOv9, thông qua việc sử dụng PGI và hàm khả nghịch, đảm bảo rằng ngay cả với model được tinh giản, thông tin thiết yếu cần cho việc phát hiện đối tượng chính xác vẫn được giữ lại và sử dụng hiệu quả.
Thông tin Gradient Có thể Lập trình (PGI)#
PGI là một khái niệm mới được giới thiệu trong YOLOv9 để xử lý vấn đề nút thắt thông tin, đảm bảo bảo toàn dữ liệu thiết yếu qua các lớp sâu của mạng. Nhờ đó, model có thể tạo ra gradient đáng tin cậy, hỗ trợ cập nhật model chính xác và cải thiện hiệu năng phát hiện tổng thể.
Mạng Tổng hợp Lớp Hiệu quả Tổng quát (GELAN)#
GELAN là kiến trúc cải thiện việc sử dụng tham số và hiệu quả tính toán của YOLOv9. Thiết kế này cho phép tích hợp linh hoạt nhiều khối tính toán khác nhau, giúp YOLOv9 thích ứng với nhiều ứng dụng mà không ảnh hưởng đến tốc độ hoặc độ chính xác.
Benchmark YOLOv9#
Benchmark YOLOv9 bằng chế độ Benchmark của Ultralytics bao gồm việc đánh giá hiệu năng model đã huấn luyện và kiểm định trong các tình huống thực tế. Quy trình này bao gồm:
- Đánh giá hiệu năng: Đánh giá tốc độ và độ chính xác của model.
- Định dạng xuất: Kiểm thử model trên nhiều định dạng xuất khác nhau để đảm bảo đáp ứng các tiêu chuẩn cần thiết và hoạt động tốt trong nhiều môi trường.
- Hỗ trợ framework: Thực hiện các đánh giá này trong package Ultralytics để đảm bảo kết quả nhất quán và đáng tin cậy.
Thông qua benchmark, bạn có thể đảm bảo model không chỉ hoạt động tốt trong môi trường kiểm thử có kiểm soát mà còn duy trì hiệu năng cao trong các ứng dụng thực tế.
Xem: Cách benchmark model YOLOv9 bằng package Python của Ultralytics
Hiệu năng trên bộ dữ liệu MS COCO#
Tại thời điểm ra mắt, YOLOv9 thiết lập các benchmark mới trên dataset COCO ở nhiều quy mô model. Bảng dưới đây liệt kê độ chính xác, số tham số và FLOPs của từng model YOLOv9 có trong Ultralytics.
Các biến thể YOLOv9, từ model t cỡ nhỏ đến model e cỡ lớn, cải thiện độ chính xác (mAP) trong khi duy trì hoặc giảm số tham số và lượng tính toán (FLOPs) so với các phiên bản trước và model cạnh tranh.
So với các detector thời gian thực khác, YOLOv9 đạt được những cải thiện sau:
- Model gọn nhẹ: YOLOv9s vượt trội hơn YOLO MS-S về hiệu quả tham số và tải tính toán, đồng thời cải thiện AP thêm 0.4∼0.6%.
- Model cỡ vừa đến lớn: YOLOv9m và YOLOv9e cải thiện sự cân bằng giữa độ phức tạp của model và hiệu năng phát hiện, giảm số tham số và lượng tính toán đồng thời nâng cao độ chính xác.
Model YOLOv9c sử dụng ít hơn 42% số tham số và giảm 21% lượng tính toán so với YOLOv7 AF trong khi đạt độ chính xác tương đương. Model YOLOv9e sử dụng ít hơn 15% số tham số và giảm 25% lượng tính toán so với YOLOv8x, đồng thời cải thiện AP thêm 1,7%.
Các kết quả này cho thấy YOLOv9 cải thiện hiệu quả tính toán mà không ảnh hưởng đến độ chính xác cần thiết cho phát hiện đối tượng thời gian thực và các tác vụ thị giác máy tính khác.
Kết luận#
Ra mắt vào tháng 2 năm 2024, YOLOv9 cải thiện hiệu quả và độ chính xác của phát hiện đối tượng thời gian thực. Bằng cách giải quyết tình trạng mất thông tin với PGI và GELAN, YOLOv9 thiết lập các benchmark mới tại thời điểm ra mắt. Kể từ đó, các model mới hơn như YOLO26 và YOLO11 đã mang đến những cải tiến hơn nữa, nhưng các cải tiến kiến trúc của YOLOv9 vẫn tiếp tục ảnh hưởng đến lĩnh vực này.
Ví dụ sử dụng#
Ví dụ này minh họa các ví dụ đơn giản về huấn luyện và suy luận với YOLOv9.
Có thể truyền các model *.pt pretrained PyTorch cũng như các file cấu hình *.yaml vào class YOLO() để tạo một instance model trong Python:
from ultralytics import YOLO

# Tạo model YOLOv9c từ đầu
model = YOLO("yolov9c.yaml")

# Tạo model YOLOv9c từ trọng số đã huấn luyện trước
model = YOLO("yolov9c.pt")

# Hiển thị thông tin model (không bắt buộc)
model.info()

# Huấn luyện model trên dataset mẫu COCO8 trong 100 epoch
results = model.train(data="coco8.yaml", epochs=100, imgsz=640)

# Chạy suy luận bằng model YOLOv9c trên ảnh 'bus.jpg'
results = model("path/to/bus.jpg")
Các tác vụ và chế độ được hỗ trợ#
Dòng YOLOv9 cung cấp nhiều model cho các tác vụ phát hiện đối tượng và phân đoạn instance, đáp ứng nhiều mức ngân sách tính toán và yêu cầu độ chính xác khác nhau.
| Model | Tên tệp | Tác vụ | Huấn luyện | Validation | Suy luận | Export |
|---|---|---|---|---|---|---|
| YOLOv9 | yolov9t.pt yolov9s.pt yolov9m.pt yolov9c.pt yolov9e.pt | Phát hiện đối tượng | ✅ | ✅ | ✅ | ✅ |
| YOLOv9-seg | yolov9c-seg.pt yolov9e-seg.pt | Phân đoạn đối tượng | ✅ | ✅ | ✅ | ✅ |
Bảng này tóm tắt các biến thể model YOLOv9 và khả năng hỗ trợ các chế độ Huấn luyện, Đánh giá, Suy luận và Xuất.
Huấn luyện model YOLOv9 sẽ cần nhiều tài nguyên hơn và mất nhiều thời gian hơn so với model YOLOv8 có kích thước tương đương.
Trích dẫn và lời cảm ơn#
Chúng tôi xin ghi nhận những đóng góp đáng kể của các tác giả YOLOv9 trong lĩnh vực phát hiện đối tượng thời gian thực:
@inproceedings{wang2024yolov9,
  title={YOLOv9: Learning What You Want to Learn Using Programmable Gradient Information},
  author={Wang, Chien-Yao and Yeh, I-Hau and Liao, Hong-Yuan Mark},
  booktitle={Computer Vision -- ECCV 2024},
  pages={1--21},
  year={2024},
  organization={Springer Nature Switzerland}
}
Bài báo YOLOv9 chính thức được xuất bản trong kỷ yếu Springer ECCV 2024, cùng với bản tiền xuất bản trên arXiv. Các tác giả đã công khai công trình của mình và codebase có thể được truy cập trên GitHub. Chúng tôi trân trọng những nỗ lực của họ trong việc thúc đẩy lĩnh vực này và giúp cộng đồng rộng lớn hơn tiếp cận công trình.
Câu hỏi thường gặp#
YOLOv9 giới thiệu hai kỹ thuật chính: Thông tin Gradient có thể lập trình (PGI) và Mạng tổng hợp lớp hiệu quả tổng quát (GELAN). Những đổi mới này giải quyết thách thức mất thông tin trong mạng nơ-ron sâu, đảm bảo hiệu quả, độ chính xác và khả năng thích ứng cao. PGI bảo toàn dữ liệu thiết yếu qua các lớp mạng, còn GELAN tối ưu hóa việc sử dụng tham số và hiệu quả tính toán.
Khi ra mắt, YOLOv9 vượt trội hơn các bộ phát hiện đối tượng thời gian thực tiên tiến khác về độ chính xác và hiệu quả. Trên dataset COCO, các model YOLOv9 đạt điểm mAP cao hơn ở nhiều kích thước khác nhau, đồng thời duy trì hoặc giảm chi phí tính toán. Chẳng hạn, YOLOv9c đạt độ chính xác tương đương với ít hơn 42% tham số và giảm 21% nhu cầu tính toán so với YOLOv7 AF.
Bạn có thể huấn luyện model YOLOv9 bằng cả lệnh Python lẫn CLI. Với Python, khởi tạo model bằng lớp
YOLOrồi gọi phương thứctrain:from ultralytics import YOLO # Tạo model YOLOv9c từ trọng số đã huấn luyện trước và huấn luyện model model = YOLO("yolov9c.pt") results = model.train(data="coco8.yaml", epochs=100, imgsz=640)Để huấn luyện bằng CLI, hãy chạy:
yolo train model=yolov9c.yaml data=coco8.yaml epochs=100 imgsz=640Tìm hiểu thêm về ví dụ sử dụng cho tác vụ huấn luyện và suy luận.
YOLOv9 được thiết kế để giảm thiểu tình trạng mất thông tin, điều đặc biệt quan trọng đối với các model gọn nhẹ vốn thường dễ mất lượng thông tin đáng kể. Bằng cách tích hợp Thông tin Gradient Có thể Lập trình (PGI) và hàm khả nghịch, YOLOv9 đảm bảo giữ lại dữ liệu thiết yếu, cải thiện độ chính xác và hiệu quả của model. Nhờ đó, YOLOv9 rất phù hợp với các ứng dụng cần model nhỏ gọn nhưng có hiệu năng cao. Để biết thêm chi tiết, hãy xem mục về tác động của YOLOv9 đến model gọn nhẹ.
YOLOv9 hỗ trợ phát hiện đối tượng và phân đoạn thực thể trong các chế độ huấn luyện, validation, suy luận và export.


Bình luận482
Đặt câu hỏi, chia sẻ kết quả hoặc giúp đỡ người khác.
vuvanhieu
to load a YOLOv5 model def load_yolov5_model(yolo_model_path): device = torch.device('cuda' if torch.cuda.is_available() else 'cpu') model = torch.hub.load('ultralytics/yolov5', 'custom', path=yolo_model_path, force_reload=True).to(device) return model
How in yolov8, yolov9?
1 Paula DerrengerUltralytics
To load a YOLOv8 or YOLOv9 model, you can use the
YOLOclass from the Ultralytics package. Here's a concise way to do it:from ultralytics import YOLO # Load a YOLOv8 model model_v8 = YOLO("yolov8n.pt") # Load a YOLOv9 model model_v9 = YOLO("yolov9c.pt")For more details, you can refer to the YOLOv9 documentation: https://docs.ultralytics.com/models/yolov9/.
MoAbbasid
@glenn-jocher @pderrenger any idea of when the lightweight models can be used in ultralytics?
1 Glenn JocherUltralytics(đã chỉnh sửa)
Hi there! 😊
Lightweight models are available in Ultralytics. YOLOv9 ships
yolov9t.pt,yolov9s.ptandyolov9m.ptalongsideyolov9c.ptandyolov9e.pt. For new projects we recommend YOLO26, whose smallest modelyolo26n.ptis built for efficiency.To try a lightweight model:
yolo train model=yolo26n.pt data=coco128.yaml epochs=100If you're tinkering with custom lightweight designs, copy an existing model YAML from the Ultralytics repo and adjust its layers or scales. Contributions or insights are welcome.
Happy detecting!
deepanalyticszlc
Very exciting! Is there a schedule for release of lightweight models?
1- Paula DerrengerUltralytics(đã chỉnh sửa)
@deepanalyticszlc hey there! 😊
Lightweight YOLOv9 models are now available:
yolov9t.pt,yolov9s.ptandyolov9m.pt, alongsideyolov9c.ptandyolov9e.pt. For the latest releases, see the Ultralytics GitHub releases.Here's a little snippet on how to load and use YOLOv9 for predictions:
from ultralytics import YOLO

# Load YOLOv9 model
model = YOLO('yolov9t.pt')  # Replace 'yolov9t.pt' with your model file

# Run inference on an image
results = model('path/to/your/image.jpg')

# Display results
results[0].show()
For new projects, we recommend YOLO26, which also comes in small sizes like
yolo26n.pt. ⏰
DolapoSalim(đã chỉnh sửa)
@glenn-jocher Kindly assist with this TypeError: TypeError: ERROR C:\path_to_custom_model/yolov9c.pt appears to be an Ultralytics YOLOv5 model originally trained with https://github.com/ultralytics/yolov5. This model is NOT forwards compatible with YOLOv8 at https://github.com/ultralytics/ultralytics. Recommend fixes are to train a new model using the latest 'ultralytics' package or to run a command with an official Ultralytics model, i.e. 'yolo predict model=yolo11n.pt'
Here is my code:
from ultralytics import YOLO

model = YOLO(path_to_YOLOV9.pt )

results = model.predict(source="IMAGE_SOURCE", show=True, conf=0.10)
Note, I am actually working with a custom trained YOLOV9
- Glenn JocherUltralytics
@DolapoSalim to resolve the YOLOv5/YOLOv9 compatibility error when using custom-trained models, please ensure you're using the latest
ultralytics>=8.2.0package and retrain your YOLOv9 model using the official YOLOv9 configuration files from our documentation. For custom training guidance, see the YOLOv9 Training section in our docs.This error typically occurs when using older model formats - newer versions maintain full backward compatibility when models are trained with current Ultralytics implementations.
1
gusreic
This article claims that Yolov9 is based on Yolov5. The Yolov9 paper claims that v9 is based on Yolov7 which is also not based on 5. Is there any other way that would explain this claim? Otherwise maybe adjust the article.
- Glenn JocherUltralytics
@gusreic yes that's correct. YOLOv9 repo is a fork of my YOLOv5 repo. I know this because I wrote nearly all the files in the YOLOv9 repo myself. Unfortunately the author has failed to make this clear, though he did include a (hidden) acknowledgement at the bottom of the README.
1 Oh, that is really unfortunate, thank you for clearing it up since it is not directly apparent. Do you think that YOLOv9 is based on YOLOv5 only with respect to the structure of the repository or would you say that the architecture of the model itself is also based on the architecture of YOLOv5?
- Glenn JocherUltralytics
@gusreic thank you for your question! YOLOv9's repository structure is indeed based on Ultralytics YOLOv5, while its architecture introduces novel components like Programmable Gradient Information (PGI) and GELAN as described in the YOLOv9 documentation. The model itself represents an independent advancement building on broader YOLO research. We'll clarify this distinction in our article! 😊
ghost
Hello,
Thanks for the great documentation!
Quick question: Is the code licensed under AGPLv3 (Ultralytics) or GPLv3 (Wang, Chien-Yao and Liao, Hong-Yuan Mark Github)?
Thanks!
- Glenn JocherUltralytics
@ProfessorHT the YOLOv9 project codebase, developed by Wang, Chien-Yao and Liao, Hong-Yuan Mark, is available on GitHub and licensed under GPLv3, while Ultralytics models and software use the AGPL-3.0 license.
Thank you for your quick response. So to be sure if I use Yolov9 from this documentation with the ultralytics library i will be under the AGPLv3 license and i should buy a license?
- Glenn JocherUltralytics
Yes, if you use YOLOv9 models from the Ultralytics library, you are under the AGPL-3.0 license and would need an Enterprise License for commercial use, unless you open-source your entire project under AGPL-3.0.
 liuweiqing
Does it support automatic downloading of pretrained weights?
- Glenn JocherUltralytics
@14790897 yes, YOLOv9 supports automatic downloading of pretrained weights when using the
YOLO()class in Python or CLI commands, as long as the specified weights file (e.g.,yolov9c.pt) is available in the Ultralytics repository. You can find more details in the YOLOv9 documentation.
jane7166
Hello. I have retrained the YOLOv9 model, and I would like to deploy it as an API. How should I proceed?
- Glenn JocherUltralytics
@jane7166 to deploy your retrained YOLOv9 model as an API, you can use frameworks like FastAPI or Flask to build an endpoint and load your model using the Ultralytics Python package. Refer to the YOLOv9 documentation for guidance on inference, which can be integrated into your API logic. Let us know if you have further questions!
Gnoot01
I'm getting the following errors despite latest torch and ultralytics installs. Kindly assist
File "C:\Users\.venv\lib\site-packages\ultralytics\engine\model.py", line 547, in predict self.predictor.setup_model(model=self.model, verbose=is_cli) File "C:\Users\.venv\lib\site-packages\ultralytics\engine\predictor.py", line 303, in setup_model self.model = AutoBackend( File "C:\Users\.venv\lib\site-packages\torch\utils\_contextlib.py", line 116, in decorate_context return func(*args, **kwargs) File "C:\Users\.venv\lib\site-packages\ultralytics\nn\autobackend.py", line 145, in __init__ model = model.fuse(verbose=verbose) TypeError: BaseModel.fuse() got an unexpected keyword argument 'verbose'- Glenn JocherUltralytics
@Gnoot01 it seems like there's a compatibility issue with the
fusemethod. Please ensure you're using the latest version of the Ultralytics package. If the issue persists, consider checking for any updates or changes in the repository that might address this. For further assistance, you can explore the YOLOv9 documentation. @glenn-jocher Hi, I'm using the latest ultralytics 8.3.24 and latest torch. However, still facing this issue. Any suggestions?
- Glenn JocherUltralytics
@Gnoot01 i'm sorry you're experiencing this issue. Please ensure your Ultralytics package is up-to-date. If the problem persists, try reinstalling the package or checking for any recent updates in the repository. For more details, you can refer to the YOLOv9 documentation.
foskyblue
I'm having issues with my Yolov9 model exported to tflite. Model was successfully exported to tflite but I cannot get the right bounding boxes. I'm following the steps listed here: https://stackoverflow.com/questions/76381317/yolov8-tflite-python-predictions-and-interpreting-output (for folov8) to make inference for my yolov9 tflite model.
1Step 1: Resizing and Padding (Letterboxing) Step 2: Non-Maximum Suppression (NMS) Step 3: Rescaling Bounding Boxes
However, when I draw the outputed bounding boxes on my image the boxes don't fit the objects in the image correctly.
The code I'm using can be seen below:
from tflite_runtime.interpreter import Interpreter from PIL import Image import numpy as np from glob import glob from typing import Tuple, List interpreter = None input_shape = (320, 576) # Input tensor dimensions (width, height) in pixels input_index = 0 # Input tensor index (from input details in model signature) output_index = 409 model_path = 'model/saved_model.tflite' def load_model(): interpreter = None interpreter = Interpreter(model_path=model_path, num_threads=2) interpreter.allocate_tensors() input_details = interpreter.get_input_details() global input_shape input_shape = tuple(input_details[0]['shape'][1:3]) global input_index input_index = input_details[0]['index'] output_details = interpreter.get_output_details() global output_index output_index = output_details[0]['index'] return interpreter def letter_box(img: np.ndarray, new_shape: Tuple[int, int]) -> np.ndarray: """ Resizes an image to fit within a new shape while maintaining the aspect ratio, and pads the remaining space with a constant value. Args: img (np.ndarray): The input image as a NumPy array. new_shape (Tuple[int, int]): The desired output shape (height, width). Returns: np.ndarray: The resized and padded image. """ shape = img.shape[:2] # Calculate the scaling ratio to fit the image within the new shape r = min(new_shape[0] / shape[0], new_shape[1] / shape[1]) # Calculate the new unpadded dimensions new_unpad = int(round(shape[1] * r)), int(round(shape[0] * r)) # Calculate the padding required on each side dw, dh = new_shape[1] - new_unpad[0], new_shape[0] - new_unpad[1] dw, dh = dw / 2, dh / 2 # Resize the image if necessary if shape[::-1] != new_unpad: img = Image.fromarray(img).resize(new_unpad, Image.Resampling.BILINEAR) img = np.array(img) # Calculate the top, bottom, left, and right padding values top, bottom = int(round(dh - 0.1)), int(round(dh + 0.1)) left, right = int(round(dw - 0.1)), int(round(dw + 0.1)) # Add padding to the image img = np.pad(img, ((top, bottom), (left, right), (0, 0)), mode='constant', constant_values=114) return img def non_max_suppression( prediction: np.ndarray, conf_thres: float = 0.25, iou_thres: float = 0.45, max_det: int = 300, max_wh: int = 7680, ): """ Perform non-maximum suppression (NMS) on a single image prediction. Args: prediction (np.ndarray): A numpy array of shape (1, num_boxes, num_classes + 4 + num_masks) containing the predicted boxes, classes, and masks. conf_thres (float): Confidence threshold for filtering boxes (0.0 to 1.0). iou_thres (float): IoU threshold for NMS (0.0 to 1.0). max_det (int): Maximum number of boxes to keep after NMS. max_wh (int): Maximum box width and height in pixels. Returns: np.ndarray: Array containing kept boxes with format (x1, y1, x2, y2, confidence, class, mask1, mask2, ...). """ # Input validation (can be removed if you're sure of your input) if 0 > conf_thres > 1: raise ValueError(f"Invalid Confidence threshold {conf_thres}, valid values are between 0.0 and 1.0") if 0 > iou_thres > 1: raise ValueError(f"Invalid IoU {iou_thres}, valid values are between 0.0 and 1.0") # Extract dimensions and metadata directly _, _, dims = prediction.shape nc = dims - 4 - prediction.shape[1] # number of classes nm = dims - nc - 4 # number of masks mi = 4 + nc # mask start index # Process the single image in the batch x = prediction[0] # Extract the single image data # Move class scores to last axis and threshold x = np.transpose(x, (1, 0)) xc = x[..., 4:mi].max(axis=-1) > conf_thres x = x[xc] if not x.shape[0]: # No boxes left after confidence thresholding return np.zeros((0, 6 + nm)) # Convert xywh to xyxy directly on the filtered boxes x[..., :4] = xywh2xyxy(x[..., :4]) # Split and process boxes, classes, and masks # pylint: disable=unbalanced-tuple-unpacking box, cls, mask = np.split(x, (4, mi), 1) conf = cls.max(1) j = cls.argmax(1) x = np.concatenate((box, conf[:, None], j[:, None].astype(float), mask), 1) x = x[conf > conf_thres] n = x.shape[0] if not n: # No boxes left after additional confidence thresholding return np.zeros((0, 6 + nm)) # NMS (simplified since we're dealing with a single image) c = x[:, 5:6] * max_wh boxes, scores = x[:, :4] + c, x[:, 4] i = numpy_nms(boxes, scores, iou_thres) i = i[:max_det] return x[i] def numpy_nms(boxes: np.ndarray, scores: np.ndarray, iou_threshold: float = 0.5) -> np.ndarray: """ Perform Non-Maximum Suppression (NMS) on a set of bounding boxes. Args: boxes (np.ndarray): Array of shape (N, 4) representing N bounding boxes. Each box is [x1, y1, x2, y2]. scores (np.ndarray): Array of shape (N,) representing the confidence scores for each box. iou_threshold (float): IoU threshold for suppressing overlapping boxes. Defaults to 0.5. Returns: np.ndarray: Boolean array of shape (N,) indicating which boxes to keep. """ # Sort boxes by score in descending order order = scores.argsort()[::-1] keep = np.ones(len(boxes), dtype=bool) # Calculate IoU matrix ious = box_iou_batch(boxes, boxes) np.fill_diagonal(ious, 0) # Set self-IoU to 0 for i, idx in enumerate(order): if not keep[idx]: continue # Suppress boxes with IoU > threshold overlap = ious[idx] > iou_threshold keep[order[i + 1:]] &= ~overlap[order[i + 1:]] return keep def box_iou_batch(boxes_a: np.ndarray, boxes_b: np.ndarray) -> np.ndarray: """ Calculate the Intersection over Union (IoU) between two sets of bounding boxes. Args: boxes_a (np.ndarray): Array of shape (N, 4) representing N bounding boxes. boxes_b (np.ndarray): Array of shape (M, 4) representing M bounding boxes. Returns: np.ndarray: Array of shape (N, M) containing IoU values for each pair of boxes. Note: Each bounding box is represented as [x1, y1, x2, y2], where (x1, y1) is the top-left corner and (x2, y2) is the bottom-right corner. """ # Calculate areas of boxes_a area_a = (boxes_a[:, 2] - boxes_a[:, 0]) * (boxes_a[:, 3] - boxes_a[:, 1]) # Calculate areas of boxes_b area_b = (boxes_b[:, 2] - boxes_b[:, 0]) * (boxes_b[:, 3] - boxes_b[:, 1]) # Calculate intersection coordinates top_left = np.maximum(boxes_a[:, None, :2], boxes_b[:, :2]) bottom_right = np.minimum(boxes_a[:, None, 2:], boxes_b[:, 2:]) # Calculate intersection area area_inter = np.prod(np.clip(bottom_right - top_left, a_min=0, a_max=None), 2) # Calculate IoU return area_inter / (area_a[:, None] + area_b - area_inter) def xywh2xyxy(box: np.ndarray) -> np.ndarray: """ Convert bounding box coordinates from (x, y, width, height) format to (x1, y1, x2, y2) format where (x1, y1) is the top-left corner and (x2, y2) is the bottom-right corner. Args: x (np.ndarray): The input bounding box coordinates in (x, y, width, height) format. Returns: np.ndarray: The bounding box coordinates in (x1, y1, x2, y2) format. """ if box.shape[-1] != 4: raise ValueError(f"input shape last dimension expected 4 but input shape is {box.shape}") # pylint: disable=unbalanced-tuple-unpacking xy, wh = np.split(box, [2], axis=-1) wh_half = wh / 2 return np.concatenate([xy - wh_half, xy + wh_half], axis=-1) def preprocess_image(pil_image: Image.Image, input_size: Tuple[int, int]) -> np.ndarray: """ Preprocesses an image for inference with a TFLite model. Args: image_path (str): Path to the image file. input_size (Tuple[int, int]): Desired input size (height, width) for the model. Returns: np.ndarray: Preprocessed image as a NumPy array, ready for inference. """ if pil_image.mode != "RGB": pil_image = pil_image.convert("RGB") im = np.asarray(pil_image) im = letter_box(im, new_shape=input_size) im = np.expand_dims(im, axis=0) # goal is to have the format (number of images, size of image, number of channnels) im = im.astype(np.float32) / 255.0 # Normalize to 0.0 - 1.0 return im def postprocess_results(output: np.ndarray, model_input_size: Tuple[int, int], image_original_size: Tuple[int, int]) -> np.ndarray: """ Postprocesses the raw outputs from a TFLite model, including scaling bounding boxes back to the original image size. Args: output (np.ndarray): List of output tensors from the TFLite model. model_input_size (Tuple[int, int]): Desired input size (height, width) for the model. image_original_size (Tuple[int, int]): Original size (height, width) of the input image. Returns: np.ndarray: Postprocessed results with bounding boxes adjusted to original image size. """ predictions = non_max_suppression(output, conf_thres=0.25, iou_thres=0.45, max_det=300, max_wh=1) return scale_boxes(image_original_size, predictions, model_input_size) def scale_boxes(image_original_size: Tuple[int, int], boxes: np.ndarray, model_input_size: Tuple[int, int]): """ Rescales bounding boxes (in the format of xyxy by default) from the shape of the image they were originally specified in (img1_shape) to the shape of a different image (img0_shape). Args: image_original_size (Tuple[int, int]): The shape of the image that the bounding boxes are for, in the format of (height, width). boxes (np.ndarray): the bounding boxes of the objects in the image, in the format of (x1, y1, x2, y2) model_input_size (Tuple[int, int]): the shape of the target image, in the format of (height, width). Returns: np.ndarray: The scaled bounding boxes, in the format of (x1, y1, x2, y2) """ # calculate from img0_shape gain = min(model_input_size[0] / image_original_size[0], model_input_size[1] / image_original_size[1]) # gain = old / new pad = ( round((model_input_size[1] - image_original_size[1] * gain) / 2 - 0.1) / model_input_size[1], round((model_input_size[0] - image_original_size[0] * gain) / 2 - 0.1) / model_input_size[0], ) # wh padding inner_image_scale = ( (1 - pad[0] * 2), (1 - pad[1] * 2), ) # wh scale boxes[..., 0] = (boxes[..., 0] - pad[0]) / inner_image_scale[0] # x padding boxes[..., 1] = (boxes[..., 1] - pad[1]) / inner_image_scale[1] # y padding boxes[..., 2] = (boxes[..., 2] - pad[0]) / inner_image_scale[0] # x padding boxes[..., 3] = (boxes[..., 3] - pad[1]) / inner_image_scale[1] # y padding boxes[..., [0, 2]] = boxes[..., [0, 2]].clip(0, 1) # x1, x2 boxes[..., [1, 3]] = boxes[..., [1, 3]].clip(0, 1) # y1, y2 return boxes def prepare_input(image_pil): # Input image must match input shape (ex: 640x640 pixels) [note: only use BILINEAR here] resized = image_pil.copy().resize(input_shape, resample=Image.Resampling.BILINEAR) # SSD Mobilenet V2 FPNLite take as input pixels between [-1.0, 1.0] expanded = np.expand_dims(np.asarray(resized, dtype=np.float32) * 2. / 255. - 1., axis=0) del resized # Enforce garbage collection sooner than later return expanded def predict(tmp_images_dir): interpreter = load_model() model_predictions = [] for img_path in tmp_images_dir: pil_image = Image.open(img_path) input_data = preprocess_image(pil_image, input_shape) interpreter.set_tensor(input_index, input_data) interpreter.invoke() output_data = interpreter.get_tensor(output_index) preds = postprocess_results(output_data, input_shape, (pil_image.size[1], pil_image.size[0])) model_predictions.append({ 'detection_classes': (preds[:, 5] + 1).tolist(), # Class values are offset by +1.0 'detection_boxes': preds[:, 0:4].tolist(), 'detection_scores': preds[:, 4].tolist(), }) print(model_predictions) images_path = glob('utilities/images/*.JPG') predict(images_path)- Glenn JocherUltralytics
@foskyblue it seems like the issue might be related to the scaling and padding logic when converting bounding boxes. Ensure that the
scale_boxesfunction correctly rescales the boxes to the original image size. For more detailed guidance, please refer to the YOLOv9 documentation: https://docs.ultralytics.com/models/yolov9/. Hi Glen thanks for your response. Unfortunately I find it difficult to correctly scale the bounding boxes from the example script I mentioned above: https://stackoverflow.com/questions/76381317/yolov8-tflite-python-predictions-and-interpreting-output.
How can I implement the YOLOv9 TFLite model with an input ape of [1, 320, 576, 3] and output shape of [1, 19, 3780] in Python?
- Glenn JocherUltralytics
To correctly scale bounding boxes for your YOLOv9 TFLite model, ensure your
scale_boxesfunction accurately adjusts the coordinates based on the original image size and model input size. Verify that padding and scaling calculations align with your preprocessing steps. For further details, please refer to the YOLOv9 documentation.