Theo dõi nhiều đối tượng bằng Ultralytics YOLO
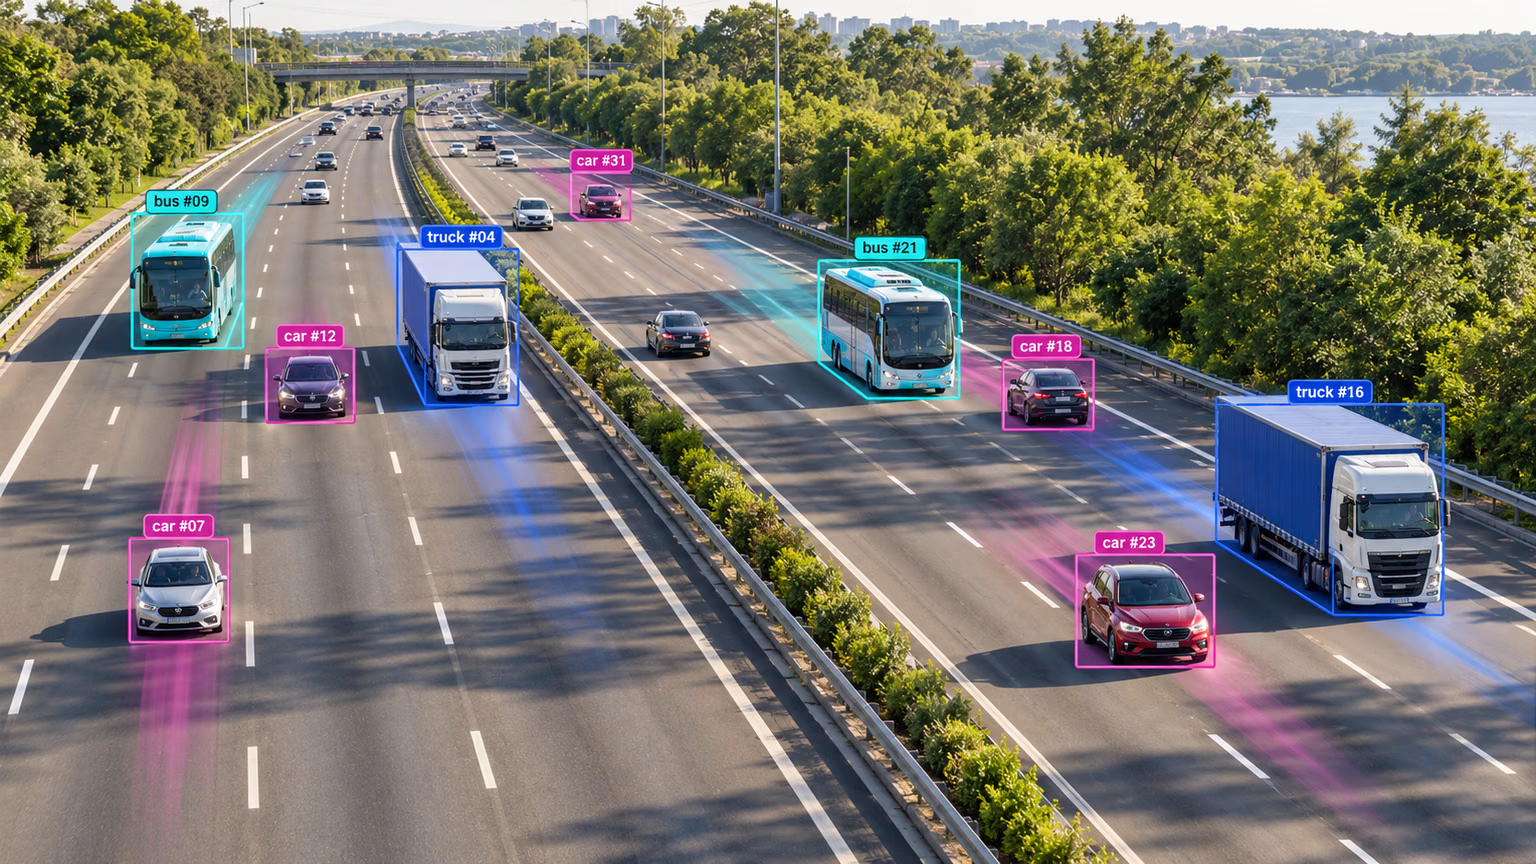
Tracking nhiều đối tượng trong phân tích video xác định vị trí và lớp của đối tượng trong mỗi khung hình, đồng thời duy trì ID riêng cho từng đối tượng được phát hiện khi video tiếp diễn. Các ứng dụng trải rộng từ giám sát và an ninh đến phân tích thể thao thời gian thực.
Xem bản xem trước YOLO27 chưa phát hành để biết về hỗ trợ theo dõi dự kiến.
Bắt đầu từ ultralytics 8.4.63, OC-SORT, Deep OC-SORT, FastTracker và TrackTrack được cung cấp cùng với BoT-SORT và ByteTrack.
Tại sao nên chọn Ultralytics YOLO để theo dõi đối tượng?#
Đầu ra từ các tracker của Ultralytics nhất quán với đầu ra phát hiện đối tượng tiêu chuẩn, nhưng có thêm ID đối tượng. Điều này giúp dễ dàng theo dõi đối tượng trong luồng video và thực hiện phân tích tiếp theo. Những lý do chính để sử dụng Ultralytics YOLO cho tracking đối tượng:
- Hiệu quả: Xử lý luồng video theo thời gian thực mà không ảnh hưởng đến độ chính xác.
- Linh hoạt: Hỗ trợ nhiều thuật toán tracking và cấu hình.
- Dễ sử dụng: API Python và các tùy chọn CLI đơn giản giúp tích hợp và triển khai nhanh chóng.
- Khả năng tùy chỉnh: Dễ sử dụng với các model YOLO được huấn luyện tùy chỉnh, cho phép tích hợp vào các ứng dụng chuyên biệt theo lĩnh vực.
Xem: Cách theo dõi nhiều đối tượng bằng Ultralytics YOLO26 | BoT-SORT và ByteTrack | VisionAI 🚀
Ứng dụng thực tế#
| Giao thông vận tải | Bán lẻ | Nuôi trồng thủy sản |
|---|---|---|
| Theo dõi phương tiện | Theo dõi người | Theo dõi cá |
Bắt đầu nhanh#
Chạy theo dõi trên video bằng tracker TrackTrack mặc định. Chuyển sang tracker khác bằng cách thay đổi đối số tracker.
from ultralytics import YOLO

model = YOLO("yolo26n.pt")

# Tracker mặc định (TrackTrack)
results = model.track(source="https://youtu.be/LNwODJXcvt4", show=True)

# Chuyển sang ByteTrack
results = model.track(source="https://youtu.be/LNwODJXcvt4", show=True, tracker="bytetrack.yaml")
Để chạy tracker trên luồng video, hãy sử dụng model Detect, Segment, Pose hoặc OBB đã huấn luyện, chẳng hạn YOLO26n, YOLO26n-seg, YOLO26n-pose hoặc YOLO26n-obb; tất cả đều có trong bộ sưu tập YOLO26 trên Ultralytics Platform. Bạn có thể huấn luyện model tùy chỉnh cục bộ hoặc bằng dịch vụ huấn luyện đám mây của Ultralytics Platform.
from ultralytics import YOLO

# Nạp model chính thức hoặc model tùy chỉnh
model = YOLO("yolo26n.pt")  # Nạp model Detect chính thức
model = YOLO("yolo26n-seg.pt")  # Nạp model Segment chính thức
model = YOLO("yolo26n-pose.pt")  # Nạp model Pose chính thức
model = YOLO("path/to/best.pt")  # Nạp model được huấn luyện tùy chỉnh

# Thực hiện theo dõi bằng model
results = model.track("https://youtu.be/LNwODJXcvt4", show=True)  # Theo dõi bằng tracker mặc định
results = model.track("https://youtu.be/LNwODJXcvt4", show=True, tracker="bytetrack.yaml")  # bằng ByteTrack
Các tracker được hỗ trợ#
Ultralytics YOLO đi kèm sáu tracker tích hợp sẵn. Bật một tracker bằng cách truyền tệp cấu hình YAML của tracker đó vào đối số tracker.
| Tracker | Tệp cấu hình | Model chuyển động | Ngoại hình / ReID | Bù chuyển động camera | Xử lý che khuất |
|---|---|---|---|---|---|
| BoT-SORT | botsort.yaml | Kalman tuyến tính | Tùy chọn (with_reid) | Có thể cấu hình (gmc_method) | Bộ đệm theo dõi + liên kết lại ReID |
| ByteTrack | bytetrack.yaml | Kalman tuyến tính | Không có | Không | Cứu vãn hai giai đoạn cho đối tượng có độ tin cậy thấp |
| OC-SORT | ocsort.yaml | Kalman lấy quan sát làm trung tâm | Không có | Không | ORU, OCM, OCR cập nhật lại từ quan sát gần nhất |
| Deep OC-SORT | deepocsort.yaml | Kalman lấy quan sát làm trung tâm | Tùy chọn (with_reid) | Có thể cấu hình (gmc_method) | OC-SORT + EMA ngoại hình thích ứng tùy chọn |
| FastTracker | fasttrack.yaml | Kalman tuyến tính + quay lui | Không có | Không | Quay lui Kalman + mở rộng bbox khi bị che khuất |
| TrackTrack | tracktrack.yaml | Kalman tuyến tính (NSA) | Tùy chọn (with_reid) | Có thể cấu hình (gmc_method) | Liên kết đa tín hiệu lặp lại + TAI |
Nên dùng tracker nào?#
Dùng sơ đồ này để chọn điểm bắt đầu; tracktrack.yaml được sử dụng khi bạn không truyền tracker:
- Cần baseline nhanh nhất, đơn giản nhất? → ByteTrack (không ReID, không bù chuyển động camera, chi phí xử lý tối thiểu).
- Video quay bằng tay, drone hoặc camera chuyển động? → BoT-SORT (bổ sung bù chuyển động camera và ReID tùy chọn).
- Chuyển động phi tuyến (thể thao, khiêu vũ, đổi hướng đột ngột) và không dùng ReID? → OC-SORT (hiệu chỉnh lấy quan sát làm trung tâm mà không tốn chi phí xử lý ngoại hình).
- Cảnh đông người, camera chuyển động, trong đó nhầm lẫn ID là vấn đề chính? → Deep OC-SORT hoặc TrackTrack (cả hai đều hỗ trợ so khớp ngoại hình tùy chọn; TrackTrack còn bổ sung liên kết đa tín hiệu và loại bỏ ID trùng lặp).
- Thường xuyên chồng lấp một phần trong thời gian thực, không có ngân sách cho ReID? → FastTracker (biến thể ByteTrack nhận biết che khuất, có khả năng quay lui Kalman).
Chuyển đổi tracker#
Truyền tên tệp cấu hình tracker vào tracker=. Các phần code khác giữ nguyên.
from ultralytics import YOLO

model = YOLO("yolo26n.pt")

results = model.track(source="path/to/video.mp4", tracker="bytetrack.yaml")
results = model.track(source="path/to/video.mp4", tracker="ocsort.yaml")
results = model.track(source="path/to/video.mp4", tracker="tracktrack.yaml")
Cấu hình#
Các đối số theo dõi#
Cấu hình tracking dùng chung các đối số inference với chế độ Predict, chẳng hạn conf, iou và show.
from ultralytics import YOLO

# Cấu hình các tham số theo dõi và chạy tracker
model = YOLO("yolo26n.pt")
results = model.track(source="https://youtu.be/LNwODJXcvt4", conf=0.1, iou=0.5, show=True)
Cấu hình tracker tùy chỉnh#
Để sử dụng cấu hình tracker đã chỉnh sửa, hãy sao chép tệp cấu hình tracker (ví dụ: thành custom_tracker.yaml) từ ultralytics/cfg/trackers rồi sửa đổi mọi thiết lập ngoại trừ tracker_type.
from ultralytics import YOLO

# Nạp model và chạy tracker bằng tệp cấu hình tùy chỉnh
model = YOLO("yolo26n.pt")
results = model.track(source="https://youtu.be/LNwODJXcvt4", tracker="custom_tracker.yaml")
Các đối số dùng chung của tracker#
Các tham số sau đây phổ biến trong hầu hết tệp YAML của tracker; không phải tham số nào cũng có trong mọi cấu hình:
Các kết quả phát hiện có giá trị bằng hoặc cao hơn track_high_thresh sẽ đi vào giai đoạn liên kết đầu tiên. Các kết quả phát hiện nằm giữa track_low_thresh và track_high_thresh có thể khôi phục track hiện có khi tracker được chọn bật liên kết độ tin cậy thấp, nhưng không khởi tạo track mới. Các kết quả phát hiện có giá trị bằng hoặc thấp hơn track_low_thresh sẽ bị bỏ qua.
| Tham số | Giá trị hoặc phạm vi hợp lệ | Mô tả |
|---|---|---|
tracker_type | botsort, bytetrack, ocsort, deepocsort, fasttrack, tracktrack | Chỉ định loại tracker. |
track_high_thresh | 0.0-1.0 | Ngưỡng cho lần liên kết đầu tiên. Ảnh hưởng đến mức độ chắc chắn khi ghép một detection với track hiện có. |
track_low_thresh | 0.0-1.0 | Giới hạn dưới cho các detection khôi phục có độ tin cậy thấp. OC-SORT và Deep OC-SORT chỉ sử dụng các detection này khi use_byte: True; TrackTrack đưa chúng vào nhóm liên kết bị phạt. |
new_track_thresh | 0.0-1.0 | Ngưỡng để khởi tạo track mới nếu detection không khớp với bất kỳ track hiện có nào. |
track_buffer | >=0 | Số frame giữ các track bị mất trước khi xóa. Giá trị cao hơn giúp chịu được hiện tượng che khuất tốt hơn. |
match_thresh | 0.0-1.0 | Ngưỡng để ghép track. Giá trị cao hơn giúp việc ghép dễ dãi hơn. |
fuse_score | True, False | Có kết hợp điểm confidence với khoảng cách IoU trước khi ghép hay không. |
gmc_method | sparseOptFlow, orb, sift, ecc, none | Phương pháp bù chuyển động toàn cục. Giúp xử lý chuyển động của camera. |
proximity_thresh | 0.0-1.0 | IoU tối thiểu cần có để một kết quả ghép ReID được xem là hợp lệ. Đảm bảo độ gần về không gian trước khi sử dụng đặc trưng ngoại hình. |
appearance_thresh | 0.0-1.0 | Độ tương đồng ngoại hình chuẩn hóa tối thiểu cần có cho ReID. |
with_reid | True, False | Bật ghép dựa trên ngoại hình để theo dõi tốt hơn qua các lần che khuất. Được BoT-SORT, Deep OC-SORT và TrackTrack hỗ trợ. |
model | Đường dẫn đến model auto hoặc model ReID tương thích | Model ReID. auto sử dụng đặc trưng backbone YOLO gốc khi có; nếu không, sẽ chuyển sang yolo26n-cls.pt. Encoder tùy chỉnh có thể là checkpoint .pt hoặc model đã export như .torchscript, .onnx, .engine hoặc thư mục model OpenVINO. |
Các tham số riêng của tracker#
Mỗi thuật toán cung cấp thêm các tùy chọn bên cạnh những tham số dùng chung. Xem phần riêng của từng tracker bên dưới để biết mô tả và hướng dẫn tinh chỉnh, hoặc tham khảo trực tiếp các file cấu hình:
Bật Re-Identification (ReID)#
ReID bị tắt theo mặc định để giảm thiểu chi phí xử lý. Bật tính năng này bằng cách đặt with_reid: True trong tệp cấu hình tracker.
Các tùy chọn model ReID:
model: auto— Sử dụng đặc trưng detector YOLO gốc, chỉ thêm overhead tối thiểu. Phù hợp khi cần một mức ReID nhất định mà không ảnh hưởng nhiều đến hiệu năng. Chuyển sangyolo26n-cls.ptnếu detector không cung cấp các đặc trưng tương thích.- Model ReID tùy chỉnh — Trỏ
model:đến checkpoint.pthoặc model embedding đã export tương thích, chẳng hạn.torchscript,.onnx,.enginehoặc thư mục model OpenVINO. Model đã export được tải thông quaAutoBackendvà phải xuất trực tiếp tensor embedding.
Encoder ONNX sẵn sàng sử dụng được phát hành cho mọi kích thước model. Đặt model: thành một trong các tên này để file tự động được tải xuống khi tracker chạy lần đầu (tương tự cách tải trọng số YOLO) — không cần export hoặc tải xuống thủ công:
# In your tracker config (e.g. tracktrack.yaml)
with_reid: True
model: yolo26n-reid.onnx # downloaded on first use; swap n→s/m/l/x for a larger encoder| Model | kích thước (pixel) | tham số (M) | FLOPs (B) |
|---|---|---|---|
| YOLO26n-reid.onnx | 448 | 2.8 | 2.0 |
| YOLO26s-reid.onnx | 448 | 7.5 | 6.6 |
| YOLO26m-reid.onnx | 448 | 12.4 | 20.1 |
| YOLO26l-reid.onnx | 448 | 15.3 | 25.2 |
| YOLO26x-reid.onnx | 448 | 32.7 | 55.9 |
Hiện chỉ có các encoder ReID ONNX cho nhánh ngoại hình của tracker. Các chế độ ReID train, val và predict, cùng với các quy trình export ReID chuyên biệt, vẫn đang được phát triển.
Để tăng hiệu năng khi dùng model phân loại riêng, hãy export model sang backend nhanh hơn như TensorRT:
from torch import nn

from ultralytics import YOLO

# Tải model phân loại
model = YOLO("yolo26n-cls.pt")

# Thêm lớp average pooling
head = model.model.model[-1]
pool = nn.Sequential(nn.AdaptiveAvgPool2d((1, 1)), nn.Flatten(start_dim=1))
pool.f, pool.i = head.f, head.i
model.model.model[-1] = pool

# Export sang TensorRT
model.export(format="engine", quantize=16, dynamic=True, batch=32)
Sau khi export, trỏ đến đường dẫn model TensorRT trong cấu hình tracker.
Chi tiết về tracker#
Các phần bên dưới mô tả thiết kế, tham số cụ thể và mẹo tinh chỉnh cho từng tracker.
Xem: Bộ theo dõi đối tượng nào hoạt động tốt hơn? | Tốc độ, FPS và độ ổn định ID | Ultralytics YOLO26 📊
BoT-SORT#
BoT-SORT (Aharon và cộng sự, 2022) mở rộng ByteTrack bằng cách bổ sung bù chuyển động camera và ReID tùy chọn:
- Bù chuyển động camera (CMC): áp dụng phép biến đổi affine ước lượng ở mỗi frame (mặc định dùng sparse optical flow; cũng có ORB / ECC) cho các trạng thái Kalman trước khi ghép IoU.
- ReID tùy chọn: có thể kết hợp embedding ngoại hình vào ma trận chi phí. Mặc định bị tắt; bật bằng
with_reid: True.
Phù hợp nhất với: tracking đa dụng, đặc biệt là khi camera di chuyển. Chỉ thêm ReID khi đám đông có ngoại hình tương tự gây ra hiện tượng đổi ID.
Các tham số riêng của BoT-SORT:
| Tham số | Giá trị hoặc phạm vi hợp lệ | Mô tả |
|---|---|---|
gmc_method | sparseOptFlow, orb, sift, ecc, none | Backend bù chuyển động camera. sparseOptFlow là mặc định. none tắt CMC. |
with_reid | True, False | Bật ghép dựa trên ngoại hình. Mặc định tắt. |
model | Đường dẫn đến model auto hoặc model ReID tương thích | auto sử dụng đặc trưng YOLO gốc khi có; model tùy chỉnh có thể là checkpoint .pt hoặc bản export tương thích. |
proximity_thresh | 0.0-1.0 | IoU tối thiểu trước khi xét đến đặc trưng ngoại hình. |
appearance_thresh | 0.0-1.0 | Độ tương đồng ngoại hình chuẩn hóa tối thiểu cần có để ghép ReID. Tăng giá trị này để ghép chặt chẽ hơn. |
Mẹo tinh chỉnh:
- Camera tĩnh: đặt
gmc_method: noneđể tiết kiệm vài ms/frame. - Camera chuyển động mạnh: giữ
sparseOptFlow;eccchính xác hơn nhưng chậm hơn. - Đám đông có ngoại hình tương tự: bật
with_reid: Truevà tăngappearance_thresh(ví dụ:0.85+).
ByteTrack#
ByteTrack (Zhang và cộng sự, ECCV 2022) là baseline gọn nhẹ. Thuật toán sử dụng Kalman tuyến tính + IoU với quy trình liên kết hai giai đoạn:
- Giai đoạn 1: ghép các detection có điểm số cao với các track đang hoạt động.
- Giai đoạn 2: thử ghép lại các track chưa được ghép với detection có điểm số thấp để khôi phục qua những lần che khuất một phần trong thời gian ngắn.
Không có model ngoại hình và không có chức năng bù chuyển động camera.
Phù hợp nhất với: camera tĩnh hoặc gần như tĩnh, nơi chi phí detector chiếm phần lớn và bạn muốn giảm overhead của tracker xuống mức tối thiểu.
Các tham số riêng của ByteTrack: Không có tham số nào ngoài các tham số tracker dùng chung.
Mẹo tinh chỉnh:
- Detector nhiễu: giảm
track_low_threshđể giai đoạn hai có thêm ứng viên. - Detector có recall cao: tăng
track_high_threshđể giảm ID bị phân mảnh. - ID thường xuyên chập chờn: tăng
track_bufferđể các track bị bỏ lỡ trong thời gian ngắn vẫn được giữ lại.
OC-SORT#
OC-SORT (Cao và cộng sự, CVPR 2023) là phiên bản mở rộng của SORT lấy quan sát làm trung tâm. Thuật toán giữ nguyên thiết kế gọn nhẹ của SORT (không dùng đặc trưng ngoại hình) và bổ sung ba hiệu chỉnh:
- Cập nhật lại lấy quan sát làm trung tâm (ORU): phát lại quỹ đạo ảo giữa quan sát cuối cùng và detection hiện tại, chạy lại bước cập nhật Kalman để hiệu chỉnh vận tốc bị lệch.
- Động lượng lấy quan sát làm trung tâm (OCM): phạt các detection di chuyển sai hướng thông qua thành phần chi phí nhất quán vận tốc.
- Khôi phục lấy quan sát làm trung tâm (OCR): kiểm tra lại các detection chưa được ghép với các track vừa bị mất, sử dụng quan sát cuối cùng thay vì trạng thái dự đoán.
Phù hợp nhất với: chuyển động phi tuyến mà không phải chịu chi phí của model ReID.
Các tham số riêng của OC-SORT:
| Tham số | Giá trị hoặc phạm vi hợp lệ | Mô tả |
|---|---|---|
delta_t | >=1 | Cửa sổ thời gian (frame) dùng để tính hướng vận tốc trong OCM. Giá trị lớn hơn giúp làm mượt nhiều hơn. |
inertia | 0.0-1.0 | Trọng số của chi phí nhất quán vận tốc. Giá trị cao hơn phạt các thay đổi hướng đột ngột nặng hơn. |
use_byte | True, False | Bật lượt liên kết thứ hai kiểu ByteTrack trên các detection có độ tin cậy thấp. |
Mẹo tinh chỉnh:
- Chuyển động phi tuyến: tăng
inertia(ví dụ:0.3-0.4). - Detection thưa: bật
use_byte: True. - Che khuất kéo dài: tăng
track_bufferđể OCR có thêm track bị mất để liên kết lại.
Với model OBB, OCR sử dụng BBox có hướng do Kalman dự đoán vì lịch sử quan sát cuối cùng có hướng không được lưu giữ.
Deep OC-SORT#
Deep OC-SORT bổ sung thông tin ngoại hình và bù chuyển động camera cho OC-SORT:
- Ghép ngoại hình: khoảng cách embedding cosine được giới hạn theo độ chồng lấp và kết hợp với chi phí chuyển động.
- EMA ngoại hình động: embedding của track được cập nhật bằng EMA với hệ số làm mượt thích ứng theo độ tin cậy của detection.
- Bù chuyển động camera: các trạng thái Kalman được biến đổi giữa các frame thông qua sparse optical flow, ORB hoặc ECC.
Phù hợp nhất với: cảnh đông người hoặc camera di chuyển, nơi thường xảy ra đổi ID giữa các đối tượng có ngoại hình khác nhau nhưng ở gần nhau về mặt không gian.
Các tham số riêng của Deep OC-SORT:
| Tham số | Giá trị hoặc phạm vi hợp lệ | Mô tả |
|---|---|---|
with_reid | True, False | Bật ghép dựa trên ngoại hình. Mặc định tắt. |
model | Đường dẫn đến model auto hoặc model ReID tương thích | auto sử dụng đặc trưng YOLO gốc khi có; model tùy chỉnh có thể là checkpoint .pt hoặc bản export tương thích. |
proximity_thresh | 0.0-1.0 | IoU tối thiểu trước khi xét đến đặc trưng ngoại hình. |
appearance_thresh | 0.0-1.0 | Độ tương đồng ngoại hình chuẩn hóa tối thiểu cần có để ghép ReID. |
alpha_fixed_emb | 0.0-1.0 | Hệ số EMA cơ sở cho các bản cập nhật embedding của track. Giá trị cao hơn giúp giữ embedding cũ lâu hơn. |
gmc_method | sparseOptFlow, orb, sift, ecc, none | Phương pháp bù chuyển động toàn cục. |
delta_t | >=1 | Cửa sổ thời gian (frame) dùng để tính hướng vận tốc trong OCM (được kế thừa từ OC-SORT). |
inertia | 0.0-1.0 | Trọng số của chi phí nhất quán vận tốc (được kế thừa từ OC-SORT). |
use_byte | True, False | Bật lượt liên kết thứ hai kiểu ByteTrack trên các detection có độ tin cậy thấp (được kế thừa từ OC-SORT). |
Mẹo tinh chỉnh:
- Đổi ID trong đám đông: tăng
appearance_thresh(ví dụ:0.92-0.95) và tăngalpha_fixed_embđể embedding thích ứng chậm hơn. - Camera di chuyển: đặt
gmc_method: sparseOptFlow(Deep OC-SORT mặc định dùngnone). - Giảm độ trễ: giữ
with_reid: False(mặc định) để chỉ dùng chuyển động + CMC; chỉ bật ReID khi lỗi chủ yếu do đổi ID.
FastTracker#
FastTracker là biến thể ByteTrack có nhận biết che khuất, không dùng model ngoại hình:
- Phát hiện che khuất: đánh dấu track bị che khuất khi tỷ lệ bị các track đang hoạt động khác che phủ vượt quá
occ_cover_thresh. - Khôi phục Kalman khi bị che khuất: khôi phục trạng thái Kalman về một frame trước khi bị che khuất bằng lịch sử được lưu trong ring buffer.
- Giảm chấn chuyển động và mở rộng vùng tìm kiếm: vận tốc được giảm chấn và bbox dự đoán được phóng to khi bị che khuất.
- Chặn khởi tạo theo IoU: ngăn track mới được tạo chồng lên các track đang hoạt động.
Phù hợp nhất với: pipeline detection thời gian thực có các mục tiêu thường xuyên chồng lấp nhau (đám đông, hàng chờ, thể thao).
Các tham số dành riêng cho FastTracker:
| Tham số | Giá trị hoặc phạm vi hợp lệ | Mô tả |
|---|---|---|
reset_velocity_offset_occ | >=0 | Số frame lịch sử lùi lại để khôi phục vận tốc Kalman khi bắt đầu bị che khuất. |
reset_pos_offset_occ | >=0 | Số frame lịch sử lùi lại để khôi phục vị trí Kalman khi bắt đầu bị che khuất. |
enlarge_bbox_occ | >=1.0 | Hệ số tỷ lệ chiều cao được áp dụng cho bbox dự đoán trong thời gian bị che khuất (chiều rộng được điều chỉnh theo tỷ lệ khung hình XYAH). |
dampen_motion_occ | 0.0-1.0 | Hệ số nhân vận tốc trong thời gian bị che khuất. Giá trị thấp hơn khiến track "chậm lại" khi đi qua vùng bị che khuất. |
active_occ_to_lost_thresh | >=1 | Số frame liên tiếp tối đa bị che khuất trước khi chuyển một track đang hoạt động sang trạng thái mất. |
occ_cover_thresh | 0.0-1.0 | Tỷ lệ diện tích của một track bị track đang hoạt động khác che phủ để xác định trạng thái che khuất. |
occ_reappear_window | >=0 | Số frame mà một track bị mất do vừa bị che khuất vẫn được ưu tiên tìm lại. |
init_iou_suppress | 0.0-1.0 | Ngăn khởi tạo track mới nếu IoU của track đó với bất kỳ track đang hoạt động nào vượt quá giá trị này. Đặt thành 1.0 để tắt. |
Mẹo tinh chỉnh:
- Thường xuyên bị che khuất một phần: giảm
occ_cover_thresh(ví dụ:0.5-0.6). - ID trùng lặp quanh vùng chồng lấp: giảm
init_iou_suppress(ví dụ:0.5). - Bị che khuất lâu: tăng đồng thời
occ_reappear_windowvàtrack_buffer. - Đối tượng di chuyển nhanh: tăng
dampen_motion_occ(tiến gần hơn đến1.0); chỉ tăngenlarge_bbox_occkhi vùng tìm kiếm rộng hơn giúp cải thiện khả năng khôi phục.
TrackTrack#
TrackTrack (Shim et al., CVPR 2025) là tracker mặc định. TrackTrack suy luận từ góc nhìn của từng track bằng phương pháp liên kết lặp đa tín hiệu:
- Liên kết dựa trên góc nhìn của track (TPA): kết hợp HMIoU, khoảng cách cosine ReID tùy chọn, khoảng cách chiếu độ tin cậy và khoảng cách góc ở các góc hộp. Việc gán được giải bằng cách lặp lại với ngưỡng nới lỏng dần.
- Khởi tạo nhận biết track (TAI): loại bỏ các track mới được tạo trùng lặp trước khi tạo ID mới.
Phù hợp nhất với: cảnh đông người thường xuyên bị che khuất, nơi ID trùng lặp là vấn đề.
Các tham số dành riêng cho TrackTrack:
| Tham số | Giá trị hoặc phạm vi hợp lệ | Mô tả |
|---|---|---|
iou_weight | 0.0-1.0 | Trọng số của khoảng cách HMIoU khi bật ReID; nếu không, HMIoU được sử dụng trực tiếp. |
reid_weight | 0.0-1.0 | Trọng số của khoảng cách cosine ReID khi bật ReID; nếu không, tham số này bị bỏ qua. |
conf_weight | 0.0-1.0 | Trọng số của khoảng cách chiếu độ tin cậy. |
angle_weight | 0.0-1.0 | Trọng số của khoảng cách góc ở các góc hộp. |
penalty_p | 0.0-1.0 | Mức phạt chi phí đối với các detection có độ tin cậy thấp. |
penalty_q | 0.0-1.0 | Mức phạt chi phí đối với các detection được khôi phục bằng NMS phụ. |
reduce_step | 0.0-1.0 | Mức nới lỏng ngưỡng khớp ở mỗi vòng lặp. |
tai_thr | 0.0-1.0 | Ngưỡng IoU cho NMS của Khởi tạo nhận biết track. |
min_track_len | >=0 | Độ dài lịch sử tối thiểu trước khi xác nhận một track mới. |
lost_match_thr | 0.0-1.0 | Ngưỡng chi phí nới lỏng hơn cho lượt liên kết lại các track mất; 0 sẽ tắt tính năng này. |
with_reid | True, False | Bật khớp ngoại hình bằng cosine-ReID (sử dụng các feature YOLO gốc). Mặc định tắt. |
model | Đường dẫn đến model auto hoặc model ReID tương thích | auto sử dụng đặc trưng YOLO gốc khi có; model tùy chỉnh có thể là checkpoint .pt hoặc bản export tương thích. |
gmc_method | sparseOptFlow, orb, sift, ecc, none | Phương pháp bù chuyển động toàn cục. |
Mẹo tinh chỉnh:
- Người đi bộ trong cảnh đông đúc: giảm
tai_thr(ví dụ:0.45) để loại bỏ thêm các track mới trùng lặp; tăngtrack_bufferđể xử lý tình trạng che khuất lâu hơn. - Chuyển động camera nhanh: giữ
gmc_method: sparseOptFlowở trạng thái bật. - Đối tượng nhỏ/nhanh: tăng nhẹ
angle_weightvà giảmmin_track_len. - Chỉ bật ReID khi cần: ReID làm tăng chi phí suy luận; với các trường hợp bị che khuất trong thời gian ngắn, chi phí đa tín hiệu mặc định thường là đủ.
Với các model Segment và Pose, TrackTrack bỏ qua bước khôi phục detection bằng loose-NMS để đảm bảo mask và keypoint vẫn khớp với detection tương ứng.
Ví dụ Python#
Xem: Cách xây dựng tính năng theo dõi đối tượng tương tác với Ultralytics YOLO26: Hoàn thành trong vài phút | Python!
Vòng lặp duy trì track#
Sau đây là một script Python sử dụng OpenCV (cv2) và YOLO26 để theo dõi đối tượng trên các frame video. Script này giả định các package cần thiết (opencv-python và ultralytics) đã được cài đặt. Tham số persist=True cho tracker biết ảnh hoặc frame hiện tại là frame tiếp theo trong một chuỗi và cần tìm các track từ ảnh trước đó trong ảnh hiện tại.
Chỉ sử dụng persist=True khi truyền các frame liên tiếp từ cùng một luồng video vào model.track(). Cách này cho phép tracker tái sử dụng trạng thái từ các frame trước đó và duy trì ID track nhất quán theo thời gian. Không sử dụng persist=True cho các ảnh không liên quan hoặc luồng khác, vì trạng thái track trước đó có thể được giữ lại.
Bạn cũng có thể chọn backend tracker bằng cách truyền tệp cấu hình tracker, chẳng hạn như tracker="botsort.yaml", tracker="bytetrack.yaml" hoặc tracker="tracktrack.yaml".
import cv2

from ultralytics import YOLO

# Tải model YOLO26
model = YOLO("yolo26n.pt")

# # Mở tệp video
video_path = "path/to/video.mp4"
cap = cv2.VideoCapture(video_path)

# # Lặp qua các frame video
while cap.isOpened():
    # # Đọc một frame từ video
    success, frame = cap.read()

    if success:
        # Chạy tracking YOLO26 trên frame, duy trì track giữa các frame
        # và sử dụng backend tracker BoT-SORT
        results = model.track(frame, persist=True, tracker="botsort.yaml")

        # # Trực quan hóa kết quả trên frame
        annotated_frame = results[0].plot()

        # # Hiển thị frame đã chú thích
        cv2.imshow("YOLO26 Tracking", annotated_frame)

        # # Thoát vòng lặp nếu nhấn 'q'
        if cv2.waitKey(1) & 0xFF == ord("q"):
            break
    else:
        # # Thoát vòng lặp nếu đã đến cuối video
        break

# # Giải phóng đối tượng capture video và đóng cửa sổ hiển thị
cap.release()
cv2.destroyAllWindows()
Lưu ý thay đổi từ model(frame) sang model.track(frame), giúp bật tracking đối tượng thay vì chỉ phát hiện đơn thuần. Script đã chỉnh sửa này sẽ chạy tracker trên từng khung hình video, trực quan hóa kết quả và hiển thị chúng trong cửa sổ. Có thể thoát vòng lặp bằng cách nhấn 'q'.
Vẽ track theo thời gian#
Trực quan hóa các track của đối tượng qua những khung hình liên tiếp có thể cung cấp thông tin hữu ích về quy luật di chuyển và hành vi của các đối tượng được phát hiện trong video. Ultralytics YOLO26 giúp việc vẽ các track này trở nên đơn giản.
Ví dụ sau sử dụng tracking của YOLO26 để vẽ chuyển động của các đối tượng được phát hiện qua nhiều khung hình video. Script mở tệp video, đọc từng khung hình và dùng model YOLO để xác định cũng như theo dõi đối tượng. Bằng cách lưu lại tâm của các bounding box được phát hiện và nối các tâm này, script vẽ các đường biểu thị quỹ đạo của những đối tượng được theo dõi.
from collections import defaultdict

import cv2
import numpy as np

from ultralytics import YOLO

# Tải model YOLO26
model = YOLO("yolo26n.pt")

# # Mở tệp video
video_path = "path/to/video.mp4"
cap = cv2.VideoCapture(video_path)

# Lưu lịch sử track
track_history = defaultdict(list)

# # Lặp qua các frame video
while cap.isOpened():
    # # Đọc một frame từ video
    success, frame = cap.read()

    if success:
        # Chạy tracking YOLO26 trên frame, duy trì track giữa các frame
        result = model.track(frame, persist=True)[0]

        # Lấy các box và ID track
        if result.boxes and result.boxes.is_track:
            boxes = result.boxes.xywh.cpu()
            track_ids = result.boxes.id.int().cpu().tolist()

            # Trực quan hóa kết quả trên frame
            frame = result.plot()

            # Vẽ các track
            for box, track_id in zip(boxes, track_ids):
                x, y, w, h = box
                track = track_history[track_id]
                track.append((float(x), float(y)))  # tọa độ tâm x, y
                if len(track) > 30:  # giữ lại 30 track trong 30 frame
                    track.pop(0)

                # Vẽ các đường tracking
                points = np.hstack(track).astype(np.int32).reshape((-1, 1, 2))
                cv2.polylines(frame, [points], isClosed=False, color=(230, 230, 230), thickness=10)

        # # Hiển thị frame đã chú thích
        cv2.imshow("YOLO26 Tracking", frame)

        # # Thoát vòng lặp nếu nhấn 'q'
        if cv2.waitKey(1) & 0xFF == ord("q"):
            break
    else:
        # # Thoát vòng lặp nếu đã đến cuối video
        break

# # Giải phóng đối tượng capture video và đóng cửa sổ hiển thị
cap.release()
cv2.destroyAllWindows()
Tracking đa luồng#
Tracking đa luồng cho phép chạy tracking đối tượng đồng thời trên nhiều luồng video. Tính năng này đặc biệt hữu ích khi xử lý nhiều đầu vào video, chẳng hạn từ nhiều camera giám sát, vì xử lý đồng thời giúp tăng thông lượng.
Script Python bên dưới sử dụng module threading của Python để chạy đồng thời nhiều phiên bản tracker. Mỗi luồng chạy tracker trên một nguồn video, và tất cả các luồng hoạt động đồng thời ở chế độ nền.
Để đảm bảo mỗi luồng nhận đúng tham số (model cần sử dụng và nguồn video), script định nghĩa hàm run_tracker_in_thread nhận các tham số này và chứa vòng lặp tracking chính. Hàm này đọc video từng frame, chạy tracker và lưu kết quả đã được chú thích.
Ví dụ này sử dụng hai model khác nhau, yolo26n.pt và yolo26n-seg.pt, mỗi model tracking đối tượng từ một nguồn khác nhau: file video cục bộ và webcam. Các nguồn được chỉ định trong SOURCES.
Tham số daemon=True trong threading.Thread có nghĩa là các thread này sẽ được đóng ngay khi chương trình chính kết thúc. Sau đó, chúng tôi khởi chạy các thread bằng start() và dùng join() để khiến thread chính chờ cho đến khi cả hai thread tracker hoàn tất.
Cuối cùng, sau khi tất cả thread hoàn thành tác vụ, các cửa sổ hiển thị kết quả sẽ được đóng bằng cv2.destroyAllWindows().
import threading

import cv2

from ultralytics import YOLO

# Định nghĩa tên model và nguồn video
MODEL_NAMES = ["yolo26n.pt", "yolo26n-seg.pt"]
SOURCES = ["path/to/video.mp4", "0"]  # video cục bộ, 0 là webcam

def run_tracker_in_thread(model_name, filename):
    """Run YOLO tracker in its own thread for concurrent processing.

    Args:
        model_name (str): Model checkpoint name or path loaded inside the thread.
        filename (str): The path to the video file or the identifier for the webcam/external camera source.
    """
    model = YOLO(model_name)
    results = model.track(filename, save=True, stream=True)
    for r in results:
        pass

# Tạo và khởi chạy các thread tracker bằng vòng lặp for
tracker_threads = []
for video_file, model_name in zip(SOURCES, MODEL_NAMES):
    thread = threading.Thread(target=run_tracker_in_thread, args=(model_name, video_file), daemon=True)
    tracker_threads.append(thread)
    thread.start()

# Chờ tất cả thread tracker hoàn tất
for thread in tracker_threads:
    thread.join()

# Dọn dẹp và đóng các cửa sổ
cv2.destroyAllWindows()
Có thể dễ dàng mở rộng ví dụ này để xử lý thêm tệp video và model bằng cách tạo thêm thread và áp dụng cùng phương pháp.
Đóng góp tracker mới#
Nếu bạn đã triển khai hoặc điều chỉnh thuật toán tracking đa đối tượng cho Ultralytics YOLO, hãy cân nhắc đóng góp thuật toán đó vào ultralytics/trackers cùng với config phù hợp trong ultralytics/cfg/trackers. Các đóng góp giúp mở rộng những tùy chọn tracking dành cho toàn cộng đồng.
Câu hỏi thường gặp#
Tracking nhiều đối tượng trong phân tích video bao gồm cả việc nhận diện đối tượng và duy trì một ID duy nhất cho mỗi đối tượng được phát hiện qua các frame video. Ultralytics YOLO hỗ trợ việc này bằng cách cung cấp khả năng tracking thời gian thực cùng ID đối tượng, phục vụ các tác vụ như giám sát an ninh và phân tích thể thao. Hệ thống sử dụng các tracker như BoT-SORT, ByteTrack, OC-SORT, Deep OC-SORT, FastTracker và TrackTrack; các tracker này có thể được cấu hình thông qua tệp YAML.
Không. Các tệp
.pttiêu chuẩn của Ultralytics lưu trọng số model YOLO, còn tracker được tạo tại thời điểm suy luận bởimodel.track(). ID track phụ thuộc vào trạng thái tracker qua các frame liên tiếp, vì vậy một ảnh đơn lẻ có thể trả về các detection như box, lớp và độ tin cậy, nhưng bản thân ảnh đó không thể tạo ra ID tracking liên tục có ý nghĩa.Để triển khai, hãy đóng gói detector và tracker cùng nhau trong ứng dụng, rồi gọi
model.track()theo từng frame vớipersist=Truekhi các frame đến từ cùng một luồng video. Sử dụng các instance model hoặc tracker riêng cho những luồng không liên quan để tránh trạng thái được giữ lại giữa các video.Bạn có thể cấu hình tracker tùy chỉnh bằng cách sao chép một tệp cấu hình tracker hiện có (ví dụ:
custom_tracker.yaml) từ thư mục cấu hình tracker của Ultralytics rồi sửa đổi các tham số theo nhu cầu, ngoại trừtracker_type. Sử dụng tệp này trong model tracking như sau:Ví dụfrom ultralytics import YOLO model = YOLO("yolo26n.pt") results = model.track(source="https://youtu.be/LNwODJXcvt4", tracker="custom_tracker.yaml")Để chạy tracking đối tượng đồng thời trên nhiều luồng video, bạn có thể sử dụng module
threadingcủa Python. Mỗi thread sẽ xử lý một luồng video riêng. Sau đây là ví dụ về cách thiết lập:Tracking đa luồngimport threading import cv2 from ultralytics import YOLO # Định nghĩa tên model và nguồn video MODEL_NAMES = ["yolo26n.pt", "yolo26n-seg.pt"] SOURCES = ["path/to/video.mp4", "0"] # video cục bộ, 0 là webcam def run_tracker_in_thread(model_name, filename): """Run YOLO tracker in its own thread for concurrent processing. Args: model_name (str): Model checkpoint name or path loaded inside the thread. filename (str): The path to the video file or the identifier for the webcam/external camera source. """ model = YOLO(model_name) results = model.track(filename, save=True, stream=True) for r in results: pass # Tạo và khởi chạy các thread tracker bằng vòng lặp for tracker_threads = [] for video_file, model_name in zip(SOURCES, MODEL_NAMES): thread = threading.Thread(target=run_tracker_in_thread, args=(model_name, video_file), daemon=True) tracker_threads.append(thread) thread.start() # Chờ tất cả thread tracker hoàn tất for thread in tracker_threads: thread.join() # Dọn dẹp và đóng các cửa sổ cv2.destroyAllWindows()Tracking nhiều đối tượng với Ultralytics YOLO có nhiều ứng dụng, bao gồm:
- Giao thông: Theo dõi phương tiện để quản lý giao thông và lái xe tự hành.
- Bán lẻ: Theo dõi người để phân tích hoạt động và đảm bảo an ninh trong cửa hàng.
- Nuôi trồng thủy sản: Theo dõi cá để giám sát môi trường thủy sinh.
- Phân tích thể thao: Theo dõi vận động viên và thiết bị để phân tích hiệu suất.
- Hệ thống an ninh: Giám sát hoạt động đáng ngờ và tạo cảnh báo an ninh.
Các ứng dụng này tận dụng khả năng xử lý video tốc độ khung hình cao theo thời gian thực với độ chính xác cao của Ultralytics YOLO.
Để trực quan hóa track của đối tượng qua nhiều frame video, bạn có thể sử dụng các tính năng tracking của model YOLO kết hợp với OpenCV để vẽ quỹ đạo của các đối tượng được phát hiện. Sau đây là script ví dụ minh họa cách thực hiện:
Vẽ track qua nhiều frame videofrom collections import defaultdict import cv2 import numpy as np from ultralytics import YOLO model = YOLO("yolo26n.pt") video_path = "path/to/video.mp4" cap = cv2.VideoCapture(video_path) track_history = defaultdict(list) while cap.isOpened(): success, frame = cap.read() if success: result = model.track(frame, persist=True)[0] annotated_frame = result.plot() if result.boxes and result.boxes.is_track: boxes = result.boxes.xywh.cpu() track_ids = result.boxes.id.int().cpu().tolist() for box, track_id in zip(boxes, track_ids): x, y, w, h = box track = track_history[track_id] track.append((float(x), float(y))) if len(track) > 30: track.pop(0) points = np.hstack(track).astype(np.int32).reshape((-1, 1, 2)) cv2.polylines(annotated_frame, [points], isClosed=False, color=(230, 230, 230), thickness=10) cv2.imshow("YOLO26 Tracking", annotated_frame) if cv2.waitKey(1) & 0xFF == ord("q"): break else: break cap.release() cv2.destroyAllWindows()Script này sẽ vẽ các đường tracking biểu thị quỹ đạo chuyển động của các đối tượng được theo dõi theo thời gian, cung cấp thông tin hữu ích về hành vi và kiểu chuyển động của đối tượng.


Bình luận679
Đặt câu hỏi, chia sẻ kết quả hoặc giúp đỡ người khác.
bhaskar2443053
I’m using YOLO-Pose to detect and track people throughout ~1-hour videos and need each person to keep the same ID. I already have high-quality ground-truth tracks from a SAM-based tracker.
Do you have a script that can fine-tune YOLO-Pose (and its tracker/Re-ID parameters) against this ground truth to squeeze out the best IDF1 or HOTA scores ?
1maxexplorer
Hi!
Thank you for your great work on YOLO and tracking integration. We are using YOLO with ByteTrack/BoT-SORT for object counting and tracking and want to improve ID stability.
-
We notice that sometimes, even when the object visually looks the same and the scene and motion are stable, the track_id changes. What parameters or reasons should we check to understand why the ID changes unexpectedly?
-
Is the match_thresh parameter based on IoU, and is it possible to print or visualize the IoU used during matching for debugging?
-
Is there a way to output Kalman-predicted boxes of lost tracks so we can analyze them?
-
Could increasing the video FPS improve tracking and IoU consistency, or is this mainly related to detection stability and parameter tuning?
-
Does ByteTrack or BoT-SORT use a min_hits parameter before confirming tracks, or are tracks confirmed immediately after creation?
-
If a track is lost, can a new ID only be assigned on the second frame after reappearance if conf > new_track_thresh and then conf > track_high_thresh, or can it happen immediately on the first detection?
-
Is the track_buffer parameter the number of frames a track is kept using Kalman prediction after it is lost before being deleted?
-
Do you have any tips to improve tracking stability and avoid unnecessary ID switches?
Thank you for your support!
-
 Glenn JocherUltralytics
@bhaskar2443053 currently there isn't a built-in script for fine-tuning YOLO-Pose tracking parameters against ground truth. You would need to implement custom evaluation using libraries like TrackEval or MOTChallenge to compute IDF1/HOTA scores and optimize tracker parameters iteratively.
@maxexplorer great questions about tracking stability! Here are the key points:
-
ID changes typically occur due to low IoU between predicted and detected boxes, occlusions, or threshold mismatches. Check
track_high_threshandmatch_threshin your tracker config. -
match_threshis indeed IoU-based. For debugging, you can add logging to the tracker code, but there's no built-in visualization. -
Kalman predictions aren't directly exposed, but you can access them by modifying the tracker implementation.
-
Higher FPS generally improves tracking by reducing inter-frame motion, making associations more reliable.
-
Both trackers use confirmation logic - tracks need to meet certain criteria before being confirmed as valid tracks.
-
New tracks can be assigned immediately if detection confidence exceeds
new_track_thresh. -
Correct -
track_buffermaintains lost tracks for that many frames using prediction. -
For stability: increase
track_buffer, adjustmatch_threshbased on your scenario, and ensure consistent detection quality with appropriateconfthresholds.
For detailed parameter tuning, refer to the tracker configuration files and our tracking documentation.
-
rohith-aiunika(đã chỉnh sửa)
Hi YOLO Team, I've been using the following Python script to track objects with my YOLOv8 model: from ultralytics import YOLO
model = YOLO(r"/home/best_pt_files/v1.0.2.pt") results = model.track(r"/home/video.MP4", save=False, stream=False)
However, I noticed that my GPU memory usage gradually increases, leading to an "out of memory" error before the video finishes processing. Interestingly, when I use the following command from the terminal, the entire video tracks successfully without excessive GPU memory consumption: yolo track model=/home/best_pt_files/1.0.2.pt source=/home/video.MP4
Previously, the Python script worked without any issues. The memory issue has only recently started occurring. Could you please help me understand the possible reasons for this memory increase and how to address it?
i have experimented with persist= True and False,stream = true and false, show = true and false also but the issue is still there
1- Glenn JocherUltralytics
@rohith-aiunika thanks for reporting this. The memory buildup in Python scripts (but not CLI) typically occurs when not using streaming mode. To match the CLI's memory behavior, modify your Python script to process frames iteratively using
stream=True:from ultralytics import YOLO model = YOLO("/home/best_pt_files/v1.0.2.pt") for result in model.track("/home/video.MP4", stream=True): # Process frames iteratively pass # Add your frame processing logic hereThis streams frames sequentially like the CLI, preventing memory accumulation. For more details, see the streaming implementation in our Tracking documentation. Let us know if this resolves the issue!
i have used stream = True, then the code is just executing without showing error and without tracking also
- Glenn JocherUltralytics
@rohith-aiunika thanks for the update. Let's ensure you're properly iterating through streaming results. Try adding a processing loop like this:
for result in model.track(source=video_path, stream=True):
    annotated_frame = result[0].plot()
    cv2.imshow('Tracking', annotated_frame)
    if cv2.waitKey(1) == ord('q'):
        break
This actively processes each frame and displays tracking annotations. If issues persist, you might need to verify your video source format using our supported inference sources documentation.
mwasela
Hello, Made a custom model that i can successfully run and with a well tweaked confidence filter, am getting good results.
Now Ive wrapped the classification and tracking functionality into a flask app, that returns the count ID's when accessed by a REST call like get, meaning it can be accessed by a separate app for processing and stuff. I want to be able to reset the counting through some other request. My camera feed is always live, i need a way to reset the track id's to zero when neccessary, they just keep counting until i exit the program.
1- Glenn JocherUltralytics
@mwasela hello,
It's great to hear that your custom model is performing well. To reset the tracking IDs in your Flask app, you can implement a mechanism to reinitialize the tracker state upon receiving a specific request. This can be done by resetting the tracker object or reloading the model within your tracking function.
For more detailed guidance on configuring and using trackers, please refer to our documentation: Multi-Object Tracking with Ultralytics YOLO.
Orziqulov-Javohir
I really need help to do this programm: I wanna select region via mouse "dangerous zone" Track detected person, If person enters this zone crop and save person's photo Can you show me pls how to do it for 10 cameras, my gpu is RTX 3080TI
1It is kind a security program detecting who entered zone
1import cv2 from ultralytics import YOLO import time
Load the YOLOv8 model
model = YOLO("yolov8n.pt") # pretrained YOLOv8n model
Initialize video capture for multiple cameras
camera_ids = [
'rtsp://admin:admin12345@172.17.67.20:554',
'rtsp://admin:admin12345@172.17.67.16:554', 'rtsp://admin:admin12345@172.17.67.18:554', 'rtsp://admin:admin12345@172.17.67.19:554', 'rtsp://admin:admin12345@172.17.67.17:554', 'rtsp://admin:admin12345@172.17.67.21:554', 'rtsp://admin:admin12345@172.17.67.17:554', 'rtsp://admin:admin12345@172.17.67.21:554', 'rtsp://admin:admin12345@172.17.67.17:554',
]caps = [cv2.VideoCapture(camera_id) for camera_id in camera_ids]
Open the video file
roi_start = [(0, 0)] * len(caps) roi_end = [(0, 0)] * len(caps) drawing = [False] * len(caps)
tracked_persons = [[] for _ in range(len(caps))] # List to track persons in dangerous zones
def draw_rectangle(event, x, y, flags, param): global roi_start, roi_end, drawing idx = param # Use param to identify the camera index if event == cv2.EVENT_LBUTTONDOWN: drawing[idx] = True roi_start[idx] = (x, y) roi_end[idx] = (x, y) print(f"Camera {idx}: Started drawing rectangle at: {roi_start[idx]}") elif event == cv2.EVENT_MOUSEMOVE: if drawing[idx]: roi_end[idx] = (x, y) print(f"Camera {idx}: Updated rectangle end to: {roi_end[idx]}") elif event == cv2.EVENT_LBUTTONUP: drawing[idx] = False roi_end[idx] = (x, y) print(f"Camera {idx}: Finished drawing rectangle at: {roi_end[idx]}")
Create a window and set mouse callback for each camera
for idx in range(len(caps)): window_name = f'Video {idx}' cv2.namedWindow(window_name) cv2.setMouseCallback(window_name, draw_rectangle, idx)
def is_inside_roi(x, y, roi_start, roi_end): x1, y1 = roi_start x2, y2 = roi_end return min(x1, x2) <= x <= max(x1, x2) and min(y1, y2) <= y <= max(y1, y2)
while True: frames = [] for cap in caps: ret, frame = cap.read() if not ret: continue # frame = cv2.resize(frame, (640, 480)) frames.append(frame)
for idx, frame in enumerate(frames):
    window_name = f'Video {idx}'

    # Draw the ROI rectangle on the frame
    if drawing[idx] or roi_start[idx] != roi_end[idx]:
        cv2.rectangle(frame, roi_start[idx], roi_end[idx], (0, 255, 0), 2)
        cv2.putText(frame, "Dangerous Zone", (roi_start[idx][0], roi_start[idx][1] - 10), cv2.FONT_HERSHEY_SIMPLEX, 0.9, (0, 255, 0), 2)

    # Run YOLOv8 tracking on the frame, persisting tracks between frames
    results = model.track(frame, tracker="bytetrack.yaml", persist=True)

    for result in results:
        boxes = result.boxes

        for box in boxes:
            x1, y1, x2, y2 = box.xyxy.tolist()[0][:4]
            cls = box.cls.tolist()[0]
            if cls == 0:  # Person class in COCO dataset
                # Check if the center of the person is inside the ROI
                cx, cy = int((x1 + x2) / 2), int((y1 + y2) / 2)
                if is_inside_roi(cx, cy, roi_start[idx], roi_end[idx]):
                    # Check if this person is already tracked
                    person_id = box.id.tolist()[0] if box.id is not None else None

                    if person_id not in tracked_persons[idx]:
                        tracked_persons[idx].append(person_id)
                        # Crop and save the frame
                        crop = frame[int(y1):int(y2), int(x1):int(x2)]
                        cv2.imwrite(f"cropped_camera{idx}_person{person_id}_{int(time.time())}.jpg", crop)
                        # Draw a label on the person
                        cv2.putText(frame, "Person in Dangerous Zone", (int(x1), int(y1) - 10), cv2.FONT_HERSHEY_SIMPLEX, 0.9, (0, 0, 255), 2)
                        cv2.rectangle(frame, (int(x1), int(y1)), (int(x2), int(y2)), (0, 0, 255), 2)

    cv2.imshow(window_name, frame)

if cv2.waitKey(1) & 0xFF == ord('q'):
    break
Release all video captures
for cap in caps: cap.release() cv2.destroyAllWindows()
- Glenn JocherUltralytics
Your approach looks solid for setting up a security program to track and save images of individuals entering a designated "dangerous zone" across multiple cameras. To enhance your implementation, ensure you're using the latest versions of the Ultralytics package for optimal performance and bug fixes. For more detailed guidance on tracking configurations and additional features, you can refer to the Ultralytics tracking documentation. If you encounter any specific issues or need further assistance, feel free to ask!
mariem158
File "", line 91 results = model.track(frame, persist=True, tracker="botsort.yaml") ^ IndentationError: unexpected indent COMMENT CORRIGER CETTE ERREUR
- Glenn JocherUltralytics
The error you're encountering is due to an unexpected indent in your code. Ensure that the indentation is consistent throughout your script. If the issue persists, please verify it with the latest version of the Ultralytics package. For more details on tracking configurations, you can refer to the Ultralytics tracking documentation.
GKYoffice
How can I get the tracking metrics of a tracker such as MOTA, IDF1, etc.
1Can I set the parameter ''save_txt'' to True in the track function, and then write code to evaluate the tracking data?
 Paula DerrengerUltralytics
Currently, the Ultralytics YOLO framework doesn't provide built-in functionality for computing tracking metrics like MOTA or IDF1 directly through the API or command line. However, you can utilize external libraries such as MOTChallenge eval for calculating these metrics.
After running your tracking with YOLOv8, you'd typically export your tracking results in a format compatible with these libraries (usually a
.txtformat with frame ID, object ID, bounding boxes, etc.). Then, use the external library to compute the desired metrics by providing it with both the ground truth and your results file.Here's a generic example on how you might save tracking results (modify based on your actual use case):
from ultralytics import YOLO

# Initialize and load your model
model = YOLO("path/to/your/model.pt")

# Tracking
results = model.track(source='path/to/video.mp4', save_txt=True, project='runs/track', name='exp')

# results are saved in 'runs/track/exp' in a format that can be used with MOTChallenge eval tools
Afterwards, follow the documentation of the MOTChallenge eval toolkit to compute the metrics using the outputs stored in
'runs/track/exp'.If you encounter any specific issues while implementing this, feel free to ask!🛠️
AdadAlShabab
Can I run two models simultaneously in one video? Ex: model = YOLO('E:/Ultralytics/best.pt') model = YOLO('yolov8m-pose.pt') results = model.track(source="file.mp4", show=True, conf=0.3, save=False) results = model.track(source="file.mp4", show=True, conf=0.3, save=False)
I want that two models will works simultaneously with cumulative results? Is it possible? Please let me know. Thanks in advance!!
1- Paula DerrengerUltralytics
@AdadAlShabab yes, you can run two models simultaneously on one video, but you'll need to manage the inference in a way that allows both models to process the video frames concurrently. Here's a simplified example using threading to achieve this:
import threading
from ultralytics import YOLO

# Load the models
model1 = YOLO('E:/Ultralytics/best.pt')
model2 = YOLO('yolov8m-pose.pt')

# Function to run tracking
def track_video(model, source, conf, show, save):
    results = model.track(source=source, show=show, conf=conf, save=save)
    # Process results here or return them

# Create threads for each model
thread1 = threading.Thread(target=track_video, args=(model1, "file.mp4", 0.3, True, False))
thread2 = threading.Thread(target=track_video, args=(model2, "file.mp4", 0.3, True, False))

# Start the threads
thread1.start()
thread2.start()

# Wait for both threads to finish
thread1.join()
thread2.join()
This script will run both models in separate threads. If you want to combine the results from both models, you'll need to implement a mechanism to synchronize and merge the results from both threads. Keep in mind that displaying the results (
show=True) from two threads might not work as expected, and you might need to handle the visualization separately.Remember to handle the GPU memory usage carefully, as running two models simultaneously will require more memory. If you encounter any issues, consider running the models sequentially or on separate GPUs if available.
4
Journey2-20
Hello I'm newer to Opencv and I'm trying to run a tracking camera for airsoft. How would i select specific bounding boxes?
- Paula DerrengerUltralytics
Use
model.track(frame, persist=True)and inspectresults[0].boxes.xyxywithresults[0].boxes.id; select the box containing your OpenCV mouse-click coordinates, store its track ID, then process or draw only boxes whoseboxes.idmatches that ID. Feel free to continue posting questions here so the Ultralytics team can help.
yashpatel2010
In my jetson orin nano super developer kit with jetpack6.1 and deepstream7.1 i want to do cross camera person tracking. Is there any default way in deepstream configs to do it? Or any other lightweight thing that can be easily doable in jetson orin nano 8 gb super dev kit.
- Glenn JocherUltralytics
Ultralytics
trackis single-camera MOT, so cross-camera person IDs are not built in; on DeepStream 7.1 the practical Orin Nano path isNvDeepSORT/ReID per stream plus downstream association from the exported embeddings described in the DeepStreamgst-nvtrackerdocs, or NVIDIA’s separate Multi-Camera Tracking workflow for full MTMC. Please keep the details here in Discussions and share your current tracker config if you want a minimal setup suggestion. (docs.nvidia.com)
anvi97(đã chỉnh sửa)
Hi @glenn-jocher,
I am building a road surface detection system using YOLO segmentation.
My pipeline:
Apply bird eye view using cv2.getPerspectiveTransform()
Mask only road area
Detect potholes, zebra crossings, and speed bumps
I am facing the following issues:
1️⃣ Overlapping Potholes Not Merging Properly
I want overlapping potholes to merge into one bounding box.
In many cases it works, but sometimes:
Two boxes are still shown for the same pothole
Even when they overlap visually
I am using YOLO with:
results = model(frame, conf=0.45, iou=0.4)
Is YOLO’s internal NMS preventing full merging? Should I apply custom merging after inference? Is segmentation-based merging better than bounding box merging for potholes?
2️⃣ Object Size Changing After Bird Eye View
I calculate pothole size using:
pixels_per_foot = 220
But I selected this value randomly (no real-world measurement).
Because of this:
Object size changes depending on frame position
Same pothole appears different size
Is it correct that without real-world calibration, size cannot be accurate? What is the correct method to calculate real-world size in a monocular dashcam setup?
3️⃣ Zebra Crossing vs Black–White Speed Bump Confusion
Black–white speed bumps are getting confused with zebra crossings because both have parallel white-black stripes.
Currently I am detecting only yellow speed bumps to avoid confusion.
What is the better approach to separate them?
Use segmentation instead of boxes?
Add geometry-based filtering?
Train with more hard-negative examples?
this is my code ..... from ultralytics import YOLO import cv2 import numpy as np
model = YOLO("runs/segment/pothole_seg_model3/weights/best.pt") pixels_per_foot = 220
video_path = "sample_video.mp4" cap = cv2.VideoCapture(video_path)
if not cap.isOpened(): print(" Cannot open video") exit()
width = int(cap.get(cv2.CAP_PROP_FRAME_WIDTH)) height = int(cap.get(cv2.CAP_PROP_FRAME_HEIGHT)) fps = cap.get(cv2.CAP_PROP_FPS) or 25.0
fourcc = cv2.VideoWriter_fourcc(*'avc1') out = cv2.VideoWriter("pothole5.mp4", fourcc, fps, (width, height))
STRETCH_AMOUNT = 50
src = np.float32([ [0, height],
[width, height],
[922, 183],
[265, 183]
])dst = np.float32([ [0, height], [width, height], [width + STRETCH_AMOUNT, 0], [0 - STRETCH_AMOUNT, 0] ])
matrix = cv2.getPerspectiveTransform(src, dst) def compute_iou(box1, box2): x1 = max(box1[0], box2[0]) y1 = max(box1[1], box2[1]) x2 = min(box1[2], box2[2]) y2 = min(box1[3], box2[3])
inter_area = max(0, x2 - x1) * max(0, y2 - y1)

box1_area = (box1[2] - box1[0]) * (box1[3] - box1[1])
box2_area = (box2[2] - box2[0]) * (box2[3] - box2[1])

union = box1_area + box2_area - inter_area

if union == 0:
    return 0

return inter_area / union
def should_merge(box1, box2, iou_thresh=0.1, dist_thresh=150): # Containment check - if one box is inside the other if (box1[0] >= box2[0] and box1[1] >= box2[1] and box1[2] <= box2[2] and box1[3] <= box2[3]): return True if (box2[0] >= box1[0] and box2[1] >= box1[1] and box2[2] <= box1[2] and box2[3] <= box1[3]): return True
iou = compute_iou(box1, box2)
if iou > iou_thresh:
    return True

cx1, cy1 = (box1[0]+box1[2])/2, (box1[1]+box1[3])/2
cx2, cy2 = (box2[0]+box2[2])/2, (box2[1]+box2[3])/2

if np.sqrt((cx1-cx2)**2 + (cy1-cy2)**2) < dist_thresh:
    return True

return False
while True: ret, frame = cap.read() if not ret: break
bird_eye = cv2.warpPerspective(frame, matrix, (width, height))

results = model(bird_eye, conf=0.45, iou=0.4)[0]
annotated = results.plot()

if results.boxes is not None:
    for box in results.boxes:
        cls_id = int(box.cls.item())

        if cls_id == 0:  # pothole only
            x1, y1, x2, y2 = map(int, box.xyxy.cpu().numpy()[0])

            w_px = x2 - x1
            h_px = y2 - y1

            w_ft = w_px / pixels_per_foot
            h_ft = h_px / pixels_per_foot

            label = f"{w_ft:.2f}ft x {h_ft:.2f}ft"

            cv2.putText(
                annotated,
                label,
                (x1, y1 - 15),
                cv2.FONT_HERSHEY_SIMPLEX,
                0.6,
                (0, 255, 255),
                2
            )

cv2.imshow("Bird Eye + Pothole Detection", annotated)
out.write(annotated)

if cv2.waitKey(1) & 0xFF == 27:
    break
cap.release() out.release() cv2.destroyAllWindows()
- Glenn JocherUltralytics
For (1), YOLO’s NMS will only suppress duplicate detections based on
iou=...—it won’t “merge” two overlapping detections into a larger union box, and in your snippetcompute_iou()/should_merge()aren’t actually applied toresults.boxes, so you’re still visualizing the raw post-NMS output; since you’re using a Segment model, the most robust way to merge “split” potholes is to union the pothole masks and re-extract connected components (then box/measure those) rather than trying to union boxes.import cv2 import numpy as np r = model(bird_eye, conf=0.45, iou=0.4)[0] if r.masks is not None and r.boxes is not None: cls = r.boxes.cls.int().cpu().numpy() pothole_idx = np.where(cls == 0)[0] if pothole_idx.size: m = r.masks.data[pothole_idx].cpu().numpy() # (N,H,W), 0/1 union = (m.sum(0) > 0).astype(np.uint8) * 255 n, labels = cv2.connectedComponents(union) for k in range(1, n): ys, xs = np.where(labels == k) x1, y1, x2, y2 = xs.min(), ys.min(), xs.max(), ys.max() cv2.rectangle(bird_eye, (x1, y1), (x2, y2), (0, 255, 255), 2)For (2), yes—without real-world calibration (and a valid “road plane” assumption),
pixels_per_foot=220can’t be physically meaningful, and even with a BEV warp you only get consistent scale if your homography is tied to metric coordinates; the usual monocular approach is: calibrate camera intrinsics, estimate the road plane, build a homography to a top-down plane in real units (or derive scale from at least one known road-plane measurement like lane width/stripe spacing), then measure in the BEV plane.For (3), the best fix is usually data: train both classes explicitly with lots of “hard negatives” (zebra crossings that look like bumps and vice versa) and keep labels consistent; segmentation often helps because you can then add simple shape/location constraints on the mask (zebra = large repeated pattern region, bump = single narrow band across lane) and optionally smooth decisions over time (if you’re doing video, using
model.track(..., persist=True)from the Track mode docs can help stabilize per-frame flicker, even though it won’t merge instances within a frame).If you can paste
!yolo checksoutput and one representative frame (plus what you consider the “correct” merged result), I can suggest concrete thresholds/post-processing for your exact outputs. In the attached frame:
The large water-filled pothole on the left should be treated as a single instance.
The small region in the top-left corner (currently detected as separate) should be merged with the large region.
Essentially, all visually continuous damaged area should result in one bounding box / one connected component.
Currently:
Mask union + connected components splits them due to small segmentation gaps
Goal:
Treat visually continuous pothole surface as one instance for measurement stability.
- Glenn JocherUltralytics
That split is expected because
connectedComponents()treats any 1–2 px “mask hole” as a hard break, so add a small gap-closing step on the union mask (morphological close / dilate→erode) before components, with the kernel sized to the largest gap you still consider “visually continuous” (see Ultralytics YOLO segmentation docs for more mask/seg usage details):# union: uint8 {0,255} union = (m.sum(0) > 0).astype(np.uint8) * 255 # bridge small gaps (tune kernel size to your expected mask discontinuities) k_close = cv2.getStructuringElement(cv2.MORPH_ELLIPSE, (25, 25)) union_closed = cv2.morphologyEx(union, cv2.MORPH_CLOSE, k_close, iterations=1) # optional: remove tiny speckles after closing k_open = cv2.getStructuringElement(cv2.MORPH_ELLIPSE, (7, 7)) union_closed = cv2.morphologyEx(union_closed, cv2.MORPH_OPEN, k_open, iterations=1) n, labels = cv2.connectedComponents(union_closed)
mslabdelhak29
Reid doesn't work how can i fix it i tried to change it True in botsort.yaml but it doesn't work
@glenn_jocher
- Glenn JocherUltralytics(đã chỉnh sửa)
@mslabdelhak29 ReID is only supported by some trackers (for example BoT-SORT), not ByteTrack, and it’s enabled via the tracker YAML you pass at runtime. Copy the default config, enable ReID explicitly, and point
track()to your copy:# custom_botsort.yaml tracker_type: botsort with_reid: True model: yolo26n-cls.pt # or another YOLO classification weight you have locallyfrom ultralytics import YOLO model = YOLO("yolo26n.pt") # any YOLO detector results = model.track(source="path/to/video.mp4", tracker="custom_botsort.yaml", persist=True, show=False)If it still doesn’t work, you’re likely editing a different YAML than the one being loaded; always pass the path as above. Also share the output of
yolo checksand the exactcustom_botsort.yamlyou used so we can verify your environment and keys. See the ReID section in the tracking guide and the BoT-SORT config for details: Multi‑Object Tracking docs and botsort.yaml config.