快速入门指南:使用 Ultralytics YOLO26 的 Seeed Studio reCamera
reCamera 在 YOLO Vision 2024 (YV24) 上面向 AI 社区首次亮相,这是 Ultralytics 的年度线上线下混合活动。reCamera 主要面向边缘 AI 应用设计,支持设备端 AI 处理,部署也十分简单。
凭借对多种硬件配置的支持和丰富的开源资源,它非常适合在边缘设备上原型设计和部署计算机视觉解决方案。
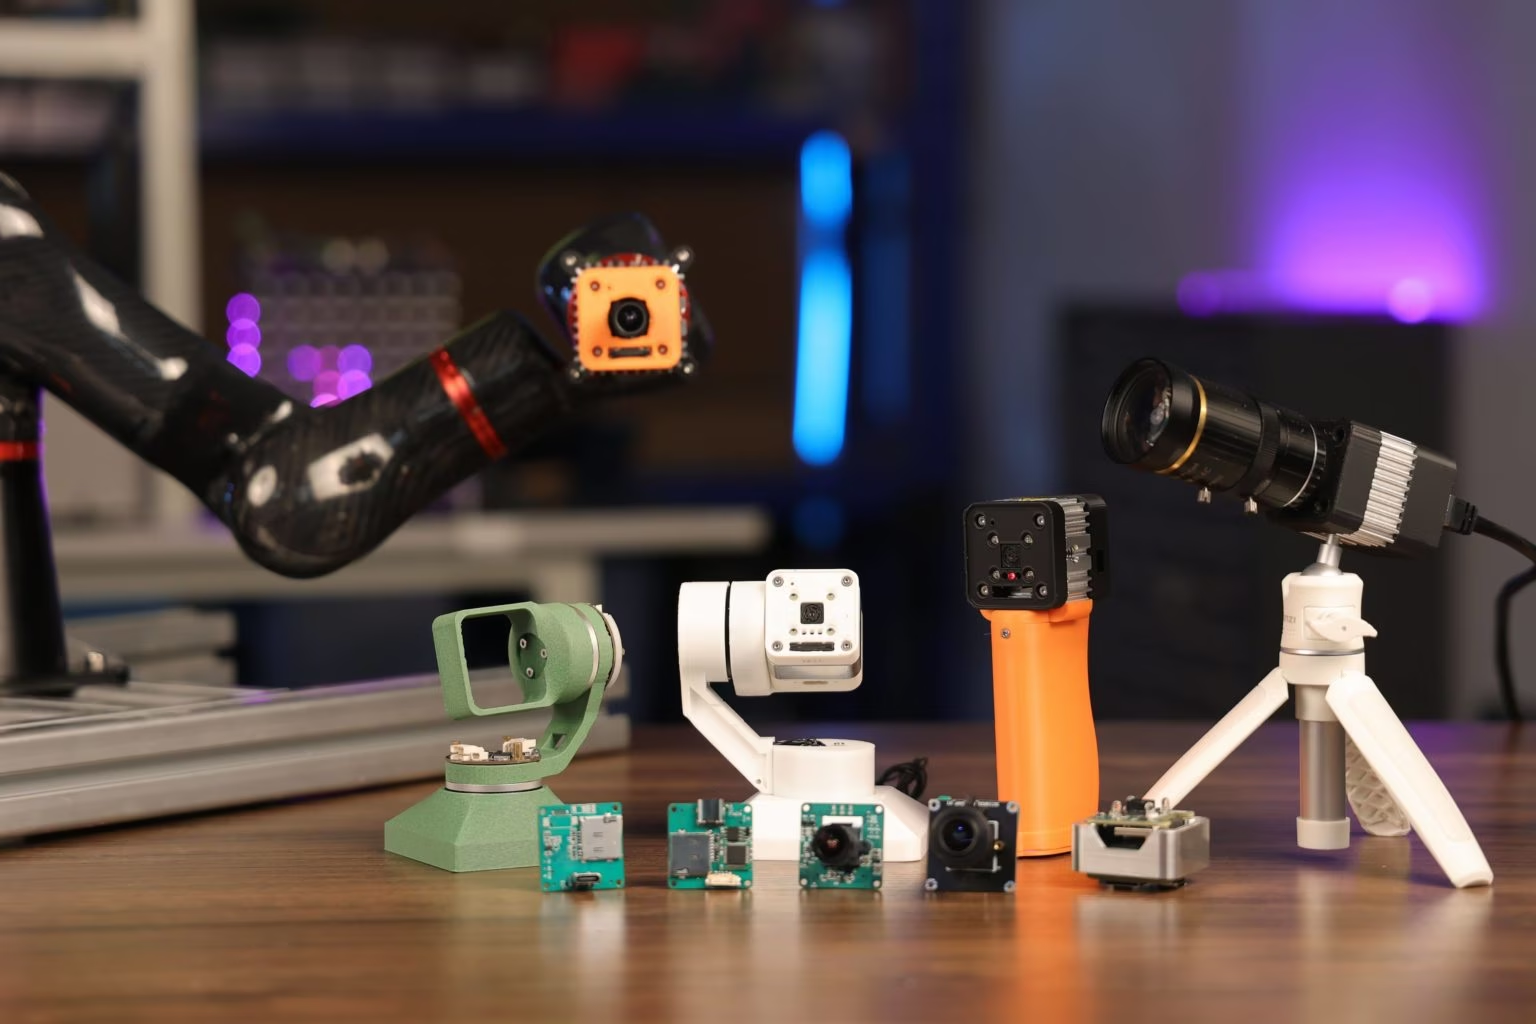
为什么选择 reCamera?#
reCamera 系列专为边缘 AI 应用打造,以满足开发者的需求。其主要特性包括:
-
RISC-V 驱动的性能:核心采用基于 RISC-V 架构的 SG200X 处理器,可为边缘 AI 任务提供高效性能。该处理器每秒可执行 1 万亿次运算 (1 TOPS),能够处理实时目标检测等任务。
-
优化的视频技术:支持 H.264 和 H.265 等先进视频压缩标准,可在不牺牲画质的情况下降低存储和带宽需求。HDR 成像、3D 降噪和镜头校正等功能,即使在具有挑战性的环境中也能保持图像质量。
-
高能效双处理:SG200X 负责处理复杂的 AI 任务,同时由一款更小型的 8 位微控制器处理简单操作以节省电量,因此 reCamera 非常适合电池供电或低功耗场景。
-
模块化和可升级设计:reCamera 采用模块化结构,由三个主要组件组成:核心板、传感器板和底板。这种设计让开发者可以随着项目演进更换或升级组件。
reCamera 快速硬件设置#
请按照 reCamera 入门指南 页面操作并选择你的设备(例如 reCamera 2002 Series、Gimbal 或 HQ POE),打开对应的快速入门指南,完成设备初始设置,例如将设备连接到网络并访问 Node-RED Web UI,以快速预览检测结果。
使用预装 YOLO 模型进行推理#
reCamera 预装了四个 Ultralytics YOLO 模型,你可以在 Node-RED 控制面板中选择所需的模型。
步骤 1:如果已将 reCamera 连接到网络,请在 Web 浏览器中输入 reCamera 的 IP 地址,打开 Node-RED 控制面板。如果通过 USB 将 reCamera 连接到 PC,则可以输入 192.168.42.1。默认情况下会加载检测模型。
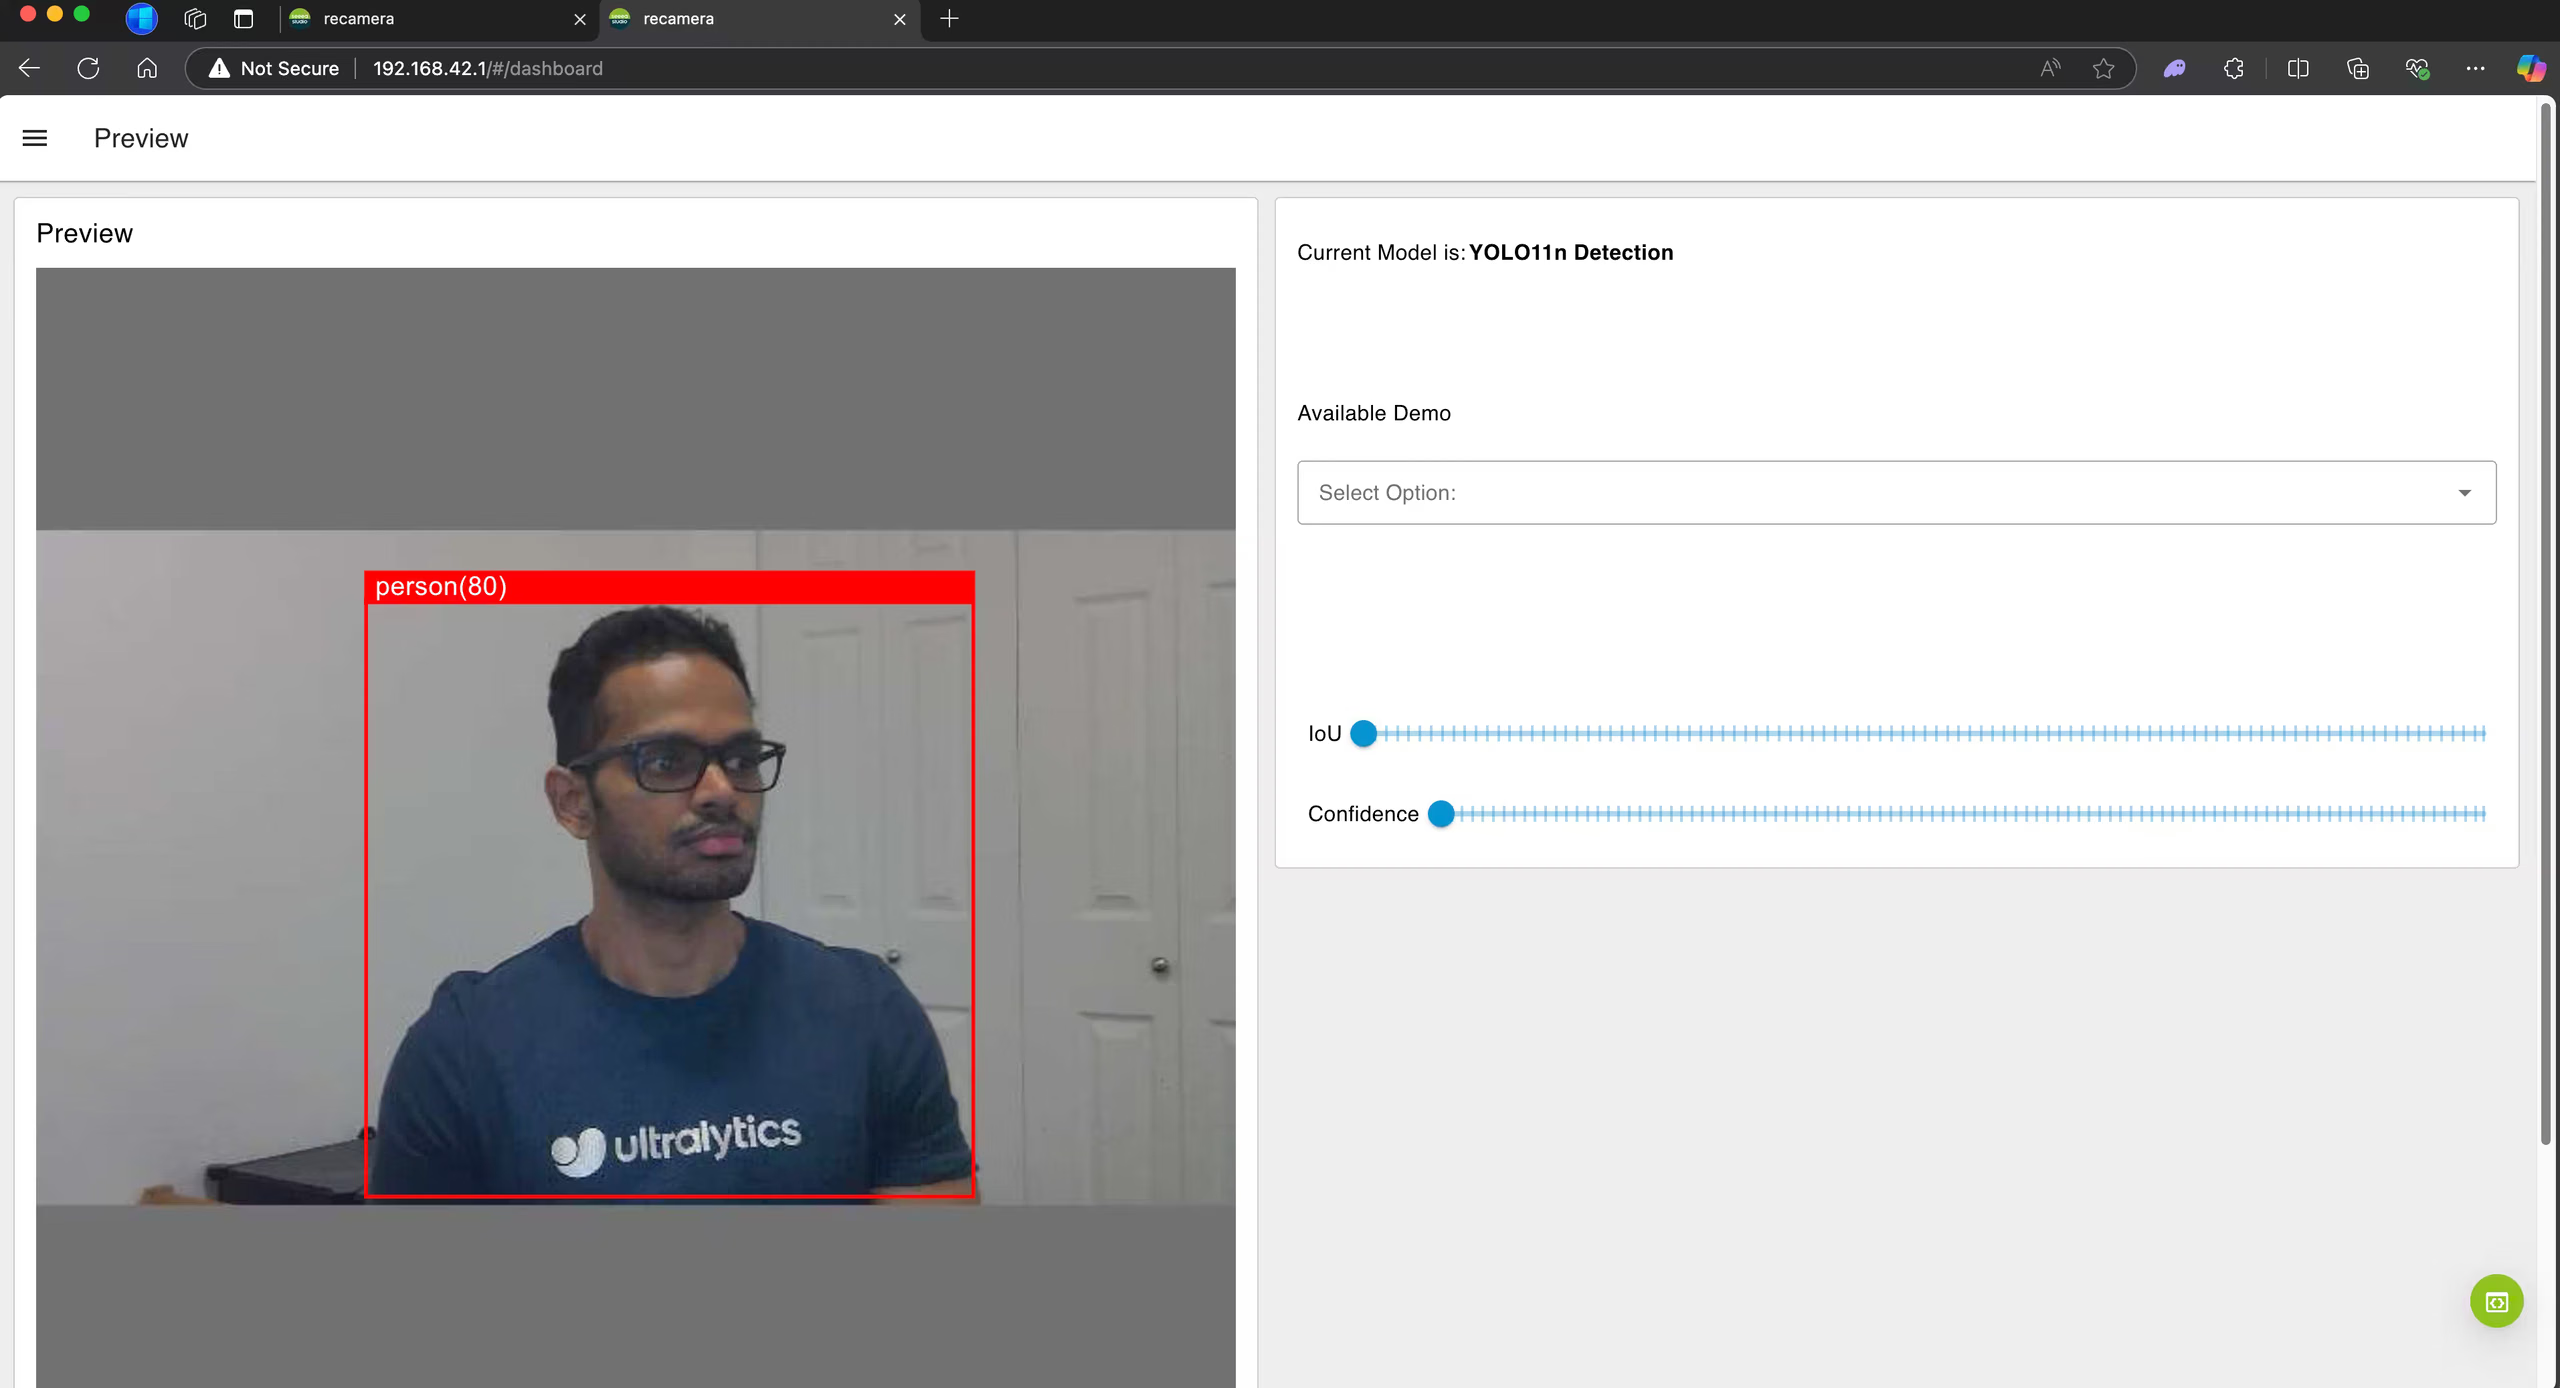
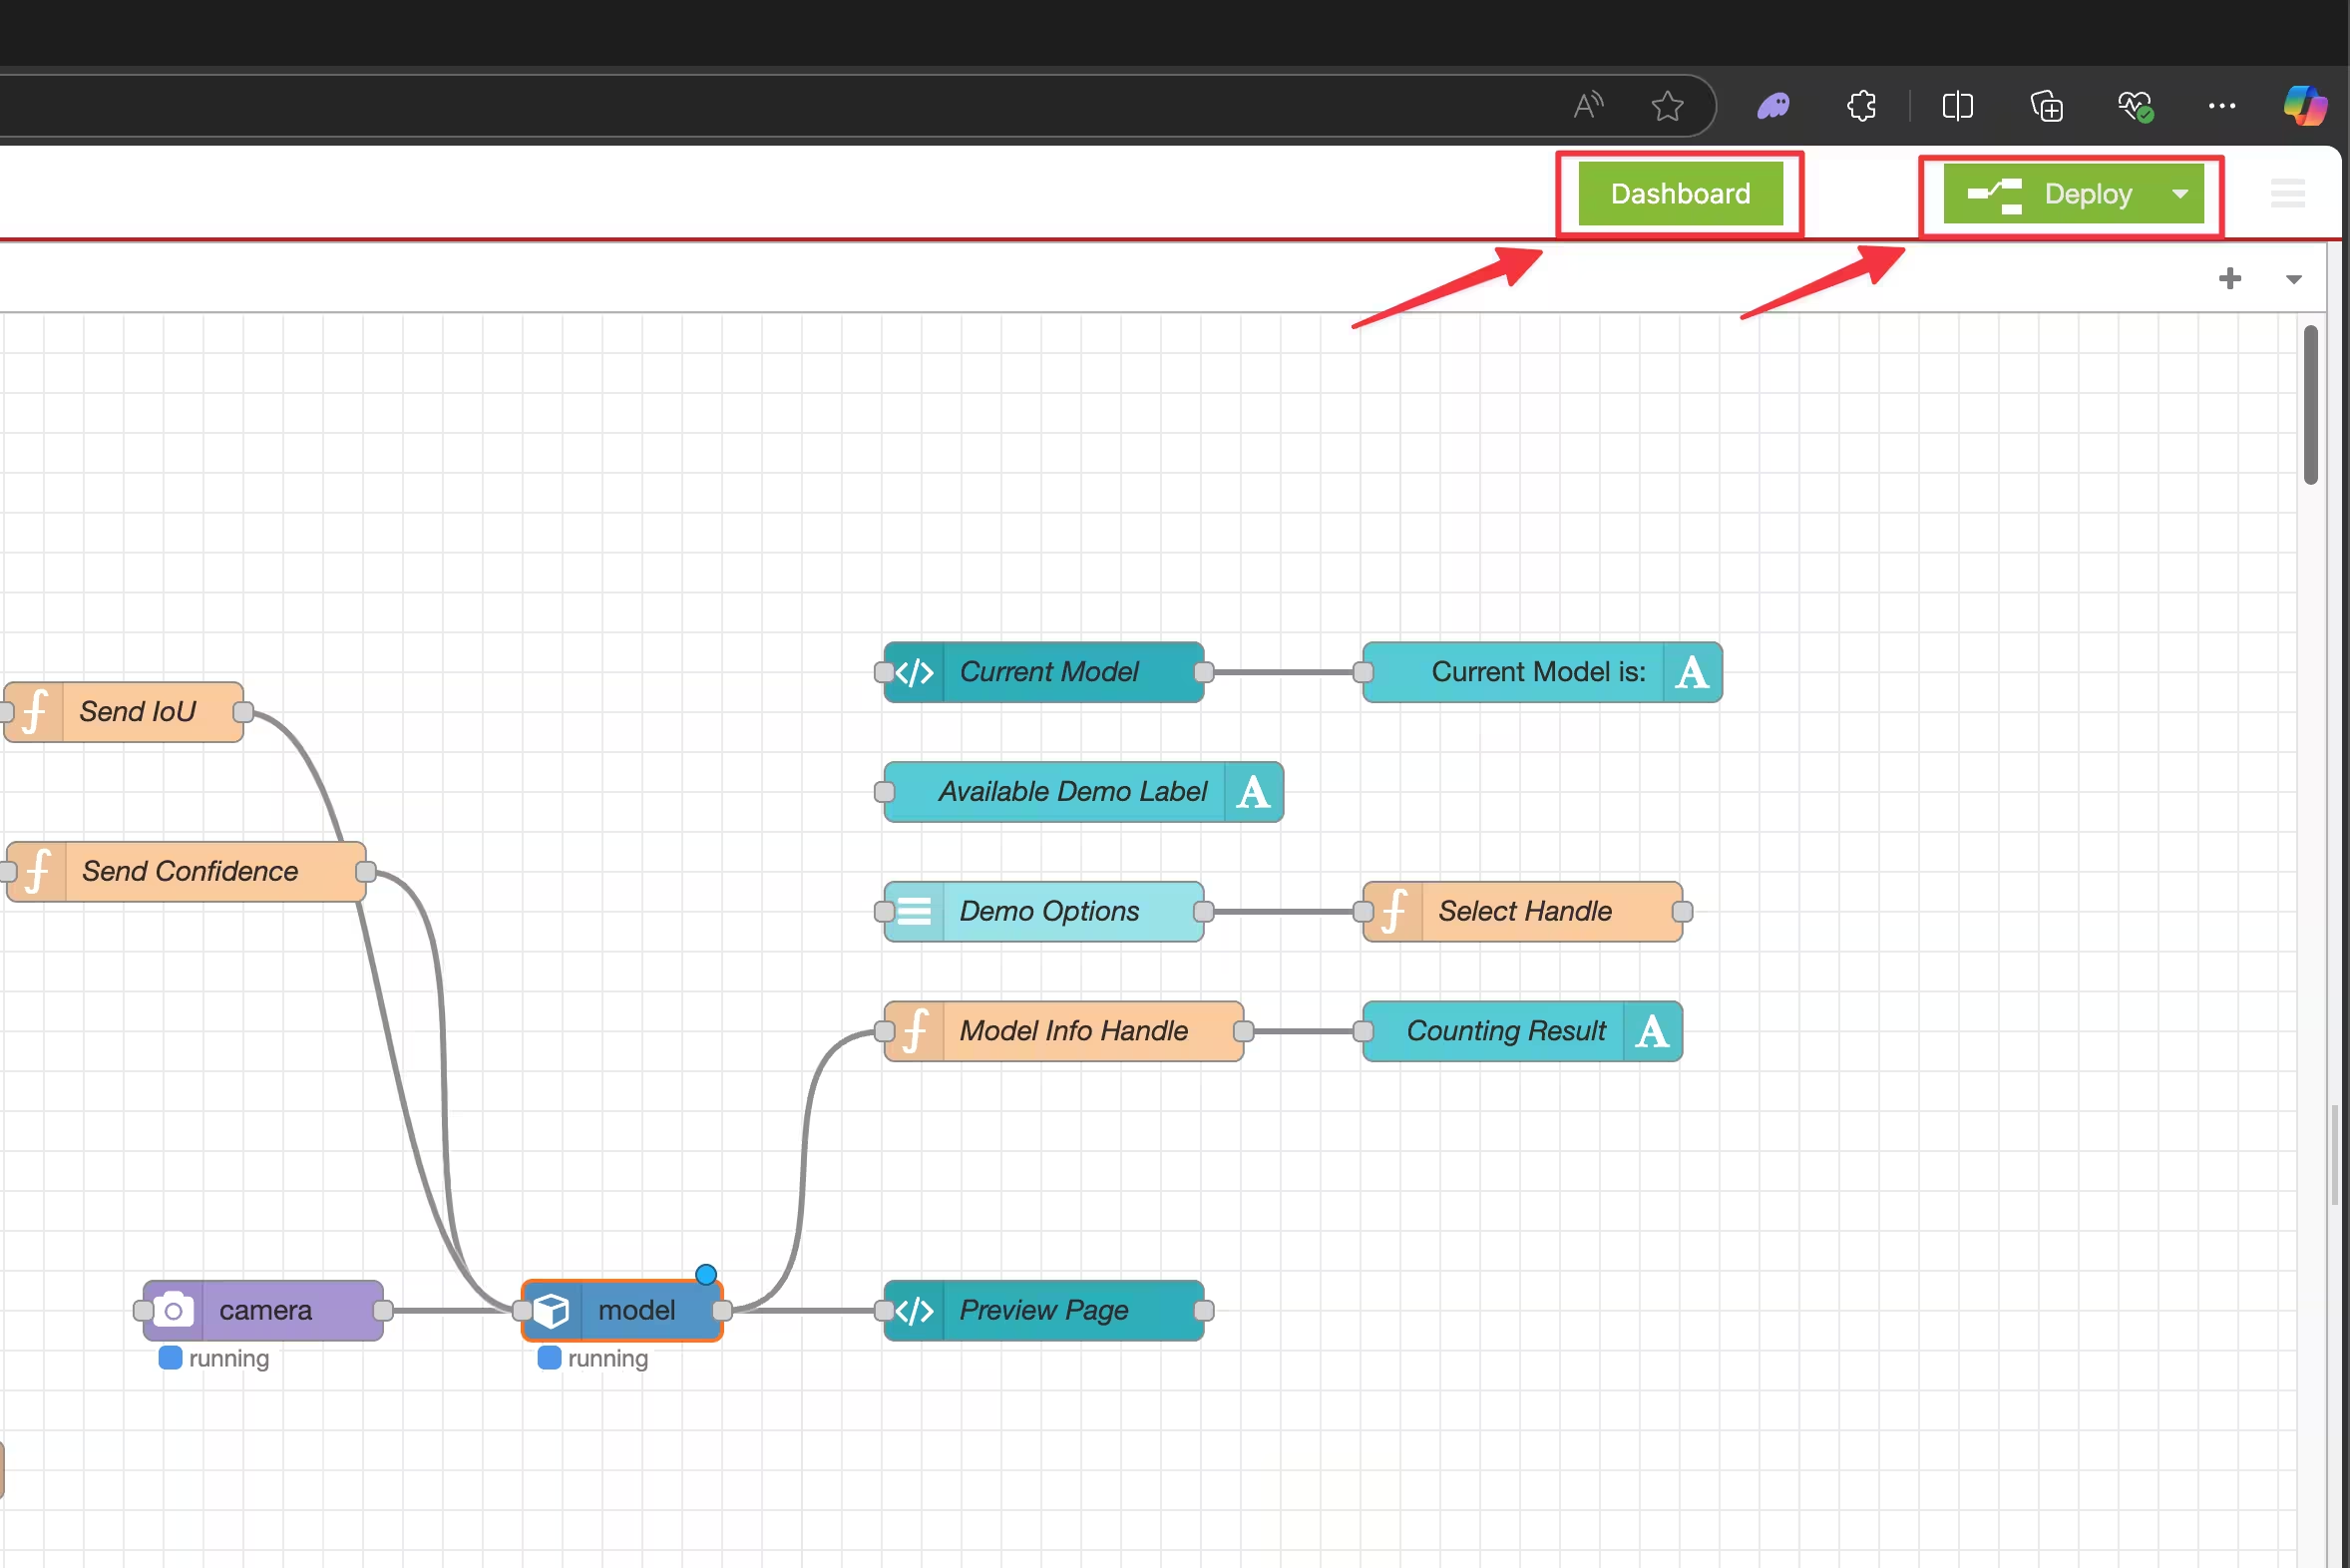
步骤 2:点击右下角的绿色圆点,进入 Node-RED 流程编辑器。
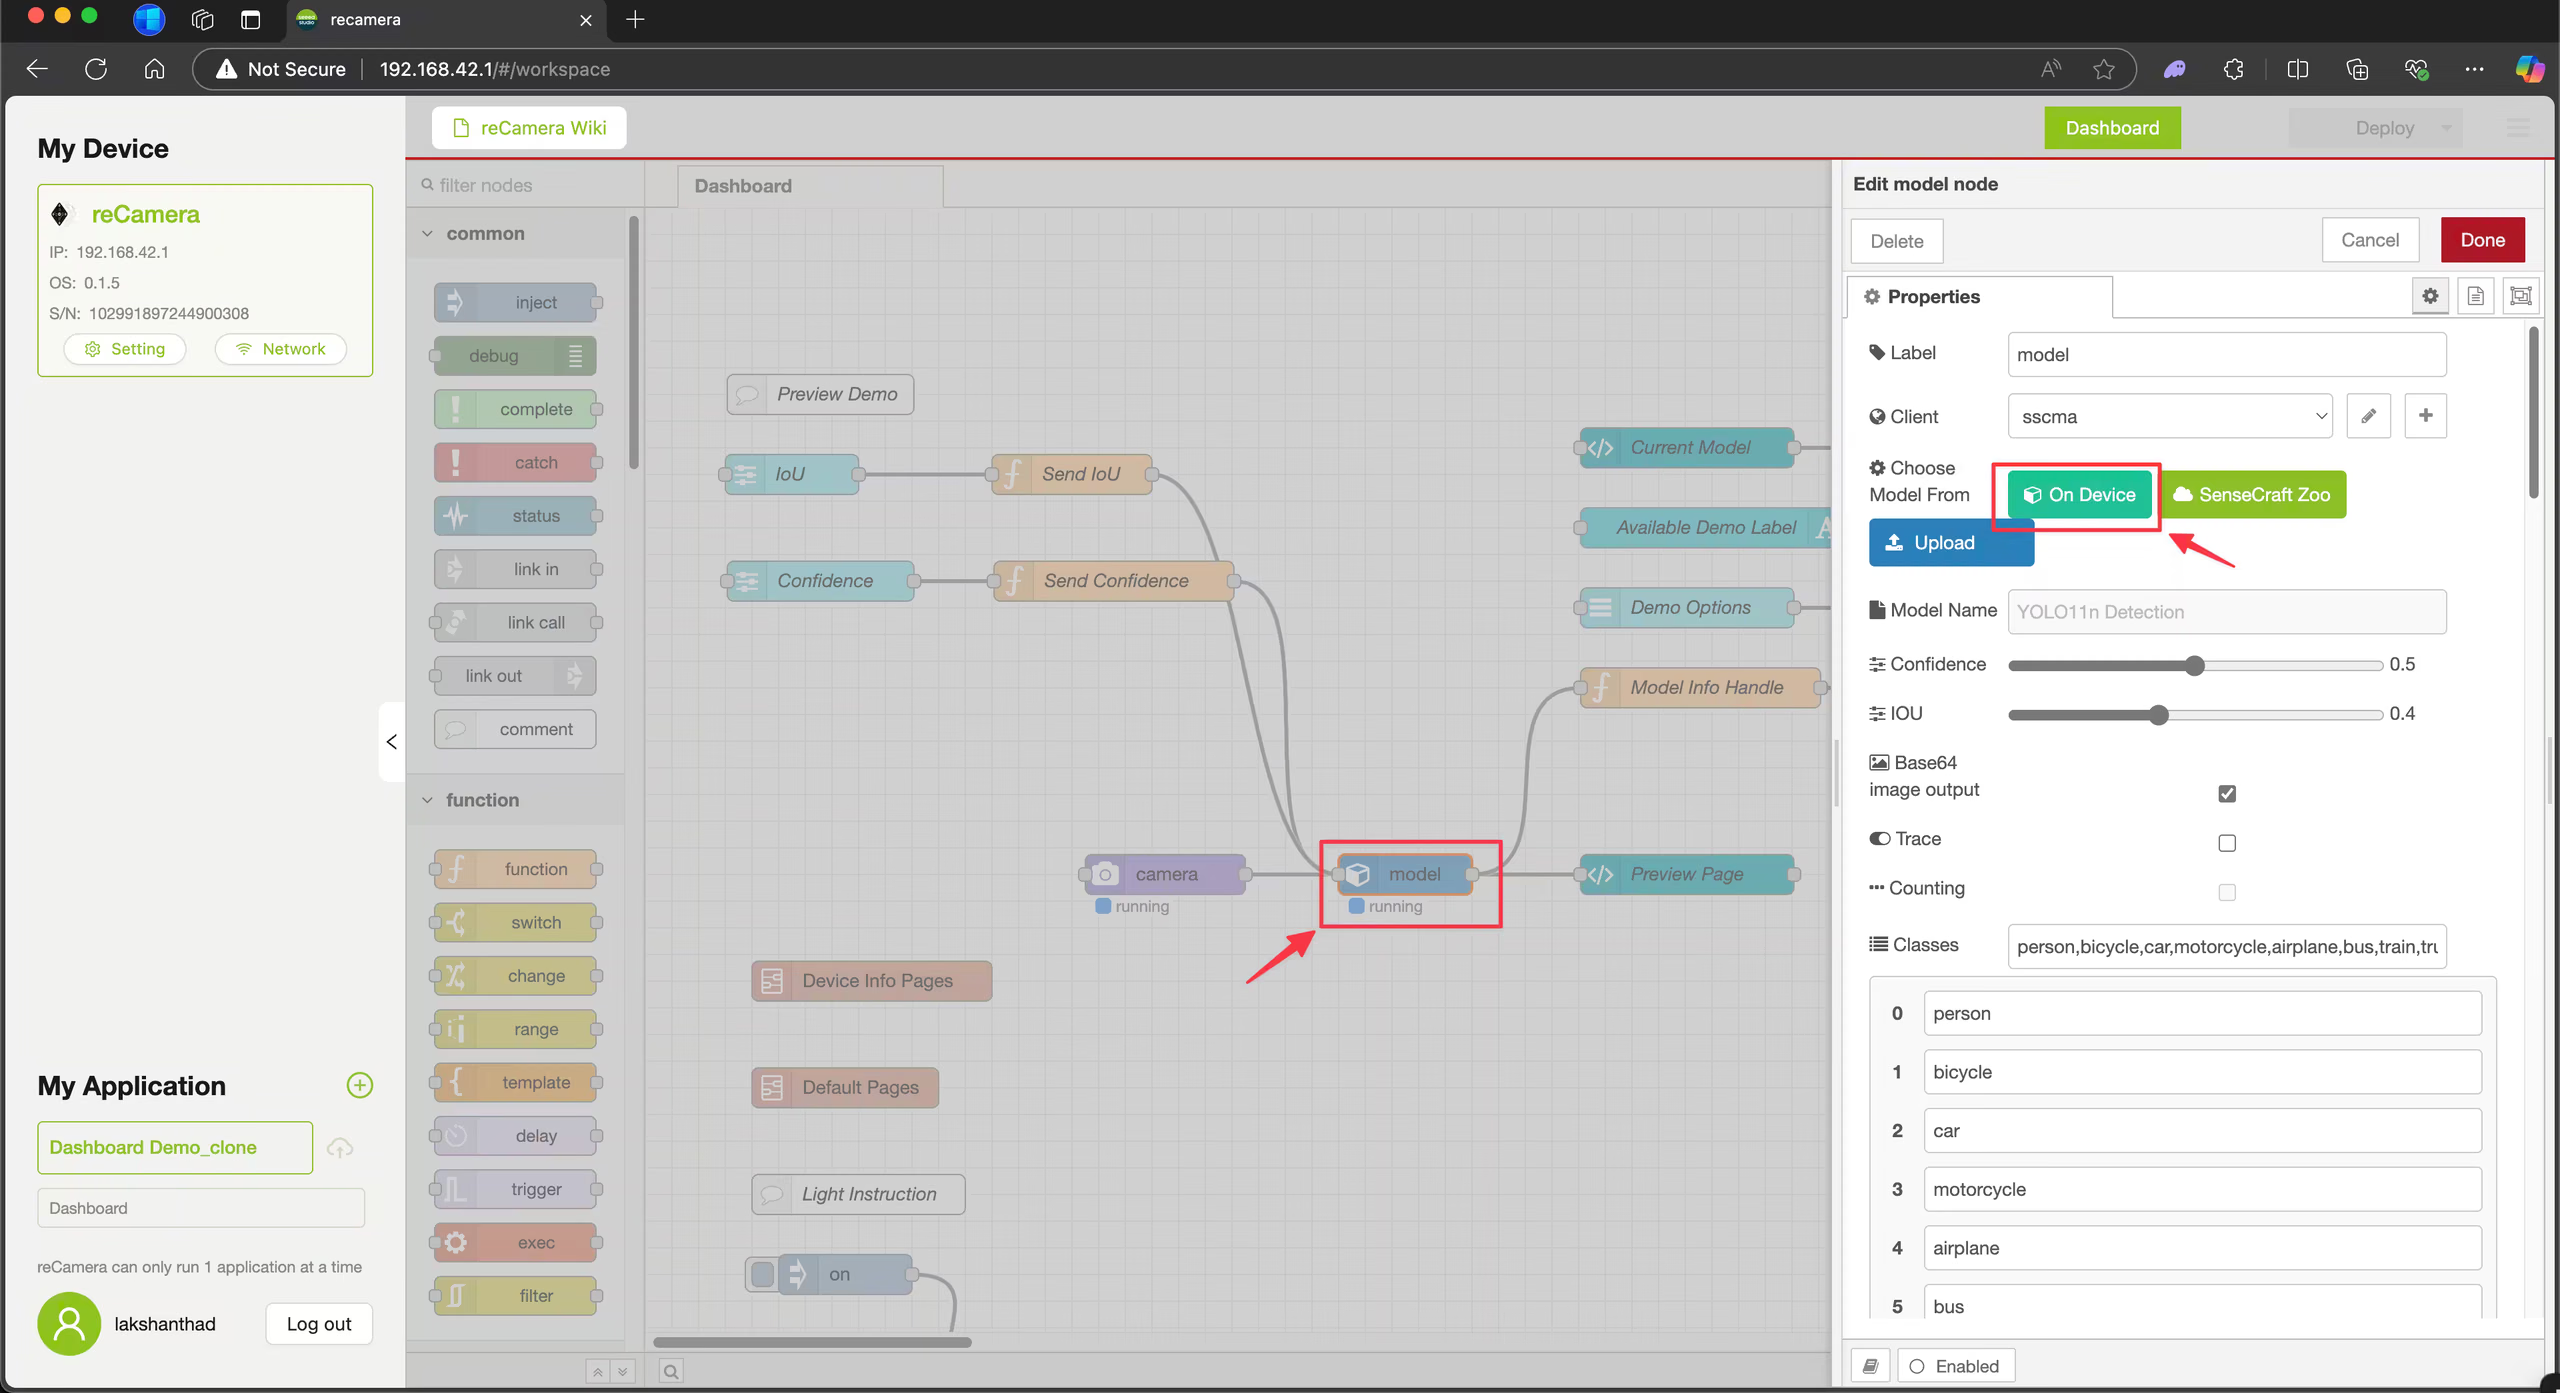
步骤 3:点击 model 节点,然后点击 On Device。
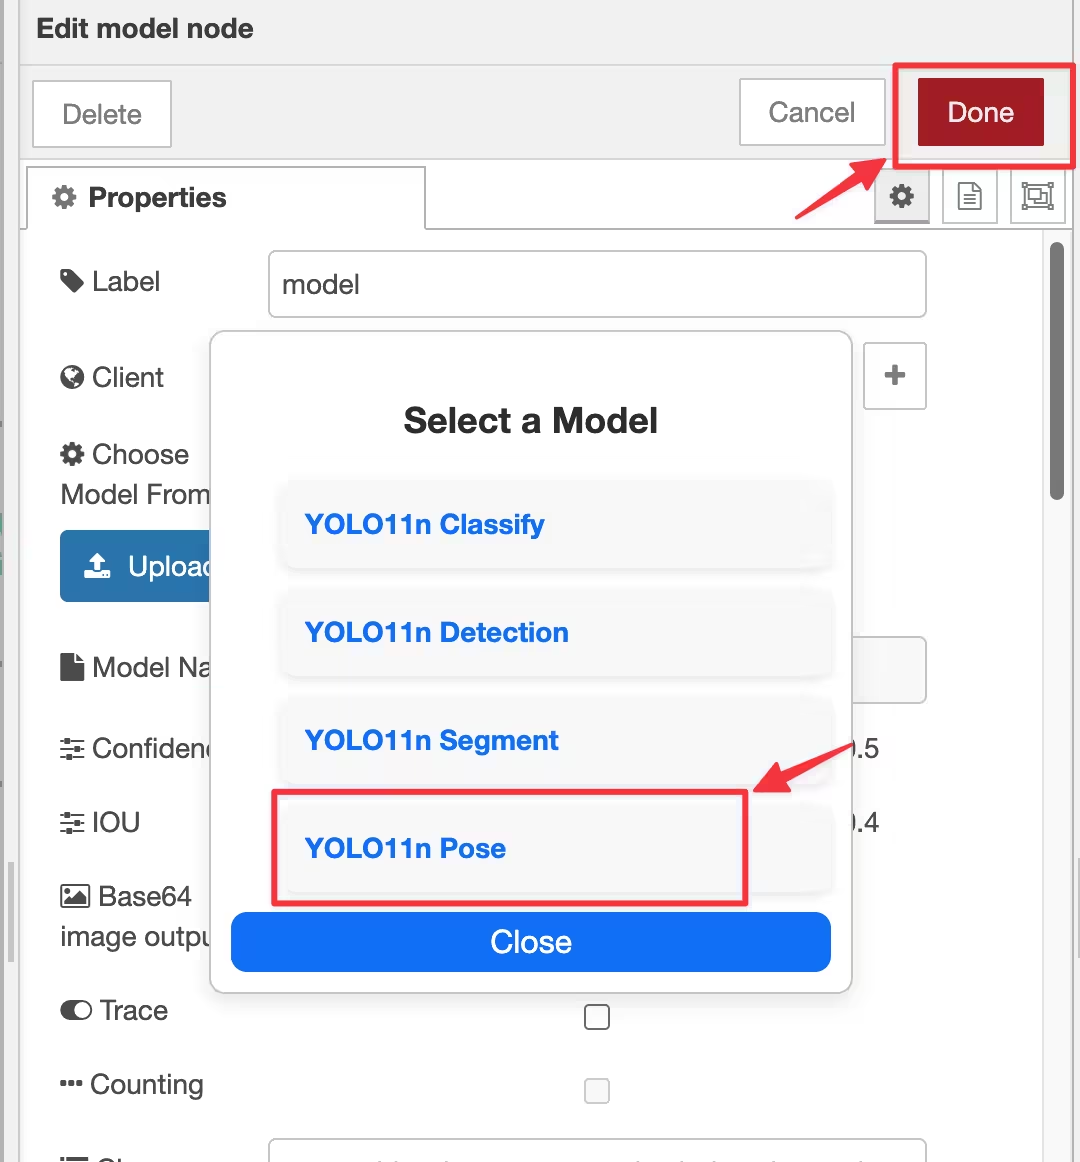
步骤 4:选择四个预装模型之一,然后点击 Done。本示例选择姿势模型。
步骤 5:点击 Deploy,部署完成后再点击 Dashboard。
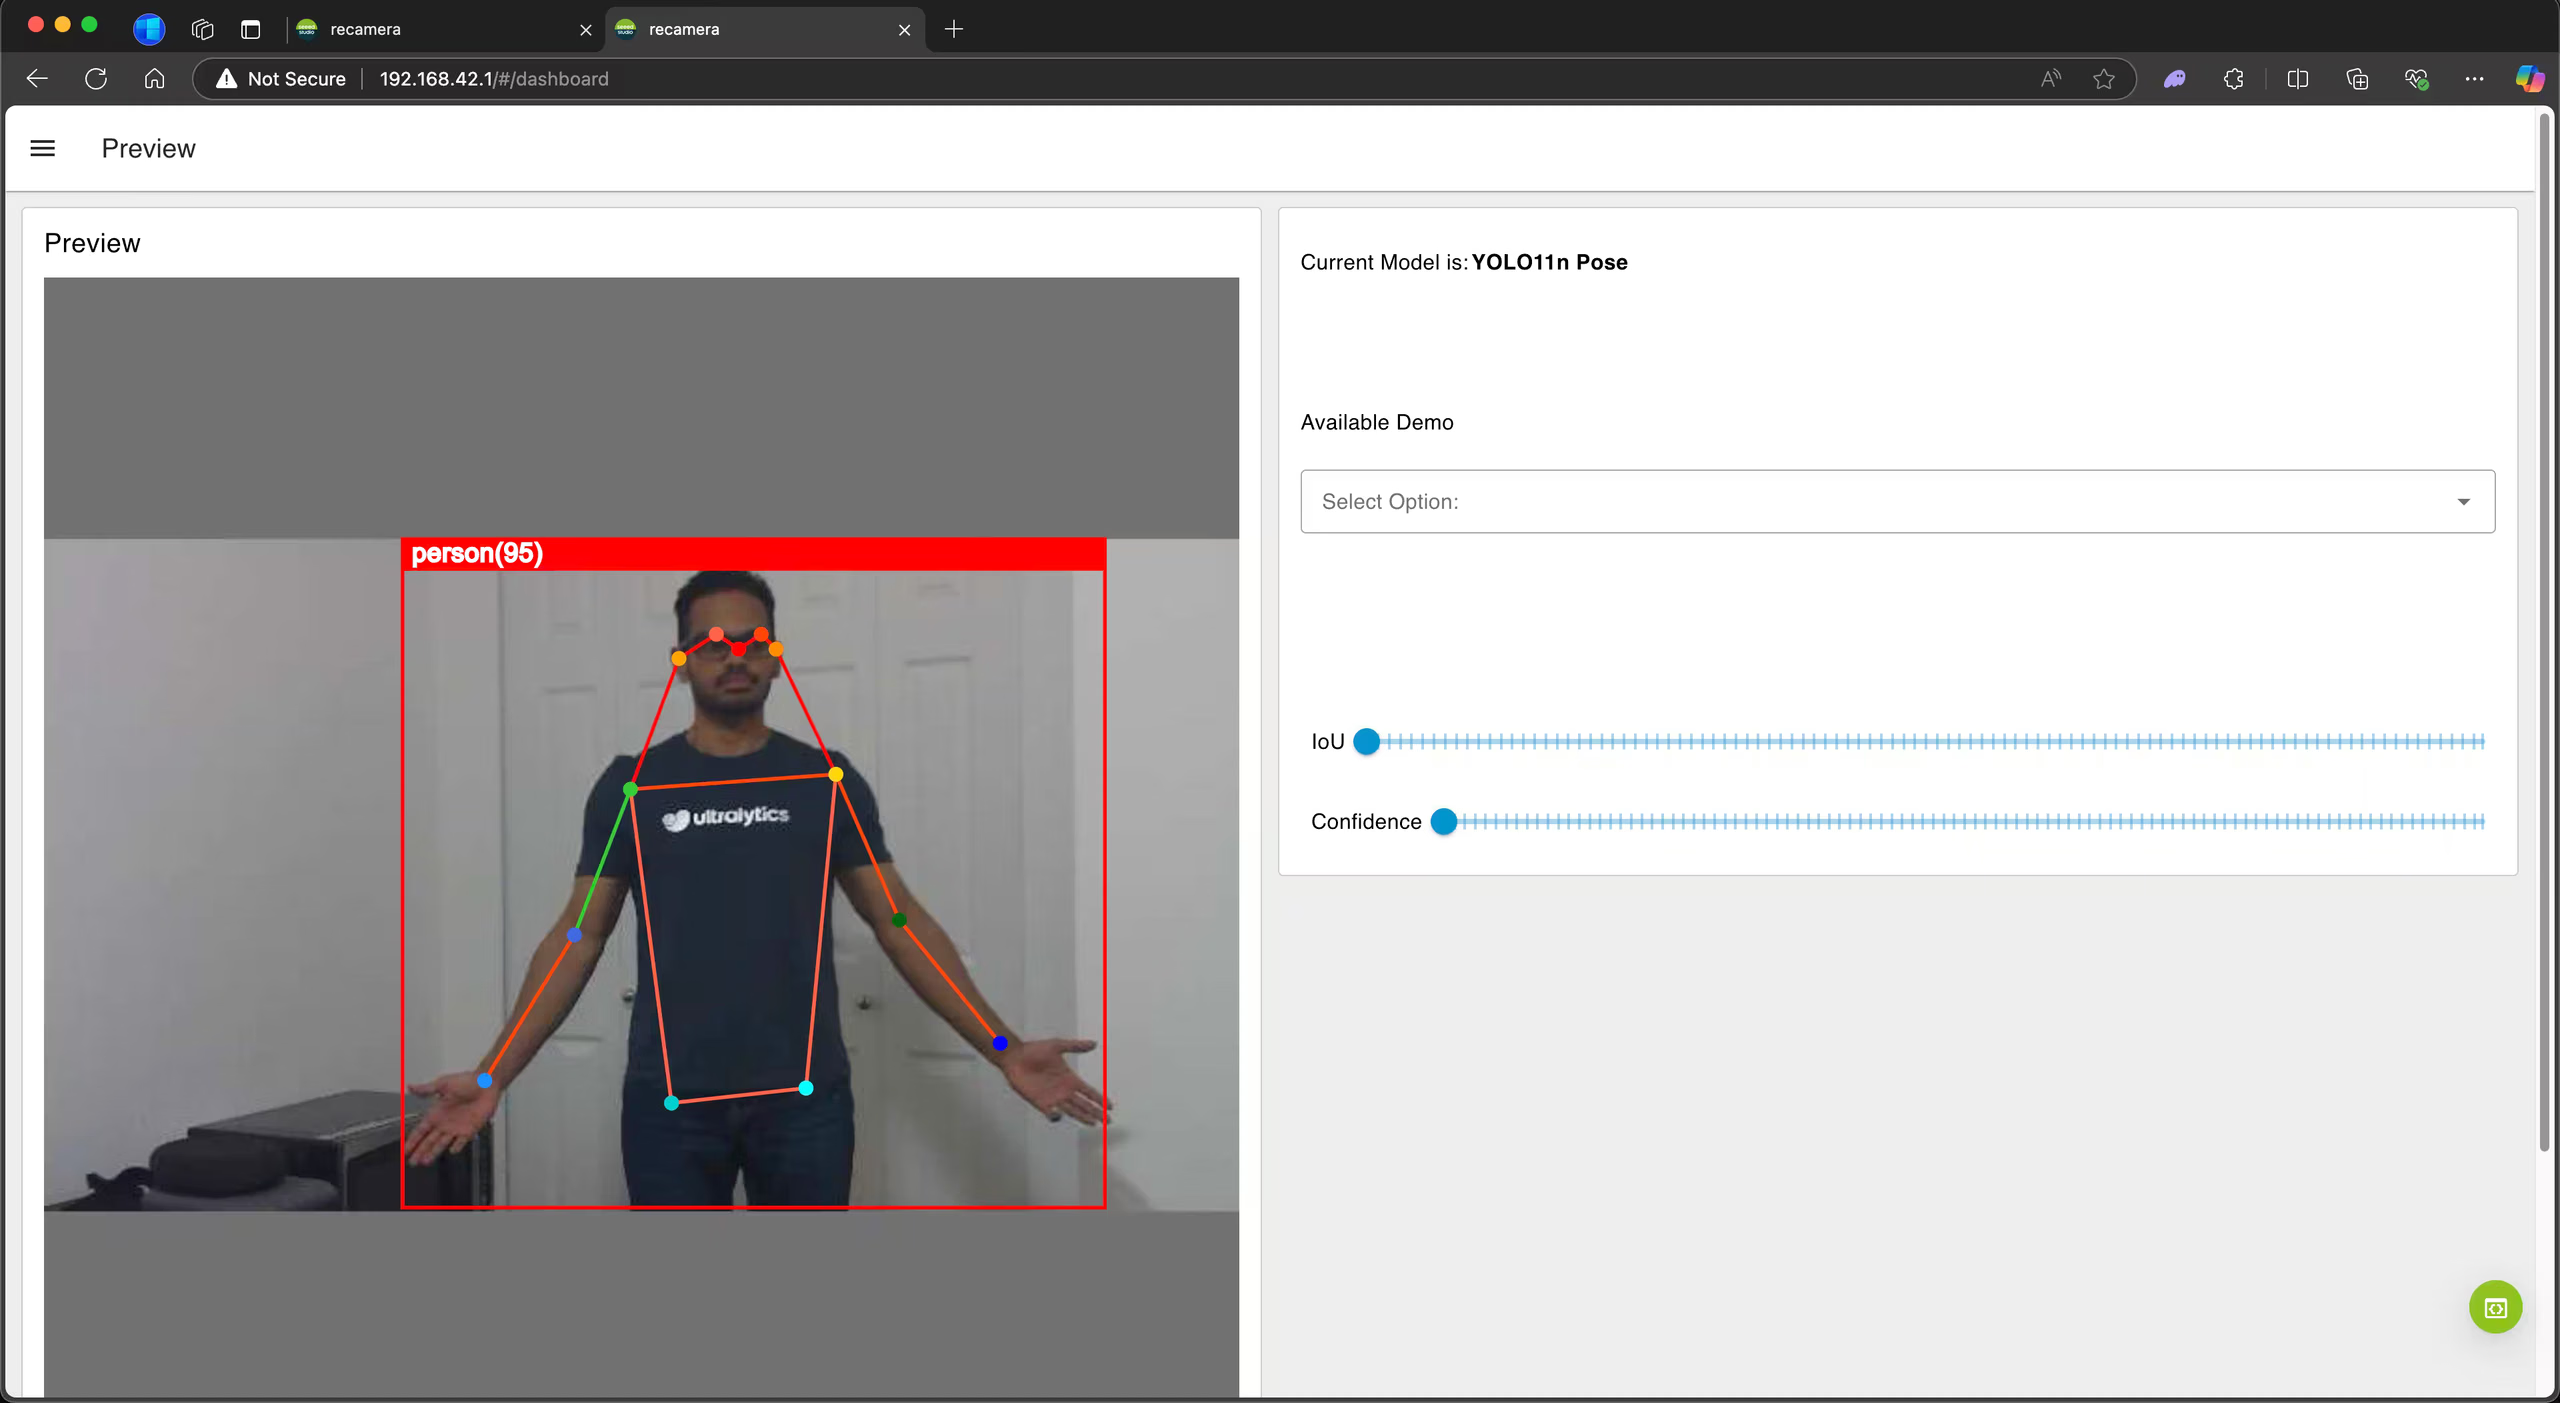
现在,控制面板会显示摄像头画面上运行的姿势估计模型。
导出为 cvimodel:转换 YOLO26 模型#
如果你想在 reCamera 上使用自定义训练的 YOLO26 模型,请按照以下步骤操作。
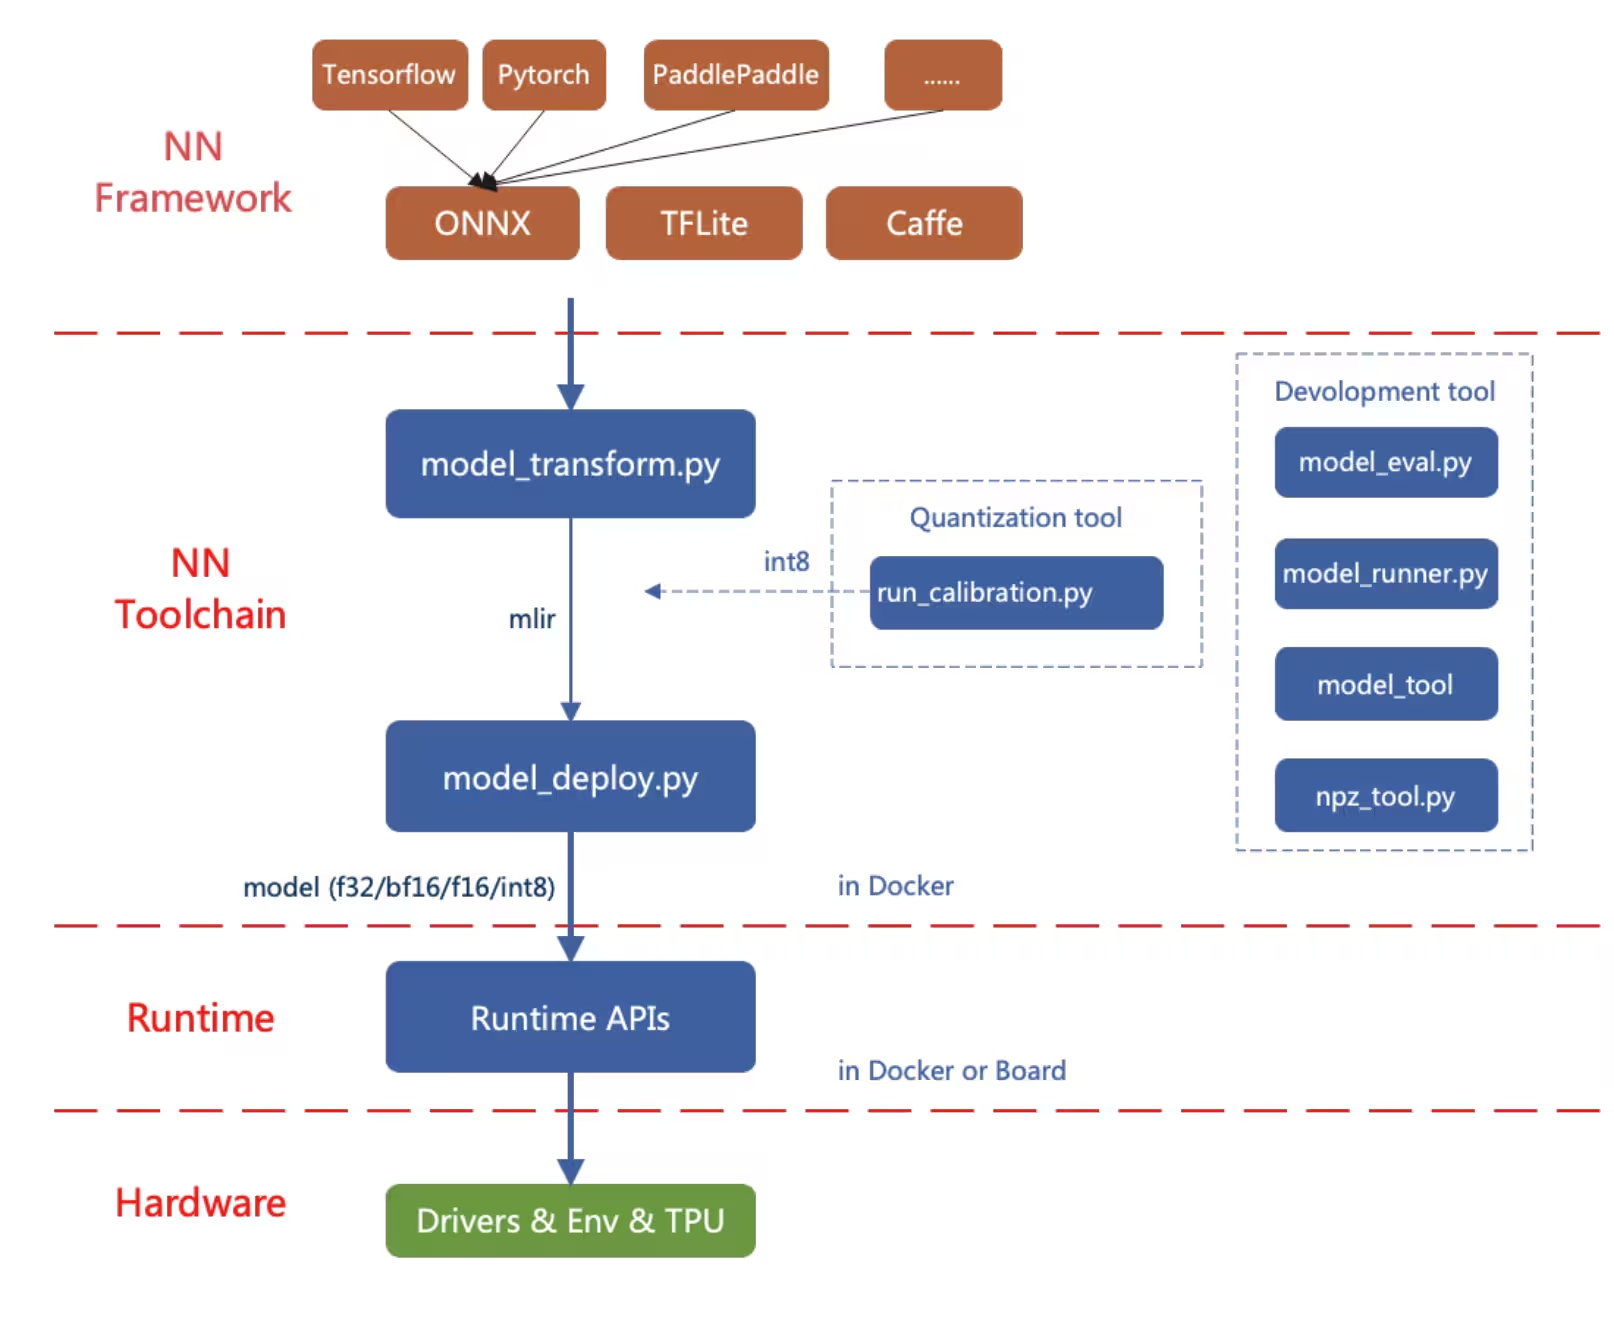
转换过程首先将 PyTorch 模型导出为 ONNX,然后将其转换为 MLIR 模型格式,最后将 MLIR 转换为 cvimodel,以便在设备上运行推理。
导出为 ONNX#
将 Ultralytics YOLO26 模型导出为 ONNX 模型格式。
安装#
运行以下命令安装所需的软件包:
pip install ultralytics有关安装流程的详细说明和最佳实践,请查看我们的 Ultralytics 安装指南。安装 YOLO26 所需的软件包时,如果遇到困难,请查阅我们的常见问题指南,获取解决方案和建议。
用法#
from ultralytics import YOLO

# 加载 YOLO26 模型
model = YOLO("yolo26n.pt")

# 将模型导出为 ONNX 格式
model.export(format="onnx", opset=14)  # 创建 'yolo26n.onnx'
有关导出流程的更多详情,请访问 Ultralytics 导出文档页面。
将 ONNX 导出为 MLIR 和 cvimodel#
获取 ONNX 模型后,请参阅转换和量化 AI 模型页面,将 ONNX 模型转换为 MLIR,再转换为 cvimodel。
reCamera 的实际应用#
reCamera 的设备端计算机视觉功能和模块化设计,使其适用于各种真实场景。
-
跌倒检测:reCamera 专为安全和医疗保健应用而设计,可实时检测跌倒,因此非常适合养老护理、医院和工业场景等需要快速响应的环境。
-
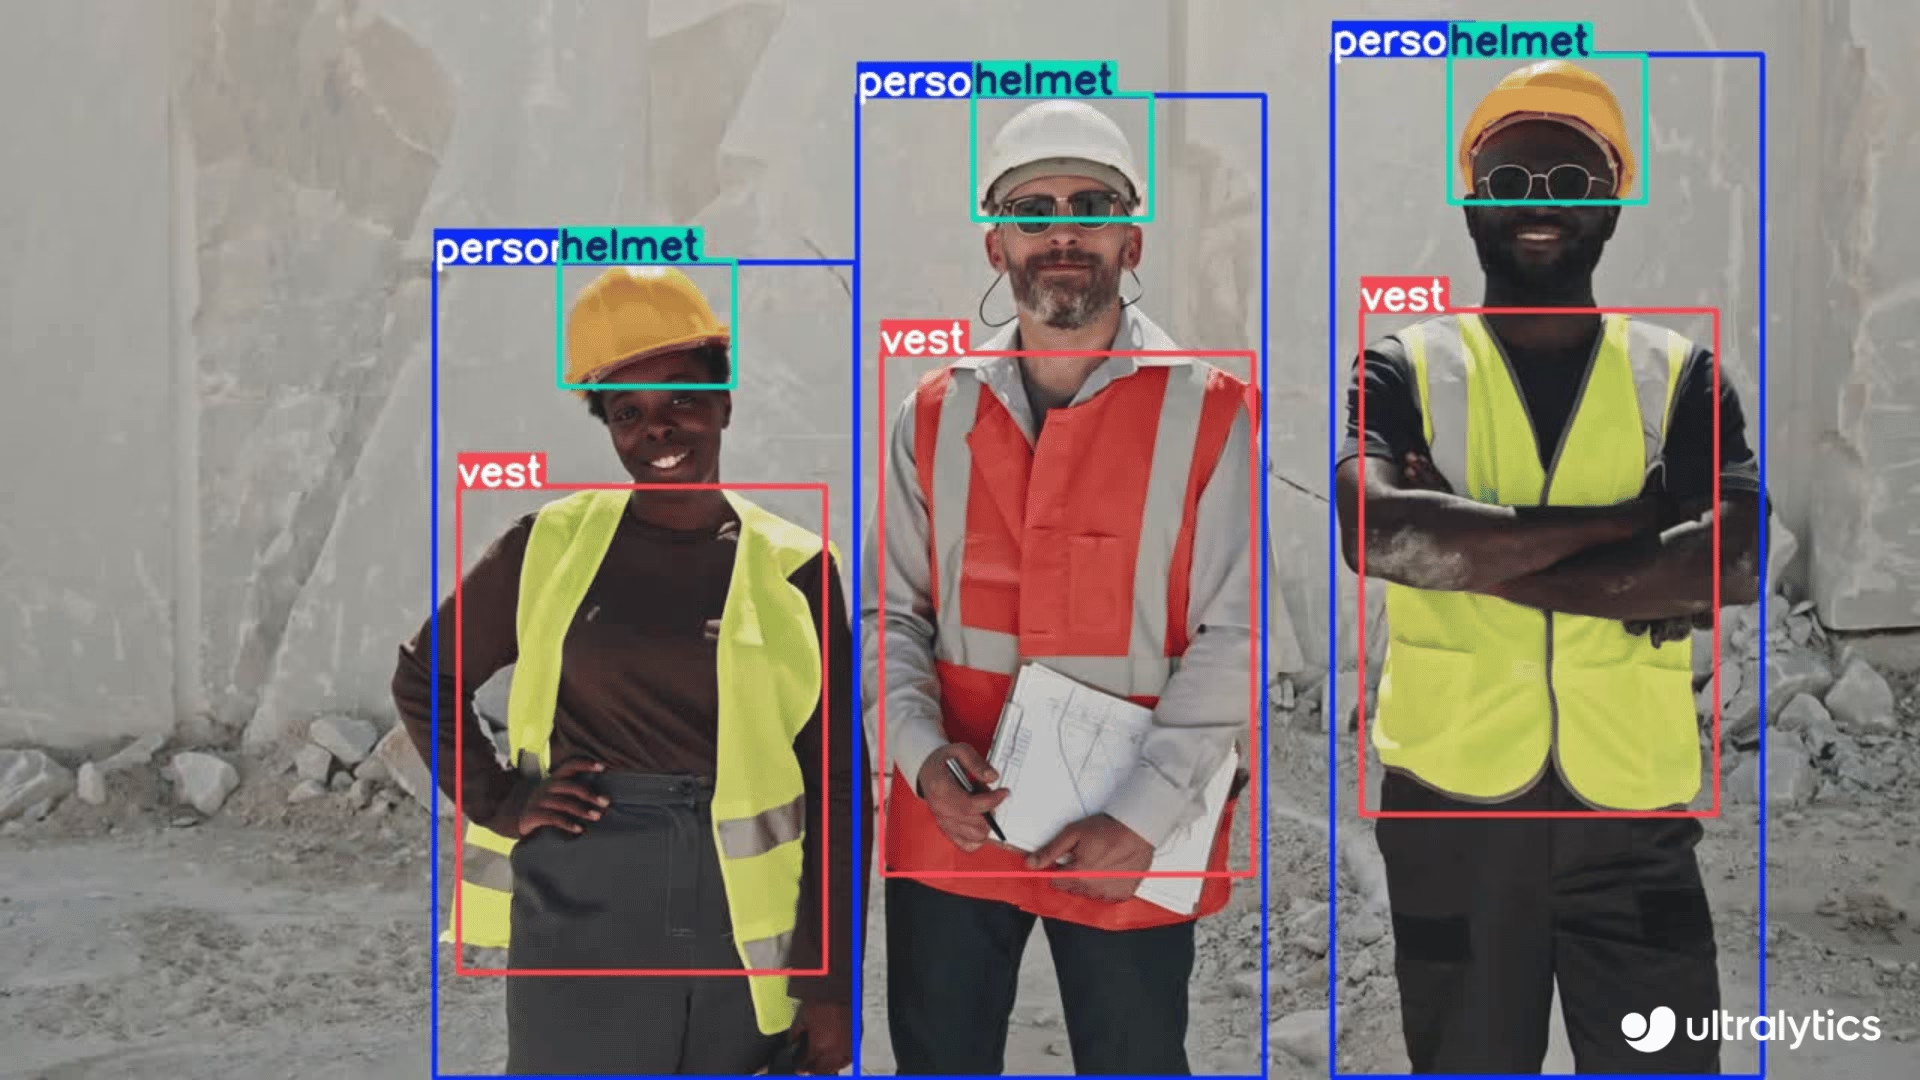
个人防护装备检测:reCamera 可通过实时检测个人防护装备(PPE)合规情况来支持工作场所安全。它可以帮助识别工作人员是否佩戴头盔、手套或其他安全装备,从而降低工业环境中的风险。
-
火灾检测:reCamera 的实时处理能力使其非常适合在工业和住宅区域进行火灾检测,及时发出预警以防止潜在灾害。
-
废弃物检测:它还可用于环境监测中的废弃物检测,以及使用 YOLO11 进行废弃物管理。
-
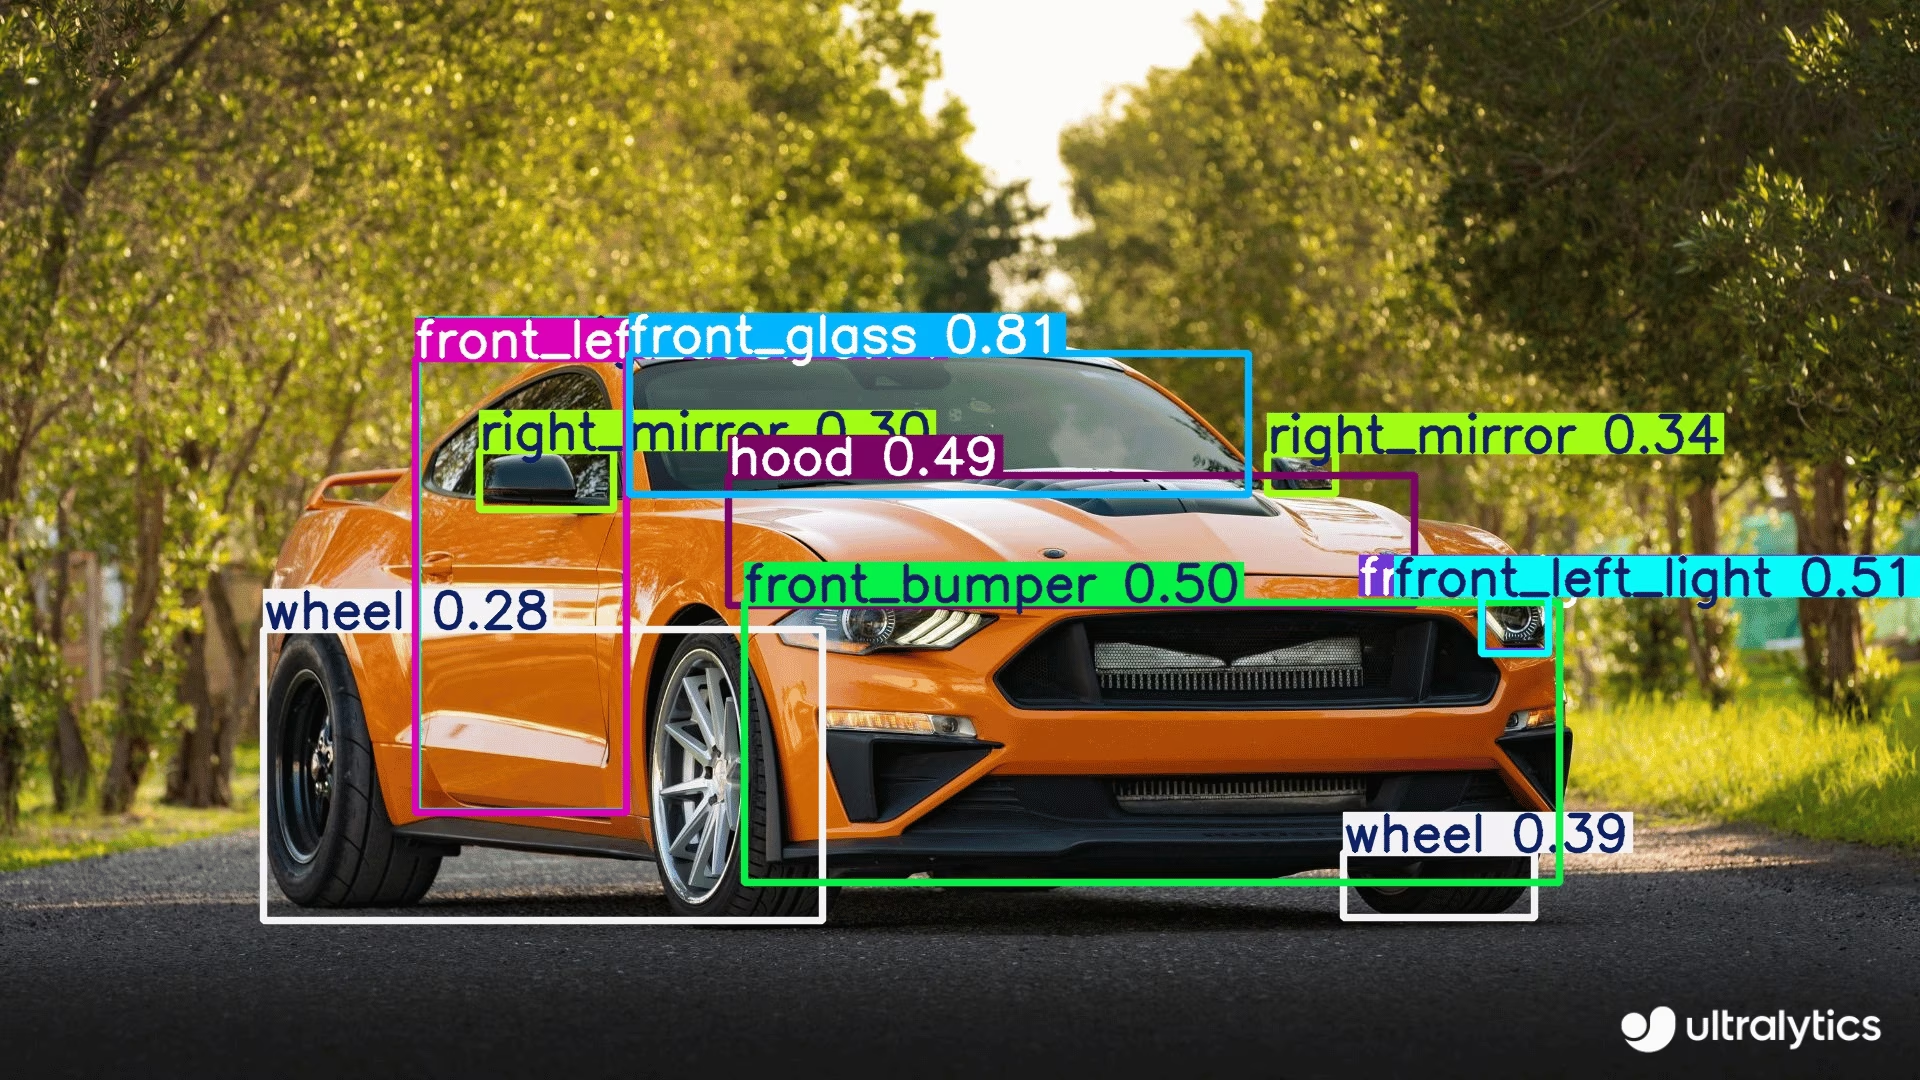
汽车零部件检测:在制造业和汽车行业,它可以帮助检测和分析汽车零部件,用于质量控制、装配线监控和库存管理。
常见问题#
首次设置 reCamera 时,请按以下步骤操作:
- 将 reCamera 连接到电源
- 使用 reCamera 入门指南页面将其连接到网络(选择你的设备以打开相应的快速入门指南)
- 在网页浏览器中输入设备的 IP 地址,以访问 Node-RED Web UI(如果通过 USB 连接,也可以使用
192.168.42.1) - 通过仪表板界面立即开始使用预装的 YOLO 模型
可以,你可以在 reCamera 上使用自己训练的 YOLO26 模型。操作步骤如下:
- 使用
model.export(format="onnx", opset=14)将 PyTorch 模型导出为 ONNX 格式 - 将 ONNX 模型转换为 MLIR 格式
- 将 MLIR 转换为 cvimodel 格式,以便在设备上进行推理
- 将转换后的模型加载到 reCamera 上
如需详细说明,请参阅转换和量化 AI 模型指南。
- 使用
传统 IP 摄像头需要外部硬件进行处理,而 reCamera 则:
- 借助 RISC-V SG200X 处理器,直接在设备上集成 AI 处理功能
- 提供 1 TOPS 的算力,适用于实时边缘 AI 应用
- 采用模块化设计,支持组件升级和定制
- 支持 H.264/H.265 压缩、HDR 成像和 3D 降噪等先进视频技术
- 预装 Ultralytics YOLO 模型,可立即使用
这些特性使 reCamera 成为边缘 AI 应用的独立解决方案,无需额外的外部处理硬件。


评论50
提出问题、分享结果,或帮助其他人。
tcpipchip
we wrote a book and trainned to yolo26 on ultralytics...i recall that works
 Glenn JocherUltralytics
Yes, a custom-trained
YOLO26model can run onreCamerausing theONNX -> MLIR -> cvimodelworkflow in the reCamera guide; if you hit a blocker, please share the exact step and full error here so the Ultralytics team can help.
HanJammer
This site mentions recamera comes with YOLO26 (which is why I bought two of them) yet YOLO11 is installed (which is visible on screenshots as well) and I can't load YOLO26 - how to do that? I can't find reliable guide :(
Ah nevermind, I think I got it, still it would be better not to advertise the camera "reCamera comes pre-installed with four Ultralytics YOLO26 models" which is basically not true.
I whipped out some 'single click' tool to convert YOLO26 onnx-es which makes it a bit easier... I need to test it a bit, for now it supports the base model. Perhaps I will push it to my github later this week.
This is fantastic.
When you finish it, i will add to the BOOK.
Here is the first version of the converter util (it's just GUI and few scripts over the actual workflow). For now it was tested with a base detection model under Windows. More to come.
https://github.com/HanJammer/reCamera_YOLO26
Video presentation here: https://youtu.be/XgPjyj2U8YQ
Here is the first version of the converter util (it's just GUI and few scripts over the actual workflow). For now it was tested with a base detection model under Windows. More to come.
https://github.com/HanJammer/reCamera_YOLO26
Video presentation here: https://youtu.be/XgPjyj2U8YQ
wow!!!!!!!!!!!!!!!!!!!!!!!!!!!!!!!!!!!!!!!!!!!!!!!!!!!!!!!
i will test soon!
- Glenn JocherUltralytics
Thanks for sharing this; for anyone testing, the supported path today is still the reCamera integration guide together with Seeed’s model conversion guide, and we’ll review the docs wording around preinstalled models since some devices appear to ship with YOLO11 rather than YOLO26.
@glenn-jocher Have you a recamera ?
- Glenn JocherUltralytics
I don’t personally keep a reCamera on my desk, but the workflow in the Seeed Studio reCamera guide is the supported path; if you have a specific setup or export question, please drop it here and the Ultralytics team can take a look.
I tested on recamera with my trainned pose keypoint model... Same problem...no keypoint
Need to test on yolo8 on tdl sdk
- Glenn JocherUltralytics
Thanks for checking this; for custom pose models on reCamera, please drop the exact export and conversion steps here in the discussion so the Ultralytics team can take a look, since keypoints should work only after a correct
ONNX -> MLIR -> cvimodelpipeline as outlined in the reCamera guide and Seeed’s conversion guide, and it’s worth first confirming your exportedONNXmodel still produces keypoints before converting.
did you do calibration ? where the images to me to the calibration :(
- Glenn JocherUltralytics
Calibration isn’t done in the Ultralytics export step; for reCamera, you export to ONNX first with the reCamera guide, then calibration happens during Seeed’s ONNX→MLIR→
cvimodelflow using a small representative set of your own images, as described in Seeed’s Convert and Quantize AI Models guide. If you hit an error in that step, please drop the full log here and we’ll take a look.
still waiting...
send me your cvimodel too...yolo11 and yolo8
please, send me arguments used in your scripts...
did you train keypoints on animals and persons, right ?
tiruvijayakumar
NOO, i didnt train on animals, i trained on these classes for pose detection for persons using yolov11n-pose.pt weights. I fine‑tuned the YOLOv11n‑pose.pt model on my custom classes:
Running Walking Golf Skate Horse riding Kicking Diving I just uploaded animal detection model to justify that custom model deployment with quantization for object detection(yolo11n.pt) on recamera has no issues, it was another cvi model which i had no issues, it worked PERFECTLY. i only issue what i am facing is the pose detection quantized model where i am not able to see the keypoints on the inference output but bounding box is drawn along with predicted class label refer below:
now just trying to train the model for pose detection using yolov8 and then i would try quantizing the model and check if the keypoints are shown in the inference output
- Glenn JocherUltralytics
Thanks, that helps narrow it down — since detection
cvimodels work and only the quantized pose model loses keypoints, this looks more like a pose conversion or postprocessing issue in the ONNX → MLIR →cvimodelstep than a training problem. Please keep the details here so the Ultralytics team can see them, and share the exact conversion commands and full text logs from the reCamera guide and Seeed model conversion guide, plus whether the same pre-quantized ONNX shows keypoints before conversion. i ran predictions on ultralytics hub on the .pt model format, i attached the whole problem scenario and image content :https://github.com/orgs/ultralytics/discussions/22090?sort=new#discussioncomment-16346206 Any ways uploading the prediction on ultralytics hub in this thread also :
so on the model.pt file inference shows this data, this confirms that pose estimation model works. { "images": [ { "shape": [ 426, 640 ], "speed": { "preprocess": 1.41517, "inference": 130.14456, "postprocess": 0.99221 }, "results": [ { "name": "Kicking", "class": 5, "confidence": 0.80929, "box": { "x1": 0.26068, "y1": 0.10738, "x2": 0.55882, "y2": 0.85426 }, "keypoints": { "x": [ 0.41923001408576965, 0.42656999826431274, 0.4166699945926666, 0.45181000232696533, 0.42857998609542847, 0.488209992647171, 0.43380001187324524, 0.543470025062561, 0.41604000329971313, 0.5516700148582458, 0.4164600074291229, 0.46198999881744385, 0.4427199959754944, 0.357340008020401, 0.427839994430542, 0.29197001457214355, 0.43891000747680664 ], "y": [ 0.2315099984407425, 0.21907000243663788, 0.21740999817848206, 0.21602000296115875, 0.21322999894618988, 0.2783600091934204, 0.2824600040912628, 0.3255299925804138, 0.35097000002861023, 0.32879000902175903, 0.3619599938392639, 0.5179499983787537, 0.5104399919509888, 0.6517800092697144, 0.6389099955558777, 0.7586100101470947, 0.7324900031089783 ], "visible": [ 0.9994300007820129, 0.9990299940109253, 0.9990000128746033, 0.999019980430603, 0.9988300204277039, 0.9995700120925903, 0.9996600151062012, 0.998960018157959, 0.9992700219154358, 0.9985499978065491, 0.997439980506897, 0.9995700120925903, 0.9995700120925903, 0.9988800287246704, 0.9989299774169922, 0.982990026473999, 0.9852499961853027 ] } } ] } ], "metadata": { "imageCount": 1, "functionTimeAlive": 78321.917, "functionTimeCall": 0.138, "model": "best.pt", "version": { "ultralytics": "8.4.30", "torch": "2.11.0+cpu", "torchvision": "0.26.0+cpu", "python": "3.14.3" } }, "networkTime": 1.214 }
I didnt capture the conversion commands and text logs during the onnx->mlir->cvimodel, would repeat the same steps and paste the images in this thread itself.
Exported the yolov11n-pose.pt(finetuned) on google colab to onnx format
Uploaded the model on netron to view the structure, onnx is in the format IRv9 ,opset v20(would downgrade it). Classes are running, walking, golf-swing, skateboarding, riding-horse and kicking
Seeed studio guide for downgrading
Initial structure of workspace folder
Step1: pull sopho/tpuc_dev:v3.1
Step2: starting the container
Step3: installing onnx
Step4: Clone Downgrade Script
Step5: Downgrade Script settings IR v8 and Opset v17
Step6: Install TPU-MLIR tools inside container:
Step7: clone tpu-mlir
Step8: setup environment tpu-mlir(long step)
Step9: according to seeed studio guide, i have to include outputs before the model's head as the parameter for this particular step model_transform
--model_name yolo11n
--model_def yolo11n.onnx
--input_shapes "[[1,3,640,640]]"
--mean "0.0,0.0,0.0"
--scale "0.0039216,0.0039216,0.0039216"
--keep_aspect_ratio
--pixel_format rgb
--output_names "/model.23/cv2.0/cv2.0.2/Conv_output_0,/model.23/cv3.0/cv3.0.2/Conv_output_0,/model.23/cv2.1/cv2.1.2/Conv_output_0,/model.23/cv3.1/cv3.1.2/Conv_output_0,/model.23/cv2.2/cv2.2.2/Conv_output_0,/model.23/cv3.2/cv3.2.2/Conv_output_0"
--test_input ../image/dog.jpg
--test_result yolo11n_top_outputs.npz
--mlir yolo11n.mlir i have the onnx file, could someone of the team help me identify the outputs before the model's head? @glenn-jocher here is the onnx file https://drive.google.com/file/d/1UF25DK2zXx0GCWdcx55SPYHL71SylDeg/view?usp=sharing
and some animal pictures...