Deploy a pretrained YOLO model with Ultralytics on Vertex AI for inference
This guide will show you how to containerize a pretrained YOLO26 model with Ultralytics, build a FastAPI inference server for it, and deploy the model with inference server on Google Cloud Vertex AI. The example implementation will cover the object detection use case for YOLO26, but the same principles will apply for using other YOLO modes.
Before we start, you will need to create a Google Cloud Platform (GCP) project. You get $300 in GCP credits to use for free as a new user, and this amount is enough to test a running setup that you can later extend for any other YOLO26 use case, including training, or batch and streaming inference.
What you will learn
- Create an inference backend for Ultralytics YOLO26 model using FastAPI.
- Create a GCP Artifact Registry repository to store your Docker image.
- Build and push the Docker image with the model to Artifact Registry.
- Import your model in Vertex AI.
- Create a Vertex AI endpoint and deploy the model.
Why deploy a containerized model?
- Full model control with Ultralytics: You can use custom inference logic with complete control over preprocessing, postprocessing, and response formatting.
- Vertex AI handles the rest: It auto-scales, yet gives flexibility in configuring compute resources, memory, and GPU configurations.
- Native GCP integrations and security: Seamless setup with Cloud Storage, BigQuery, Cloud Functions, VPC controls, IAM policies, and audit logs.
Prerequisites
- Install Docker on your machine.
- Install the Google Cloud SDK and authenticate for using the gcloud CLI.
- It is highly recommended that you go through the Docker Quickstart Guide for Ultralytics, because you will need to extend one of the official Ultralytics Docker images while following this guide.
1. Create an inference backend with FastAPI
First, you need to create a FastAPI application that will serve the YOLO26 model inference requests. This application will handle the model loading, image preprocessing, and inference (prediction) logic.
Vertex AI Compliance Fundamentals
Vertex AI expects your container to implement two specific endpoints:
- Health endpoint (
/health): Must return HTTP status200 OKwhen service is ready. Predict endpoint (
/predict): Accepts structured prediction requests with base64-encoded images and optional parameters. Payload size limits apply depending on the endpoint type.Request payloads for the
/predictendpoint should follow this JSON structure:{ "instances": [{ "image": "base64_encoded_image" }], "parameters": { "confidence": 0.5 } }
Project folder structure
The bulk of our build will be happening inside the Docker container, and Ultralytics will also load a pretrained YOLO26 model, so you can keep the local folder structure simple:
YOUR_PROJECT/
├── src/
│   ├── __init__.py
│   ├── app.py              # Core YOLO26 inference logic
│   └── main.py             # FastAPI inference server
├── tests/
├── .env                    # Environment variables for local development
├── Dockerfile              # Container configuration
├── LICENSE                 # AGPL-3.0 License
└── pyproject.toml          # Python dependencies and project config
Important license note
Ultralytics YOLO26 models and framework are licensed under AGPL-3.0, which has important compliance requirements. Make sure to read the Ultralytics docs on how to comply with the license terms.
Create pyproject.toml with dependencies
To conveniently manage your project, create a pyproject.toml file with the following dependencies:
[project]
name = "YOUR_PROJECT_NAME"
version = "0.0.1"
description = "YOUR_PROJECT_DESCRIPTION"
requires-python = ">=3.10,<3.13"
dependencies = [
   "ultralytics>=8.3.0",
   "fastapi[all]>=0.89.1",
   "uvicorn[standard]>=0.20.0",
   "pillow>=9.0.0",
]

[build-system]
requires = ["setuptools>=61.0"]
build-backend = "setuptools.build_meta"
uvicornwill be used to run the FastAPI server.pillowwill be used for image processing, but you are not limited to PIL images only — Ultralytics supports many other formats.
Create inference logic with Ultralytics YOLO26
Now that you have the project structure and dependencies set up, you can implement the core YOLO26 inference logic. Create a src/app.py file that will handle model loading, image processing, and prediction, using Ultralytics Python API.
# src/app.py

from ultralytics import YOLO

# Model initialization and readiness state
model_yolo = None
_model_ready = False


def _initialize_model():
    """Initialize the YOLO model."""
    global model_yolo, _model_ready

    try:
        # Use pretrained YOLO26n model from Ultralytics base image
        model_yolo = YOLO("yolo26n.pt")
        _model_ready = True

    except Exception as e:
        print(f"Error initializing YOLO model: {e}")
        _model_ready = False
        model_yolo = None


# Initialize model on module import
_initialize_model()


def is_model_ready() -> bool:
    """Check if the model is ready for inference."""
    return _model_ready and model_yolo is not None
This will load the model once when the container starts, and the model will be shared across all requests. If your model will be handling heavy inference load, it is recommended to select a machine type with more memory when importing a model in Vertex AI at a later step.
Next, create two utility functions for input and output image processing with pillow. YOLO26 supports PIL images natively.
def get_image_from_bytes(binary_image: bytes) -> Image.Image:
    """Convert image from bytes to PIL RGB format."""
    input_image = Image.open(io.BytesIO(binary_image)).convert("RGB")
    return input_image
def get_bytes_from_image(image: Image.Image) -> bytes:
    """Convert PIL image to bytes."""
    return_image = io.BytesIO()
    image.save(return_image, format="JPEG", quality=85)
    return_image.seek(0)
    return return_image.getvalue()
Finally, implement the run_inference function that will handle the object detection. In this example, we will extract bounding boxes, class names, and confidence scores from the model predictions. The function will return a dictionary with detections and raw results for further processing or annotation.
def run_inference(input_image: Image.Image, confidence_threshold: float = 0.5) -> Dict[str, Any]:
    """Run inference on an image using YOLO26n model."""
    global model_yolo

    # Check if model is ready
    if not is_model_ready():
        print("Model not ready for inference")
        return {"detections": [], "results": None}

    try:
        # Make predictions and get raw results
        results = model_yolo.predict(
            imgsz=640, source=input_image, conf=confidence_threshold, save=False, augment=False, verbose=False
        )

        # Extract detections (bounding boxes, class names, and confidences)
        detections = []
        if results and len(results) > 0:
            result = results[0]
            if result.boxes is not None and len(result.boxes.xyxy) > 0:
                boxes = result.boxes

                # Convert tensors to numpy for processing
                xyxy = boxes.xyxy.cpu().numpy()
                conf = boxes.conf.cpu().numpy()
                cls = boxes.cls.cpu().numpy().astype(int)

                # Create detection dictionaries
                for i in range(len(xyxy)):
                    detection = {
                        "xmin": float(xyxy[i][0]),
                        "ymin": float(xyxy[i][1]),
                        "xmax": float(xyxy[i][2]),
                        "ymax": float(xyxy[i][3]),
                        "confidence": float(conf[i]),
                        "class": int(cls[i]),
                        "name": model_yolo.names.get(int(cls[i]), f"class_{int(cls[i])}"),
                    }
                    detections.append(detection)

        return {
            "detections": detections,
            "results": results,  # Keep raw results for annotation
        }
    except Exception as e:
        # If there's an error, return empty structure
        print(f"Error in YOLO detection: {e}")
        return {"detections": [], "results": None}
Optionally, you can add a function to annotate the image with bounding boxes and labels using the Ultralytics built-in plotting method. This will be useful if you want to return annotated images in the prediction response.
def get_annotated_image(results: list) -> Image.Image:
    """Get annotated image using Ultralytics built-in plot method."""
    if not results or len(results) == 0:
        raise ValueError("No results provided for annotation")

    result = results[0]
    # Use Ultralytics built-in plot method with PIL output
    return result.plot(pil=True)
Create HTTP inference server with FastAPI
Now that you have the core YOLO26 inference logic, you can create a FastAPI application to serve it. This will include the health check and prediction endpoints required by Vertex AI.
First, add the imports and configure logging for Vertex AI. Because Vertex AI treats stderr as error output, it makes sense to pipe the logs to stdout.
import sys

from loguru import logger

# Configure logger
logger.remove()
logger.add(
    sys.stdout,
    colorize=True,
    format="<green>{time:HH:mm:ss}</green> | <level>{message}</level>",
    level=10,
)
logger.add("log.log", rotation="1 MB", level="DEBUG", compression="zip")
For a complete Vertex AI compliance, define the required endpoints in environment variables and set the size limit for requests. It is recommended to use private Vertex AI endpoints for production deployments. This way you will have a higher request payload limit (10 MB instead of 1.5 MB for public endpoints), together with robust security and access control.
# Vertex AI environment variables
AIP_HTTP_PORT = int(os.getenv("AIP_HTTP_PORT", "8080"))
AIP_HEALTH_ROUTE = os.getenv("AIP_HEALTH_ROUTE", "/health")
AIP_PREDICT_ROUTE = os.getenv("AIP_PREDICT_ROUTE", "/predict")

# Request size limit (10 MB for private endpoints, 1.5 MB for public)
MAX_REQUEST_SIZE = 10 * 1024 * 1024  # 10 MB in bytes
Add two Pydantic models for validating your requests and responses:
# Pydantic models for request/response
class PredictionRequest(BaseModel):
    instances: list
    parameters: Optional[Dict[str, Any]] = None


class PredictionResponse(BaseModel):
    predictions: list
Add the health check endpoint to verify your model readiness. This is important for Vertex AI, as without a dedicated health check its orchestrator will be pinging random sockets and will not be able to determine if the model is ready for inference. Your check must return 200 OK for success and 503 Service Unavailable for failure:
# Health check endpoint
@app.get(AIP_HEALTH_ROUTE, status_code=status.HTTP_200_OK)
def health_check():
    """Health check endpoint for Vertex AI."""
    if not is_model_ready():
        raise HTTPException(status_code=503, detail="Model not ready")
    return {"status": "healthy"}
You now have everything to implement the prediction endpoint that will handle the inference requests. It will accept an image file, run the inference, and return the results. Note that the image must be base64-encoded, which additionally increases the size of the payload by up to 33%.
@app.post(AIP_PREDICT_ROUTE, response_model=PredictionResponse)
async def predict(request: PredictionRequest):
    """Prediction endpoint for Vertex AI."""
    try:
        predictions = []

        for instance in request.instances:
            if isinstance(instance, dict):
                if "image" in instance:
                    image_data = base64.b64decode(instance["image"])
                    input_image = get_image_from_bytes(image_data)
                else:
                    raise HTTPException(status_code=400, detail="Instance must contain 'image' field")
            else:
                raise HTTPException(status_code=400, detail="Invalid instance format")

            # Extract YOLO26 parameters if provided
            parameters = request.parameters or {}
            confidence_threshold = parameters.get("confidence", 0.5)
            return_annotated_image = parameters.get("return_annotated_image", False)

            # Run inference with YOLO26n model
            result = run_inference(input_image, confidence_threshold=confidence_threshold)
            detections_list = result["detections"]

            # Format predictions for Vertex AI
            detections = []
            for detection in detections_list:
                formatted_detection = {
                    "class": detection["name"],
                    "confidence": detection["confidence"],
                    "bbox": {
                        "xmin": detection["xmin"],
                        "ymin": detection["ymin"],
                        "xmax": detection["xmax"],
                        "ymax": detection["ymax"],
                    },
                }
                detections.append(formatted_detection)

            # Build prediction response
            prediction = {"detections": detections, "detection_count": len(detections)}

            # Add annotated image if requested and detections exist
            if (
                return_annotated_image
                and result["results"]
                and result["results"][0].boxes is not None
                and len(result["results"][0].boxes) > 0
            ):
                import base64

                annotated_image = get_annotated_image(result["results"])
                img_bytes = get_bytes_from_image(annotated_image)
                prediction["annotated_image"] = base64.b64encode(img_bytes).decode("utf-8")

            predictions.append(prediction)

        logger.info(
            f"Processed {len(request.instances)} instances, found {sum(len(p['detections']) for p in predictions)} total detections"
        )

        return PredictionResponse(predictions=predictions)

    except HTTPException:
        # Re-raise HTTPException as-is (don't catch and convert to 500)
        raise
    except Exception as e:
        logger.error(f"Prediction error: {e}")
        raise HTTPException(status_code=500, detail=f"Prediction failed: {e}")
Finally, add the application entry point to run the FastAPI server.
if __name__ == "__main__":
    import uvicorn

    logger.info(f"Starting server on port {AIP_HTTP_PORT}")
    logger.info(f"Health check route: {AIP_HEALTH_ROUTE}")
    logger.info(f"Predict route: {AIP_PREDICT_ROUTE}")
    uvicorn.run(app, host="0.0.0.0", port=AIP_HTTP_PORT)
You now have a complete FastAPI application that can serve YOLO26 inference requests. You can test it locally by installing the dependencies and running the server, for example, with uv.
# Install dependencies
uv pip install -e .

# Run the FastAPI server directly
uv run src/main.py
To test the server, you can query both the /health and /predict endpoints using cURL. Put a test image in the tests folder. Then, in your Terminal, run the following commands:
# Test health endpoint
curl http://localhost:8080/health

# Test predict endpoint with base64 encoded image
curl -X POST -H "Content-Type: application/json" -d "{\"instances\": [{\"image\": \"$(base64 -i tests/test_image.jpg)\"}]}" http://localhost:8080/predict
You should receive a JSON response with the detected objects. On your first request, expect a short delay, as Ultralytics needs to pull and load the YOLO26 model.
2. Extend the Ultralytics Docker image with your application
Ultralytics provides several Docker images that you can use as a base for your application image. Docker will install Ultralytics and the necessary GPU drivers.
To use the full capabilities of Ultralytics YOLO models, you should select the CUDA-optimized image for GPU inference. However, if CPU inference is enough for your task, you can save computing resources by selecting the CPU-only image as well:
- Dockerfile: CUDA-optimized image for YOLO26 single/multi-GPU training and inference.
- Dockerfile-cpu: CPU-only image for YOLO26 inference.
Create a Docker image for your application
Create a Dockerfile in the root of your project with the following content:
# Extends official Ultralytics Docker image for YOLO26
FROM ultralytics/ultralytics:latest

ENV PYTHONUNBUFFERED=1 \
    PYTHONDONTWRITEBYTECODE=1

# Install FastAPI and dependencies
RUN uv pip install fastapi[all] uvicorn[standard] loguru

WORKDIR /app
COPY src/ ./src/
COPY pyproject.toml ./

# Install the application package
RUN uv pip install -e .

RUN mkdir -p /app/logs
ENV PYTHONPATH=/app/src

# Port for Vertex AI
EXPOSE 8080

# Start the inference server
ENTRYPOINT ["python", "src/main.py"]
In the example, the official Ultralytics Docker image ultralytics:latest is used as a base. It already contains the YOLO26 model and all necessary dependencies. The server's entrypoint is the same as we used to test the FastAPI application locally.
Build and test the Docker image
Now you can build the Docker image with the following command:
docker build --platform linux/amd64 -t IMAGE_NAME:IMAGE_VERSION .
Replace IMAGE_NAME and IMAGE_VERSION with your desired values, for example, yolo26-fastapi:0.1. Note that you must build the image for the linux/amd64 architecture if you are deploying on Vertex AI. The --platform parameter needs to be explicitly set if you are building the image on an Apple Silicon Mac or any other non-x86 architecture.
Once the image build is completed, you can test the Docker image locally:
docker run --platform linux/amd64 -p 8080:8080 IMAGE_NAME:IMAGE_VERSION
Your Docker container is now running a FastAPI server on port 8080, ready to accept inference requests. You can test both the /health and the /predict endpoint with the same cURL commands as before:
# Test health endpoint
curl http://localhost:8080/health

# Test predict endpoint with base64 encoded image
curl -X POST -H "Content-Type: application/json" -d "{\"instances\": [{\"image\": \"$(base64 -i tests/test_image.jpg)\"}]}" http://localhost:8080/predict
3. Upload the Docker image to GCP Artifact Registry
To import your containerized model in Vertex AI, you need to upload the Docker image to Google Cloud Artifact Registry. If you don't have an Artifact Registry repository yet, you will need to create one first.
Create a repository in Google Cloud Artifact Registry
Open the Artifact Registry page in the Google Cloud Console. If you are using the Artifact Registry for the first time, you may be prompted to enable the Artifact Registry API first.

- Select Create Repository.
- Enter the name of your repository. Select the desired region and use default settings for other options, unless you need to change them specifically.
Note
Region selection may affect the availability of machines and certain compute limitations for non-Enterprise users. You can find more information in the Vertex AI official documentation: Vertex AI quotas and limits
- Once the repository is created, save your PROJECT_ID, Location (Region), and Repository Name to your secrets vault or
.envfile. You will need them later to tag and push your Docker image to the Artifact Registry.
Authenticate Docker to Artifact Registry
Authenticate your Docker client to the Artifact Registry repository you just created. Run the following command in your terminal:
gcloud auth configure-docker YOUR_REGION-docker.pkg.dev
Tag and push your image to Artifact Registry
Tag and push the Docker image to Google Artifact Registry.
Use unique tags for your images
It is recommended to use unique tags every time you will be updating your image. Most GCP services, including Vertex AI, rely on the image tags for automated versioning and scaling, so it is a good practice to use semantic versioning or date-based tags.
Tag your image with the Artifact Registry repository URL. Replace the placeholders with the values you saved earlier.
docker tag IMAGE_NAME:IMAGE_VERSION YOUR_REGION-docker.pkg.dev/YOUR_PROJECT_ID/YOUR_REPOSITORY_NAME/IMAGE_NAME:IMAGE_VERSION
Push the tagged image to the Artifact Registry repository.
docker push YOUR_REGION-docker.pkg.dev/YOUR_PROJECT_ID/YOUR_REPOSITORY_NAME/IMAGE_NAME:IMAGE_VERSION
Wait for the process to complete. You should now see the image in your Artifact Registry repository.
For more specific instructions on how to work with images in Artifact Registry, see the Artifact Registry documentation: Push and pull images.
4. Import your model in Vertex AI
Using the Docker image you've just pushed, you can now import the model in Vertex AI.
In Google Cloud navigation menu, go to Vertex AI > Model Registry. Alternatively, search for "Vertex AI" in the search bar at the top of the Google Cloud Console.

Click Import.
- Select Import as a new model.
- Select the region. You can choose the same region as your Artifact Registry repository, but your selection should be dictated by the availability of machine types and quotas in your region.
Select Import an existing model container.

In the Container image field, browse the Artifact Registry repository you created earlier and select the image you just pushed.
Scroll down to the Environment variables section and enter the predict and health endpoints, and the port that you defined in your FastAPI application.

Click Import. Vertex AI will take several minutes to register the model and prepare it for deployment. You will receive an email notification once the import is complete.
5. Create a Vertex AI Endpoint and deploy your model
Endpoints vs Models in Vertex AI
In Vertex AI terminology, endpoints refer to the deployed models, since they represent the HTTP endpoints where you send inference requests, whereas models are the trained ML artifacts stored in the Model Registry.
To deploy a model, you need to create an Endpoint in Vertex AI.
- In your Vertex AI navigation menu, go to Endpoints. Select your region you used when importing your model. Click Create.

- Enter the Endpoint name.
- For Access, Vertex AI recommends using private Vertex AI endpoints. Apart from security benefits, you get a higher payload limit if you select a private endpoint, however you will need to configure your VPC network and firewall rules to allow access to the endpoint. Refer to the Vertex AI documentation for more instructions on private endpoints.
- Click Continue.
- On the Model settings dialog, select the model you imported earlier. Now you can configure the machine type, memory, and GPU settings for your model. Allow for ample memory if you are expecting high inference loads to ensure there are no I/O bottlenecks for the proper YOLO26 performance.
In Accelerator type, select the GPU type you want to use for inference. If you are not sure which GPU to select, you can start with NVIDIA T4, which is CUDA-supported.
Region and machine type quotas
Remember that certain regions have very limited compute quotas, so you may not be able to select certain machine types or GPUs in your region. If this is critical, change the region of your deployment to one with a bigger quota. Find more information in the Vertex AI official documentation: Vertex AI quotas and limits.
Once the machine type is selected, you can click Continue. At this point, you can choose to enable model monitoring in Vertex AI—an extra service that will track your model's performance and provide insights into its behavior. This is optional and incurs additional costs, so select according to your needs. Click Create.
Vertex AI will take several minutes (up to 30 min in some regions) to deploy the model. You will receive an email notification once the deployment is complete.
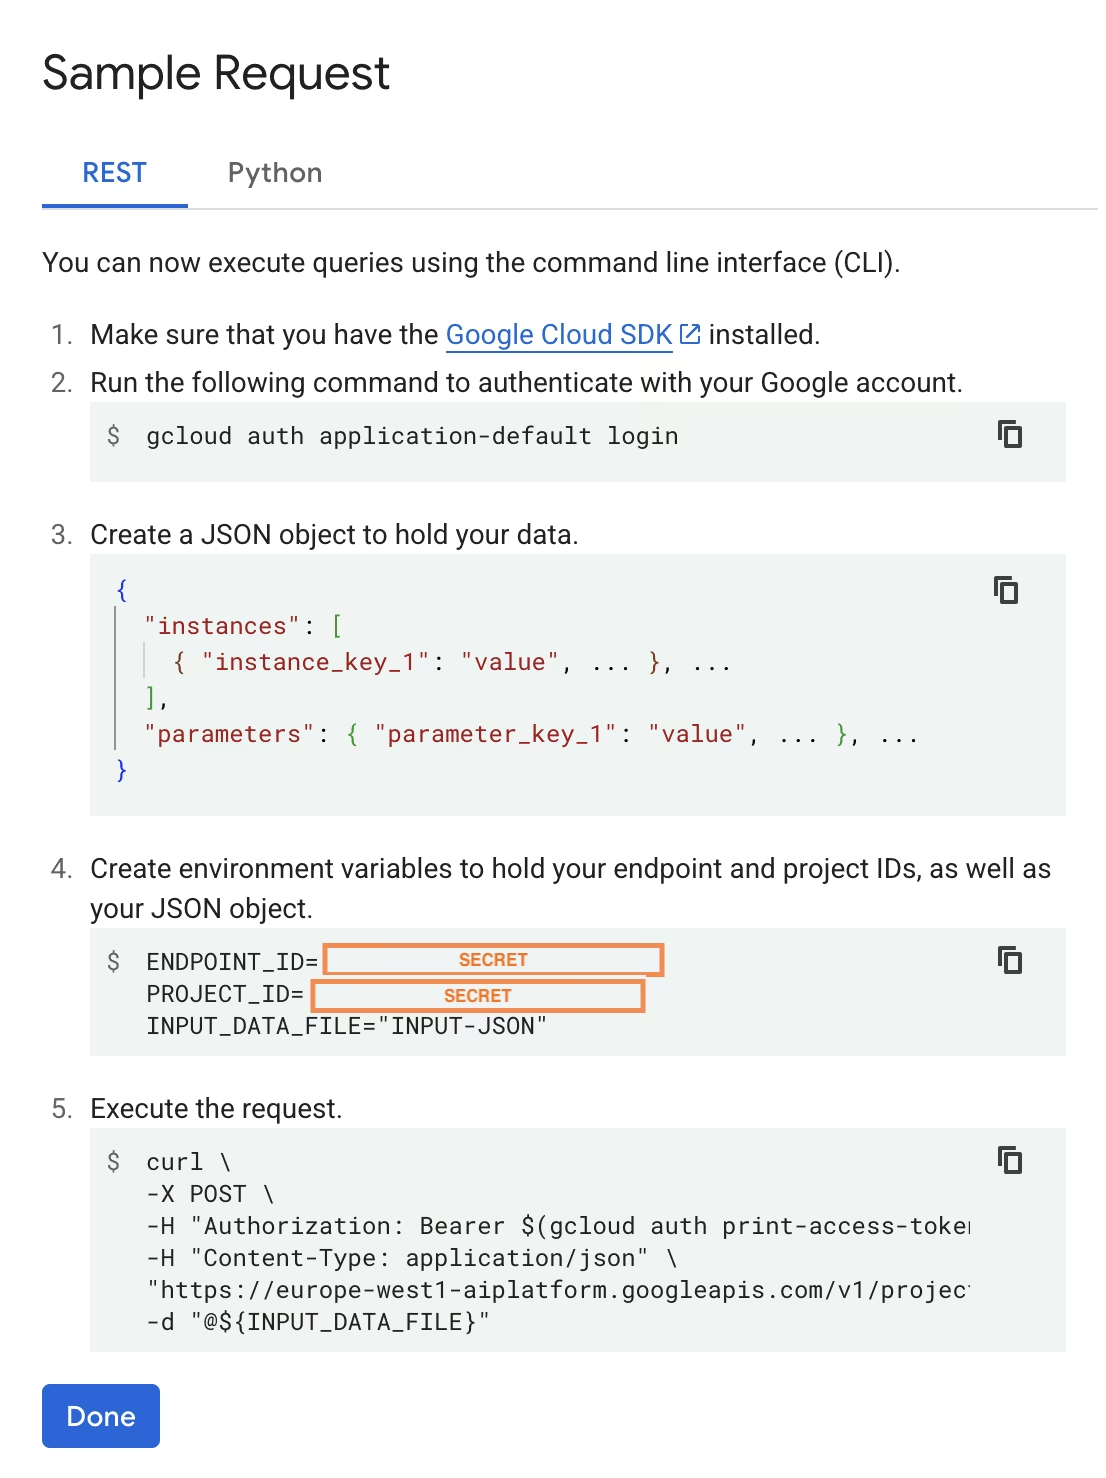
6. Test your deployed model
Once the deployment is complete, Vertex AI will provide you with a sample API interface to test your model.
To test remote inference, you can use the provided cURL command or create another Python client library that will send requests to the deployed model. Remember that you need to encode your image to base64 before sending it to the /predict endpoint.
Expect a short delay on the first request
Similarly to the local testing, expect a short delay on the first request, as Ultralytics will need to pull and load the YOLO26 model in the running container.
You have successfully deployed a pretrained YOLO26 model with Ultralytics on Google Cloud Vertex AI.
FAQ
Can I use Ultralytics YOLO models on Vertex AI without Docker?
Yes; however, you will first need to export the model to a format compatible with Vertex AI, such as TensorFlow, Scikit-learn, or XGBoost. Google Cloud provides a guide on running .pt models on Vertex with a complete overview of the conversion process: Run PyTorch models on Vertex AI.
Please note that the resulting setup will rely only on the Vertex AI standard serving layer and will not support the advanced Ultralytics framework features. Since Vertex AI fully supports containerized models and can scale them automatically according to your deployment configuration, it allows you to leverage the full capabilities of Ultralytics YOLO models without needing to convert them to a different format.
Why is FastAPI a good choice for serving YOLO26 inference?
FastAPI provides high throughput for inference workloads. Async support allows handling multiple concurrent requests without blocking the main thread, which is important when serving computer vision models.
Automatic request/response validation with FastAPI reduces runtime errors in production inference services. This is particularly valuable for object detection APIs where input format consistency is critical.
FastAPI adds minimal computational overhead to your inference pipeline, leaving more resources available for model execution and image processing tasks.
FastAPI also supports SSE (Server-Sent Events), which is useful for streaming inference scenarios.
Why do I have to select a region so many times?
This is actually a versatility feature of Google Cloud Platform, where you need to select a region for every service you use. For the task of deploying a containerized model on Vertex AI, your most important region selection is the one for the Model Registry. It will determine the availability of machine types and quotas for your model deployment.
Additionally, if you will be extending the setup and storing prediction data or results in Cloud Storage or BigQuery, you will need to use the same region as for Model Registry to minimize latency and ensure high throughput for data access.


