YOLOv9: un passo avanti nella tecnologia di rilevamento degli oggetti
YOLOv9 ha fatto progredire il rilevamento di oggetti in tempo reale introducendo le informazioni di gradiente programmabili (PGI) e la rete generalizzata di aggregazione efficiente dei livelli (GELAN). Al momento del rilascio, ha migliorato l’efficienza e la precisione rispetto ai precedenti rilevatori in tempo reale sul dataset MS COCO. Il progetto YOLOv9 è stato sviluppato da un team open source indipendente e si basa sulla codebase YOLOv5 di Ultralytics.
Guarda: Addestramento di YOLOv9 su dati personalizzati con Ultralytics | Dataset di pacchi industriali
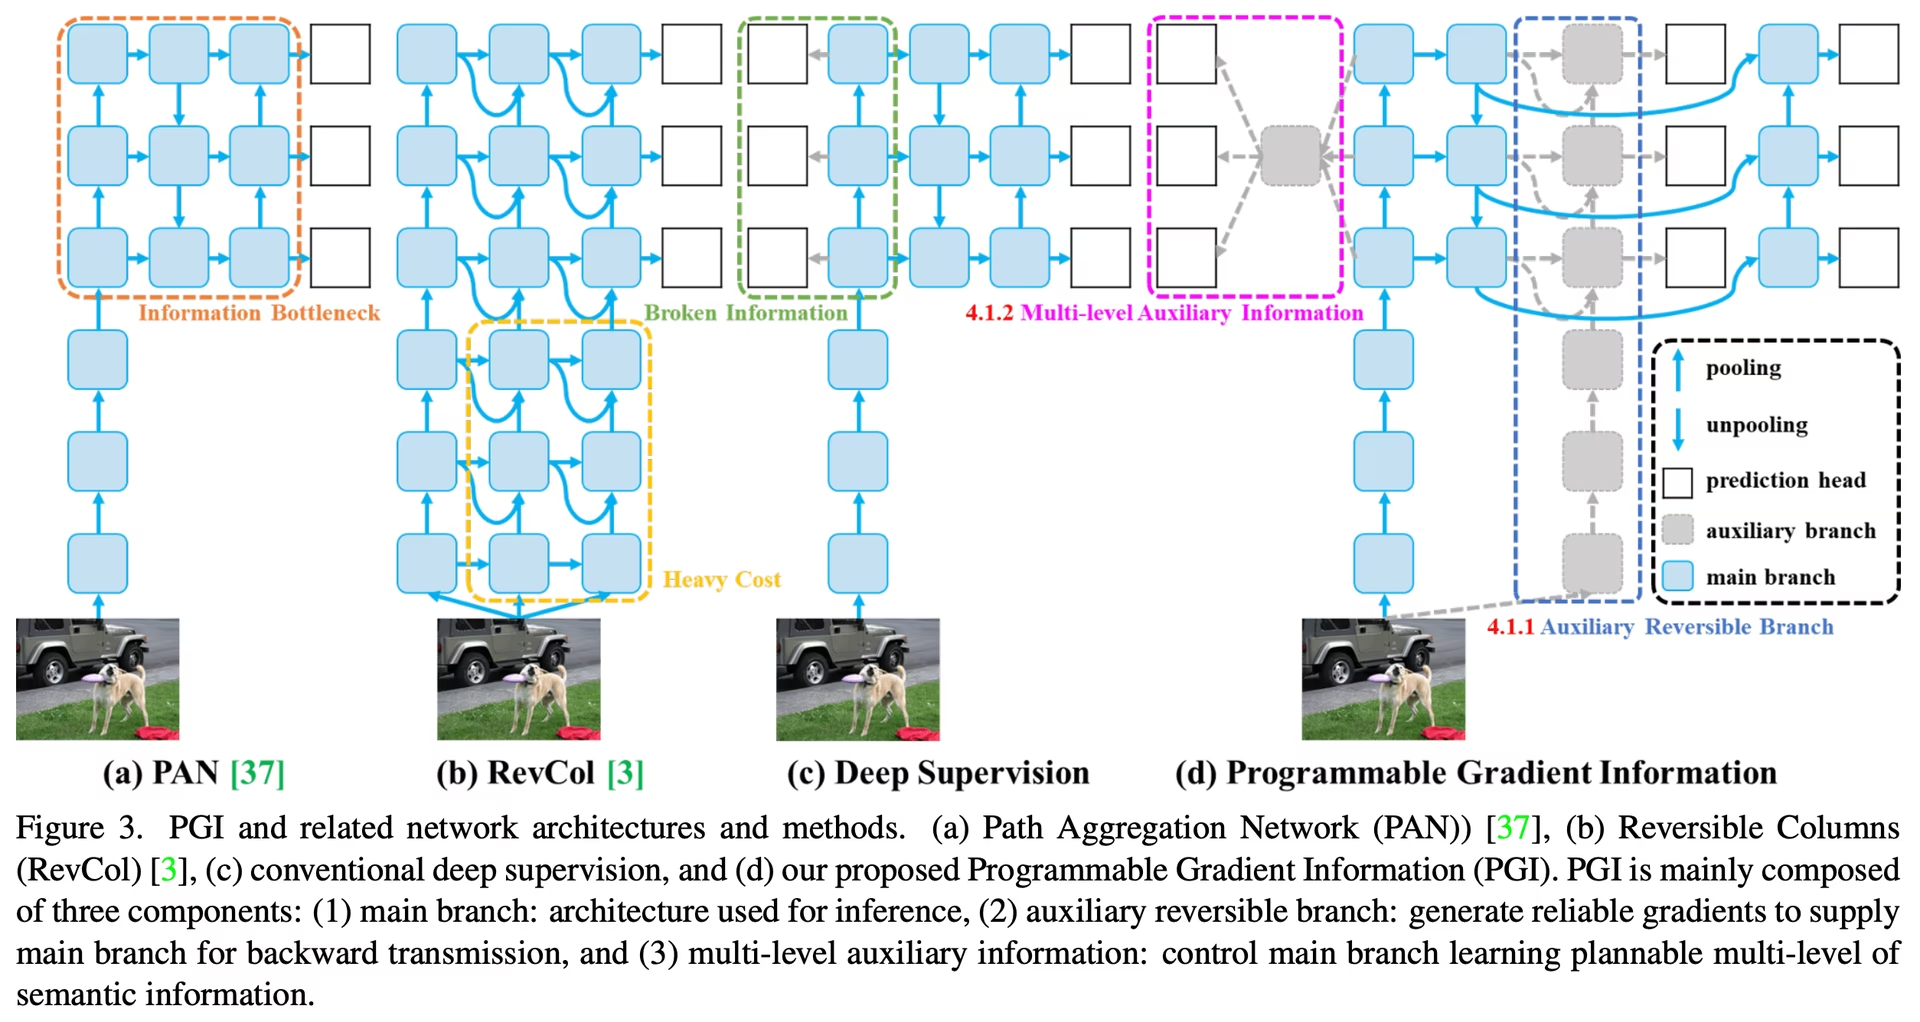
Introduzione a YOLOv9#
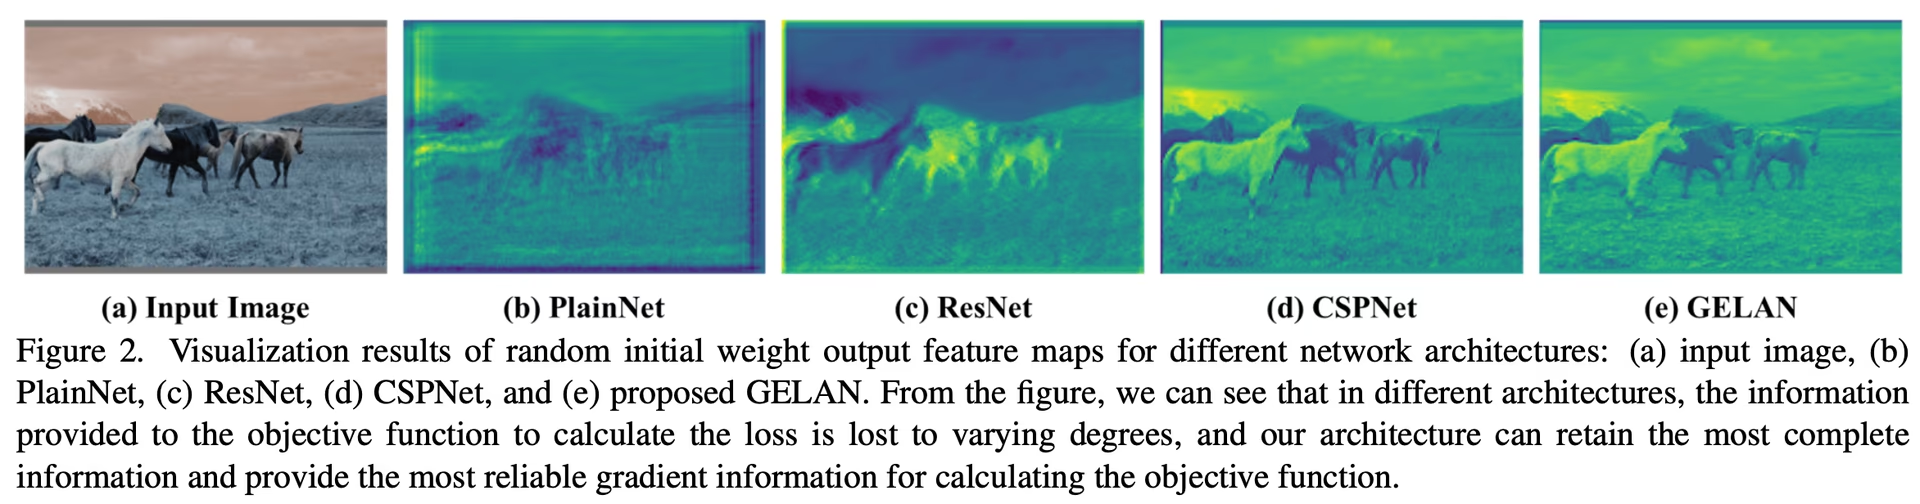
YOLOv9 affronta la perdita di informazioni intrinseca nelle reti neurali profonde. Integrando PGI e l’architettura GELAN, YOLOv9 aumenta la capacità di apprendimento del modello e conserva informazioni cruciali durante il processo di rilevamento, migliorando precisione ed efficienza.
Innovazioni principali di YOLOv9#
Il design di YOLOv9 affronta la perdita di informazioni nelle reti neurali profonde. Il principio del collo di bottiglia dell’informazione e l’uso di funzioni reversibili sono elementi centrali del design e aiutano YOLOv9 a mantenere un’elevata efficienza e precisione.
Principio del collo di bottiglia informativo#
Il principio del collo di bottiglia informativo mette in luce una sfida fondamentale del deep learning: quando i dati attraversano i livelli successivi di una rete, aumenta il rischio di perdita di informazioni. Questo fenomeno è rappresentato matematicamente come:
I(X, X) >= I(X, f_theta(X)) >= I(X, g_phi(f_theta(X)))dove I indica l'informazione mutua e f e g rappresentano funzioni di trasformazione con i parametri theta e phi, rispettivamente. YOLOv9 affronta questa sfida implementando le informazioni del gradiente programmabili (PGI), che aiutano a preservare i dati essenziali lungo la profondità della rete, garantendo una generazione dei gradienti più affidabile e, di conseguenza, una migliore convergenza e prestazioni del modello.
Funzioni reversibili#
Il concetto di funzioni reversibili è un altro elemento fondamentale della progettazione di YOLOv9. Una funzione è considerata reversibile se può essere invertita senza alcuna perdita di informazioni, come espresso da:
X = v_zeta(r_psi(X))con psi e zeta come parametri rispettivamente della funzione reversibile e della sua inversa. Questa proprietà è fondamentale per le architetture di deep learning, poiché consente alla rete di conservare un flusso informativo completo e quindi di aggiornare con maggiore precisione i parametri del modello. YOLOv9 integra funzioni reversibili nella propria architettura per mitigare il rischio di degrado delle informazioni, soprattutto nei livelli più profondi, garantendo la conservazione dei dati fondamentali per le attività di rilevamento degli oggetti.
Impatto sui modelli leggeri#
Affrontare la perdita di informazioni è particolarmente importante per i modelli leggeri, che spesso hanno un numero insufficiente di parametri e tendono a perdere informazioni significative durante il passaggio in avanti. Grazie all'uso di PGI e di funzioni reversibili, l'architettura di YOLOv9 garantisce che, anche con un modello snello, le informazioni essenziali per un rilevamento preciso degli oggetti vengano conservate e utilizzate in modo efficace.
Informazioni del gradiente programmabili (PGI)#
PGI è un nuovo concetto introdotto in YOLOv9 per contrastare il problema del collo di bottiglia informativo e garantire la conservazione dei dati essenziali attraverso i livelli profondi della rete. Ciò consente di generare gradienti affidabili, facilitando aggiornamenti precisi del modello e migliorando le prestazioni complessive di rilevamento.
Rete generalizzata ed efficiente di aggregazione dei livelli (GELAN)#
GELAN è un’architettura che migliora l’utilizzo dei parametri e l’efficienza computazionale di YOLOv9. Il suo design consente di integrare in modo flessibile diversi blocchi computazionali, rendendo YOLOv9 adattabile a un’ampia gamma di applicazioni senza sacrificare velocità o precisione.
Benchmark di YOLOv9#
Eseguire il benchmarking di YOLOv9 con la modalità Benchmark di Ultralytics significa valutare le prestazioni del tuo modello addestrato e convalidato in scenari reali. Il processo include:
- Valutazione delle prestazioni: valutazione della velocità e della precisione del modello.
- Formati di esportazione: test del modello con diversi formati di esportazione per assicurarsi che soddisfi gli standard necessari e funzioni bene in vari ambienti.
- Supporto ai framework: eseguire queste valutazioni nel pacchetto Ultralytics per ottenere risultati coerenti e affidabili.
Eseguire benchmark ti permette di assicurarti che il modello non solo funzioni bene in ambienti di test controllati, ma mantenga prestazioni elevate anche nelle applicazioni pratiche del mondo reale.
Guarda: Come eseguire il benchmark del modello YOLOv9 usando il pacchetto Python Ultralytics
Prestazioni sul dataset MS COCO#
Al momento del rilascio, YOLOv9 ha stabilito nuovi benchmark sul dataset COCO per diverse dimensioni del modello. La tabella seguente elenca la precisione, i parametri e i FLOPs di ciascun modello YOLOv9 disponibile in Ultralytics.
Le varianti YOLOv9, dal modello t di dimensioni minime al modello e di grandi dimensioni, migliorano la precisione (mAP) mantenendo o riducendo il numero di parametri e i calcoli (FLOPs) rispetto alle versioni precedenti e ai modelli concorrenti.
Rispetto ad altri rilevatori in tempo reale, YOLOv9 offre i seguenti miglioramenti:
- Modelli leggeri: YOLOv9s supera YOLO MS-S in termini di efficienza dei parametri e carico computazionale, ottenendo al contempo un miglioramento dello 0,4∼0,6% in AP.
- Modelli medi e grandi: YOLOv9m e YOLOv9e migliorano il compromesso tra complessità del modello e prestazioni di rilevamento, riducendo parametri e calcoli e aumentando la precisione.
Il modello YOLOv9c usa il 42% di parametri in meno e richiede il 21% di calcoli in meno rispetto a YOLOv7 AF, raggiungendo una precisione comparabile. Il modello YOLOv9e usa il 15% di parametri in meno e richiede il 25% di calcoli in meno rispetto a YOLOv8x, con un miglioramento di AP dell’1,7%.
Questi risultati dimostrano che YOLOv9 ha migliorato l’efficienza computazionale senza compromettere la precisione necessaria per il rilevamento di oggetti in tempo reale e altre attività di visione artificiale.
Conclusione#
YOLOv9, rilasciato a febbraio 2024, ha migliorato l’efficienza e la precisione del rilevamento di oggetti in tempo reale. Affrontando la perdita di informazioni con PGI e GELAN, al momento del rilascio YOLOv9 ha stabilito nuovi benchmark. Da allora, modelli più recenti come YOLO26 e YOLO11 hanno introdotto ulteriori miglioramenti, ma le innovazioni architetturali di YOLOv9 continuano a influenzare il settore.
Esempi d'uso#
Questo esempio fornisce semplici esempi di addestramento e inferenza con YOLOv9.
I modelli *.pt preaddestrati con PyTorch e i file di configurazione *.yaml possono essere passati alla classe YOLO() per creare un'istanza del modello in Python:
from ultralytics import YOLO

# Crea da zero un modello YOLOv9c
model = YOLO("yolov9c.yaml")

# Crea un modello YOLOv9c dai pesi preaddestrati
model = YOLO("yolov9c.pt")

# Visualizza le informazioni sul modello (facoltativo)
model.info()

# Addestra il modello sul dataset di esempio COCO8 per 100 epoche
results = model.train(data="coco8.yaml", epochs=100, imgsz=640)

# Esegui l'inferenza con il modello YOLOv9c sull'immagine 'bus.jpg'
results = model("path/to/bus.jpg")
Attività e modalità supportate#
La serie YOLOv9 offre diversi modelli per il rilevamento di oggetti e la segmentazione di istanze, adatti a diversi budget computazionali e requisiti di precisione.
| Modello | Nomi dei file | Attività | Addestramento | Validazione | Inferenza | Esporta |
|---|---|---|---|---|---|---|
| YOLOv9 | yolov9t.pt yolov9s.pt yolov9m.pt yolov9c.pt yolov9e.pt | Rilevamento di oggetti | ✅ | ✅ | ✅ | ✅ |
| YOLOv9-seg | yolov9c-seg.pt yolov9e-seg.pt | Segmentazione di istanze | ✅ | ✅ | ✅ | ✅ |
Questa tabella riepiloga le varianti del modello YOLOv9 e il supporto per le modalità di Addestramento, Convalida, Inferenza ed Esportazione.
L'addestramento dei modelli YOLOv9 richiede più risorse e più tempo rispetto a un modello YOLOv8 di dimensioni equivalenti.
Citazioni e ringraziamenti#
Desideriamo ringraziare gli autori di YOLOv9 per il loro significativo contributo al campo del rilevamento di oggetti in tempo reale:
@inproceedings{wang2024yolov9,
  title={YOLOv9: Learning What You Want to Learn Using Programmable Gradient Information},
  author={Wang, Chien-Yao and Yeh, I-Hau and Liao, Hong-Yuan Mark},
  booktitle={Computer Vision -- ECCV 2024},
  pages={1--21},
  year={2024},
  organization={Springer Nature Switzerland}
}
Il documento ufficiale su YOLOv9 è stato pubblicato negli atti Springer di ECCV 2024, con una versione preliminare su arXiv. Gli autori hanno reso pubblico il loro lavoro e il codice sorgente è disponibile su GitHub. Apprezziamo il loro impegno nel far progredire il settore e nel rendere il loro lavoro accessibile a una comunità più ampia.
Domande frequenti#
YOLOv9 introduce due tecniche principali: informazioni di gradiente programmabili (PGI) e rete generalizzata di aggregazione efficiente dei livelli (GELAN). Queste innovazioni affrontano le sfide legate alla perdita di informazioni nelle reti neurali profonde, garantendo elevata efficienza, precisione e adattabilità. PGI preserva i dati essenziali tra i livelli della rete, mentre GELAN ottimizza l'utilizzo dei parametri e l'efficienza computazionale.
Al momento del rilascio, YOLOv9 superava gli altri rilevatori di oggetti in tempo reale all'avanguardia per precisione ed efficienza. Sul dataset COCO, i modelli YOLOv9 raggiungono punteggi mAP più elevati a varie dimensioni, mantenendo o riducendo il sovraccarico computazionale. Ad esempio, YOLOv9c raggiunge una precisione comparabile con il 42% di parametri in meno e una richiesta computazionale inferiore del 21% rispetto a YOLOv7 AF.
Puoi addestrare un modello YOLOv9 sia con Python sia con i comandi CLI. In Python, istanzia un modello usando la classe
YOLOe chiama il metodotrain:from ultralytics import YOLO # Crea un modello YOLOv9c dai pesi preaddestrati e addestralo model = YOLO("yolov9c.pt") results = model.train(data="coco8.yaml", epochs=100, imgsz=640)Per l'addestramento tramite CLI, esegui:
yolo train model=yolov9c.yaml data=coco8.yaml epochs=100 imgsz=640Scopri di più sugli esempi di utilizzo per l'addestramento e l'inferenza.
YOLOv9 è progettato per ridurre la perdita di informazioni, un aspetto particolarmente importante per i modelli leggeri, che spesso tendono a perdere informazioni significative. Integrando le informazioni del gradiente programmabili (PGI) e le funzioni reversibili, YOLOv9 garantisce la conservazione dei dati essenziali, migliorando la precisione e l'efficienza del modello. Questo lo rende particolarmente adatto alle applicazioni che richiedono modelli compatti e dalle prestazioni elevate. Per maggiori dettagli, consulta la sezione sull'impatto di YOLOv9 sui modelli leggeri.
YOLOv9 supporta il rilevamento degli oggetti e la segmentazione delle istanze nelle modalità di addestramento, convalida, inferenza ed esportazione.


Commenti482
Fai una domanda, condividi i tuoi risultati o aiuta qualcun altro.
vuvanhieu
to load a YOLOv5 model def load_yolov5_model(yolo_model_path): device = torch.device('cuda' if torch.cuda.is_available() else 'cpu') model = torch.hub.load('ultralytics/yolov5', 'custom', path=yolo_model_path, force_reload=True).to(device) return model
How in yolov8, yolov9?
1 Paula DerrengerUltralytics
To load a YOLOv8 or YOLOv9 model, you can use the
YOLOclass from the Ultralytics package. Here's a concise way to do it:from ultralytics import YOLO # Load a YOLOv8 model model_v8 = YOLO("yolov8n.pt") # Load a YOLOv9 model model_v9 = YOLO("yolov9c.pt")For more details, you can refer to the YOLOv9 documentation: https://docs.ultralytics.com/models/yolov9/.
MoAbbasid
@glenn-jocher @pderrenger any idea of when the lightweight models can be used in ultralytics?
1 Glenn JocherUltralytics(modificato)
Hi there! 😊
Lightweight models are available in Ultralytics. YOLOv9 ships
yolov9t.pt,yolov9s.ptandyolov9m.ptalongsideyolov9c.ptandyolov9e.pt. For new projects we recommend YOLO26, whose smallest modelyolo26n.ptis built for efficiency.To try a lightweight model:
yolo train model=yolo26n.pt data=coco128.yaml epochs=100If you're tinkering with custom lightweight designs, copy an existing model YAML from the Ultralytics repo and adjust its layers or scales. Contributions or insights are welcome.
Happy detecting!
deepanalyticszlc
Very exciting! Is there a schedule for release of lightweight models?
1- Paula DerrengerUltralytics(modificato)
@deepanalyticszlc hey there! 😊
Lightweight YOLOv9 models are now available:
yolov9t.pt,yolov9s.ptandyolov9m.pt, alongsideyolov9c.ptandyolov9e.pt. For the latest releases, see the Ultralytics GitHub releases.Here's a little snippet on how to load and use YOLOv9 for predictions:
from ultralytics import YOLO

# Load YOLOv9 model
model = YOLO('yolov9t.pt')  # Replace 'yolov9t.pt' with your model file

# Run inference on an image
results = model('path/to/your/image.jpg')

# Display results
results[0].show()
For new projects, we recommend YOLO26, which also comes in small sizes like
yolo26n.pt. ⏰
DolapoSalim(modificato)
@glenn-jocher Kindly assist with this TypeError: TypeError: ERROR C:\path_to_custom_model/yolov9c.pt appears to be an Ultralytics YOLOv5 model originally trained with https://github.com/ultralytics/yolov5. This model is NOT forwards compatible with YOLOv8 at https://github.com/ultralytics/ultralytics. Recommend fixes are to train a new model using the latest 'ultralytics' package or to run a command with an official Ultralytics model, i.e. 'yolo predict model=yolo11n.pt'
Here is my code:
from ultralytics import YOLO

model = YOLO(path_to_YOLOV9.pt )

results = model.predict(source="IMAGE_SOURCE", show=True, conf=0.10)
Note, I am actually working with a custom trained YOLOV9
- Glenn JocherUltralytics
@DolapoSalim to resolve the YOLOv5/YOLOv9 compatibility error when using custom-trained models, please ensure you're using the latest
ultralytics>=8.2.0package and retrain your YOLOv9 model using the official YOLOv9 configuration files from our documentation. For custom training guidance, see the YOLOv9 Training section in our docs.This error typically occurs when using older model formats - newer versions maintain full backward compatibility when models are trained with current Ultralytics implementations.
1
gusreic
This article claims that Yolov9 is based on Yolov5. The Yolov9 paper claims that v9 is based on Yolov7 which is also not based on 5. Is there any other way that would explain this claim? Otherwise maybe adjust the article.
- Glenn JocherUltralytics
@gusreic yes that's correct. YOLOv9 repo is a fork of my YOLOv5 repo. I know this because I wrote nearly all the files in the YOLOv9 repo myself. Unfortunately the author has failed to make this clear, though he did include a (hidden) acknowledgement at the bottom of the README.
1 Oh, that is really unfortunate, thank you for clearing it up since it is not directly apparent. Do you think that YOLOv9 is based on YOLOv5 only with respect to the structure of the repository or would you say that the architecture of the model itself is also based on the architecture of YOLOv5?
- Glenn JocherUltralytics
@gusreic thank you for your question! YOLOv9's repository structure is indeed based on Ultralytics YOLOv5, while its architecture introduces novel components like Programmable Gradient Information (PGI) and GELAN as described in the YOLOv9 documentation. The model itself represents an independent advancement building on broader YOLO research. We'll clarify this distinction in our article! 😊
ghost
Hello,
Thanks for the great documentation!
Quick question: Is the code licensed under AGPLv3 (Ultralytics) or GPLv3 (Wang, Chien-Yao and Liao, Hong-Yuan Mark Github)?
Thanks!
- Glenn JocherUltralytics
@ProfessorHT the YOLOv9 project codebase, developed by Wang, Chien-Yao and Liao, Hong-Yuan Mark, is available on GitHub and licensed under GPLv3, while Ultralytics models and software use the AGPL-3.0 license.
Thank you for your quick response. So to be sure if I use Yolov9 from this documentation with the ultralytics library i will be under the AGPLv3 license and i should buy a license?
- Glenn JocherUltralytics
Yes, if you use YOLOv9 models from the Ultralytics library, you are under the AGPL-3.0 license and would need an Enterprise License for commercial use, unless you open-source your entire project under AGPL-3.0.
 liuweiqing
Does it support automatic downloading of pretrained weights?
- Glenn JocherUltralytics
@14790897 yes, YOLOv9 supports automatic downloading of pretrained weights when using the
YOLO()class in Python or CLI commands, as long as the specified weights file (e.g.,yolov9c.pt) is available in the Ultralytics repository. You can find more details in the YOLOv9 documentation.
jane7166
Hello. I have retrained the YOLOv9 model, and I would like to deploy it as an API. How should I proceed?
- Glenn JocherUltralytics
@jane7166 to deploy your retrained YOLOv9 model as an API, you can use frameworks like FastAPI or Flask to build an endpoint and load your model using the Ultralytics Python package. Refer to the YOLOv9 documentation for guidance on inference, which can be integrated into your API logic. Let us know if you have further questions!
Gnoot01
I'm getting the following errors despite latest torch and ultralytics installs. Kindly assist
File "C:\Users\.venv\lib\site-packages\ultralytics\engine\model.py", line 547, in predict self.predictor.setup_model(model=self.model, verbose=is_cli) File "C:\Users\.venv\lib\site-packages\ultralytics\engine\predictor.py", line 303, in setup_model self.model = AutoBackend( File "C:\Users\.venv\lib\site-packages\torch\utils\_contextlib.py", line 116, in decorate_context return func(*args, **kwargs) File "C:\Users\.venv\lib\site-packages\ultralytics\nn\autobackend.py", line 145, in __init__ model = model.fuse(verbose=verbose) TypeError: BaseModel.fuse() got an unexpected keyword argument 'verbose'- Glenn JocherUltralytics
@Gnoot01 it seems like there's a compatibility issue with the
fusemethod. Please ensure you're using the latest version of the Ultralytics package. If the issue persists, consider checking for any updates or changes in the repository that might address this. For further assistance, you can explore the YOLOv9 documentation. @glenn-jocher Hi, I'm using the latest ultralytics 8.3.24 and latest torch. However, still facing this issue. Any suggestions?
- Glenn JocherUltralytics
@Gnoot01 i'm sorry you're experiencing this issue. Please ensure your Ultralytics package is up-to-date. If the problem persists, try reinstalling the package or checking for any recent updates in the repository. For more details, you can refer to the YOLOv9 documentation.
foskyblue
I'm having issues with my Yolov9 model exported to tflite. Model was successfully exported to tflite but I cannot get the right bounding boxes. I'm following the steps listed here: https://stackoverflow.com/questions/76381317/yolov8-tflite-python-predictions-and-interpreting-output (for folov8) to make inference for my yolov9 tflite model.
1Step 1: Resizing and Padding (Letterboxing) Step 2: Non-Maximum Suppression (NMS) Step 3: Rescaling Bounding Boxes
However, when I draw the outputed bounding boxes on my image the boxes don't fit the objects in the image correctly.
The code I'm using can be seen below:
from tflite_runtime.interpreter import Interpreter from PIL import Image import numpy as np from glob import glob from typing import Tuple, List interpreter = None input_shape = (320, 576) # Input tensor dimensions (width, height) in pixels input_index = 0 # Input tensor index (from input details in model signature) output_index = 409 model_path = 'model/saved_model.tflite' def load_model(): interpreter = None interpreter = Interpreter(model_path=model_path, num_threads=2) interpreter.allocate_tensors() input_details = interpreter.get_input_details() global input_shape input_shape = tuple(input_details[0]['shape'][1:3]) global input_index input_index = input_details[0]['index'] output_details = interpreter.get_output_details() global output_index output_index = output_details[0]['index'] return interpreter def letter_box(img: np.ndarray, new_shape: Tuple[int, int]) -> np.ndarray: """ Resizes an image to fit within a new shape while maintaining the aspect ratio, and pads the remaining space with a constant value. Args: img (np.ndarray): The input image as a NumPy array. new_shape (Tuple[int, int]): The desired output shape (height, width). Returns: np.ndarray: The resized and padded image. """ shape = img.shape[:2] # Calculate the scaling ratio to fit the image within the new shape r = min(new_shape[0] / shape[0], new_shape[1] / shape[1]) # Calculate the new unpadded dimensions new_unpad = int(round(shape[1] * r)), int(round(shape[0] * r)) # Calculate the padding required on each side dw, dh = new_shape[1] - new_unpad[0], new_shape[0] - new_unpad[1] dw, dh = dw / 2, dh / 2 # Resize the image if necessary if shape[::-1] != new_unpad: img = Image.fromarray(img).resize(new_unpad, Image.Resampling.BILINEAR) img = np.array(img) # Calculate the top, bottom, left, and right padding values top, bottom = int(round(dh - 0.1)), int(round(dh + 0.1)) left, right = int(round(dw - 0.1)), int(round(dw + 0.1)) # Add padding to the image img = np.pad(img, ((top, bottom), (left, right), (0, 0)), mode='constant', constant_values=114) return img def non_max_suppression( prediction: np.ndarray, conf_thres: float = 0.25, iou_thres: float = 0.45, max_det: int = 300, max_wh: int = 7680, ): """ Perform non-maximum suppression (NMS) on a single image prediction. Args: prediction (np.ndarray): A numpy array of shape (1, num_boxes, num_classes + 4 + num_masks) containing the predicted boxes, classes, and masks. conf_thres (float): Confidence threshold for filtering boxes (0.0 to 1.0). iou_thres (float): IoU threshold for NMS (0.0 to 1.0). max_det (int): Maximum number of boxes to keep after NMS. max_wh (int): Maximum box width and height in pixels. Returns: np.ndarray: Array containing kept boxes with format (x1, y1, x2, y2, confidence, class, mask1, mask2, ...). """ # Input validation (can be removed if you're sure of your input) if 0 > conf_thres > 1: raise ValueError(f"Invalid Confidence threshold {conf_thres}, valid values are between 0.0 and 1.0") if 0 > iou_thres > 1: raise ValueError(f"Invalid IoU {iou_thres}, valid values are between 0.0 and 1.0") # Extract dimensions and metadata directly _, _, dims = prediction.shape nc = dims - 4 - prediction.shape[1] # number of classes nm = dims - nc - 4 # number of masks mi = 4 + nc # mask start index # Process the single image in the batch x = prediction[0] # Extract the single image data # Move class scores to last axis and threshold x = np.transpose(x, (1, 0)) xc = x[..., 4:mi].max(axis=-1) > conf_thres x = x[xc] if not x.shape[0]: # No boxes left after confidence thresholding return np.zeros((0, 6 + nm)) # Convert xywh to xyxy directly on the filtered boxes x[..., :4] = xywh2xyxy(x[..., :4]) # Split and process boxes, classes, and masks # pylint: disable=unbalanced-tuple-unpacking box, cls, mask = np.split(x, (4, mi), 1) conf = cls.max(1) j = cls.argmax(1) x = np.concatenate((box, conf[:, None], j[:, None].astype(float), mask), 1) x = x[conf > conf_thres] n = x.shape[0] if not n: # No boxes left after additional confidence thresholding return np.zeros((0, 6 + nm)) # NMS (simplified since we're dealing with a single image) c = x[:, 5:6] * max_wh boxes, scores = x[:, :4] + c, x[:, 4] i = numpy_nms(boxes, scores, iou_thres) i = i[:max_det] return x[i] def numpy_nms(boxes: np.ndarray, scores: np.ndarray, iou_threshold: float = 0.5) -> np.ndarray: """ Perform Non-Maximum Suppression (NMS) on a set of bounding boxes. Args: boxes (np.ndarray): Array of shape (N, 4) representing N bounding boxes. Each box is [x1, y1, x2, y2]. scores (np.ndarray): Array of shape (N,) representing the confidence scores for each box. iou_threshold (float): IoU threshold for suppressing overlapping boxes. Defaults to 0.5. Returns: np.ndarray: Boolean array of shape (N,) indicating which boxes to keep. """ # Sort boxes by score in descending order order = scores.argsort()[::-1] keep = np.ones(len(boxes), dtype=bool) # Calculate IoU matrix ious = box_iou_batch(boxes, boxes) np.fill_diagonal(ious, 0) # Set self-IoU to 0 for i, idx in enumerate(order): if not keep[idx]: continue # Suppress boxes with IoU > threshold overlap = ious[idx] > iou_threshold keep[order[i + 1:]] &= ~overlap[order[i + 1:]] return keep def box_iou_batch(boxes_a: np.ndarray, boxes_b: np.ndarray) -> np.ndarray: """ Calculate the Intersection over Union (IoU) between two sets of bounding boxes. Args: boxes_a (np.ndarray): Array of shape (N, 4) representing N bounding boxes. boxes_b (np.ndarray): Array of shape (M, 4) representing M bounding boxes. Returns: np.ndarray: Array of shape (N, M) containing IoU values for each pair of boxes. Note: Each bounding box is represented as [x1, y1, x2, y2], where (x1, y1) is the top-left corner and (x2, y2) is the bottom-right corner. """ # Calculate areas of boxes_a area_a = (boxes_a[:, 2] - boxes_a[:, 0]) * (boxes_a[:, 3] - boxes_a[:, 1]) # Calculate areas of boxes_b area_b = (boxes_b[:, 2] - boxes_b[:, 0]) * (boxes_b[:, 3] - boxes_b[:, 1]) # Calculate intersection coordinates top_left = np.maximum(boxes_a[:, None, :2], boxes_b[:, :2]) bottom_right = np.minimum(boxes_a[:, None, 2:], boxes_b[:, 2:]) # Calculate intersection area area_inter = np.prod(np.clip(bottom_right - top_left, a_min=0, a_max=None), 2) # Calculate IoU return area_inter / (area_a[:, None] + area_b - area_inter) def xywh2xyxy(box: np.ndarray) -> np.ndarray: """ Convert bounding box coordinates from (x, y, width, height) format to (x1, y1, x2, y2) format where (x1, y1) is the top-left corner and (x2, y2) is the bottom-right corner. Args: x (np.ndarray): The input bounding box coordinates in (x, y, width, height) format. Returns: np.ndarray: The bounding box coordinates in (x1, y1, x2, y2) format. """ if box.shape[-1] != 4: raise ValueError(f"input shape last dimension expected 4 but input shape is {box.shape}") # pylint: disable=unbalanced-tuple-unpacking xy, wh = np.split(box, [2], axis=-1) wh_half = wh / 2 return np.concatenate([xy - wh_half, xy + wh_half], axis=-1) def preprocess_image(pil_image: Image.Image, input_size: Tuple[int, int]) -> np.ndarray: """ Preprocesses an image for inference with a TFLite model. Args: image_path (str): Path to the image file. input_size (Tuple[int, int]): Desired input size (height, width) for the model. Returns: np.ndarray: Preprocessed image as a NumPy array, ready for inference. """ if pil_image.mode != "RGB": pil_image = pil_image.convert("RGB") im = np.asarray(pil_image) im = letter_box(im, new_shape=input_size) im = np.expand_dims(im, axis=0) # goal is to have the format (number of images, size of image, number of channnels) im = im.astype(np.float32) / 255.0 # Normalize to 0.0 - 1.0 return im def postprocess_results(output: np.ndarray, model_input_size: Tuple[int, int], image_original_size: Tuple[int, int]) -> np.ndarray: """ Postprocesses the raw outputs from a TFLite model, including scaling bounding boxes back to the original image size. Args: output (np.ndarray): List of output tensors from the TFLite model. model_input_size (Tuple[int, int]): Desired input size (height, width) for the model. image_original_size (Tuple[int, int]): Original size (height, width) of the input image. Returns: np.ndarray: Postprocessed results with bounding boxes adjusted to original image size. """ predictions = non_max_suppression(output, conf_thres=0.25, iou_thres=0.45, max_det=300, max_wh=1) return scale_boxes(image_original_size, predictions, model_input_size) def scale_boxes(image_original_size: Tuple[int, int], boxes: np.ndarray, model_input_size: Tuple[int, int]): """ Rescales bounding boxes (in the format of xyxy by default) from the shape of the image they were originally specified in (img1_shape) to the shape of a different image (img0_shape). Args: image_original_size (Tuple[int, int]): The shape of the image that the bounding boxes are for, in the format of (height, width). boxes (np.ndarray): the bounding boxes of the objects in the image, in the format of (x1, y1, x2, y2) model_input_size (Tuple[int, int]): the shape of the target image, in the format of (height, width). Returns: np.ndarray: The scaled bounding boxes, in the format of (x1, y1, x2, y2) """ # calculate from img0_shape gain = min(model_input_size[0] / image_original_size[0], model_input_size[1] / image_original_size[1]) # gain = old / new pad = ( round((model_input_size[1] - image_original_size[1] * gain) / 2 - 0.1) / model_input_size[1], round((model_input_size[0] - image_original_size[0] * gain) / 2 - 0.1) / model_input_size[0], ) # wh padding inner_image_scale = ( (1 - pad[0] * 2), (1 - pad[1] * 2), ) # wh scale boxes[..., 0] = (boxes[..., 0] - pad[0]) / inner_image_scale[0] # x padding boxes[..., 1] = (boxes[..., 1] - pad[1]) / inner_image_scale[1] # y padding boxes[..., 2] = (boxes[..., 2] - pad[0]) / inner_image_scale[0] # x padding boxes[..., 3] = (boxes[..., 3] - pad[1]) / inner_image_scale[1] # y padding boxes[..., [0, 2]] = boxes[..., [0, 2]].clip(0, 1) # x1, x2 boxes[..., [1, 3]] = boxes[..., [1, 3]].clip(0, 1) # y1, y2 return boxes def prepare_input(image_pil): # Input image must match input shape (ex: 640x640 pixels) [note: only use BILINEAR here] resized = image_pil.copy().resize(input_shape, resample=Image.Resampling.BILINEAR) # SSD Mobilenet V2 FPNLite take as input pixels between [-1.0, 1.0] expanded = np.expand_dims(np.asarray(resized, dtype=np.float32) * 2. / 255. - 1., axis=0) del resized # Enforce garbage collection sooner than later return expanded def predict(tmp_images_dir): interpreter = load_model() model_predictions = [] for img_path in tmp_images_dir: pil_image = Image.open(img_path) input_data = preprocess_image(pil_image, input_shape) interpreter.set_tensor(input_index, input_data) interpreter.invoke() output_data = interpreter.get_tensor(output_index) preds = postprocess_results(output_data, input_shape, (pil_image.size[1], pil_image.size[0])) model_predictions.append({ 'detection_classes': (preds[:, 5] + 1).tolist(), # Class values are offset by +1.0 'detection_boxes': preds[:, 0:4].tolist(), 'detection_scores': preds[:, 4].tolist(), }) print(model_predictions) images_path = glob('utilities/images/*.JPG') predict(images_path)- Glenn JocherUltralytics
@foskyblue it seems like the issue might be related to the scaling and padding logic when converting bounding boxes. Ensure that the
scale_boxesfunction correctly rescales the boxes to the original image size. For more detailed guidance, please refer to the YOLOv9 documentation: https://docs.ultralytics.com/models/yolov9/. Hi Glen thanks for your response. Unfortunately I find it difficult to correctly scale the bounding boxes from the example script I mentioned above: https://stackoverflow.com/questions/76381317/yolov8-tflite-python-predictions-and-interpreting-output.
How can I implement the YOLOv9 TFLite model with an input ape of [1, 320, 576, 3] and output shape of [1, 19, 3780] in Python?
- Glenn JocherUltralytics
To correctly scale bounding boxes for your YOLOv9 TFLite model, ensure your
scale_boxesfunction accurately adjusts the coordinates based on the original image size and model input size. Verify that padding and scaling calculations align with your preprocessing steps. For further details, please refer to the YOLOv9 documentation.