Link to this section推論のために、学習済みYOLOモデルをUltralyticsを使用してVertex AIにデプロイします。#
このガイドでは、学習済みYOLO26モデルをUltralyticsでコンテナ化し、FastAPI推論サーバーを構築し、モデルと推論サーバーをGoogle Cloud Vertex AIにデプロイする方法を説明します。実装例ではYOLO26の物体検出のユースケースを取り上げますが、他のYOLOモードを使用する場合も同様の原則が適用されます。
作業を始める前に、Google Cloud Platform (GCP) プロジェクトを作成する必要があります。新規ユーザーは300米ドル分のGCPクレジットを無料で利用でき、この金額は、後で学習やバッチ推論、ストリーミング推論など、他のあらゆるYOLO26のユースケースに拡張可能な実行環境をテストするのに十分です。
Link to this section学習内容#
- FastAPIを使用して、Ultralytics YOLO26モデル用の推論バックエンドを作成します。
- Dockerイメージを保存するためのGCP Artifact Registryリポジトリを作成します。
- モデルを含むDockerイメージをビルドし、Artifact Registryにプッシュします。
- Vertex AIにモデルをインポートします。
- Vertex AIエンドポイントを作成し、モデルをデプロイします。
- Ultralyticsによる完全なモデル制御: 前処理、後処理、および応答のフォーマットを完全に制御し、カスタム推論ロジックを使用できます。
- Vertex AIによる残りの管理: 自動スケーリングに対応しつつ、コンピューティングリソース、メモリ、GPU構成を柔軟に設定できます。
- ネイティブGCP統合とセキュリティ: Cloud Storage、BigQuery、Cloud Functions、VPC制御、IAMポリシー、監査ログとのシームレスな設定が可能です。
Link to this section前提条件#
- マシンにDockerをインストールします。
- Google Cloud SDKをインストールし、gcloud CLIを使用するための認証を行います。
- 本ガイドに従うにあたり、公式のUltralytics Dockerイメージを拡張する必要があるため、Docker Quickstart Guide for Ultralyticsに目を通しておくことを強く推奨します。
Link to this sectionFastAPIによる推論バックエンドの作成#
まず、YOLO26モデルの推論リクエストを処理するFastAPIアプリケーションを作成する必要があります。このアプリケーションは、モデルの読み込み、画像の事前処理、および推論(予測)ロジックを処理します。
Link to this sectionVertex AIコンプライアンスの基本#
Vertex AIでは、コンテナが以下の2つの特定のエンドポイントを実装している必要があります。
-
ヘルスチェックエンドポイント (
/health): サービスが準備完了状態のときに HTTP ステータス200 OKを返す必要があります。 -
Predict エンドポイント (
/predict): base64エンコードされた画像とオプションのパラメータを含む構造化された予測リクエストを受け付けます。ペイロードサイズ制限は、エンドポイントのタイプに応じて適用されます。/predictエンドポイントへのリクエストペイロードは、以下のJSON構造に従う必要があります。{ "instances": [{ "image": "base64_encoded_image" }], "parameters": { "confidence": 0.5 } }
Link to this sectionプロジェクトフォルダの構成#
ビルドの大部分はDockerコンテナ内で行われ、Ultralyticsも学習済みのYOLO26モデルをロードするため、ローカルのフォルダ構成はシンプルに保つことができます。
YOUR_PROJECT/
├── src/
│   ├── __init__.py
│   ├── app.py              # Core YOLO26 inference logic
│   └── main.py             # FastAPI inference server
├── tests/
├── .env                    # Environment variables for local development
├── Dockerfile              # Container configuration
├── LICENSE                 # AGPL-3.0 License
└── pyproject.toml # Python dependencies and project configUltralytics YOLO26モデルとフレームワークはAGPL-3.0ライセンスの下で提供されており、重要なコンプライアンス要件があります。ライセンス条項への準拠方法に関するUltralyticsドキュメントを必ずお読みください。
Link to this section依存関係を含むpyproject.tomlの作成#
プロジェクトを適切に管理するために、以下の依存関係を含む pyproject.toml ファイルを作成します。
[project]
name = "YOUR_PROJECT_NAME"
version = "0.0.1"
description = "YOUR_PROJECT_DESCRIPTION"
requires-python = ">=3.10,<3.13"
dependencies = [
   "ultralytics>=8.3.0",
   "fastapi[all]>=0.89.1",
   "uvicorn[standard]>=0.20.0",
   "pillow>=9.0.0",
]

[build-system]
requires = ["setuptools>=61.0"]
build-backend = "setuptools.build_meta"uvicornはFastAPIサーバーを実行するために使用されます。pillowは画像処理に使用されますが、PIL画像に限られるわけではありません。Ultralyticsは他の多くのフォーマットをサポートしています。
Link to this sectionUltralytics YOLO26を使用した推論ロジックの作成#
プロジェクトの構成と依存関係の設定が完了したので、YOLO26推論の中核となるロジックを実装できます。モデルのロード、画像処理、および予測をUltralytics Python APIを使用して処理する src/app.py ファイルを作成します。
# src/app.py

from ultralytics import YOLO

# Model initialization and readiness state
model_yolo = None
_model_ready = False

def _initialize_model():
    """Initialize the YOLO model."""
    global model_yolo, _model_ready

    try:
        # Use pretrained YOLO26n model from Ultralytics base image
        model_yolo = YOLO("yolo26n.pt")
        _model_ready = True

    except Exception as e:
        print(f"Error initializing YOLO model: {e}")
        _model_ready = False
        model_yolo = None

# Initialize model on module import
_initialize_model()

def is_model_ready() -> bool:
    """Check if the model is ready for inference."""
    return _model_ready and model_yolo is not None
これにより、コンテナ起動時にモデルが一度ロードされ、すべてのリクエスト間でモデルが共有されます。モデルが重い推論負荷を処理する場合は、後の手順でVertex AIにモデルをインポートする際に、より多くのメモリを搭載したマシンタイプを選択することを推奨します。
次に、pillow を使用した入力および出力画像処理用の2つのユーティリティ関数を作成します。YOLO26はPIL画像をネイティブにサポートしています。
def get_image_from_bytes(binary_image: bytes) -> Image.Image:
    """Convert image from bytes to PIL RGB format."""
    input_image = Image.open(io.BytesIO(binary_image)).convert("RGB")
    return input_image
def get_bytes_from_image(image: Image.Image) -> bytes:
"""Convert PIL image to bytes."""
return_image = io.BytesIO()
image.save(return_image, format="JPEG", quality=85)
return_image.seek(0)
return return_image.getvalue()最後に、物体検出を処理する run_inference 関数を実装します。この例では、モデルの予測からバウンディングボックス、クラス名、信頼度スコアを抽出します。この関数は、さらなる処理や注釈付けのために、検出結果と生データを格納した辞書を返します。
def run_inference(input_image: Image.Image, confidence_threshold: float = 0.5) -> Dict[str, Any]:
    """Run inference on an image using YOLO26n model."""
    global model_yolo

    # Check if model is ready
    if not is_model_ready():
        print("Model not ready for inference")
        return {"detections": [], "results": None}

    try:
        # Make predictions and get raw results
        results = model_yolo.predict(
            imgsz=640, source=input_image, conf=confidence_threshold, save=False, augment=False, verbose=False
        )

        # Extract detections (bounding boxes, class names, and confidences)
        detections = []
        if results and len(results) > 0:
            result = results[0]
            if result.boxes is not None and len(result.boxes.xyxy) > 0:
                boxes = result.boxes

                # Convert tensors to numpy for processing
                xyxy = boxes.xyxy.cpu().numpy()
                conf = boxes.conf.cpu().numpy()
                cls = boxes.cls.cpu().numpy().astype(int)

                # Create detection dictionaries
                for i in range(len(xyxy)):
                    detection = {
                        "xmin": float(xyxy[i][0]),
                        "ymin": float(xyxy[i][1]),
                        "xmax": float(xyxy[i][2]),
                        "ymax": float(xyxy[i][3]),
                        "confidence": float(conf[i]),
                        "class": int(cls[i]),
                        "name": model_yolo.names.get(int(cls[i]), f"class_{int(cls[i])}"),
                    }
                    detections.append(detection)

        return {
            "detections": detections,
            "results": results,  # Keep raw results for annotation
        }
    except Exception as e:
        # If there's an error, return empty structure
        print(f"Error in YOLO detection: {e}")
        return {"detections": [], "results": None}
必要に応じて、Ultralytics組み込みのプロッティングメソッドを使用して、バウンディングボックスとラベルで画像に注釈を付ける関数を追加できます。これは、予測応答で注釈付きの画像を返したい場合に便利です。
def get_annotated_image(results: list) -> Image.Image:
    """Get annotated image using Ultralytics built-in plot method."""
    if not results or len(results) == 0:
        raise ValueError("No results provided for annotation")

    result = results[0]
    # Use Ultralytics built-in plot method with PIL output
    return result.plot(pil=True)
Link to this sectionFastAPIによるHTTP推論サーバーの作成#
YOLO26推論の中核となるロジックが完成したので、それを提供するためのFastAPIアプリケーションを作成できます。これには、Vertex AIに必要なヘルスチェックと予測エンドポイントが含まれます。
まず、インポートを追加し、Vertex AI用にロギングを設定します。Vertex AIはstderrをエラー出力として扱うため、ログをstdoutにパイプするのが賢明です。
import sys

from loguru import logger

# Configure logger
logger.remove()
logger.add(
    sys.stdout,
    colorize=True,
    format="<green>{time:HH:mm:ss}</green> | <level>{message}</level>",
    level=10,
)
logger.add("log.log", rotation="1 MB", level="DEBUG", compression="zip")
Vertex AIに完全に準拠するには、必要なエンドポイントを環境変数で定義し、リクエストのサイズ制限を設定してください。本番環境のデプロイには、Vertex AIプライベートエンドポイントを使用することを推奨します。これにより、パブリックエンドポイントの1.5 MBに対して10 MBというより大きなリクエストペイロード制限を利用でき、堅牢なセキュリティとアクセス制御も確保されます。
# Vertex AI environment variables
AIP_HTTP_PORT = int(os.getenv("AIP_HTTP_PORT", "8080"))
AIP_HEALTH_ROUTE = os.getenv("AIP_HEALTH_ROUTE", "/health")
AIP_PREDICT_ROUTE = os.getenv("AIP_PREDICT_ROUTE", "/predict")

# Request size limit (10 MB for private endpoints, 1.5 MB for public)
MAX_REQUEST_SIZE = 10 * 1024 * 1024  # 10 MB in bytes
リクエストとレスポンスを検証するためのPydanticモデルを2つ追加します。
# Pydantic models for request/response
class PredictionRequest(BaseModel):
    instances: list
    parameters: Optional[Dict[str, Any]] = None

class PredictionResponse(BaseModel):
predictions: listモデルの準備状況を確認するためのヘルスチェックエンドポイントを追加します。これはVertex AIにとって重要です。専用のヘルスチェックがないと、オーケストレーターがランダムなソケットにpingを送信し、モデルが推論の準備ができているかどうかを判断できなくなるためです。チェックは成功時に 200 OK を、失敗時に 503 Service Unavailable を返す必要があります。
# Health check endpoint
@app.get(AIP_HEALTH_ROUTE, status_code=status.HTTP_200_OK)
def health_check():
    """Health check endpoint for Vertex AI."""
    if not is_model_ready():
        raise HTTPException(status_code=503, detail="Model not ready")
    return {"status": "healthy"}
これで、推論リクエストを処理する予測エンドポイントを実装する準備が整いました。画像ファイルを受け取り、推論を実行し、結果を返します。画像はbase64エンコードされている必要があることに注意してください。これはペイロードのサイズを最大33%増加させます。
@app.post(AIP_PREDICT_ROUTE, response_model=PredictionResponse)
async def predict(request: PredictionRequest):
    """Prediction endpoint for Vertex AI."""
    try:
        predictions = []

        for instance in request.instances:
            if isinstance(instance, dict):
                if "image" in instance:
                    image_data = base64.b64decode(instance["image"])
                    input_image = get_image_from_bytes(image_data)
                else:
                    raise HTTPException(status_code=400, detail="Instance must contain 'image' field")
            else:
                raise HTTPException(status_code=400, detail="Invalid instance format")

            # Extract YOLO26 parameters if provided
            parameters = request.parameters or {}
            confidence_threshold = parameters.get("confidence", 0.5)
            return_annotated_image = parameters.get("return_annotated_image", False)

            # Run inference with YOLO26n model
            result = run_inference(input_image, confidence_threshold=confidence_threshold)
            detections_list = result["detections"]

            # Format predictions for Vertex AI
            detections = []
            for detection in detections_list:
                formatted_detection = {
                    "class": detection["name"],
                    "confidence": detection["confidence"],
                    "bbox": {
                        "xmin": detection["xmin"],
                        "ymin": detection["ymin"],
                        "xmax": detection["xmax"],
                        "ymax": detection["ymax"],
                    },
                }
                detections.append(formatted_detection)

            # Build prediction response
            prediction = {"detections": detections, "detection_count": len(detections)}

            # Add annotated image if requested and detections exist
            if (
                return_annotated_image
                and result["results"]
                and result["results"][0].boxes is not None
                and len(result["results"][0].boxes) > 0
            ):
                import base64

                annotated_image = get_annotated_image(result["results"])
                img_bytes = get_bytes_from_image(annotated_image)
                prediction["annotated_image"] = base64.b64encode(img_bytes).decode("utf-8")

            predictions.append(prediction)

        logger.info(
            f"Processed {len(request.instances)} instances, found {sum(len(p['detections']) for p in predictions)} total detections"
        )

        return PredictionResponse(predictions=predictions)

    except HTTPException:
        # Re-raise HTTPException as-is (don't catch and convert to 500)
        raise
    except Exception as e:
        logger.error(f"Prediction error: {e}")
        raise HTTPException(status_code=500, detail=f"Prediction failed: {e}")
最後に、FastAPIサーバーを実行するためのアプリケーションエントリポイントを追加します。
if __name__ == "__main__":
    import uvicorn

    logger.info(f"Starting server on port {AIP_HTTP_PORT}")
    logger.info(f"Health check route: {AIP_HEALTH_ROUTE}")
    logger.info(f"Predict route: {AIP_PREDICT_ROUTE}")
    uvicorn.run(app, host="0.0.0.0", port=AIP_HTTP_PORT)
これで、YOLO26推論リクエストを処理できる完全なFastAPIアプリケーションが完成しました。依存関係をインストールし、例えばuvを使用してサーバーを実行することで、ローカルでテストできます。
# Install dependencies
uv pip install -e .

# Run the FastAPI server directly
uv run src/main.py
サーバーをテストするには、cURLを使用して /health と /predict の両方のエンドポイントにクエリを送信できます。tests フォルダにテスト画像を配置します。次に、ターミナルで以下のコマンドを実行します。
# Test health endpoint
curl http://localhost:8080/health

# Test predict endpoint with base64 encoded image
curl -X POST -H "Content-Type: application/json" -d "{\"instances\": [{\"image\": \"$(base64 -i tests/test_image.jpg)\"}]}" http://localhost:8080/predict
検出されたオブジェクトを含むJSONレスポンスを受け取るはずです。最初の初回リクエストでは、UltralyticsがYOLO26モデルをプルしてロードする必要があるため、わずかな遅延が発生することを想定してください。
Link to this sectionアプリケーションによるUltralytics Dockerイメージの拡張#
Ultralyticsは、アプリケーションイメージのベースとして使用できるいくつかのDockerイメージを提供しています。DockerがUltralyticsと必要なGPUドライバーをインストールします。
Ultralytics YOLOモデルの全機能を使用するには、GPU推論用にCUDA最適化されたイメージを選択する必要があります。ただし、CPU推論でタスクが十分な場合は、CPUのみのイメージを選択することでコンピューティングリソースを節約できます。
- Dockerfile: YOLO26のシングル/マルチGPU学習および推論向けのCUDA最適化イメージ。
- Dockerfile-cpu: YOLO26推論用のCPUのみのイメージ。
Link to this sectionアプリケーション用のDockerイメージを作成#
プロジェクトのルートに以下の内容で Dockerfile を作成します。
# Extends official Ultralytics Docker image for YOLO26
FROM ultralytics/ultralytics:latest

ENV PYTHONUNBUFFERED=1 \
    PYTHONDONTWRITEBYTECODE=1

# Install FastAPI and dependencies
RUN uv pip install fastapi[all] uvicorn[standard] loguru

WORKDIR /app
COPY src/ ./src/
COPY pyproject.toml ./

# Install the application package
RUN uv pip install -e .

RUN mkdir -p /app/logs
ENV PYTHONPATH=/app/src

# Port for Vertex AI
EXPOSE 8080

# Start the inference server
ENTRYPOINT ["python", "src/main.py"]
この例では、公式のUltralytics Dockerイメージ ultralytics:latest をベースとして使用しています。これにはYOLO26モデルとすべての必要な依存関係が既に含まれています。サーバーのエントリポイントは、FastAPIアプリケーションをローカルでテストしたときと同じものを使用します。
Link to this sectionDockerイメージのビルドとテスト#
以下のコマンドを使用してDockerイメージをビルドできます。
docker build --platform linux/amd64 -t IMAGE_NAME:IMAGE_VERSION .IMAGE_NAME と IMAGE_VERSION を yolo26-fastapi:0.1 などの希望の値に置き換えます。Vertex AIにデプロイする場合は、linux/amd64 アーキテクチャ向けにイメージをビルドする必要があることに注意してください。AppleシリコンMacやその他の非x86アーキテクチャでイメージをビルドする場合は、--platform パラメータを明示的に設定する必要があります。
イメージのビルドが完了したら、ローカルでDockerイメージをテストできます。
docker run --platform linux/amd64 -p 8080:8080 IMAGE_NAME:IMAGE_VERSIONDockerコンテナがポート 8080 でFastAPIサーバーを実行しており、推論リクエストを受け付ける準備ができました。前と同じcURLコマンドで、/health エンドポイントと /predict エンドポイントの両方をテストできます。
# Test health endpoint
curl http://localhost:8080/health

# Test predict endpoint with base64 encoded image
curl -X POST -H "Content-Type: application/json" -d "{\"instances\": [{\"image\": \"$(base64 -i tests/test_image.jpg)\"}]}" http://localhost:8080/predict
Link to this sectionGCP Artifact RegistryへのDockerイメージのアップロード#
コンテナ化されたモデルをVertex AIにインポートするには、Google Cloud Artifact RegistryにDockerイメージをアップロードする必要があります。Artifact Registryリポジトリがまだない場合は、最初に作成する必要があります。
Link to this sectionGoogle Cloud Artifact Registryでのリポジトリ作成#
Google Cloud ConsoleでArtifact Registryページを開きます。Artifact Registryを初めて使用する場合は、まずArtifact Registry APIを有効にするよう求められることがあります。

- 「リポジトリを作成」を選択します。
- リポジトリ名を入力します。希望するリージョンを選択し、特に変更が必要な場合を除き、他のオプションはデフォルト設定を使用します。
リージョンの選択は、マシンの可用性や非エンタープライズユーザー向けの特定のコンピューティング制限に影響を与える可能性があります。詳細については、Vertex AIの公式ドキュメントVertex AIのクォータと制限を参照してください。
- リポジトリが作成されたら、PROJECT_ID、場所(リージョン)、リポジトリ名をシークレット保管庫または
.envファイルに保存します。後でDockerイメージにタグを付け、Artifact Registryにプッシュする際に必要になります。
Link to this sectionArtifact RegistryへのDocker認証#
作成したArtifact Registryリポジトリに対してDockerクライアントを認証します。ターミナルで以下のコマンドを実行します。
gcloud auth configure-docker YOUR_REGION-docker.pkg.devLink to this sectionイメージのタグ付けとArtifact Registryへのプッシュ#
Dockerイメージにタグを付け、Google Artifact Registryにプッシュします。
イメージを更新するたびに一意のタグを使用することを推奨します。Vertex AIを含むほとんどのGCPサービスは、自動バージョニングやスケーリングのためにイメージタグに依存しているため、セマンティックバージョニングや日付ベースのタグを使用するのが良い習慣です。
Artifact RegistryのリポジトリURLでイメージにタグを付けます。プレースホルダーを先に保存した値に置き換えます。
docker tag IMAGE_NAME:IMAGE_VERSION YOUR_REGION-docker.pkg.dev/YOUR_PROJECT_ID/YOUR_REPOSITORY_NAME/IMAGE_NAME:IMAGE_VERSIONタグ付けされたイメージをArtifact Registryリポジトリにプッシュします。
docker push YOUR_REGION-docker.pkg.dev/YOUR_PROJECT_ID/YOUR_REPOSITORY_NAME/IMAGE_NAME:IMAGE_VERSION処理が完了するのを待ちます。これでArtifact Registryリポジトリにイメージが表示されるはずです。
Artifact Registryでのイメージ操作に関するより詳細な手順については、Artifact Registryのドキュメントイメージのプッシュとプルを参照してください。
Link to this sectionVertex AIへのモデルのインポート#
プッシュしたDockerイメージを使用して、Vertex AIにモデルをインポートできます。
- Google Cloudのナビゲーションメニューで「Vertex AI」>「モデルレジストリ」に移動します。または、Google Cloud Console上部の検索バーで「Vertex AI」を検索します。


Link to this sectionVertex AIエンドポイントの作成とモデルのデプロイ#
Vertex AIの用語では、エンドポイントはデプロイされたモデルを指します。これは推論リクエストを送信するHTTPエンドポイントを表すためです。一方、モデルはモデルレジストリに保存されている学習済みMLアーティファクトです。
モデルをデプロイするには、Vertex AIでエンドポイントを作成する必要があります。
- Vertex AIのナビゲーションメニューで「エンドポイント」に移動します。モデルをインポートしたときに使用したリージョンを選択し、「作成」をクリックします。

一部のリージョンではコンピューティングクォータが非常に限られているため、お住まいのリージョンで特定のマシンタイプやGPUを選択できない場合があることに注意してください。これが重要な問題となる場合は、デプロイ先のリージョンをより大きなクォータを持つ場所に変更してください。詳細については、Vertex AIの公式ドキュメントVertex AIのクォータと制限を参照してください。
- マシンタイプを選択したら、「続行」をクリックします。この時点で、モデルのパフォーマンスを追跡し、その動作に関するインサイトを提供する追加サービスである「モデルのモニタリング」をVertex AIで有効にすることを選択できます。これはオプションであり、追加コストが発生するため、必要に応じて選択してください。「作成」をクリックします。
Vertex AIがモデルをデプロイするまで数分(一部のリージョンでは最大30分)かかります。デプロイが完了すると、電子メール通知が届きます。
Link to this sectionデプロイされたモデルのテスト#
デプロイが完了すると、Vertex AIはモデルをテストするためのサンプルAPIインターフェースを提供します。
リモート推論をテストするには、提供されたcURLコマンドを使用するか、デプロイされたモデルにリクエストを送信する別のPythonクライアントライブラリを作成します。/predict エンドポイントに送信する前に、画像をbase64にエンコードする必要があることを忘れないでください。
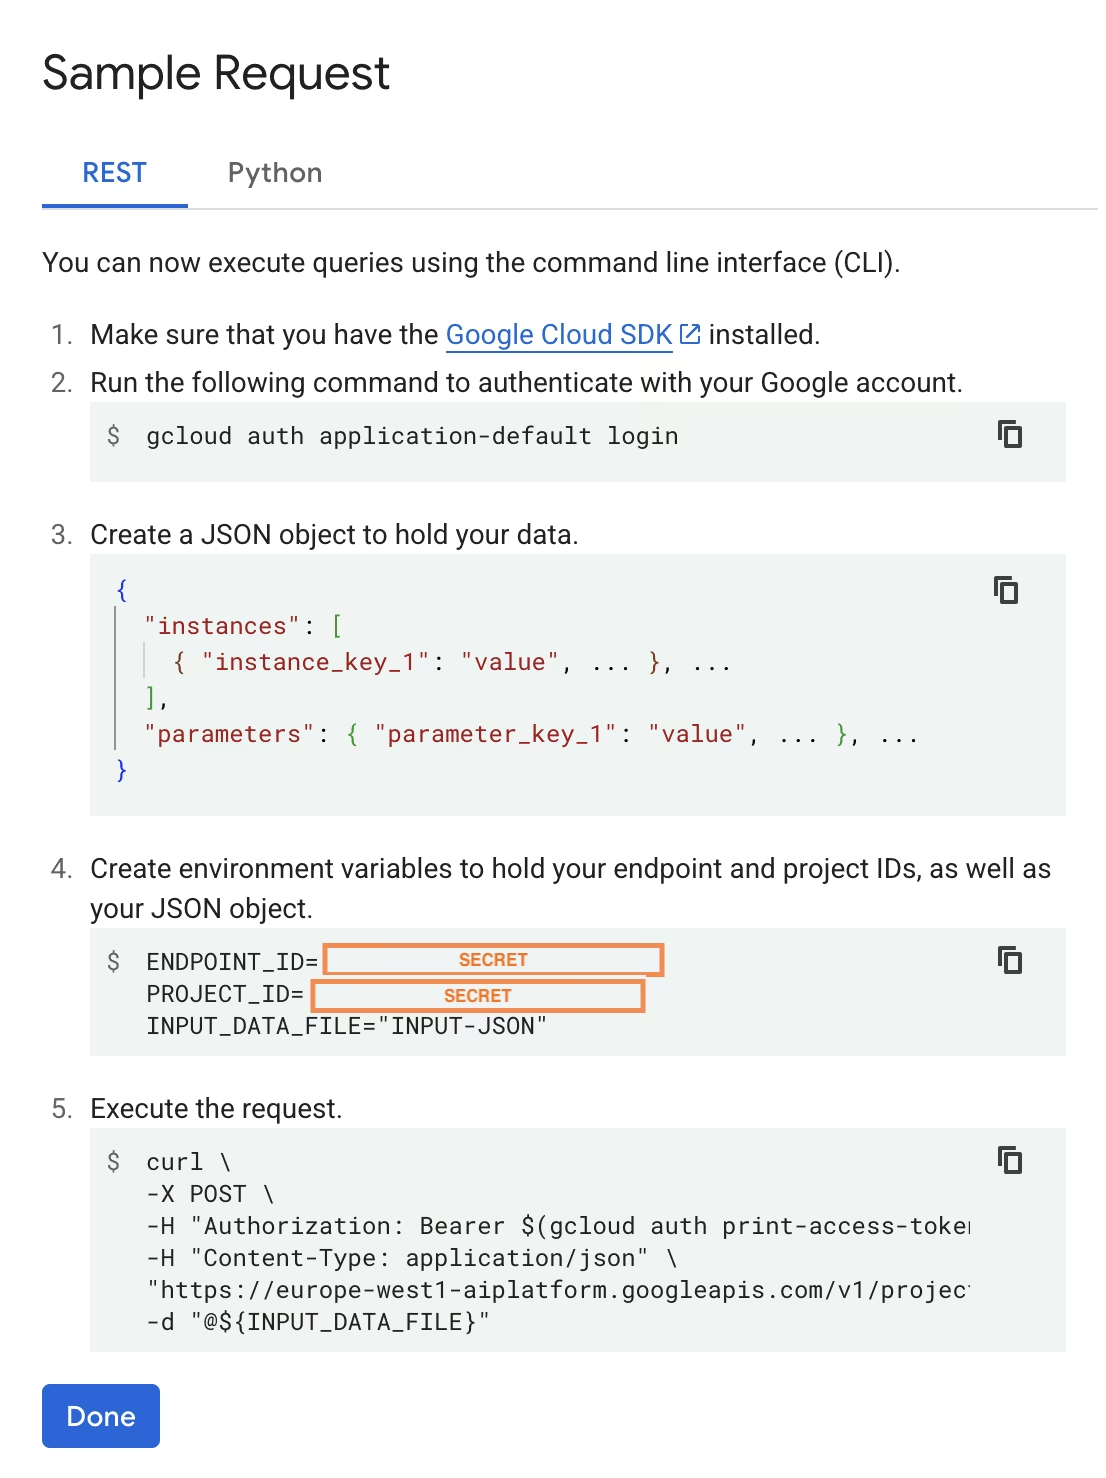
ローカルテストと同様に、Ultralyticsが実行中のコンテナ内でYOLO26モデルをプルしてロードする必要があるため、初回リクエスト時にわずかな遅延が発生することを想定してください。
これで、Google Cloud Vertex AI上でUltralyticsを使用して、学習済みのYOLO26モデルを正常にデプロイできました。
Link to this sectionよくある質問 (FAQ)#
Link to this sectionDockerなしでVertex AI上でUltralytics YOLOモデルを使用できますか?#
はい。ただし、最初にモデルをTensorFlow、Scikit-learn、XGBoostなど、Vertex AIと互換性のあるフォーマットにエクスポートする必要があります。Google Cloudは、変換プロセスの概要を含め、Vertex上で .pt モデルを実行するためのガイドを提供しています: Run PyTorch models on Vertex AI。
その結果得られるセットアップはVertex AIの標準的なサービング層のみに依存し、高度なUltralyticsフレームワークの機能はサポートされないことに注意してください。Vertex AIはコンテナ化されたモデルを完全にサポートしており、デプロイ構成に応じて自動的にスケーリングできるため、モデルを別のフォーマットに変換することなく、Ultralytics YOLOモデルのすべての機能を活用することができます。
Link to this sectionなぜFastAPIはYOLO26の推論サービスに適しているのでしょうか?#
FastAPIは推論ワークロードに対して高いスループットを提供します。非同期サポートにより、メインスレッドをブロックすることなく複数の同時リクエストを処理できるため、コンピュータビジョンモデルをサービングする際に重要となります。
FastAPIによる自動のリクエスト/レスポンスバリデーションは、本番環境の推論サービスにおけるランタイムエラーを低減します。これは、入力フォーマットの一貫性が重要となる物体検出APIにとって特に有用です。
FastAPIは推論パイプラインへの計算オーバーヘッドを最小限に抑えるため、モデルの実行や画像処理タスクにより多くのリソースを割り当てることができます。
FastAPIはSSE(Server-Sent Events)もサポートしており、ストリーミング推論のシナリオで役立ちます。
Link to this sectionなぜ何度もリージョンを選択する必要があるのですか?#
これはGoogle Cloud Platformの汎用性を示す機能であり、利用するサービスごとにリージョンを選択する必要があります。コンテナ化されたモデルをVertex AIにデプロイするタスクにおいては、Model Registry用のリージョン選択が最も重要です。これが、モデルデプロイにおけるマシンタイプとクォータの可用性を決定します。
さらに、今後セットアップを拡張して予測データや結果をCloud StorageまたはBigQueryに保存する場合、レイテンシを最小限に抑え、データアクセスにおける高いスループットを確保するために、Model Registryと同じリージョンを使用する必要があります。