セグメント・エニシング・モデル(SAM)

MetaのSegment Anything Model(SAM)は、プロンプト対応の画像セグメンテーションを実現しました。点、ボックス、またはマスクのプロンプトを指定すると、軽量なデコーダーによって、指定されたオブジェクトのマスクがインタラクティブな用途にも十分な速度で返されます。
SAMの紹介:セグメント・エニシング・モデル#
Segment Anything Model(SAM)は、幅広い画像解析タスクでプロンプト対応セグメンテーションを実現するために開発された画像セグメンテーションモデルです。SAMはMetaのSegment Anythingプロジェクトの中核であり、このプロジェクトでは画像セグメンテーション向けの新しいモデル、タスク、データセットが発表されました。
SAMの設計により、事前知識なしで新しい画像分布やタスクに適応できます。この能力はゼロショット転移と呼ばれます。1,100万枚の厳選画像に対して10億個を超えるマスクを含むSA-1B datasetで学習したSAMは、優れたゼロショット性能を示し、多くの場合、従来の完全教師あり学習の結果と同等、またはそれを上回ります。
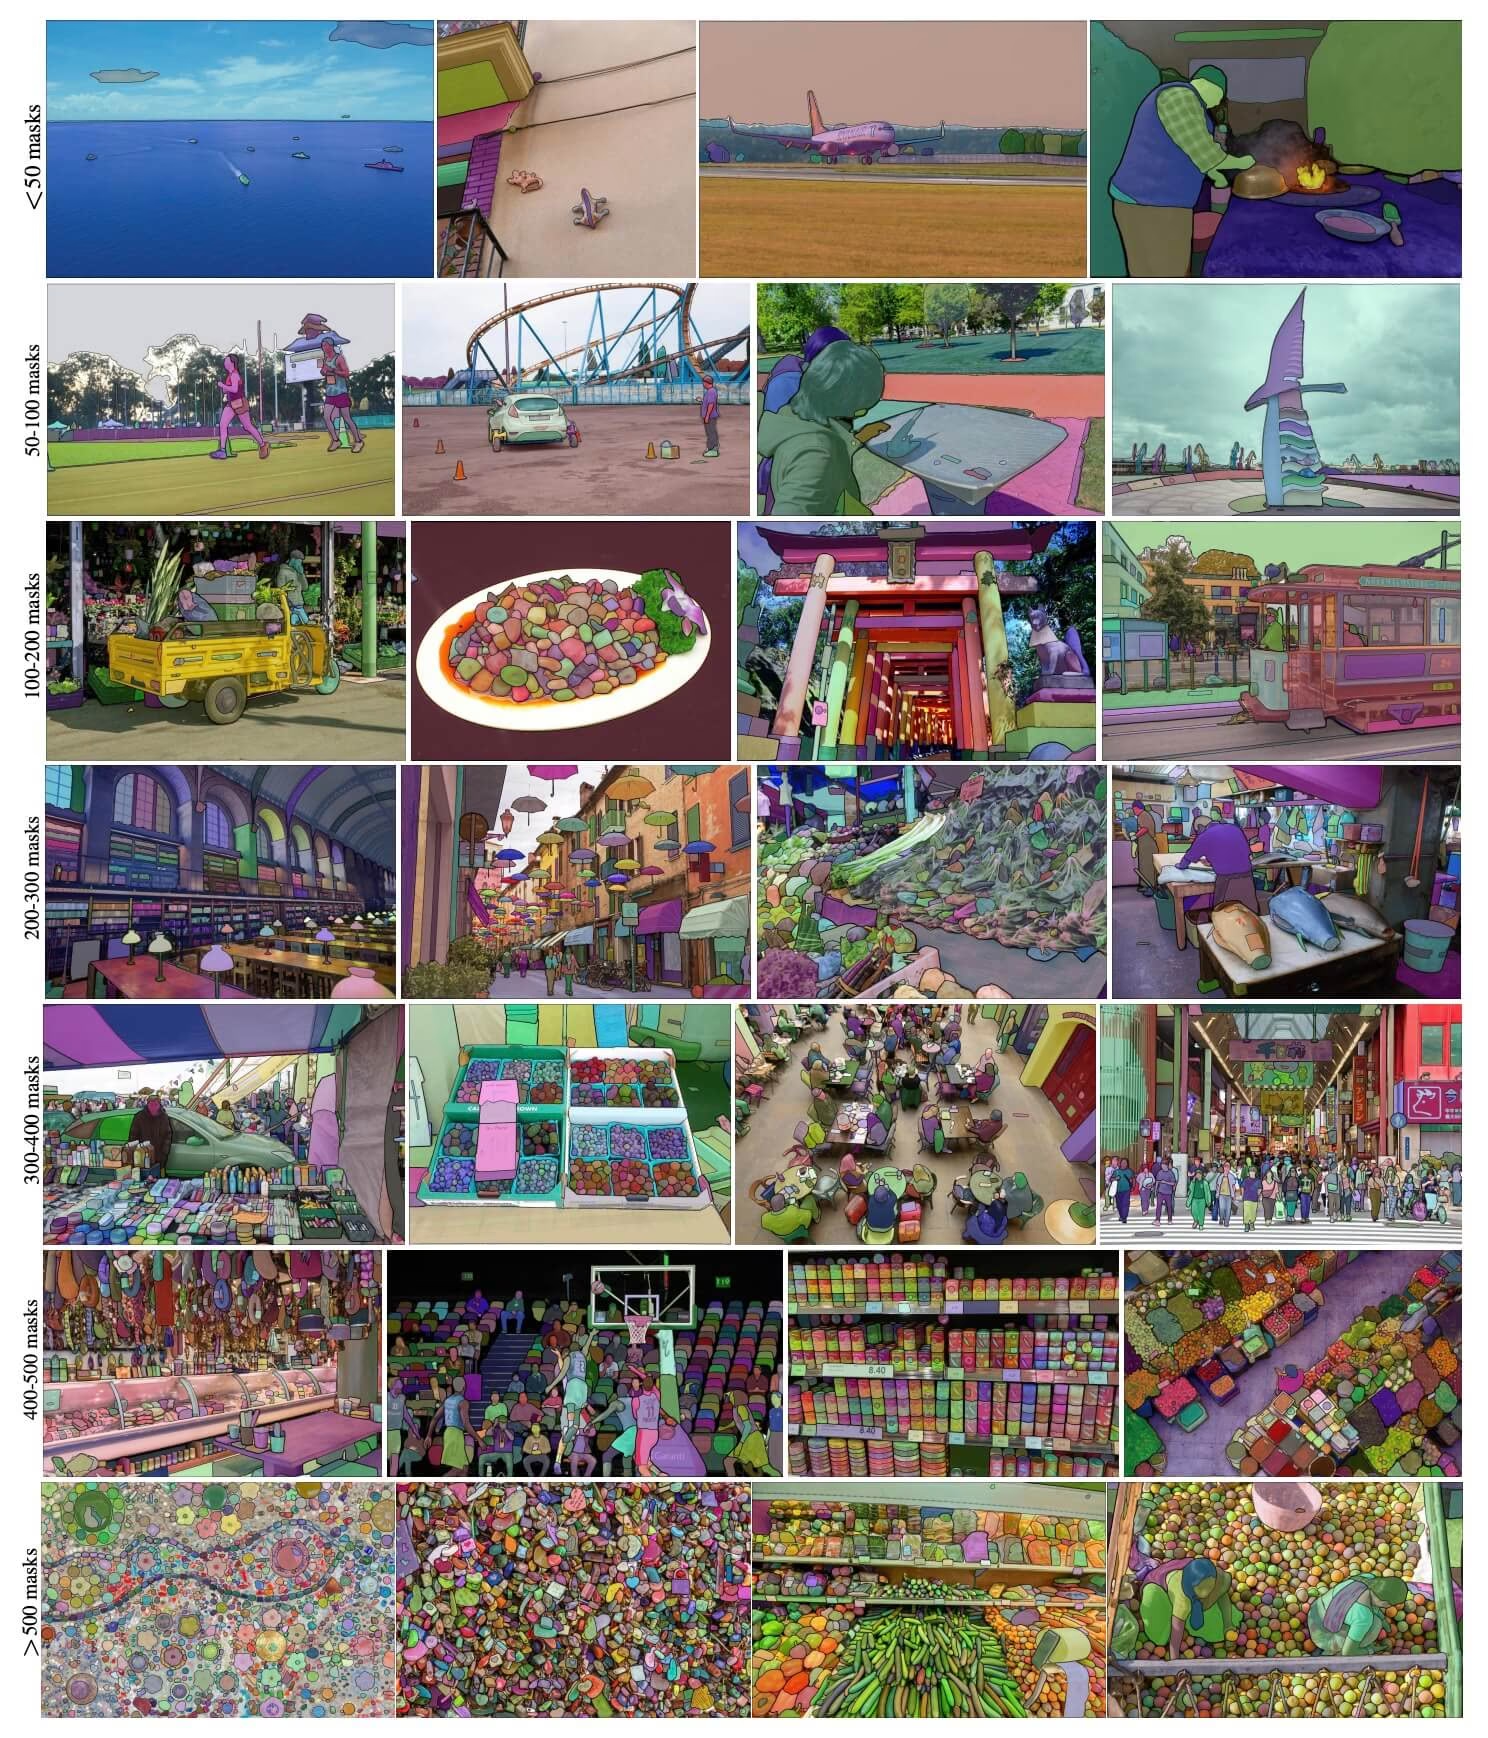 SA-1Bのサンプル画像。 SA-1Bデータセットのマスクを重ねた画像です。SA-1Bには、多様で高解像度、ライセンス取得済み、かつプライバシーに配慮した1,100万枚の画像と、11億個の高品質なセグメンテーションマスクが含まれています。これらのマスクはすべてSAMによって自動的にアノテーションされ、人による評価や多数の実験で高品質かつ多様であることが確認されています。可視化のため、画像は画像あたりのマスク数でグループ化されています(平均で画像1枚あたり約100個のマスクがあります)。
セグメント・エニシング・モデル(SAM)の主な特徴#
- プロンプタブルなセグメンテーションタスク: SAMは、プロンプタブルなセグメンテーションタスクを念頭に設計されています。オブジェクトを特定する空間的な手掛かりやテキストなど、任意のプロンプトから有効なセグメンテーションマスクを生成できます。
- 高度なアーキテクチャ: Segment Anything Modelは、重量級の画像エンコーダー、プロンプトエンコーダー、軽量なマスクデコーダーを使用します。このアーキテクチャにより、柔軟なプロンプト指定、リアルタイムのマスク計算、セグメンテーションタスクにおける曖昧さへの対応が可能になります。
- SA-1Bデータセット: Segment Anythingプロジェクトで公開されたSA-1Bデータセットには、1,100万枚の画像に対して10億個を超えるマスクが含まれています。公開時点で最大のセグメンテーションデータセットであり、多様かつ大規模な学習データソースをSAMに提供します。
- ゼロショット性能: SAMはさまざまなセグメンテーションタスクで優れたゼロショット性能を発揮するため、プロンプトエンジニアリングを最小限に抑えながら、多様な用途ですぐに使用できます。
セグメント・エニシング・モデルとSA-1Bデータセットの詳細については、Segment AnythingのGitHubをご覧いただき、研究論文Segment Anythingをご確認ください。
SAMファミリーモデル(SAM 2.1、SAM 3、SAM 3.1)は、Ultralytics Platformのスマートアノテーション機能を支え、クリック操作によるマスキングでデータセットのラベル付けを迅速化します。
利用可能なモデル、サポート対象タスク、動作モード#
この表では、利用可能なモデル、各モデルの事前学習済み重み、対応タスク、および学習、検証、推論、エクスポートなどの各モードとの互換性を示します。対応モードは✅、非対応モードは❌で示します。
| モデルタイプ | 事前学習済み重み | サポートされるタスク | トレーニング | 検証 | 推論 | エクスポート |
|---|---|---|---|---|---|---|
| SAMベース | sam_b.pt | インスタンスセグメンテーション | ❌ | ❌ | ✅ | ❌ |
| SAMラージ | sam_l.pt | インスタンスセグメンテーション | ❌ | ❌ | ✅ | ❌ |
SAMの使い方:画像セグメンテーションにおける汎用性と性能#
Segment Anything Modelは、学習データ以外にも、エッジ検出、オブジェクト候補の生成、インスタンスセグメンテーション、テキストからマスクを予測する初期段階の処理など、多くの下流タスクに使用できます。プロンプトエンジニアリングにより、SAMは新しいタスクやデータ分布にゼロショットで適応できます。
SAMの推論例#
指定したプロンプトを使って画像をセグメント化します。
from ultralytics import SAM

# モデルを読み込む
model = SAM("sam_b.pt")

# モデル情報を表示(任意)
model.info()

# bboxesプロンプトを使用して推論を実行
results = model("ultralytics/assets/zidane.jpg", bboxes=[439, 437, 524, 709])

# 単一ポイントを使用して推論を実行
results = model(points=[900, 370], labels=[1])

# 複数のポイントを使用して推論を実行
results = model(points=[[400, 370], [900, 370]], labels=[1, 1])

# オブジェクトごとに複数のポイントプロンプトを使用して推論を実行
results = model(points=[[[400, 370], [900, 370]]], labels=[[1, 1]])

# ネガティブポイントプロンプトを使用して推論を実行
results = model(points=[[[400, 370], [900, 370]]], labels=[[1, 0]])画像全体をセグメント化します。
from ultralytics import SAM

# モデルを読み込む
model = SAM("sam_b.pt")

# モデル情報を表示(任意)
model.info()

# 推論を実行
model("path/to/image.jpg")- プロンプト(bboxes/points/masks)を渡さない場合、SAMは画像全体をセグメント化します。
画像を一度設定すれば、画像エンコーダーを再実行せずに、プロンプト推論を複数回実行できます。
import cv2

from ultralytics.models.sam import Predictor as SAMPredictor

# SAMPredictorを作成
overrides = {"conf": 0.25, "task": "segment", "mode": "predict", "imgsz": 1024, "model": "mobile_sam.pt"}
predictor = SAMPredictor(overrides=overrides)

# 画像を設定
predictor.set_image("ultralytics/assets/zidane.jpg")  # 画像ファイルを設定
predictor.set_image(cv2.imread("ultralytics/assets/zidane.jpg"))  # np.ndarrayを設定
results = predictor(bboxes=[439, 437, 524, 709])

# 単一点プロンプトで推論を実行
results = predictor(points=[900, 370], labels=[1])

# 複数の点プロンプトで推論を実行
results = predictor(points=[[400, 370], [900, 370]], labels=[1, 1])

# ネガティブポイントプロンプトを使用して推論を実行
results = predictor(points=[[[400, 370], [900, 370]]], labels=[[1, 0]])

# 画像をリセット
predictor.reset_image()
追加の引数を指定してすべてをセグメント化します。
from ultralytics.models.sam import Predictor as SAMPredictor

# SAMPredictorを作成
overrides = {"conf": 0.25, "task": "segment", "mode": "predict", "imgsz": 1024, "model": "mobile_sam.pt"}
predictor = SAMPredictor(overrides=overrides)

# 追加の引数を指定してセグメント化
results = predictor(source="ultralytics/assets/zidane.jpg", crop_n_layers=1, points_stride=64, min_mask_region_area=100)上記の例で返されるresultsはすべてResultsオブジェクトであり、予測されたマスクと元の画像にアクセスできます。
Segment everythingの引数の詳細については、Predictor/generateリファレンスをご覧ください。
SAMとYOLOの比較#
ここでは、MetaのSAM-bモデルと、YOLO26を含むUltralyticsのセグメンテーションモデルを比較します。
| モデル | サイズ (MB) | パラメーター (M) | 速度(CPU) (ms/im) |
|---|---|---|---|
| Meta SAM-b | 375 | 93.7 | 41703 |
| MobileSAM | 40.7 | 10.1 | 23802 |
| FastSAM-sとYOLOv8のバックボーン | 23.9 | 11.8 | 58.0 |
| Ultralytics YOLOv8n-seg | 7.1(52.8倍小型) | 3.4(27.6倍少ない) | 24.8(1682倍高速) |
| Ultralytics YOLO11n-seg | 6.2(60.5倍小型) | 2.9(32.3倍少ない) | 24.3(1716倍高速) |
| Ultralytics YOLO26n-seg | 6.7(56.0倍小型) | 2.7(34.7倍少ない) | 25.2(1655倍高速) |
この比較から、SAMの各バリアントとYOLOのセグメンテーションモデルでは、モデルサイズと速度に大きな違いがあることがわかります。SAMは独自の自動セグメンテーション機能を備えていますが、YOLOモデル、特にYOLOv8n-seg、YOLO11n-seg、YOLO26n-segは、大幅に小型で高速かつ計算効率に優れています。
SAMの速度はPyTorchで、YOLOの速度はONNX Runtimeで測定しました。テストは16GBのRAMを搭載した2025年製Apple M4 Airで、torch==2.10.0、ultralytics==8.4.31、onnxruntime==1.24.4を使用して実施しました。このテストを再現するには、次の手順を実行してください。
from ultralytics import ASSETS, SAM, YOLO, FastSAM

# SAM-b、MobileSAMのプロファイルを取得
for file in ["sam_b.pt", "mobile_sam.pt"]:
    model = SAM(file)
    model.info()
    model(ASSETS)

# FastSAM-sのプロファイルを取得
model = FastSAM("FastSAM-s.pt")
model.info()
model(ASSETS)

# YOLOモデル(ONNX)のプロファイルを取得
for file_name in ["yolov8n-seg.pt", "yolo11n-seg.pt", "yolo26n-seg.pt"]:
    model = YOLO(file_name)
    model.info()
    onnx_path = model.export(format="onnx", dynamic=True, nms=False)  # YOLO26のNMSフリーヘッド。YOLOv8/YOLO11では何もしません
    model = YOLO(onnx_path)
model(ASSETS)自動アノテーション:セグメンテーションデータセットをすばやく作成#
自動アノテーションはSAMの主要な機能であり、事前学習済みの検出モデルを使用してセグメンテーションデータセットを作成できます。この機能により、時間のかかる手動ラベル付けを省き、多数の画像を迅速にアノテーションできます。
検出モデルを使ってセグメンテーションデータセットを生成する#
Ultralyticsフレームワークでデータセットを自動アノテーションするには、検出器(YOLO26xなど)とSAMを組み合わせるauto_annotate関数を使用します。
from ultralytics.data.annotator import auto_annotate

auto_annotate(data="path/to/images", det_model="yolo26x.pt", sam_model="sam_b.pt")| 引数 | 種類 | デフォルト | 説明 |
|---|---|---|---|
data | str | 必須 | アノテーションまたはセグメンテーションの対象画像を含むディレクトリへのパス。 |
det_model | str | 'yolo26x.pt' | 初期の物体検出に使用するYOLO検出モデルのパス。 |
sam_model | str | 'sam_b.pt' | セグメンテーションに使用するSAMモデルのパス(SAM、SAM 2、MobileSAM、SAM 3の重みに対応)。 |
device | str | '' | 計算デバイス(例:'cuda:0'、'cpu'、またはデバイスを自動検出する場合は'')。 |
conf | float | 0.25 | 信頼度の低い検出結果を除外するためのYOLO検出信頼度しきい値。 |
iou | float | 0.5 | 重複するボックスを除外するための非最大値抑制のIoUしきい値。 |
imgsz | int | 640 | 画像のリサイズに使用する入力サイズ(必要に応じて32の倍数に切り上げられます)。 |
max_det | int | 300 | メモリ効率を高めるための、画像ごとの検出数の最大値。 |
classes | list[int] | None | 検出するクラスインデックスのリスト(例:人物と自転車の場合は[0, 1])。 |
output_dir | str | None | アノテーションの保存ディレクトリ(デフォルト:兄弟ディレクトリの<data>_auto_annotate_labels)。 |
auto_annotate関数には画像のパスを指定します。また、事前学習済みの検出モデルとSAMセグメンテーションモデル、モデルの実行デバイス、アノテーション結果の保存先ディレクトリを任意の引数で指定できます。
事前学習済みモデルによる自動アノテーションは、セグメンテーションデータセットの作成に必要な時間と労力を大幅に削減します。これにより、大量の画像を保有するチームは、手動アノテーションではなく、モデルの開発と評価に集中できます。
引用と謝辞#
SAMが研究や開発に役立つ場合は、論文の引用をご検討ください。
@misc{kirillov2023segment,
      title={Segment Anything},
      author={Alexander Kirillov and Eric Mintun and Nikhila Ravi and Hanzi Mao and Chloe Rolland and Laura Gustafson and Tete Xiao and Spencer Whitehead and Alexander C. Berg and Wan-Yen Lo and Piotr Dollár and Ross Girshick},
      year={2023},
      eprint={2304.02643},
      archivePrefix={arXiv},
      primaryClass={cs.CV}
}コンピュータービジョンコミュニティにとって価値あるこのリソースを作成し、維持しているMeta AIに感謝申し上げます。
よくある質問#
MetaのSegment Anything Model(SAM)は、プロンプト対応セグメンテーションタスク向けに設計された画像セグメンテーションモデルです。画像エンコーダーとプロンプトエンコーダーを軽量なマスクデコーダーと組み合わせ、点、ボックス、マスクなどのプロンプトからセグメンテーションマスクを生成します。SA-1Bデータセットで学習したSAMは、事前知識がなくても新しい画像分布やタスクに適応し、ゼロショットで優れた性能を発揮します。
バウンディングボックスや点など、さまざまなプロンプトを使って推論を実行すると、セグメント・エニシング・モデル(SAM)を画像セグメンテーションに使用できます。Pythonを使った例を以下に示します。
from ultralytics import SAM

# モデルを読み込む
model = SAM("sam_b.pt")

# バウンディングボックスのプロンプトでセグメント化
model("ultralytics/assets/zidane.jpg", bboxes=[439, 437, 524, 709])

# 点プロンプトを指定してセグメント化
model("ultralytics/assets/zidane.jpg", points=[900, 370], labels=[1])

# 複数の点プロンプトを指定してセグメント化
model("ultralytics/assets/zidane.jpg", points=[[400, 370], [900, 370]], labels=[1, 1])

# オブジェクトごとに複数の点プロンプトを指定してセグメント化
model("ultralytics/assets/zidane.jpg", points=[[[400, 370], [900, 370]]], labels=[[1, 1]])

# 負の点プロンプトを指定してセグメント化します。
model("ultralytics/assets/zidane.jpg", points=[[[400, 370], [900, 370]]], labels=[[1, 0]])
また、コマンドラインインターフェース(CLI)でSAMの推論を実行することもできます。
yolo predict model=sam_b.pt source=path/to/image.jpgYOLOモデルと比べると、SAM-b、MobileSAM、FastSAM-sなどのSAM派生モデルは一般にサイズが大きく、速度も遅い一方、独自のゼロショットセグメンテーション機能を備えています。たとえば、CPU上ではYOLO26n-segはMetaのオリジナルSAM-bモデルより56倍小型で、1650倍以上高速です。そのため、迅速で軽量かつ計算効率に優れたセグメンテーションが必要な用途にはYOLOモデルが適しています。一方、SAMモデルは柔軟でプロンプタブルなゼロショットセグメンテーションに優れています。
UltralyticsのSAMには、事前学習済み検出モデルを使ってセグメンテーションデータセットを生成する自動アノテーション機能があります。Pythonでの例を以下に示します。
from ultralytics.data.annotator import auto_annotate auto_annotate(data="path/to/images", det_model="yolo26x.pt", sam_model="sam_b.pt")この関数には画像のパスを指定し、事前学習済みの検出モデルとSAMセグメンテーションモデル、デバイス、出力ディレクトリを任意の引数で指定します。詳しいガイドについては、自動アノテーションをご覧ください。
SAMはSA-1Bデータセットでトレーニングされています。このデータセットは、1,100万枚の画像に含まれる10億個以上のマスクで構成されています。SA-1Bはリリース時点で最大のセグメンテーションデータセットであり、高品質で多様なトレーニングデータを提供して、セグメンテーションタスク全般におけるSAMのゼロショット性能を支えています。


コメント27
質問したり、結果を共有したり、ほかの人をサポートしたりできます。
kh-diab
can we use SAM to process labeled images with bounding box to segment the object inside the box and generate new labels files like yolo or coco format if yes how please
1 Paula DerrengerUltralytics
Yes, you can use SAM to process labeled images with bounding boxes to segment the objects inside and generate new label files in formats like YOLO or COCO. You can achieve this by using the
auto_annotatefunction in the Ultralytics framework. This function allows you to auto-annotate your dataset using a pre-trained detection model and SAM for segmentation. For more details, you can refer to the Segment Anything Model documentation. If you need further assistance, feel free to ask!Hello @pderrenger
Thanks I tried to run the below but I face error all the time
import os import cv2 import numpy as np from ultralytics import SAM
Load the SAM model
model = SAM("sam_b.pt") # Update the model path if needed
Function to load YOLO annotations
def load_yolo_annotations(annotation_path, image_width, image_height): bboxes = [] try: with open(annotation_path, 'r') as file: lines = file.readlines() for line in lines: parts = line.strip().split() class_id = int(parts[0]) x_center = float(parts[1]) * image_width y_center = float(parts[2]) * image_height width = float(parts[3]) * image_width height = float(parts[4]) * image_height x = x_center - width / 2 y = y_center - height / 2 bboxes.append((x, y, x + width, y + height)) # Update to [x1, y1, x2, y2] except Exception as e: print(f"Error reading annotation file {annotation_path}: {e}") return bboxes
Paths
images_folder = r'E:\MSc\tesi\20210901_Herrenpuent_Taenikon_Matrice_300_15m_1.6m_s\500 D' annotations_folder = r'C:\Users\Khaled\OneDrive - OST\Study Material\Msc Thesis\dataset\Group D yolo format\obj_train_data' output_folder = r'C:\Users\Khaled\OneDrive - OST\Study Material\Msc Thesis\dataset\test output sam'
if not os.path.exists(output_folder): os.makedirs(output_folder)
Process each image and its corresponding annotation
total_images = len(os.listdir(images_folder)) processed_images = 0
for image_filename in os.listdir(images_folder): if image_filename.endswith(('.JPG', '.jpg', '.png')): image_path = os.path.join(images_folder, image_filename) annotation_path = os.path.join(annotations_folder, image_filename.replace('.JPG', '.txt').replace('.jpg', '.txt').replace('.png', '.txt'))
    print(f"Processing {image_filename}...")

    # Check if annotation file exists
    if not os.path.exists(annotation_path):
        print(f"Annotation file not found for {image_filename}")
        continue

    # Load the image
    image = cv2.imread(image_path)
    if image is None:
        print(f"Failed to load image {image_path}")
        continue

    image_rgb = cv2.cvtColor(image, cv2.COLOR_BGR2RGB)
    height, width, _ = image.shape

    # Load YOLO annotations
    bboxes = load_yolo_annotations(annotation_path, width, height)
    if not bboxes:
        print(f"No bounding boxes found in {annotation_path}")
        continue

    # Perform segmentation using SAM model
    results = model(image_rgb, bboxes=bboxes)

    for idx, result in enumerate(results):
        if hasattr(result, 'masks') and result.masks is not None:
            masks = result.masks.cpu().numpy()  # Convert to numpy array
            for m_idx, mask in enumerate(masks):
                chw_mask = mask.astype(np.uint8)  # Ensure mask is in uint8 format
                hwc_mask = np.transpose(chw_mask, (1, 2, 0))  # Convert CHW to HWC
                contours, _ = cv2.findContours(hwc_mask, cv2.RETR_EXTERNAL, cv2.CHAIN_APPROX_SIMPLE)

                segmented_image = cv2.bitwise_and(image, image, mask=hwc_mask)

                # Save the segmented image
                output_path = os.path.join(output_folder, image_filename.replace('.JPG', f'_segmented_{idx}_{m_idx}.jpg').replace('.jpg', f'_segmented_{idx}_{m_idx}.jpg').replace('.png', f'_segmented_{idx}_{m_idx}.png'))
                cv2.imwrite(output_path, segmented_image)
                print(f"Saved segmented image to {output_path}")

    processed_images += 1
    print(f"Processed {processed_images}/{total_images} images.")
print("Processing completed.")
error is
AttributeError: 'Masks' object has no attribute 'astype'. See valid attributes below.
A class for storing and manipulating detection masks.

    xy (list): A list of segments in pixel coordinates.
    xyn (list): A list of normalized segments.

Methods:
    cpu(): Returns the masks tensor on CPU memory.
    numpy(): Returns the masks tensor as a numpy array.
    cuda(): Returns the masks tensor on GPU memory.
    to(device, dtype): Returns the masks tensor with the specified device and dtype.
PS C:\Users\Khaled> & C:/MSc_Workspace/anaconda3/envs/GenEnv/python.exe "c:/Users/Khaled/OneDrive - OST/Study Material/Msc Thesis/coding/sam segment.py" Processing DJI_20210901122818_0695.JPG...
0: 1024x1024 67330.4ms Speed: 48.0ms preprocess, 67330.4ms inference, 8095.5ms postprocess per image at shape (1, 3, 1024, 1024) Traceback (most recent call last): File "c:\Users\Khaled\OneDrive - OST\Study Material\Msc Thesis\coding\sam segment.py", line 75, in chw_mask = mask.astype(np.uint8) # Ensure mask is in uint8 format File "C:\MSc_Workspace\anaconda3\envs\GenEnv\lib\site-packages\ultralytics\utils_init_.py", line 162, in getattr raise AttributeError(f"'{name}' object has no attribute '{attr}'. See valid attributes below.\n{self.doc}") AttributeError: 'Masks' object has no attribute 'astype'. See valid attributes below.
A class for storing and manipulating detection masks.

Attributes:
    xy (list): A list of segments in pixel coordinates.
    xyn (list): A list of normalized segments.

Methods:
    cpu(): Returns the masks tensor on CPU memory.
    numpy(): Returns the masks tensor as a numpy array.
    cuda(): Returns the masks tensor on GPU memory.
    to(device, dtype): Returns the masks tensor with the specified device and dtype.
do you have idea how to solve it thanks
evans rojas
Hola me gustaría usar SAM para clasificar vegetación a partir de una imagen. ¿Qué recomendaciones me sugieren?
- Paula DerrengerUltralytics
Hola, Evans. SAM puede ayudarte a delimitar la vegetación, pero el SAM original no identifica por sí solo especies ni tipos de cobertura. Te sugiero comenzar con puntos positivos sobre la vegetación y negativos sobre el fondo, revisar las máscaras y asignarles tus clases manualmente. Si buscas automatizar la clasificación en más imágenes, puedes usar esas anotaciones para entrenar un modelo de segmentación por instancias para plantas individuales o de segmentación semántica para coberturas del terreno. ¿Quieres separar vegetación del fondo o distinguir especies, y trabajas con fotografías terrestres, de dron o satelitales?
meenakshi71
I've been trying to export the SAM model (which i had trained on my custom dataset) into ONNX but the output is always wrong. It is just generating a grid instead of a proper segmentation mask every time even after providing multiple kinds of prompts.
 Glenn JocherUltralytics
@meenakshi71 it seems the issue may stem from the export process or configuration. Ensure you are using the correct export parameters and supported formats. SAM models are primarily designed for real-time inference and not all functionalities may transfer seamlessly to ONNX. Refer to the SAM export documentation for guidance. If the problem persists, consider testing the ONNX model with simpler prompts to isolate the issue.
MeenakshiKK236
Why are my segmentation results being automatically saved into this directory while using the SAM model to perform segmentation on my custom dataset? "Results saved to runs/segment/predict4"
- Glenn JocherUltralytics
@MeenakshiKK236 the results are saved to the
runs/segment/predict4directory by default. You can change the save directory by specifying theprojectandnamearguments in your command. For more details, please refer to the SAM documentation.
NasserAlqeifi
Correct me if I'm wrong, when I use the auto_annotate function I will only get labels for my dataset with the classes in Yolo pre-trained? What if I need classes that are not available within Yolo? For example, I want to get a label for the road, and this is not available in any version of Yolo, but it is available in SAM?
- Glenn JocherUltralytics
@NasserAlqeifi you are correct. The
auto_annotatefunction uses YOLO's pre-trained classes for labeling. If you need classes not available in YOLO, like "road," you can use SAM directly for segmentation. For more details, please refer to the Segment Anything Model documentation. - Glenn JocherUltralytics
@NasserAlqeifi but also remember SAM identifies segments but not classes, so it may find a sign or a road, but it won't be able to assign a class to them by itself.
Thank you for your quick response. Indeed, I tried to use SAM directly and found that it does not save the class names in the name, but the class number.
from ultralytics import SAM
Load a model
model = SAM("sam2_l.pt")
Predict results
results = model.predict(source=r"/testSAM/image.png", stream=True, bboxes=None, points=None, labels=None, show=False)
Iterate over results, print names, and save each result to a file
for i, result in enumerate(results): # Print the names detected in the result print(f"Result {i}: Detected Names - {result.names}")
# Save the result as an image file
result.save(f"output_{i}.jpg")
------------- output ---------
image 1/1 /testSAM/image.png: 1024x1024 1 0, 1 1, 1 2, 1 3, 1 4, 1 5, 1 6, 1 7, 1 8, 1 9, 1 10, 1 11, 1 12, 1 13, 1 14, 1 15, 1 16, 1 17, 1 18, 1 19, 1 20, 1 21, 1 22, 1 23, 1 24, 1 25, 1 26, 1 27, 1 28, 1 29, 1 30, 1 31, 1 32, 23758.2ms Result 0: Detected Names - {0: '0', 1: '1', 2: '2', 3: '3', 4: '4', 5: '5', 6: '6', 7: '7', 8: '8', 9: '9', 10: '10', 11: '11', 12: '12', 13: '13', 14: '14', 15: '15', 16: '16', 17: '17', 18: '18', 19: '19', 20: '20', 21: '21', 22: '22', 23: '23', 24: '24', 25: '25', 26: '26', 27: '27', 28: '28', 29: '29', 30: '30', 31: '31', 32: '32'} Speed: 20.3ms preprocess, 23758.2ms inference, 7.1ms postprocess per image at shape (1, 3, 1024, 1024)
- Glenn JocherUltralytics
Thank you for your feedback. Currently, SAM does not assign class names, only class numbers. If you need specific class names, you may need to implement a custom mapping or post-processing step to assign the desired class names based on your requirements.
dreambit
I have images where a single object (such as a car) is partially covered by small trees, resulting in the object being divided into multiple visible fragments. In coco it could look like { "id": 1, "image_id": 1, "category_id": 1, "bbox": [x, y, width, height], "segmentation": [ [polygon1_x1, polygon1_y1, polygon1_x2, polygon1_y2, ...], [polygon2_x1, polygon2_y1, polygon2_x2, polygon2_y2, ...] ], "area": 500, "iscrowd": 0 } Each polygon is an array of coordinates defining a closed shape
Is it possible with auto_annotate and yolo format?
- Glenn JocherUltralytics(編集済み)
@dreambit hi there!
Thank you for your detailed question. Yes, you can use the
auto_annotatefunction in the Ultralytics framework to handle images where objects are partially occluded and appear as multiple fragments. This function can generate segmentation masks for such complex scenarios.Here's how you can achieve this:
- Prepare Your Dataset: Ensure your images are organized in a directory.
- Use the
auto_annotateFunction: This function will use a pre-trained YOLO detection model and the SAM segmentation model to annotate your images.
Here's a code example to get you started:
from ultralytics.data.annotator import auto_annotate

# Path to your images
data_path = "path/to/your/images"

# Auto-annotate using YOLO26 and SAM models
auto_annotate(data=data_path, det_model="yolo26x.pt", sam_model="sam_b.pt")
Explanation:
data: Path to the folder containing your images.det_model: The pre-trained YOLO detection model, which defaults toyolo26x.pt.sam_model: The pre-trained SAM segmentation model, which defaults tosam_b.pt.
This setup will generate segmentation masks for your images, even if the objects are partially occluded.
For more detailed information on using SAM and its capabilities, you can refer to the Segment Anything Model (SAM) documentation.
If you encounter any issues or need further assistance, please provide a reproducible example so we can better understand and address your specific scenario. You can find more information on creating a minimum reproducible example here.
Feel free to update to the latest versions of the packages to ensure you have the latest features and fixes.
Best of luck with your project! 🚀
Glenn thanks, but as I see in docs https://docs.ultralytics.com/datasets/segment/#ultralytics-yolo-format ... In this format, is the index of the class for the object, and ... are the bounding coordinates of the object's segmentation mask. The coordinates are separated by spaces.
So it means that I could have only one segmentation mask?
0 0.681 0.485 0.670 0.487 0.676 0.487 1 0.504 0.000 0.501 0.004 0.498 0.004 0.493 0.010 0.492 0.0104
Glen, i ran the command you specified, and used an image from coco data set to test, as you can see segmentations are not correct, only half of the objects are segmented:
Here is original image from coco with car mask https://ibb.co/RjYyRdk
- Glenn JocherUltralytics(編集済み)
Hi @dreambit,
Thank you for sharing the images and details. I understand the challenge you're facing with partial segmentations. The
auto_annotatefunction should ideally handle such cases, but it seems like the segmentation results are not as expected.Steps to Troubleshoot and Improve Segmentation:
-
Verify Latest Versions: Ensure you are using the latest versions of the Ultralytics and SAM models. This can help avoid any bugs that might have been fixed in recent updates.
-
Reproducible Example: If the issue persists, providing a minimum reproducible example would be very helpful. This allows us to better understand and diagnose the problem. You can find guidance on creating a reproducible example here.
-
Adjusting Prompts: Sometimes, adjusting the prompts (bounding boxes or points) can improve segmentation results. Here’s an example of how you can use different prompts:
from ultralytics import SAM # Load a model model = SAM("sam_b.pt") # Run inference with bounding boxes prompt results = model("path/to/image.jpg", bboxes=[[x1, y1, x2, y2], [x3, y3, x4, y4]]) # Run inference with points prompt results = model("path/to/image.jpg", points=[[x1, y1], [x2, y2]], labels=[1, 1]) -
Segment Everything: If specific prompts are not yielding the desired results, you can try segmenting the entire image without prompts:
from ultralytics import SAM # Load a model model = SAM("sam_b.pt") # Segment the whole image results = model("path/to/image.jpg") -
Multiple Masks Handling: If your object is divided into multiple fragments, ensure that the segmentation model is capable of handling multiple masks per object. The YOLO format typically supports one segmentation mask per object, but you can adapt the output to handle multiple masks by combining them post-processing.
Example of Handling Multiple Masks:
If you need to combine multiple masks into a single annotation, you can do this post-processing:
# `results[0].masks.data` holds all masks of the image, shape (N, H, W)
combined_mask = results[0].masks.data.cpu().numpy().max(axis=0)

# Save or use the combined mask
Documentation and Resources:
For more detailed information on using SAM and its capabilities, please refer to the Segment Anything Model (SAM) documentation.
If you continue to face issues, please share a reproducible example, and we’ll be happy to assist further. Your feedback is valuable, and we aim to provide the best support possible.
-
kshweikeh
is there anyway where I can train YOLO SAM on a custom dataset?
- Paula DerrengerUltralytics(編集済み)
@kshweikeh hi there!
Currently, the Segment Anything Model (SAM) from Ultralytics is designed primarily for inference and does not support training on custom datasets. However, you can leverage SAM's powerful zero-shot capabilities for various segmentation tasks without the need for additional training.
If you're looking to create a segmentation dataset using SAM, you can use the auto-annotation feature. This allows you to generate segmentation masks using a pre-trained detection model. Here's a quick example:
from ultralytics.data.annotator import auto_annotate

auto_annotate(data="path/to/images", det_model="yolo26x.pt", sam_model="sam_b.pt")
This function will help you annotate your images quickly and efficiently, bypassing the need for manual labeling.
For more detailed information on using SAM, you can visit our Segment Anything Model (SAM) documentation.
If you have any further questions or need additional assistance, feel free to ask! 😊
Blessing988
@pderrenger It looks like auto_annotate for SAM only gives out the segmentation masks. What if you want to generate the bounding boxes in additionto the masks to verify if the results are right. Thanks.
Also, how will one visualise the segmentation masks after the auto_annotate which have been saved in a directory of txt files.
- Paula DerrengerUltralytics(編集済み)
Hi @Blessing988,
auto_annotatewrites one YOLO segmentation polygon per line (class_id x1 y1 x2 y2 ..., normalized) to its output folder (output_dir, by default<images folder>_auto_annotate_labels). Here is a script to draw those polygons on the images:from pathlib import Path import cv2 import numpy as np def visualize_annotations(image_dir, label_dir, output_dir): Path(output_dir).mkdir(parents=True, exist_ok=True) for image_path in Path(image_dir).glob("*.jpg"): image = cv2.imread(str(image_path)) h, w = image.shape[:2] label_path = Path(label_dir) / f"{image_path.stem}.txt" if not label_path.exists(): continue for line in label_path.read_text().splitlines(): values = line.split() polygon = (np.array(values[1:], dtype=float).reshape(-1, 2) * [w, h]).astype(np.int32) cv2.polylines(image, [polygon], isClosed=True, color=(0, 255, 0), thickness=2) cv2.imwrite(str(Path(output_dir) / image_path.name), image) visualize_annotations("path/to/images", "path/to/labels", "path/to/output")For more detailed information on using SAM and its features, you can refer to the Segment Anything Model (SAM) documentation.
Feel free to reach out if you have any further questions or need additional assistance! 😊
pabentse
Would be fantastic with support for the "H" size as well!
- Paula DerrengerUltralytics
@pabentse absolutely, the addition of an "H" size model would be a great enhancement to the range of model sizes we offer, catering to different computational needs and use cases. The YOLO community's feedback is invaluable, and suggestions like yours help guide future developments. Keep an eye on our updates! 👀🚀