Link to this section빠른 시작 가이드: Raspberry Pi와 Ultralytics YOLO26#
Raspberry Pi is a small, affordable computer that runs Ultralytics YOLO26 for real-time object detection at the edge — no GPU required. This guide walks you through deploying YOLO26 on Raspberry Pi 4 and 5: flashing the OS, installing Ultralytics, exporting to NCNN for the fastest inference on ARM, and running predictions on a live camera feed. It also includes performance benchmarks across ten export formats so you can pick the best speed and accuracy trade-off for your hardware.
Ultralytics 설정하기, NCNN으로 내보내기 및 추론 실행하기, 벤치마크 또는 카메라 추론으로 이동하세요.
Watch: Raspberry Pi 5 updates and improvements.
이 가이드는 최신 Raspberry Pi OS Bookworm (Debian 12)을 실행하는 Raspberry Pi 4 및 Raspberry Pi 5에서 테스트되었습니다. 동일한 Raspberry Pi OS Bookworm이 설치되어 있다면 Raspberry Pi 3와 같은 이전 Raspberry Pi 기기에서도 이 가이드를 사용하여 원활하게 작동할 것으로 예상됩니다.
Link to this sectionRaspberry Pi란 무엇인가요?#
Raspberry Pi는 작고 저렴한 싱글 보드 컴퓨터입니다. 취미용 홈 자동화부터 산업용까지 광범위한 프로젝트와 애플리케이션에서 인기를 얻고 있습니다. Raspberry Pi 보드는 다양한 운영 체제를 실행할 수 있으며, 센서, 액추에이터 및 기타 하드웨어 구성 요소와 쉽게 통합할 수 있는 GPIO(General Purpose Input/Output) 핀을 제공합니다. 다양한 사양의 모델이 출시되어 있지만, 모두 저비용, 콤팩트함, 범용성이라는 기본 설계 철학을 공유합니다.
Link to this sectionRaspberry Pi 시리즈 비교#
| Raspberry Pi 3 | Raspberry Pi 4 | Raspberry Pi 5 | |
|---|---|---|---|
| CPU | Broadcom BCM2837, Cortex-A53 64Bit SoC | Broadcom BCM2711, Cortex-A72 64Bit SoC | Broadcom BCM2712, Cortex-A76 64Bit SoC |
| CPU 최대 클럭 | 1.4GHz | 1.8GHz | 2.4GHz |
| GPU | Videocore IV | Videocore VI | VideoCore VII |
| GPU 최대 클럭 | 400Mhz | 500Mhz | 800Mhz |
| 메모리 | 1GB LPDDR2 SDRAM | 1GB, 2GB, 4GB, 8GB LPDDR4-3200 SDRAM | 4GB, 8GB LPDDR4X-4267 SDRAM |
| PCIe | 해당 없음 | 해당 없음 | 1xPCIe 2.0 인터페이스 |
| 최대 전력 소모 | 2.5A@5V | 3A@5V | 5A@5V (PD 지원) |
Link to this sectionRaspberry Pi OS란 무엇인가요?#
Raspberry Pi OS(구 Raspbian)는 Raspberry Pi 재단에서 보급하는 콤팩트 싱글 보드 컴퓨터군인 Raspberry Pi를 위해 Debian GNU/Linux 배포판을 기반으로 개발된 유닉스 계열 운영 체제입니다. Raspberry Pi OS는 ARM CPU가 탑재된 Raspberry Pi에 최적화되어 있으며, Openbox 스태킹 윈도우 매니저를 갖춘 수정된 LXDE 데스크톱 환경을 사용합니다. Raspberry Pi OS는 Raspberry Pi에서 가능한 많은 Debian 패키지의 안정성과 성능을 향상시키는 데 중점을 두고 활발히 개발되고 있습니다.
Link to this sectionRaspberry Pi에 Raspberry Pi OS 플래싱하기#
Raspberry Pi를 손에 넣은 후 가장 먼저 해야 할 일은 마이크로 SD 카드에 Raspberry Pi OS를 플래싱하고, 기기에 삽입한 뒤 OS로 부팅하는 것입니다. 기기 첫 사용을 준비하려면 Raspberry Pi에서 제공하는 자세한 Getting Started Documentation by Raspberry Pi를 따르십시오.
Link to this sectionUltralytics 설정하기#
다음 Computer Vision 프로젝트를 위해 Raspberry Pi에 Ultralytics 패키지를 설정하는 두 가지 방법이 있습니다:
Link to this sectionDocker로 시작하기#
Raspberry Pi에서 Ultralytics YOLO26을 시작하는 가장 빠른 방법은 Raspberry Pi용으로 미리 빌드된 Docker 이미지를 사용하는 것입니다.
아래 명령어를 실행하여 Docker 컨테이너를 가져오고(pull) Raspberry Pi에서 실행하세요. 이는 Python3 환경에서 Ubuntu 24.04를 실행하는 arm64v8/ubuntu Docker 이미지를 기반으로 합니다.
t=ultralytics/ultralytics:latest-arm64
sudo docker pull $t && sudo docker run -it --ipc=host $t
Docker 이미지에 Ultralytics가 이미 포함되어 있으므로 바로 모델을 NCNN으로 내보내기 단계로 진행할 수 있습니다.
Link to this sectionDocker 없이 시작하기#
Link to this sectionUltralytics 패키지 설치#
여기서는 PyTorch 모델을 다른 형식으로 내보낼 수 있도록 선택적 의존성 패키지와 함께 Raspberry Pi에 Ultralytics 패키지를 설치합니다.
-
패키지 목록 업데이트, pip 설치 및 최신 버전으로 업그레이드
sudo apt update sudo apt install python3-pip -y pip install -U pip -
선택적 종속성을 포함하여
ultralyticspip 패키지 설치pip install ultralytics[export] -
장치 재부팅
sudo reboot
Link to this sectionRaspberry Pi에서 NCNN 사용하기#
Ultralytics에서 지원하는 모든 모델 export formats 중에서 NCNN은 ARM 아키텍처와 같은 모바일/임베디드 플랫폼에 최적화되어 있어 Raspberry Pi 기기에서 최고의 추론 성능을 제공합니다. YOLO26n PyTorch 모델을 NCNN으로 변환한 다음, 내보낸 모델로 추론을 실행하세요:
from ultralytics import YOLO

# Load a YOLO26n PyTorch model
model = YOLO("yolo26n.pt")

# Export the model to NCNN format
model.export(format="ncnn")  # creates 'yolo26n_ncnn_model'

# Load the exported NCNN model
ncnn_model = YOLO("yolo26n_ncnn_model")

# Run inference
results = ncnn_model("https://ultralytics.com/images/bus.jpg")지원되는 내보내기 옵션에 대한 자세한 내용은 모델 배포 옵션 가이드를 참조하세요.
Link to this sectionYOLO11 대비 YOLO26 성능 향상#
YOLO26은 Raspberry Pi 5와 같은 하드웨어 제약이 있는 기기에서 실행되도록 특별히 설계되었습니다. YOLO11n과 비교했을 때, YOLO26n은 Raspberry Pi 5에서 ONNX 내보내기 모델로 640 입력 크기 기준 약 15%의 FPS 증가(6.79 → 7.79)를 달성함과 동시에 더 높은 mAP(40.1 vs 39.5)를 제공합니다. 아래 표와 차트에서 이 비교를 확인하실 수 있습니다.

| 모델 | mAP50-95(B) | 추론 시간(ms/im) |
|---|---|---|
| YOLO26n | 40.1 | 128.42 |
| YOLO26s | 47.8 | 352.84 |
| YOLO26m | 52.5 | 993.78 |
| YOLO26l | 54.4 | 1259.46 |
| YOLO26x | 56.9 | 2636.26 |
Ultralytics 8.4.14 버전으로 벤치마킹되었습니다.
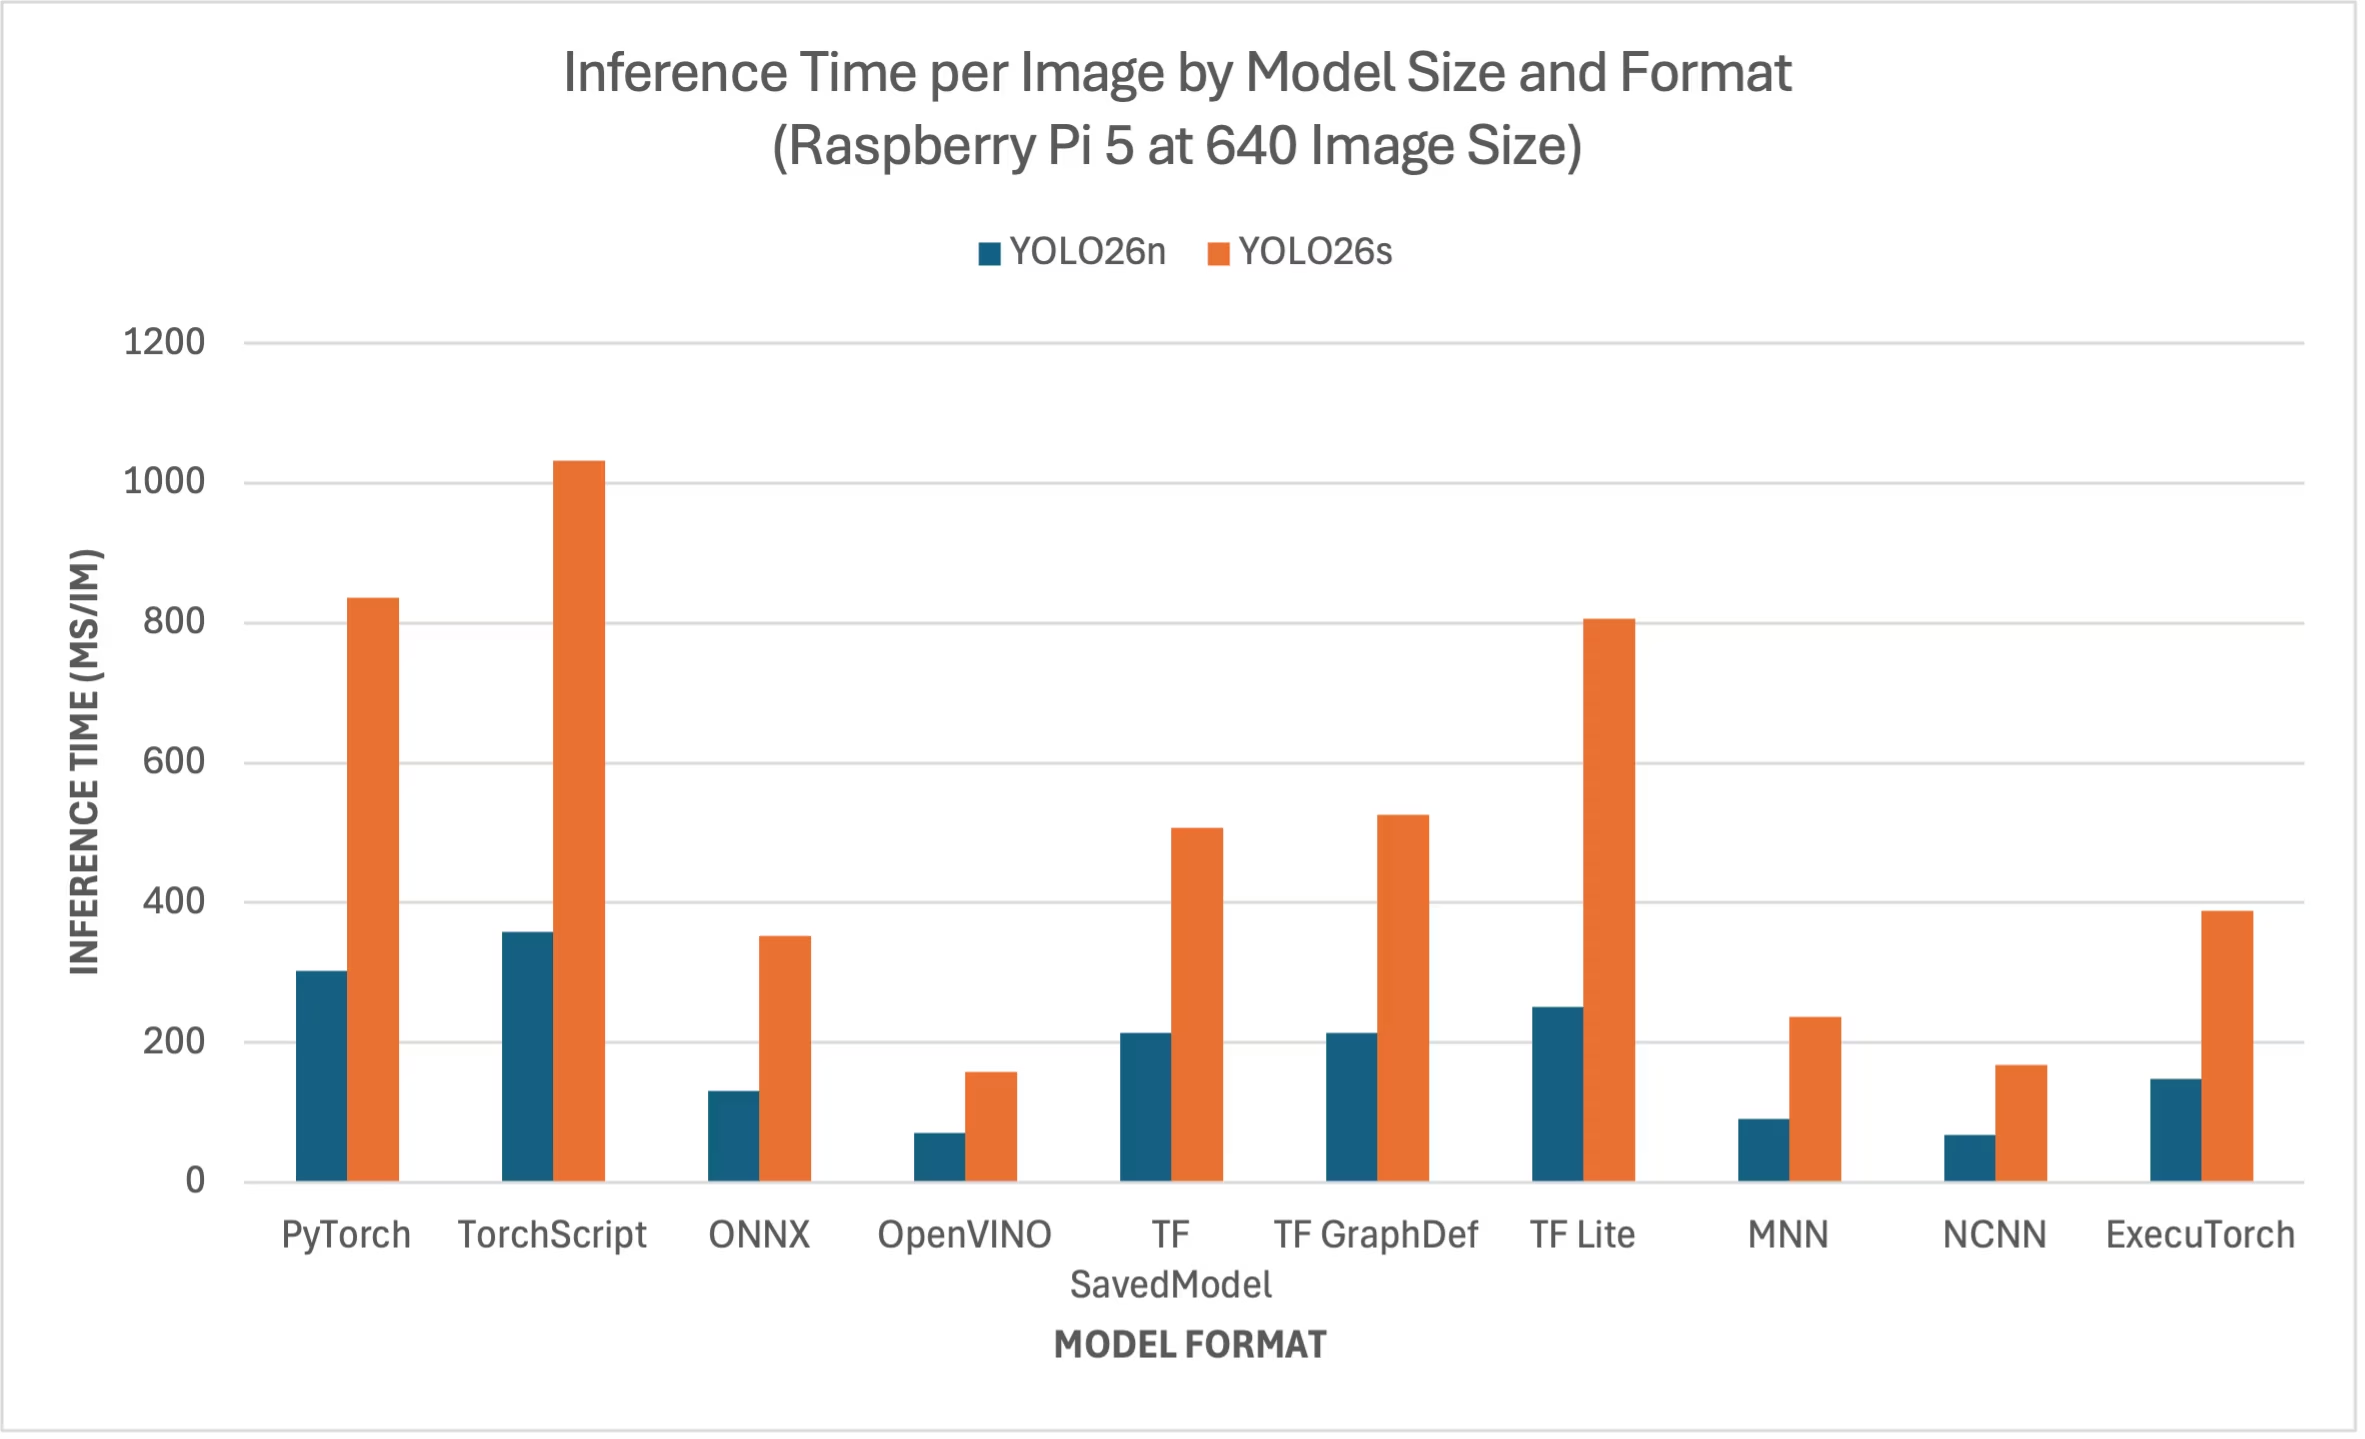
Link to this sectionRaspberry Pi 5 YOLO26 벤치마크#
YOLO26 벤치마크는 Ultralytics 팀이 10가지 다른 모델 형식(PyTorch, TorchScript, ONNX, OpenVINO, TF SavedModel, TF GraphDef, TF Lite, MNN, NCNN, ExecuTorch)에 대해 속도와 accuracy를 측정하여 수행했습니다. 벤치마크는 Raspberry Pi 5에서 기본 입력 이미지 크기 640으로 FP32 precision 환경에서 실행되었습니다.
Link to this section비교 차트#
다른 모델 크기는 Raspberry Pi에서 실행하기에 너무 크고 적절한 성능을 제공하지 않기 때문에 YOLO26n 및 YOLO26s 모델에 대한 벤치마크만 포함했습니다.
Link to this section상세 비교 표#
아래 표는 Raspberry Pi 5에서 실행되는 10가지 다른 형식(PyTorch, TorchScript, ONNX, OpenVINO, TF SavedModel, TF GraphDef, TF Lite, MNN, NCNN, ExecuTorch)에 대한 두 가지 모델(YOLO26n, YOLO26s)의 벤치마크 결과를 나타내며, 각 조합에 대한 상태, 크기, mAP50-95(B) 지표 및 추론 시간을 제공합니다.
| 형식 | 상태 | 디스크 크기 (MB) | mAP50-95(B) | 추론 시간(ms/im) |
|---|---|---|---|---|
| PyTorch | ✅ | 5.3 | 0.4798 | 302.15 |
| TorchScript | ✅ | 9.8 | 0.4764 | 357.58 |
| ONNX | ✅ | 9.5 | 0.4764 | 130.33 |
| OpenVINO | ✅ | 9.6 | 0.4818 | 70.74 |
| TF SavedModel | ✅ | 24.6 | 0.4764 | 213.58 |
| TF GraphDef | ✅ | 9.5 | 0.4764 | 213.5 |
| TF Lite | ✅ | 9.9 | 0.4764 | 251.41 |
| MNN | ✅ | 9.4 | 0.4784 | 90.89 |
| NCNN | ✅ | 9.4 | 0.4805 | 67.69 |
| ExecuTorch | ✅ | 9.4 | 0.4764 | 148.36 |
Ultralytics 8.4.1 버전으로 벤치마킹되었습니다.
추론 시간은 전처리 및 후처리 시간을 포함하지 않습니다.
Link to this section결과 재현하기#
모든 내보내기 형식에서 위의 Ultralytics 벤치마크를 재현하려면 다음 코드를 실행하십시오:
from ultralytics import YOLO

# Load a YOLO26n PyTorch model
model = YOLO("yolo26n.pt")

# Benchmark YOLO26n speed and accuracy on the COCO128 dataset for all export formats
results = model.benchmark(data="coco128.yaml", imgsz=640)
벤치마크 결과는 시스템의 정확한 하드웨어 및 소프트웨어 구성과 벤치마크 실행 시점의 시스템 부하에 따라 달라질 수 있습니다. 가장 신뢰할 수 있는 결과를 얻으려면 data='coco.yaml'(5000개의 검증 이미지)과 같이 이미지가 많은 데이터셋을 사용하십시오.
Link to this sectionRaspberry Pi 카메라 사용하기#
Raspberry Pi를 사용하여 컴퓨터 비전 프로젝트를 수행할 때는 추론을 위해 실시간 비디오 피드를 확보하는 것이 필수적일 수 있습니다. Raspberry Pi의 온보드 MIPI CSI 커넥터를 사용하면 공식 Raspberry Pi 카메라 모듈을 연결할 수 있습니다. 이 가이드에서는 Raspberry Pi Camera Module 3를 사용하여 비디오 피드를 캡처하고 YOLO26 모델을 사용하여 추론을 수행했습니다.
Raspberry Pi에서 제공하는 다양한 카메라 모듈과 Raspberry Pi 카메라 모듈 시작하기에 대해 자세히 알아보십시오.
Raspberry Pi 5는 Raspberry Pi 4보다 작은 CSI 커넥터(15핀 대 22핀)를 사용하므로 Raspberry Pi 카메라를 연결하려면 15핀-22핀 어댑터 케이블이 필요합니다.
Link to this section카메라 테스트하기#
카메라를 Raspberry Pi에 연결한 후 다음 명령어를 실행하십시오. 카메라로부터 약 5초 동안 실시간 비디오 피드가 출력되는 것을 확인할 수 있습니다.
rpicam-hello공식 Raspberry Pi 문서의 rpicam-hello 사용법에 대해 자세히 알아보십시오.
Link to this section카메라를 이용한 추론#
Raspberry Pi 카메라를 사용하여 YOLO26 모델에서 추론을 실행하는 두 가지 방법이 있습니다.
Raspberry Pi OS에 사전 설치된 picamera2를 사용하여 카메라에 액세스하고 YOLO26 모델에 대한 추론을 실행할 수 있습니다.
import cv2
from picamera2 import Picamera2

from ultralytics import YOLO

# Initialize the Picamera2
picam2 = Picamera2()
picam2.preview_configuration.main.size = (1280, 720)
picam2.preview_configuration.main.format = "RGB888"
picam2.preview_configuration.align()
picam2.configure("preview")
picam2.start()

# Load the YOLO26 model
model = YOLO("yolo26n.pt")

while True:
    # Capture frame-by-frame
    frame = picam2.capture_array()

    # Run YOLO26 inference on the frame
    results = model(frame)

    # Visualize the results on the frame
    annotated_frame = results[0].plot()

    # Display the resulting frame
    cv2.imshow("Camera", annotated_frame)

    # Break the loop if 'q' is pressed
    if cv2.waitKey(1) == ord("q"):
        break

# Release resources and close windows
cv2.destroyAllWindows()이미지/비디오 입력 유형을 변경하려면 추론 소스 문서를 확인하세요.
Link to this sectionRaspberry Pi 사용 시 모범 사례#
YOLO26을 실행하는 Raspberry Pi에서 최대 성능을 구현하기 위해 따라야 할 몇 가지 모범 사례가 있습니다.
-
SSD 사용
Raspberry Pi를 24시간 연중무휴로 계속 사용하는 경우, SD 카드는 지속적인 쓰기 작업을 견디지 못하고 고장 날 수 있으므로 시스템용 SSD를 사용하는 것이 좋습니다. Raspberry Pi 5의 온보드 PCIe 커넥터를 사용하면 이제 NVMe Base for Raspberry Pi 5와 같은 어댑터를 사용하여 SSD를 연결할 수 있습니다.
-
GUI 없이 플래싱
Raspberry Pi OS를 플래싱할 때 데스크톱 환경(Raspberry Pi OS Lite)을 설치하지 않도록 선택하면 장치의 RAM을 약간 절약하여 컴퓨터 비전 처리를 위한 공간을 더 확보할 수 있습니다.
-
Raspberry Pi 오버클럭
Raspberry Pi 5에서 Ultralytics YOLO26 모델을 실행하는 동안 성능을 약간 높이고 싶다면 CPU를 기본 2.4GHz에서 2.9GHz로, GPU를 800MHz에서 1GHz로 오버클럭할 수 있습니다. 시스템이 불안정해지거나 충돌이 발생하면 오버클럭 값을 100MHz 단위로 줄이십시오. 오버클럭은 열 발생을 증가시켜 스로틀링(thermal throttling)을 유발할 수 있으므로 적절한 냉각 장치를 갖추어야 합니다.
a. 소프트웨어 업그레이드
sudo apt update && sudo apt dist-upgradeb. 구성 파일 편집을 위해 열기
sudo nano /boot/firmware/config.txtc. 하단에 다음 줄 추가
arm_freq=3000
gpu_freq=1000
force_turbo=1
d. CTRL + X를 누른 다음 Y를 눌러 저장하고 종료한 후 ENTER를 누르십시오.
e. Raspberry Pi 재부팅
Link to this section다음 단계#
Raspberry Pi에 YOLO26을 성공적으로 설정했습니다. 더 자세한 내용을 보려면 추가 추론 옵션에 대한 예측 모드, 추가 배포 형식을 위한 내보내기 모드, 또는 에지에서 더 많은 컴퓨팅 성능이 필요한 경우 NVIDIA Jetson 가이드를 탐색해 보세요. 전체 문서를 보려면 Ultralytics YOLO26 문서를 방문하세요.
Link to this section감사의 말 및 인용#
이 가이드는 멸종 위기 종 보존을 위한 YOLO 활용에 전념하는 단체인 Kashmir World Foundation의 Daan Eeltink가 처음 작성했습니다. 객체 탐지 기술 분야에서 이들이 보여준 선구적인 작업과 교육적 초점에 감사를 표합니다.
Kashmir World Foundation의 활동에 대한 자세한 내용은 웹사이트를 방문하십시오.
Link to this sectionFAQ#
Link to this sectionDocker를 사용하지 않고 Raspberry Pi에 Ultralytics YOLO26을 어떻게 설정합니까?#
Docker 없이 Raspberry Pi에 Ultralytics YOLO26을 설정하려면 다음 단계를 따르십시오:
- 패키지 목록을 업데이트하고
pip를 설치하십시오:sudo apt update sudo apt install python3-pip -y pip install -U pip - 선택적 종속성과 함께 Ultralytics 패키지를 설치하십시오:
pip install ultralytics[export] - 변경 사항을 적용하려면 장치를 재부팅하십시오:
sudo reboot
자세한 지침은 Docker 없이 시작하기 섹션을 참조하십시오.
Link to this sectionAI 작업을 위해 Raspberry Pi에서 Ultralytics YOLO26의 NCNN 형식을 사용해야 하는 이유는 무엇입니까?#
Ultralytics YOLO26의 NCNN 형식은 모바일 및 임베디드 플랫폼에 최적화되어 있어 Raspberry Pi 기기에서 AI 작업을 실행하는 데 이상적입니다. NCNN은 ARM 아키텍처를 활용하여 추론 성능을 극대화하며 다른 형식에 비해 더 빠르고 효율적인 처리를 제공합니다. 지원되는 내보내기 형식에 대한 자세한 내용은 모델 내보내기 옵션을 참조하세요.
Link to this sectionRaspberry Pi에서 사용하기 위해 YOLO26 모델을 NCNN 형식으로 어떻게 변환합니까?#
Python 또는 CLI 명령을 사용하여 PyTorch YOLO26 모델을 NCNN 형식으로 변환할 수 있습니다:
from ultralytics import YOLO

# Load a YOLO26n PyTorch model
model = YOLO("yolo26n.pt")

# Export the model to NCNN format
model.export(format="ncnn")  # creates 'yolo26n_ncnn_model'

# Load the exported NCNN model
ncnn_model = YOLO("yolo26n_ncnn_model")

# Run inference
results = ncnn_model("https://ultralytics.com/images/bus.jpg")
자세한 내용은 Raspberry Pi에서 NCNN 사용 섹션을 참조하십시오.
Link to this sectionYOLO26 실행과 관련하여 Raspberry Pi 4와 Raspberry Pi 5의 하드웨어 차이점은 무엇입니까?#
주요 차이점은 다음과 같습니다:
- CPU: Raspberry Pi 4는 Broadcom BCM2711, Cortex-A72 64비트 SoC를 사용하는 반면, Raspberry Pi 5는 Broadcom BCM2712, Cortex-A76 64비트 SoC를 사용합니다.
- 최대 CPU 주파수: Raspberry Pi 4의 최대 주파수는 1.8GHz인 반면, Raspberry Pi 5는 2.4GHz에 도달합니다.
- 메모리: Raspberry Pi 4는 최대 8GB의 LPDDR4-3200 SDRAM을 제공하며, Raspberry Pi 5는 4GB 및 8GB 모델로 제공되는 LPDDR4X-4267 SDRAM을 특징으로 합니다.
이러한 개선 사항은 Raspberry Pi 4와 비교했을 때 Raspberry Pi 5에서 YOLO26 모델의 더 나은 성능 벤치마크를 도출합니다. 자세한 내용은 Raspberry Pi 시리즈 비교 표를 참조하십시오.
Link to this sectionUltralytics YOLO26과 함께 작동하도록 Raspberry Pi 카메라 모듈을 어떻게 설정합니까?#
YOLO26 추론을 위해 Raspberry Pi 카메라를 설정하는 두 가지 방법이 있습니다:
-
picamera2사용:import cv2 from picamera2 import Picamera2 from ultralytics import YOLO picam2 = Picamera2() picam2.preview_configuration.main.size = (1280, 720) picam2.preview_configuration.main.format = "RGB888" picam2.preview_configuration.align() picam2.configure("preview") picam2.start() model = YOLO("yolo26n.pt") while True: frame = picam2.capture_array() results = model(frame) annotated_frame = results[0].plot() cv2.imshow("Camera", annotated_frame) if cv2.waitKey(1) == ord("q"): break cv2.destroyAllWindows() -
TCP 스트림 사용:
rpicam-vid -n -t 0 --inline --listen -o tcp://127.0.0.1:8888from ultralytics import YOLO model = YOLO("yolo26n.pt") results = model("tcp://127.0.0.1:8888")
자세한 설정 지침은 카메라를 사용한 추론 섹션을 방문하십시오.