세그먼트 애니씽 모델(SAM)

Meta의 세그먼트 애니씽 모델(SAM)은 프롬프트 기반 이미지 분할을 도입했습니다. 점, 박스 또는 마스크 프롬프트를 입력하면 지정된 객체의 마스크를 반환하며, 경량 디코더를 사용해 인터랙티브한 작업에 충분히 빠르게 처리합니다.
SAM 소개: 세그먼트 애니씽 모델#
세그먼트 애니씽 모델(SAM)은 다양한 이미지 분석 작업에 걸쳐 프롬프트 기반 분할을 수행하도록 설계된 이미지 분할 모델입니다. SAM은 새로운 모델, 작업 및 이미지 분할 데이터셋을 소개한 Meta의 세그먼트 애니씽 프로젝트의 핵심입니다.
SAM은 사전 지식 없이 새로운 이미지 분포와 작업에 적응할 수 있도록 설계되어 있으며, 이러한 기능을 제로샷 전이라고 합니다. 1,100만 개의 선별된 이미지에 걸쳐 10억 개가 넘는 마스크를 포함하는 SA-1B 데이터셋으로 학습된 SAM은 우수한 제로샷 성능을 보이며, 기존의 완전 지도 학습 결과와 대등하거나 이를 능가하는 경우가 많습니다.
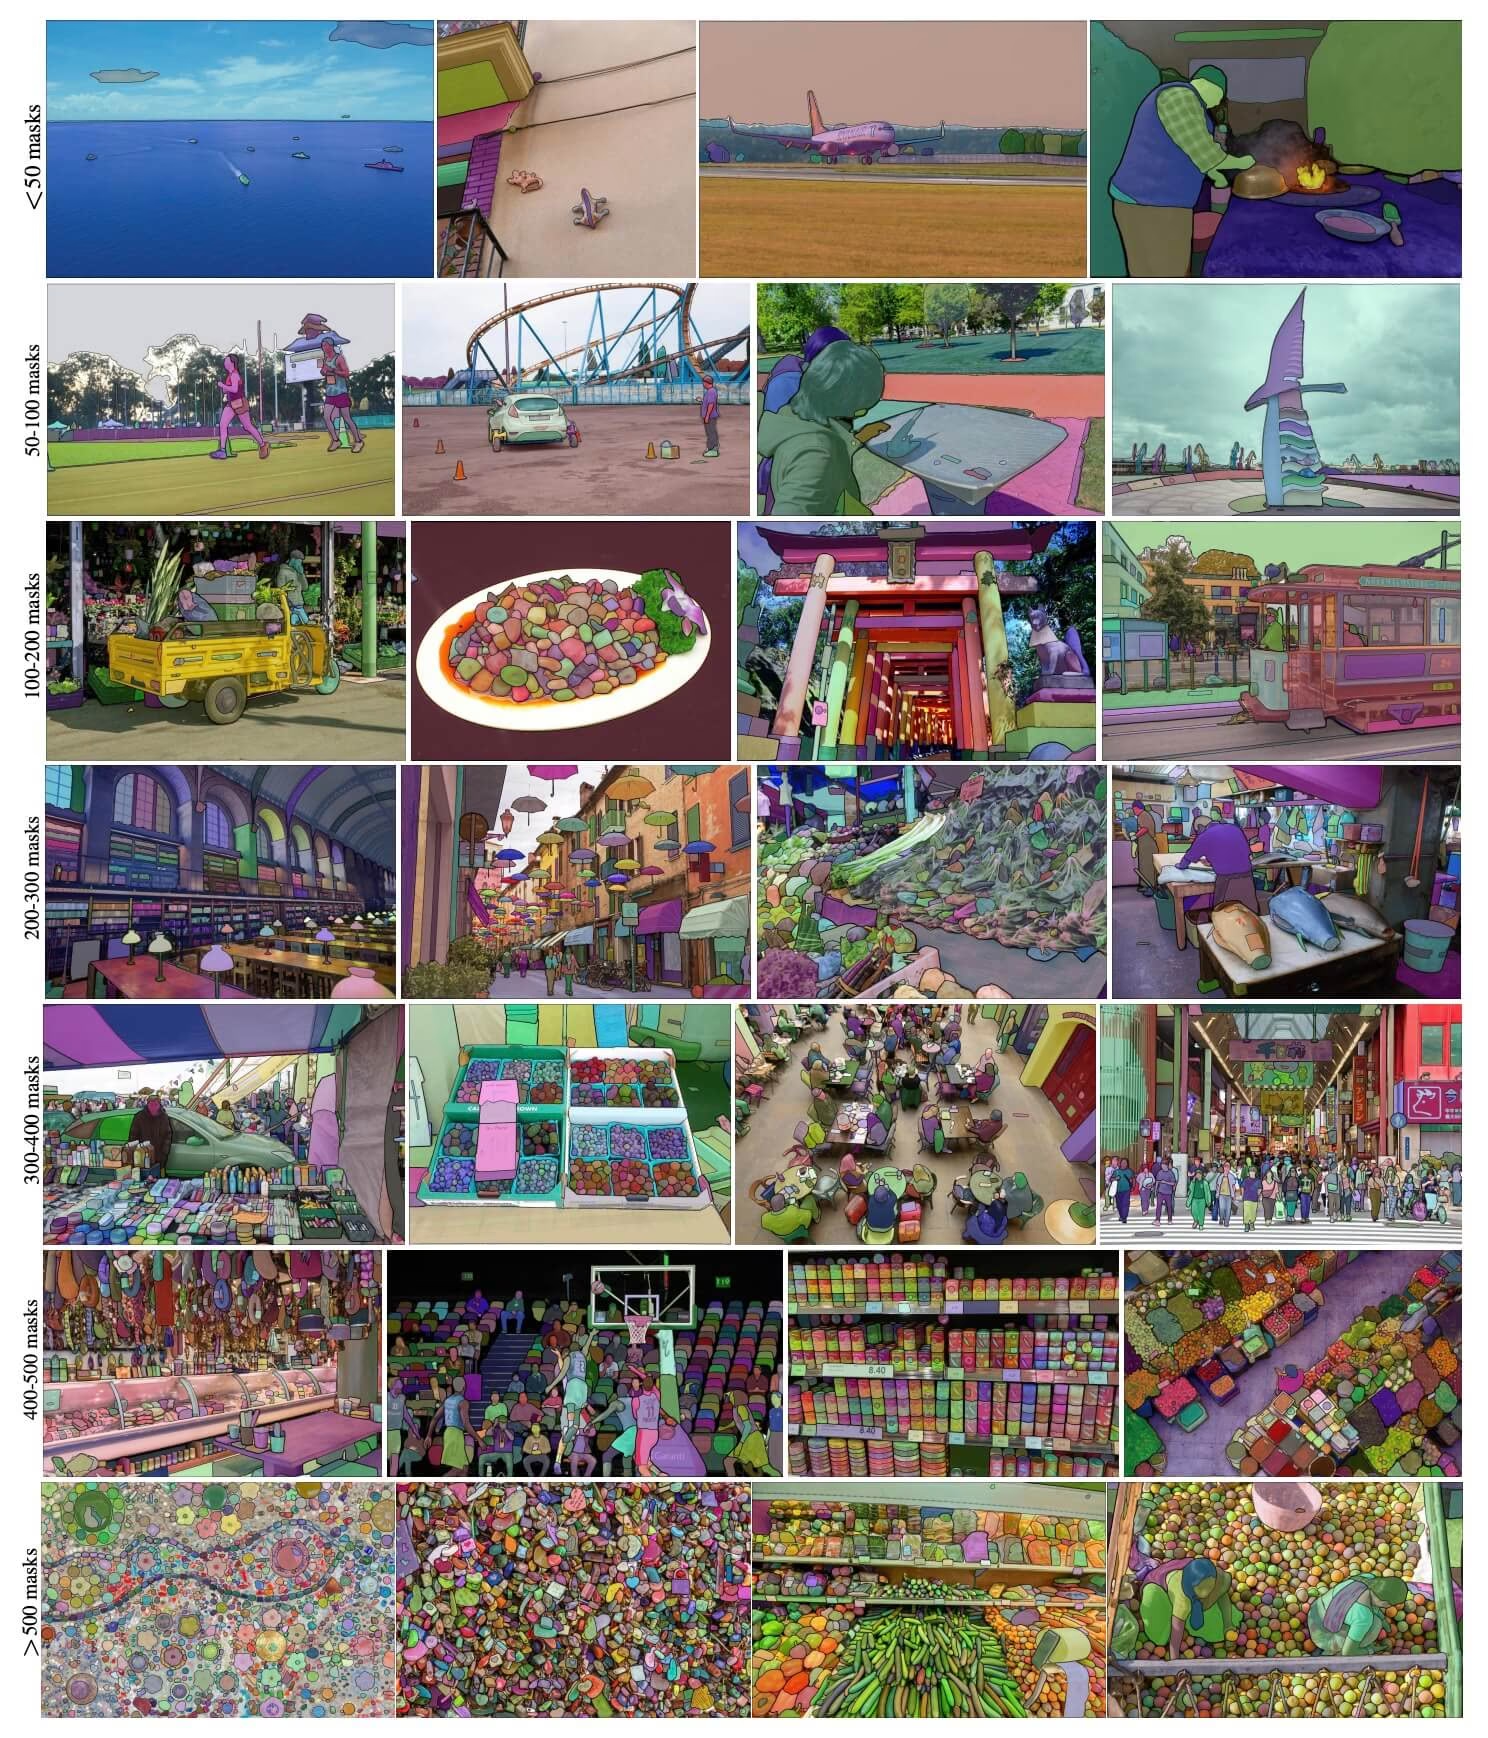 SA-1B 예시 이미지. SA-1B 데이터셋의 마스크가 오버레이된 이미지입니다. SA-1B에는 다양하고 고해상도이며 라이선스가 부여되고 개인정보를 보호하는 이미지 1,100만 개와 고품질 분할 마스크 11억 개가 포함되어 있습니다. 이 마스크는 모두 SAM이 자동으로 어노테이션했으며, 사람의 평가와 수많은 실험을 통해 높은 품질과 다양성을 갖춘 것으로 확인되었습니다. 시각화를 위해 이미지당 마스크 개수에 따라 이미지가 그룹화되어 있습니다(이미지당 평균 마스크 수는 약 100개입니다).
세그먼트 애니씽 모델(SAM)의 주요 기능#
- 프롬프트 기반 세그멘테이션 작업: SAM은 프롬프트 기반 세그멘테이션 작업을 염두에 두고 설계되었으며, 객체를 식별하는 공간 정보나 텍스트 단서 등 주어진 프롬프트에 따라 유효한 세그멘테이션 마스크를 생성할 수 있습니다.
- 고급 아키텍처: 세그먼트 애니씽 모델은 대형 이미지 인코더, 프롬프트 인코더 및 경량 마스크 디코더를 사용합니다. 이 아키텍처는 분할 작업에서 유연한 프롬프트 입력, 실시간 마스크 계산 및 모호성 인식을 지원합니다.
- SA-1B 데이터셋: 세그먼트 애니씽 프로젝트에서 소개한 SA-1B 데이터셋에는 1,100만 개의 이미지에 걸쳐 10억 개가 넘는 마스크가 포함되어 있습니다. 출시 당시 최대 규모의 분할 데이터셋이었던 SA-1B는 SAM에 다양하고 대규모인 학습 데이터 소스를 제공합니다.
- 제로샷 성능: SAM은 다양한 분할 작업에서 우수한 제로샷 성능을 보여, 프롬프트 엔지니어링을 최소화하면서 다양한 애플리케이션에 바로 사용할 수 있는 도구입니다.
세그먼트 애니씽 모델과 SA-1B 데이터셋을 자세히 알아보려면 Segment Anything GitHub를 방문하고 연구 논문 Segment Anything을 확인하세요.
SAM 계열 모델(SAM 2.1, SAM 3 및 SAM 3.1)은 Ultralytics Platform의 스마트 어노테이션 기능을 구동하여, 클릭 기반 마스킹으로 데이터셋에 빠르게 레이블을 지정할 수 있도록 합니다.
사용 가능한 모델, 지원 작업 및 작동 모드#
이 표에는 사용 가능한 모델, 각 모델의 사전 학습된 가중치, 지원 작업 및 학습, 검증, 추론, 내보내기와 같은 다양한 작동 모드와의 호환성이 나와 있습니다. 지원되는 모드는 ✅로, 지원되지 않는 모드는 ❌로 표시됩니다.
SAM 사용 방법: 이미지 세그멘테이션의 유연성과 강력한 기능#
세그먼트 애니씽 모델은 학습 데이터 외에도 에지 검출, 객체 제안 생성, 인스턴스 분할, 초기 텍스트-마스크 예측 등 다양한 다운스트림 작업에 사용할 수 있습니다. 프롬프트 엔지니어링을 통해 SAM은 새로운 작업과 데이터 분포에 제로샷 방식으로 적응할 수 있습니다.
SAM 예측 예시#
주어진 프롬프트를 사용해 이미지를 세그먼트 분할합니다.
from ultralytics import SAM

# 모델 로드
model = SAM("sam_b.pt")

# 모델 정보 표시(선택 사항)
model.info()

# bboxes 프롬프트로 추론 실행
results = model("ultralytics/assets/zidane.jpg", bboxes=[439, 437, 524, 709])

# 단일 점으로 추론 실행
results = model(points=[900, 370], labels=[1])

# 여러 점으로 추론 실행
results = model(points=[[400, 370], [900, 370]], labels=[1, 1])

# 객체마다 여러 점 프롬프트로 추론 실행
results = model(points=[[[400, 370], [900, 370]]], labels=[[1, 1]])

# 음수 점 프롬프트로 추론 실행
results = model(points=[[[400, 370], [900, 370]]], labels=[[1, 0]])이미지 전체를 세그먼트 분할합니다.
from ultralytics import SAM

# 모델 로드
model = SAM("sam_b.pt")

# 모델 정보 표시(선택 사항)
model.info()

# 추론 실행
model("path/to/image.jpg")- 프롬프트(bbox/점/마스크)를 전달하지 않으면 SAM은 이미지 전체를 분할합니다.
이미지를 한 번 설정한 다음, 이미지 인코더를 다시 실행하지 않고 여러 차례 프롬프트 추론을 수행할 수 있습니다.
import cv2

from ultralytics.models.sam import Predictor as SAMPredictor

# SAMPredictor 생성
overrides = {"conf": 0.25, "task": "segment", "mode": "predict", "imgsz": 1024, "model": "mobile_sam.pt"}
predictor = SAMPredictor(overrides=overrides)

# 이미지를 설정합니다.
predictor.set_image("ultralytics/assets/zidane.jpg")  # 이미지 파일로 설정
predictor.set_image(cv2.imread("ultralytics/assets/zidane.jpg"))  # np.ndarray로 설정
results = predictor(bboxes=[439, 437, 524, 709])

# 단일 포인트 프롬프트로 추론 실행
results = predictor(points=[900, 370], labels=[1])

# 여러 포인트 프롬프트로 추론 실행
results = predictor(points=[[400, 370], [900, 370]], labels=[1, 1])

# 음수 점 프롬프트로 추론 실행
results = predictor(points=[[[400, 370], [900, 370]]], labels=[[1, 0]])

# 이미지 초기화
predictor.reset_image()
추가 인수로 모든 영역을 세그먼트 분할합니다.
from ultralytics.models.sam import Predictor as SAMPredictor

# SAMPredictor 생성
overrides = {"conf": 0.25, "task": "segment", "mode": "predict", "imgsz": 1024, "model": "mobile_sam.pt"}
predictor = SAMPredictor(overrides=overrides)

# 추가 인수로 세그먼트 분할
results = predictor(source="ultralytics/assets/zidane.jpg", crop_n_layers=1, points_stride=64, min_mask_region_area=100)위 예시에서 반환된 모든 results은 예측된 마스크와 원본 이미지에 액세스할 수 있는 Results 객체입니다.
Segment everything인수에 대한 자세한 내용은Predictor/generate참조를 확인하세요.
SAM과 YOLO 비교#
여기에서는 Meta의 SAM-b 모델을 YOLO26을 포함한 Ultralytics 분할 모델과 비교합니다:
| 모델 | 크기 (MB) | 매개변수 (M) | 속도(CPU) (ms/im) |
|---|---|---|---|
| Meta SAM-b | 375 | 93.7 | 41703 |
| MobileSAM | 40.7 | 10.1 | 23802 |
| FastSAM-s와 YOLOv8 백본 | 23.9 | 11.8 | 58.0 |
| Ultralytics YOLOv8n-seg | 7.1 (52.8배 더 작음) | 3.4 (27.6배 더 적음) | 24.8 (1682배 더 빠름) |
| Ultralytics YOLO11n-seg | 6.2 (60.5배 더 작음) | 2.9 (32.3배 더 적음) | 24.3 (1716배 더 빠름) |
| Ultralytics YOLO26n-seg | 6.7 (56.0배 더 작음) | 2.7 (34.7배 더 적음) | 25.2 (1655배 더 빠름) |
이 비교는 SAM 변형 모델과 YOLO 세그멘테이션 모델 간 모델 크기와 속도의 상당한 차이를 보여줍니다. SAM은 고유한 자동 세그멘테이션 기능을 제공하지만, 특히 YOLOv8n-seg, YOLO11n-seg, YOLO26n-seg와 같은 YOLO 모델은 크기가 훨씬 작고 속도가 빠르며 연산 효율성이 더 높습니다.
SAM 속도는 PyTorch로 측정했으며, YOLO 속도는 ONNX Runtime으로 측정했습니다. 테스트는 16GB RAM을 탑재한 2025년형 Apple M4 Air에서 torch==2.10.0, ultralytics==8.4.31, onnxruntime==1.24.4를 사용해 실행했습니다. 이 테스트를 재현하려면 다음을 수행합니다:
from ultralytics import ASSETS, SAM, YOLO, FastSAM

# SAM-b, MobileSAM 프로파일링
for file in ["sam_b.pt", "mobile_sam.pt"]:
    model = SAM(file)
    model.info()
    model(ASSETS)

# FastSAM-s 프로파일링
model = FastSAM("FastSAM-s.pt")
model.info()
model(ASSETS)

# YOLO 모델 프로파일링(ONNX)
for file_name in ["yolov8n-seg.pt", "yolo11n-seg.pt", "yolo26n-seg.pt"]:
    model = YOLO(file_name)
    model.info()
    onnx_path = model.export(format="onnx", dynamic=True, nms=False)  # YOLO26 NMS 없는 헤드; YOLOv8/YOLO11에서는 작동하지 않음
    model = YOLO(onnx_path)
    model(ASSETS)
자동 주석: 세그멘테이션 데이터셋을 빠르게 구축하는 방법#
자동 어노테이션은 SAM의 핵심 기능으로, 사전 학습된 검출 모델을 사용해 분할 데이터셋을 생성할 수 있습니다. 이 기능을 사용하면 시간이 많이 드는 수동 레이블 지정 없이도 대량의 이미지에 빠르게 어노테이션할 수 있습니다.
탐지 모델을 사용해 세그멘테이션 데이터셋 생성하기#
Ultralytics 프레임워크를 사용해 데이터셋에 자동으로 어노테이션하려면, YOLO26x와 같은 검출기를 SAM과 결합하는 auto_annotate 함수를 사용하세요:
from ultralytics.data.annotator import auto_annotate

auto_annotate(data="path/to/images", det_model="yolo26x.pt", sam_model="sam_b.pt")| 인수 | 유형 | 기본값 | 설명 |
|---|---|---|---|
data | str | 필수 | 어노테이션 또는 세분화 대상 이미지가 포함된 디렉터리 경로입니다. |
det_model | str | 'yolo26x.pt' | 초기 객체 탐지를 위한 YOLO 탐지 모델 경로입니다. |
sam_model | str | 'sam_b.pt' | 세분화를 위한 SAM 모델 경로입니다(SAM, SAM 2, MobileSAM 및 SAM 3 가중치 지원). |
device | str | '' | 연산 장치입니다(예: 'cuda:0', 'cpu' 또는 자동 장치 감지를 위한 ''). |
conf | float | 0.25 | 약한 탐지를 필터링하기 위한 YOLO 탐지 신뢰도 임계값입니다. |
iou | float | 0.5 | 겹치는 박스를 필터링하기 위한 비최대 억제의 IoU 임계값입니다. |
imgsz | int | 640 | 이미지 크기 조정에 사용할 입력 크기입니다(필요한 경우 32의 배수로 올림). |
max_det | int | 300 | 메모리 효율성을 위한 이미지당 최대 탐지 수입니다. |
classes | list[int] | None | 탐지할 클래스 인덱스 목록입니다(예: 사람 및 자전거의 경우 [0, 1]). |
output_dir | str | None | 어노테이션 저장 디렉터리입니다(기본값: 동일한 상위 디렉터리의 <data>_auto_annotate_labels). |
auto_annotate 함수에는 이미지 경로를 지정하며, 사전 학습된 탐지 모델과 SAM 세그멘테이션 모델, 모델을 실행할 디바이스, 주석 결과를 저장할 출력 디렉터리를 지정하는 선택적 인수도 사용할 수 있습니다.
사전 학습된 모델을 사용한 자동 어노테이션은 분할 데이터셋 생성에 필요한 시간과 노력을 크게 줄여 줍니다. 대량의 이미지 컬렉션을 보유한 팀은 수동 어노테이션 대신 모델 개발과 평가에 집중할 수 있습니다.
인용 및 감사의 글#
연구 또는 개발 작업에서 SAM이 유용하다면 논문을 인용해 주시기 바랍니다.
@misc{kirillov2023segment,
      title={Segment Anything},
      author={Alexander Kirillov and Eric Mintun and Nikhila Ravi and Hanzi Mao and Chloe Rolland and Laura Gustafson and Tete Xiao and Spencer Whitehead and Alexander C. Berg and Wan-Yen Lo and Piotr Dollár and Ross Girshick},
      year={2023},
      eprint={2304.02643},
      archivePrefix={arXiv},
      primaryClass={cs.CV}
}
컴퓨터 비전 커뮤니티를 위해 이 귀중한 리소스를 만들고 유지 관리해 주신 Meta AI에 감사의 뜻을 전합니다.
자주 묻는 질문#
Meta의 세그먼트 애니씽 모델(SAM)은 프롬프트 기반 분할 작업을 위해 설계된 이미지 분할 모델입니다. 이미지 및 프롬프트 인코더와 경량 마스크 디코더를 결합해 점, 박스 또는 마스크와 같은 프롬프트로부터 분할 마스크를 생성합니다. SA-1B 데이터셋으로 학습된 SAM은 사전 지식 없이도 새로운 이미지 분포와 작업에 적응하며 제로샷에서 우수한 성능을 발휘합니다.
바운딩 박스나 포인트와 같은 다양한 프롬프트로 추론을 실행해 이미지 세그멘테이션에 세그먼트 애니씽 모델(SAM)을 사용할 수 있습니다. 다음은 Python을 사용하는 예시입니다.
from ultralytics import SAM

# 모델 로드
model = SAM("sam_b.pt")

# 바운딩 박스 프롬프트로 세분화
model("ultralytics/assets/zidane.jpg", bboxes=[439, 437, 524, 709])

# 포인트 프롬프트로 세그먼트 분할
model("ultralytics/assets/zidane.jpg", points=[900, 370], labels=[1])

# 여러 포인트 프롬프트로 세그먼트 분할
model("ultralytics/assets/zidane.jpg", points=[[400, 370], [900, 370]], labels=[1, 1])

# 객체별로 여러 포인트 프롬프트를 사용해 세그먼트 분할
model("ultralytics/assets/zidane.jpg", points=[[[400, 370], [900, 370]]], labels=[[1, 1]])

# 음수 포인트 프롬프트로 세그먼트 분할.
model("ultralytics/assets/zidane.jpg", points=[[[400, 370], [900, 370]]], labels=[[1, 0]])
또는 명령줄 인터페이스(CLI)에서 SAM을 사용해 추론을 실행할 수 있습니다.
yolo predict model=sam_b.pt source=path/to/image.jpgYOLO 모델과 비교하면 SAM-b, MobileSAM, FastSAM-s와 같은 SAM 변형 모델은 일반적으로 더 크고 느리지만, 고유한 제로샷 세그멘테이션 기능을 제공합니다. 예를 들어 YOLO26n-seg은 CPU에서 Meta의 오리지널 SAM-b 모델보다 56배 더 작고 1650배 이상 빠릅니다. 따라서 YOLO 모델은 빠르고 경량이며 계산 효율성이 높은 세그멘테이션이 필요한 애플리케이션에 적합하고, SAM 모델은 유연하고 프롬프트 기반이며 제로샷 방식의 세그멘테이션 작업에 강점을 보입니다.
Ultralytics의 SAM에는 사전 학습된 탐지 모델을 사용해 세그멘테이션 데이터셋을 생성하는 자동 주석 기능이 있습니다. 다음은 Python 예시입니다.
from ultralytics.data.annotator import auto_annotate

auto_annotate(data="path/to/images", det_model="yolo26x.pt", sam_model="sam_b.pt")
이 함수에는 이미지 경로와 사전 학습된 탐지 모델 및 SAM 세그멘테이션 모델을 위한 선택적 인수를 지정하며, 디바이스와 출력 디렉터리도 설정할 수 있습니다. 전체 가이드는 자동 주석을 참조하세요.
SAM은 1,100만 개 이미지에 걸쳐 10억 개 이상의 마스크를 포함하는 SA-1B 데이터셋으로 학습됩니다. SA-1B는 출시 당시 최대 규모의 분할 데이터셋으로, 분할 작업 전반에 걸친 SAM의 제로샷 성능을 뒷받침하는 고품질의 다양한 학습 데이터를 제공합니다.


댓글27
질문을 하거나 결과를 공유하거나 다른 사람을 도와주세요.
kh-diab
can we use SAM to process labeled images with bounding box to segment the object inside the box and generate new labels files like yolo or coco format if yes how please
1 Paula DerrengerUltralytics
Yes, you can use SAM to process labeled images with bounding boxes to segment the objects inside and generate new label files in formats like YOLO or COCO. You can achieve this by using the
auto_annotatefunction in the Ultralytics framework. This function allows you to auto-annotate your dataset using a pre-trained detection model and SAM for segmentation. For more details, you can refer to the Segment Anything Model documentation. If you need further assistance, feel free to ask!Hello @pderrenger
Thanks I tried to run the below but I face error all the time
import os import cv2 import numpy as np from ultralytics import SAM
Load the SAM model
model = SAM("sam_b.pt") # Update the model path if needed
Function to load YOLO annotations
def load_yolo_annotations(annotation_path, image_width, image_height): bboxes = [] try: with open(annotation_path, 'r') as file: lines = file.readlines() for line in lines: parts = line.strip().split() class_id = int(parts[0]) x_center = float(parts[1]) * image_width y_center = float(parts[2]) * image_height width = float(parts[3]) * image_width height = float(parts[4]) * image_height x = x_center - width / 2 y = y_center - height / 2 bboxes.append((x, y, x + width, y + height)) # Update to [x1, y1, x2, y2] except Exception as e: print(f"Error reading annotation file {annotation_path}: {e}") return bboxes
Paths
images_folder = r'E:\MSc\tesi\20210901_Herrenpuent_Taenikon_Matrice_300_15m_1.6m_s\500 D' annotations_folder = r'C:\Users\Khaled\OneDrive - OST\Study Material\Msc Thesis\dataset\Group D yolo format\obj_train_data' output_folder = r'C:\Users\Khaled\OneDrive - OST\Study Material\Msc Thesis\dataset\test output sam'
if not os.path.exists(output_folder): os.makedirs(output_folder)
Process each image and its corresponding annotation
total_images = len(os.listdir(images_folder)) processed_images = 0
for image_filename in os.listdir(images_folder): if image_filename.endswith(('.JPG', '.jpg', '.png')): image_path = os.path.join(images_folder, image_filename) annotation_path = os.path.join(annotations_folder, image_filename.replace('.JPG', '.txt').replace('.jpg', '.txt').replace('.png', '.txt'))
    print(f"Processing {image_filename}...")

    # Check if annotation file exists
    if not os.path.exists(annotation_path):
        print(f"Annotation file not found for {image_filename}")
        continue

    # Load the image
    image = cv2.imread(image_path)
    if image is None:
        print(f"Failed to load image {image_path}")
        continue

    image_rgb = cv2.cvtColor(image, cv2.COLOR_BGR2RGB)
    height, width, _ = image.shape

    # Load YOLO annotations
    bboxes = load_yolo_annotations(annotation_path, width, height)
    if not bboxes:
        print(f"No bounding boxes found in {annotation_path}")
        continue

    # Perform segmentation using SAM model
    results = model(image_rgb, bboxes=bboxes)

    for idx, result in enumerate(results):
        if hasattr(result, 'masks') and result.masks is not None:
            masks = result.masks.cpu().numpy()  # Convert to numpy array
            for m_idx, mask in enumerate(masks):
                chw_mask = mask.astype(np.uint8)  # Ensure mask is in uint8 format
                hwc_mask = np.transpose(chw_mask, (1, 2, 0))  # Convert CHW to HWC
                contours, _ = cv2.findContours(hwc_mask, cv2.RETR_EXTERNAL, cv2.CHAIN_APPROX_SIMPLE)

                segmented_image = cv2.bitwise_and(image, image, mask=hwc_mask)

                # Save the segmented image
                output_path = os.path.join(output_folder, image_filename.replace('.JPG', f'_segmented_{idx}_{m_idx}.jpg').replace('.jpg', f'_segmented_{idx}_{m_idx}.jpg').replace('.png', f'_segmented_{idx}_{m_idx}.png'))
                cv2.imwrite(output_path, segmented_image)
                print(f"Saved segmented image to {output_path}")

    processed_images += 1
    print(f"Processed {processed_images}/{total_images} images.")
print("Processing completed.")
error is
AttributeError: 'Masks' object has no attribute 'astype'. See valid attributes below.
A class for storing and manipulating detection masks.

    xy (list): A list of segments in pixel coordinates.
    xyn (list): A list of normalized segments.

Methods:
    cpu(): Returns the masks tensor on CPU memory.
    numpy(): Returns the masks tensor as a numpy array.
    cuda(): Returns the masks tensor on GPU memory.
    to(device, dtype): Returns the masks tensor with the specified device and dtype.
PS C:\Users\Khaled> & C:/MSc_Workspace/anaconda3/envs/GenEnv/python.exe "c:/Users/Khaled/OneDrive - OST/Study Material/Msc Thesis/coding/sam segment.py" Processing DJI_20210901122818_0695.JPG...
0: 1024x1024 67330.4ms Speed: 48.0ms preprocess, 67330.4ms inference, 8095.5ms postprocess per image at shape (1, 3, 1024, 1024) Traceback (most recent call last): File "c:\Users\Khaled\OneDrive - OST\Study Material\Msc Thesis\coding\sam segment.py", line 75, in chw_mask = mask.astype(np.uint8) # Ensure mask is in uint8 format File "C:\MSc_Workspace\anaconda3\envs\GenEnv\lib\site-packages\ultralytics\utils_init_.py", line 162, in getattr raise AttributeError(f"'{name}' object has no attribute '{attr}'. See valid attributes below.\n{self.doc}") AttributeError: 'Masks' object has no attribute 'astype'. See valid attributes below.
A class for storing and manipulating detection masks.

Attributes:
    xy (list): A list of segments in pixel coordinates.
    xyn (list): A list of normalized segments.

Methods:
    cpu(): Returns the masks tensor on CPU memory.
    numpy(): Returns the masks tensor as a numpy array.
    cuda(): Returns the masks tensor on GPU memory.
    to(device, dtype): Returns the masks tensor with the specified device and dtype.
do you have idea how to solve it thanks
evans rojas
Hola me gustaría usar SAM para clasificar vegetación a partir de una imagen. ¿Qué recomendaciones me sugieren?
- Paula DerrengerUltralytics
Hola, Evans. SAM puede ayudarte a delimitar la vegetación, pero el SAM original no identifica por sí solo especies ni tipos de cobertura. Te sugiero comenzar con puntos positivos sobre la vegetación y negativos sobre el fondo, revisar las máscaras y asignarles tus clases manualmente. Si buscas automatizar la clasificación en más imágenes, puedes usar esas anotaciones para entrenar un modelo de segmentación por instancias para plantas individuales o de segmentación semántica para coberturas del terreno. ¿Quieres separar vegetación del fondo o distinguir especies, y trabajas con fotografías terrestres, de dron o satelitales?
meenakshi71
I've been trying to export the SAM model (which i had trained on my custom dataset) into ONNX but the output is always wrong. It is just generating a grid instead of a proper segmentation mask every time even after providing multiple kinds of prompts.
 Glenn JocherUltralytics
@meenakshi71 it seems the issue may stem from the export process or configuration. Ensure you are using the correct export parameters and supported formats. SAM models are primarily designed for real-time inference and not all functionalities may transfer seamlessly to ONNX. Refer to the SAM export documentation for guidance. If the problem persists, consider testing the ONNX model with simpler prompts to isolate the issue.
MeenakshiKK236
Why are my segmentation results being automatically saved into this directory while using the SAM model to perform segmentation on my custom dataset? "Results saved to runs/segment/predict4"
- Glenn JocherUltralytics
@MeenakshiKK236 the results are saved to the
runs/segment/predict4directory by default. You can change the save directory by specifying theprojectandnamearguments in your command. For more details, please refer to the SAM documentation.
NasserAlqeifi
Correct me if I'm wrong, when I use the auto_annotate function I will only get labels for my dataset with the classes in Yolo pre-trained? What if I need classes that are not available within Yolo? For example, I want to get a label for the road, and this is not available in any version of Yolo, but it is available in SAM?
- Glenn JocherUltralytics
@NasserAlqeifi you are correct. The
auto_annotatefunction uses YOLO's pre-trained classes for labeling. If you need classes not available in YOLO, like "road," you can use SAM directly for segmentation. For more details, please refer to the Segment Anything Model documentation. - Glenn JocherUltralytics
@NasserAlqeifi but also remember SAM identifies segments but not classes, so it may find a sign or a road, but it won't be able to assign a class to them by itself.
Thank you for your quick response. Indeed, I tried to use SAM directly and found that it does not save the class names in the name, but the class number.
from ultralytics import SAM
Load a model
model = SAM("sam2_l.pt")
Predict results
results = model.predict(source=r"/testSAM/image.png", stream=True, bboxes=None, points=None, labels=None, show=False)
Iterate over results, print names, and save each result to a file
for i, result in enumerate(results): # Print the names detected in the result print(f"Result {i}: Detected Names - {result.names}")
# Save the result as an image file
result.save(f"output_{i}.jpg")
------------- output ---------
image 1/1 /testSAM/image.png: 1024x1024 1 0, 1 1, 1 2, 1 3, 1 4, 1 5, 1 6, 1 7, 1 8, 1 9, 1 10, 1 11, 1 12, 1 13, 1 14, 1 15, 1 16, 1 17, 1 18, 1 19, 1 20, 1 21, 1 22, 1 23, 1 24, 1 25, 1 26, 1 27, 1 28, 1 29, 1 30, 1 31, 1 32, 23758.2ms Result 0: Detected Names - {0: '0', 1: '1', 2: '2', 3: '3', 4: '4', 5: '5', 6: '6', 7: '7', 8: '8', 9: '9', 10: '10', 11: '11', 12: '12', 13: '13', 14: '14', 15: '15', 16: '16', 17: '17', 18: '18', 19: '19', 20: '20', 21: '21', 22: '22', 23: '23', 24: '24', 25: '25', 26: '26', 27: '27', 28: '28', 29: '29', 30: '30', 31: '31', 32: '32'} Speed: 20.3ms preprocess, 23758.2ms inference, 7.1ms postprocess per image at shape (1, 3, 1024, 1024)
- Glenn JocherUltralytics
Thank you for your feedback. Currently, SAM does not assign class names, only class numbers. If you need specific class names, you may need to implement a custom mapping or post-processing step to assign the desired class names based on your requirements.
dreambit
I have images where a single object (such as a car) is partially covered by small trees, resulting in the object being divided into multiple visible fragments. In coco it could look like { "id": 1, "image_id": 1, "category_id": 1, "bbox": [x, y, width, height], "segmentation": [ [polygon1_x1, polygon1_y1, polygon1_x2, polygon1_y2, ...], [polygon2_x1, polygon2_y1, polygon2_x2, polygon2_y2, ...] ], "area": 500, "iscrowd": 0 } Each polygon is an array of coordinates defining a closed shape
Is it possible with auto_annotate and yolo format?
- Glenn JocherUltralytics(수정됨)
@dreambit hi there!
Thank you for your detailed question. Yes, you can use the
auto_annotatefunction in the Ultralytics framework to handle images where objects are partially occluded and appear as multiple fragments. This function can generate segmentation masks for such complex scenarios.Here's how you can achieve this:
- Prepare Your Dataset: Ensure your images are organized in a directory.
- Use the
auto_annotateFunction: This function will use a pre-trained YOLO detection model and the SAM segmentation model to annotate your images.
Here's a code example to get you started:
from ultralytics.data.annotator import auto_annotate

# Path to your images
data_path = "path/to/your/images"

# Auto-annotate using YOLO26 and SAM models
auto_annotate(data=data_path, det_model="yolo26x.pt", sam_model="sam_b.pt")
Explanation:
data: Path to the folder containing your images.det_model: The pre-trained YOLO detection model, which defaults toyolo26x.pt.sam_model: The pre-trained SAM segmentation model, which defaults tosam_b.pt.
This setup will generate segmentation masks for your images, even if the objects are partially occluded.
For more detailed information on using SAM and its capabilities, you can refer to the Segment Anything Model (SAM) documentation.
If you encounter any issues or need further assistance, please provide a reproducible example so we can better understand and address your specific scenario. You can find more information on creating a minimum reproducible example here.
Feel free to update to the latest versions of the packages to ensure you have the latest features and fixes.
Best of luck with your project! 🚀
Glenn thanks, but as I see in docs https://docs.ultralytics.com/datasets/segment/#ultralytics-yolo-format ... In this format, is the index of the class for the object, and ... are the bounding coordinates of the object's segmentation mask. The coordinates are separated by spaces.
So it means that I could have only one segmentation mask?
0 0.681 0.485 0.670 0.487 0.676 0.487 1 0.504 0.000 0.501 0.004 0.498 0.004 0.493 0.010 0.492 0.0104
Glen, i ran the command you specified, and used an image from coco data set to test, as you can see segmentations are not correct, only half of the objects are segmented:
Here is original image from coco with car mask https://ibb.co/RjYyRdk
- Glenn JocherUltralytics(수정됨)
Hi @dreambit,
Thank you for sharing the images and details. I understand the challenge you're facing with partial segmentations. The
auto_annotatefunction should ideally handle such cases, but it seems like the segmentation results are not as expected.Steps to Troubleshoot and Improve Segmentation:
-
Verify Latest Versions: Ensure you are using the latest versions of the Ultralytics and SAM models. This can help avoid any bugs that might have been fixed in recent updates.
-
Reproducible Example: If the issue persists, providing a minimum reproducible example would be very helpful. This allows us to better understand and diagnose the problem. You can find guidance on creating a reproducible example here.
-
Adjusting Prompts: Sometimes, adjusting the prompts (bounding boxes or points) can improve segmentation results. Here’s an example of how you can use different prompts:
from ultralytics import SAM # Load a model model = SAM("sam_b.pt") # Run inference with bounding boxes prompt results = model("path/to/image.jpg", bboxes=[[x1, y1, x2, y2], [x3, y3, x4, y4]]) # Run inference with points prompt results = model("path/to/image.jpg", points=[[x1, y1], [x2, y2]], labels=[1, 1]) -
Segment Everything: If specific prompts are not yielding the desired results, you can try segmenting the entire image without prompts:
from ultralytics import SAM # Load a model model = SAM("sam_b.pt") # Segment the whole image results = model("path/to/image.jpg") -
Multiple Masks Handling: If your object is divided into multiple fragments, ensure that the segmentation model is capable of handling multiple masks per object. The YOLO format typically supports one segmentation mask per object, but you can adapt the output to handle multiple masks by combining them post-processing.
Example of Handling Multiple Masks:
If you need to combine multiple masks into a single annotation, you can do this post-processing:
# `results[0].masks.data` holds all masks of the image, shape (N, H, W)
combined_mask = results[0].masks.data.cpu().numpy().max(axis=0)

# Save or use the combined mask
Documentation and Resources:
For more detailed information on using SAM and its capabilities, please refer to the Segment Anything Model (SAM) documentation.
If you continue to face issues, please share a reproducible example, and we’ll be happy to assist further. Your feedback is valuable, and we aim to provide the best support possible.
-
kshweikeh
is there anyway where I can train YOLO SAM on a custom dataset?
- Paula DerrengerUltralytics(수정됨)
@kshweikeh hi there!
Currently, the Segment Anything Model (SAM) from Ultralytics is designed primarily for inference and does not support training on custom datasets. However, you can leverage SAM's powerful zero-shot capabilities for various segmentation tasks without the need for additional training.
If you're looking to create a segmentation dataset using SAM, you can use the auto-annotation feature. This allows you to generate segmentation masks using a pre-trained detection model. Here's a quick example:
from ultralytics.data.annotator import auto_annotate

auto_annotate(data="path/to/images", det_model="yolo26x.pt", sam_model="sam_b.pt")
This function will help you annotate your images quickly and efficiently, bypassing the need for manual labeling.
For more detailed information on using SAM, you can visit our Segment Anything Model (SAM) documentation.
If you have any further questions or need additional assistance, feel free to ask! 😊
Blessing988
@pderrenger It looks like auto_annotate for SAM only gives out the segmentation masks. What if you want to generate the bounding boxes in additionto the masks to verify if the results are right. Thanks.
Also, how will one visualise the segmentation masks after the auto_annotate which have been saved in a directory of txt files.
- Paula DerrengerUltralytics(수정됨)
Hi @Blessing988,
auto_annotatewrites one YOLO segmentation polygon per line (class_id x1 y1 x2 y2 ..., normalized) to its output folder (output_dir, by default<images folder>_auto_annotate_labels). Here is a script to draw those polygons on the images:from pathlib import Path import cv2 import numpy as np def visualize_annotations(image_dir, label_dir, output_dir): Path(output_dir).mkdir(parents=True, exist_ok=True) for image_path in Path(image_dir).glob("*.jpg"): image = cv2.imread(str(image_path)) h, w = image.shape[:2] label_path = Path(label_dir) / f"{image_path.stem}.txt" if not label_path.exists(): continue for line in label_path.read_text().splitlines(): values = line.split() polygon = (np.array(values[1:], dtype=float).reshape(-1, 2) * [w, h]).astype(np.int32) cv2.polylines(image, [polygon], isClosed=True, color=(0, 255, 0), thickness=2) cv2.imwrite(str(Path(output_dir) / image_path.name), image) visualize_annotations("path/to/images", "path/to/labels", "path/to/output")For more detailed information on using SAM and its features, you can refer to the Segment Anything Model (SAM) documentation.
Feel free to reach out if you have any further questions or need additional assistance! 😊
pabentse
Would be fantastic with support for the "H" size as well!
- Paula DerrengerUltralytics
@pabentse absolutely, the addition of an "H" size model would be a great enhancement to the range of model sizes we offer, catering to different computational needs and use cases. The YOLO community's feedback is invaluable, and suggestions like yours help guide future developments. Keep an eye on our updates! 👀🚀