YOLOv9: прорыв в технологии обнаружения объектов
YOLOv9 улучшила обнаружение объектов в реальном времени благодаря внедрению программируемой градиентной информации (PGI) и обобщённой эффективной сети агрегации слоёв (GELAN). На момент выпуска она превосходила предыдущие детекторы реального времени по эффективности и точности на наборе данных MS COCO. Проект YOLOv9 разработала отдельная команда энтузиастов открытого исходного кода; он создан на основе кодовой базы Ultralytics YOLOv5.
Смотри: Обучение YOLOv9 на пользовательских данных с помощью Ultralytics | Датасет промышленных упаковок
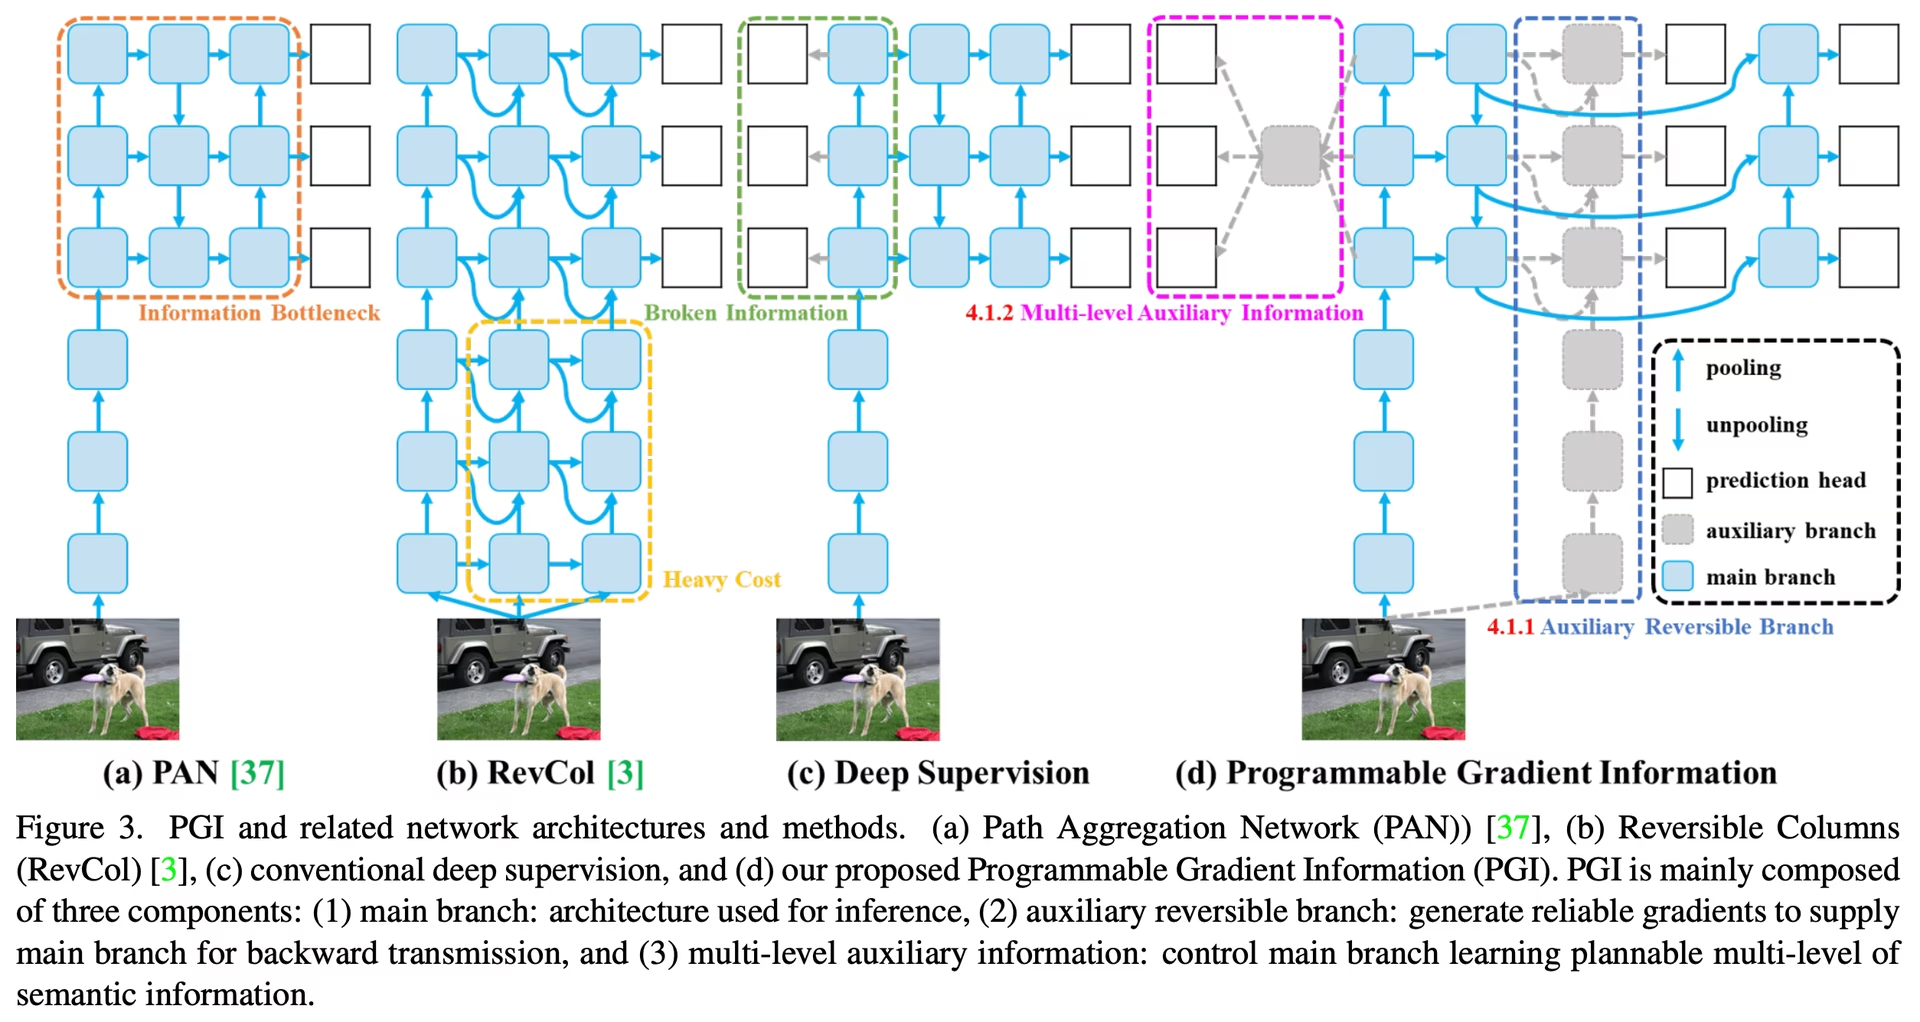
Введение в YOLOv9#
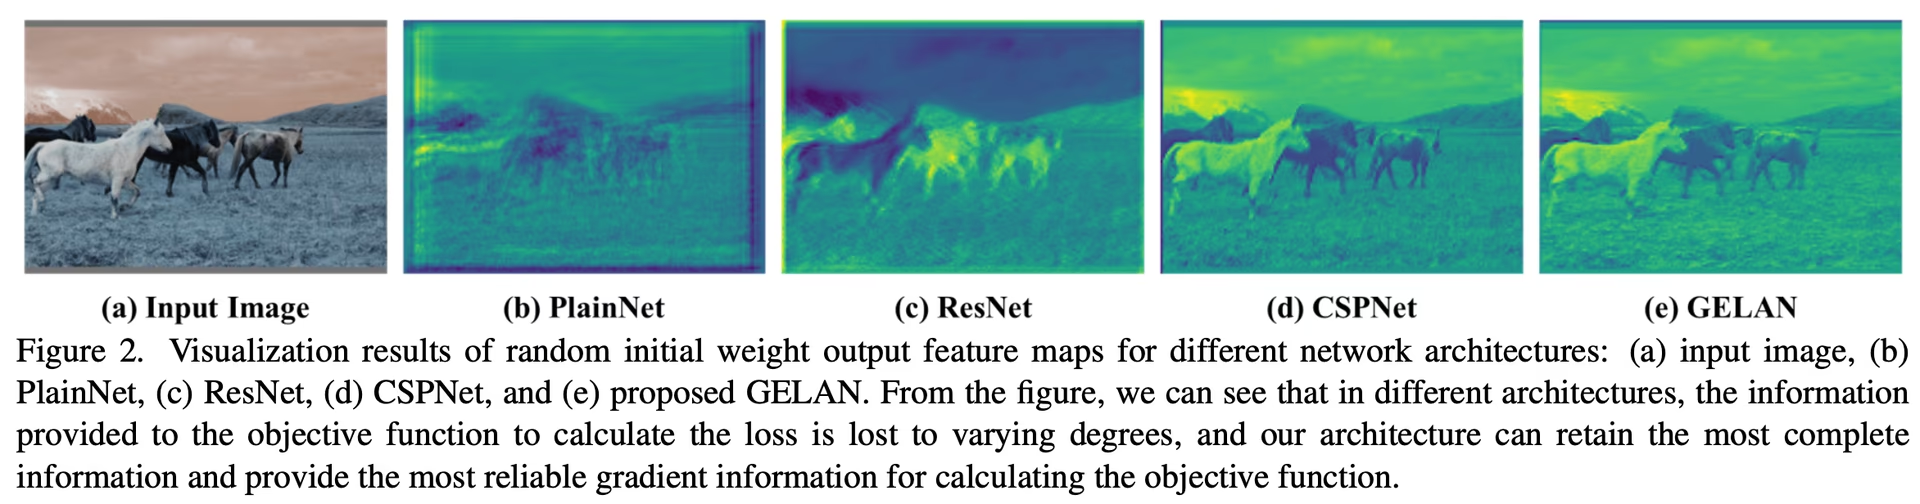
YOLOv9 решает проблему потери информации, характерную для глубоких нейронных сетей. Благодаря интеграции PGI и архитектуры GELAN модель повышает способность к обучению и сохраняет важную информацию на протяжении всего процесса обнаружения, улучшая точность и эффективность.
Ключевые инновации YOLOv9#
Архитектура YOLOv9 направлена на устранение потери информации в глубоких нейронных сетях. Центральную роль в её проектировании играют принцип информационного бутылочного горлышка и обратимые функции, которые помогают YOLOv9 поддерживать высокую эффективность и точность.
Принцип информационного узкого места#
Принцип информационного узкого места раскрывает фундаментальную проблему глубокого обучения: по мере прохождения данных через последовательные слои сети вероятность потери информации растёт. Это явление можно математически представить так:
I(X, X) >= I(X, f_theta(X)) >= I(X, g_phi(f_theta(X)))где I обозначает взаимную информацию, а f и g — функции преобразования с параметрами theta и phi соответственно. YOLOv9 решает эту проблему с помощью программируемой градиентной информации (PGI), которая помогает сохранять важные данные на протяжении всей глубины сети, обеспечивая более надёжное формирование градиентов и, как следствие, лучшую сходимость и производительность модели.
Обратимые функции#
Концепция обратимых функций — ещё один краеугольный камень архитектуры YOLOv9. Функция считается обратимой, если её можно инвертировать без потери информации, что можно выразить так:
X = v_zeta(r_psi(X))с psi и zeta в качестве параметров обратимой функции и её обратной функции соответственно. Это свойство особенно важно для архитектур глубокого обучения, поскольку позволяет сети сохранять полный поток информации и, следовательно, точнее обновлять параметры модели. YOLOv9 включает обратимые функции в свою архитектуру, чтобы снижать риск деградации информации, особенно в глубоких слоях, и сохранять критически важные данные для обнаружения объектов.
Влияние на облегчённые модели#
Решение проблемы потери информации особенно важно для облегчённых моделей: в них часто недостаточно параметров, и они склонны терять значительный объём информации при прямом распространении данных. Благодаря использованию PGI и обратимых функций архитектура YOLOv9 сохраняет и эффективно использует важные данные, необходимые для точного обнаружения объектов, даже в компактной модели.
Программируемая градиентная информация (PGI)#
PGI — новая концепция, представленная в YOLOv9 для решения проблемы информационного узкого места и сохранения важных данных в глубоких слоях сети. Благодаря этому формируются надёжные градиенты, которые обеспечивают точное обновление модели и повышают общую эффективность обнаружения.
Обобщённая эффективная сеть агрегации слоёв (GELAN)#
GELAN — это архитектура, которая повышает эффективность использования параметров и вычислений в YOLOv9. Она позволяет гибко интегрировать различные вычислительные блоки, благодаря чему YOLOv9 подходит для самых разных приложений без ущерба для скорости или точности.
Результаты тестирования YOLOv9#
Тестирование производительности YOLOv9 с помощью режима Benchmark Ultralytics включает оценку обученной и прошедшей валидацию модели в реальных условиях. Этот процесс включает:
- Оценка производительности: оценка скорости и точности модели.
- Форматы экспорта: проверка модели в разных форматах экспорта, чтобы убедиться, что она соответствует необходимым требованиям и хорошо работает в различных средах.
- Поддержка фреймворка: проведение этих оценок в пакете Ultralytics для получения последовательных и надёжных результатов.
Тестирование позволяет убедиться, что модель хорошо работает не только в контролируемых условиях, но и в реальных приложениях.
Смотри: Как провести бенчмарк модели YOLOv9 с помощью пакета Ultralytics Python
Производительность на наборе данных MS COCO#
На момент выпуска YOLOv9 установила новые рекорды на наборе данных COCO для моделей разных размеров. В таблице ниже перечислены показатели точности, число параметров и FLOPs каждой модели YOLOv9, доступной в Ultralytics.
Варианты YOLOv9 — от крошечной модели t до крупной модели e — повышают точность (mAP), сохраняя или сокращая количество параметров и вычислительные затраты (FLOPs) по сравнению с предыдущими версиями и конкурирующими моделями.
По сравнению с другими детекторами реального времени YOLOv9 демонстрирует следующие преимущества:
- Компактные модели: YOLOv9s превосходит YOLO MS-S по эффективности использования параметров и вычислительной нагрузке, при этом показатель AP выше на 0,4∼0,6%.
- Средние и крупные модели: YOLOv9m и YOLOv9e улучшают соотношение сложности модели и качества обнаружения, сокращая число параметров и вычислительные затраты и повышая точность.
Модель YOLOv9c использует на 42% меньше параметров и требует на 21% меньше вычислений, чем YOLOv7 AF, при сопоставимой точности. Модель YOLOv9e использует на 15% меньше параметров и требует на 25% меньше вычислений, чем YOLOv8x, при этом AP выше на 1,7%.
Эти результаты показывают, что YOLOv9 повысила эффективность вычислений без ущерба для точности, необходимой для обнаружения объектов в реальном времени и других задач компьютерного зрения.
Заключение#
Выпущенная в феврале 2024 года YOLOv9 повысила эффективность и точность обнаружения объектов в реальном времени. Устранив потерю информации с помощью PGI и GELAN, на момент выпуска YOLOv9 установила новые рекорды. Более новые модели, такие как YOLO26 и YOLO11, с тех пор получили дальнейшие улучшения, однако архитектурные инновации YOLOv9 продолжают влиять на эту область.
Примеры использования#
В этом примере приведены простые примеры обучения и инференса YOLOv9.
Предобученные модели *.pt на базе PyTorch, а также файлы конфигурации *.yaml можно передать классу YOLO(), чтобы создать экземпляр модели в Python:
from ultralytics import YOLO

# Создаём модель YOLOv9c с нуля
model = YOLO("yolov9c.yaml")

# Создаём модель YOLOv9c из предварительно обученных весов
model = YOLO("yolov9c.pt")

# Показать информацию о модели (необязательно)
model.info()

# Обучить модель на демонстрационном наборе данных COCO8 в течение 100 эпох
results = model.train(data="coco8.yaml", epochs=100, imgsz=640)

# Выполняем инференс с моделью YOLOv9c на изображении 'bus.jpg'
results = model("path/to/bus.jpg")
Поддерживаемые задачи и режимы#
В серию YOLOv9 входит несколько моделей для обнаружения объектов и сегментации экземпляров, рассчитанных на разные вычислительные бюджеты и требования к точности.
| Модель | Имена файлов | Задачи | Обучение | Валидация | Инференс | Экспорт |
|---|---|---|---|---|---|---|
| YOLOv9 | yolov9t.pt yolov9s.pt yolov9m.pt yolov9c.pt yolov9e.pt | Обнаружение объектов | ✅ | ✅ | ✅ | ✅ |
| YOLOv9-seg | yolov9c-seg.pt yolov9e-seg.pt | Сегментация экземпляров | ✅ | ✅ | ✅ | ✅ |
В этой таблице представлены варианты моделей YOLOv9 и поддерживаемые ими режимы обучения, валидации, инференса и экспорта.
Обучение моделей YOLOv9 потребует больше ресурсов и займёт больше времени, чем обучение модели YOLOv8 сопоставимого размера.
Цитирование и благодарности#
Мы хотели бы поблагодарить авторов YOLOv9 за значительный вклад в развитие обнаружения объектов в реальном времени:
@inproceedings{wang2024yolov9,
  title={YOLOv9: Learning What You Want to Learn Using Programmable Gradient Information},
  author={Wang, Chien-Yao and Yeh, I-Hau and Liao, Hong-Yuan Mark},
  booktitle={Computer Vision -- ECCV 2024},
  pages={1--21},
  year={2024},
  organization={Springer Nature Switzerland}
}
Официальная статья о YOLOv9 опубликована в сборнике Springer ECCV 2024, а её предварительная версия доступна на arXiv. Авторы открыли доступ к своей работе, а кодовую базу можно найти на GitHub. Мы ценим их вклад в развитие этой области и стремление сделать результаты своей работы доступными широкому сообществу.
Часто задаваемые вопросы#
В YOLOv9 представлены два основных метода: программируемая информация о градиенте (PGI) и обобщённая эффективная сеть агрегации слоёв (GELAN). Эти нововведения помогают решить проблему потери информации в глубоких нейронных сетях, обеспечивая высокую эффективность, точность и адаптивность. PGI сохраняет важные данные между слоями сети, а GELAN оптимизирует использование параметров и вычислительную эффективность.
На момент выпуска YOLOv9 превосходила другие передовые детекторы объектов реального времени по точности и эффективности. На датасете COCO модели YOLOv9 обеспечивают более высокие значения mAP на моделях разных размеров, сохраняя или сокращая вычислительные затраты. Например, YOLOv9c обеспечивает сопоставимую точность, используя на 42% меньше параметров и на 21% меньше вычислительных ресурсов, чем YOLOv7 AF.
Обучить модель YOLOv9 можно с помощью команд Python и CLI. Для работы с Python создай экземпляр модели с помощью класса
YOLOи вызови методtrain:from ultralytics import YOLO # Создаём модель YOLOv9c из предварительно обученных весов и запускаем обучение model = YOLO("yolov9c.pt") results = model.train(data="coco8.yaml", epochs=100, imgsz=640)Для обучения через CLI выполни команду:
yolo train model=yolov9c.yaml data=coco8.yaml epochs=100 imgsz=640Узнай больше о примерах использования для обучения и инференса.
YOLOv9 разработана для решения проблемы потери информации, особенно актуальной для компактных моделей, которые часто теряют значительный объём данных. Благодаря интеграции программируемой градиентной информации (PGI) и обратимых функций YOLOv9 сохраняет важные данные, повышая точность и эффективность модели. Поэтому модель особенно подходит для приложений, где нужны компактные и высокопроизводительные модели. Подробнее смотри в разделе Влияние YOLOv9 на облегчённые модели.
YOLOv9 поддерживает обнаружение объектов и сегментацию экземпляров в режимах обучения, валидации, инференса и экспорта.


Комментарии482
Задай вопрос, поделись результатами или помоги кому-нибудь.
vuvanhieu
to load a YOLOv5 model def load_yolov5_model(yolo_model_path): device = torch.device('cuda' if torch.cuda.is_available() else 'cpu') model = torch.hub.load('ultralytics/yolov5', 'custom', path=yolo_model_path, force_reload=True).to(device) return model
How in yolov8, yolov9?
1 Paula DerrengerUltralytics
To load a YOLOv8 or YOLOv9 model, you can use the
YOLOclass from the Ultralytics package. Here's a concise way to do it:from ultralytics import YOLO # Load a YOLOv8 model model_v8 = YOLO("yolov8n.pt") # Load a YOLOv9 model model_v9 = YOLO("yolov9c.pt")For more details, you can refer to the YOLOv9 documentation: https://docs.ultralytics.com/models/yolov9/.
MoAbbasid
@glenn-jocher @pderrenger any idea of when the lightweight models can be used in ultralytics?
1 Glenn JocherUltralytics(изменено)
Hi there! 😊
Lightweight models are available in Ultralytics. YOLOv9 ships
yolov9t.pt,yolov9s.ptandyolov9m.ptalongsideyolov9c.ptandyolov9e.pt. For new projects we recommend YOLO26, whose smallest modelyolo26n.ptis built for efficiency.To try a lightweight model:
yolo train model=yolo26n.pt data=coco128.yaml epochs=100If you're tinkering with custom lightweight designs, copy an existing model YAML from the Ultralytics repo and adjust its layers or scales. Contributions or insights are welcome.
Happy detecting!
deepanalyticszlc
Very exciting! Is there a schedule for release of lightweight models?
1- Paula DerrengerUltralytics(изменено)
@deepanalyticszlc hey there! 😊
Lightweight YOLOv9 models are now available:
yolov9t.pt,yolov9s.ptandyolov9m.pt, alongsideyolov9c.ptandyolov9e.pt. For the latest releases, see the Ultralytics GitHub releases.Here's a little snippet on how to load and use YOLOv9 for predictions:
from ultralytics import YOLO

# Load YOLOv9 model
model = YOLO('yolov9t.pt')  # Replace 'yolov9t.pt' with your model file

# Run inference on an image
results = model('path/to/your/image.jpg')

# Display results
results[0].show()
For new projects, we recommend YOLO26, which also comes in small sizes like
yolo26n.pt. ⏰
DolapoSalim(изменено)
@glenn-jocher Kindly assist with this TypeError: TypeError: ERROR C:\path_to_custom_model/yolov9c.pt appears to be an Ultralytics YOLOv5 model originally trained with https://github.com/ultralytics/yolov5. This model is NOT forwards compatible with YOLOv8 at https://github.com/ultralytics/ultralytics. Recommend fixes are to train a new model using the latest 'ultralytics' package or to run a command with an official Ultralytics model, i.e. 'yolo predict model=yolo11n.pt'
Here is my code:
from ultralytics import YOLO

model = YOLO(path_to_YOLOV9.pt )

results = model.predict(source="IMAGE_SOURCE", show=True, conf=0.10)
Note, I am actually working with a custom trained YOLOV9
- Glenn JocherUltralytics
@DolapoSalim to resolve the YOLOv5/YOLOv9 compatibility error when using custom-trained models, please ensure you're using the latest
ultralytics>=8.2.0package and retrain your YOLOv9 model using the official YOLOv9 configuration files from our documentation. For custom training guidance, see the YOLOv9 Training section in our docs.This error typically occurs when using older model formats - newer versions maintain full backward compatibility when models are trained with current Ultralytics implementations.
1
gusreic
This article claims that Yolov9 is based on Yolov5. The Yolov9 paper claims that v9 is based on Yolov7 which is also not based on 5. Is there any other way that would explain this claim? Otherwise maybe adjust the article.
- Glenn JocherUltralytics
@gusreic yes that's correct. YOLOv9 repo is a fork of my YOLOv5 repo. I know this because I wrote nearly all the files in the YOLOv9 repo myself. Unfortunately the author has failed to make this clear, though he did include a (hidden) acknowledgement at the bottom of the README.
1 Oh, that is really unfortunate, thank you for clearing it up since it is not directly apparent. Do you think that YOLOv9 is based on YOLOv5 only with respect to the structure of the repository or would you say that the architecture of the model itself is also based on the architecture of YOLOv5?
- Glenn JocherUltralytics
@gusreic thank you for your question! YOLOv9's repository structure is indeed based on Ultralytics YOLOv5, while its architecture introduces novel components like Programmable Gradient Information (PGI) and GELAN as described in the YOLOv9 documentation. The model itself represents an independent advancement building on broader YOLO research. We'll clarify this distinction in our article! 😊
ghost
Hello,
Thanks for the great documentation!
Quick question: Is the code licensed under AGPLv3 (Ultralytics) or GPLv3 (Wang, Chien-Yao and Liao, Hong-Yuan Mark Github)?
Thanks!
- Glenn JocherUltralytics
@ProfessorHT the YOLOv9 project codebase, developed by Wang, Chien-Yao and Liao, Hong-Yuan Mark, is available on GitHub and licensed under GPLv3, while Ultralytics models and software use the AGPL-3.0 license.
Thank you for your quick response. So to be sure if I use Yolov9 from this documentation with the ultralytics library i will be under the AGPLv3 license and i should buy a license?
- Glenn JocherUltralytics
Yes, if you use YOLOv9 models from the Ultralytics library, you are under the AGPL-3.0 license and would need an Enterprise License for commercial use, unless you open-source your entire project under AGPL-3.0.
 liuweiqing
Does it support automatic downloading of pretrained weights?
- Glenn JocherUltralytics
@14790897 yes, YOLOv9 supports automatic downloading of pretrained weights when using the
YOLO()class in Python or CLI commands, as long as the specified weights file (e.g.,yolov9c.pt) is available in the Ultralytics repository. You can find more details in the YOLOv9 documentation.
jane7166
Hello. I have retrained the YOLOv9 model, and I would like to deploy it as an API. How should I proceed?
- Glenn JocherUltralytics
@jane7166 to deploy your retrained YOLOv9 model as an API, you can use frameworks like FastAPI or Flask to build an endpoint and load your model using the Ultralytics Python package. Refer to the YOLOv9 documentation for guidance on inference, which can be integrated into your API logic. Let us know if you have further questions!
Gnoot01
I'm getting the following errors despite latest torch and ultralytics installs. Kindly assist
File "C:\Users\.venv\lib\site-packages\ultralytics\engine\model.py", line 547, in predict self.predictor.setup_model(model=self.model, verbose=is_cli) File "C:\Users\.venv\lib\site-packages\ultralytics\engine\predictor.py", line 303, in setup_model self.model = AutoBackend( File "C:\Users\.venv\lib\site-packages\torch\utils\_contextlib.py", line 116, in decorate_context return func(*args, **kwargs) File "C:\Users\.venv\lib\site-packages\ultralytics\nn\autobackend.py", line 145, in __init__ model = model.fuse(verbose=verbose) TypeError: BaseModel.fuse() got an unexpected keyword argument 'verbose'- Glenn JocherUltralytics
@Gnoot01 it seems like there's a compatibility issue with the
fusemethod. Please ensure you're using the latest version of the Ultralytics package. If the issue persists, consider checking for any updates or changes in the repository that might address this. For further assistance, you can explore the YOLOv9 documentation. @glenn-jocher Hi, I'm using the latest ultralytics 8.3.24 and latest torch. However, still facing this issue. Any suggestions?
- Glenn JocherUltralytics
@Gnoot01 i'm sorry you're experiencing this issue. Please ensure your Ultralytics package is up-to-date. If the problem persists, try reinstalling the package or checking for any recent updates in the repository. For more details, you can refer to the YOLOv9 documentation.
foskyblue
I'm having issues with my Yolov9 model exported to tflite. Model was successfully exported to tflite but I cannot get the right bounding boxes. I'm following the steps listed here: https://stackoverflow.com/questions/76381317/yolov8-tflite-python-predictions-and-interpreting-output (for folov8) to make inference for my yolov9 tflite model.
1Step 1: Resizing and Padding (Letterboxing) Step 2: Non-Maximum Suppression (NMS) Step 3: Rescaling Bounding Boxes
However, when I draw the outputed bounding boxes on my image the boxes don't fit the objects in the image correctly.
The code I'm using can be seen below:
from tflite_runtime.interpreter import Interpreter from PIL import Image import numpy as np from glob import glob from typing import Tuple, List interpreter = None input_shape = (320, 576) # Input tensor dimensions (width, height) in pixels input_index = 0 # Input tensor index (from input details in model signature) output_index = 409 model_path = 'model/saved_model.tflite' def load_model(): interpreter = None interpreter = Interpreter(model_path=model_path, num_threads=2) interpreter.allocate_tensors() input_details = interpreter.get_input_details() global input_shape input_shape = tuple(input_details[0]['shape'][1:3]) global input_index input_index = input_details[0]['index'] output_details = interpreter.get_output_details() global output_index output_index = output_details[0]['index'] return interpreter def letter_box(img: np.ndarray, new_shape: Tuple[int, int]) -> np.ndarray: """ Resizes an image to fit within a new shape while maintaining the aspect ratio, and pads the remaining space with a constant value. Args: img (np.ndarray): The input image as a NumPy array. new_shape (Tuple[int, int]): The desired output shape (height, width). Returns: np.ndarray: The resized and padded image. """ shape = img.shape[:2] # Calculate the scaling ratio to fit the image within the new shape r = min(new_shape[0] / shape[0], new_shape[1] / shape[1]) # Calculate the new unpadded dimensions new_unpad = int(round(shape[1] * r)), int(round(shape[0] * r)) # Calculate the padding required on each side dw, dh = new_shape[1] - new_unpad[0], new_shape[0] - new_unpad[1] dw, dh = dw / 2, dh / 2 # Resize the image if necessary if shape[::-1] != new_unpad: img = Image.fromarray(img).resize(new_unpad, Image.Resampling.BILINEAR) img = np.array(img) # Calculate the top, bottom, left, and right padding values top, bottom = int(round(dh - 0.1)), int(round(dh + 0.1)) left, right = int(round(dw - 0.1)), int(round(dw + 0.1)) # Add padding to the image img = np.pad(img, ((top, bottom), (left, right), (0, 0)), mode='constant', constant_values=114) return img def non_max_suppression( prediction: np.ndarray, conf_thres: float = 0.25, iou_thres: float = 0.45, max_det: int = 300, max_wh: int = 7680, ): """ Perform non-maximum suppression (NMS) on a single image prediction. Args: prediction (np.ndarray): A numpy array of shape (1, num_boxes, num_classes + 4 + num_masks) containing the predicted boxes, classes, and masks. conf_thres (float): Confidence threshold for filtering boxes (0.0 to 1.0). iou_thres (float): IoU threshold for NMS (0.0 to 1.0). max_det (int): Maximum number of boxes to keep after NMS. max_wh (int): Maximum box width and height in pixels. Returns: np.ndarray: Array containing kept boxes with format (x1, y1, x2, y2, confidence, class, mask1, mask2, ...). """ # Input validation (can be removed if you're sure of your input) if 0 > conf_thres > 1: raise ValueError(f"Invalid Confidence threshold {conf_thres}, valid values are between 0.0 and 1.0") if 0 > iou_thres > 1: raise ValueError(f"Invalid IoU {iou_thres}, valid values are between 0.0 and 1.0") # Extract dimensions and metadata directly _, _, dims = prediction.shape nc = dims - 4 - prediction.shape[1] # number of classes nm = dims - nc - 4 # number of masks mi = 4 + nc # mask start index # Process the single image in the batch x = prediction[0] # Extract the single image data # Move class scores to last axis and threshold x = np.transpose(x, (1, 0)) xc = x[..., 4:mi].max(axis=-1) > conf_thres x = x[xc] if not x.shape[0]: # No boxes left after confidence thresholding return np.zeros((0, 6 + nm)) # Convert xywh to xyxy directly on the filtered boxes x[..., :4] = xywh2xyxy(x[..., :4]) # Split and process boxes, classes, and masks # pylint: disable=unbalanced-tuple-unpacking box, cls, mask = np.split(x, (4, mi), 1) conf = cls.max(1) j = cls.argmax(1) x = np.concatenate((box, conf[:, None], j[:, None].astype(float), mask), 1) x = x[conf > conf_thres] n = x.shape[0] if not n: # No boxes left after additional confidence thresholding return np.zeros((0, 6 + nm)) # NMS (simplified since we're dealing with a single image) c = x[:, 5:6] * max_wh boxes, scores = x[:, :4] + c, x[:, 4] i = numpy_nms(boxes, scores, iou_thres) i = i[:max_det] return x[i] def numpy_nms(boxes: np.ndarray, scores: np.ndarray, iou_threshold: float = 0.5) -> np.ndarray: """ Perform Non-Maximum Suppression (NMS) on a set of bounding boxes. Args: boxes (np.ndarray): Array of shape (N, 4) representing N bounding boxes. Each box is [x1, y1, x2, y2]. scores (np.ndarray): Array of shape (N,) representing the confidence scores for each box. iou_threshold (float): IoU threshold for suppressing overlapping boxes. Defaults to 0.5. Returns: np.ndarray: Boolean array of shape (N,) indicating which boxes to keep. """ # Sort boxes by score in descending order order = scores.argsort()[::-1] keep = np.ones(len(boxes), dtype=bool) # Calculate IoU matrix ious = box_iou_batch(boxes, boxes) np.fill_diagonal(ious, 0) # Set self-IoU to 0 for i, idx in enumerate(order): if not keep[idx]: continue # Suppress boxes with IoU > threshold overlap = ious[idx] > iou_threshold keep[order[i + 1:]] &= ~overlap[order[i + 1:]] return keep def box_iou_batch(boxes_a: np.ndarray, boxes_b: np.ndarray) -> np.ndarray: """ Calculate the Intersection over Union (IoU) between two sets of bounding boxes. Args: boxes_a (np.ndarray): Array of shape (N, 4) representing N bounding boxes. boxes_b (np.ndarray): Array of shape (M, 4) representing M bounding boxes. Returns: np.ndarray: Array of shape (N, M) containing IoU values for each pair of boxes. Note: Each bounding box is represented as [x1, y1, x2, y2], where (x1, y1) is the top-left corner and (x2, y2) is the bottom-right corner. """ # Calculate areas of boxes_a area_a = (boxes_a[:, 2] - boxes_a[:, 0]) * (boxes_a[:, 3] - boxes_a[:, 1]) # Calculate areas of boxes_b area_b = (boxes_b[:, 2] - boxes_b[:, 0]) * (boxes_b[:, 3] - boxes_b[:, 1]) # Calculate intersection coordinates top_left = np.maximum(boxes_a[:, None, :2], boxes_b[:, :2]) bottom_right = np.minimum(boxes_a[:, None, 2:], boxes_b[:, 2:]) # Calculate intersection area area_inter = np.prod(np.clip(bottom_right - top_left, a_min=0, a_max=None), 2) # Calculate IoU return area_inter / (area_a[:, None] + area_b - area_inter) def xywh2xyxy(box: np.ndarray) -> np.ndarray: """ Convert bounding box coordinates from (x, y, width, height) format to (x1, y1, x2, y2) format where (x1, y1) is the top-left corner and (x2, y2) is the bottom-right corner. Args: x (np.ndarray): The input bounding box coordinates in (x, y, width, height) format. Returns: np.ndarray: The bounding box coordinates in (x1, y1, x2, y2) format. """ if box.shape[-1] != 4: raise ValueError(f"input shape last dimension expected 4 but input shape is {box.shape}") # pylint: disable=unbalanced-tuple-unpacking xy, wh = np.split(box, [2], axis=-1) wh_half = wh / 2 return np.concatenate([xy - wh_half, xy + wh_half], axis=-1) def preprocess_image(pil_image: Image.Image, input_size: Tuple[int, int]) -> np.ndarray: """ Preprocesses an image for inference with a TFLite model. Args: image_path (str): Path to the image file. input_size (Tuple[int, int]): Desired input size (height, width) for the model. Returns: np.ndarray: Preprocessed image as a NumPy array, ready for inference. """ if pil_image.mode != "RGB": pil_image = pil_image.convert("RGB") im = np.asarray(pil_image) im = letter_box(im, new_shape=input_size) im = np.expand_dims(im, axis=0) # goal is to have the format (number of images, size of image, number of channnels) im = im.astype(np.float32) / 255.0 # Normalize to 0.0 - 1.0 return im def postprocess_results(output: np.ndarray, model_input_size: Tuple[int, int], image_original_size: Tuple[int, int]) -> np.ndarray: """ Postprocesses the raw outputs from a TFLite model, including scaling bounding boxes back to the original image size. Args: output (np.ndarray): List of output tensors from the TFLite model. model_input_size (Tuple[int, int]): Desired input size (height, width) for the model. image_original_size (Tuple[int, int]): Original size (height, width) of the input image. Returns: np.ndarray: Postprocessed results with bounding boxes adjusted to original image size. """ predictions = non_max_suppression(output, conf_thres=0.25, iou_thres=0.45, max_det=300, max_wh=1) return scale_boxes(image_original_size, predictions, model_input_size) def scale_boxes(image_original_size: Tuple[int, int], boxes: np.ndarray, model_input_size: Tuple[int, int]): """ Rescales bounding boxes (in the format of xyxy by default) from the shape of the image they were originally specified in (img1_shape) to the shape of a different image (img0_shape). Args: image_original_size (Tuple[int, int]): The shape of the image that the bounding boxes are for, in the format of (height, width). boxes (np.ndarray): the bounding boxes of the objects in the image, in the format of (x1, y1, x2, y2) model_input_size (Tuple[int, int]): the shape of the target image, in the format of (height, width). Returns: np.ndarray: The scaled bounding boxes, in the format of (x1, y1, x2, y2) """ # calculate from img0_shape gain = min(model_input_size[0] / image_original_size[0], model_input_size[1] / image_original_size[1]) # gain = old / new pad = ( round((model_input_size[1] - image_original_size[1] * gain) / 2 - 0.1) / model_input_size[1], round((model_input_size[0] - image_original_size[0] * gain) / 2 - 0.1) / model_input_size[0], ) # wh padding inner_image_scale = ( (1 - pad[0] * 2), (1 - pad[1] * 2), ) # wh scale boxes[..., 0] = (boxes[..., 0] - pad[0]) / inner_image_scale[0] # x padding boxes[..., 1] = (boxes[..., 1] - pad[1]) / inner_image_scale[1] # y padding boxes[..., 2] = (boxes[..., 2] - pad[0]) / inner_image_scale[0] # x padding boxes[..., 3] = (boxes[..., 3] - pad[1]) / inner_image_scale[1] # y padding boxes[..., [0, 2]] = boxes[..., [0, 2]].clip(0, 1) # x1, x2 boxes[..., [1, 3]] = boxes[..., [1, 3]].clip(0, 1) # y1, y2 return boxes def prepare_input(image_pil): # Input image must match input shape (ex: 640x640 pixels) [note: only use BILINEAR here] resized = image_pil.copy().resize(input_shape, resample=Image.Resampling.BILINEAR) # SSD Mobilenet V2 FPNLite take as input pixels between [-1.0, 1.0] expanded = np.expand_dims(np.asarray(resized, dtype=np.float32) * 2. / 255. - 1., axis=0) del resized # Enforce garbage collection sooner than later return expanded def predict(tmp_images_dir): interpreter = load_model() model_predictions = [] for img_path in tmp_images_dir: pil_image = Image.open(img_path) input_data = preprocess_image(pil_image, input_shape) interpreter.set_tensor(input_index, input_data) interpreter.invoke() output_data = interpreter.get_tensor(output_index) preds = postprocess_results(output_data, input_shape, (pil_image.size[1], pil_image.size[0])) model_predictions.append({ 'detection_classes': (preds[:, 5] + 1).tolist(), # Class values are offset by +1.0 'detection_boxes': preds[:, 0:4].tolist(), 'detection_scores': preds[:, 4].tolist(), }) print(model_predictions) images_path = glob('utilities/images/*.JPG') predict(images_path)- Glenn JocherUltralytics
@foskyblue it seems like the issue might be related to the scaling and padding logic when converting bounding boxes. Ensure that the
scale_boxesfunction correctly rescales the boxes to the original image size. For more detailed guidance, please refer to the YOLOv9 documentation: https://docs.ultralytics.com/models/yolov9/. Hi Glen thanks for your response. Unfortunately I find it difficult to correctly scale the bounding boxes from the example script I mentioned above: https://stackoverflow.com/questions/76381317/yolov8-tflite-python-predictions-and-interpreting-output.
How can I implement the YOLOv9 TFLite model with an input ape of [1, 320, 576, 3] and output shape of [1, 19, 3780] in Python?
- Glenn JocherUltralytics
To correctly scale bounding boxes for your YOLOv9 TFLite model, ensure your
scale_boxesfunction accurately adjusts the coordinates based on the original image size and model input size. Verify that padding and scaling calculations align with your preprocessing steps. For further details, please refer to the YOLOv9 documentation.