Triển khai model YOLO được huấn luyện trước bằng Ultralytics trên Vertex AI để suy luận#
Hướng dẫn này sẽ chỉ cho bạn cách đóng gói model YOLO26 được huấn luyện trước bằng Ultralytics vào container, xây dựng máy chủ suy luận FastAPI cho model và triển khai model cùng máy chủ suy luận trên Google Cloud Vertex AI. Phần triển khai ví dụ sẽ trình bày trường hợp sử dụng phát hiện đối tượng cho YOLO26, nhưng các nguyên tắc tương tự cũng áp dụng khi sử dụng các tác vụ YOLO khác.
Trước khi bắt đầu, bạn cần tạo một dự án Nền tảng Google Cloud (GCP). Là người dùng mới, bạn được tặng $300 tín dụng GCP để sử dụng miễn phí; số tín dụng này đủ để thử nghiệm một cấu hình đang chạy mà sau đó bạn có thể mở rộng cho bất kỳ trường hợp sử dụng YOLO26 nào khác, bao gồm huấn luyện hoặc suy luận theo lô và theo luồng.
Bạn sẽ tìm hiểu#
- Tạo backend suy luận cho model Ultralytics YOLO26 bằng FastAPI.
- Tạo repository GCP Artifact Registry để lưu trữ Docker image.
- Build và push Docker image chứa model lên Artifact Registry.
- Nhập model vào Vertex AI.
- Tạo endpoint Vertex AI và triển khai model.
- Toàn quyền kiểm soát model với Ultralytics: Bạn có thể sử dụng logic suy luận tùy chỉnh và toàn quyền kiểm soát bước tiền xử lý, hậu xử lý cũng như định dạng phản hồi.
- Vertex AI xử lý các phần còn lại: Vertex AI tự động mở rộng quy mô, đồng thời cho phép linh hoạt cấu hình tài nguyên tính toán, bộ nhớ và GPU.
- Tích hợp GCP gốc và bảo mật: Dễ dàng thiết lập với Cloud Storage, BigQuery, Cloud Functions, các biện pháp kiểm soát VPC, chính sách IAM và nhật ký kiểm toán.
Điều kiện tiên quyết#
- Cài đặt Docker trên máy của bạn.
- Cài đặt Google Cloud SDK và xác thực để sử dụng gcloud CLI.
- Bạn nên đọc Hướng dẫn bắt đầu nhanh Docker cho Ultralytics, vì trong quá trình làm theo hướng dẫn này, bạn sẽ cần mở rộng một trong các Docker image chính thức của Ultralytics.
1. Tạo backend suy luận bằng FastAPI#
Trước tiên, bạn cần tạo ứng dụng FastAPI để xử lý các yêu cầu suy luận của model YOLO26. Ứng dụng này sẽ đảm nhiệm việc tải model, tiền xử lý ảnh và logic suy luận (dự đoán).
Các nguyên tắc cơ bản về tuân thủ Vertex AI#
Vertex AI yêu cầu container của bạn triển khai hai endpoint cụ thể:
-
Endpoint Health (
/health): Phải trả về trạng thái HTTP200 OKkhi dịch vụ sẵn sàng. -
Endpoint Predict (
/predict): Chấp nhận các yêu cầu dự đoán có cấu trúc, chứa ảnh được mã hóa base64 và các tham số tùy chọn. Tùy thuộc vào loại endpoint, các giới hạn kích thước payload sẽ được áp dụng.Payload yêu cầu cho endpoint
/predictcần tuân theo cấu trúc JSON sau:{ "instances": [{ "image": "base64_encoded_image" }], "parameters": { "confidence": 0.5 } }
Cấu trúc thư mục dự án#
Phần lớn quy trình build sẽ diễn ra bên trong Docker container; Ultralytics cũng sẽ tải một model YOLO26 được huấn luyện trước, vì vậy bạn có thể giữ cấu trúc thư mục cục bộ đơn giản:
YOUR_PROJECT/
├── src/
│   ├── __init__.py
│   ├── app.py              # Core YOLO26 inference logic
│   └── main.py             # FastAPI inference server
├── tests/
├── .env                    # Environment variables for local development
├── Dockerfile              # Container configuration
├── LICENSE                 # AGPL-3.0 License
└── pyproject.toml # Python dependencies and project configCác model và framework Ultralytics YOLO26 được cấp phép theo AGPL-3.0, kèm theo các yêu cầu tuân thủ quan trọng. Hãy đọc tài liệu Ultralytics về cách tuân thủ các điều khoản giấy phép.
Tạo pyproject.toml với các dependency#
Để quản lý dự án thuận tiện hơn, hãy tạo tệp pyproject.toml với các dependency sau:
[project]
name = "YOUR_PROJECT_NAME"
version = "0.0.1"
description = "YOUR_PROJECT_DESCRIPTION"
requires-python = ">=3.10,<3.13"
dependencies = [
   "ultralytics>=8.4.0",
   "fastapi[all]>=0.89.1",
   "uvicorn[standard]>=0.20.0",
   "pillow>=9.0.0",
   "loguru",
]

[build-system]
requires = ["setuptools>=61.0"]
build-backend = "setuptools.build_meta"uvicornsẽ được dùng để chạy máy chủ FastAPI.logurusẽ được dùng để ghi log trong máy chủ FastAPI.pillowsẽ được dùng để xử lý ảnh, nhưng bạn không bị giới hạn ở ảnh PIL — Ultralytics hỗ trợ nhiều định dạng khác.
Tạo logic suy luận bằng Ultralytics YOLO26#
Sau khi thiết lập cấu trúc dự án và các dependency, bạn có thể triển khai logic suy luận cốt lõi của YOLO26. Tạo tệp src/app.py để xử lý việc tải model, xử lý ảnh và dự đoán bằng Python API của Ultralytics.
# src/app.py

from ultralytics import YOLO

# Model initialization and readiness state
model_yolo = None
_model_ready = False

def _initialize_model():
    """Initialize the YOLO model."""
    global model_yolo, _model_ready

    try:
        # Use pretrained YOLO26n model from Ultralytics base image
        model_yolo = YOLO("yolo26n.pt")
        _model_ready = True

    except Exception as e:
        print(f"Error initializing YOLO model: {e}")
        _model_ready = False
        model_yolo = None

# Initialize model on module import
_initialize_model()

def is_model_ready() -> bool:
    """Check if the model is ready for inference."""
    return _model_ready and model_yolo is not None
Model sẽ được tải một lần khi container khởi động và được dùng chung cho tất cả yêu cầu. Nếu model phải xử lý khối lượng suy luận lớn, bạn nên chọn loại máy có nhiều bộ nhớ hơn khi nhập model vào Vertex AI ở bước sau.
Tiếp theo, tạo hai hàm tiện ích để xử lý ảnh đầu vào và đầu ra bằng pillow. YOLO26 hỗ trợ ảnh PIL nguyên bản.
def get_image_from_bytes(binary_image: bytes) -> Image.Image:
    """Convert image from bytes to PIL RGB format."""
    input_image = Image.open(io.BytesIO(binary_image)).convert("RGB")
    return input_image
def get_bytes_from_image(image: Image.Image) -> bytes:
"""Convert PIL image to bytes."""
return_image = io.BytesIO()
image.save(return_image, format="JPEG", quality=85)
return_image.seek(0)
return return_image.getvalue()Cuối cùng, triển khai hàm run_inference để xử lý việc phát hiện đối tượng. Trong ví dụ này, chúng ta sẽ trích xuất bounding box, tên lớp và điểm tin cậy từ các dự đoán của model. Hàm sẽ trả về một dictionary chứa các đối tượng được phát hiện và kết quả thô để tiếp tục xử lý hoặc chú thích.
def run_inference(input_image: Image.Image, confidence_threshold: float = 0.5) -> Dict[str, Any]:
    """Run inference on an image using YOLO26n model."""
    # Check if model is ready
    if not is_model_ready():
        print("Model not ready for inference")
        return {"detections": [], "results": None}

    try:
        # Make predictions and get raw results
        results = model_yolo.predict(
            imgsz=640, source=input_image, conf=confidence_threshold, save=False, augment=False, verbose=False
        )

        # Extract detections (bounding boxes, class names, and confidences)
        detections = []
        if results and len(results) > 0:
            result = results[0]
            if result.boxes is not None and len(result.boxes.xyxy) > 0:
                boxes = result.boxes

                # Convert tensors to numpy for processing
                xyxy = boxes.xyxy.cpu().numpy()
                conf = boxes.conf.cpu().numpy()
                cls = boxes.cls.cpu().numpy().astype(int)

                # Create detection dictionaries
                for i in range(len(xyxy)):
                    detection = {
                        "xmin": float(xyxy[i][0]),
                        "ymin": float(xyxy[i][1]),
                        "xmax": float(xyxy[i][2]),
                        "ymax": float(xyxy[i][3]),
                        "confidence": float(conf[i]),
                        "class": int(cls[i]),
                        "name": model_yolo.names.get(int(cls[i]), f"class_{int(cls[i])}"),
                    }
                    detections.append(detection)

        return {
            "detections": detections,
            "results": results,  # Keep raw results for annotation
        }
    except Exception as e:
        # If there's an error, return empty structure
        print(f"Error in YOLO detection: {e}")
        return {"detections": [], "results": None}
Bạn có thể thêm một hàm tùy chọn để chú thích ảnh bằng bounding box và nhãn, sử dụng phương thức vẽ tích hợp của Ultralytics. Hàm này hữu ích nếu bạn muốn trả về ảnh đã chú thích trong phản hồi dự đoán.
def get_annotated_image(results: list) -> Image.Image:
    """Get annotated image using Ultralytics built-in plot method."""
    if not results or len(results) == 0:
        raise ValueError("No results provided for annotation")

    result = results[0]
    # Dùng phương thức plot tích hợp của Ultralytics với đầu ra PIL
    return result.plot(pil=True)
Tạo máy chủ suy luận HTTP bằng FastAPI#
Sau khi có logic suy luận cốt lõi của YOLO26, bạn có thể tạo ứng dụng FastAPI để cung cấp logic đó. Ứng dụng sẽ bao gồm các endpoint kiểm tra tình trạng và dự đoán theo yêu cầu của Vertex AI.
Trước tiên, tạo src/main.py, thêm các câu lệnh import, tạo ứng dụng FastAPI và cấu hình logging cho Vertex AI. Vì Vertex AI xem stderr là đầu ra lỗi, nên chuyển log sang stdout là hợp lý.
# src/main.py

import sys

from fastapi import FastAPI
from loguru import logger

app = FastAPI()

# Cấu hình logger
logger.remove()
logger.add(
    sys.stdout,
    colorize=True,
    format="<green>{time:HH:mm:ss}</green> | <level>{message}</level>",
    level=10,
)
logger.add("log.log", rotation="1 MB", level="DEBUG", compression="zip")
Để tuân thủ đầy đủ yêu cầu của Vertex AI, hãy xác định các endpoint bắt buộc trong biến môi trường và đặt giới hạn kích thước yêu cầu. Khi triển khai trong môi trường production, bạn nên sử dụng endpoint Vertex AI riêng tư. Cách này giúp tăng giới hạn payload yêu cầu (10 MB thay vì 1.5 MB ở endpoint công khai), đồng thời cung cấp khả năng bảo mật và kiểm soát truy cập mạnh mẽ.
# Biến môi trường Vertex AI
AIP_HTTP_PORT = int(os.getenv("AIP_HTTP_PORT", "8080"))
AIP_HEALTH_ROUTE = os.getenv("AIP_HEALTH_ROUTE", "/health")
AIP_PREDICT_ROUTE = os.getenv("AIP_PREDICT_ROUTE", "/predict")

# Giới hạn kích thước yêu cầu (10 MB cho endpoint riêng tư, 1.5 MB cho endpoint công khai)
MAX_REQUEST_SIZE = 10 * 1024 * 1024  # 10 MB tính bằng byte
Thêm hai model Pydantic để xác thực yêu cầu và phản hồi:
# Model Pydantic cho yêu cầu/phản hồi
class PredictionRequest(BaseModel):
    instances: list
    parameters: Optional[Dict[str, Any]] = None

class PredictionResponse(BaseModel):
    predictions: list
Thêm endpoint kiểm tra tình trạng để xác minh model đã sẵn sàng. Điều này rất quan trọng với Vertex AI, vì nếu không có bước kiểm tra tình trạng chuyên biệt, bộ điều phối sẽ ping các socket ngẫu nhiên và không thể xác định model đã sẵn sàng suy luận hay chưa. Khi thành công, bước kiểm tra phải trả về 200 OK; khi thất bại, phải trả về 503 Service Unavailable:
# Endpoint kiểm tra tình trạng
@app.get(AIP_HEALTH_ROUTE, status_code=status.HTTP_200_OK)
def health_check():
    """Health check endpoint for Vertex AI."""
    if not is_model_ready():
        raise HTTPException(status_code=503, detail="Model not ready")
    return {"status": "healthy"}
Giờ đây, bạn đã có đủ cơ sở để triển khai endpoint dự đoán xử lý các yêu cầu suy luận. Endpoint sẽ nhận một tệp ảnh, chạy suy luận và trả về kết quả. Lưu ý rằng ảnh phải được mã hóa base64, làm tăng kích thước payload thêm tối đa 33%.
@app.post(AIP_PREDICT_ROUTE, response_model=PredictionResponse)
async def predict(request: PredictionRequest):
    """Prediction endpoint for Vertex AI."""
    try:
        predictions = []

        for instance in request.instances:
            if isinstance(instance, dict):
                if "image" in instance:
                    image_data = base64.b64decode(instance["image"])
                    input_image = get_image_from_bytes(image_data)
                else:
                    raise HTTPException(status_code=400, detail="Instance must contain 'image' field")
            else:
                raise HTTPException(status_code=400, detail="Invalid instance format")

            # Extract YOLO26 parameters if provided
            parameters = request.parameters or {}
            confidence_threshold = parameters.get("confidence", 0.5)
            return_annotated_image = parameters.get("return_annotated_image", False)

            # Run inference with YOLO26n model
            result = run_inference(input_image, confidence_threshold=confidence_threshold)
            detections_list = result["detections"]

            # Format predictions for Vertex AI
            detections = []
            for detection in detections_list:
                formatted_detection = {
                    "class": detection["name"],
                    "confidence": detection["confidence"],
                    "bbox": {
                        "xmin": detection["xmin"],
                        "ymin": detection["ymin"],
                        "xmax": detection["xmax"],
                        "ymax": detection["ymax"],
                    },
                }
                detections.append(formatted_detection)

            # Build prediction response
            prediction = {"detections": detections, "detection_count": len(detections)}

            # Add annotated image if requested and detections exist
            if (
                return_annotated_image
                and result["results"]
                and result["results"][0].boxes is not None
                and len(result["results"][0].boxes) > 0
            ):
                annotated_image = get_annotated_image(result["results"])
                img_bytes = get_bytes_from_image(annotated_image)
                prediction["annotated_image"] = base64.b64encode(img_bytes).decode("utf-8")

            predictions.append(prediction)

        logger.info(
            f"Processed {len(request.instances)} instances, found {sum(len(p['detections']) for p in predictions)} total detections"
        )

        return PredictionResponse(predictions=predictions)

    except HTTPException:
        # Re-raise HTTPException as-is (don't catch and convert to 500)
        raise
    except Exception as e:
        logger.error(f"Prediction error: {e}")
        raise HTTPException(status_code=500, detail=f"Prediction failed: {e}")
Cuối cùng, thêm entry point của ứng dụng để chạy máy chủ FastAPI.
if __name__ == "__main__":
    import uvicorn

    logger.info(f"Starting server on port {AIP_HTTP_PORT}")
    logger.info(f"Health check route: {AIP_HEALTH_ROUTE}")
    logger.info(f"Predict route: {AIP_PREDICT_ROUTE}")
    uvicorn.run(app, host="0.0.0.0", port=AIP_HTTP_PORT)
Giờ đây, bạn đã có ứng dụng FastAPI hoàn chỉnh để xử lý các yêu cầu suy luận YOLO26. Bạn có thể kiểm thử ứng dụng cục bộ bằng cách cài đặt các dependency và chạy máy chủ, chẳng hạn bằng uv.
# Install dependencies
uv pip install -e .

# Run the FastAPI server directly
uv run src/main.py
Để kiểm thử máy chủ, bạn có thể dùng cURL truy vấn cả endpoint /health và /predict. Đặt một ảnh kiểm thử trong thư mục tests. Sau đó, chạy các lệnh sau trong Terminal:
# Test health endpoint
curl http://localhost:8080/health

# Test predict endpoint with base64 encoded image
curl -X POST -H "Content-Type: application/json" -d "{\"instances\": [{\"image\": \"$(base64 -i tests/test_image.jpg)\"}]}" http://localhost:8080/predict
Bạn sẽ nhận được phản hồi JSON chứa các đối tượng được phát hiện. Ở yêu cầu đầu tiên, hãy dự kiến có một khoảng trễ ngắn vì Ultralytics cần tải xuống và nạp model YOLO26.
2. Mở rộng Docker image Ultralytics bằng ứng dụng của bạn#
Ultralytics cung cấp một số Docker image có thể dùng làm nền tảng cho image ứng dụng. Các image này có sẵn Ultralytics và những thư viện CUDA cần thiết, vì vậy bạn chỉ cần thêm ứng dụng lên trên.
Để tận dụng đầy đủ các khả năng của model Ultralytics YOLO, bạn nên chọn image được tối ưu hóa cho CUDA để suy luận bằng GPU. Tuy nhiên, nếu suy luận bằng CPU đáp ứng đủ yêu cầu, bạn cũng có thể tiết kiệm tài nguyên tính toán bằng cách chọn image chỉ dành cho CPU:
- Dockerfile: Image được tối ưu hóa cho CUDA, dùng để huấn luyện và suy luận YOLO26 trên một hoặc nhiều GPU.
- Dockerfile-cpu: Image chỉ dành cho CPU để suy luận YOLO26.
Tạo Docker image cho ứng dụng#
Tạo tệp Dockerfile ở thư mục gốc của dự án với nội dung sau:
# Extends official Ultralytics Docker image for YOLO26
FROM ultralytics/ultralytics:latest

ENV PYTHONUNBUFFERED=1

# Install FastAPI and dependencies
RUN uv pip install --system fastapi[all] uvicorn[standard] loguru

WORKDIR /app
COPY src/ ./src/
COPY pyproject.toml ./

# Install the application package
RUN uv pip install --system -e .

RUN mkdir -p /app/logs
ENV PYTHONPATH=/app/src

# Port for Vertex AI
EXPOSE 8080

# Start the inference server
ENTRYPOINT ["python", "src/main.py"]
Trong ví dụ này, Docker image chính thức của Ultralytics ultralytics:latest được dùng làm image nền. Image này đã có model YOLO26 và tất cả dependency cần thiết. Entry point của máy chủ giống với entry point đã dùng để kiểm thử ứng dụng FastAPI cục bộ.
Build và kiểm thử Docker image#
Giờ đây, bạn có thể build Docker image bằng lệnh sau:
docker build --platform linux/amd64 -t IMAGE_NAME:IMAGE_VERSION .Thay IMAGE_NAME và IMAGE_VERSION bằng các giá trị bạn muốn, chẳng hạn yolo26-fastapi:0.1. Lưu ý rằng nếu triển khai trên Vertex AI, bạn phải build image cho kiến trúc linux/amd64. Cần đặt rõ tham số --platform nếu bạn build image trên máy Mac dùng Apple Silicon hoặc một kiến trúc không phải x86 khác.
Sau khi build image xong, bạn có thể kiểm thử Docker image cục bộ:
docker run --platform linux/amd64 -p 8080:8080 IMAGE_NAME:IMAGE_VERSIONDocker container hiện đang chạy máy chủ FastAPI trên cổng 8080, sẵn sàng nhận các yêu cầu suy luận. Bạn có thể kiểm thử cả endpoint /health và /predict bằng các lệnh cURL đã dùng trước đó:
# Test health endpoint
curl http://localhost:8080/health

# Test predict endpoint with base64 encoded image
curl -X POST -H "Content-Type: application/json" -d "{\"instances\": [{\"image\": \"$(base64 -i tests/test_image.jpg)\"}]}" http://localhost:8080/predict
3. Tải Docker image lên GCP Artifact Registry#
Để nhập model được đóng gói trong container vào Vertex AI, bạn cần tải Docker image lên Google Cloud Artifact Registry. Nếu chưa có repository Artifact Registry, trước tiên bạn cần tạo một repository.
Tạo repository trong Google Cloud Artifact Registry#
Mở trang Artifact Registry trong Google Cloud Console. Nếu đây là lần đầu bạn sử dụng Artifact Registry, hệ thống có thể nhắc bạn bật API Artifact Registry trước.

- Chọn Create Repository.
- Nhập tên repository. Chọn khu vực mong muốn và giữ các tùy chọn khác ở cài đặt mặc định, trừ khi bạn cần thay đổi cụ thể.
Việc chọn khu vực có thể ảnh hưởng đến khả năng cung cấp máy và một số giới hạn tính toán đối với người dùng không thuộc Enterprise. Bạn có thể tìm hiểu thêm trong tài liệu chính thức của Vertex AI: Hạn mức và giới hạn của Vertex AI
- Sau khi tạo repository, hãy lưu PROJECT_ID, Location (Region) và Repository Name vào kho bí mật hoặc tệp
.env. Bạn sẽ cần các thông tin này sau để gắn thẻ và push Docker image lên Artifact Registry.
Xác thực Docker với Artifact Registry#
Xác thực Docker client với repository Artifact Registry vừa tạo. Chạy lệnh sau trong terminal:
gcloud auth configure-docker YOUR_REGION-docker.pkg.devGắn thẻ và push image lên Artifact Registry#
Gắn thẻ và push Docker image lên Google Artifact Registry.
Bạn nên sử dụng thẻ duy nhất mỗi lần cập nhật image. Hầu hết dịch vụ GCP, bao gồm Vertex AI, dựa vào thẻ image để tự động quản lý phiên bản và mở rộng quy mô, vì vậy nên sử dụng quy tắc đánh phiên bản ngữ nghĩa hoặc thẻ dựa trên ngày tháng.
Gắn thẻ image bằng URL repository Artifact Registry. Thay các placeholder bằng những giá trị bạn đã lưu trước đó.
docker tag IMAGE_NAME:IMAGE_VERSION YOUR_REGION-docker.pkg.dev/YOUR_PROJECT_ID/YOUR_REPOSITORY_NAME/IMAGE_NAME:IMAGE_VERSIONPush image đã gắn thẻ lên repository Artifact Registry.
docker push YOUR_REGION-docker.pkg.dev/YOUR_PROJECT_ID/YOUR_REPOSITORY_NAME/IMAGE_NAME:IMAGE_VERSIONChờ quá trình hoàn tất. Giờ đây, bạn sẽ thấy hình ảnh trong kho Artifact Registry của mình.
Để biết hướng dẫn cụ thể hơn về cách làm việc với hình ảnh trong Artifact Registry, hãy xem tài liệu Artifact Registry: Đẩy và kéo hình ảnh.
4. Nhập model vào Vertex AI#
Giờ đây, bạn có thể sử dụng Docker image vừa đẩy lên để nhập model vào Vertex AI.
-
Trong menu điều hướng của Google Cloud, hãy chuyển đến Vertex AI > Model Registry. Hoặc tìm kiếm "Vertex AI" trong thanh tìm kiếm ở đầu Google Cloud Console.

-
Nhấp vào Import.
-
Chọn Import as a new model.
-
Chọn khu vực. Bạn có thể chọn cùng khu vực với kho Artifact Registry, nhưng lựa chọn của bạn nên dựa trên tình trạng sẵn có của các loại máy và hạn mức trong khu vực đó.
-
Chọn Import an existing model container.

-
Trong trường Container image, duyệt đến kho Artifact Registry mà bạn đã tạo trước đó và chọn image bạn vừa đẩy lên.
-
Cuộn xuống phần Environment variables, rồi nhập các endpoint predict và health, cùng với cổng mà bạn đã xác định trong ứng dụng FastAPI.

-
Nhấp vào Import. Vertex AI sẽ mất vài phút để đăng ký model và chuẩn bị model cho việc triển khai. Bạn sẽ nhận được thông báo qua email khi quá trình nhập hoàn tất.
5. Tạo Vertex AI Endpoint và triển khai model#
Trong thuật ngữ của Vertex AI, endpoint là các model đã triển khai, vì endpoint biểu thị các điểm cuối HTTP mà bạn gửi yêu cầu inference đến; còn model là các tạo phẩm ML đã huấn luyện được lưu trữ trong Model Registry.
Để triển khai model, bạn cần tạo một Endpoint trong Vertex AI.
-
Trong menu điều hướng Vertex AI, hãy chuyển đến Endpoints. Chọn khu vực bạn đã dùng khi nhập model. Nhấp vào Create.

-
Nhập Endpoint name.
-
Đối với Access, Vertex AI khuyến nghị sử dụng các endpoint Vertex AI riêng tư. Ngoài lợi ích về bảo mật, bạn còn được giới hạn payload cao hơn nếu chọn endpoint riêng tư; tuy nhiên, bạn sẽ cần cấu hình mạng VPC và các quy tắc tường lửa để cho phép truy cập endpoint. Tham khảo tài liệu Vertex AI để biết thêm hướng dẫn về endpoint riêng tư.
-
Nhấp vào Continue.
-
Trong hộp thoại Model settings, chọn model bạn đã nhập trước đó. Giờ đây, bạn có thể cấu hình loại máy, bộ nhớ và GPU cho model. Hãy cấp đủ bộ nhớ nếu bạn dự kiến khối lượng suy luận cao, để tránh các nút thắt cổ chai I/O và đảm bảo hiệu năng YOLO26 phù hợp.
-
Trong Accelerator type, chọn loại GPU bạn muốn dùng cho suy luận. Nếu chưa biết nên chọn GPU nào, bạn có thể bắt đầu với NVIDIA T4, được CUDA hỗ trợ.
Lưu ý rằng một số khu vực có hạn mức tài nguyên tính toán rất thấp, vì vậy bạn có thể không chọn được một số loại máy hoặc GPU tại khu vực của mình. Nếu đây là yếu tố quan trọng, hãy chuyển khu vực triển khai sang nơi có hạn mức cao hơn. Tìm hiểu thêm trong tài liệu chính thức của Vertex AI: Hạn mức và giới hạn của Vertex AI.
- Sau khi chọn loại máy, bạn có thể nhấp vào Continue. Lúc này, bạn có thể bật tính năng giám sát model trong Vertex AI — một dịch vụ bổ sung theo dõi hiệu suất của model và cung cấp thông tin chuyên sâu về hành vi của model. Tính năng này không bắt buộc và phát sinh thêm chi phí, vì vậy hãy chọn theo nhu cầu của bạn. Nhấp vào Create.
Vertex AI sẽ mất vài phút (tối đa 30 phút ở một số khu vực) để triển khai model. Bạn sẽ nhận được thông báo qua email khi quá trình triển khai hoàn tất.
6. Kiểm thử model đã triển khai#
Sau khi quá trình triển khai hoàn tất, Vertex AI sẽ cung cấp cho bạn giao diện API mẫu để kiểm thử model.
Để kiểm thử inference từ xa, bạn có thể dùng lệnh cURL được cung cấp hoặc tạo một thư viện client Python khác để gửi yêu cầu đến model đã triển khai. Hãy nhớ mã hóa hình ảnh sang base64 trước khi gửi đến endpoint /predict.
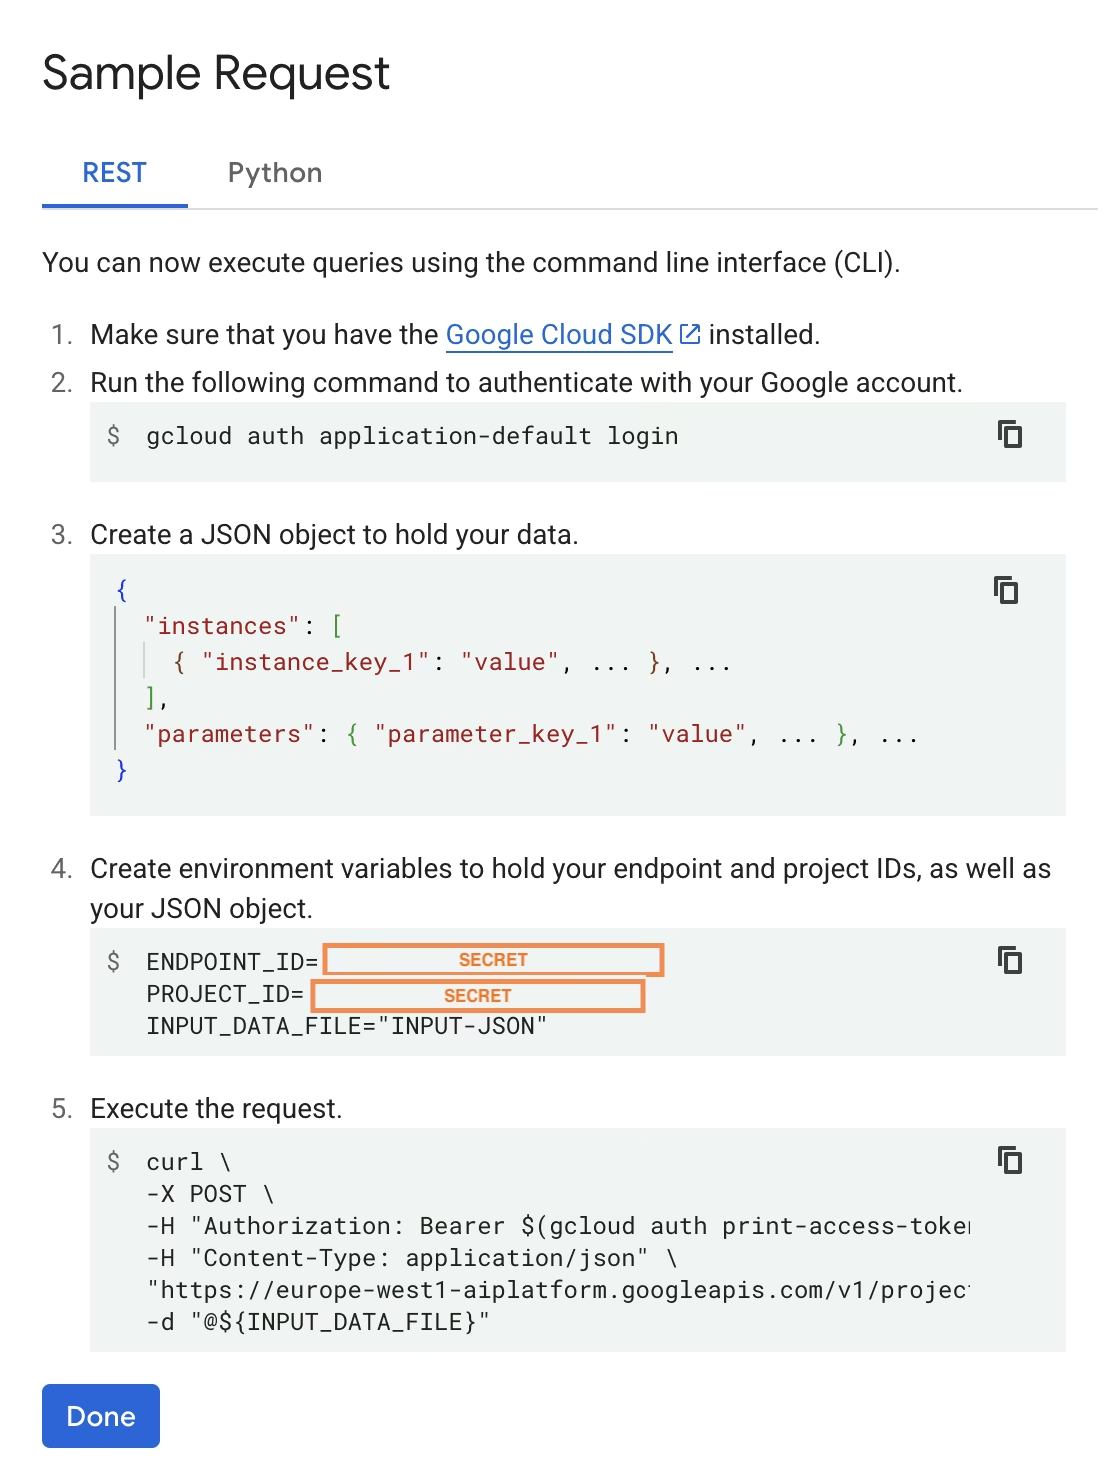
Tương tự như khi kiểm thử cục bộ, hãy dự kiến yêu cầu đầu tiên sẽ có độ trễ ngắn vì Ultralytics cần tải về và nạp model YOLO26 vào container đang chạy.
Bạn đã triển khai thành công model YOLO26 pretrained của Ultralytics trên Google Cloud Vertex AI.
Câu hỏi thường gặp#
Có; tuy nhiên, trước tiên bạn cần xuất model sang định dạng tương thích với Vertex AI, chẳng hạn như TensorFlow, Scikit-learn hoặc XGBoost. Google Cloud cung cấp hướng dẫn chạy model
.pttrên Vertex, kèm tổng quan đầy đủ về quy trình chuyển đổi: Chạy model PyTorch trên Vertex AI.Xin lưu ý rằng cấu hình thu được sẽ chỉ dựa vào lớp phục vụ tiêu chuẩn của Vertex AI và không hỗ trợ các tính năng nâng cao của framework Ultralytics. Vì Vertex AI hỗ trợ đầy đủ các model được đóng gói trong container và có thể tự động mở rộng quy mô theo cấu hình triển khai, bạn có thể tận dụng toàn bộ khả năng của model Ultralytics YOLO mà không cần chuyển đổi sang định dạng khác.
FastAPI cung cấp thông lượng cao cho các workload inference. Hỗ trợ async cho phép xử lý nhiều yêu cầu đồng thời mà không chặn luồng chính, điều này rất quan trọng khi phục vụ các model thị giác máy tính.
Tính năng xác thực yêu cầu/phản hồi tự động của FastAPI giúp giảm lỗi runtime trong các dịch vụ inference production. Điều này đặc biệt hữu ích với API phát hiện đối tượng, nơi tính nhất quán của định dạng đầu vào là yếu tố then chốt.
FastAPI tạo thêm rất ít overhead tính toán cho pipeline inference, nhờ đó dành được nhiều tài nguyên hơn cho việc chạy model và xử lý hình ảnh.
FastAPI cũng hỗ trợ SSE (Sự kiện do máy chủ gửi), hữu ích trong các tình huống inference dạng luồng.
Đây thực chất là một tính năng linh hoạt của Google Cloud Platform, nơi bạn cần chọn khu vực cho từng dịch vụ mình sử dụng. Khi triển khai model đóng gói trong container trên Vertex AI, lựa chọn khu vực quan trọng nhất là khu vực dành cho Model Registry. Lựa chọn này sẽ quyết định các loại máy và hạn mức khả dụng cho việc triển khai model.
Ngoài ra, nếu bạn mở rộng cấu hình và lưu dữ liệu dự đoán hoặc kết quả trong Cloud Storage hay BigQuery, bạn cần sử dụng cùng khu vực với Model Registry để giảm độ trễ và đảm bảo thông lượng truy cập dữ liệu cao.