Hướng dẫn bắt đầu nhanh: Seeed Studio reCamera với Ultralytics YOLO26
reCamera được giới thiệu với cộng đồng AI tại YOLO Vision 2024 (YV24), sự kiện kết hợp thường niên của Ultralytics. Sản phẩm chủ yếu được thiết kế cho ứng dụng AI biên, cung cấp khả năng xử lý AI trực tiếp trên thiết bị và triển khai đơn giản.
Với khả năng hỗ trợ nhiều cấu hình phần cứng và tài nguyên mã nguồn mở, sản phẩm này rất phù hợp để tạo nguyên mẫu và triển khai giải pháp thị giác máy tính ở biên.
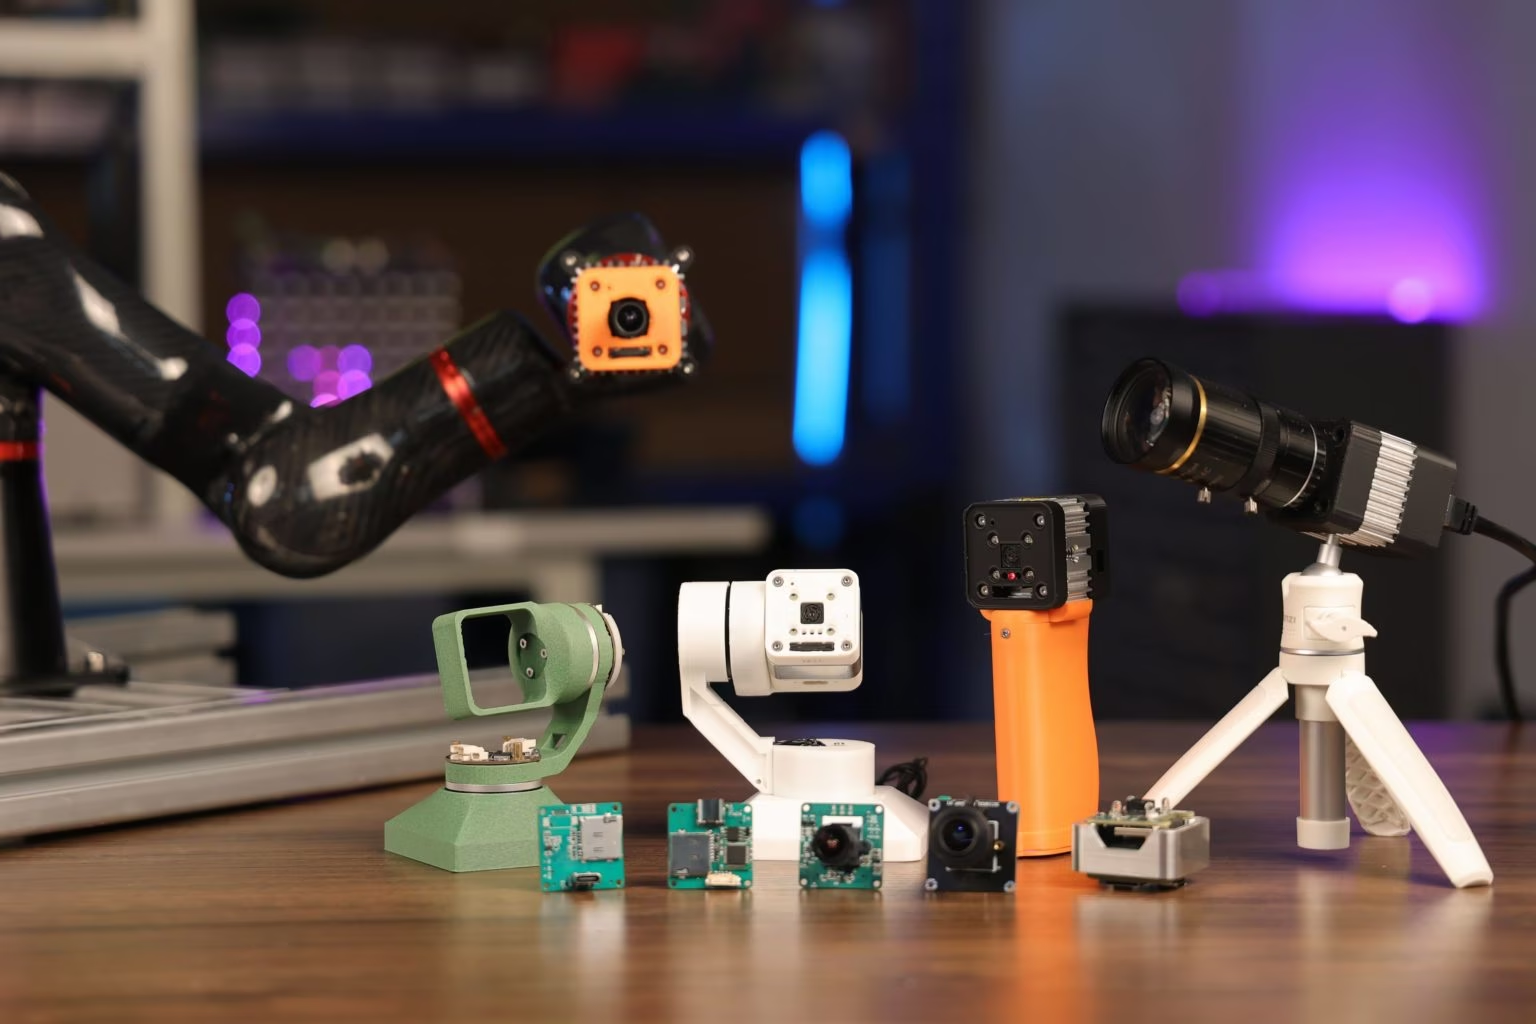
Vì sao nên chọn reCamera?#
Dòng reCamera được thiết kế chuyên biệt cho ứng dụng AI biên, phù hợp với nhu cầu của nhà phát triển. Các tính năng chính gồm:
-
Hiệu năng dựa trên RISC-V: Bộ xử lý SG200X, được xây dựng trên kiến trúc RISC-V, là thành phần cốt lõi và mang lại hiệu năng hiệu quả cho các tác vụ AI biên. Với khả năng thực hiện 1 nghìn tỷ phép toán mỗi giây (1 TOPS), bộ xử lý này có thể xử lý các tác vụ như phát hiện đối tượng theo thời gian thực.
-
Công nghệ video tối ưu hóa: Hỗ trợ các chuẩn nén video tiên tiến, bao gồm H.264 và H.265, để giảm yêu cầu về lưu trữ và băng thông mà không ảnh hưởng đến chất lượng. Các tính năng như xử lý ảnh HDR, giảm nhiễu 3D và hiệu chỉnh ống kính giúp duy trì chất lượng ảnh ngay cả trong môi trường khó khăn.
-
Xử lý kép tiết kiệm năng lượng: Trong khi SG200X xử lý các tác vụ AI phức tạp, một vi điều khiển 8-bit nhỏ hơn đảm nhiệm các thao tác đơn giản để tiết kiệm điện năng, khiến reCamera trở thành lựa chọn lý tưởng cho các hệ thống dùng pin hoặc công suất thấp.
-
Thiết kế mô-đun, có thể nâng cấp: reCamera được xây dựng với cấu trúc mô-đun gồm ba thành phần chính: bo mạch lõi, bo mạch cảm biến và bo mạch nền. Thiết kế này cho phép nhà phát triển thay thế hoặc nâng cấp các thành phần khi dự án phát triển.
Thiết lập phần cứng reCamera nhanh chóng#
Truy cập trang Bắt đầu với reCamera và chọn thiết bị của bạn (chẳng hạn reCamera 2002 Series, Gimbal hoặc HQ POE) để mở Hướng dẫn bắt đầu nhanh, hướng dẫn thiết lập ban đầu như kết nối thiết bị với mạng và truy cập giao diện web Node-RED để xem nhanh kết quả phát hiện.
Suy luận bằng các model YOLO được cài đặt sẵn#
reCamera được cài sẵn bốn model Ultralytics YOLO, và bạn có thể chọn model mong muốn trong dashboard Node-RED.
Bước 1: Nếu đã kết nối reCamera với mạng, hãy nhập địa chỉ IP của reCamera vào trình duyệt web để mở dashboard Node-RED. Nếu đã kết nối reCamera với PC qua USB, bạn có thể nhập 192.168.42.1. Model phát hiện được tải theo mặc định.
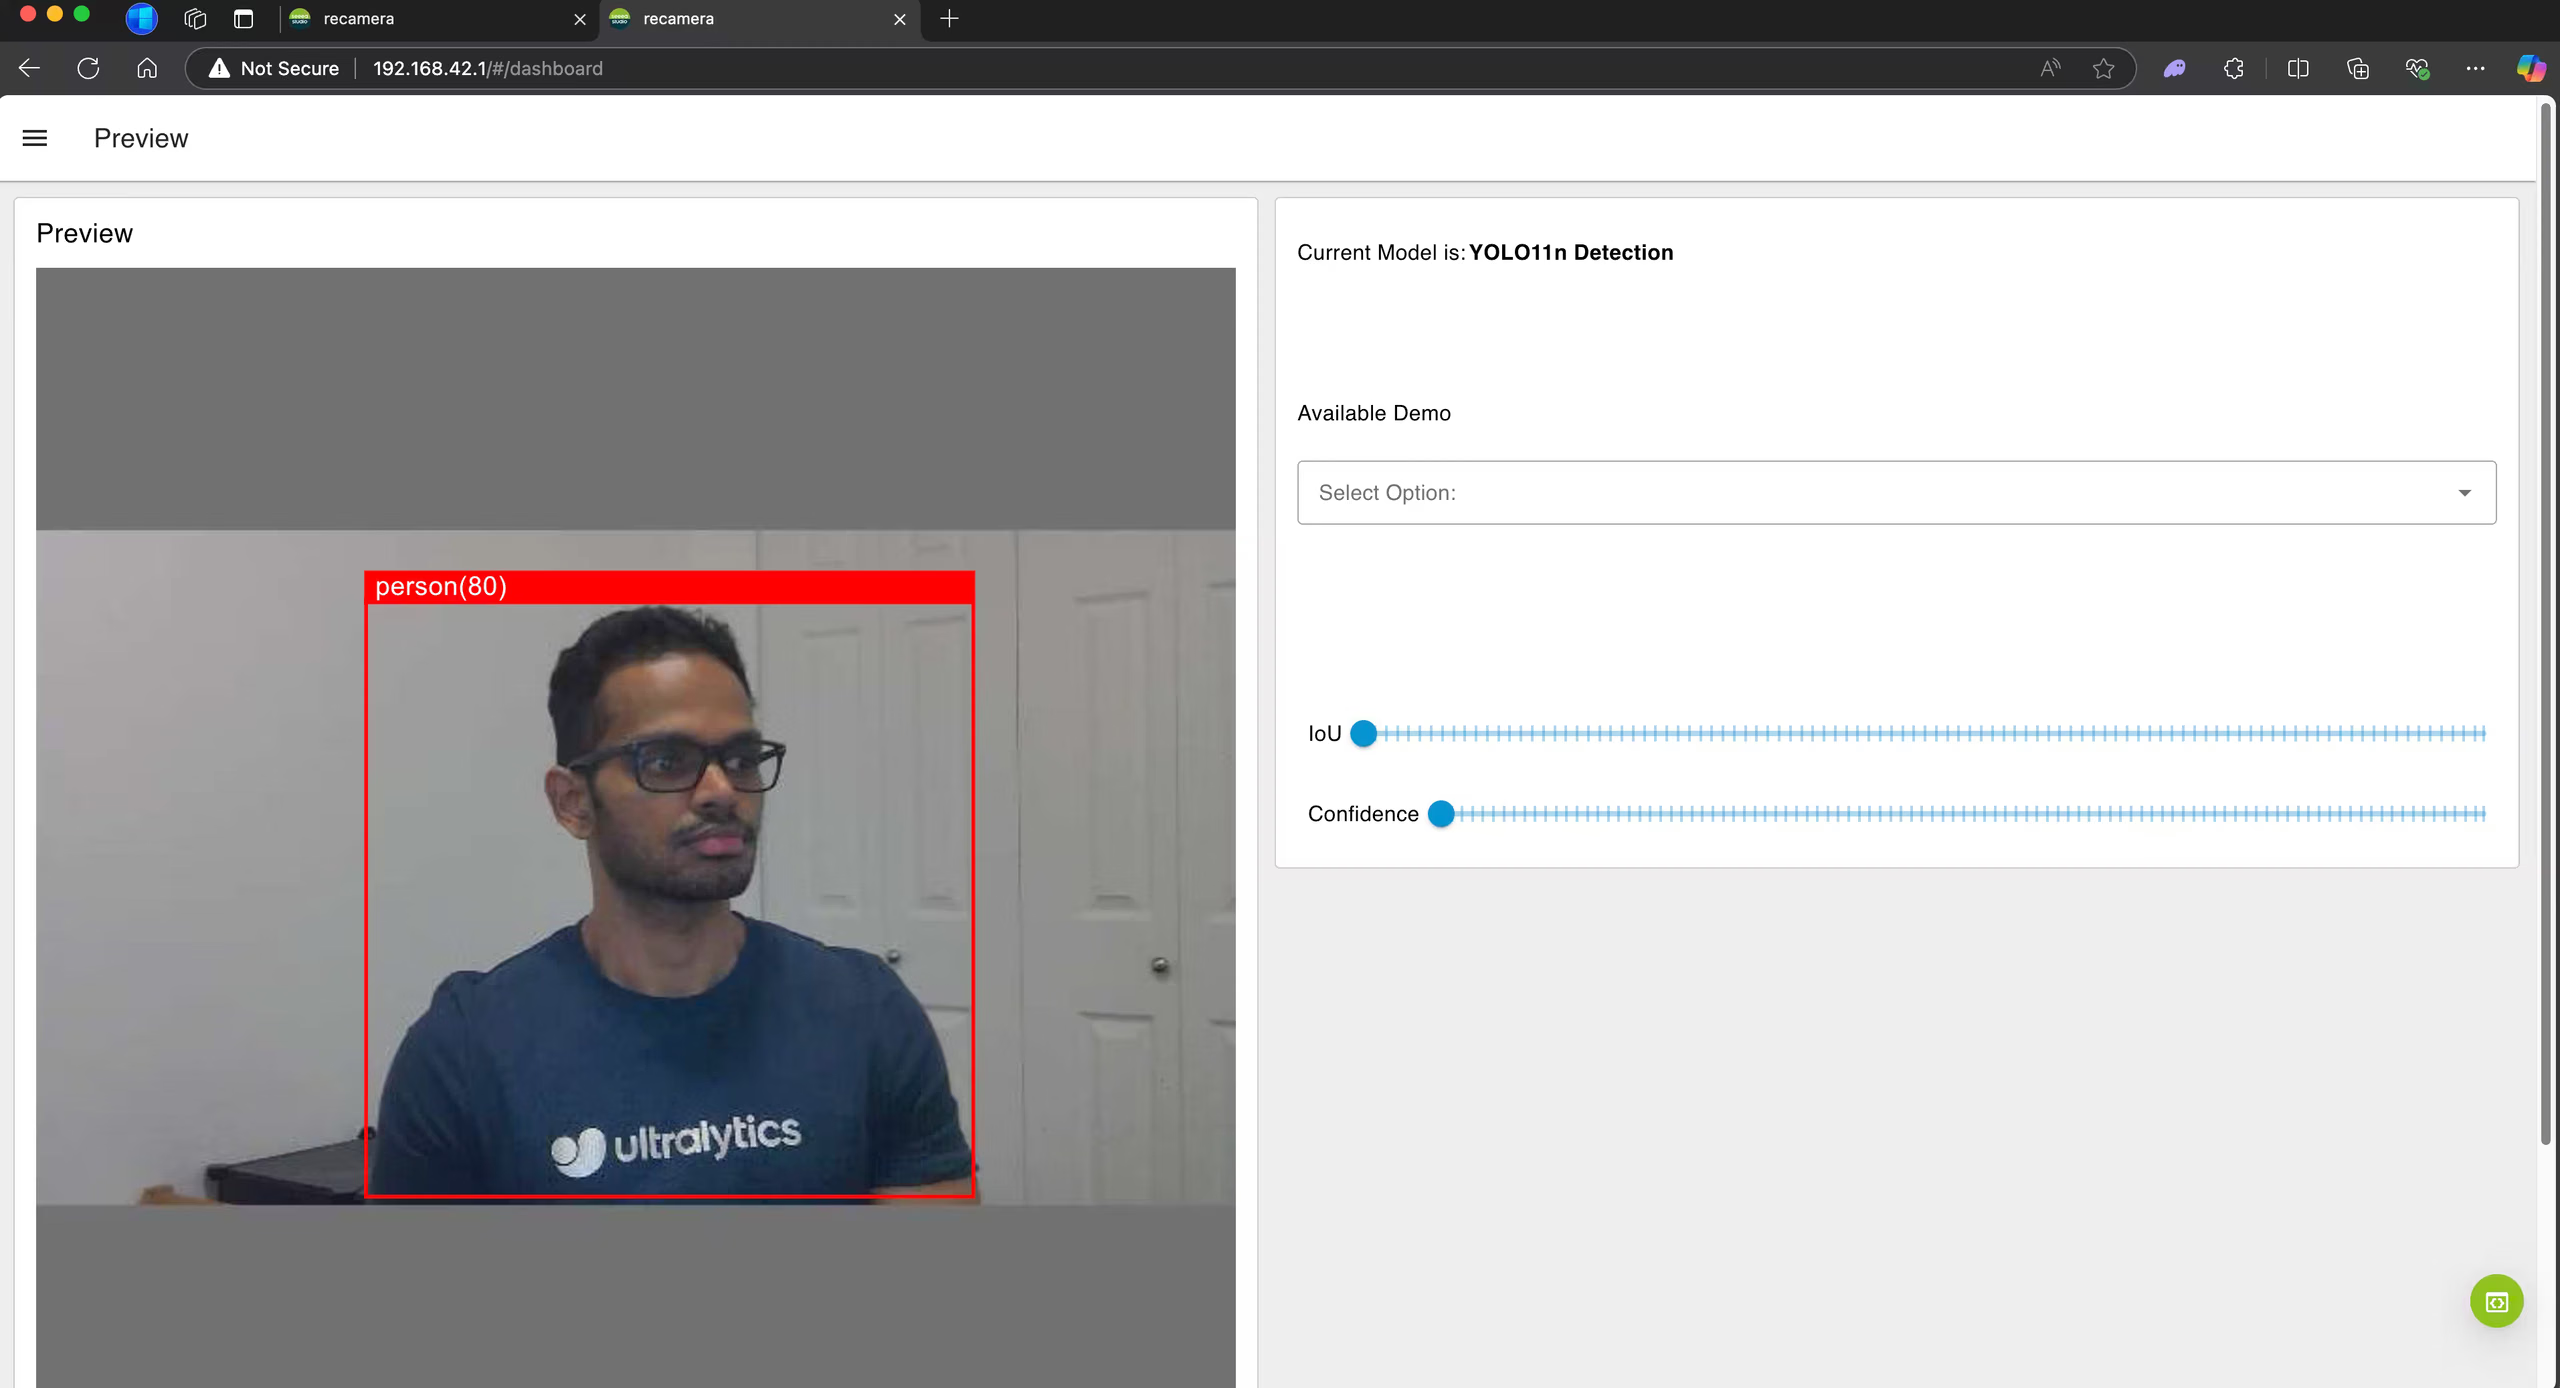
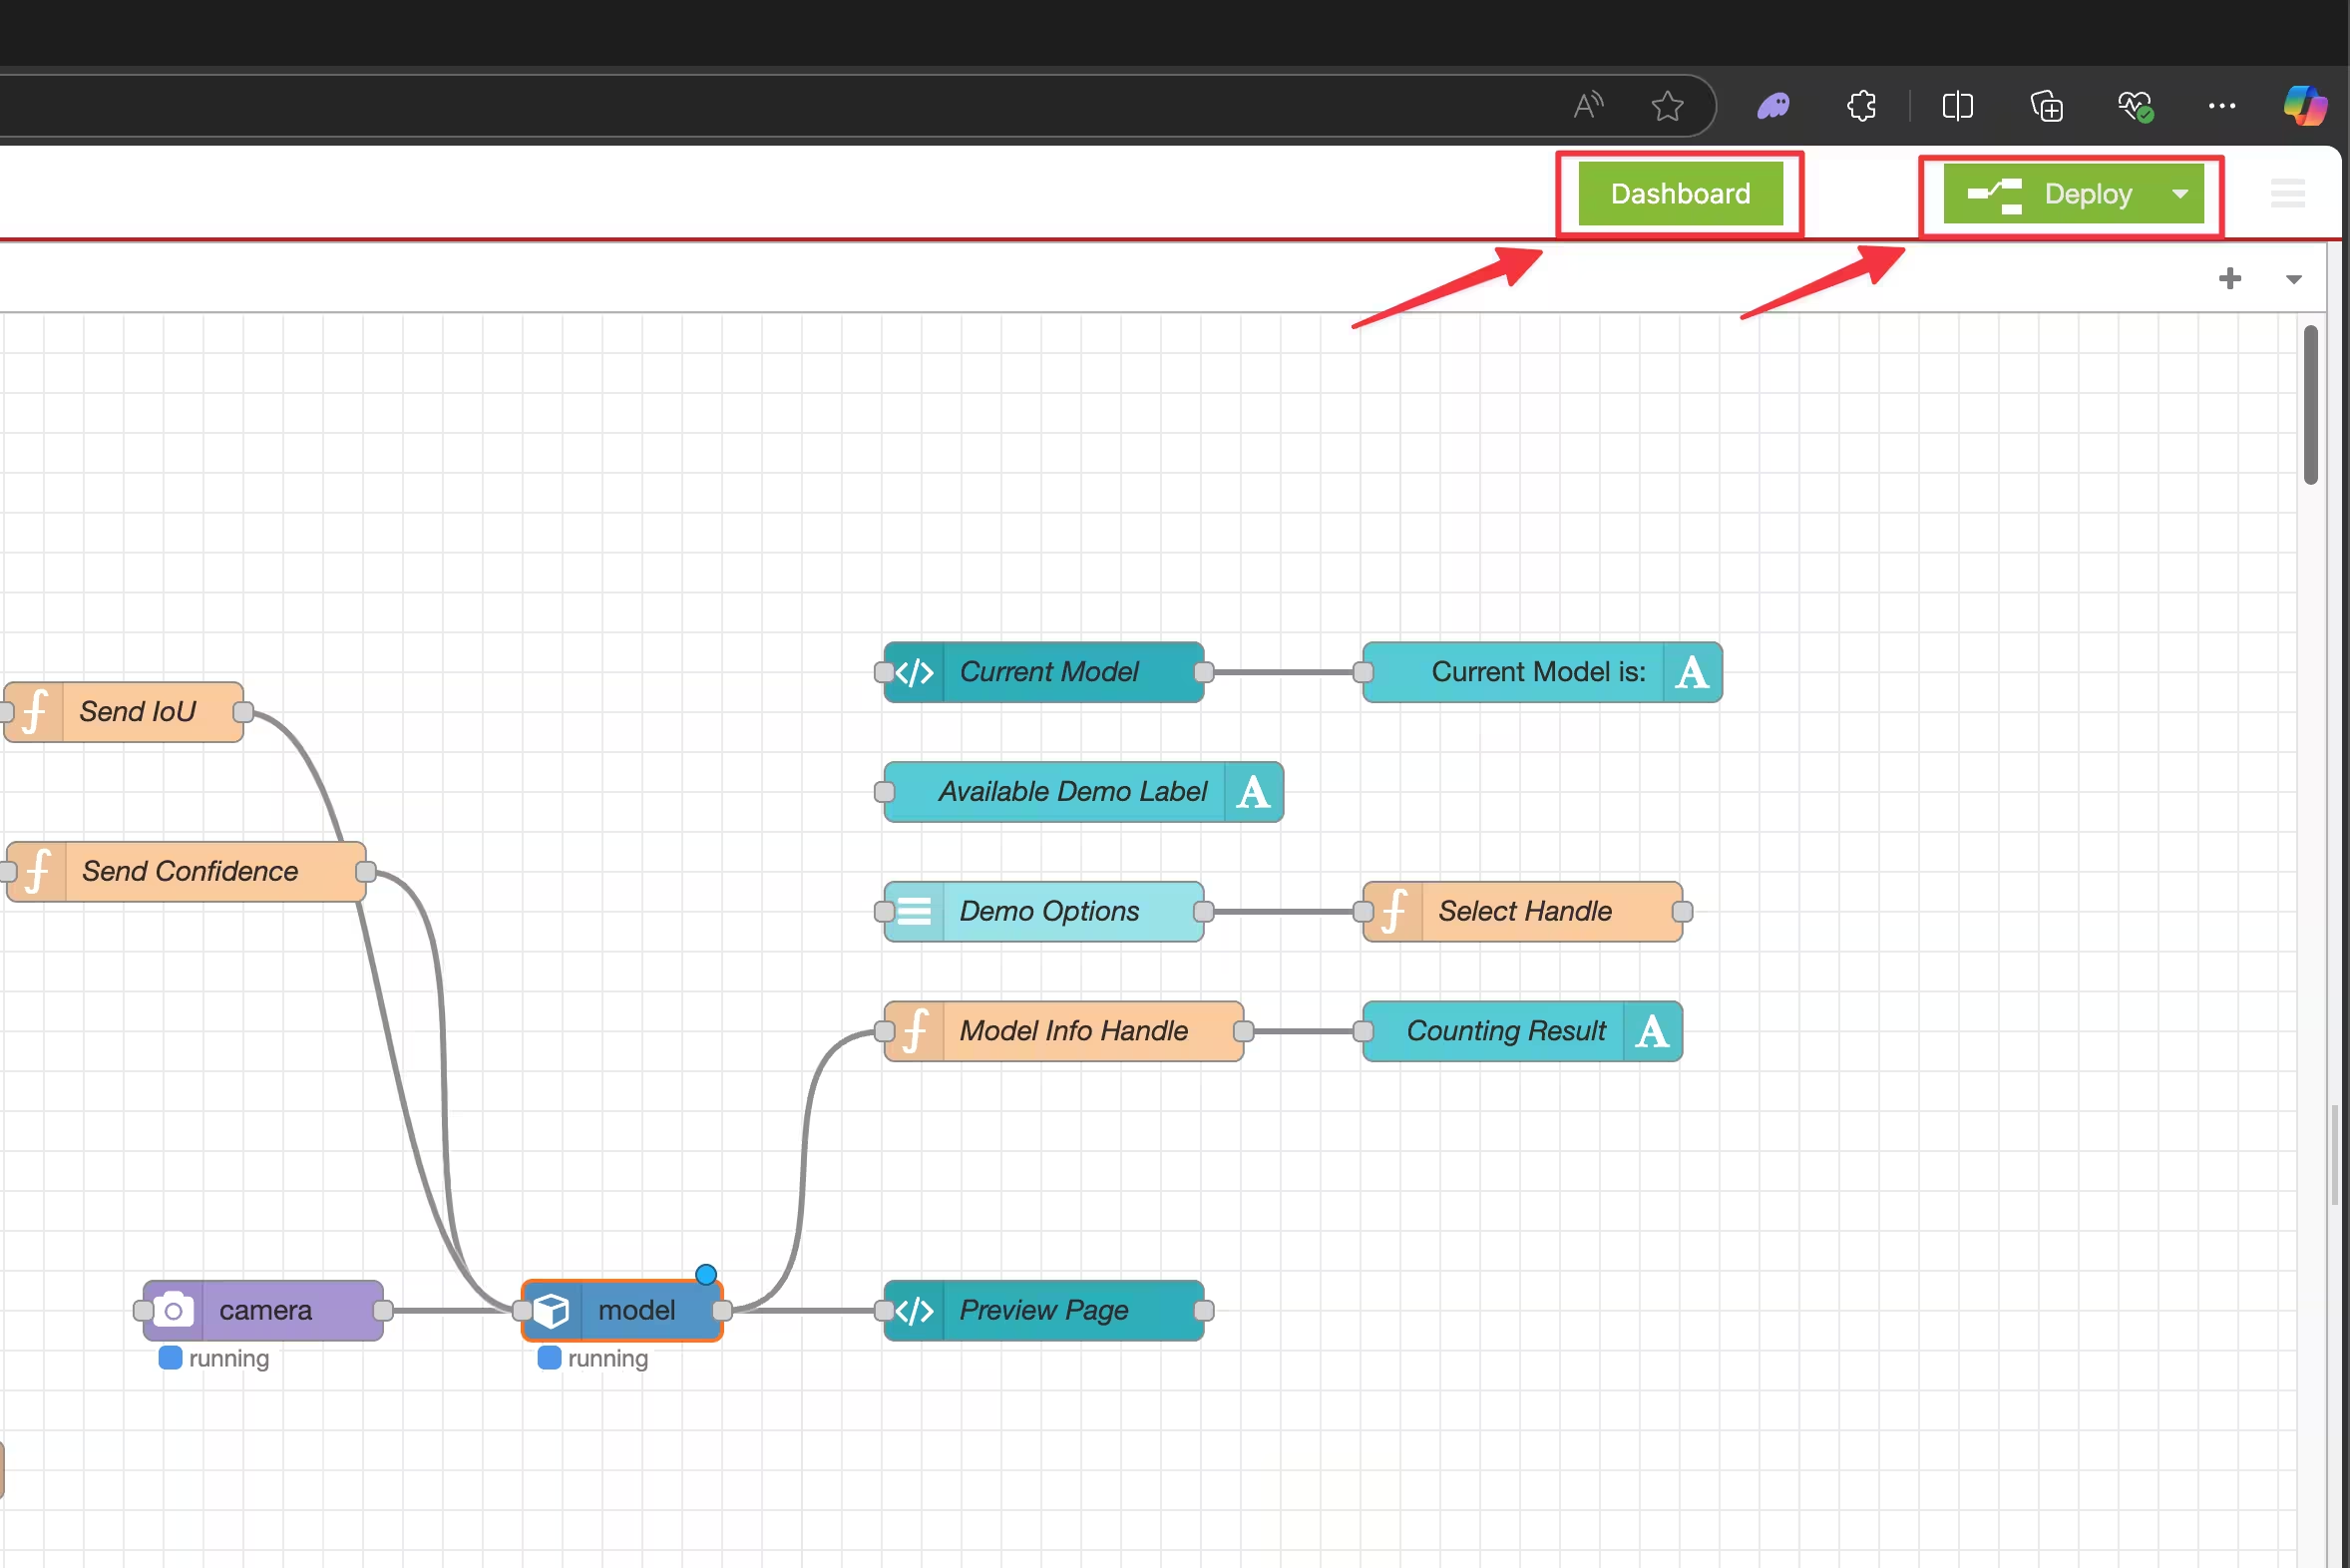
Bước 2: Nhấp vào vòng tròn màu xanh lá ở góc dưới bên phải để mở trình chỉnh sửa flow của Node-RED.
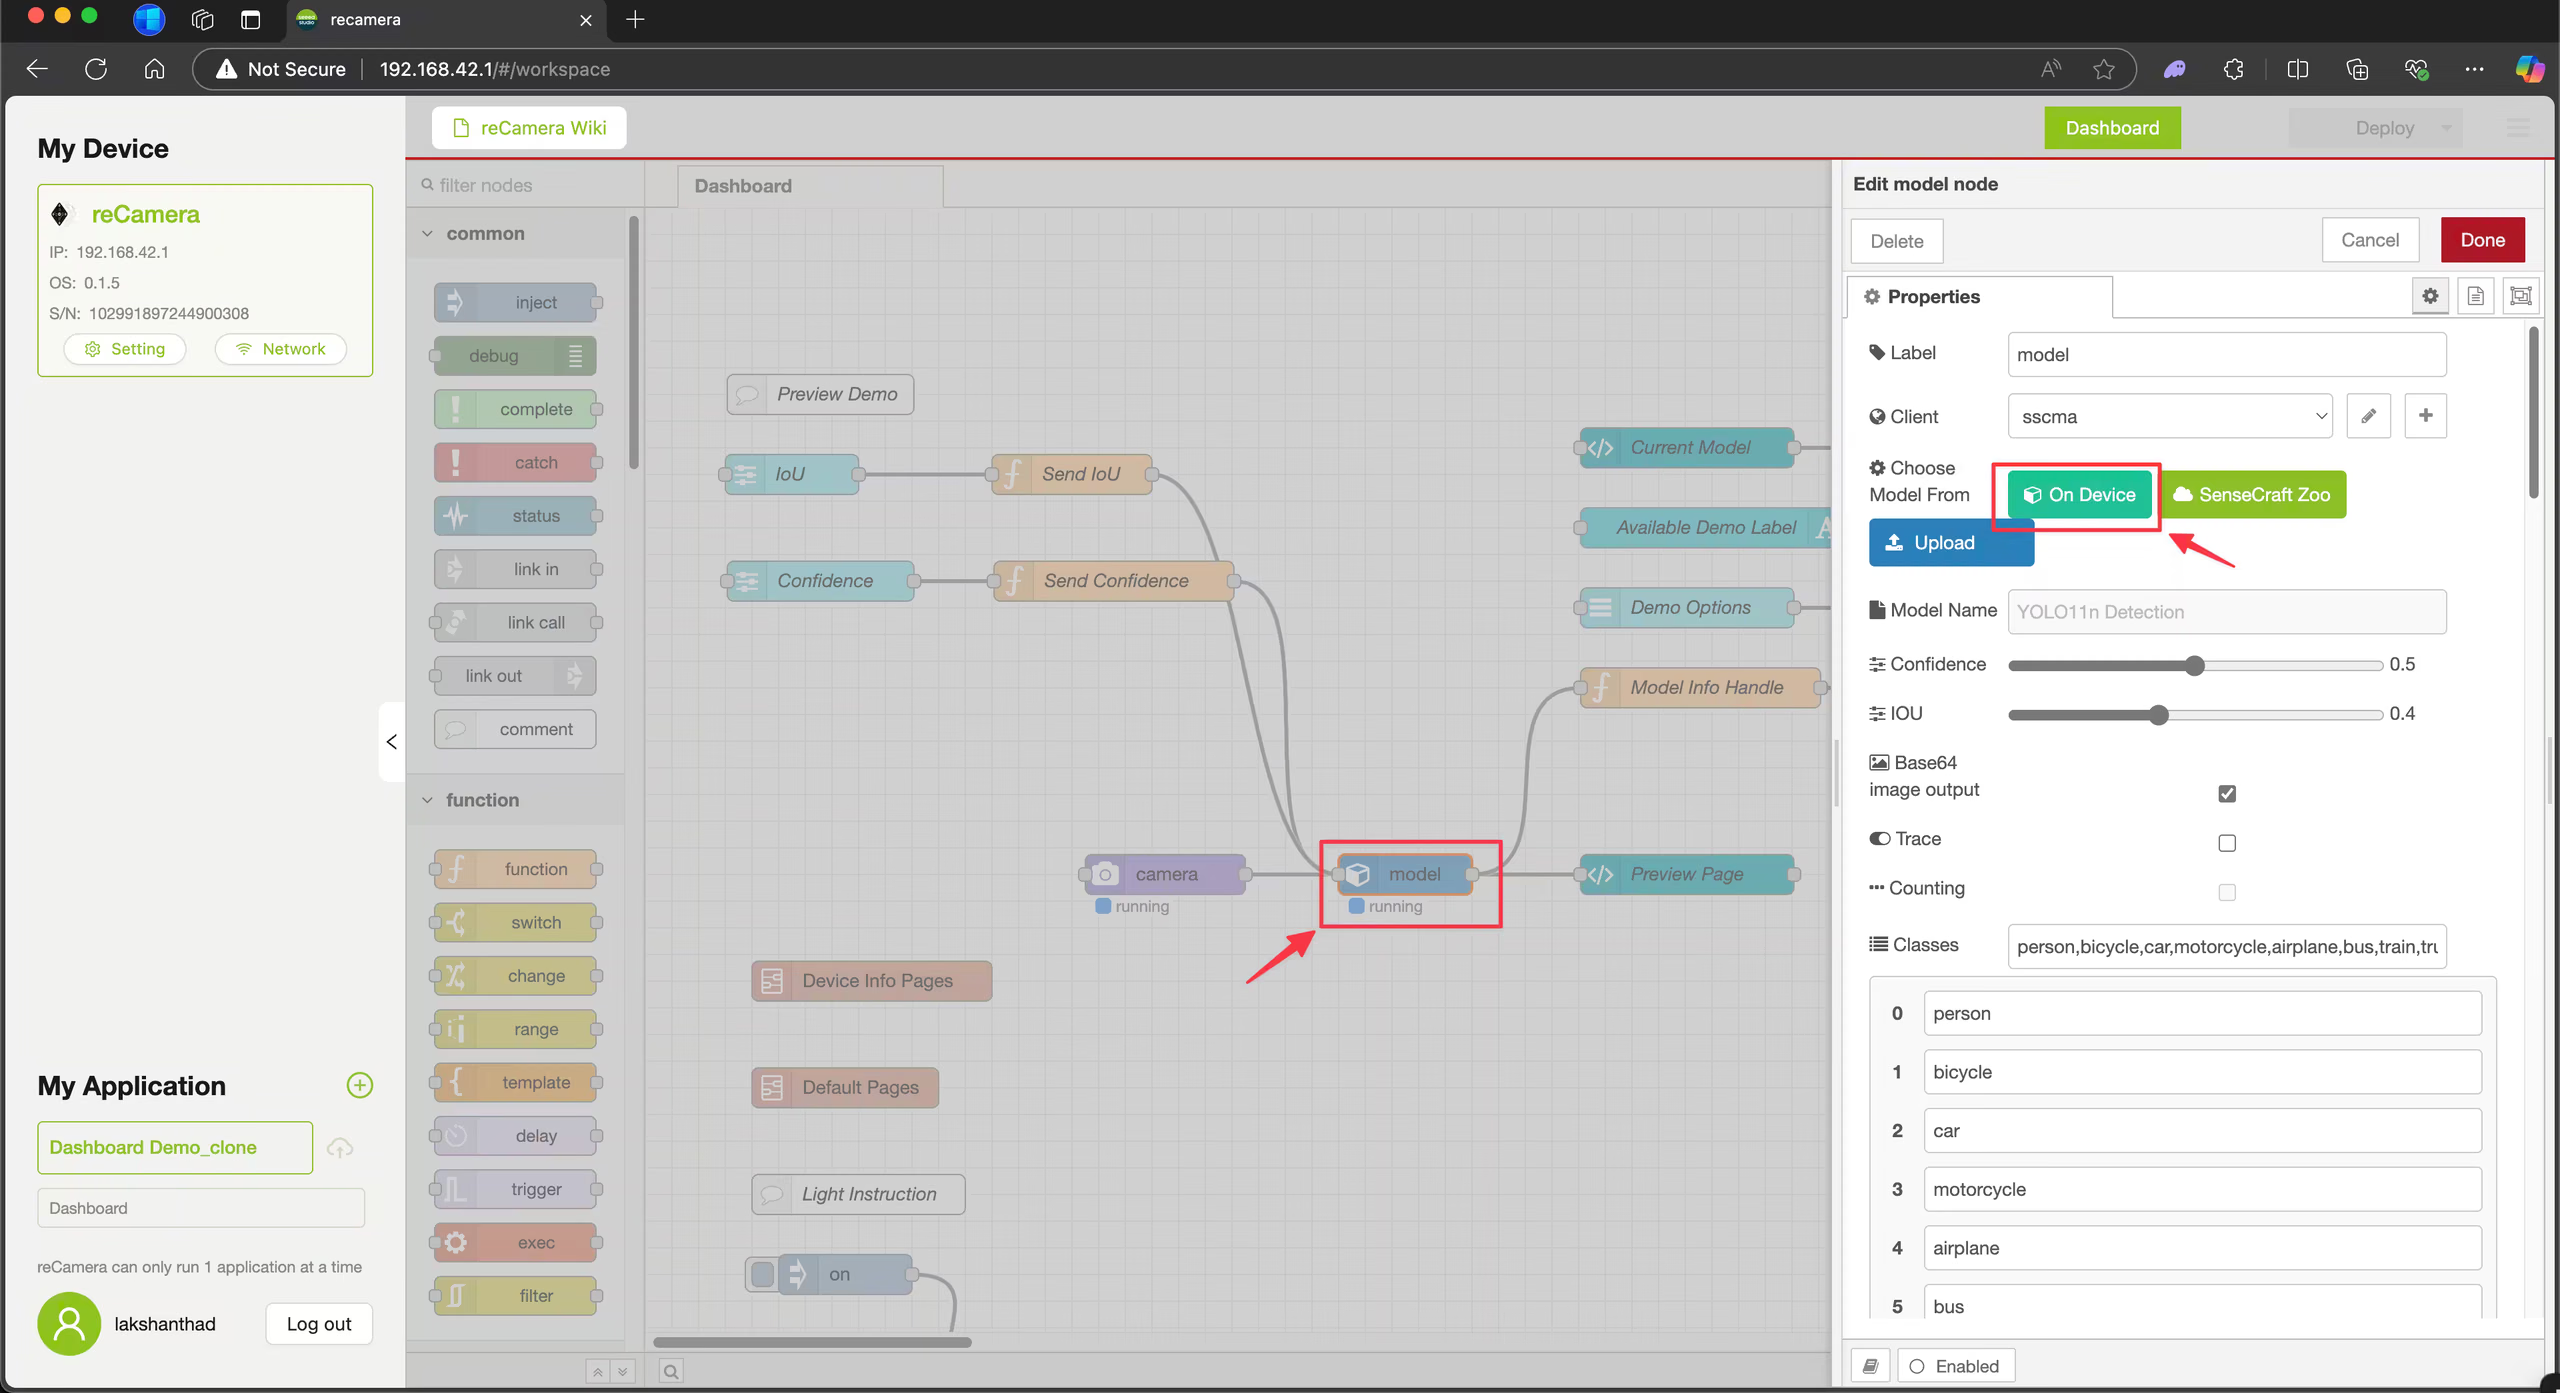
Bước 3: Nhấp vào node model, sau đó nhấp vào On Device.
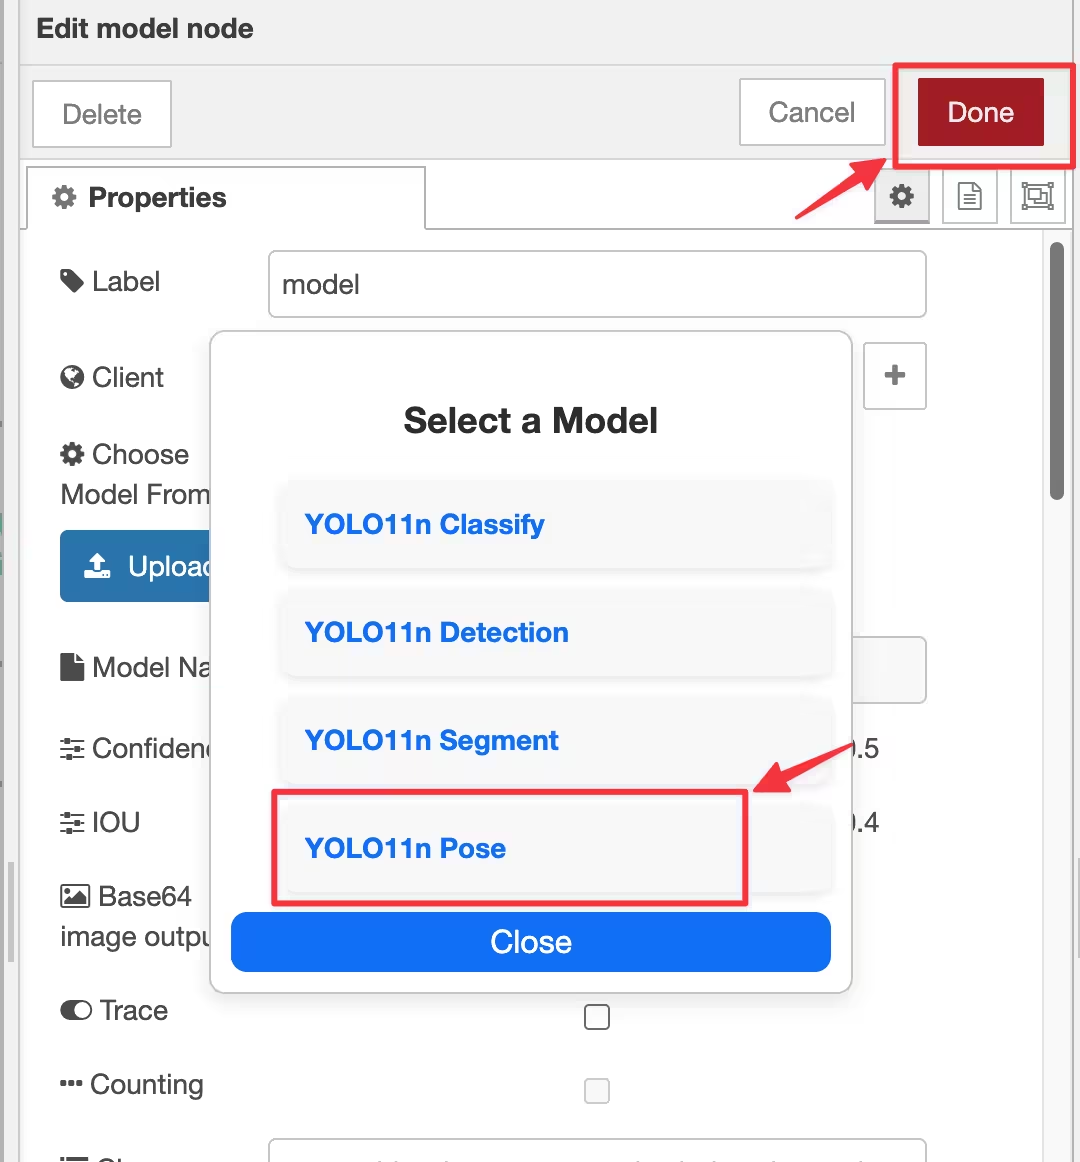
Bước 4: Chọn một trong bốn model được cài sẵn và nhấp vào Done. Ví dụ này chọn model pose.
Bước 5: Nhấp vào Deploy; khi quá trình triển khai hoàn tất, hãy nhấp vào Dashboard.
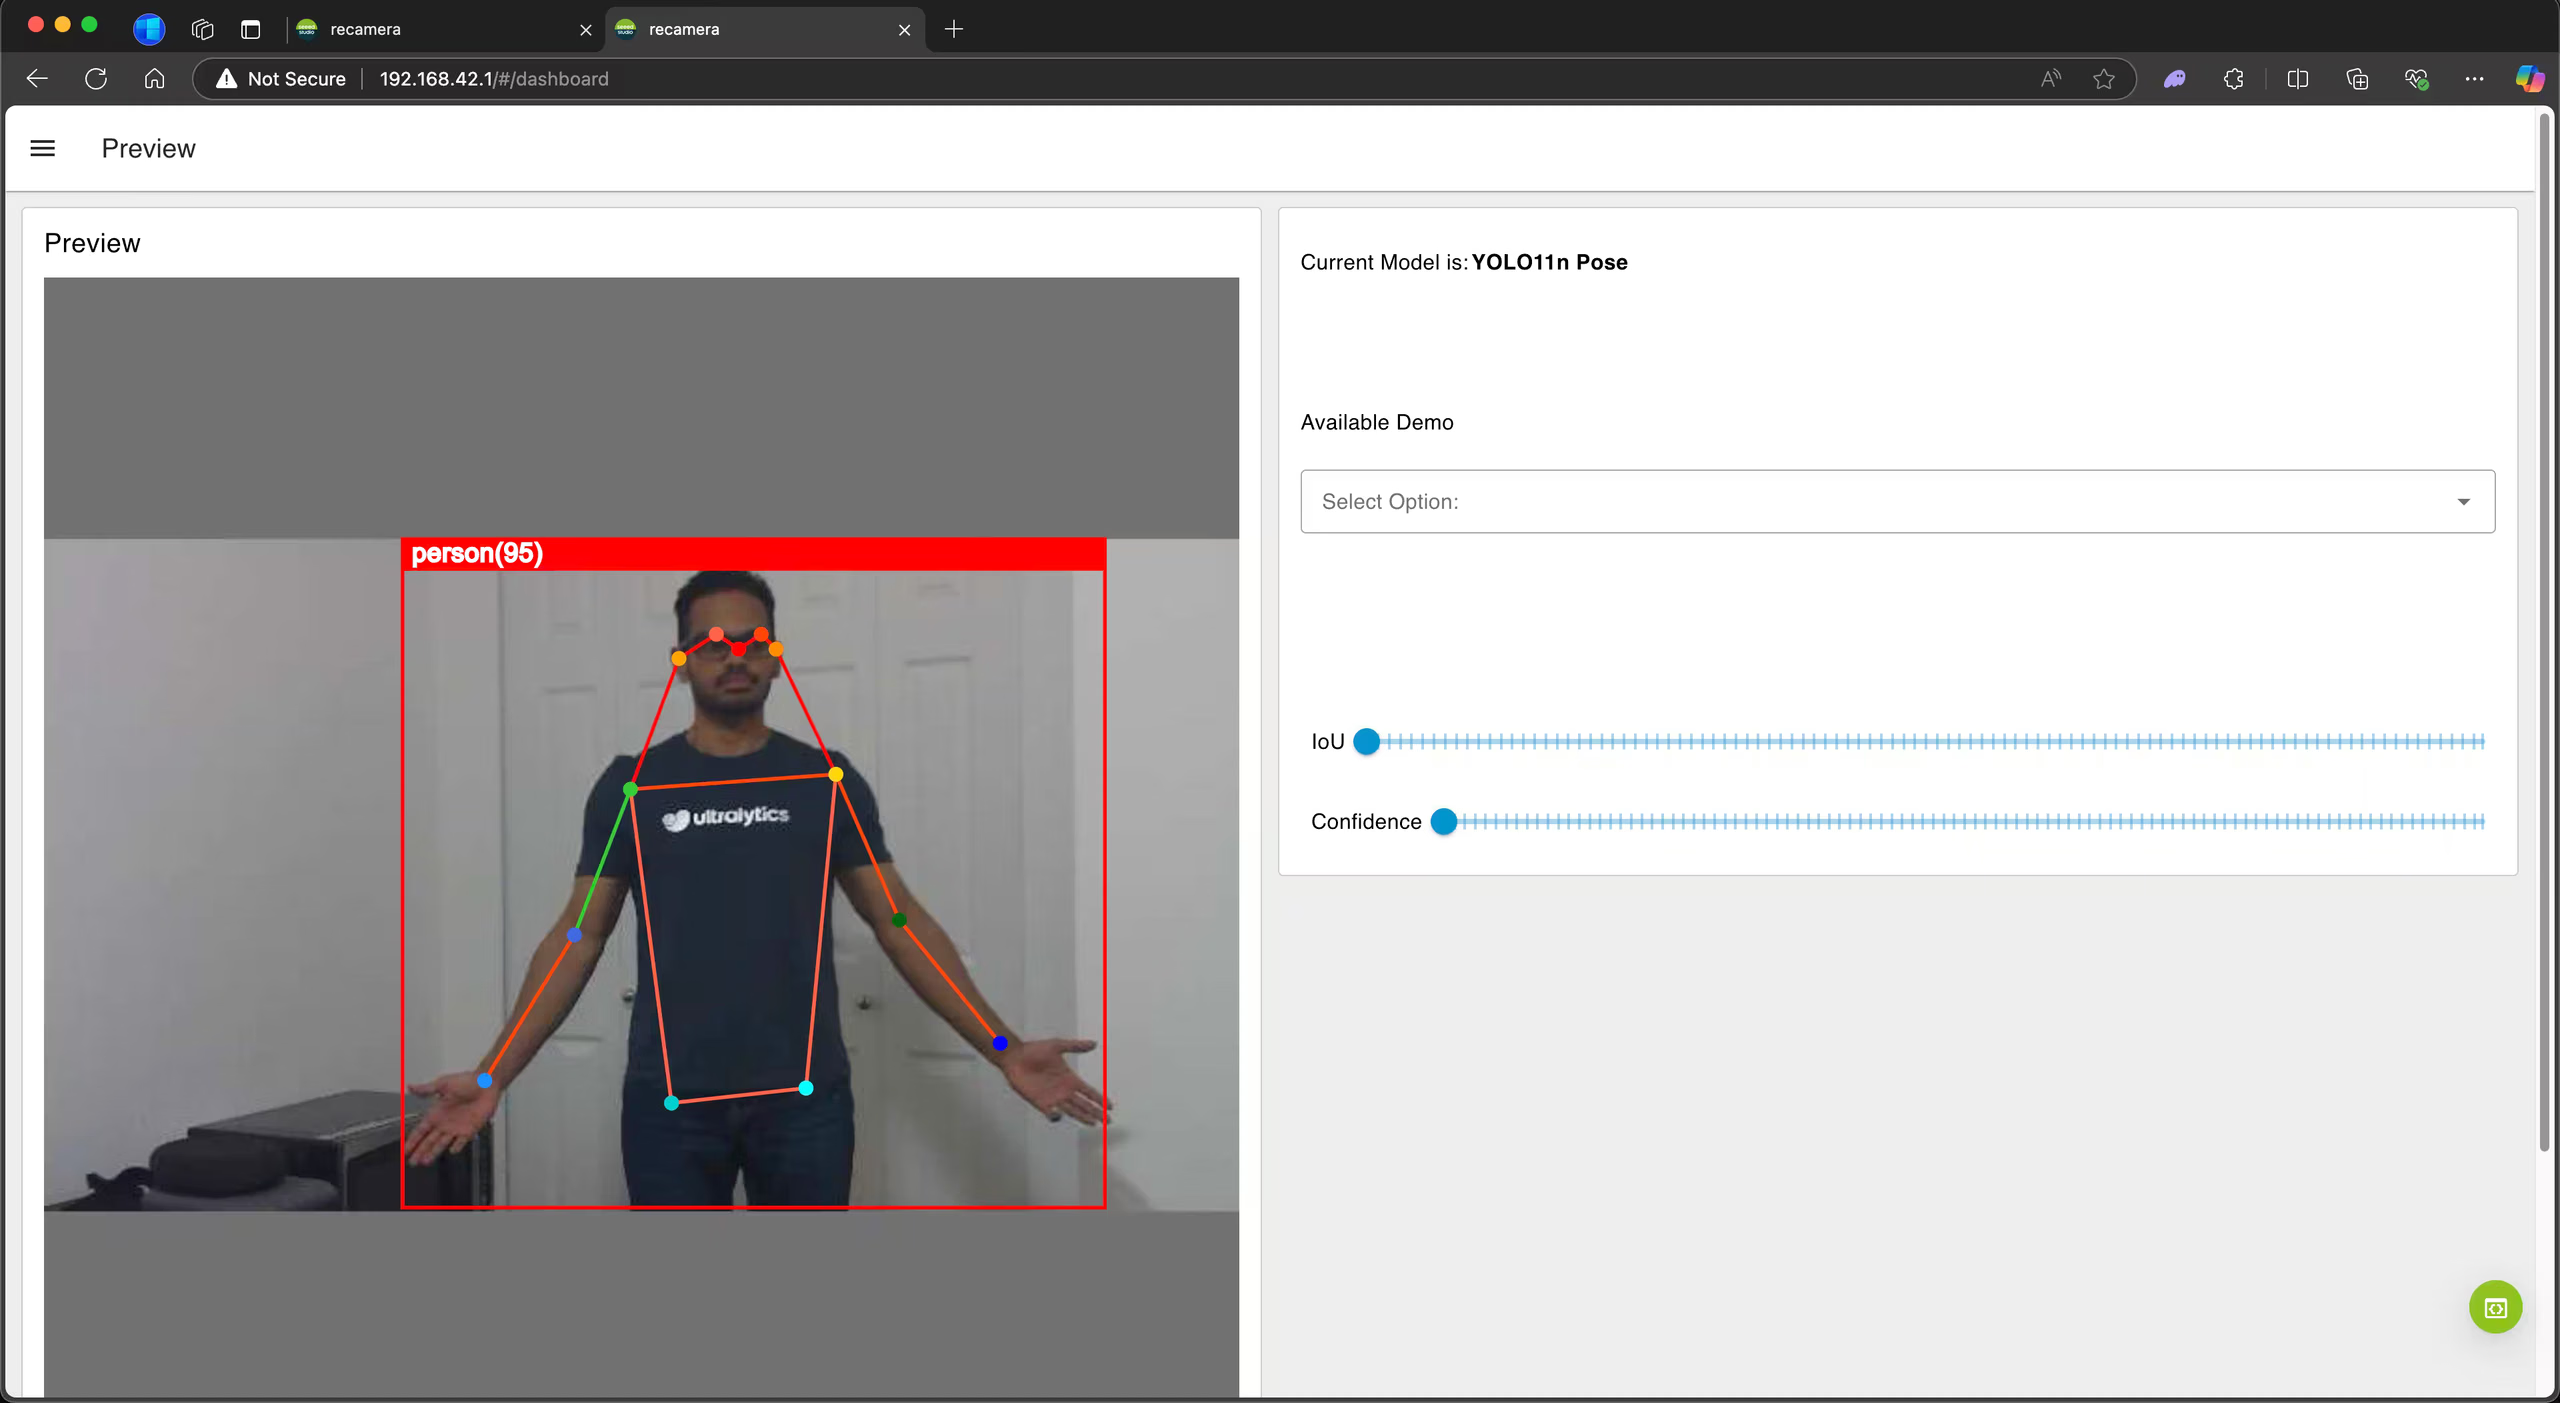
Dashboard hiện hiển thị model ước tính pose đang chạy trên luồng hình ảnh từ camera.
Xuất sang cvimodel: Chuyển đổi model YOLO26#
Nếu muốn sử dụng model YOLO26 được huấn luyện tùy chỉnh với reCamera, hãy làm theo các bước dưới đây.
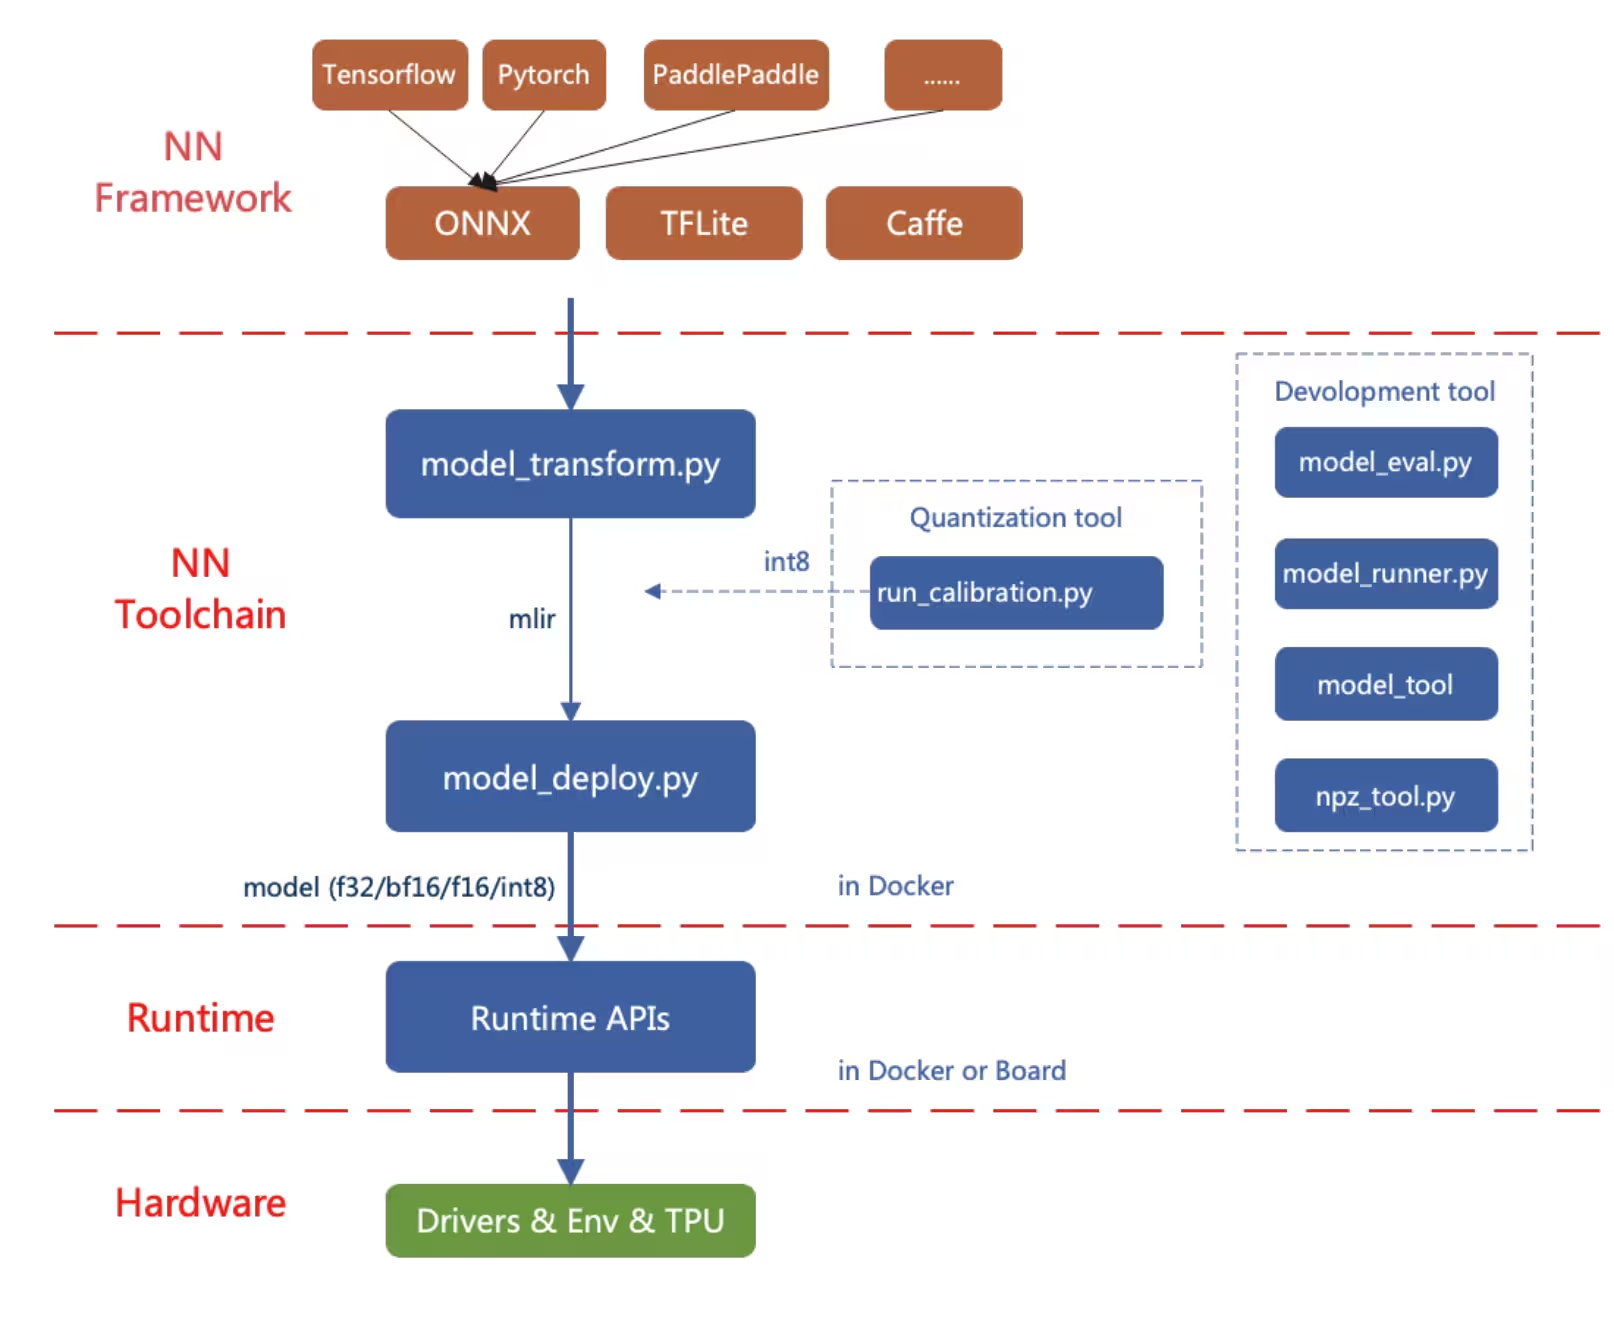
Quá trình chuyển đổi trước tiên xuất model PyTorch sang ONNX, sau đó chuyển đổi sang định dạng model MLIR, rồi cuối cùng chuyển MLIR sang cvimodel để chạy inference trên thiết bị.
Xuất sang ONNX#
Xuất model Ultralytics YOLO26 sang định dạng model ONNX.
Cài đặt#
Để cài đặt các package cần thiết, hãy chạy:
pip install ultralyticsĐể biết hướng dẫn chi tiết và các phương pháp tốt nhất về quy trình cài đặt, hãy xem hướng dẫn cài đặt Ultralytics. Nếu gặp khó khăn khi cài đặt các package cần thiết cho YOLO26, hãy tham khảo hướng dẫn khắc phục sự cố thường gặp để tìm giải pháp và mẹo hữu ích.
Cách sử dụng#
from ultralytics import YOLO

# Nạp model YOLO26
model = YOLO("yolo26n.pt")

# # Xuất model sang định dạng ONNX
model.export(format="onnx", opset=14)  # tạo 'yolo26n.onnx'
Để biết thêm chi tiết về quy trình xuất, hãy truy cập trang tài liệu Ultralytics về xuất model.
Xuất ONNX sang MLIR và cvimodel#
Sau khi có model ONNX, hãy tham khảo trang Chuyển đổi và lượng tử hóa model AI để chuyển model ONNX sang MLIR, rồi sang cvimodel.
Ứng dụng thực tế của reCamera#
Khả năng thị giác máy tính trên thiết bị và thiết kế mô-đun của reCamera khiến thiết bị phù hợp với nhiều tình huống thực tế.
-
Phát hiện té ngã: Được thiết kế cho các ứng dụng an toàn và chăm sóc sức khỏe, reCamera có thể phát hiện té ngã theo thời gian thực, phù hợp với dịch vụ chăm sóc người cao tuổi, bệnh viện và môi trường công nghiệp, nơi cần phản ứng nhanh.
-
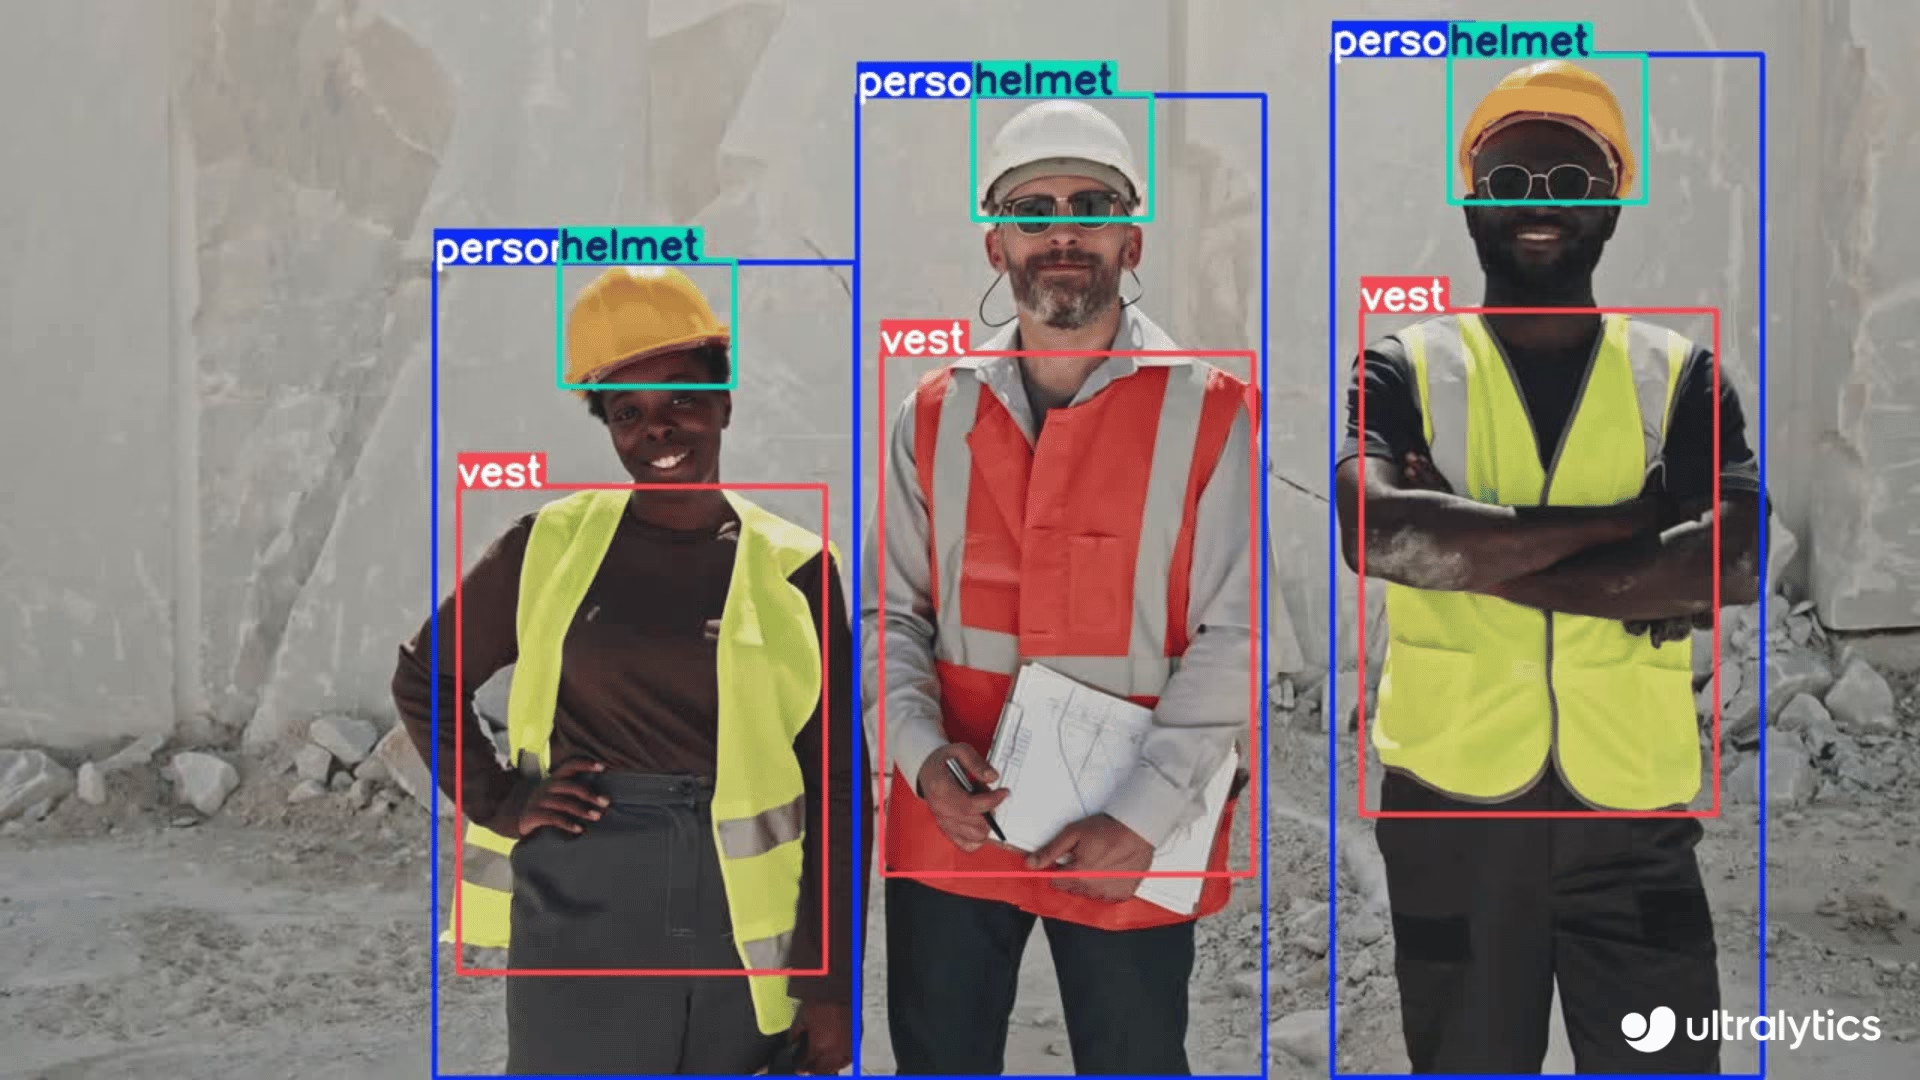
Phát hiện trang bị bảo hộ cá nhân: reCamera có thể hỗ trợ an toàn nơi làm việc bằng cách phát hiện mức độ tuân thủ quy định về PPE theo thời gian thực. Thiết bị giúp xác định người lao động có đang đội mũ bảo hộ, đeo găng tay hoặc sử dụng trang bị an toàn khác hay không, qua đó giảm rủi ro trong môi trường công nghiệp.
-
Phát hiện cháy: Khả năng xử lý theo thời gian thực của reCamera khiến thiết bị phù hợp để phát hiện cháy tại các khu vực công nghiệp và dân cư, đưa ra cảnh báo sớm để ngăn ngừa thảm họa tiềm ẩn.
-
Phát hiện rác thải: Thiết bị cũng có thể được dùng để phát hiện rác thải trong hoạt động giám sát môi trường và quản lý rác thải bằng YOLO11.
-
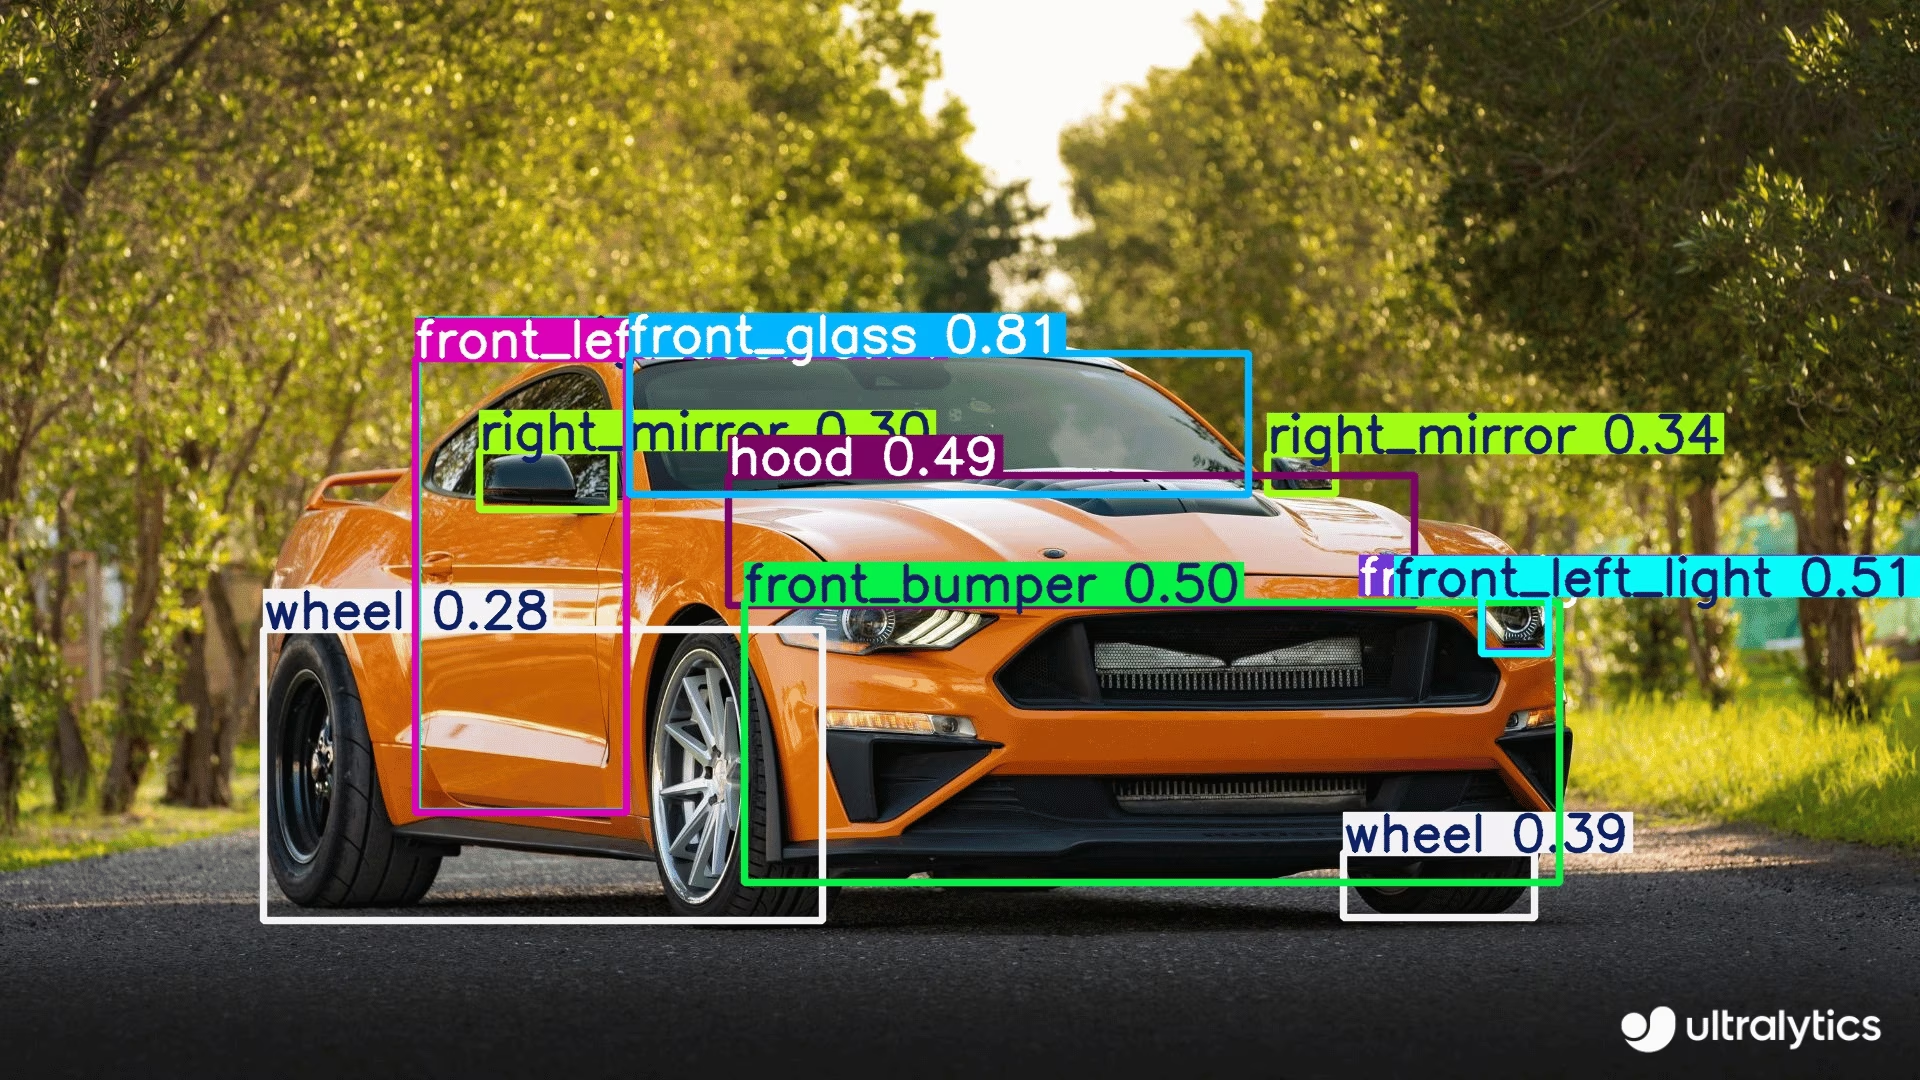
Phát hiện phụ tùng ô tô: Trong ngành sản xuất và công nghiệp ô tô, thiết bị hỗ trợ phát hiện và phân tích phụ tùng ô tô nhằm kiểm soát chất lượng, giám sát dây chuyền lắp ráp và quản lý hàng tồn kho.
Câu hỏi thường gặp#
Để thiết lập reCamera lần đầu tiên, hãy làm theo các bước sau:
- Kết nối reCamera với nguồn điện
- Kết nối thiết bị với mạng bằng trang Bắt đầu với reCamera (chọn thiết bị để mở Hướng dẫn bắt đầu nhanh tương ứng)
- Truy cập giao diện web Node-RED bằng cách nhập địa chỉ IP của thiết bị vào trình duyệt web (hoặc sử dụng
192.168.42.1nếu kết nối qua USB) - Bắt đầu sử dụng ngay các model YOLO được cài đặt sẵn thông qua giao diện dashboard
Có, bạn có thể sử dụng các model YOLO26 tự huấn luyện với reCamera. Quy trình gồm các bước sau:
- Xuất model PyTorch sang định dạng ONNX bằng
model.export(format="onnx", opset=14) - Chuyển đổi model ONNX sang định dạng MLIR
- Chuyển đổi MLIR sang định dạng cvimodel để suy luận trên thiết bị
- Tải model đã chuyển đổi lên reCamera
Để xem hướng dẫn chi tiết, tham khảo hướng dẫn Chuyển đổi và lượng tử hóa model AI.
- Xuất model PyTorch sang định dạng ONNX bằng
Không giống camera IP truyền thống cần phần cứng bên ngoài để xử lý, reCamera:
- Tích hợp trực tiếp khả năng xử lý AI trên thiết bị với bộ xử lý RISC-V SG200X
- Cung cấp sức mạnh tính toán 1 TOPS cho các ứng dụng AI biên theo thời gian thực
- Có thiết kế mô-đun cho phép nâng cấp và tùy chỉnh linh kiện
- Hỗ trợ các công nghệ video tiên tiến như nén H.264/H.265, xử lý ảnh HDR và giảm nhiễu 3D
- Được cài đặt sẵn các model Ultralytics YOLO để sử dụng ngay
Nhờ những tính năng này, reCamera là giải pháp độc lập cho các ứng dụng AI biên mà không cần thêm phần cứng xử lý bên ngoài.


Bình luận50
Đặt câu hỏi, chia sẻ kết quả hoặc giúp đỡ người khác.
tcpipchip
we wrote a book and trainned to yolo26 on ultralytics...i recall that works
 Glenn JocherUltralytics
Yes, a custom-trained
YOLO26model can run onreCamerausing theONNX -> MLIR -> cvimodelworkflow in the reCamera guide; if you hit a blocker, please share the exact step and full error here so the Ultralytics team can help.
HanJammer
This site mentions recamera comes with YOLO26 (which is why I bought two of them) yet YOLO11 is installed (which is visible on screenshots as well) and I can't load YOLO26 - how to do that? I can't find reliable guide :(
Ah nevermind, I think I got it, still it would be better not to advertise the camera "reCamera comes pre-installed with four Ultralytics YOLO26 models" which is basically not true.
I whipped out some 'single click' tool to convert YOLO26 onnx-es which makes it a bit easier... I need to test it a bit, for now it supports the base model. Perhaps I will push it to my github later this week.
This is fantastic.
When you finish it, i will add to the BOOK.
Here is the first version of the converter util (it's just GUI and few scripts over the actual workflow). For now it was tested with a base detection model under Windows. More to come.
https://github.com/HanJammer/reCamera_YOLO26
Video presentation here: https://youtu.be/XgPjyj2U8YQ
Here is the first version of the converter util (it's just GUI and few scripts over the actual workflow). For now it was tested with a base detection model under Windows. More to come.
https://github.com/HanJammer/reCamera_YOLO26
Video presentation here: https://youtu.be/XgPjyj2U8YQ
wow!!!!!!!!!!!!!!!!!!!!!!!!!!!!!!!!!!!!!!!!!!!!!!!!!!!!!!!
i will test soon!
- Glenn JocherUltralytics
Thanks for sharing this; for anyone testing, the supported path today is still the reCamera integration guide together with Seeed’s model conversion guide, and we’ll review the docs wording around preinstalled models since some devices appear to ship with YOLO11 rather than YOLO26.
@glenn-jocher Have you a recamera ?
- Glenn JocherUltralytics
I don’t personally keep a reCamera on my desk, but the workflow in the Seeed Studio reCamera guide is the supported path; if you have a specific setup or export question, please drop it here and the Ultralytics team can take a look.
I tested on recamera with my trainned pose keypoint model... Same problem...no keypoint
Need to test on yolo8 on tdl sdk
- Glenn JocherUltralytics
Thanks for checking this; for custom pose models on reCamera, please drop the exact export and conversion steps here in the discussion so the Ultralytics team can take a look, since keypoints should work only after a correct
ONNX -> MLIR -> cvimodelpipeline as outlined in the reCamera guide and Seeed’s conversion guide, and it’s worth first confirming your exportedONNXmodel still produces keypoints before converting.
did you do calibration ? where the images to me to the calibration :(
- Glenn JocherUltralytics
Calibration isn’t done in the Ultralytics export step; for reCamera, you export to ONNX first with the reCamera guide, then calibration happens during Seeed’s ONNX→MLIR→
cvimodelflow using a small representative set of your own images, as described in Seeed’s Convert and Quantize AI Models guide. If you hit an error in that step, please drop the full log here and we’ll take a look.
still waiting...
send me your cvimodel too...yolo11 and yolo8
please, send me arguments used in your scripts...
did you train keypoints on animals and persons, right ?
tiruvijayakumar
NOO, i didnt train on animals, i trained on these classes for pose detection for persons using yolov11n-pose.pt weights. I fine‑tuned the YOLOv11n‑pose.pt model on my custom classes:
Running Walking Golf Skate Horse riding Kicking Diving I just uploaded animal detection model to justify that custom model deployment with quantization for object detection(yolo11n.pt) on recamera has no issues, it was another cvi model which i had no issues, it worked PERFECTLY. i only issue what i am facing is the pose detection quantized model where i am not able to see the keypoints on the inference output but bounding box is drawn along with predicted class label refer below:
now just trying to train the model for pose detection using yolov8 and then i would try quantizing the model and check if the keypoints are shown in the inference output
- Glenn JocherUltralytics
Thanks, that helps narrow it down — since detection
cvimodels work and only the quantized pose model loses keypoints, this looks more like a pose conversion or postprocessing issue in the ONNX → MLIR →cvimodelstep than a training problem. Please keep the details here so the Ultralytics team can see them, and share the exact conversion commands and full text logs from the reCamera guide and Seeed model conversion guide, plus whether the same pre-quantized ONNX shows keypoints before conversion. i ran predictions on ultralytics hub on the .pt model format, i attached the whole problem scenario and image content :https://github.com/orgs/ultralytics/discussions/22090?sort=new#discussioncomment-16346206 Any ways uploading the prediction on ultralytics hub in this thread also :
so on the model.pt file inference shows this data, this confirms that pose estimation model works. { "images": [ { "shape": [ 426, 640 ], "speed": { "preprocess": 1.41517, "inference": 130.14456, "postprocess": 0.99221 }, "results": [ { "name": "Kicking", "class": 5, "confidence": 0.80929, "box": { "x1": 0.26068, "y1": 0.10738, "x2": 0.55882, "y2": 0.85426 }, "keypoints": { "x": [ 0.41923001408576965, 0.42656999826431274, 0.4166699945926666, 0.45181000232696533, 0.42857998609542847, 0.488209992647171, 0.43380001187324524, 0.543470025062561, 0.41604000329971313, 0.5516700148582458, 0.4164600074291229, 0.46198999881744385, 0.4427199959754944, 0.357340008020401, 0.427839994430542, 0.29197001457214355, 0.43891000747680664 ], "y": [ 0.2315099984407425, 0.21907000243663788, 0.21740999817848206, 0.21602000296115875, 0.21322999894618988, 0.2783600091934204, 0.2824600040912628, 0.3255299925804138, 0.35097000002861023, 0.32879000902175903, 0.3619599938392639, 0.5179499983787537, 0.5104399919509888, 0.6517800092697144, 0.6389099955558777, 0.7586100101470947, 0.7324900031089783 ], "visible": [ 0.9994300007820129, 0.9990299940109253, 0.9990000128746033, 0.999019980430603, 0.9988300204277039, 0.9995700120925903, 0.9996600151062012, 0.998960018157959, 0.9992700219154358, 0.9985499978065491, 0.997439980506897, 0.9995700120925903, 0.9995700120925903, 0.9988800287246704, 0.9989299774169922, 0.982990026473999, 0.9852499961853027 ] } } ] } ], "metadata": { "imageCount": 1, "functionTimeAlive": 78321.917, "functionTimeCall": 0.138, "model": "best.pt", "version": { "ultralytics": "8.4.30", "torch": "2.11.0+cpu", "torchvision": "0.26.0+cpu", "python": "3.14.3" } }, "networkTime": 1.214 }
I didnt capture the conversion commands and text logs during the onnx->mlir->cvimodel, would repeat the same steps and paste the images in this thread itself.
Exported the yolov11n-pose.pt(finetuned) on google colab to onnx format
Uploaded the model on netron to view the structure, onnx is in the format IRv9 ,opset v20(would downgrade it). Classes are running, walking, golf-swing, skateboarding, riding-horse and kicking
Seeed studio guide for downgrading
Initial structure of workspace folder
Step1: pull sopho/tpuc_dev:v3.1
Step2: starting the container
Step3: installing onnx
Step4: Clone Downgrade Script
Step5: Downgrade Script settings IR v8 and Opset v17
Step6: Install TPU-MLIR tools inside container:
Step7: clone tpu-mlir
Step8: setup environment tpu-mlir(long step)
Step9: according to seeed studio guide, i have to include outputs before the model's head as the parameter for this particular step model_transform
--model_name yolo11n
--model_def yolo11n.onnx
--input_shapes "[[1,3,640,640]]"
--mean "0.0,0.0,0.0"
--scale "0.0039216,0.0039216,0.0039216"
--keep_aspect_ratio
--pixel_format rgb
--output_names "/model.23/cv2.0/cv2.0.2/Conv_output_0,/model.23/cv3.0/cv3.0.2/Conv_output_0,/model.23/cv2.1/cv2.1.2/Conv_output_0,/model.23/cv3.1/cv3.1.2/Conv_output_0,/model.23/cv2.2/cv2.2.2/Conv_output_0,/model.23/cv3.2/cv3.2.2/Conv_output_0"
--test_input ../image/dog.jpg
--test_result yolo11n_top_outputs.npz
--mlir yolo11n.mlir i have the onnx file, could someone of the team help me identify the outputs before the model's head? @glenn-jocher here is the onnx file https://drive.google.com/file/d/1UF25DK2zXx0GCWdcx55SPYHL71SylDeg/view?usp=sharing
and some animal pictures...