Link to this sectionTải YOLOv5 từ PyTorch Hub#
📚 Hướng dẫn này giải thích cách tải YOLOv5 🚀 từ PyTorch Hub tại https://pytorch.org/hub/ultralytics_yolov5.
Link to this sectionTrước khi Bắt đầu#
Cài đặt requirements.txt trong môi trường Python>=3.8.0, bao gồm PyTorch>=1.8. Các Model và dataset sẽ tự động tải xuống từ bản phát hành YOLOv5 mới nhất.
pip install -r https://raw.githubusercontent.com/ultralytics/yolov5/master/requirements.txtKhông bắt buộc phải clone ultralytics/yolov5 — PyTorch Hub tự động lấy code về.
Link to this sectionTải YOLOv5 với PyTorch Hub#
Link to this sectionVí dụ đơn giản#
Ví dụ này tải một model YOLOv5s đã được huấn luyện trước từ PyTorch Hub dưới dạng model và truyền vào một hình ảnh để suy luận (inference). 'yolov5s' là model YOLOv5 nhẹ và nhanh nhất. Để biết chi tiết về tất cả các model có sẵn, vui lòng xem README.
import torch

# Model
model = torch.hub.load("ultralytics/yolov5", "yolov5s")

# Image
im = "https://ultralytics.com/images/zidane.jpg"

# Inference
results = model(im)

results.pandas().xyxy[0]
#      xmin    ymin    xmax   ymax  confidence  class    name
# 0  749.50   43.50  1148.0  704.5    0.874023      0  person
# 1  433.50  433.50   517.5  714.5    0.687988     27     tie
# 2  114.75  195.75  1095.0  708.0    0.624512      0  person
# 3  986.00  304.00  1028.0  420.0    0.286865     27     tie
Link to this sectionVí dụ chi tiết#
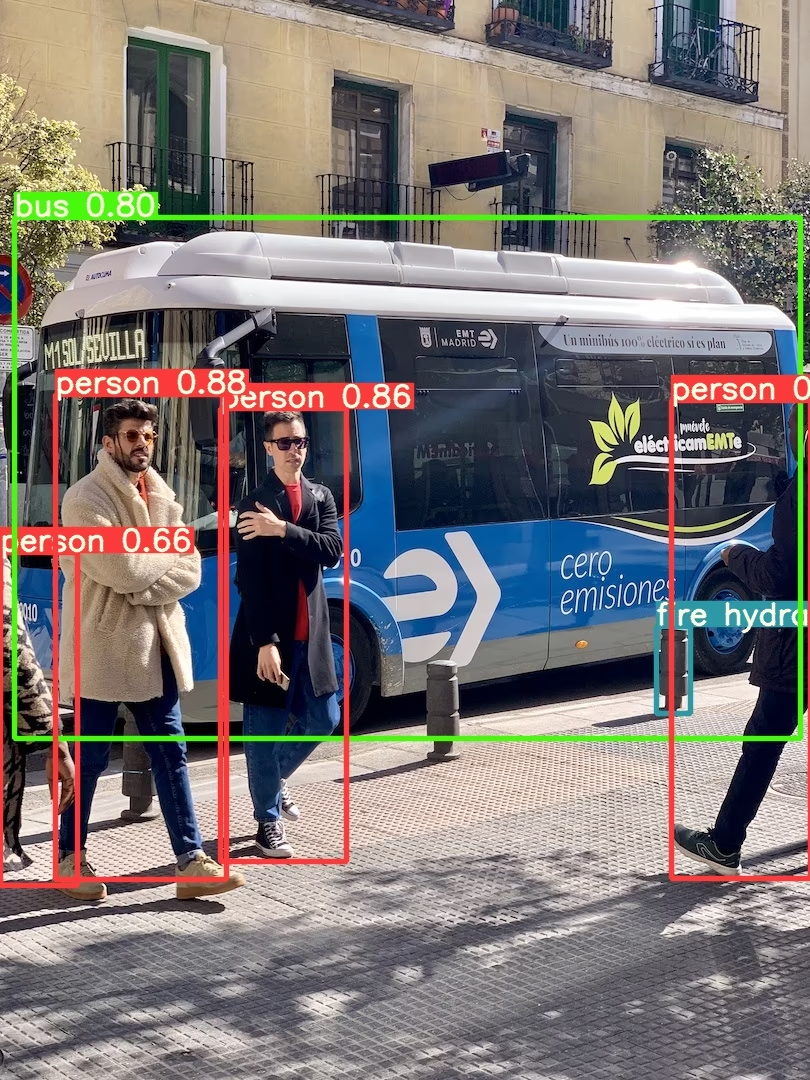
Ví dụ này cho thấy batched inference với các nguồn ảnh PIL và OpenCV. results có thể được in ra console, lưu vào runs/hub, hiển thị trên màn hình ở các môi trường hỗ trợ, và trả về dưới dạng tensor hoặc dataframe pandas.
import cv2
import torch
from PIL import Image

# Model
model = torch.hub.load("ultralytics/yolov5", "yolov5s")

# Images
for f in "zidane.jpg", "bus.jpg":
    torch.hub.download_url_to_file("https://ultralytics.com/images/" + f, f)  # download 2 images
im1 = Image.open("zidane.jpg")  # PIL image
im2 = cv2.imread("bus.jpg")[..., ::-1]  # OpenCV image (BGR to RGB)

# Inference
results = model([im1, im2], size=640)  # batch of images

# Results
results.print()
results.save()  # or .show()

results.xyxy[0]  # im1 predictions (tensor)
results.pandas().xyxy[0]  # im1 predictions (pandas)
#      xmin    ymin    xmax   ymax  confidence  class    name
# 0  749.50   43.50  1148.0  704.5    0.874023      0  person
# 1  433.50  433.50   517.5  714.5    0.687988     27     tie
# 2  114.75  195.75  1095.0  708.0    0.624512      0  person
# 3  986.00  304.00  1028.0  420.0    0.286865     27     tie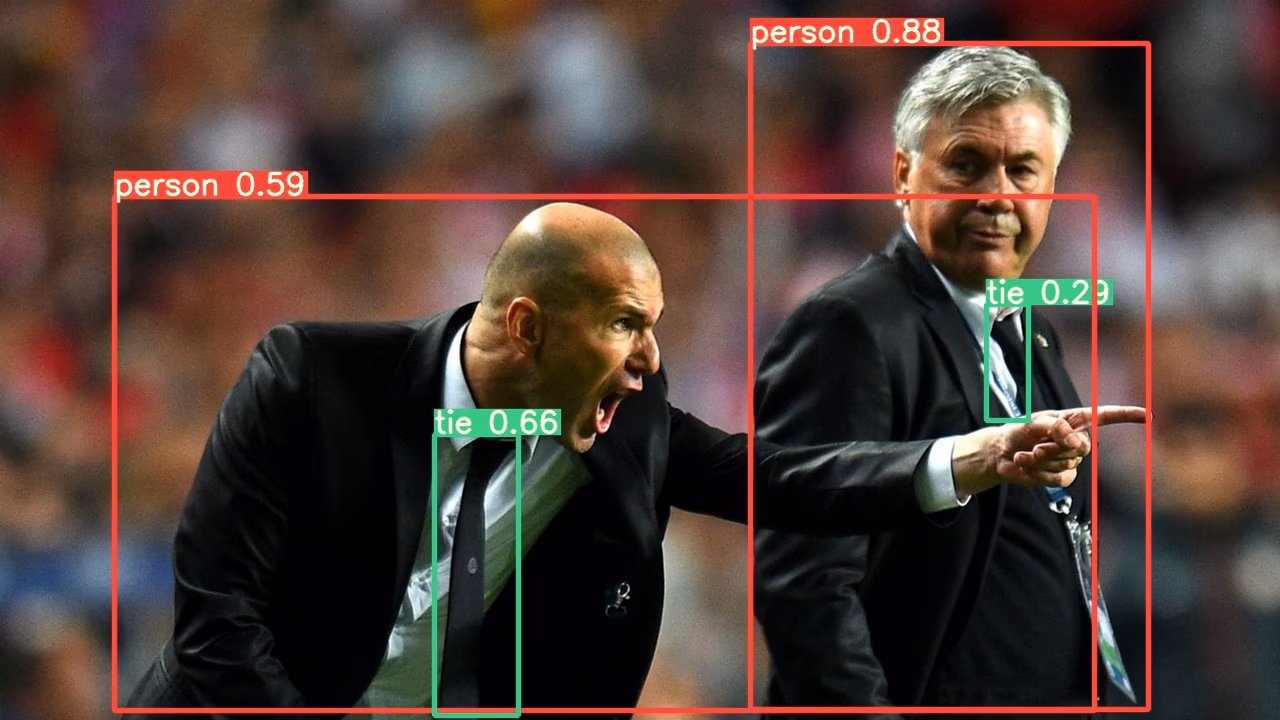
For all inference options see YOLOv5 AutoShape() forward method.
Link to this sectionCài đặt suy luận (Inference Settings)#
Các model YOLOv5 chứa nhiều thuộc tính suy luận khác nhau như ngưỡng tin cậy (confidence threshold), ngưỡng IoU, v.v., có thể được thiết lập bằng cách:
model.conf = 0.25  # NMS confidence threshold
model.iou = 0.45  # NMS IoU threshold
model.agnostic = False  # NMS class-agnostic
model.multi_label = False  # NMS multiple labels per box
model.classes = None  # (optional list) filter by class, i.e. = [0, 15, 16] for COCO persons, cats and dogs
model.max_det = 1000  # maximum number of detections per image
model.amp = False  # Automatic Mixed Precision (AMP) inference

results = model(im, size=320)  # custom inference size
Link to this sectionThiết bị#
Các model có thể được chuyển sang bất kỳ thiết bị nào sau khi khởi tạo:
model.cpu()  # CPU
model.cuda()  # GPU
model.to(device)  # i.e. device=torch.device(0)
Các model cũng có thể được tạo trực tiếp trên bất kỳ device nào:
model = torch.hub.load("ultralytics/yolov5", "yolov5s", device="cpu") # load on CPUCác hình ảnh đầu vào sẽ tự động được chuyển sang thiết bị model chính xác trước khi thực hiện suy luận.
Link to this sectionẨn các thông báo (Silence Outputs)#
Các model có thể được tải ở chế độ im lặng với _verbose=False:
model = torch.hub.load("ultralytics/yolov5", "yolov5s", _verbose=False) # load silentlyLink to this sectionCác kênh đầu vào (Input Channels)#
Để tải một model YOLOv5s đã được huấn luyện trước với 4 kênh đầu vào thay vì mặc định là 3:
model = torch.hub.load("ultralytics/yolov5", "yolov5s", channels=4)Trong trường hợp này, model sẽ bao gồm các trọng số đã được huấn luyện trước ngoại trừ lớp đầu vào đầu tiên, vì nó không còn cùng hình dạng với lớp đầu vào đã được huấn luyện trước đó. Lớp đầu vào sẽ vẫn được khởi tạo bằng các trọng số ngẫu nhiên.
Link to this sectionSố lượng lớp (Number of Classes)#
Để tải một model YOLOv5s đã được huấn luyện trước với 10 lớp đầu ra thay vì mặc định là 80:
model = torch.hub.load("ultralytics/yolov5", "yolov5s", classes=10)Trong trường hợp này, model sẽ bao gồm các trọng số đã được huấn luyện trước ngoại trừ các lớp đầu ra, vì chúng không còn cùng hình dạng với các lớp đầu ra đã được huấn luyện trước đó. Các lớp đầu ra sẽ vẫn được khởi tạo bằng các trọng số ngẫu nhiên.
Link to this sectionBuộc tải lại (Force Reload)#
Nếu bạn gặp sự cố với các bước trên, việc đặt force_reload=True có thể giúp ích bằng cách loại bỏ bộ nhớ đệm hiện có và buộc tải xuống phiên bản YOLOv5 mới nhất từ PyTorch Hub. Các bản sao lưu trong bộ nhớ đệm nằm ở ~/.cache/torch/hub; xóa thư mục đó cũng mang lại hiệu quả tương tự.
model = torch.hub.load("ultralytics/yolov5", "yolov5s", force_reload=True) # force reloadLink to this sectionSuy luận từ ảnh chụp màn hình (Screenshot Inference)#
Để thực hiện suy luận trên màn hình desktop của bạn:
import torch
from PIL import ImageGrab

# Model
model = torch.hub.load("ultralytics/yolov5", "yolov5s")

# Image
im = ImageGrab.grab()  # take a screenshot

# Inference
results = model(im)
Link to this sectionSuy luận đa GPU (Multi-GPU Inference)#
Các model YOLOv5 có thể được tải lên nhiều GPU song song với suy luận đa luồng:
import threading

import torch

def run(model, im):
    """Performs inference on an image using a given model and saves the output; model must support `.save()` method."""
    results = model(im)
    results.save()

# Models
model0 = torch.hub.load("ultralytics/yolov5", "yolov5s", device=0)
model1 = torch.hub.load("ultralytics/yolov5", "yolov5s", device=1)

# Inference
threading.Thread(target=run, args=[model0, "https://ultralytics.com/images/zidane.jpg"], daemon=True).start()
threading.Thread(target=run, args=[model1, "https://ultralytics.com/images/bus.jpg"], daemon=True).start()
Link to this sectionHuấn luyện#
Để tải model YOLOv5 cho mục đích huấn luyện thay vì suy luận, hãy đặt autoshape=False. Để tải model với các trọng số được khởi tạo ngẫu nhiên (để huấn luyện từ đầu), hãy sử dụng pretrained=False. Bạn phải cung cấp tập lệnh huấn luyện của riêng mình trong trường hợp này. Ngoài ra, hãy xem Hướng dẫn huấn luyện dữ liệu tùy chỉnh của YOLOv5 để biết cách huấn luyện model.
import torch

model = torch.hub.load("ultralytics/yolov5", "yolov5s", autoshape=False)  # load pretrained
model = torch.hub.load("ultralytics/yolov5", "yolov5s", autoshape=False, pretrained=False)  # load scratch
Link to this sectionKết quả Base64#
Để sử dụng với các dịch vụ API. Xem ví dụ về Flask REST API để biết chi tiết.
import base64
from io import BytesIO

from PIL import Image

results = model(im)  # inference

results.ims  # array of original images (as np array) passed to model for inference
results.render()  # updates results.ims with boxes and labels
for im in results.ims:
    buffered = BytesIO()
    im_base64 = Image.fromarray(im)
    im_base64.save(buffered, format="JPEG")
    print(base64.b64encode(buffered.getvalue()).decode("utf-8"))  # base64 encoded image with results
Link to this sectionKết quả đã cắt (Cropped Results)#
Kết quả có thể được trả về và lưu dưới dạng các đoạn cắt (crops) phát hiện:
results = model(im)  # inference
crops = results.crop(save=True)  # cropped detections dictionary
Link to this sectionKết quả Pandas#
Kết quả có thể được trả về dưới dạng Pandas DataFrames:
results = model(im)  # inference
results.pandas().xyxy[0]  # Pandas DataFrame
Pandas Output (click to expand)
print(results.pandas().xyxy[0])
#      xmin    ymin    xmax   ymax  confidence  class    name
# 0  749.50   43.50  1148.0  704.5    0.874023      0  person
# 1  433.50  433.50   517.5  714.5    0.687988     27     tie
# 2  114.75  195.75  1095.0  708.0    0.624512      0  person
# 3  986.00  304.00  1028.0  420.0    0.286865     27     tie
Link to this sectionKết quả đã sắp xếp#
Kết quả có thể được sắp xếp theo cột, ví dụ: để sắp xếp việc phát hiện chữ số biển số xe từ trái sang phải (trục x):
results = model(im)  # inference
results.pandas().xyxy[0].sort_values("xmin")  # sorted left-right
Link to this sectionKết quả JSON#
Results can be returned in JSON format once converted to .pandas() dataframes using the .to_json() method. The JSON format can be modified using the orient argument. See pandas .to_json() documentation for details.
results = model(ims)  # inference
results.pandas().xyxy[0].to_json(orient="records")  # JSON img1 predictions
JSON Output (click to expand)
[
    {
        "xmin": 749.5,
        "ymin": 43.5,
        "xmax": 1148.0,
        "ymax": 704.5,
        "confidence": 0.8740234375,
        "class": 0,
        "name": "person"
    },
    {
        "xmin": 433.5,
        "ymin": 433.5,
        "xmax": 517.5,
        "ymax": 714.5,
        "confidence": 0.6879882812,
        "class": 27,
        "name": "tie"
    },
    {
        "xmin": 115.25,
        "ymin": 195.75,
        "xmax": 1096.0,
        "ymax": 708.0,
        "confidence": 0.6254882812,
        "class": 0,
        "name": "person"
    },
    {
        "xmin": 986.0,
        "ymin": 304.0,
        "xmax": 1028.0,
        "ymax": 420.0,
        "confidence": 0.2873535156,
        "class": 27,
        "name": "tie"
    }
]
Link to this sectionCác model tùy chỉnh#
Ví dụ này tải một model YOLOv5s tùy chỉnh 20 lớp đã được huấn luyện trên VOC 'best.pt' với PyTorch Hub.
import torch

model = torch.hub.load("ultralytics/yolov5", "custom", path="path/to/best.pt")  # local model
model = torch.hub.load("path/to/yolov5", "custom", path="path/to/best.pt", source="local")  # local repo
Link to this sectionCác model TensorRT, ONNX và OpenVINO#
PyTorch Hub hỗ trợ suy luận trên hầu hết các định dạng xuất YOLOv5, bao gồm cả các model đã được huấn luyện tùy chỉnh. Xem Hướng dẫn xuất TFLite, ONNX, CoreML, TensorRT để biết chi tiết về việc xuất model.
- TensorRT có thể nhanh hơn gấp 2-5 lần so với PyTorch trên GPU benchmarks.
- ONNX và OpenVINO có thể nhanh hơn gấp 2-3 lần so với PyTorch trên CPU benchmarks.
import torch

model = torch.hub.load("ultralytics/yolov5", "custom", path="yolov5s.pt")  # PyTorch
model = torch.hub.load("ultralytics/yolov5", "custom", path="yolov5s.torchscript")  # TorchScript
model = torch.hub.load("ultralytics/yolov5", "custom", path="yolov5s.onnx")  # ONNX
model = torch.hub.load("ultralytics/yolov5", "custom", path="yolov5s_openvino_model/")  # OpenVINO
model = torch.hub.load("ultralytics/yolov5", "custom", path="yolov5s.engine")  # TensorRT
model = torch.hub.load("ultralytics/yolov5", "custom", path="yolov5s.mlmodel")  # CoreML (macOS-only)
model = torch.hub.load("ultralytics/yolov5", "custom", path="yolov5s.tflite")  # TFLite
model = torch.hub.load("ultralytics/yolov5", "custom", path="yolov5s_paddle_model/")  # PaddlePaddle
Link to this sectionCác Môi trường được Hỗ trợ#
Ultralytics cung cấp hàng loạt môi trường sẵn sàng sử dụng, mỗi môi trường được cài đặt sẵn các phụ thuộc thiết yếu như CUDA, CUDNN, Python và PyTorch, để khởi động dự án của bạn.
- Free GPU Notebooks:


- Google Cloud: Hướng dẫn bắt đầu nhanh GCP
- Amazon: AWS Quickstart Guide
- Azure: AzureML Quickstart Guide
- Docker: Docker Quickstart Guide

Link to this sectionTrạng thái Dự án#
![]()
Huy hiệu này cho biết tất cả các bài kiểm tra Tích hợp liên tục (CI) của YOLOv5 GitHub Actions đều đã vượt qua thành công. Các bài kiểm tra CI này kiểm tra nghiêm ngặt chức năng và hiệu suất của YOLOv5 trên nhiều khía cạnh chính: huấn luyện, xác thực, suy luận, xuất model và benchmarks. Chúng đảm bảo hoạt động nhất quán và đáng tin cậy trên macOS, Windows và Ubuntu, với các bài kiểm tra được thực hiện mỗi 24 giờ và sau mỗi commit mới.