Link to this section如何在 VSCode 终端中查看 YOLO 推理结果#
图片来自 libsixel 网站。
Link to this section动机#
通过 SSH 连接到远程机器时,通常无法正常可视化图像结果,或者需要将数据移动到具有 GUI 的本地设备上。VSCode 集成终端可以直接渲染图像,因此你可以在运行推理的地方直接检查 预测结果,而无需将文件复制回笔记本电脑。本指南将引导你完成 设置、连接 代码,并解答 常见问题。
仅与 Linux 和 macOS 兼容。请查看 VSCode 存储库、问题状态 或 文档,以获取有关 Windows 支持在终端中使用 sixel 查看图像的更新。
VSCode 支持使用集成终端查看图像的协议有 sixel 和 iTerm。本指南将演示 sixel 协议的使用。
Link to this section流程#
-
首先,你必须在 VSCode 中启用
terminal.integrated.enableImages和terminal.integrated.gpuAcceleration设置。"terminal.integrated.gpuAcceleration": "auto" # "auto" is default, can also use "on" "terminal.integrated.enableImages": true
-
Install the
python-sixellibrary in your virtual environment. This is a fork of thePySixellibrary, which is no longer maintained.pip install sixel -
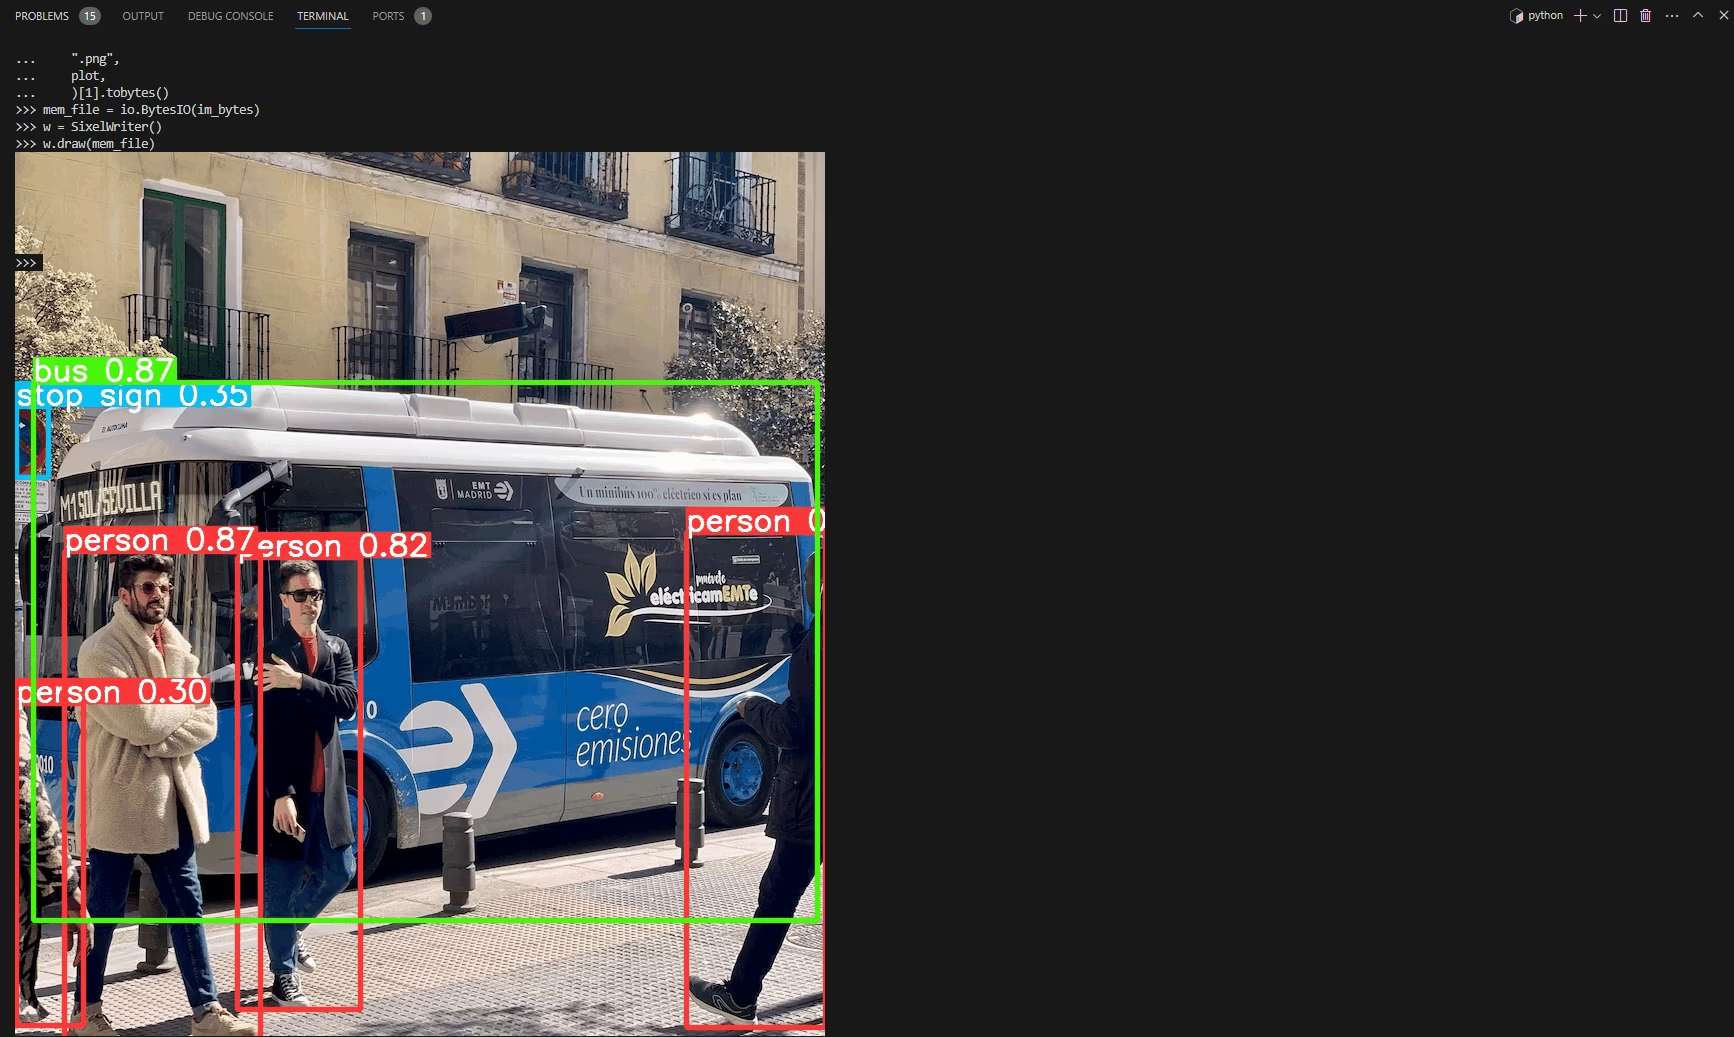
加载模型并执行推理,然后绘制结果并存储在变量中。有关推理参数和处理结果的更多信息,请参阅 预测模式 页面。
from ultralytics import YOLO # Load a model model = YOLO("yolo26n.pt") # Run inference on an image results = model.predict(source="ultralytics/assets/bus.jpg") # Plot inference results plot = results[0].plot() # (1)!- 请参阅 绘图方法参数 以查看可使用的可能参数。
-
现在,使用 OpenCV 将
np.ndarray转换为bytes数据。然后使用io.BytesIO创建一个“类文件”对象。import io import cv2 # Results image as bytes im_bytes = cv2.imencode( ".png", # (1)! plot, )[1].tobytes() # (2)! # Image bytes as a file-like object mem_file = io.BytesIO(im_bytes)- 也可以使用其他图像扩展名。
- 只需要返回的索引为
1的对象。
-
创建一个
SixelWriter实例,然后使用.draw()方法在终端中绘制图像。from sixel import SixelWriter # Create sixel writer object w = SixelWriter() # Draw the sixel image in the terminal w.draw(mem_file)
Link to this section推理结果示例#
使用此示例处理视频或动画 GIF 帧尚未经过测试。尝试需自担风险。
Link to this section完整代码示例#
import io

import cv2
from sixel import SixelWriter

from ultralytics import YOLO

# Load a model
model = YOLO("yolo26n.pt")

# Run inference on an image
results = model.predict(source="ultralytics/assets/bus.jpg")

# Plot inference results
plot = results[0].plot()  # (3)!

# Results image as bytes
im_bytes = cv2.imencode(
    ".png",  # (1)!
    plot,
)[1].tobytes()  # (2)!

mem_file = io.BytesIO(im_bytes)
w = SixelWriter()
w.draw(mem_file)- 也可以使用其他图像扩展名。
- 只需要返回的索引为
1的对象。 - 请参阅 绘图方法参数 以查看可使用的可能参数。
你可能需要使用 clear 来“擦除”终端中显示的图像。
Link to this section常见问题解答#
Link to this section如何在 macOS 或 Linux 的 VSCode 终端中查看 YOLO 推理结果?#
要在 macOS 或 Linux 的 VSCode 终端中查看 YOLO 推理结果,请按照以下步骤操作:
-
启用必要的 VSCode 设置:
"terminal.integrated.enableImages": true "terminal.integrated.gpuAcceleration": "auto" -
安装 sixel 库:
pip install sixel -
加载你的 YOLO 模型并运行推理:
from ultralytics import YOLO model = YOLO("yolo26n.pt") results = model.predict(source="ultralytics/assets/bus.jpg") plot = results[0].plot() -
将推理结果图像转换为字节并在终端中显示:
import io

import cv2
from sixel import SixelWriter

im_bytes = cv2.imencode(".png", plot)[1].tobytes()
mem_file = io.BytesIO(im_bytes)
SixelWriter().draw(mem_file)
有关更多详细信息,请访问 预测模式 页面。
Link to this section为什么 sixel 协议仅在 Linux 和 macOS 上有效?#
sixel 协议目前仅在 Linux 和 macOS 上受支持,因为这些平台具有与 sixel 图形兼容的原生终端功能。Windows 对使用 sixel 的终端图形的支持仍在开发中。有关 Windows 兼容性的更新,请查看 VSCode 问题状态 和 文档。
Link to this section如果我在 VSCode 终端中显示图像时遇到问题怎么办?#
如果没有内容渲染,请按顺序完成这些检查:
- 确认
terminal.integrated.enableImages和terminal.integrated.gpuAcceleration均已启用(如 流程 部分所示),然后重启集成终端以使设置生效。 - 验证
sixel是否安装在脚本运行所在的相同虚拟环境中(pip install sixel)。 - 在编码之前,确保
plot是有效的np.ndarray,因为如果图像为空或不是有效数组,cv2.imencode会引发错误。请参阅 绘图方法参数 以获取results[0].plot()接受的值。
如果问题仍然存在,请咨询 VSCode 存储库 获取终端图像支持状态。
Link to this sectionYOLO 能否使用 sixel 在终端中显示视频推理结果?#
目前尚未测试使用 sixel 在终端中显示视频推理结果或动画 GIF 帧,且可能不受支持。我们建议从静态图像开始并验证兼容性。尝试视频结果需自担风险,并牢记性能限制。有关绘制推理结果的更多信息,请访问 预测模式 页面。
Link to this section如何排查 python-sixel 库的问题?#
The sixel package is a fork of the unmaintained PySixel library and is a thin Python wrapper over Pillow (PIL). If import sixel fails or SixelWriter().draw() raises an error, confirm the package installed into your active virtual environment, ensure Pillow is available, and check the python-sixel GitHub repository for platform-specific notes. For more on generating the image you pass to draw(), see the predict mode documentation.