Link to this sectionنشر نموذج YOLO مُدرب مسبقًا باستخدام Ultralytics على Vertex AI للاستدلال#
سيوضح لك هذا الدليل كيفية وضع نموذج YOLO26 مُدرب مسبقًا في حاوية باستخدام Ultralytics، وبناء خادم استدلال FastAPI له، ونشر النموذج مع خادم الاستدلال على Google Cloud Vertex AI. سيغطي مثال التنفيذ حالة استخدام اكتشاف الكائنات لنموذج YOLO26، ولكن المبادئ نفسها ستنطبق على استخدام أنماط YOLO الأخرى.
قبل البدء، ستحتاج إلى إنشاء مشروع على Google Cloud Platform (GCP). ستحصل على 300 دولار أمريكي كأرصدة GCP لاستخدامها مجانًا كمستخدم جديد، وهذا المبلغ كافٍ لاختبار إعداد تشغيل يمكنك توسيعه لاحقًا لأي حالة استخدام أخرى لنموذج YOLO26، بما في ذلك التدريب، أو الاستدلال بالدفعة (batch) والاستدلال المباشر (streaming).
Link to this sectionما ستتعلمه#
- إنشاء واجهة خلفية للاستدلال لنموذج Ultralytics YOLO26 باستخدام FastAPI.
- إنشاء مستودع GCP Artifact Registry لتخزين صورة Docker الخاصة بك.
- بناء ودفع صورة Docker مع النموذج إلى Artifact Registry.
- استيراد نموذجك في Vertex AI.
- إنشاء نقطة نهاية (endpoint) في Vertex AI ونشر النموذج.
- تحكم كامل في النموذج باستخدام Ultralytics: يمكنك استخدام منطق استدلال مخصص مع تحكم كامل في المعالجة الأولية، والمعالجة اللاحقة، وتنسيق الاستجابة.
- يتولى Vertex AI الباقي: فهو يقوم بالتحجيم التلقائي (auto-scales)، مع توفير المرونة في تكوين موارد الحوسبة، والذاكرة، وتكوينات GPU.
- تكاملات GCP الأصلية والأمان: إعداد سلس مع Cloud Storage، وBigQuery، وCloud Functions، وضوابط VPC، وسياسات IAM، وسجلات التدقيق.
Link to this sectionالمتطلبات الأساسية#
- قم بتثبيت Docker على جهازك.
- قم بتثبيت Google Cloud SDK والمصادقة لاستخدام gcloud CLI.
- نوصي بشدة بالاطلاع على دليل البدء السريع لـ Docker الخاص بـ Ultralytics، حيث ستحتاج إلى توسيع إحدى صور Docker الرسمية لـ Ultralytics أثناء اتباع هذا الدليل.
Link to this sectionإنشاء واجهة خلفية للاستدلال باستخدام FastAPI#
أولاً، تحتاج إلى إنشاء تطبيق FastAPI الذي سيخدم طلبات استدلال نموذج YOLO26. سيتولى هذا التطبيق منطق تحميل النموذج، والمعالجة الأولية للصور، والاستدلال (التنبؤ).
Link to this sectionأساسيات الامتثال لـ Vertex AI#
يتوقع Vertex AI من الحاوية الخاصة بك تنفيذ نقطتي نهاية محددتين:
-
نقطة نهاية الحالة الصحية (
/health): يجب أن تعيد حالة HTTP200 OKعندما تكون الخدمة جاهزة. -
نقطة نهاية Predict (
/predict): تقبل طلبات التنبؤ المهيكلة مع صور base64-encoded ومعلمات اختيارية. تطبق حدود حجم الحمولة اعتماداً على نوع نقطة النهاية.يجب أن تتبع حمولات الطلب لنقطة النهاية
/predictبنية JSON التالية:{ "instances": [{ "image": "base64_encoded_image" }], "parameters": { "confidence": 0.5 } }
Link to this sectionهيكل مجلد المشروع#
الجزء الأكبر من عملية البناء سيتم داخل حاوية Docker، وسيقوم Ultralytics أيضًا بتحميل نموذج YOLO26 مُدرب مسبقًا، لذا يمكنك الحفاظ على هيكل المجلد المحلي بسيطًا:
YOUR_PROJECT/
├── src/
│   ├── __init__.py
│   ├── app.py              # Core YOLO26 inference logic
│   └── main.py             # FastAPI inference server
├── tests/
├── .env                    # Environment variables for local development
├── Dockerfile              # Container configuration
├── LICENSE                 # AGPL-3.0 License
└── pyproject.toml # Python dependencies and project configنماذج وإطار عمل Ultralytics YOLO26 مرخصة بموجب AGPL-3.0، والتي تحتوي على متطلبات امتثال هامة. تأكد من قراءة مستندات Ultralytics حول كيفية الامتثال لشروط الترخيص.
Link to this sectionإنشاء ملف pyproject.toml مع التبعيات#
لإدارة مشروعك بشكل مريح، قم بإنشاء ملف pyproject.toml مع التبعيات التالية:
[project]
name = "YOUR_PROJECT_NAME"
version = "0.0.1"
description = "YOUR_PROJECT_DESCRIPTION"
requires-python = ">=3.10,<3.13"
dependencies = [
   "ultralytics>=8.3.0",
   "fastapi[all]>=0.89.1",
   "uvicorn[standard]>=0.20.0",
   "pillow>=9.0.0",
]

[build-system]
requires = ["setuptools>=61.0"]
build-backend = "setuptools.build_meta"- سيتم استخدام
uvicornلتشغيل خادم FastAPI. - سيتم استخدام
pillowلمعالجة الصور، ولكنك لست مقيدًا بصور PIL فقط - يدعم Ultralytics العديد من التنسيقات الأخرى.
Link to this sectionإنشاء منطق الاستدلال باستخدام Ultralytics YOLO26#
الآن بعد أن أصبح لديك هيكل المشروع والتبعيات جاهزة، يمكنك تنفيذ منطق استدلال YOLO26 الأساسي. قم بإنشاء ملف src/app.py سيتولى تحميل النموذج، ومعالجة الصور، والتنبؤ، باستخدام Ultralytics Python API.
# src/app.py

from ultralytics import YOLO

# Model initialization and readiness state
model_yolo = None
_model_ready = False

def _initialize_model():
    """Initialize the YOLO model."""
    global model_yolo, _model_ready

    try:
        # Use pretrained YOLO26n model from Ultralytics base image
        model_yolo = YOLO("yolo26n.pt")
        _model_ready = True

    except Exception as e:
        print(f"Error initializing YOLO model: {e}")
        _model_ready = False
        model_yolo = None

# Initialize model on module import
_initialize_model()

def is_model_ready() -> bool:
    """Check if the model is ready for inference."""
    return _model_ready and model_yolo is not None
سيقوم هذا بتحميل النموذج مرة واحدة عند بدء تشغيل الحاوية، وسيتم مشاركة النموذج عبر جميع الطلبات. إذا كان نموذجك سيتعامل مع حمل استدلال ثقيل، يوصى باختيار نوع آلة بذاكرة أكبر عند استيراد نموذج في Vertex AI في خطوة لاحقة.
بعد ذلك، قم بإنشاء دالتين مساعدتين لمعالجة الصور المدخلة والمخرجة باستخدام pillow. يدعم YOLO26 صور PIL محليًا.
def get_image_from_bytes(binary_image: bytes) -> Image.Image:
    """Convert image from bytes to PIL RGB format."""
    input_image = Image.open(io.BytesIO(binary_image)).convert("RGB")
    return input_image
def get_bytes_from_image(image: Image.Image) -> bytes:
"""Convert PIL image to bytes."""
return_image = io.BytesIO()
image.save(return_image, format="JPEG", quality=85)
return_image.seek(0)
return return_image.getvalue()أخيرًا، نفذ دالة run_inference التي ستتولى اكتشاف الكائنات. في هذا المثال، سنستخرج مربعات الإحاطة، وأسماء الفئات، ودرجات الثقة من تنبؤات النموذج. ستعيد الدالة قاموسًا يحتوي على الاكتشافات والنتائج الخام لمزيد من المعالجة أو التعليق التوضيحي.
def run_inference(input_image: Image.Image, confidence_threshold: float = 0.5) -> Dict[str, Any]:
    """Run inference on an image using YOLO26n model."""
    global model_yolo

    # Check if model is ready
    if not is_model_ready():
        print("Model not ready for inference")
        return {"detections": [], "results": None}

    try:
        # Make predictions and get raw results
        results = model_yolo.predict(
            imgsz=640, source=input_image, conf=confidence_threshold, save=False, augment=False, verbose=False
        )

        # Extract detections (bounding boxes, class names, and confidences)
        detections = []
        if results and len(results) > 0:
            result = results[0]
            if result.boxes is not None and len(result.boxes.xyxy) > 0:
                boxes = result.boxes

                # Convert tensors to numpy for processing
                xyxy = boxes.xyxy.cpu().numpy()
                conf = boxes.conf.cpu().numpy()
                cls = boxes.cls.cpu().numpy().astype(int)

                # Create detection dictionaries
                for i in range(len(xyxy)):
                    detection = {
                        "xmin": float(xyxy[i][0]),
                        "ymin": float(xyxy[i][1]),
                        "xmax": float(xyxy[i][2]),
                        "ymax": float(xyxy[i][3]),
                        "confidence": float(conf[i]),
                        "class": int(cls[i]),
                        "name": model_yolo.names.get(int(cls[i]), f"class_{int(cls[i])}"),
                    }
                    detections.append(detection)

        return {
            "detections": detections,
            "results": results,  # Keep raw results for annotation
        }
    except Exception as e:
        # If there's an error, return empty structure
        print(f"Error in YOLO detection: {e}")
        return {"detections": [], "results": None}
اختياريًا، يمكنك إضافة دالة لتعليق الصورة بمربعات الإحاطة والتسميات باستخدام طريقة الرسم المضمنة في Ultralytics. سيكون هذا مفيدًا إذا كنت ترغب في إرجاع صور معلقة في استجابة التنبؤ.
def get_annotated_image(results: list) -> Image.Image:
    """Get annotated image using Ultralytics built-in plot method."""
    if not results or len(results) == 0:
        raise ValueError("No results provided for annotation")

    result = results[0]
    # Use Ultralytics built-in plot method with PIL output
    return result.plot(pil=True)
Link to this sectionإنشاء خادم استدلال HTTP باستخدام FastAPI#
الآن بعد أن أصبح لديك منطق استدلال YOLO26 الأساسي، يمكنك إنشاء تطبيق FastAPI لخدمته. سيشمل ذلك نقاط نهاية فحص الصحة والتنبؤ المطلوبة من قبل Vertex AI.
أولاً، أضف الاستيرادات وقم بتكوين التسجيل (logging) لـ Vertex AI. نظرًا لأن Vertex AI يعامل stderr كمخرج خطأ، فمن المنطقي توجيه السجلات إلى stdout.
import sys

from loguru import logger

# Configure logger
logger.remove()
logger.add(
    sys.stdout,
    colorize=True,
    format="<green>{time:HH:mm:ss}</green> | <level>{message}</level>",
    level=10,
)
logger.add("log.log", rotation="1 MB", level="DEBUG", compression="zip")
لتحقيق امتثال كامل لـ Vertex AI، حدد نقاط النهاية المطلوبة في متغيرات البيئة واضبط حد الحجم للطلبات. يُوصى باستخدام نقاط نهاية Vertex AI الخاصة لعمليات النشر في بيئة الإنتاج. بهذه الطريقة ستحصل على حد أعلى لحمولة الطلب (10 ميجابايت بدلاً من 1.5 ميجابايت لنقاط النهاية العامة)، بالإضافة إلى أمان قوي وتحكم في الوصول.
# Vertex AI environment variables
AIP_HTTP_PORT = int(os.getenv("AIP_HTTP_PORT", "8080"))
AIP_HEALTH_ROUTE = os.getenv("AIP_HEALTH_ROUTE", "/health")
AIP_PREDICT_ROUTE = os.getenv("AIP_PREDICT_ROUTE", "/predict")

# Request size limit (10 MB for private endpoints, 1.5 MB for public)
MAX_REQUEST_SIZE = 10 * 1024 * 1024  # 10 MB in bytes
أضف نموذجي Pydantic للتحقق من صحة طلباتك واستجاباتك:
# Pydantic models for request/response
class PredictionRequest(BaseModel):
    instances: list
    parameters: Optional[Dict[str, Any]] = None

class PredictionResponse(BaseModel):
    predictions: list
أضف نقطة نهاية فحص الصحة للتحقق من استعداد نموذجك. هذا مهم لـ Vertex AI، لأنه بدون فحص صحة مخصص، سيقوم المنسق الخاص به بعمل ping لمقابس عشوائية ولن يكون قادرًا على تحديد ما إذا كان النموذج جاهزًا للاستدلال. يجب أن يعيد فحصك 200 OK للنجاح و503 Service Unavailable للفشل:
# Health check endpoint
@app.get(AIP_HEALTH_ROUTE, status_code=status.HTTP_200_OK)
def health_check():
    """Health check endpoint for Vertex AI."""
    if not is_model_ready():
        raise HTTPException(status_code=503, detail="Model not ready")
    return {"status": "healthy"}
لديك الآن كل شيء لتنفيذ نقطة نهاية التنبؤ التي ستتعامل مع طلبات الاستدلال. ستقبل ملف صورة، وتنفذ الاستدلال، وتعيد النتائج. لاحظ أنه يجب أن تكون الصورة مشفرة بـ base64، مما يزيد إضافيًا من حجم الحمولة بنسبة تصل إلى 33%.
@app.post(AIP_PREDICT_ROUTE, response_model=PredictionResponse)
async def predict(request: PredictionRequest):
    """Prediction endpoint for Vertex AI."""
    try:
        predictions = []

        for instance in request.instances:
            if isinstance(instance, dict):
                if "image" in instance:
                    image_data = base64.b64decode(instance["image"])
                    input_image = get_image_from_bytes(image_data)
                else:
                    raise HTTPException(status_code=400, detail="Instance must contain 'image' field")
            else:
                raise HTTPException(status_code=400, detail="Invalid instance format")

            # Extract YOLO26 parameters if provided
            parameters = request.parameters or {}
            confidence_threshold = parameters.get("confidence", 0.5)
            return_annotated_image = parameters.get("return_annotated_image", False)

            # Run inference with YOLO26n model
            result = run_inference(input_image, confidence_threshold=confidence_threshold)
            detections_list = result["detections"]

            # Format predictions for Vertex AI
            detections = []
            for detection in detections_list:
                formatted_detection = {
                    "class": detection["name"],
                    "confidence": detection["confidence"],
                    "bbox": {
                        "xmin": detection["xmin"],
                        "ymin": detection["ymin"],
                        "xmax": detection["xmax"],
                        "ymax": detection["ymax"],
                    },
                }
                detections.append(formatted_detection)

            # Build prediction response
            prediction = {"detections": detections, "detection_count": len(detections)}

            # Add annotated image if requested and detections exist
            if (
                return_annotated_image
                and result["results"]
                and result["results"][0].boxes is not None
                and len(result["results"][0].boxes) > 0
            ):
                import base64

                annotated_image = get_annotated_image(result["results"])
                img_bytes = get_bytes_from_image(annotated_image)
                prediction["annotated_image"] = base64.b64encode(img_bytes).decode("utf-8")

            predictions.append(prediction)

        logger.info(
            f"Processed {len(request.instances)} instances, found {sum(len(p['detections']) for p in predictions)} total detections"
        )

        return PredictionResponse(predictions=predictions)

    except HTTPException:
        # Re-raise HTTPException as-is (don't catch and convert to 500)
        raise
    except Exception as e:
        logger.error(f"Prediction error: {e}")
        raise HTTPException(status_code=500, detail=f"Prediction failed: {e}")
أخيرًا، أضف نقطة دخول التطبيق لتشغيل خادم FastAPI.
if __name__ == "__main__":
    import uvicorn

    logger.info(f"Starting server on port {AIP_HTTP_PORT}")
    logger.info(f"Health check route: {AIP_HEALTH_ROUTE}")
    logger.info(f"Predict route: {AIP_PREDICT_ROUTE}")
    uvicorn.run(app, host="0.0.0.0", port=AIP_HTTP_PORT)
لديك الآن تطبيق FastAPI كامل يمكنه خدمة طلبات استدلال YOLO26. يمكنك اختباره محليًا عن طريق تثبيت التبعيات وتشغيل الخادم، على سبيل المثال، باستخدام uv.
# Install dependencies
uv pip install -e .

# Run the FastAPI server directly
uv run src/main.py
لاختبار الخادم، يمكنك الاستعلام عن كل من نقاط النهاية /health و/predict باستخدام cURL. ضع صورة اختبار في مجلد tests. ثم، في جهازك الطرفي (Terminal)، قم بتشغيل الأوامر التالية:
# Test health endpoint
curl http://localhost:8080/health

# Test predict endpoint with base64 encoded image
curl -X POST -H "Content-Type: application/json" -d "{\"instances\": [{\"image\": \"$(base64 -i tests/test_image.jpg)\"}]}" http://localhost:8080/predict
يجب أن تتلقى استجابة JSON مع الكائنات المكتشفة. في طلبك الأول، توقع تأخيرًا قصيرًا، حيث يحتاج Ultralytics إلى سحب وتحميل نموذج YOLO26.
Link to this sectionتوسيع صورة Docker الخاصة بـ Ultralytics باستخدام تطبيقك#
يوفر Ultralytics العديد من صور Docker التي يمكنك استخدامها كأساس لصورة تطبيقك. سيقوم Docker بتثبيت Ultralytics وبرامج تشغيل GPU اللازمة.
لاستخدام القدرات الكاملة لنماذج Ultralytics YOLO، يجب عليك اختيار الصورة المحسنة لـ CUDA لاستدلال GPU. ومع ذلك، إذا كان استدلال CPU كافيًا لمهمتك، يمكنك توفير موارد الحوسبة عن طريق اختيار صورة CPU فقط أيضًا:
- Dockerfile: صورة محسنة لـ CUDA لتدريب واستدلال YOLO26 باستخدام GPU واحد أو متعدد.
- Dockerfile-cpu: صورة CPU فقط لاستدلال YOLO26.
Link to this sectionإنشاء صورة Docker لتطبيقك#
قم بإنشاء Dockerfile في جذر مشروعك بالمحتوى التالي:
# Extends official Ultralytics Docker image for YOLO26
FROM ultralytics/ultralytics:latest

ENV PYTHONUNBUFFERED=1 \
    PYTHONDONTWRITEBYTECODE=1

# Install FastAPI and dependencies
RUN uv pip install fastapi[all] uvicorn[standard] loguru

WORKDIR /app
COPY src/ ./src/
COPY pyproject.toml ./

# Install the application package
RUN uv pip install -e .

RUN mkdir -p /app/logs
ENV PYTHONPATH=/app/src

# Port for Vertex AI
EXPOSE 8080

# Start the inference server
ENTRYPOINT ["python", "src/main.py"]
في المثال، تم استخدام صورة Ultralytics Docker الرسمية ultralytics:latest كأساس. إنها تحتوي بالفعل على نموذج YOLO26 وجميع التبعيات اللازمة. نقطة دخول الخادم هي نفسها التي استخدمناها لاختبار تطبيق FastAPI محليًا.
Link to this sectionبناء واختبار صورة Docker#
الآن يمكنك بناء صورة Docker باستخدام الأمر التالي:
docker build --platform linux/amd64 -t IMAGE_NAME:IMAGE_VERSION .استبدل IMAGE_NAME وIMAGE_VERSION بالقيم المطلوبة، على سبيل المثال، yolo26-fastapi:0.1. لاحظ أنه يجب عليك بناء الصورة لبنية linux/amd64 إذا كنت تنشر على Vertex AI. يجب ضبط المعلمة --platform بشكل صريح إذا كنت تبني الصورة على جهاز Apple Silicon Mac أو أي بنية أخرى غير x86.
بمجرد اكتمال بناء الصورة، يمكنك اختبار صورة Docker محليًا:
docker run --platform linux/amd64 -p 8080:8080 IMAGE_NAME:IMAGE_VERSIONحاوية Docker الخاصة بك تقوم الآن بتشغيل خادم FastAPI على المنفذ 8080، وهي جاهزة لقبول طلبات الاستدلال. يمكنك اختبار كل من نقطة النهاية /health و/predict بنفس أوامر cURL كما في السابق:
# Test health endpoint
curl http://localhost:8080/health

# Test predict endpoint with base64 encoded image
curl -X POST -H "Content-Type: application/json" -d "{\"instances\": [{\"image\": \"$(base64 -i tests/test_image.jpg)\"}]}" http://localhost:8080/predict
Link to this sectionتحميل صورة Docker إلى GCP Artifact Registry#
لاستيراد نموذجك الموجود في حاوية في Vertex AI، تحتاج إلى تحميل صورة Docker إلى Google Cloud Artifact Registry. إذا لم يكن لديك مستودع Artifact Registry بعد، فستحتاج إلى إنشاء واحد أولاً.
Link to this sectionإنشاء مستودع في Google Cloud Artifact Registry#
افتح صفحة Artifact Registry في Google Cloud Console. إذا كنت تستخدم Artifact Registry لأول مرة، فقد يُطلب منك تمكين واجهة برمجة تطبيقات Artifact Registry أولاً.

- حدد إنشاء مستودع.
- أدخل اسم المستودع الخاص بك. حدد المنطقة المطلوبة واستخدم الإعدادات الافتراضية للخيارات الأخرى، ما لم تكن بحاجة إلى تغييرها تحديدًا.
قد يؤثر اختيار المنطقة على توفر الأجهزة وبعض قيود الحوسبة لمستخدمي غير Enterprise. يمكنك العثور على مزيد من المعلومات في وثائق Vertex AI الرسمية: حصص وحدود Vertex AI
- بمجرد إنشاء المستودع، احفظ PROJECT_ID، والموقع (المنطقة)، واسم المستودع في خزنة أسرارك أو ملف
.env. ستحتاج إليها لاحقًا لتمييز (tag) ودفع صورة Docker الخاصة بك إلى Artifact Registry.
Link to this sectionمصادقة Docker على Artifact Registry#
قم بمصادقة عميل Docker الخاص بك على مستودع Artifact Registry الذي أنشأته للتو. قم بتشغيل الأمر التالي في جهازك الطرفي:
gcloud auth configure-docker YOUR_REGION-docker.pkg.devLink to this sectionتمييز ودفع صورتك إلى Artifact Registry#
قم بتمييز ودفع صورة Docker إلى Google Artifact Registry.
يوصى باستخدام علامات فريدة في كل مرة تقوم فيها بتحديث صورتك. تعتمد معظم خدمات GCP، بما في ذلك Vertex AI، على علامات الصور لإصدارات النسخ والتحجيم التلقائي، لذا من الممارسات الجيدة استخدام إصدار دلالي أو علامات قائمة على التاريخ.
قم بتمييز صورتك بعنوان URL الخاص بمستودع Artifact Registry. استبدل العناصر النائبة بالقيم التي حفظتها سابقًا.
docker tag IMAGE_NAME:IMAGE_VERSION YOUR_REGION-docker.pkg.dev/YOUR_PROJECT_ID/YOUR_REPOSITORY_NAME/IMAGE_NAME:IMAGE_VERSIONادفع الصورة المميزة إلى مستودع Artifact Registry.
docker push YOUR_REGION-docker.pkg.dev/YOUR_PROJECT_ID/YOUR_REPOSITORY_NAME/IMAGE_NAME:IMAGE_VERSIONانتظر حتى تكتمل العملية. يجب أن ترى الآن الصورة في مستودع Artifact Registry الخاص بك.
لمزيد من التعليمات المحددة حول كيفية العمل مع الصور في Artifact Registry، راجع مستندات Artifact Registry: دفع وسحب الصور.
Link to this sectionاستيراد نموذجك في Vertex AI#
باستخدام صورة Docker التي دفعتها للتو، يمكنك الآن استيراد النموذج في Vertex AI.
- في قائمة تنقل Google Cloud، انتقل إلى Vertex AI > سجل النموذج (Model Registry). بدلاً من ذلك، ابحث عن "Vertex AI" في شريط البحث في أعلى Google Cloud Console.


Link to this sectionإنشاء نقطة نهاية Vertex AI ونشر نموذجك#
في مصطلحات Vertex AI، تشير نقاط النهاية (endpoints) إلى النماذج المنشورة، لأنها تمثل نقاط نهاية HTTP التي ترسل إليها طلبات الاستدلال، في حين أن النماذج (models) هي عناصر ML المدربة المخزنة في سجل النموذج.
لنشر نموذج، تحتاج إلى إنشاء نقطة نهاية في Vertex AI.
- في قائمة تنقل Vertex AI، انتقل إلى نقاط النهاية. حدد منطقتك التي استخدمتها عند استيراد نموذجك. انقر فوق إنشاء.

تذكر أن بعض المناطق لديها حصص حوسبة محدودة للغاية، لذا قد لا تتمكن من اختيار أنواع معينة من الأجهزة أو وحدات GPU في منطقتك. إذا كان هذا أمراً حرجاً، فقم بتغيير منطقة النشر الخاصة بك إلى منطقة ذات حصة أكبر. اعثر على مزيد من المعلومات في وثائق Vertex AI الرسمية: حصص وحدود Vertex AI.
- بمجرد اختيار نوع الآلة، يمكنك النقر فوق متابعة. في هذه المرحلة، يمكنك اختيار تمكين مراقبة النموذج في Vertex AI—وهي خدمة إضافية ستتتبع أداء نموذجك وتقدم رؤى حول سلوكه. هذا اختياري ويتحمل تكاليف إضافية، لذا اختر وفقًا لاحتياجاتك. انقر فوق إنشاء.
سيستغرق Vertex AI عدة دقائق (تصل إلى 30 دقيقة في بعض المناطق) لنشر النموذج. ستتلقى إشعارًا عبر البريد الإلكتروني بمجرد اكتمال النشر.
Link to this sectionاختبر نموذجك المنشور#
بمجرد اكتمال النشر، سيوفر لك Vertex AI واجهة API نموذجية لاختبار نموذجك.
لاختبار الاستدلال عن بعد، يمكنك استخدام أمر cURL المقدم أو إنشاء مكتبة عميل Python أخرى سترسل طلبات إلى النموذج المنشور. تذكر أنك بحاجة إلى تشفير صورتك بـ base64 قبل إرسالها إلى نقطة النهاية /predict.
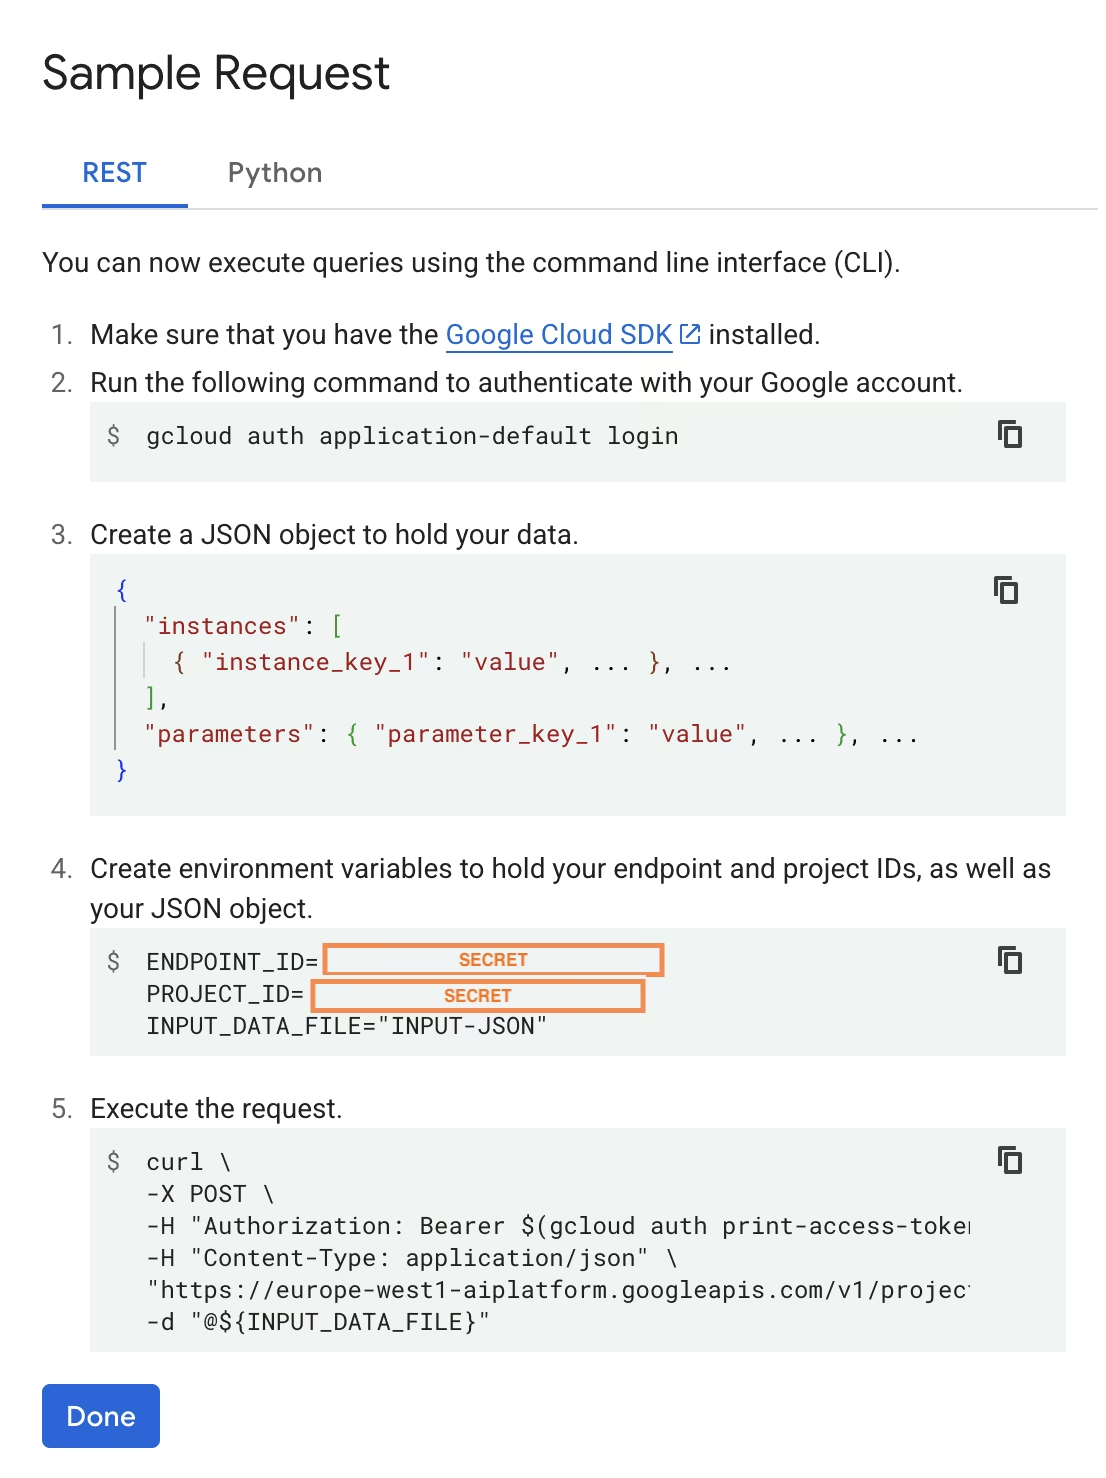
بشكل مشابه للاختبار المحلي، توقع تأخيرًا قصيرًا في الطلب الأول، حيث سيحتاج Ultralytics إلى سحب وتحميل نموذج YOLO26 في الحاوية قيد التشغيل.
لقد نجحت في نشر نموذج YOLO26 مُدرب مسبقًا باستخدام Ultralytics على Google Cloud Vertex AI.
Link to this sectionالأسئلة الشائعة#
Link to this sectionهل يمكنني استخدام نماذج Ultralytics YOLO على Vertex AI بدون Docker؟#
نعم؛ ومع ذلك، ستحتاج أولاً إلى تصدير النموذج إلى تنسيق متوافق مع Vertex AI، مثل TensorFlow، أو Scikit-learn، أو XGBoost. توفر Google Cloud دليلاً حول تشغيل نماذج .pt على Vertex مع نظرة عامة كاملة على عملية التحويل: تشغيل نماذج PyTorch على Vertex AI.
يرجى ملاحظة أن الإعداد الناتج سيعتمد فقط على طبقة خدمة Vertex AI القياسية ولن يدعم ميزات إطار عمل Ultralytics المتقدمة. نظرًا لأن Vertex AI يدعم بالكامل النماذج الموجودة في حاويات ويمكنه تحجيمها تلقائيًا وفقًا لتكوين النشر الخاص بك، فإنه يسمح لك بالاستفادة من القدرات الكاملة لنماذج Ultralytics YOLO دون الحاجة إلى تحويلها إلى تنسيق مختلف.
Link to this sectionلماذا يعد FastAPI خياراً جيداً لتقديم استنتاج YOLO26؟#
يوفر FastAPI إنتاجية عالية لأعباء عمل الاستنتاج. يسمح الدعم غير المتزامن (Async) بالتعامل مع طلبات متزامنة متعددة دون حظر الخيط الرئيسي، وهو أمر مهم عند تقديم نماذج الرؤية الحاسوبية.
يقلل التحقق التلقائي من الطلبات/الاستجابات باستخدام FastAPI من أخطاء وقت التشغيل في خدمات الاستنتاج الإنتاجية. وهذا ذو قيمة خاصة لواجهات برمجة تطبيقات كشف الأشياء (object detection APIs) حيث يعد اتساق تنسيق المدخلات أمراً بالغ الأهمية.
يضيف FastAPI حداً أدنى من العبء الحسابي على خط أنابيب الاستنتاج الخاص بك، مما يترك المزيد من الموارد المتاحة لتنفيذ النموذج ومهام معالجة الصور.
يدعم FastAPI أيضاً SSE (أحداث الخادم المرسلة)، وهي ميزة مفيدة لسيناريوهات الاستنتاج المتدفق.
Link to this sectionلماذا يجب علي اختيار منطقة (region) عدة مرات؟#
هذه في الواقع ميزة تعدد استخدامات في Google Cloud Platform، حيث تحتاج إلى اختيار منطقة لكل خدمة تستخدمها. بالنسبة لمهمة نشر نموذج حاوية (containerized) على Vertex AI، فإن أهم اختيار للمنطقة هو الخاص بـ Model Registry. سيحدد هذا توافر أنواع الأجهزة وحصص نشر النموذج الخاص بك.
بالإضافة إلى ذلك، إذا كنت ستقوم بتوسيع الإعداد وتخزين بيانات التنبؤ أو النتائج في Cloud Storage أو BigQuery، فستحتاج إلى استخدام نفس المنطقة المستخدمة في Model Registry لتقليل زمن الوصول وضمان إنتاجية عالية للوصول إلى البيانات.