دليل نشر YOLO26 على نقاط نهاية Amazon SageMaker
يفتح نشر نماذج رؤية الكمبيوتر المتقدمة مثل YOLO26 من Ultralytics على نقاط نهاية Amazon SageMaker مجموعة واسعة من الإمكانيات لتطبيقات تعلم الآلة المتنوعة. يكمن المفتاح للاستخدام الفعال لهذه النماذج في فهم عمليات إعدادها وتكوينها ونشرها. يصبح YOLO26 أكثر قوة عند دمجه بسلاسة مع Amazon SageMaker، وهي خدمة تعلم آلة قوية وقابلة للتطوير من AWS.
سيرشدك هذا الدليل خلال عملية نشر نماذج YOLO26 PyTorch على نقاط نهاية Amazon SageMaker خطوة بخطوة. ستتعلم أساسيات إعداد بيئة AWS الخاصة بك، وتكوين النموذج بشكل مناسب، واستخدام أدوات مثل AWS CloudFormation وAWS Cloud Development Kit (CDK) للنشر.
Amazon SageMaker
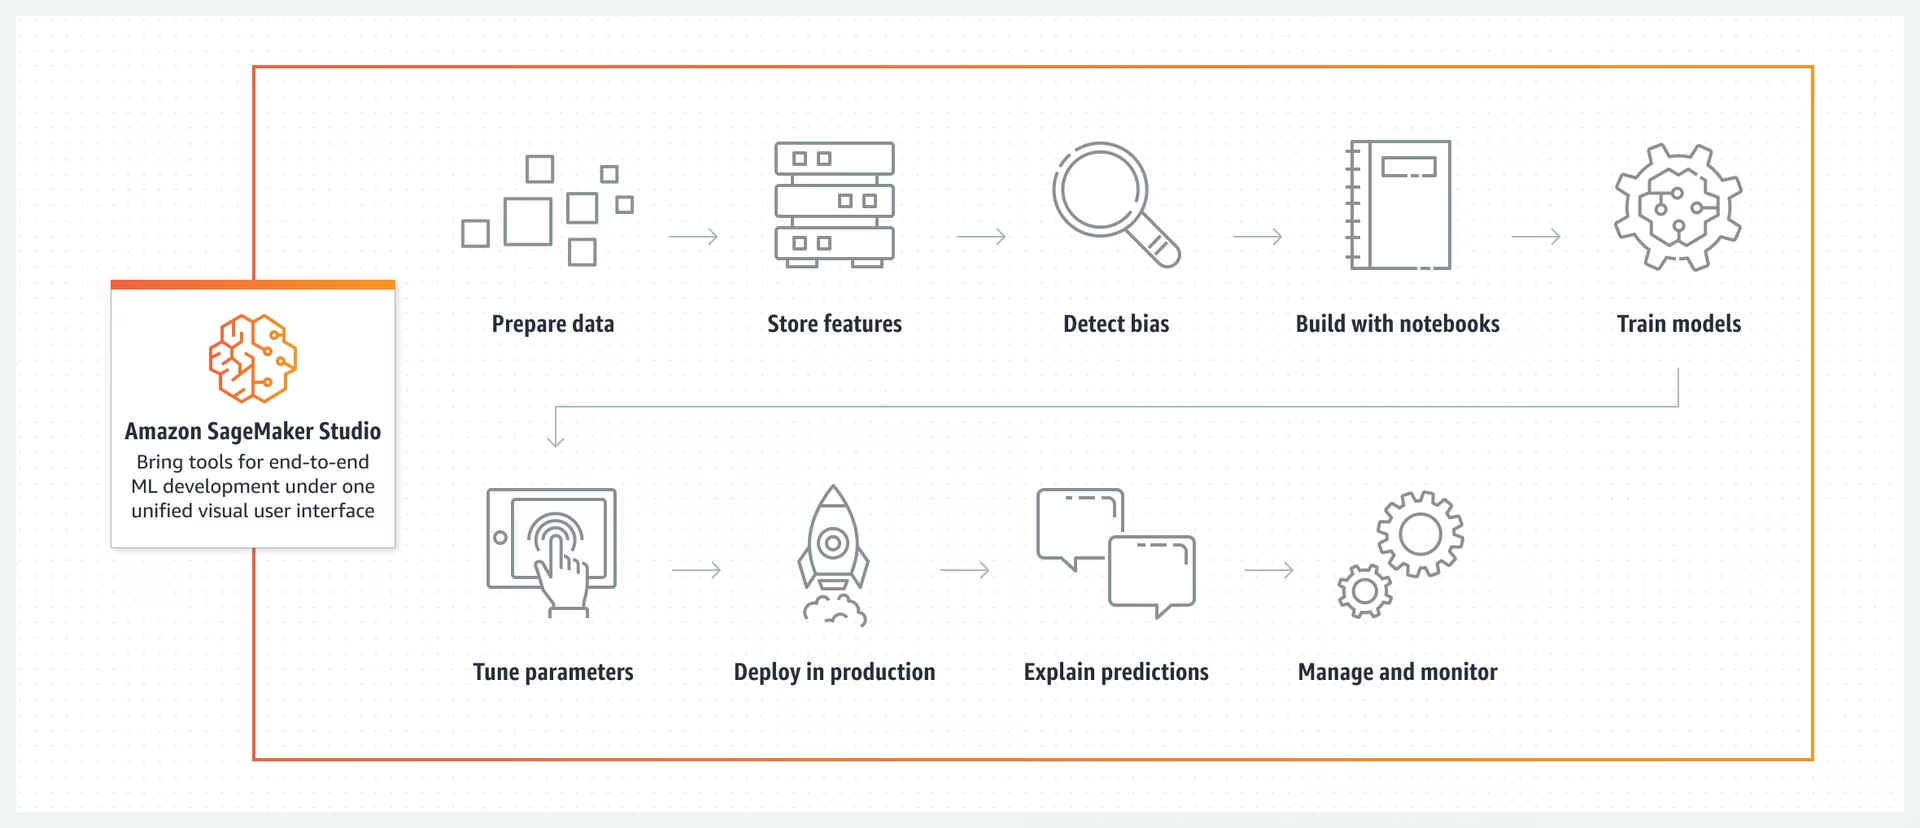
Amazon SageMaker هي خدمة تعلم آلي من Amazon Web Services (AWS) تعمل على تبسيط عملية بناء نماذج التعلم الآلي وتدريبها ونشرها. وهي توفر مجموعة واسعة من الأدوات للتعامل مع مختلف جوانب سير عمل التعلم الآلي. ويشمل ذلك الميزات الآلية لضبط النماذج، وخيارات لتدريب النماذج على نطاق واسع، وطرق مباشرة لنشر النماذج في الإنتاج. يدعم SageMaker أطر عمل التعلم الآلي الشائعة، مما يوفر المرونة اللازمة للمشاريع المتنوعة. وتغطي ميزاته أيضًا وضع العلامات على البيانات وإدارة سير العمل وتحليل الأداء.
نشر YOLO26 على نقاط نهاية Amazon SageMaker
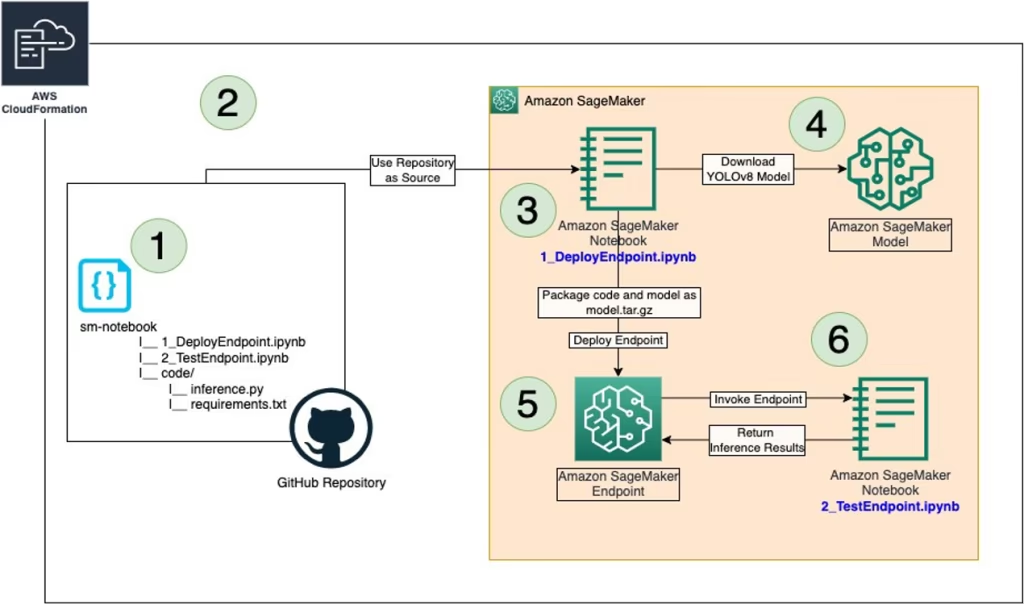
يتيح لك نشر YOLO26 على Amazon SageMaker استخدام بيئته المدارة للاستدلال في الوقت الفعلي والاستفادة من ميزات مثل التحجيم التلقائي. ألقِ نظرة على بنية AWS أدناه.
الخطوة الأولى: إعداد بيئة AWS الخاصة بك
أولاً، تأكد من توفر المتطلبات الأساسية التالية:
حساب AWS: إذا لم يكن لديك حساب بالفعل، فقم بالتسجيل للحصول على حساب AWS.
أدوار IAM التي تم تكوينها: ستحتاج إلى دور IAM مع الأذونات اللازمة لـ Amazon SageMaker و AWS CloudFormation و Amazon S3. يجب أن يكون لهذا الدور سياسات تسمح له بالوصول إلى هذه الخدمات.
AWS CLI: إذا لم يكن مثبتًا بالفعل، فقم بتنزيل وتثبيت AWS Command Line Interface (CLI) وقم بتهيئته بتفاصيل حسابك. اتبع تعليمات AWS CLI للتثبيت.
AWS CDK: إذا لم يكن مثبتًا بالفعل، فقم بتثبيت AWS Cloud Development Kit (CDK)، والذي سيتم استخدامه لبرمجة النشر. اتبع تعليمات AWS CDK للتثبيت.
حصة خدمة كافية: تأكد من أن لديك حصصًا كافية لموردين منفصلين في Amazon SageMaker: واحد لـ
ml.m5.4xlargeأحدهما لاستخدام نقطة النهاية والآخر لـml.m5.4xlargeلاستخدام مثيل دفتر الملاحظات. يتطلب كل من هذه القيم حدًا أدنى لحصة واحدة. إذا كانت حصصك الحالية أقل من هذا الشرط، فمن المهم طلب زيادة لكل منها. يمكنك طلب زيادة الحصة باتباع التعليمات التفصيلية الواردة في وثائق حصص خدمة AWS.
الخطوة 2: استنساخ مستودع YOLO26 SageMaker
الخطوة التالية هي استنساخ مستودع AWS المحدد الذي يحتوي على الموارد اللازمة لنشر YOLO26 على SageMaker. يتضمن هذا المستودع، المستضاف على GitHub، نصوص CDK البرمجية وملفات التكوين الضرورية.
استنساخ مستودع GitHub: نفذ الأمر التالي في جهازك الطرفي لاستنساخ مستودع host-yolov8-on-sagemaker-endpoint:
git clone https://github.com/aws-samples/host-yolov8-on-sagemaker-endpoint.gitانتقل إلى الدليل المستنسخ: غيّر الدليل إلى المستودع المستنسخ:
cd host-yolov8-on-sagemaker-endpoint/yolov8-pytorch-cdk
الخطوة الثالثة: إعداد بيئة CDK
الآن بعد أن أصبح لديك الرمز الضروري، قم بإعداد بيئتك للنشر باستخدام AWS CDK.
إنشاء بيئة Python افتراضية: يؤدي هذا إلى عزل بيئة Python والتبعيات الخاصة بك. قم بتشغيل:
python3 -m venv .venvتفعيل البيئة الافتراضية:
source .venv/bin/activateتثبيت التبعيات: قم بتثبيت تبعيات python المطلوبة للمشروع:
pip3 install -r requirements.txtترقية مكتبة AWS CDK: تأكد من أن لديك أحدث إصدار من مكتبة AWS CDK:
pip install --upgrade aws-cdk-lib
الخطوة الرابعة: إنشاء حزمة AWS CloudFormation
تجميع تطبيق CDK: قم بإنشاء قالب AWS CloudFormation من كود CDK الخاص بك:
cdk synthتهيئة تطبيق CDK: جهز بيئة AWS الخاصة بك لنشر CDK:
cdk bootstrapنشر المكدس: سيؤدي هذا إلى إنشاء موارد AWS الضرورية ونشر النموذج الخاص بك:
cdk deploy
الخطوة 5: نشر نموذج YOLO
قبل الخوض في تعليمات النشر، تأكد من مراجعة مجموعة نماذج YOLO26 التي تقدمها Ultralytics. سيساعدك هذا على اختيار النموذج الأنسب لمتطلبات مشروعك.
بعد إنشاء حزمة AWS CloudFormation، الخطوة التالية هي نشر YOLO26.
افتح مثيل دفتر الملاحظات: انتقل إلى وحدة تحكم AWS وانتقل إلى خدمة Amazon SageMaker. حدد "Notebook Instances" من لوحة المعلومات، ثم حدد موقع مثيل دفتر الملاحظات الذي تم إنشاؤه بواسطة برنامج نشر CDK الخاص بك. افتح مثيل دفتر الملاحظات للوصول إلى بيئة Jupyter.
الوصول إلى inference.py وتعديله: بعد فتح مثيل دفتر SageMaker في Jupyter، حدد موقع الملف inference.py. قم بتحرير الدالة output_fn في inference.py كما هو موضح أدناه واحفظ التغييرات التي أجريتها على البرنامج النصي، مع التأكد من عدم وجود أخطاء في بناء الجملة.
import json


def output_fn(prediction_output):
    """Formats model outputs as JSON string, extracting attributes like boxes, masks, keypoints."""
    print("Executing output_fn from inference.py ...")
    infer = {}
    for result in prediction_output:
        if result.boxes is not None:
            infer["boxes"] = result.boxes.numpy().data.tolist()
        if result.masks is not None:
            infer["masks"] = result.masks.numpy().data.tolist()
        if result.keypoints is not None:
            infer["keypoints"] = result.keypoints.numpy().data.tolist()
        if result.obb is not None:
            infer["obb"] = result.obb.numpy().data.tolist()
        if result.probs is not None:
            infer["probs"] = result.probs.numpy().data.tolist()
    return json.dumps(infer)
نشر نقطة النهاية باستخدام 1_DeployEndpoint.ipynb: في بيئة Jupyter، افتح دفتر ملاحظات 1_DeployEndpoint.ipynb الموجود في دليل sm-notebook. اتبع التعليمات الموجودة في دفتر الملاحظات وقم بتشغيل الخلايا لتنزيل نموذج YOLO26، وتعبئته باستخدام رمز الاستدلال المحدث، وتحميله إلى حاوية Amazon S3. سيرشدك دفتر الملاحظات خلال إنشاء ونشر نقطة نهاية SageMaker لنموذج YOLO26.
الخطوة 6: اختبار عملية النشر
بعد نشر نموذج YOLO26 الخاص بك، من المهم اختبار أدائه ووظائفه.
افتح دفتر ملاحظات الاختبار: في بيئة Jupyter نفسها، حدد موقع وافتح دفتر ملاحظات 2_TestEndpoint.ipynb، الموجود أيضًا في دليل sm-notebook.
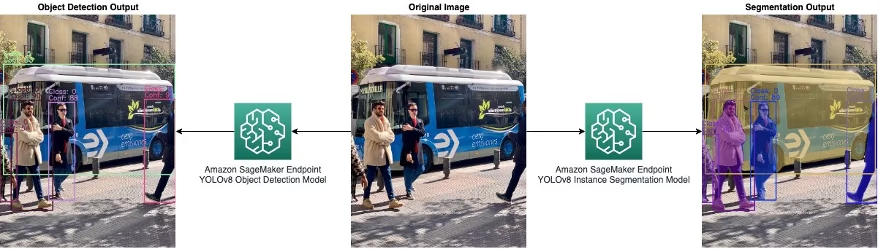
تشغيل دفتر اختبار: اتبع التعليمات الموجودة في الدفتر لاختبار نقطة نهاية SageMaker التي تم نشرها. يتضمن ذلك إرسال صورة إلى نقطة النهاية وتشغيل الاستدلالات. بعد ذلك، ستقوم برسم الإخراج لتصور أداء النموذج و دقته، كما هو موضح أدناه.
- تنظيف الموارد: سيوجهك دفتر الملاحظات التجريبي أيضًا خلال عملية تنظيف نقطة النهاية والنموذج المستضاف. هذه خطوة مهمة لإدارة التكاليف والموارد بفعالية، خاصةً إذا كنت لا تخطط لاستخدام النموذج الذي تم نشره على الفور.
الخطوة 7: المراقبة والإدارة
بعد الاختبار، يعد الرصد والإدارة المستمران للنموذج الذي تم نشره أمرًا ضروريًا.
المراقبة باستخدام Amazon CloudWatch: تحقق بانتظام من أداء وصحة نقطة نهاية SageMaker الخاصة بك باستخدام Amazon CloudWatch.
إدارة نقطة النهاية: استخدم وحدة تحكم SageMaker للإدارة المستمرة لنقطة النهاية. يتضمن ذلك تغيير الحجم أو تحديث النموذج أو إعادة نشره حسب الحاجة.
بإكمال هذه الخطوات، ستكون قد نجحت في نشر واختبار نموذج YOLO26 على نقاط نهاية Amazon SageMaker. لا تزودك هذه العملية بالخبرة العملية في استخدام خدمات AWS لنشر تعلم الآلة فحسب، بل ترسي أيضًا الأساس لنشر نماذج متقدمة أخرى في المستقبل.
ملخص
لقد أرشدك هذا الدليل خطوة بخطوة خلال نشر YOLO26 على نقاط نهاية Amazon SageMaker باستخدام AWS CloudFormation وAWS Cloud Development Kit (CDK). تتضمن العملية استنساخ مستودع GitHub الضروري، وإعداد بيئة CDK، ونشر النموذج باستخدام خدمات AWS، واختبار أدائه على SageMaker.
لمزيد من التفاصيل التقنية، راجع هذه المقالة على مدونة AWS Machine Learning. يمكنك أيضًا الاطلاع على وثائق Amazon SageMaker الرسمية للحصول على مزيد من الرؤى حول الميزات والوظائف المختلفة.
هل أنت مهتم بمعرفة المزيد عن تكاملات YOLO26 المختلفة؟ قم بزيارة صفحة دليل تكاملات Ultralytics لاكتشاف أدوات وإمكانيات إضافية يمكنها تعزيز مشاريع تعلم الآلة الخاصة بك.
الأسئلة الشائعة
كيف أقوم بنشر نموذج Ultralytics YOLO26 على نقاط نهاية Amazon SageMaker؟
لنشر نموذج Ultralytics YOLO26 على نقاط نهاية Amazon SageMaker، اتبع هذه الخطوات:
- إعداد بيئة AWS الخاصة بك: تأكد من أن لديك حساب AWS، وأدوار IAM مع الأذونات اللازمة، و AWS CLI مهيأ. قم بتثبيت AWS CDK إذا لم يتم ذلك بالفعل (راجع تعليمات AWS CDK).
- استنسخ مستودع YOLO26 SageMaker:
git clone https://github.com/aws-samples/host-yolov8-on-sagemaker-endpoint.git cd host-yolov8-on-sagemaker-endpoint/yolov8-pytorch-cdk - إعداد بيئة CDK: قم بإنشاء بيئة python افتراضية، وقم بتنشيطها، وتثبيت التبعيات، وقم بترقية مكتبة AWS CDK.
python3 -m venv .venv source .venv/bin/activate pip3 install -r requirements.txt pip install --upgrade aws-cdk-lib - النشر باستخدام AWS CDK: تجميع ونشر حزمة CloudFormation، وتهيئة البيئة.
cdk synth
cdk bootstrap
cdk deploy
لمزيد من التفاصيل، راجع قسم الوثائق.
ما هي المتطلبات الأساسية لنشر YOLO26 على Amazon SageMaker؟
لنشر YOLO26 على Amazon SageMaker، تأكد من توفر المتطلبات الأساسية التالية:
- حساب AWS: حساب AWS نشط (سجل هنا).
- أدوار IAM: أدوار IAM مُكوَّنة بأذونات لـ SageMaker و CloudFormation و Amazon S3.
- AWS CLI: تم تثبيت وتهيئة واجهة سطر الأوامر AWS (دليل تثبيت AWS CLI).
- AWS CDK: تم تثبيت AWS Cloud Development Kit (دليل إعداد CDK).
- حصص الخدمة: حصص كافية لـ
ml.m5.4xlargeمثيلات لكل من نقطة النهاية واستخدام دفتر الملاحظات (طلب زيادة الحصة).
لإعداد مفصل، ارجع إلى هذا القسم.
لماذا يجب علي استخدام Ultralytics YOLO26 على Amazon SageMaker؟
يوفر استخدام Ultralytics YOLO26 على Amazon SageMaker عدة مزايا:
- قابلية التوسع والإدارة: توفر SageMaker بيئة مُدارة مع ميزات مثل التحجيم التلقائي، مما يساعد في تلبية احتياجات الاستدلال في الوقت الفعلي.
- التكامل مع خدمات AWS: يمكنك الاندماج بسلاسة مع خدمات AWS الأخرى، مثل S3 لتخزين البيانات، و CloudFormation للبنية التحتية كتعليمات برمجية، و CloudWatch للمراقبة.
- سهولة النشر: إعداد مبسط باستخدام نصوص AWS CDK وعمليات نشر مبسطة.
- الأداء: استفد من البنية التحتية عالية الأداء في Amazon SageMaker لتشغيل مهام الاستدلال واسعة النطاق بكفاءة.
استكشف المزيد حول مزايا استخدام SageMaker في قسم المقدمة.
هل يمكنني تخصيص منطق الاستدلال لـ YOLO26 على Amazon SageMaker؟
نعم، يمكنك تخصيص منطق الاستدلال لـ YOLO26 على Amazon SageMaker:
تعديل
inference.py: تحديد موقع وتخصيصoutput_fnالدالة فيinference.pyلتخصيص تنسيقات الإخراج.import json def output_fn(prediction_output): """Formats model outputs as JSON string, extracting attributes like boxes, masks, keypoints.""" infer = {} for result in prediction_output: if result.boxes is not None: infer["boxes"] = result.boxes.numpy().data.tolist() # Add more processing logic if necessary return json.dumps(infer)نشر نموذج محدث: تأكد من إعادة نشر النموذج باستخدام دفاتر Jupyter المتوفرة (
1_DeployEndpoint.ipynb) لتضمين هذه التغييرات.
راجع الخطوات التفصيلية لنشر النموذج المعدل.
كيف يمكنني اختبار نموذج YOLO26 المنشور على Amazon SageMaker؟
لاختبار نموذج YOLO26 المنشور على Amazon SageMaker:
- افتح دفتر ملاحظات الاختبار: تحديد موقع
2_TestEndpoint.ipynbدفتر ملاحظات في بيئة SageMaker Jupyter. - تشغيل دفتر الملاحظات: اتبع تعليمات دفتر الملاحظات لإرسال صورة إلى نقطة النهاية، وإجراء الاستدلال، وعرض النتائج.
- تصور النتائج: استخدم وظائف الرسم المضمنة لتصور مقاييس الأداء، مثل المربعات المحيطة بالكائنات المكتشفة.
للحصول على إرشادات اختبار شاملة، تفضل بزيارة قسم الاختبار.


