تتبّع أجسام متعددة باستخدام Ultralytics YOLO
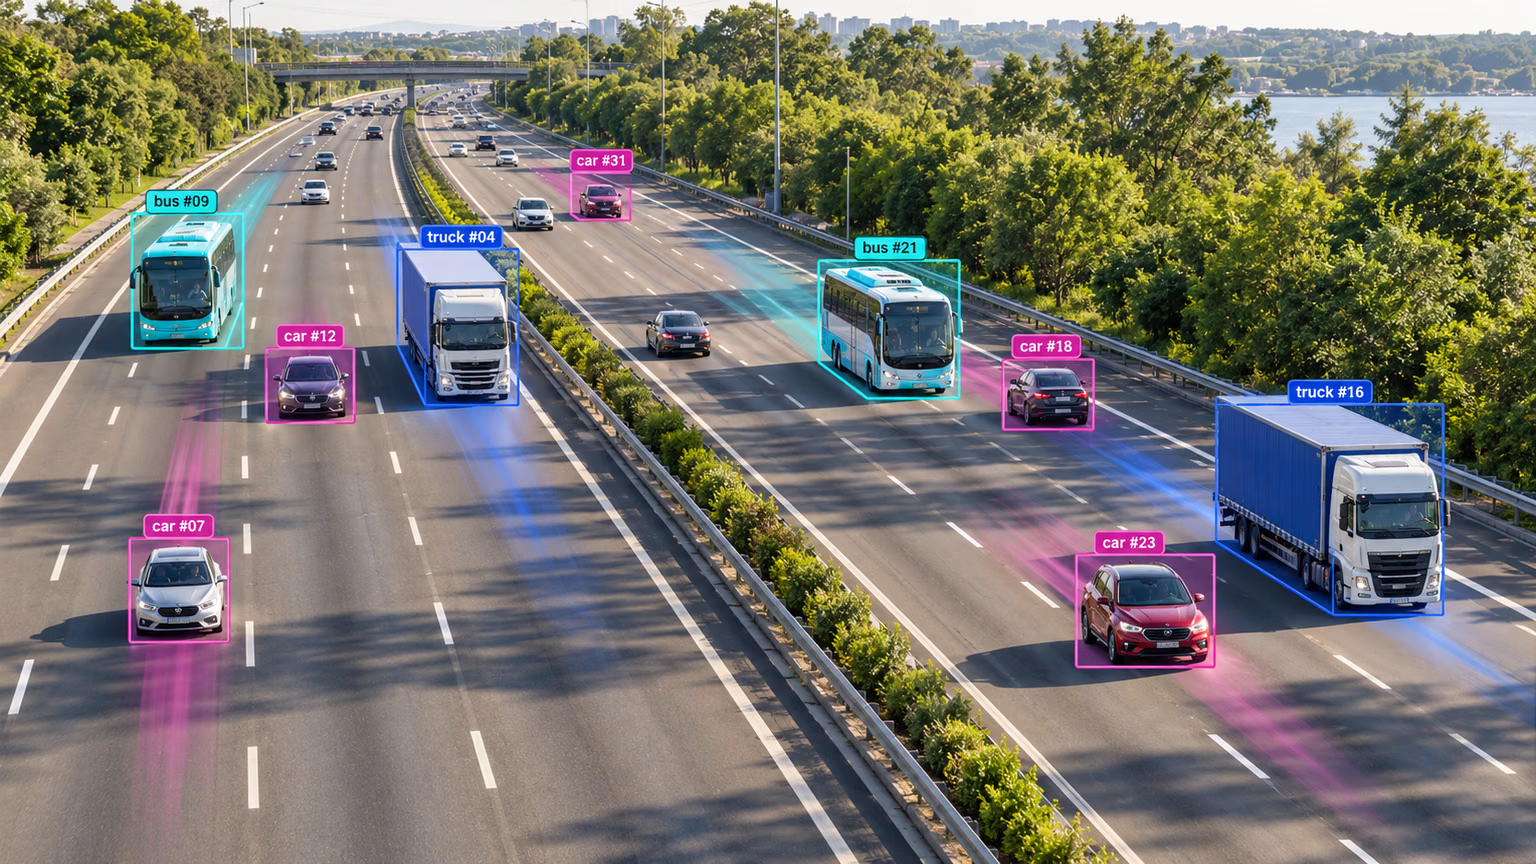
يحدّد تتبّع الأجسام المتعددة في تحليلات الفيديو موقع العناصر وفئاتها ضمن كل إطار، ويحافظ أيضًا على معرّف فريد لكل عنصر مكتشف مع تقدّم الفيديو. وتتراوح التطبيقات بين المراقبة والأمن وتحليلات الرياضة الآنية.
اطّلع على معاينة YOLO27 غير المُصدرة لمعرفة دعم التتبّع المخطط له.
بدءًا من ultralytics 8.4.63، تتوفر OC-SORT وDeep OC-SORT وFastTracker وTrackTrack، إلى جانب BoT-SORT وByteTrack.
لماذا تختار Ultralytics YOLO لتتبّع الأجسام؟#
تتوافق مخرجات متتبّعات Ultralytics مع اكتشاف العناصر القياسي، مع إضافة معرّفات العناصر. ويسهّل ذلك تتبّع العناصر في تدفقات الفيديو وإجراء التحليلات اللاحقة. ومن الأسباب الرئيسية لاستخدام Ultralytics YOLO لتتبّع العناصر:
- الكفاءة: معالجة تدفقات الفيديو في الزمن الفعلي دون المساس بـالدقة.
- المرونة: يدعم خوارزميات تتبّع متعددة وتكوينات متنوعة.
- سهولة الاستخدام: واجهة API بسيطة بلغة Python وخيارات CLI تتيح التكامل والنشر بسرعة.
- قابلية التخصيص: سهولة الاستخدام مع نماذج YOLO المدرّبة تدريبًا مخصصًا، ما يتيح دمجها في التطبيقات المتخصصة.
شاهد: كيفية تنفيذ تتبع كائنات متعددة باستخدام Ultralytics YOLO26 | BoT-SORT وByteTrack | VisionAI 🚀
تطبيقات واقعية#
| النقل والمواصلات | البيع بالتجزئة | الاستزراع المائي |
|---|---|---|
| تتبّع المركبات | تتبّع الأشخاص | تتبّع الأسماك |
البدء السريع#
شغّل التتبّع على فيديو باستخدام المتتبّع TrackTrack الافتراضي. للتبديل إلى متتبّع آخر، غيّر وسيطة tracker.
from ultralytics import YOLO
model = YOLO("yolo26n.pt")
# المتتبّع الافتراضي (TrackTrack)
results = model.track(source="https://youtu.be/LNwODJXcvt4", show=True)
# التبديل إلى ByteTrack
results = model.track(source="https://youtu.be/LNwODJXcvt4", show=True, tracker="bytetrack.yaml")لتشغيل المتتبّع على تدفقات الفيديو، استخدم نموذج Detect أو Segment أو Pose أو OBB مدرّبًا، مثل YOLO26n أو YOLO26n-seg أو YOLO26n-pose أو YOLO26n-obb، وكلها متاحة ضمن مجموعة YOLO26 على منصة Ultralytics. يمكنك تدريب نماذج مخصّصة محليًا أو باستخدام التدريب السحابي على منصة Ultralytics.
from ultralytics import YOLO
# تحميل نموذج رسمي أو مخصص
model = YOLO("yolo26n.pt") # تحميل نموذج Detect رسمي
model = YOLO("yolo26n-seg.pt") # تحميل نموذج Segment رسمي
model = YOLO("yolo26n-pose.pt") # تحميل نموذج Pose رسمي
model = YOLO("path/to/best.pt") # تحميل نموذج مدرّب تدريبًا مخصصًا
# تنفيذ التتبّع باستخدام النموذج
results = model.track("https://youtu.be/LNwODJXcvt4", show=True) # التتبّع باستخدام المتتبّع الافتراضي
results = model.track("https://youtu.be/LNwODJXcvt4", show=True, tracker="bytetrack.yaml") # باستخدام ByteTrackالمتتبّعات المدعومة#
يأتي Ultralytics YOLO مزودًا بستة متتبّعات مدمجة. فعِّل أحدها بتمرير ملف إعداد YAML الخاص به إلى الوسيطة tracker.
| المتتبّع | ملف الإعداد | نموذج الحركة | المظهر / ReID | تعويض حركة الكاميرا | التعامل مع الحجب |
|---|---|---|---|---|---|
| BoT-SORT | botsort.yaml | كالمان خطي | اختياري (with_reid) | قابل للتهيئة (gmc_method) | مخزن مؤقت للتتبّع + إعادة ربط ReID |
| ByteTrack | bytetrack.yaml | كالمان خطي | لا يوجد | لا | استعادة ثنائية المرحلة للكشف منخفض الثقة |
| OC-SORT | ocsort.yaml | كالمان مرتكز على الرصد | لا يوجد | لا | إعادة تحديث ORU وOCM وOCR انطلاقًا من آخر رصد |
| Deep OC-SORT | deepocsort.yaml | كالمان مرتكز على الرصد | اختياري (with_reid) | قابل للتهيئة (gmc_method) | OC-SORT + متوسط أسي متكيف اختياري للمظهر (EMA) |
| FastTracker | fasttrack.yaml | كالمان خطي + التراجع | لا يوجد | لا | التراجع في كالمان + تكبير bbox عند الحجب |
| TrackTrack | tracktrack.yaml | كالمان خطي (NSA) | اختياري (with_reid) | قابل للتهيئة (gmc_method) | إقران تكراري متعدد الإشارات + TAI |
أي متتبّع ينبغي أن أستخدم؟#
استخدم هذا المخطط لاختيار نقطة بداية؛ ويُستخدم tracktrack.yaml عند عدم تمرير tracker:
- هل تحتاج إلى أسرع خط أساس وأبسطه؟ → ByteTrack (من دون ReID أو تعويض لحركة الكاميرا، وبأقل حمل إضافي).
- هل تتعامل مع لقطات بكاميرا محمولة أو طائرة مسيّرة أو كاميرا متحركة؟ → BoT-SORT (يضيف تعويض حركة الكاميرا وخيار ReID).
- هل توجد حركة غير خطية (رياضة أو رقص أو انعطافات مفاجئة) ولا تحتاج إلى ReID؟ → OC-SORT (تصحيحات مرتكزة على الرصد من دون كلفة المظهر).
- هل تعمل على مشاهد مزدحمة بكاميرا متحركة، حيث تكون تبديلات المعرّفات المشكلة الرئيسية؟ → Deep OC-SORT أو TrackTrack (يدعم كلاهما المطابقة الاختيارية للمظهر؛ ويضيف TrackTrack أيضًا الإقران متعدد الإشارات وكبح المعرّفات المكررة).
- هل يحدث تداخل جزئي متكرر في الزمن الفعلي، من دون ميزانية لـ ReID؟ → FastTracker (نسخة من ByteTrack تراعي الحجب وتستخدم التراجع في كالمان).
التبديل بين المتتبّعات#
مرّر اسم ملف إعداد المتتبّع إلى tracker=. وتظل جميع أجزاء الشيفرة الأخرى كما هي.
from ultralytics import YOLO

model = YOLO("yolo26n.pt")

results = model.track(source="path/to/video.mp4", tracker="bytetrack.yaml")
results = model.track(source="path/to/video.mp4", tracker="ocsort.yaml")
results = model.track(source="path/to/video.mp4", tracker="tracktrack.yaml")التهيئة#
وسيطات التتبّع#
يشترك تكوين التتبّع مع وضع التنبؤ في وسائط الاستدلال، مثل conf وiou وshow.
from ultralytics import YOLO
# تهيئة معلمات التتبّع وتشغيل المتتبّع
model = YOLO("yolo26n.pt")
results = model.track(source="https://youtu.be/LNwODJXcvt4", conf=0.1, iou=0.5, show=True)إعداد متتبّع مخصص#
لاستخدام تكوين متتبّع معدّل، انسخ ملف تكوين متتبّع (مثل custom_tracker.yaml) من ultralytics/cfg/trackers وعدّل أي إعداد باستثناء tracker_type.
from ultralytics import YOLO
# تحميل النموذج وتشغيل المتتبّع باستخدام ملف إعداد مخصص
model = YOLO("yolo26n.pt")
results = model.track(source="https://youtu.be/LNwODJXcvt4", tracker="custom_tracker.yaml")وسيطات المتتبّع المشتركة#
المعلمات التالية شائعة في معظم ملفات YAML الخاصة بالمتتبّعات؛ ولا تظهر كل المعلمات في جميع ملفات الإعداد:
تدخل الاكتشافات التي تساوي track_high_thresh أو تتجاوزها المرحلة الأولى من الإقران. ويمكن للاكتشافات الواقعة بين track_low_thresh وtrack_high_thresh استعادة المسارات الحالية عندما يفعّل المتتبّع المحدد الإقران منخفض الثقة، لكنها لا تبدأ مسارات جديدة. أما الاكتشافات التي تساوي track_low_thresh أو تقل عنها، فيتم تجاهلها.
| المعلمة | القيم أو النطاقات الصالحة | الوصف |
|---|---|---|
tracker_type | botsort, bytetrack, ocsort, deepocsort, fasttrack, tracktrack | يحدّد نوع المتتبّع. |
track_high_thresh | 0.0-1.0 | عتبة المطابقة الأولى. تؤثر في مدى الثقة بمطابقة اكتشاف مع مسار موجود. |
track_low_thresh | 0.0-1.0 | الحد الأدنى لاكتشافات الاسترداد منخفضة الثقة. لا يستخدمها OC-SORT وDeep OC-SORT إلا عند use_byte: True؛ أما TrackTrack فيضمّها إلى مجموعة المطابقة الخاضعة للعقوبة. |
new_track_thresh | 0.0-1.0 | العتبة اللازمة لبدء مسار جديد إذا لم يتطابق الاكتشاف مع أي مسار موجود. |
track_buffer | >=0 | عدد الإطارات التي تبقى فيها المسارات المفقودة نشطة قبل إزالتها. تعني القيمة الأعلى تسامحًا أكبر مع الاحتجاب. |
match_thresh | 0.0-1.0 | عتبة مطابقة المسارات. تجعل القيم الأعلى المطابقة أكثر تساهلًا. |
fuse_score | True, False | ما إذا كان ينبغي دمج درجات الثقة مع مسافات IoU قبل المطابقة. |
gmc_method | sparseOptFlow, orb, sift, ecc, none | طريقة تعويض الحركة العامة. تساعد على مراعاة حركة الكاميرا. |
proximity_thresh | 0.0-1.0 | الحد الأدنى لقيمة IoU المطلوبة لمطابقة ReID صالحة. يضمن التقارب المكاني قبل استخدام مؤشرات المظهر. |
appearance_thresh | 0.0-1.0 | الحد الأدنى للتشابه المظهري المُطبَّع المطلوب لـ ReID. |
with_reid | True, False | تفعيل المطابقة المستندة إلى المظهر لتحسين التتبع عبر حالات الاحتجاب. يدعمها BoT-SORT وDeep OC-SORT وTrackTrack. |
model | auto أو مسار نموذج ReID متوافق | نموذج ReID. يستخدم auto ميزات العمود الفقري الأصلي لـ YOLO عند توفرها؛ وإلا فيلجأ إلى yolo26n-cls.pt. يمكن أن يكون المُرمِّز المخصص نقطة تحقق .pt أو نموذجًا مُصدّرًا مثل .torchscript أو .onnx أو .engine، أو دليل نموذج OpenVINO. |
وسيطات خاصة بأداة التتبع#
توفّر كل خوارزمية عناصر تحكم إضافية إلى جانب المعلمات المشتركة. راجع الأقسام الخاصة بكل أداة تتبع أدناه للاطلاع على الأوصاف ونصائح الضبط، أو ارجع مباشرةً إلى ملفات الإعداد:
تفعيل إعادة التعرّف (ReID)#
يكون ReID معطّلًا افتراضيًا للحد من الحمل الإضافي. فعّله بضبط with_reid: True في ملف تكوين المتتبّع.
خيارات نموذج ReID:
model: auto— يستخدم ميزات كاشف YOLO الأصلي، مع عبء إضافي ضئيل. وهو مثالي عندما تحتاج إلى قدر من ReID دون تأثير كبير في الأداء. ويلجأ إلىyolo26n-cls.ptإذا لم يوفّر الكاشف ميزات متوافقة.- نموذج ReID مخصص — وجّه
model:إلى نقطة تحقق.ptأو نموذج تضمين مُصدّر متوافق، مثل.torchscriptأو.onnxأو.engine، أو دليل نموذج OpenVINO. تُحمّل النماذج المُصدّرة عبرAutoBackend، ويجب أن تُخرج موتر تضمين مباشرةً.
تتوفر مُرمِّزات ONNX جاهزة للاستخدام لكل حجم من أحجام النماذج. عيّن model: إلى أحد هذه الأسماء، وسيُنزَّل الملف تلقائيًا عند تشغيل أداة التتبع لأول مرة (بالطريقة نفسها التي تُجلب بها أوزان YOLO)، دون الحاجة إلى تصدير أو تنزيل يدوي:
# In your tracker config (e.g. tracktrack.yaml)
with_reid: True
model: yolo26n-reid.onnx # downloaded on first use; swap n→s/m/l/x for a larger encoder| النموذج | الحجم (بالبكسل) | المعلمات (مليون) | FLOPs (مليار) |
|---|---|---|---|
| YOLO26n-reid.onnx | 448 | 2.8 | 2.0 |
| YOLO26s-reid.onnx | 448 | 7.5 | 6.6 |
| YOLO26m-reid.onnx | 448 | 12.4 | 20.1 |
| YOLO26l-reid.onnx | 448 | 15.3 | 25.2 |
| YOLO26x-reid.onnx | 448 | 32.7 | 55.9 |
تتوفر حاليًا مُرمِّزات ONNX الخاصة بفرع المظهر في أداة التتبع فقط. ولا تزال أوضاع ReID train وval وpredict، إلى جانب وصفات تصدير ReID المخصصة، قيد التطوير.
لتحقيق أداء أفضل باستخدام نموذج تصنيف منفصل، صدّره إلى واجهة خلفية أسرع مثل TensorRT:
from torch import nn
from ultralytics import YOLO
# تحميل نموذج التصنيف
model = YOLO("yolo26n-cls.pt")
# إضافة طبقة تجميع متوسط
head = model.model.model[-1]
pool = nn.Sequential(nn.AdaptiveAvgPool2d((1, 1)), nn.Flatten(start_dim=1))
pool.f, pool.i = head.f, head.i
model.model.model[-1] = pool
# التصدير إلى TensorRT
model.export(format="engine", quantize=16, dynamic=True, batch=32)بعد التصدير، حدّد مسار نموذج TensorRT في إعداد أداة التتبع.
تفاصيل أدوات التتبع#
تصف الأقسام أدناه تصميم كل أداة تتبع ومعلماتها الخاصة ونصائح ضبطها.
شاهد: أي متعقّب للكائنات يحقق أداءً أفضل؟ | السرعة وFPS واستقرار المعرّفات | Ultralytics YOLO26 📊
BoT-SORT#
توسّع BoT-SORT (Aharon وآخرون، 2022) خوارزمية ByteTrack بإضافة تعويض حركة الكاميرا وإمكانية استخدام ReID:
- تعويض حركة الكاميرا (CMC): يُطبَّق تشوّه أفيني يُقدَّر في كل إطار (بتدفق بصري متفرق افتراضيًا؛ ويتوفر أيضًا ORB / ECC) على حالات Kalman قبل المطابقة باستخدام IoU.
- ReID اختياري: يمكن دمج تضمينات المظهر في مصفوفة الكلفة. يكون معطّلًا افتراضيًا؛ ويمكن تفعيله باستخدام
with_reid: True.
الأنسب لـ: التتبع العام، ولا سيما باستخدام كاميرات متحركة. أضف ReID فقط عندما تؤدي الحشود المتشابهة المظهر إلى تبديل المعرّفات.
وسيطات خاصة بـ BoT-SORT:
| المعلمة | القيم أو النطاقات الصالحة | الوصف |
|---|---|---|
gmc_method | sparseOptFlow, orb, sift, ecc, none | الواجهة الخلفية لتعويض حركة الكاميرا. sparseOptFlow هي القيمة الافتراضية. يعطّل none ميزة CMC. |
with_reid | True, False | تفعيل المطابقة المستندة إلى المظهر. وهي معطّلة افتراضيًا. |
model | auto أو مسار نموذج ReID متوافق | يستخدم auto ميزات YOLO الأصلية عند توفرها؛ ويمكن أن تكون النماذج المخصصة نقاط تحقق .pt أو صادرات متوافقة. |
proximity_thresh | 0.0-1.0 | الحد الأدنى لقيمة IoU قبل أخذ ميزات المظهر في الحسبان. |
appearance_thresh | 0.0-1.0 | الحد الأدنى للتشابه المظهري المُطبَّع المطلوب لمطابقة ReID. ارفع القيمة لجعل المطابقة أكثر صرامة. |
نصائح الضبط:
- كاميرا ثابتة: عيّن
gmc_method: noneلتوفير بضعة مللي ثانية لكل إطار. - حركة كاميرا كبيرة: أبقِ
sparseOptFlow؛ فـeccأدق لكنه أبطأ. - حشود متشابهة المظهر: فعّل
with_reid: Trueوارفعappearance_thresh(مثلًا إلى0.85+).
ByteTrack#
تُعدّ ByteTrack (Zhang وآخرون، ECCV 2022) خوارزميةً أساسية خفيفة الوزن. وهي تستخدم Kalman خطيًا مع IoU، وتعتمد مطابقةً من مرحلتين:
- المرحلة الأولى: مطابقة الاكتشافات ذات الدرجات العالية بالمسارات النشطة.
- المرحلة الثانية: إعادة محاولة مطابقة المسارات غير المطابقة بالاكتشافات ذات الدرجات المنخفضة لاستعادتها بعد احتجاب جزئي قصير.
لا يوجد نموذج للمظهر ولا تعويض لحركة الكاميرا.
الأنسب لـ: الكاميرات الثابتة أو شبه الثابتة، عندما تهيمن كلفة الكاشف على الأداء وتريد تقليل العبء الإضافي لأداة التتبع إلى أدنى حد.
وسيطات خاصة بـ ByteTrack: لا شيء سوى وسيطات أداة التتبع المشتركة.
نصائح الضبط:
- كاشف كثير الضوضاء: خفّض
track_low_threshلزيادة عدد المرشحين في المرحلة الثانية. - كاشف عالي الاستدعاء: ارفع
track_high_threshلتقليل تفتت المعرّفات. - وميض متكرر للمعرّفات: ارفع
track_bufferكي تبقى المسارات التي فات رصدها لفترة وجيزة نشطة.
OC-SORT#
تُعدّ OC-SORT (Cao وآخرون، CVPR 2023) تطويرًا لخوارزمية SORT يتمحور حول الرصد. وتحافظ على تصميم SORT خفيف الوزن (من دون ميزات المظهر)، مع إضافة ثلاثة تصحيحات:
- إعادة التحديث المتمحورة حول الرصد (ORU): تعيد تشغيل مسار افتراضي بين آخر رصد والاكتشاف الحالي، وتعيد تنفيذ تحديث Kalman لإصلاح انجراف السرعة.
- الزخم المتمحور حول الرصد (OCM): يفرض عقوبة على الاكتشافات التي تتحرك في الاتجاه الخاطئ باستخدام حدّ لتوافق السرعة.
- الاسترداد المتمحور حول الرصد (OCR): يعيد فحص الاكتشافات غير المطابقة ومقارنتها بالمسارات المفقودة حديثًا، مستخدمًا آخر رصد بدلًا من الحالة المتوقعة.
الأنسب لـ: الحركة غير الخطية دون كلفة نموذج ReID.
وسيطات خاصة بـ OC-SORT:
| المعلمة | القيم أو النطاقات الصالحة | الوصف |
|---|---|---|
delta_t | >=1 | النافذة الزمنية (بالإطارات) لحساب اتجاه السرعة في OCM. تؤدي القيم الأكبر إلى مزيد من التنعيم. |
inertia | 0.0-1.0 | وزن كلفة توافق السرعة. تفرض القيم الأعلى عقوبة أكبر على التغيّرات المفاجئة في الاتجاه. |
use_byte | True, False | تفعيل مرور مطابقة ثانٍ على نمط ByteTrack للاكتشافات منخفضة الثقة. |
نصائح الضبط:
- حركة غير خطية: ارفع
inertia(مثلًا إلى0.3-0.4). - اكتشافات متفرقة: فعّل
use_byte: True. - احتجابات طويلة: ارفع
track_bufferلزيادة عدد المسارات المفقودة التي يمكن لـ OCR إعادة ربطها.
مع نماذج OBB، يستخدم OCR الصندوق الموجّه المتوقع بواسطة Kalman، إذ لا يُحتفَظ بسجل لآخر رصد للصناديق الموجّهة.
Deep OC-SORT#
تضيف Deep OC-SORT معلومات المظهر وتعويض حركة الكاميرا إلى OC-SORT:
- مطابقة المظهر: تُقيَّد مسافة جيب التمام بين التضمينات بالتداخل، وتُدمج مع كلفة الحركة.
- متوسط أسي متحرك ديناميكي للمظهر (EMA): تُحدَّث تضمينات المسارات باستخدام EMA، ويتكيف عامل التنعيم مع ثقة الاكتشاف.
- تعويض حركة الكاميرا: تُحوَّل حالات Kalman بين الإطارات باستخدام التدفق البصري المتفرق أو ORB أو ECC.
الأنسب لـ: المشاهد المزدحمة أو المصوّرة بكاميرات متحركة، حيث يشيع تبديل المعرّفات بين أجسام مختلفة بصريًا لكنها متقاربة مكانيًا.
وسيطات خاصة بـ Deep OC-SORT:
| المعلمة | القيم أو النطاقات الصالحة | الوصف |
|---|---|---|
with_reid | True, False | تفعيل المطابقة المستندة إلى المظهر. وهي معطّلة افتراضيًا. |
model | auto أو مسار نموذج ReID متوافق | يستخدم auto ميزات YOLO الأصلية عند توفرها؛ ويمكن أن تكون النماذج المخصصة نقاط تحقق .pt أو صادرات متوافقة. |
proximity_thresh | 0.0-1.0 | الحد الأدنى لقيمة IoU قبل أخذ ميزات المظهر في الحسبان. |
appearance_thresh | 0.0-1.0 | الحد الأدنى للتشابه المظهري المُطبَّع المطلوب لمطابقة ReID. |
alpha_fixed_emb | 0.0-1.0 | عامل EMA الأساسي لتحديث تضمينات المسارات. تحافظ القيم الأعلى على التضمين الأقدم مدة أطول. |
gmc_method | sparseOptFlow, orb, sift, ecc, none | طريقة تعويض الحركة العامة. |
delta_t | >=1 | النافذة الزمنية (بالإطارات) لحساب اتجاه السرعة في OCM (موروثة من OC-SORT). |
inertia | 0.0-1.0 | وزن كلفة توافق السرعة (موروث من OC-SORT). |
use_byte | True, False | تفعيل مطابقة ثانية على نمط ByteTrack للاكتشافات منخفضة الثقة (موروثة من OC-SORT). |
نصائح الضبط:
- تبديل المعرّفات في الحشود: ارفع
appearance_thresh(مثلًا إلى0.92-0.95) وارفعalpha_fixed_embكي تتكيف التضمينات ببطء أكبر. - كاميرا متحركة: عيّن
gmc_method: sparseOptFlow(يستخدم Deep OC-SORT افتراضيًاnone). - زمن استجابة أقل: أبقِ
with_reid: False(القيمة الافتراضية) للحركة وCMC فقط؛ وفعّل ReID فقط عندما تكون أخطاء تبديل المعرّفات هي السائدة.
FastTracker#
تُعدّ FastTracker نسخةً من ByteTrack تراعي الاحتجاب ولا تستخدم نموذجًا للمظهر:
- اكتشاف الاحتجاب: يحدّد المسارات على أنها محتجبة عندما تتجاوز تغطية المسارات النشطة الأخرى
occ_cover_thresh. - التراجع عن حالة Kalman عند الاحتجاب: يعيد حالة Kalman إلى إطار سابق للاحتجاب، باستخدام سجل محفوظ في مخزن دائري.
- تخفيف الحركة وتوسيع نطاق البحث: تُخفَّف السرعة ويُكبَّر الصندوق المتوقع bbox أثناء الاحتجاب.
- كبح Init-IoU: يمنع إنشاء مسارات جديدة فوق المسارات النشطة.
الأنسب لـ: مسارات عمل الكشف الفوري فقط التي تشهد تداخلًا متكررًا بين الأهداف (الحشود والطوابير والرياضة).
وسيطات خاصة بـ FastTracker:
| المعلمة | القيم أو النطاقات الصالحة | الوصف |
|---|---|---|
reset_velocity_offset_occ | >=0 | عدد إطارات السجل السابقة لاستعادة سرعة Kalman عند بدء الاحتجاب. |
reset_pos_offset_occ | >=0 | عدد إطارات السجل السابقة لاستعادة موضع Kalman عند بدء الاحتجاب. |
enlarge_bbox_occ | >=1.0 | مقياس الارتفاع المطبّق على BBox المتوقعة أثناء الاحتجاب (يُضبط العرض وفق نسبة XYAH). |
dampen_motion_occ | 0.0-1.0 | مضاعف السرعة أثناء الاحتجاب. تجعل القيم الأقل المسار «يتباطأ» خلال الاحتجاب. |
active_occ_to_lost_thresh | >=1 | الحد الأقصى لعدد إطارات الاحتجاب المتتالية قبل نقل مسار نشط إلى قائمة المسارات المفقودة. |
occ_cover_thresh | 0.0-1.0 | النسبة من مساحة المسار التي يغطيها مسار نشط آخر للإعلان عن حدوث احتجاب. |
occ_reappear_window | >=0 | عدد الإطارات التي يظل خلالها المسار المفقود الذي احتُجب مؤخرًا أسهل في إعادة العثور عليه. |
init_iou_suppress | 0.0-1.0 | منع بدء مسار جديد إذا تجاوزت قيمة IoU له مع أي مسار نشط هذا الحد. عيّن القيمة إلى 1.0 لتعطيل ذلك. |
نصائح الضبط:
- حالات الاحتجاب الجزئي المتكررة: خفّض
occ_cover_thresh(مثلًا، إلى0.5-0.6). - معرّفات مكررة قرب مناطق التداخل: خفّض
init_iou_suppress(مثلًا، إلى0.5). - حالات الاحتجاب الطويلة: ارفع
occ_reappear_windowوtrack_bufferمعًا. - الأهداف سريعة الحركة: ارفع
dampen_motion_occ(ليقترب من1.0)؛ ولا ترفعenlarge_bbox_occإلا عندما يؤدي توسيع نطاق البحث إلى تحسين الاستعادة.
TrackTrack#
TrackTrack (Shim et al., CVPR 2025) هو أداة التتبّع الافتراضية. ويحلل كل مسار من منظوره، مستخدمًا الإسناد التكراري متعدد الإشارات:
- الإسناد القائم على منظور المسار (TPA): يجمع بين HMIoU ومسافة ReID الجيبية الاختيارية ومسافة إسقاط الثقة ومسافة زاوية الزاوية. ويُحل الإسناد تكراريًا باستخدام عتبة مرنة.
- التهيئة الواعية بالمسار (TAI): تمنع إنشاء مسارات مكررة قبل إنشاء معرّف جديد.
الأنسب لـ: المشاهد المكتظة التي يتكرر فيها الاحتجاب وتشكّل فيها المعرّفات المكررة مشكلة.
وسيطات خاصة بـ TrackTrack:
| المعلمة | القيم أو النطاقات الصالحة | الوصف |
|---|---|---|
iou_weight | 0.0-1.0 | وزن مسافة HMIoU عند تفعيل ReID؛ وإلا فتُستخدم HMIoU مباشرةً. |
reid_weight | 0.0-1.0 | وزن مسافة ReID الجيبية عند تفعيل ReID؛ وإلا فتُهمل. |
conf_weight | 0.0-1.0 | وزن مسافة إسقاط الثقة. |
angle_weight | 0.0-1.0 | وزن مسافة زاوية الزاوية. |
penalty_p | 0.0-1.0 | عقوبة التكلفة للكشوف منخفضة الثقة. |
penalty_q | 0.0-1.0 | عقوبة التكلفة للكشوف المستعادة بواسطة NMS ثانوي. |
reduce_step | 0.0-1.0 | مقدار إرخاء عتبة المطابقة في كل تكرار. |
tai_thr | 0.0-1.0 | عتبة IoU لـ NMS الخاص بالتهيئة الواعية بالمسار. |
min_track_len | >=0 | الحد الأدنى لطول السجل قبل تأكيد مسار جديد. |
lost_match_thr | 0.0-1.0 | بوابة تكلفة أكثر تساهلًا لمرحلة إعادة الإسناد المرنة للمسارات المفقودة؛ وتعطّلها القيمة 0. |
with_reid | True, False | تفعيل مطابقة المظهر باستخدام ReID الجيبية (تستخدم ميزات YOLO الأصلية). وهي معطّلة افتراضيًا. |
model | auto أو مسار نموذج ReID متوافق | يستخدم auto ميزات YOLO الأصلية عند توفرها؛ ويمكن أن تكون النماذج المخصصة نقاط تحقق .pt أو صادرات متوافقة. |
gmc_method | sparseOptFlow, orb, sift, ecc, none | طريقة تعويض الحركة العامة. |
نصائح الضبط:
- المشاة في المشاهد المكتظة: خفّض
tai_thr(مثلًا، إلى0.45) للحد من إنشاء المسارات المكررة؛ وارفعtrack_bufferللتعامل مع حالات الاحتجاب الأطول. - حركة الكاميرا السريعة: أبقِ
gmc_method: sparseOptFlowمفعّلًا. - الأجسام الصغيرة أو السريعة: ارفع
angle_weightقليلًا، واخفضmin_track_len. - فعّل ReID عند الحاجة فقط: فهو يزيد تكلفة الاستدلال؛ وفي حالات الاحتجاب القصيرة، تكفي عادةً التكلفة الافتراضية متعددة الإشارات.
مع نماذج Segment وPose، يتجاوز TrackTrack استعادة الكشوف باستخدام NMS المتساهل، للحفاظ على محاذاة الأقنعة والنقاط المفتاحية مع الكشوف.
أمثلة Python#
شاهد: كيفية إنشاء تتبّع تفاعلي للأجسام باستخدام Ultralytics YOLO26: أنجزه في دقائق | Python!
حلقة تتبّع مستمرة#
فيما يلي برنامج Python نصي يستخدم OpenCV (cv2) وYOLO26 لتتبّع الأجسام في إطارات الفيديو. يفترض هذا البرنامج أن الحزم اللازمة (opencv-python وultralytics) مثبّتة مسبقًا. تخبر الوسيطة persist=True أداة التتبّع بأن الصورة أو الإطار الحالي هو التالي في التسلسل، وأن عليها توقّع وجود مسارات من الصورة السابقة في الصورة الحالية.
استخدم persist=True فقط عند تمرير إطارات متتالية من تدفق الفيديو نفسه إلى model.track(). يتيح ذلك لأداة التتبّع إعادة استخدام الحالة من الإطارات السابقة والحفاظ على اتساق معرّفات المسارات بمرور الوقت. لا تستخدم persist=True مع صور غير مترابطة أو تدفق مختلف، إذ قد تنتقل حالة المسارات السابقة.
يمكنك أيضًا اختيار الواجهة الخلفية لأداة التتبّع بتمرير ملف إعدادات لها، مثل tracker="botsort.yaml" أو tracker="bytetrack.yaml" أو tracker="tracktrack.yaml".
import cv2
from ultralytics import YOLO
# تحميل نموذج YOLO26
model = YOLO("yolo26n.pt")
# افتح ملف الفيديو
video_path = "path/to/video.mp4"
cap = cv2.VideoCapture(video_path)
# تكرار إطارات الفيديو
while cap.isOpened():
# قراءة إطار من الفيديو
success, frame = cap.read()
if success:
# تشغيل تتبّع YOLO26 على الإطار، مع الاحتفاظ بالمسارات بين الإطارات
# واستخدام الواجهة الخلفية لأداة التتبّع BoT-SORT
results = model.track(frame, persist=True, tracker="botsort.yaml")
# تصور النتائج على الإطار
annotated_frame = results[0].plot()
# عرض الإطار المشروح
cv2.imshow("YOLO26 Tracking", annotated_frame)
# إنهاء الحلقة إذا ضُغط على 'q'
if cv2.waitKey(1) & 0xFF == ord("q"):
break
else:
# إنهاء الحلقة عند الوصول إلى نهاية الفيديو
break
# تحرير كائن التقاط الفيديو وإغلاق نافذة العرض
cap.release()
cv2.destroyAllWindows()لاحظ التغيير من model(frame) إلى model.track(frame)، الذي يفعّل تتبّع العناصر بدلًا من الاكتشاف البسيط. سيشغّل هذا النص البرمجي المعدّل المتتبّع على كل إطار من الفيديو، ويعرض النتائج مرئيًا في نافذة. ويمكن إنهاء الحلقة بالضغط على 'q'.
رسم المسارات بمرور الوقت#
يمكن أن يوفر عرض مسارات العناصر عبر الإطارات المتعاقبة رؤى قيّمة حول أنماط حركة العناصر المكتشفة وسلوكها ضمن الفيديو. يجعل Ultralytics YOLO26 رسم هذه المسارات أمرًا مباشرًا.
يستخدم المثال التالي تتبّع YOLO26 لرسم حركة العناصر المكتشفة عبر إطارات فيديو متعددة. يفتح النص البرمجي ملف فيديو ويقرأه إطارًا تلو الآخر، ويستخدم نموذج YOLO لتحديد العناصر وتتبعها. ومن خلال الاحتفاظ بالنقاط المركزية لمربعات الإحاطة المكتشفة وربطها، يرسم خطوطًا تمثل المسارات التي سلكتها العناصر المتتبَّعة.
from collections import defaultdict
import cv2
import numpy as np
from ultralytics import YOLO
# تحميل نموذج YOLO26
model = YOLO("yolo26n.pt")
# افتح ملف الفيديو
video_path = "path/to/video.mp4"
cap = cv2.VideoCapture(video_path)
# تخزين سجل المسارات
track_history = defaultdict(list)
# تكرار إطارات الفيديو
while cap.isOpened():
# قراءة إطار من الفيديو
success, frame = cap.read()
if success:
# تشغيل تتبّع YOLO26 على الإطار، مع الاحتفاظ بالمسارات بين الإطارات
result = model.track(frame, persist=True)[0]
# الحصول على الصناديق ومعرّفات المسارات
if result.boxes and result.boxes.is_track:
boxes = result.boxes.xywh.cpu()
track_ids = result.boxes.id.int().cpu().tolist()
# عرض النتيجة مرئيًا على الإطار
frame = result.plot()
# رسم المسارات
for box, track_id in zip(boxes, track_ids):
x, y, w, h = box
track = track_history[track_id]
track.append((float(x), float(y))) # نقطة المركز x وy
if len(track) > 30: # الاحتفاظ بـ 30 مسارًا لمدة 30 إطارًا
track.pop(0)
# رسم خطوط التتبّع
points = np.hstack(track).astype(np.int32).reshape((-1, 1, 2))
cv2.polylines(frame, [points], isClosed=False, color=(230, 230, 230), thickness=10)
# عرض الإطار المشروح
cv2.imshow("YOLO26 Tracking", frame)
# إنهاء الحلقة إذا ضُغط على 'q'
if cv2.waitKey(1) & 0xFF == ord("q"):
break
else:
# إنهاء الحلقة عند الوصول إلى نهاية الفيديو
break
# تحرير كائن التقاط الفيديو وإغلاق نافذة العرض
cap.release()
cv2.destroyAllWindows()التتبّع متعدد الخيوط#
يتيح التتبّع متعدد الخيوط تشغيل تتبّع العناصر على عدة تدفقات فيديو في آنٍ واحد. وتفيد هذه الميزة بشكل خاص عند التعامل مع عدة مدخلات فيديو، مثل تلك الواردة من كاميرات مراقبة متعددة، إذ تحسّن المعالجة المتزامنة معدل الإنتاجية.
يستخدم نص Python البرمجي أدناه الوحدة threading من Python لتشغيل مثيلات متعددة من المتتبّع بالتوازي. ويشغّل كل خيط المتتبّع على مصدر فيديو واحد، فيما تعمل جميع الخيوط في الخلفية بالتزامن.
لضمان حصول كل سلسلة تنفيذ على المعلمات الصحيحة (النموذج المطلوب استخدامه ومصدر الفيديو)، يعرّف البرنامج النصي دالة run_tracker_in_thread تقبل هذه المعلمات وتتضمن حلقة التتبع الرئيسية. تقرأ هذه الدالة إطارات الفيديو واحدًا تلو الآخر، وتشغّل أداة التتبع، وتحفظ النتائج المشروحة.
يُستخدم في هذا المثال نموذجان مختلفان، yolo26n.pt وyolo26n-seg.pt، ويتتبع كل منهما الكائنات في مصدر مختلف: ملف فيديو محلي وكاميرا ويب. تُحدَّد المصادر في SOURCES.
تعني الوسيطة daemon=True في threading.Thread أن هذه الخيوط ستُغلق فور انتهاء البرنامج الرئيسي. ثم نبدأ الخيوط باستخدام start()، ونستخدم join() لجعل الخيط الرئيسي ينتظر إلى أن ينتهي خيطا التتبّع.
أخيرًا، بعد أن تُكمل جميع الخيوط مهامها، تُغلق النوافذ التي تعرض النتائج باستخدام cv2.destroyAllWindows().
import threading
import cv2
from ultralytics import YOLO
# تعريف أسماء النماذج ومصادر الفيديو
MODEL_NAMES = ["yolo26n.pt", "yolo26n-seg.pt"]
SOURCES = ["path/to/video.mp4", "0"] # فيديو محلي، و0 لكاميرا الويب
def run_tracker_in_thread(model_name, filename):
"""Run YOLO tracker in its own thread for concurrent processing.
Args:
model_name (str): Model checkpoint name or path loaded inside the thread.
filename (str): The path to the video file or the identifier for the webcam/external camera source.
"""
model = YOLO(model_name)
results = model.track(filename, save=True, stream=True)
for r in results:
pass
# إنشاء خيوط أداة التتبّع وبدؤها باستخدام حلقة for
tracker_threads = []
for video_file, model_name in zip(SOURCES, MODEL_NAMES):
thread = threading.Thread(target=run_tracker_in_thread, args=(model_name, video_file), daemon=True)
tracker_threads.append(thread)
thread.start()
# انتظار انتهاء جميع خيوط أداة التتبّع
for thread in tracker_threads:
thread.join()
# تنظيف الموارد وإغلاق النوافذ
cv2.destroyAllWindows()يمكن توسيع هذا المثال بسهولة للتعامل مع مزيد من ملفات الفيديو والنماذج، وذلك بإنشاء مزيد من الخيوط واتباع المنهجية نفسها.
المساهمة بأدوات تتبّع جديدة#
إذا نفّذت أو هيّأت خوارزمية لتتبع كائنات متعددة لـ Ultralytics YOLO، فننصحك بالتفكير في المساهمة بها في ultralytics/trackers مع إعداد مطابق في ultralytics/cfg/trackers. توسّع المساهمات خيارات التتبع المتاحة للمجتمع بأكمله.
الأسئلة الشائعة#
يشمل تتبّع الأجسام المتعددة في تحليلات الفيديو تحديد الأجسام والحفاظ على معرّف فريد لكل جسم مكتشف عبر إطارات الفيديو. ويدعم Ultralytics YOLO ذلك من خلال توفير التتبّع في الوقت الفعلي إلى جانب معرّفات الأجسام، ما يتيح تنفيذ مهام مثل المراقبة الأمنية وتحليلات الرياضة. ويستخدم النظام أدوات تتبّع مثل BoT-SORT وByteTrack وOC-SORT وDeep OC-SORT وFastTracker وTrackTrack، ويمكن ضبطها عبر ملفات YAML.
لا. تخزّن ملفات Ultralytics القياسية
.ptأوزان نموذج YOLO، بينما تُنشأ أداة التتبّع وقت الاستدلال بواسطةmodel.track(). وتعتمد معرّفات المسارات على حالة أداة التتبّع عبر الإطارات المتتالية؛ لذلك يمكن لصورة مستقلة واحدة أن تُرجع كشوفًا مثل الصناديق والفئات ومستويات الثقة، لكنها لا تستطيع وحدها إنتاج معرّفات تتبّع مستمرة ذات معنى.للنشر، اجمع الكاشف وأداة التتبّع معًا في تطبيقك، واستدعِ
model.track()إطارًا تلو الآخر معpersist=Trueعندما تأتي الإطارات من تدفق الفيديو نفسه. استخدم مثيلات منفصلة من النموذج أو أداة التتبّع للتدفقات غير المترابطة، كي لا تنتقل الحالة بين مقاطع الفيديو.يمكنك إعداد أداة تتبّع مخصصة بنسخ ملف إعدادات أداة تتبّع موجود (مثل
custom_tracker.yaml) من دليل إعدادات أدوات التتبّع في Ultralytics، ثم تعديل الوسيطات حسب الحاجة، باستثناءtracker_type. استخدم هذا الملف في نموذج التتبّع كما يلي:مثالfrom ultralytics import YOLO model = YOLO("yolo26n.pt") results = model.track(source="https://youtu.be/LNwODJXcvt4", tracker="custom_tracker.yaml")لتشغيل تتبّع الأجسام على تدفقات فيديو متعددة في الوقت نفسه، يمكنك استخدام وحدة Python
threading. وسيتولى كل خيط معالجة تدفق فيديو منفصل. إليك مثالًا يوضّح كيفية إعداد ذلك:التتبّع متعدد الخيوطimport threading import cv2 from ultralytics import YOLO # تعريف أسماء النماذج ومصادر الفيديو MODEL_NAMES = ["yolo26n.pt", "yolo26n-seg.pt"] SOURCES = ["path/to/video.mp4", "0"] # فيديو محلي، و0 لكاميرا الويب def run_tracker_in_thread(model_name, filename): """Run YOLO tracker in its own thread for concurrent processing. Args: model_name (str): Model checkpoint name or path loaded inside the thread. filename (str): The path to the video file or the identifier for the webcam/external camera source. """ model = YOLO(model_name) results = model.track(filename, save=True, stream=True) for r in results: pass # إنشاء خيوط أداة التتبّع وبدؤها باستخدام حلقة for tracker_threads = [] for video_file, model_name in zip(SOURCES, MODEL_NAMES): thread = threading.Thread(target=run_tracker_in_thread, args=(model_name, video_file), daemon=True) tracker_threads.append(thread) thread.start() # انتظار انتهاء جميع خيوط أداة التتبّع for thread in tracker_threads: thread.join() # تنظيف الموارد وإغلاق النوافذ cv2.destroyAllWindows()لتتبّع الأجسام المتعددة باستخدام Ultralytics YOLO تطبيقات عديدة، منها:
- النقل: تتبّع المركبات لإدارة حركة المرور والقيادة الذاتية.
- البيع بالتجزئة: تتبّع الأشخاص لتحليلات المتاجر وأغراض الأمن.
- تربية الأحياء المائية: تتبّع الأسماك لمراقبة البيئات المائية.
- تحليلات الرياضة: تتبّع اللاعبين والمعدات لتحليل الأداء.
- الأنظمة الأمنية: مراقبة الأنشطة المشبوهة وإنشاء إنذارات أمنية.
تستفيد هذه التطبيقات من قدرة Ultralytics YOLO على معالجة مقاطع الفيديو ذات معدل الإطارات العالي في الوقت الفعلي وبدقة عالية.
لعرض مسارات الأجسام عبر إطارات فيديو متعددة، يمكنك استخدام ميزات التتبّع في نموذج YOLO إلى جانب OpenCV لرسم مسارات الأجسام المكتشفة. إليك مثالًا لبرنامج نصي يوضّح ذلك:
رسم المسارات عبر إطارات فيديو متعددةfrom collections import defaultdict import cv2 import numpy as np from ultralytics import YOLO model = YOLO("yolo26n.pt") video_path = "path/to/video.mp4" cap = cv2.VideoCapture(video_path) track_history = defaultdict(list) while cap.isOpened(): success, frame = cap.read() if success: result = model.track(frame, persist=True)[0] annotated_frame = result.plot() if result.boxes and result.boxes.is_track: boxes = result.boxes.xywh.cpu() track_ids = result.boxes.id.int().cpu().tolist() for box, track_id in zip(boxes, track_ids): x, y, w, h = box track = track_history[track_id] track.append((float(x), float(y))) if len(track) > 30: track.pop(0) points = np.hstack(track).astype(np.int32).reshape((-1, 1, 2)) cv2.polylines(annotated_frame, [points], isClosed=False, color=(230, 230, 230), thickness=10) cv2.imshow("YOLO26 Tracking", annotated_frame) if cv2.waitKey(1) & 0xFF == ord("q"): break else: break cap.release() cv2.destroyAllWindows()يرسم هذا البرنامج خطوط التتبّع التي تُظهر مسارات حركة الأجسام المتتبَّعة بمرور الوقت، ما يوفّر رؤى قيّمة حول سلوك الأجسام وأنماطها.


التعليقات679
اطرح سؤالًا، وشارك نتائجك، أو ساعد شخصًا آخر.
bhaskar2443053
I’m using YOLO-Pose to detect and track people throughout ~1-hour videos and need each person to keep the same ID. I already have high-quality ground-truth tracks from a SAM-based tracker.
Do you have a script that can fine-tune YOLO-Pose (and its tracker/Re-ID parameters) against this ground truth to squeeze out the best IDF1 or HOTA scores ?
1maxexplorer
Hi!
Thank you for your great work on YOLO and tracking integration. We are using YOLO with ByteTrack/BoT-SORT for object counting and tracking and want to improve ID stability.
-
We notice that sometimes, even when the object visually looks the same and the scene and motion are stable, the track_id changes. What parameters or reasons should we check to understand why the ID changes unexpectedly?
-
Is the match_thresh parameter based on IoU, and is it possible to print or visualize the IoU used during matching for debugging?
-
Is there a way to output Kalman-predicted boxes of lost tracks so we can analyze them?
-
Could increasing the video FPS improve tracking and IoU consistency, or is this mainly related to detection stability and parameter tuning?
-
Does ByteTrack or BoT-SORT use a min_hits parameter before confirming tracks, or are tracks confirmed immediately after creation?
-
If a track is lost, can a new ID only be assigned on the second frame after reappearance if conf > new_track_thresh and then conf > track_high_thresh, or can it happen immediately on the first detection?
-
Is the track_buffer parameter the number of frames a track is kept using Kalman prediction after it is lost before being deleted?
-
Do you have any tips to improve tracking stability and avoid unnecessary ID switches?
Thank you for your support!
-
 Glenn JocherUltralytics
@bhaskar2443053 currently there isn't a built-in script for fine-tuning YOLO-Pose tracking parameters against ground truth. You would need to implement custom evaluation using libraries like TrackEval or MOTChallenge to compute IDF1/HOTA scores and optimize tracker parameters iteratively.
@maxexplorer great questions about tracking stability! Here are the key points:
-
ID changes typically occur due to low IoU between predicted and detected boxes, occlusions, or threshold mismatches. Check
track_high_threshandmatch_threshin your tracker config. -
match_threshis indeed IoU-based. For debugging, you can add logging to the tracker code, but there's no built-in visualization. -
Kalman predictions aren't directly exposed, but you can access them by modifying the tracker implementation.
-
Higher FPS generally improves tracking by reducing inter-frame motion, making associations more reliable.
-
Both trackers use confirmation logic - tracks need to meet certain criteria before being confirmed as valid tracks.
-
New tracks can be assigned immediately if detection confidence exceeds
new_track_thresh. -
Correct -
track_buffermaintains lost tracks for that many frames using prediction. -
For stability: increase
track_buffer, adjustmatch_threshbased on your scenario, and ensure consistent detection quality with appropriateconfthresholds.
For detailed parameter tuning, refer to the tracker configuration files and our tracking documentation.
-
rohith-aiunika(تم التعديل)
Hi YOLO Team, I've been using the following Python script to track objects with my YOLOv8 model: from ultralytics import YOLO
model = YOLO(r"/home/best_pt_files/v1.0.2.pt") results = model.track(r"/home/video.MP4", save=False, stream=False)
However, I noticed that my GPU memory usage gradually increases, leading to an "out of memory" error before the video finishes processing. Interestingly, when I use the following command from the terminal, the entire video tracks successfully without excessive GPU memory consumption: yolo track model=/home/best_pt_files/1.0.2.pt source=/home/video.MP4
Previously, the Python script worked without any issues. The memory issue has only recently started occurring. Could you please help me understand the possible reasons for this memory increase and how to address it?
i have experimented with persist= True and False,stream = true and false, show = true and false also but the issue is still there
1- Glenn JocherUltralytics
@rohith-aiunika thanks for reporting this. The memory buildup in Python scripts (but not CLI) typically occurs when not using streaming mode. To match the CLI's memory behavior, modify your Python script to process frames iteratively using
stream=True:from ultralytics import YOLO model = YOLO("/home/best_pt_files/v1.0.2.pt") for result in model.track("/home/video.MP4", stream=True): # Process frames iteratively pass # Add your frame processing logic hereThis streams frames sequentially like the CLI, preventing memory accumulation. For more details, see the streaming implementation in our Tracking documentation. Let us know if this resolves the issue!
i have used stream = True, then the code is just executing without showing error and without tracking also
- Glenn JocherUltralytics
@rohith-aiunika thanks for the update. Let's ensure you're properly iterating through streaming results. Try adding a processing loop like this:
for result in model.track(source=video_path, stream=True):
    annotated_frame = result[0].plot()
    cv2.imshow('Tracking', annotated_frame)
    if cv2.waitKey(1) == ord('q'):
        break
This actively processes each frame and displays tracking annotations. If issues persist, you might need to verify your video source format using our supported inference sources documentation.
mwasela
Hello, Made a custom model that i can successfully run and with a well tweaked confidence filter, am getting good results.
Now Ive wrapped the classification and tracking functionality into a flask app, that returns the count ID's when accessed by a REST call like get, meaning it can be accessed by a separate app for processing and stuff. I want to be able to reset the counting through some other request. My camera feed is always live, i need a way to reset the track id's to zero when neccessary, they just keep counting until i exit the program.
1- Glenn JocherUltralytics
@mwasela hello,
It's great to hear that your custom model is performing well. To reset the tracking IDs in your Flask app, you can implement a mechanism to reinitialize the tracker state upon receiving a specific request. This can be done by resetting the tracker object or reloading the model within your tracking function.
For more detailed guidance on configuring and using trackers, please refer to our documentation: Multi-Object Tracking with Ultralytics YOLO.
Orziqulov-Javohir
I really need help to do this programm: I wanna select region via mouse "dangerous zone" Track detected person, If person enters this zone crop and save person's photo Can you show me pls how to do it for 10 cameras, my gpu is RTX 3080TI
1It is kind a security program detecting who entered zone
1import cv2 from ultralytics import YOLO import time
Load the YOLOv8 model
model = YOLO("yolov8n.pt") # pretrained YOLOv8n model
Initialize video capture for multiple cameras
camera_ids = [
'rtsp://admin:admin12345@172.17.67.20:554',
'rtsp://admin:admin12345@172.17.67.16:554', 'rtsp://admin:admin12345@172.17.67.18:554', 'rtsp://admin:admin12345@172.17.67.19:554', 'rtsp://admin:admin12345@172.17.67.17:554', 'rtsp://admin:admin12345@172.17.67.21:554', 'rtsp://admin:admin12345@172.17.67.17:554', 'rtsp://admin:admin12345@172.17.67.21:554', 'rtsp://admin:admin12345@172.17.67.17:554',
]caps = [cv2.VideoCapture(camera_id) for camera_id in camera_ids]
Open the video file
roi_start = [(0, 0)] * len(caps) roi_end = [(0, 0)] * len(caps) drawing = [False] * len(caps)
tracked_persons = [[] for _ in range(len(caps))] # List to track persons in dangerous zones
def draw_rectangle(event, x, y, flags, param): global roi_start, roi_end, drawing idx = param # Use param to identify the camera index if event == cv2.EVENT_LBUTTONDOWN: drawing[idx] = True roi_start[idx] = (x, y) roi_end[idx] = (x, y) print(f"Camera {idx}: Started drawing rectangle at: {roi_start[idx]}") elif event == cv2.EVENT_MOUSEMOVE: if drawing[idx]: roi_end[idx] = (x, y) print(f"Camera {idx}: Updated rectangle end to: {roi_end[idx]}") elif event == cv2.EVENT_LBUTTONUP: drawing[idx] = False roi_end[idx] = (x, y) print(f"Camera {idx}: Finished drawing rectangle at: {roi_end[idx]}")
Create a window and set mouse callback for each camera
for idx in range(len(caps)): window_name = f'Video {idx}' cv2.namedWindow(window_name) cv2.setMouseCallback(window_name, draw_rectangle, idx)
def is_inside_roi(x, y, roi_start, roi_end): x1, y1 = roi_start x2, y2 = roi_end return min(x1, x2) <= x <= max(x1, x2) and min(y1, y2) <= y <= max(y1, y2)
while True: frames = [] for cap in caps: ret, frame = cap.read() if not ret: continue # frame = cv2.resize(frame, (640, 480)) frames.append(frame)
for idx, frame in enumerate(frames):
    window_name = f'Video {idx}'

    # Draw the ROI rectangle on the frame
    if drawing[idx] or roi_start[idx] != roi_end[idx]:
        cv2.rectangle(frame, roi_start[idx], roi_end[idx], (0, 255, 0), 2)
        cv2.putText(frame, "Dangerous Zone", (roi_start[idx][0], roi_start[idx][1] - 10), cv2.FONT_HERSHEY_SIMPLEX, 0.9, (0, 255, 0), 2)

    # Run YOLOv8 tracking on the frame, persisting tracks between frames
    results = model.track(frame, tracker="bytetrack.yaml", persist=True)

    for result in results:
        boxes = result.boxes

        for box in boxes:
            x1, y1, x2, y2 = box.xyxy.tolist()[0][:4]
            cls = box.cls.tolist()[0]
            if cls == 0:  # Person class in COCO dataset
                # Check if the center of the person is inside the ROI
                cx, cy = int((x1 + x2) / 2), int((y1 + y2) / 2)
                if is_inside_roi(cx, cy, roi_start[idx], roi_end[idx]):
                    # Check if this person is already tracked
                    person_id = box.id.tolist()[0] if box.id is not None else None

                    if person_id not in tracked_persons[idx]:
                        tracked_persons[idx].append(person_id)
                        # Crop and save the frame
                        crop = frame[int(y1):int(y2), int(x1):int(x2)]
                        cv2.imwrite(f"cropped_camera{idx}_person{person_id}_{int(time.time())}.jpg", crop)
                        # Draw a label on the person
                        cv2.putText(frame, "Person in Dangerous Zone", (int(x1), int(y1) - 10), cv2.FONT_HERSHEY_SIMPLEX, 0.9, (0, 0, 255), 2)
                        cv2.rectangle(frame, (int(x1), int(y1)), (int(x2), int(y2)), (0, 0, 255), 2)

    cv2.imshow(window_name, frame)

if cv2.waitKey(1) & 0xFF == ord('q'):
    break
Release all video captures
for cap in caps: cap.release() cv2.destroyAllWindows()
- Glenn JocherUltralytics
Your approach looks solid for setting up a security program to track and save images of individuals entering a designated "dangerous zone" across multiple cameras. To enhance your implementation, ensure you're using the latest versions of the Ultralytics package for optimal performance and bug fixes. For more detailed guidance on tracking configurations and additional features, you can refer to the Ultralytics tracking documentation. If you encounter any specific issues or need further assistance, feel free to ask!
mariem158
File "", line 91 results = model.track(frame, persist=True, tracker="botsort.yaml") ^ IndentationError: unexpected indent COMMENT CORRIGER CETTE ERREUR
- Glenn JocherUltralytics
The error you're encountering is due to an unexpected indent in your code. Ensure that the indentation is consistent throughout your script. If the issue persists, please verify it with the latest version of the Ultralytics package. For more details on tracking configurations, you can refer to the Ultralytics tracking documentation.
GKYoffice
How can I get the tracking metrics of a tracker such as MOTA, IDF1, etc.
1Can I set the parameter ''save_txt'' to True in the track function, and then write code to evaluate the tracking data?
 Paula DerrengerUltralytics
Currently, the Ultralytics YOLO framework doesn't provide built-in functionality for computing tracking metrics like MOTA or IDF1 directly through the API or command line. However, you can utilize external libraries such as MOTChallenge eval for calculating these metrics.
After running your tracking with YOLOv8, you'd typically export your tracking results in a format compatible with these libraries (usually a
.txtformat with frame ID, object ID, bounding boxes, etc.). Then, use the external library to compute the desired metrics by providing it with both the ground truth and your results file.Here's a generic example on how you might save tracking results (modify based on your actual use case):
from ultralytics import YOLO

# Initialize and load your model
model = YOLO("path/to/your/model.pt")

# Tracking
results = model.track(source='path/to/video.mp4', save_txt=True, project='runs/track', name='exp')

# results are saved in 'runs/track/exp' in a format that can be used with MOTChallenge eval tools
Afterwards, follow the documentation of the MOTChallenge eval toolkit to compute the metrics using the outputs stored in
'runs/track/exp'.If you encounter any specific issues while implementing this, feel free to ask!🛠️
AdadAlShabab
Can I run two models simultaneously in one video? Ex: model = YOLO('E:/Ultralytics/best.pt') model = YOLO('yolov8m-pose.pt') results = model.track(source="file.mp4", show=True, conf=0.3, save=False) results = model.track(source="file.mp4", show=True, conf=0.3, save=False)
I want that two models will works simultaneously with cumulative results? Is it possible? Please let me know. Thanks in advance!!
1- Paula DerrengerUltralytics
@AdadAlShabab yes, you can run two models simultaneously on one video, but you'll need to manage the inference in a way that allows both models to process the video frames concurrently. Here's a simplified example using threading to achieve this:
import threading
from ultralytics import YOLO

# Load the models
model1 = YOLO('E:/Ultralytics/best.pt')
model2 = YOLO('yolov8m-pose.pt')

# Function to run tracking
def track_video(model, source, conf, show, save):
    results = model.track(source=source, show=show, conf=conf, save=save)
    # Process results here or return them

# Create threads for each model
thread1 = threading.Thread(target=track_video, args=(model1, "file.mp4", 0.3, True, False))
thread2 = threading.Thread(target=track_video, args=(model2, "file.mp4", 0.3, True, False))

# Start the threads
thread1.start()
thread2.start()

# Wait for both threads to finish
thread1.join()
thread2.join()
This script will run both models in separate threads. If you want to combine the results from both models, you'll need to implement a mechanism to synchronize and merge the results from both threads. Keep in mind that displaying the results (
show=True) from two threads might not work as expected, and you might need to handle the visualization separately.Remember to handle the GPU memory usage carefully, as running two models simultaneously will require more memory. If you encounter any issues, consider running the models sequentially or on separate GPUs if available.
4
Journey2-20
Hello I'm newer to Opencv and I'm trying to run a tracking camera for airsoft. How would i select specific bounding boxes?
- Paula DerrengerUltralytics
Use
model.track(frame, persist=True)and inspectresults[0].boxes.xyxywithresults[0].boxes.id; select the box containing your OpenCV mouse-click coordinates, store its track ID, then process or draw only boxes whoseboxes.idmatches that ID. Feel free to continue posting questions here so the Ultralytics team can help.
yashpatel2010
In my jetson orin nano super developer kit with jetpack6.1 and deepstream7.1 i want to do cross camera person tracking. Is there any default way in deepstream configs to do it? Or any other lightweight thing that can be easily doable in jetson orin nano 8 gb super dev kit.
- Glenn JocherUltralytics
Ultralytics
trackis single-camera MOT, so cross-camera person IDs are not built in; on DeepStream 7.1 the practical Orin Nano path isNvDeepSORT/ReID per stream plus downstream association from the exported embeddings described in the DeepStreamgst-nvtrackerdocs, or NVIDIA’s separate Multi-Camera Tracking workflow for full MTMC. Please keep the details here in Discussions and share your current tracker config if you want a minimal setup suggestion. (docs.nvidia.com)
anvi97(تم التعديل)
Hi @glenn-jocher,
I am building a road surface detection system using YOLO segmentation.
My pipeline:
Apply bird eye view using cv2.getPerspectiveTransform()
Mask only road area
Detect potholes, zebra crossings, and speed bumps
I am facing the following issues:
1️⃣ Overlapping Potholes Not Merging Properly
I want overlapping potholes to merge into one bounding box.
In many cases it works, but sometimes:
Two boxes are still shown for the same pothole
Even when they overlap visually
I am using YOLO with:
results = model(frame, conf=0.45, iou=0.4)
Is YOLO’s internal NMS preventing full merging? Should I apply custom merging after inference? Is segmentation-based merging better than bounding box merging for potholes?
2️⃣ Object Size Changing After Bird Eye View
I calculate pothole size using:
pixels_per_foot = 220
But I selected this value randomly (no real-world measurement).
Because of this:
Object size changes depending on frame position
Same pothole appears different size
Is it correct that without real-world calibration, size cannot be accurate? What is the correct method to calculate real-world size in a monocular dashcam setup?
3️⃣ Zebra Crossing vs Black–White Speed Bump Confusion
Black–white speed bumps are getting confused with zebra crossings because both have parallel white-black stripes.
Currently I am detecting only yellow speed bumps to avoid confusion.
What is the better approach to separate them?
Use segmentation instead of boxes?
Add geometry-based filtering?
Train with more hard-negative examples?
this is my code ..... from ultralytics import YOLO import cv2 import numpy as np
model = YOLO("runs/segment/pothole_seg_model3/weights/best.pt") pixels_per_foot = 220
video_path = "sample_video.mp4" cap = cv2.VideoCapture(video_path)
if not cap.isOpened(): print(" Cannot open video") exit()
width = int(cap.get(cv2.CAP_PROP_FRAME_WIDTH)) height = int(cap.get(cv2.CAP_PROP_FRAME_HEIGHT)) fps = cap.get(cv2.CAP_PROP_FPS) or 25.0
fourcc = cv2.VideoWriter_fourcc(*'avc1') out = cv2.VideoWriter("pothole5.mp4", fourcc, fps, (width, height))
STRETCH_AMOUNT = 50
src = np.float32([ [0, height],
[width, height],
[922, 183],
[265, 183]
])dst = np.float32([ [0, height], [width, height], [width + STRETCH_AMOUNT, 0], [0 - STRETCH_AMOUNT, 0] ])
matrix = cv2.getPerspectiveTransform(src, dst) def compute_iou(box1, box2): x1 = max(box1[0], box2[0]) y1 = max(box1[1], box2[1]) x2 = min(box1[2], box2[2]) y2 = min(box1[3], box2[3])
inter_area = max(0, x2 - x1) * max(0, y2 - y1)

box1_area = (box1[2] - box1[0]) * (box1[3] - box1[1])
box2_area = (box2[2] - box2[0]) * (box2[3] - box2[1])

union = box1_area + box2_area - inter_area

if union == 0:
    return 0

return inter_area / union
def should_merge(box1, box2, iou_thresh=0.1, dist_thresh=150): # Containment check - if one box is inside the other if (box1[0] >= box2[0] and box1[1] >= box2[1] and box1[2] <= box2[2] and box1[3] <= box2[3]): return True if (box2[0] >= box1[0] and box2[1] >= box1[1] and box2[2] <= box1[2] and box2[3] <= box1[3]): return True
iou = compute_iou(box1, box2)
if iou > iou_thresh:
    return True

cx1, cy1 = (box1[0]+box1[2])/2, (box1[1]+box1[3])/2
cx2, cy2 = (box2[0]+box2[2])/2, (box2[1]+box2[3])/2

if np.sqrt((cx1-cx2)**2 + (cy1-cy2)**2) < dist_thresh:
    return True

return False
while True: ret, frame = cap.read() if not ret: break
bird_eye = cv2.warpPerspective(frame, matrix, (width, height))

results = model(bird_eye, conf=0.45, iou=0.4)[0]
annotated = results.plot()

if results.boxes is not None:
    for box in results.boxes:
        cls_id = int(box.cls.item())

        if cls_id == 0:  # pothole only
            x1, y1, x2, y2 = map(int, box.xyxy.cpu().numpy()[0])

            w_px = x2 - x1
            h_px = y2 - y1

            w_ft = w_px / pixels_per_foot
            h_ft = h_px / pixels_per_foot

            label = f"{w_ft:.2f}ft x {h_ft:.2f}ft"

            cv2.putText(
                annotated,
                label,
                (x1, y1 - 15),
                cv2.FONT_HERSHEY_SIMPLEX,
                0.6,
                (0, 255, 255),
                2
            )

cv2.imshow("Bird Eye + Pothole Detection", annotated)
out.write(annotated)

if cv2.waitKey(1) & 0xFF == 27:
    break
cap.release() out.release() cv2.destroyAllWindows()
- Glenn JocherUltralytics
For (1), YOLO’s NMS will only suppress duplicate detections based on
iou=...—it won’t “merge” two overlapping detections into a larger union box, and in your snippetcompute_iou()/should_merge()aren’t actually applied toresults.boxes, so you’re still visualizing the raw post-NMS output; since you’re using a Segment model, the most robust way to merge “split” potholes is to union the pothole masks and re-extract connected components (then box/measure those) rather than trying to union boxes.import cv2 import numpy as np r = model(bird_eye, conf=0.45, iou=0.4)[0] if r.masks is not None and r.boxes is not None: cls = r.boxes.cls.int().cpu().numpy() pothole_idx = np.where(cls == 0)[0] if pothole_idx.size: m = r.masks.data[pothole_idx].cpu().numpy() # (N,H,W), 0/1 union = (m.sum(0) > 0).astype(np.uint8) * 255 n, labels = cv2.connectedComponents(union) for k in range(1, n): ys, xs = np.where(labels == k) x1, y1, x2, y2 = xs.min(), ys.min(), xs.max(), ys.max() cv2.rectangle(bird_eye, (x1, y1), (x2, y2), (0, 255, 255), 2)For (2), yes—without real-world calibration (and a valid “road plane” assumption),
pixels_per_foot=220can’t be physically meaningful, and even with a BEV warp you only get consistent scale if your homography is tied to metric coordinates; the usual monocular approach is: calibrate camera intrinsics, estimate the road plane, build a homography to a top-down plane in real units (or derive scale from at least one known road-plane measurement like lane width/stripe spacing), then measure in the BEV plane.For (3), the best fix is usually data: train both classes explicitly with lots of “hard negatives” (zebra crossings that look like bumps and vice versa) and keep labels consistent; segmentation often helps because you can then add simple shape/location constraints on the mask (zebra = large repeated pattern region, bump = single narrow band across lane) and optionally smooth decisions over time (if you’re doing video, using
model.track(..., persist=True)from the Track mode docs can help stabilize per-frame flicker, even though it won’t merge instances within a frame).If you can paste
!yolo checksoutput and one representative frame (plus what you consider the “correct” merged result), I can suggest concrete thresholds/post-processing for your exact outputs. In the attached frame:
The large water-filled pothole on the left should be treated as a single instance.
The small region in the top-left corner (currently detected as separate) should be merged with the large region.
Essentially, all visually continuous damaged area should result in one bounding box / one connected component.
Currently:
Mask union + connected components splits them due to small segmentation gaps
Goal:
Treat visually continuous pothole surface as one instance for measurement stability.
- Glenn JocherUltralytics
That split is expected because
connectedComponents()treats any 1–2 px “mask hole” as a hard break, so add a small gap-closing step on the union mask (morphological close / dilate→erode) before components, with the kernel sized to the largest gap you still consider “visually continuous” (see Ultralytics YOLO segmentation docs for more mask/seg usage details):# union: uint8 {0,255} union = (m.sum(0) > 0).astype(np.uint8) * 255 # bridge small gaps (tune kernel size to your expected mask discontinuities) k_close = cv2.getStructuringElement(cv2.MORPH_ELLIPSE, (25, 25)) union_closed = cv2.morphologyEx(union, cv2.MORPH_CLOSE, k_close, iterations=1) # optional: remove tiny speckles after closing k_open = cv2.getStructuringElement(cv2.MORPH_ELLIPSE, (7, 7)) union_closed = cv2.morphologyEx(union_closed, cv2.MORPH_OPEN, k_open, iterations=1) n, labels = cv2.connectedComponents(union_closed)
mslabdelhak29
Reid doesn't work how can i fix it i tried to change it True in botsort.yaml but it doesn't work
@glenn_jocher
- Glenn JocherUltralytics(تم التعديل)
@mslabdelhak29 ReID is only supported by some trackers (for example BoT-SORT), not ByteTrack, and it’s enabled via the tracker YAML you pass at runtime. Copy the default config, enable ReID explicitly, and point
track()to your copy:# custom_botsort.yaml tracker_type: botsort with_reid: True model: yolo26n-cls.pt # or another YOLO classification weight you have locallyfrom ultralytics import YOLO model = YOLO("yolo26n.pt") # any YOLO detector results = model.track(source="path/to/video.mp4", tracker="custom_botsort.yaml", persist=True, show=False)If it still doesn’t work, you’re likely editing a different YAML than the one being loaded; always pass the path as above. Also share the output of
yolo checksand the exactcustom_botsort.yamlyou used so we can verify your environment and keys. See the ReID section in the tracking guide and the BoT-SORT config for details: Multi‑Object Tracking docs and botsort.yaml config.