Schnellstartanleitung: Raspberry Pi mit Ultralytics YOLO26
Ein Raspberry Pi ist ein kleiner, preisgünstiger Computer, auf dem Ultralytics YOLO26 Echtzeit-Objekterkennung am Rand des Netzwerks ausführt – ganz ohne GPU. Diese Anleitung führt dich durch die Bereitstellung von YOLO26 auf Raspberry Pi 4 und 5: vom Flashen des Betriebssystems und der Installation von Ultralytics über den Export nach NCNN für die schnellste Inferenz auf ARM bis zur Ausführung von Vorhersagen mit einem Live-Kamerabild. Außerdem enthält sie Leistungsbenchmarks für acht Exportformate, damit du für deine Hardware den besten Kompromiss aus Geschwindigkeit und Genauigkeit findest.
Springe zu Ultralytics einrichten, nach NCNN exportieren und Inferenz ausführen, Benchmarks oder Inferenz mit der Kamera.
Ansehen: Updates und Verbesserungen für Raspberry Pi 5.
Diese Anleitung wurde mit Raspberry Pi 4 und Raspberry Pi 5 getestet, auf denen das aktuelle Raspberry Pi OS Bookworm (Debian 12) läuft. Sie sollte auch auf älteren Raspberry-Pi-Geräten wie Raspberry Pi 3 funktionieren, sofern dieselbe Version von Raspberry Pi OS Bookworm installiert ist.
Was ist Raspberry Pi?#
Raspberry Pi ist ein kleiner, preisgünstiger Einplatinencomputer. Er ist für viele Projekte und Anwendungen beliebt geworden, von der Hausautomatisierung als Hobby bis hin zu industriellen Einsätzen. Raspberry-Pi-Platinen können verschiedene Betriebssysteme ausführen und verfügen über GPIO-Pins (Allzweck-Ein-/Ausgänge), mit denen sich Sensoren, Aktoren und andere Hardwarekomponenten einfach anschließen lassen. Sie sind in verschiedenen Modellen mit unterschiedlichen technischen Daten erhältlich, haben aber alle dasselbe Grundkonzept: kostengünstig, kompakt und vielseitig zu sein.
Vergleich der Raspberry-Pi-Serien#
| Raspberry Pi 3 | Raspberry Pi 4 | Raspberry Pi 5 | |
|---|---|---|---|
| CPU | Broadcom BCM2837, Cortex-A53 64-Bit-SoC | Broadcom BCM2711, Cortex-A72 64-Bit-SoC | Broadcom BCM2712, Cortex-A76 64-Bit-SoC |
| Maximale CPU-Frequenz | 1.4GHz | 1.8GHz | 2.4GHz |
| GPU | VideoCore IV | VideoCore VI | VideoCore VII |
| Maximale GPU-Taktfrequenz | 400MHz | 500MHz | 800MHz |
| Speicher | 1GB LPDDR2 SDRAM | 1GB, 2GB, 4GB, 8GB LPDDR4-3200 SDRAM | 2GB, 4GB, 8GB, 16GB LPDDR4X-4267 SDRAM |
| PCIe | Nicht zutreffend | Nicht zutreffend | 1xPCIe 2.0-Schnittstelle |
| Maximale Leistungsaufnahme | 2.5A@5V | 3A@5V | 5A@5V (PD aktiviert) |
Was ist Raspberry Pi OS?#
Raspberry Pi OS (früher bekannt als Raspbian) ist ein Unix-ähnliches Betriebssystem, das auf der Debian-GNU/Linux-Distribution für die Familie kompakter Einplatinencomputer Raspberry Pi basiert, die von der Raspberry Pi Foundation vertrieben werden. Raspberry Pi OS ist stark für Raspberry Pi mit ARM-CPUs optimiert und verwendet eine leichtgewichtige Desktop-Umgebung, die auf Raspberry Pi 4 und 5 standardmäßig mit Wayland läuft. Raspberry Pi OS wird aktiv weiterentwickelt; dabei liegt der Schwerpunkt darauf, die Stabilität und Leistung möglichst vieler Debian-Pakete auf Raspberry Pi zu verbessern.
Raspberry Pi OS auf Raspberry Pi flashen#
Als Erstes solltest du nach dem Auspacken deines Raspberry Pi eine microSD-Karte mit Raspberry Pi OS flashen, sie in das Gerät einsetzen und das Betriebssystem starten. Folge der ausführlichen Erste-Schritte-Dokumentation von Raspberry Pi, um dein Gerät für die erste Verwendung vorzubereiten.
Ultralytics einrichten#
Du kannst das Ultralytics-Paket auf zwei Arten auf Raspberry Pi einrichten, um dein nächstes Computer-Vision-Projekt umzusetzen:
Mit Docker loslegen#
Am schnellsten kannst du Ultralytics YOLO26 auf Raspberry Pi nutzen, indem du ein vorgefertigtes Docker-Image für Raspberry Pi ausführst.
Führe den folgenden Befehl aus, um den Docker-Container herunterzuladen und auf Raspberry Pi auszuführen. Er basiert auf dem offiziellen Python-Image 3.13-slim, das Python 3.13 auf der neuesten Debian-Version ausführt.
t=ultralytics/ultralytics:latest-arm64
sudo docker pull $t && sudo docker run -it --ipc=host $t
Das Docker-Image enthält Ultralytics bereits, sodass du direkt mit dem Export deines Modells nach NCNN beginnen kannst.
Ohne Docker loslegen#
Ultralytics-Paket installieren#
Hier installieren wir das Ultralytics-Paket auf Raspberry Pi. Exportabhängigkeiten für Formate wie NCNN werden automatisch installiert, wenn du zum ersten Mal ein PyTorch-Modell exportierst. Daher benötigst du hier nur das Basispaket.
-
Paketlisten aktualisieren, pip installieren und auf die neueste Version aktualisieren
sudo apt update sudo apt install python3-pip -y pip install -U pip -
Das pip-Paket
ultralyticsinstallierenpip install ultralytics -
Gerät neu starten
sudo reboot
NCNN auf Raspberry Pi verwenden#
Von allen von Ultralytics unterstützten Exportformaten bietet NCNN die beste Inferenzleistung auf Raspberry-Pi-Geräten, da es stark für Mobil- und eingebettete Plattformen wie ARM optimiert ist. Wandle dein YOLO26n-PyTorch-Modell in NCNN um und führe anschließend mit dem exportierten Modell eine Inferenz aus:
from ultralytics import YOLO

# Ein YOLO26n-PyTorch-Modell laden
model = YOLO("yolo26n.pt")

# Das Modell ins NCNN-Format exportieren
model.export(format="ncnn")  # creates 'yolo26n_ncnn_model'

# Das exportierte NCNN-Modell laden
ncnn_model = YOLO("yolo26n_ncnn_model")

# Inferenz ausführen
results = ncnn_model("https://ultralytics.com/images/bus.jpg")Weitere Informationen zu den unterstützten Exportoptionen findest du im Leitfaden zu den Optionen für die Modellbereitstellung.
Leistungsverbesserungen von YOLO26 gegenüber YOLO11#
YOLO26 wurde speziell für Geräte mit begrenzten Ressourcen wie den Raspberry Pi 5 entwickelt. Im Vergleich zu YOLO11n erzielt YOLO26n bei einer Eingabegröße von 640 mit ONNX-exportierten Modellen auf dem Raspberry Pi 5 rund 15 % mehr FPS (6.79 → 7.79) und zugleich eine höhere mAP (40.1 gegenüber 39.5). Die folgende Tabelle und das Diagramm veranschaulichen diesen Vergleich.
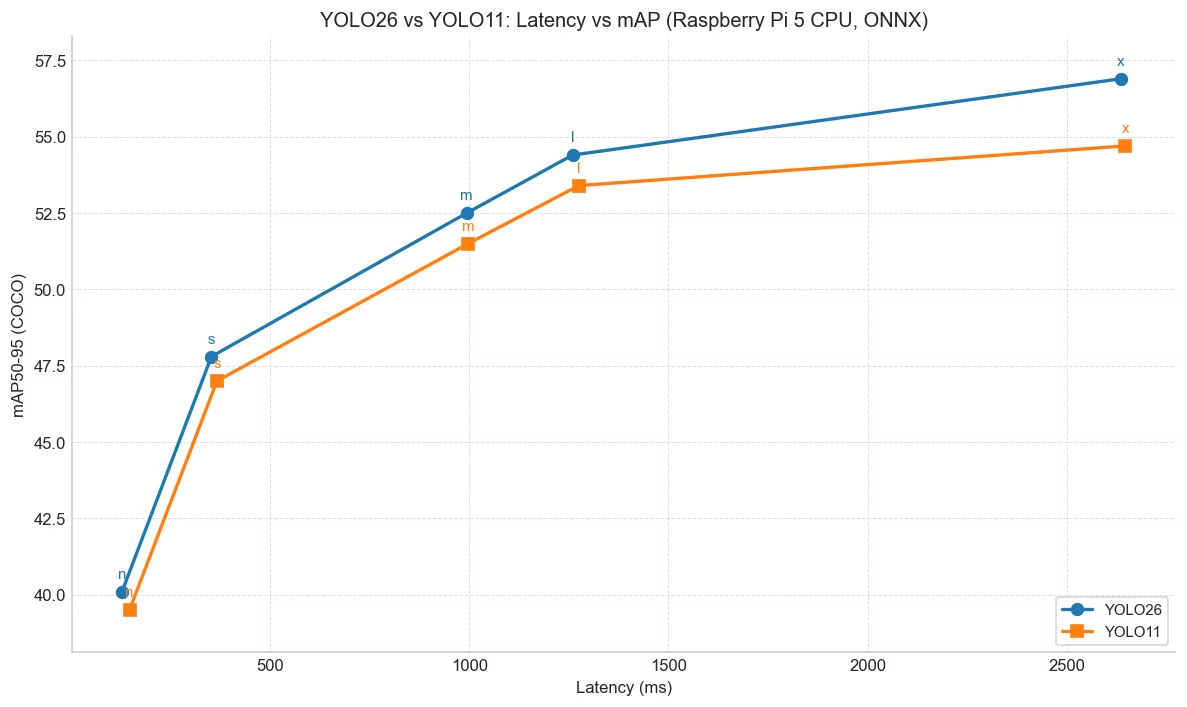
| Modell | mAP50-95(B) | Inferenzzeit (ms/Bild) |
|---|---|---|
| YOLO26n | 40.1 | 128.42 |
| YOLO26s | 47.8 | 352.84 |
| YOLO26m | 52.5 | 993.78 |
| YOLO26l | 54.4 | 1259.46 |
| YOLO26x | 56.9 | 2636.26 |
Getestet mit Ultralytics 8.4.14.
YOLO26-Benchmarks auf Raspberry Pi 5#
Das Ultralytics-Team hat YOLO26-Benchmarks für acht verschiedene Modellformate durchgeführt und Geschwindigkeit sowie Genauigkeit gemessen: PyTorch, TorchScript, ONNX, OpenVINO, LiteRT, MNN, NCNN und ExecuTorch. Die Benchmarks wurden auf einem Raspberry Pi 5 mit FP32-Präzision und der standardmäßigen Eingabebildgröße von 640 durchgeführt.
Vergleichsdiagramm#
Berücksichtigt werden nur YOLO26n und YOLO26s, da größere Modelle auf Raspberry Pi zu langsam und daher unpraktisch sind.
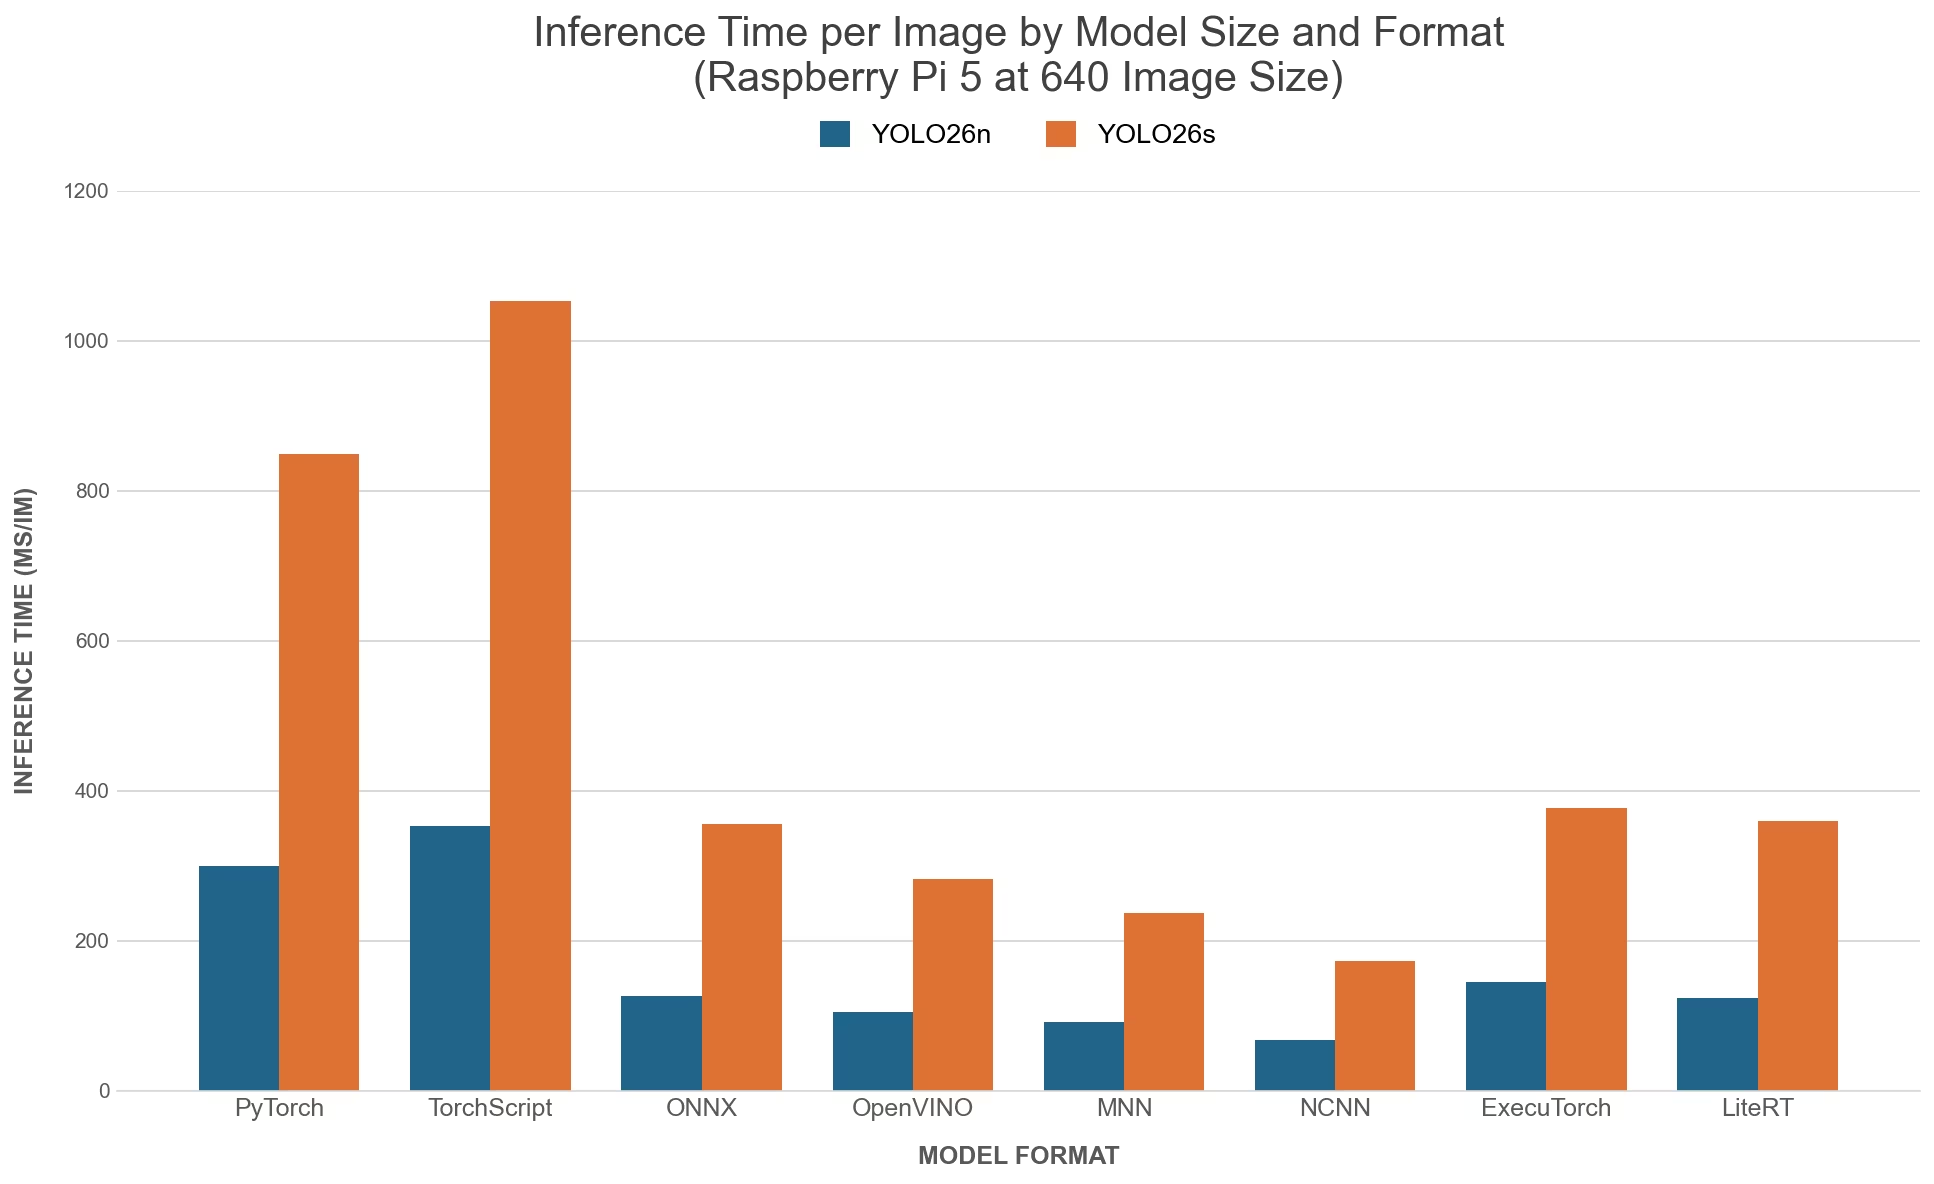
Detaillierte Vergleichstabelle#
Die folgende Tabelle zeigt Benchmark-Ergebnisse für zwei verschiedene Modelle (YOLO26n, YOLO26s) in acht verschiedenen Formaten (PyTorch, TorchScript, ONNX, OpenVINO, LiteRT, MNN, NCNN, ExecuTorch) auf einem Raspberry Pi 5. Für jede Kombination werden Status, Größe, die Metrik mAP50-95(B) und Inferenzzeit angegeben.
| Format | Status | Dateigröße (MB) | mAP50-95(B) | Inferenzzeit (ms/Bild) |
|---|---|---|---|---|
| PyTorch | ✅ | 5.3 | 0.4760 | 299.09 |
| TorchScript | ✅ | 9.8 | 0.4734 | 353.20 |
| ONNX | ✅ | 9.5 | 0.4734 | 125.99 |
| OpenVINO | ✅ | 9.6 | 0.4734 | 104.55 |
| LiteRT | ✅ | 9.8 | 0.4730 | 123.30 |
| MNN | ✅ | 9.4 | 0.4749 | 91.87 |
| NCNN | ✅ | 9.4 | 0.4784 | 67.03 |
| ExecuTorch | ✅ | 9.4 | 0.4772 | 144.83 |
Getestet mit Ultralytics 8.4.108
Die Inferenzzeit umfasst keine Vor- und Nachverarbeitung.
Unsere Ergebnisse reproduzieren#
Führe diesen Code aus, um die obigen Ultralytics-Benchmarks für alle Exportformate zu reproduzieren:
from ultralytics import YOLO

# Ein YOLO26n-PyTorch-Modell laden
model = YOLO("yolo26n.pt")

# Benchmark für Geschwindigkeit und Genauigkeit von YOLO26n auf dem COCO128-Datensatz für alle Exportformate
results = model.benchmark(data="coco128.yaml", imgsz=640)
Beachte, dass die Benchmark-Ergebnisse je nach genauer Hardware- und Softwarekonfiguration eines Systems sowie der aktuellen Auslastung des Systems zum Zeitpunkt der Benchmarks variieren können. Die zuverlässigsten Ergebnisse erhältst du mit einem Datensatz mit vielen Bildern, z. B. data='coco.yaml' (5000 Validierungsbilder).
Der Export nach format=litert (über litert-torch) wird nur unter Linux x86_64 und macOS unterstützt, nicht direkt auf dem Raspberry Pi. Exportiere das Modell .tflite auf einem Linux-x86_64-Rechner oder einem Mac, kopiere es auf den Raspberry Pi und verwende den Pi für die Inferenz.
Raspberry-Pi-Kamera verwenden#
Für Computer-Vision-Projekte auf Raspberry Pi werden häufig Echtzeit-Videobilder für die Inferenz benötigt. Über den integrierten MIPI-CSI-Anschluss des Raspberry Pi kannst du offizielle Raspberry-Pi-Kameramodule anschließen. In dieser Anleitung verwenden wir ein Raspberry Pi Camera Module 3, um Videobilder aufzunehmen und mit YOLO26-Modellen Inferenz auszuführen.
Erfahre mehr über die verschiedenen von Raspberry Pi angebotenen Kameramodule und darüber, wie du mit den Raspberry-Pi-Kameramodulen loslegst.
Der Raspberry Pi 5 hat kleinere CSI-Anschlüsse als der Raspberry Pi 4 (22-polig statt 15-polig). Daher benötigst du ein Adapterkabel von 15 auf 22 Pins, um eine Raspberry-Pi-Kamera anzuschließen.
Kamera testen#
Führe nach dem Anschließen der Kamera an den Raspberry Pi den folgenden Befehl rpicam-hello aus. Etwa 5 Sekunden lang solltest du ein Livebild der Kamera sehen.
rpicam-helloInferenz mit Kamera#
Es gibt zwei Möglichkeiten, mit der Raspberry-Pi-Kamera Inferenz mit YOLO26-Modellen auszuführen.
Verwende picamera2, das mit Raspberry Pi OS vorinstalliert ist, um auf die Kamera zuzugreifen und mit YOLO26-Modellen Inferenz auszuführen.
import cv2
from picamera2 import Picamera2

from ultralytics import YOLO

# Picamera2 initialisieren
picam2 = Picamera2()
picam2.preview_configuration.main.size = (1280, 720)
picam2.preview_configuration.main.format = "RGB888"
picam2.preview_configuration.align()
picam2.configure("preview")
picam2.start()

# YOLO26-Modell laden
model = YOLO("yolo26n.pt")

while True:
    # Einzelbilder aufnehmen
    frame = picam2.capture_array()

    # YOLO26-Inferenz für das Einzelbild ausführen
    results = model(frame)

    # Ergebnisse auf dem Bild visualisieren
    annotated_frame = results[0].plot()

    # Das resultierende Einzelbild anzeigen
    cv2.imshow("Camera", annotated_frame)

    # Schleife beenden, wenn „q“ gedrückt wird
    if cv2.waitKey(1) == ord("q"):
        break

# Ressourcen freigeben und Fenster schließen
cv2.destroyAllWindows()
Bewährte Vorgehensweisen bei der Verwendung von Raspberry Pi#
Befolge diese bewährten Vorgehensweisen, um die maximale Leistung von YOLO26 auf Raspberry Pi zu erzielen.
-
Eine SSD verwenden
Für den Dauerbetrieb rund um die Uhr solltest du eine SSD als Systemlaufwerk verwenden, da eine SD-Karte durch kontinuierliche Schreibvorgänge verschleißen oder ausfallen kann. Über den integrierten PCIe-Anschluss des Raspberry Pi 5 kannst du SSDs mit einem Adapter wie dem NVMe Base für Raspberry Pi 5 anschließen.
-
Ohne grafische Oberfläche flashen
Beim Flashen von Raspberry Pi OS kannst du auf die Installation der Desktop-Umgebung verzichten (Raspberry Pi OS Lite). Dadurch sparst du etwas RAM auf dem Gerät und hast mehr Speicher für die Computer-Vision-Verarbeitung zur Verfügung.
-
Raspberry Pi übertakten
Wenn du bei der Ausführung von Ultralytics YOLO26-Modellen auf Raspberry Pi 5 eine leichte Leistungssteigerung erzielen möchtest, kannst du die CPU von ihrer Basisfrequenz von 2.4GHz auf 3.0GHz und die GPU von 800MHz auf 1GHz übertakten. Wird das System instabil oder stürzt ab, verringere die Übertaktungswerte schrittweise um jeweils 100MHz. Sorge für ausreichende Kühlung, da beim Übertakten mehr Wärme entsteht und es zu thermischer Drosselung kommen kann.
a. Software aktualisieren
sudo apt update && sudo apt dist-upgradeb. Öffnen, um die Konfigurationsdatei zu bearbeiten
sudo nano /boot/firmware/config.txtc. Die folgenden Zeilen am Ende hinzufügen
arm_freq=3000
gpu_freq=1000
force_turbo=1
d. Mit CTRL + X und anschließend Y speichern und beenden, dann ENTER drücken
e. Raspberry Pi neu starten
Nächste Schritte#
Du hast YOLO26 erfolgreich auf deinem Raspberry Pi eingerichtet. Als Nächstes kannst du den Predict-Modus erkunden, um weitere Inferenzoptionen kennenzulernen, den Export-Modus für zusätzliche Bereitstellungsformate nutzen oder den NVIDIA-Jetson-Leitfaden aufrufen, wenn du mehr Rechenleistung am Netzwerkrand benötigst. Die vollständige Dokumentation findest du in der Ultralytics-YOLO26-Dokumentation.
Danksagungen und Zitate#
Diese Anleitung wurde ursprünglich von Daan Eeltink für die Kashmir World Foundation erstellt, eine Organisation, die sich dem Einsatz von YOLO zum Schutz gefährdeter Arten widmet. Wir würdigen ihre Pionierarbeit und ihren Bildungsauftrag im Bereich der Objekterkennungstechnologien.
Weitere Informationen zu den Aktivitäten der Kashmir World Foundation findest du auf ihrer Website.
Häufig gestellte Fragen#
Führe die folgenden Schritte aus, um Ultralytics YOLO26 ohne Docker auf einem Raspberry Pi einzurichten:
- Paketliste aktualisieren und
pipinstallieren:sudo apt update sudo apt install python3-pip -y pip install -U pip - Ultralytics-Paket installieren:
pip install ultralytics - Gerät neu starten, um die Änderungen zu übernehmen:
sudo reboot
Eine ausführliche Anleitung findest du im Abschnitt Ohne Docker loslegen.
- Paketliste aktualisieren und
NCNN ist stark für Mobil- und eingebettete Plattformen optimiert und daher eine gute Wahl, um YOLO26 auf Raspberry-Pi-Geräten auszuführen. Die für ARM optimierten Kernel ermöglichen auf dem Pi eine schnellere Inferenz als die anderen Exportformate in den obigen Benchmarks.
Du kannst ein YOLO26-PyTorch-Modell entweder mit Python oder mit CLI-Befehlen ins NCNN-Format umwandeln:
Beispielfrom ultralytics import YOLO # Ein YOLO26n-PyTorch-Modell laden model = YOLO("yolo26n.pt") # Das Modell ins NCNN-Format exportieren model.export(format="ncnn") # creates 'yolo26n_ncnn_model' # Das exportierte NCNN-Modell laden ncnn_model = YOLO("yolo26n_ncnn_model") # Inferenz ausführen results = ncnn_model("https://ultralytics.com/images/bus.jpg")Weitere Informationen findest du im Abschnitt NCNN auf Raspberry Pi verwenden.
Zu den wichtigsten Unterschieden gehören:
- CPU: Der Raspberry Pi 4 verwendet ein Broadcom BCM2711, Cortex-A72 64-Bit-SoC, während der Raspberry Pi 5 ein Broadcom BCM2712, Cortex-A76 64-Bit-SoC verwendet.
- Maximale CPU-Frequenz: Der Raspberry Pi 4 erreicht eine maximale Frequenz von 1.8GHz, während der Raspberry Pi 5 2.4GHz erreicht.
- Speicher: Der Raspberry Pi 4 bietet bis zu 8 GB LPDDR4-3200-SDRAM, während der Raspberry Pi 5 mit LPDDR4X-4267-SDRAM ausgestattet ist, das in Varianten mit 2 GB, 4 GB, 8 GB und 16 GB verfügbar ist.
Diese Verbesserungen tragen dazu bei, dass YOLO26-Modelle auf dem Raspberry Pi 5 bei Leistungsbenchmarks besser abschneiden als auf dem Raspberry Pi 4. Weitere Informationen findest du in der Tabelle Vergleich der Raspberry-Pi-Modelle.
Es gibt zwei Möglichkeiten, eine Raspberry-Pi-Kamera für die YOLO26-Inferenz einzurichten:
-
Mit
picamera2:import cv2 from picamera2 import Picamera2 from ultralytics import YOLO picam2 = Picamera2() picam2.preview_configuration.main.size = (1280, 720) picam2.preview_configuration.main.format = "RGB888" picam2.preview_configuration.align() picam2.configure("preview") picam2.start() model = YOLO("yolo26n.pt") while True: frame = picam2.capture_array() results = model(frame) annotated_frame = results[0].plot() cv2.imshow("Camera", annotated_frame) if cv2.waitKey(1) == ord("q"): break cv2.destroyAllWindows() -
Mit einem TCP-Stream:
rpicam-vid -n -t 0 --inline --listen -o tcp://127.0.0.1:8888from ultralytics import YOLO model = YOLO("yolo26n.pt") results = model("tcp://127.0.0.1:8888")
Eine ausführliche Anleitung zur Einrichtung findest du im Abschnitt Inferenz mit Kamera.
-


Kommentare134
Stell eine Frage, teile deine Ergebnisse oder hilf jemand anderem.
smhty
Works great on Raspberry Pi 5. A tutorial for the AI kit that comes with Raspberry Pi 5 would be great as well: https://www.raspberrypi.com/products/ai-kit/
1 Glenn JocherUltralytics(bearbeitet)
Hi there!
Thank you for your feedback and for sharing your positive experience on the Raspberry Pi 5! 😊
Creating a tutorial for the AI kit that comes with the Raspberry Pi 5 is a fantastic idea. In the meantime, you can refer to our comprehensive Quick Start Guide for Raspberry Pi with Ultralytics YOLO26, which provides detailed instructions on setting up and running YOLO on Raspberry Pi devices, including performance benchmarks.
For those interested in using the AI kit, the setup process should be quite similar. Here’s a quick overview to get you started:
-
Flash Raspberry Pi OS: Ensure you have the latest Raspberry Pi OS Bookworm (Debian 12) installed. Follow the Getting Started Documentation by Raspberry Pi to prepare your device.
-
Set Up Ultralytics:
- With Docker:
t=ultralytics/ultralytics:latest-arm64 && sudo docker pull $t && sudo docker run -it --ipc=host $t - Without Docker:
sudo apt update sudo apt install python3-pip -y pip install -U pip pip install ultralytics[export] sudo reboot
- With Docker:
-
Use NCNN for Best Performance: Convert your YOLO26 model to NCNN format for optimal performance on Raspberry Pi:
from ultralytics import YOLO # Load a YOLO26n PyTorch model model = YOLO("yolo26n.pt") # Export the model to NCNN format model.export(format="ncnn") # creates 'yolo26n_ncnn_model' # Load the exported NCNN model ncnn_model = YOLO("yolo26n_ncnn_model") # Run inference results = ncnn_model("https://ultralytics.com/images/bus.jpg") -
Using the Raspberry Pi Camera: For real-time video feeds, you can use the
picamera2library or set up a TCP stream:-
Using
picamera2:import cv2 from picamera2 import Picamera2 from ultralytics import YOLO picam2 = Picamera2() picam2.preview_configuration.main.size = (1280, 720) picam2.preview_configuration.main.format = "RGB888" picam2.preview_configuration.align() picam2.configure("preview") picam2.start() model = YOLO("yolo26n.pt") while True: frame = picam2.capture_array() results = model(frame) annotated_frame = results[0].plot() cv2.imshow("Camera", annotated_frame) if cv2.waitKey(1) == ord("q"): break cv2.destroyAllWindows() -
Using TCP Stream:
rpicam-vid -n -t 0 --inline --listen -o tcp://127.0.0.1:8888from ultralytics import YOLO model = YOLO("yolo26n.pt") results = model("tcp://127.0.0.1:8888")
-
We hope this helps you get started with the AI kit on your Raspberry Pi 5. For more detailed instructions and additional resources, please visit our Raspberry Pi Guide.
Happy coding! 🚀
-
wnelis
Today I've installed module ultralytics on a Raspberry Pi 4 with 4 [GiB] memory running Trixie. Some remarks about what I've learned: . Use the 64-bit variant of Raspberry OS; . Use an microSD card of at least 32 [GiB]; . Disable /tmp becoming a file system in memory (tmpfs):
sudo systemctl mask tmp.mount; . OpenCV is installed using apt, module ultralytics is installed in a virtual Python environment: 'python -m venv --system-site-packages `.It is found that YOLO runs into a hardware error: "Illegal instruction". This can be reproduced by using the Python script shown above to export the model in NCNN format. The output is:
Downloading https://github.com/ultralyti…: 100% ━━━━━━━━━━━━ 5.3MB 1.4MB/s 3.8s Ultralytics 8.4.191 🚀 Python-3.13.5 torch-2.14.1+cu130 CPU (aarch64) Illegal instruction
How can this issue be solved?
 Paula DerrengerUltralytics
@wnelis the most likely cause is a native PyTorch binary using instructions unsupported by the Pi 4’s CPU, rather than faulty hardware; similar crashes are documented in Ultralytics #19091 and upstream PyTorch, although your exact version is not confirmed affected. (github.com) Your log shows a CUDA build (
+cu130); first replace it with the matching official CPU-only packages inside your activated virtual environment, then retry the export: (pytorch.org)python -m pip install --force-reinstall torch==2.14.1 torchvision==0.29.1 --index-url https://download.pytorch.org/whl/cpuIf it still crashes, please share the text output of
yolo checksandpython -m pip show torch torchvisionfrom that same environment so we can identify package/path conflicts.
hm-zeroone(bearbeitet)
"We haven’t validated Orbit OS yet, but if it supports tflite or onnx runtimes you should be able to deploy an exported Ultralytics YOLO26 model there using Export mode and the deployment options guide; if you try it, please share the exact device, export format, and any text error logs here in Discussions so the Ultralytics team can take a look."
Hi @glenn-jocher,
I added a new feature to my Orbit OS app to test YOLO models directly on edge devices, in this case a Raspberry Pi. The app now allows adding new models, and by default includes YOLO v8, v11 and v26.
We also introduced a benchmark mode, where you can select an image and run all models to compare performance and results.
In the example shown in the image, YOLOv8 achieved the highest number of correct object detections by time.
This demo video shows the remote deployment, no SSH, no Docker, of the app in action on Raspberry Pi 5 vs Arduino UNO Q and a comparison (“VS”) between the RPi 5 and UNO Q running YOLO v8. https://youtu.be/aiFJmosYVAI?si=v3Jo_TbswU3n-sZU
- Glenn JocherUltralytics
Thanks for sharing the Orbit OS benchmark; for a fair cross-model comparison please include the exact export/runtime backend,
imgsz, confidence/IoU thresholds, and per-image latency/FPS, since on Raspberry Pi CPU deployments NCNN is usually the best baseline for YOLO26. Hey! Thanks for the feedback. All models were tested under the same conditions — TFlite runtime, same image, same thresholds (conf=0.50, IoU=0.45), same imgsz 640×640 with letterbox preprocessing.
Everything runs through the OrbitOS SDK which currently has TFLite and ONNX embedded. NCNN is something we'll look into adding in a future release.
Quick question — for RPi deployments, would you recommend INT8 or float16 as the default export format?
Orbit OS SDK 26.0.1 Inference example.
Orbit OS is multi-language — For now only Go SDK is available, Python, Java and C++ SDKs are coming soon.
model, _ := device.AIManager.UploadAndLoadModel( "yolo8n", "models/yolo26n_float16.tflite", aiv26.ModelBackend_TFLITE, aiv26.ExecutionMode_EXEC_HIGH_THREADS, ) resp, _ := model.Infer(ctx, tensor.Data, tensor.Shape, tensor.Dtype) fmt.Println(resp.GetOutputShape()) // [1 84 8400] fmt.Println(resp.GetLatencyUs()) // e.g. 528000- Glenn JocherUltralytics(bearbeitet)
For plain Raspberry Pi CPU deployment with
LiteRT(.tflite), I’d usually default toINT8for the best speed and memory savings, and usefloat16only if quantization hurts accuracy too much or your runtime performs better with FP kernels; if you benchmark both, the LiteRT export guide is the right reference, while our Raspberry Pi guide showsNCNNas the strongest baseline once you add that backend.1
safdarhamid64-cpu
when i write in raspberry pi terminal : from ultralytics import yolo error msg illegal instruction pops up , i have trained model and even i have first created environment and installed pip install ultralytics but still i am not able to run model yolo11n on my Raspberry Pi 4 , Guide me plzz
- Glenn JocherUltralytics
That
Illegal instructionon Raspberry Pi usually means an incompatible binary wheel (most oftentorch/numpypulled for the wrong arch/OS), and also note the correct import isfrom ultralytics import YOLO(capitalized), notyolo; please paste the text output ofyolo checksplus the full traceback here in this discussion, and confirmuname -m+ whether you’re on Raspberry Pi OS Bookworm 64-bit as in the Raspberry Pi YOLO26 guide; as a quick way to rule out env issues you can also try our ARM64 Docker flow from that guide:```bash t=ultralytics/ultralytics:latest-arm64 sudo docker pull $t && sudo docker run -it --ipc=host $t python -c "from ultralytics import YOLO; YOLO('yolo11n.pt')"
inuropix
Hi.. I get an error when implement botsort with reid is True and the model is ncnn(exported from yolo26n-cls.pt)
Here’s the full traceback from the error:
    self.tracks = self.model.track(
                  ^^^^^^^^^^^^^^^^^
 File "/home/sbr/people_counting/lib/python3.11/site-packages/ultralytics/engine/model.py", line 579, in track
    return self.predict(source=source, stream=stream, **kwargs)
           ^^^^^^^^^^^^^^^^^^^^^^^^^^^^^^^^^^^^^^^^^^^^^^^^^^^^
  File "/home/sbr/people_counting/lib/python3.11/site-packages/ultralytics/engine/model.py", line 536, in predict
    return self.predictor.predict_cli(source=source) if is_cli else self.predictor(source=source, stream=stream)
                                                                    ^^^^^^^^^^^^^^^^^^^^^^^^^^^^^^^^^^^^^^^^^^^^
  File "/home/sbr/people_counting/lib/python3.11/site-packages/ultralytics/engine/predictor.py", line 225, in __call__
    return list(self.stream_inference(source, model, *args, **kwargs))  # merge list of Results into one
           ^^^^^^^^^^^^^^^^^^^^^^^^^^^^^^^^^^^^^^^^^^^^^^^^^^^^^^^^^^^
  File "/home/sbr/people_counting/lib/python3.11/site-packages/torch/utils/_contextlib.py", line 40, in generator_context
    response = gen.send(None)
               ^^^^^^^^^^^^^^
  File "/home/sbr/people_counting/lib/python3.11/site-packages/ultralytics/engine/predictor.py", line 338, in stream_inference
    self.run_callbacks("on_predict_postprocess_end")
  File "/home/sbr/people_counting/lib/python3.11/site-packages/ultralytics/engine/predictor.py", line 509, in run_callbacks
    callback(self)
  File "/home/sbr/people_counting/lib/python3.11/site-packages/ultralytics/trackers/track.py", line 93, in on_predict_postprocess_end
    tracks = tracker.update(det, result.orig_img, getattr(result, "feats", None))
             ^^^^^^^^^^^^^^^^^^^^^^^^^^^^^^^^^^^^^^^^^^^^^^^^^^^^^^^^^^^^^^^^^^^^
  File "/home/sbr/people_counting/lib/python3.11/site-packages/ultralytics/trackers/byte_tracker.py", line 361, in update
    dists = self.get_dists(unconfirmed, detections)
            ^^^^^^^^^^^^^^^^^^^^^^^^^^^^^^^^^^^^^^^
  File "/home/sbr/people_counting/lib/python3.11/site-packages/ultralytics/trackers/bot_sort.py", line 220, in get_dists
    emb_dists = matching.embedding_distance(tracks, detections) / 2.0
                ^^^^^^^^^^^^^^^^^^^^^^^^^^^^^^^^^^^^^^^^^^^^^^^
  File "/home/sbr/people_counting/lib/python3.11/site-packages/ultralytics/trackers/utils/matching.py", line 128, in embedding_distance
    cost_matrix = np.maximum(0.0, cdist(track_features, det_features, metric))  # Normalized features
                                  ^^^^^^^^^^^^^^^^^^^^^^^^^^^^^^^^^^^^^^^^^^^
  File "/home/sbr/people_counting/lib/python3.11/site-packages/scipy/spatial/distance.py", line 2903, in cdist
    raise ValueError('XA must be a 2-dimensional array.')
ValueError: XA must be a 2-dimensional array.
Any idea?
- Glenn JocherUltralytics
That traceback usually means BoT-SORT didn’t get valid (2D) ReID embeddings; also note that
.track()should run with a Detect/Seg/Pose model, whileyolo26n-clsis only meant to be the ReID feature extractor configured insidebotsort.yaml(viawith_reid/model). (docs.ultralytics.com)yolo track model=yolo26n.pt source=path/to/video.mp4 tracker="botsort.yaml"# in a copy of botsort.yaml with_reid: True model: yolo26n-cls.pt # first confirm this works before swapping to an exported backendIf you just need stable tracking on Raspberry Pi, try
tracker="bytetrack.yaml"(no ReID); if you still hit this, please paste yourbotsort.yamland the output ofyolo checksso we can reproduce from the same environment. (docs.ultralytics.com)
hananabuzainab
I can't install ultralytics on rasspbery pi 5...with python 3.11 version,why??
I used: pip install ultralytics
How can i fix this problem ??
- Glenn JocherUltralytics
Can you paste the full
pip install ultralyticserror text (as text, not a screenshot) and the output ofpython3 -Vhere so we can pinpoint what’s failing? On Raspberry Pi 5 this is most often a Python/pip mismatch or non-Bookworm/32-bit setup—please also confirm you’re on Raspberry Pi OS Bookworm 64-bit as in the Raspberry Pi with Ultralytics YOLO26 guide.python3 -V python3 -m pip install -U pip setuptools wheel python3 -m venv .venv source .venv/bin/activate python -m pip install -U pip python -m pip install ultralytics
avasanjesh
Hi,
I want to use python version of raspberry pi 32 bit OS. can you please tell me if i can export yolo detection model in 32 bit raspberry pi?
Edward-YS
Hello,I'm wondering if there is Benchmarking Results of Two Different Models (YOLO8n, YOLO8s) Across Ten Formats: PyTorch, TF, ONNX, OpenVINO, TF SavedModel, TF GraphDef, TF Lite, PaddlePaddle, MNN, NCNN.
zyt2011
Installing a single Hailo-5 is sufficient.
发件人: Beautifulboy111 @.> 发送时间: 2025年4月22日 14:24 收件人: ultralytics/ultralytics @.> 抄送: zyt2011 @.>; Mention @.> 主题: Re: [ultralytics/ultralytics] zh/guides/raspberry-pi/ (Discussion #19489)
Why does my Raspberry Pi 5 have a high inference latency of 150ms when using NCNN for video recognition, even after overclocking? How can I reduce the inference time?
― Reply to this email directly, view it on GitHubhttps://github.com/orgs/ultralytics/discussions/19489#discussioncomment-12906311, or unsubscribehttps://github.com/notifications/unsubscribe-auth/BJ7DFR53TAD7QVJNO3TTXJL22XOAJAVCNFSM6AAAAABYEEJCHCVHI2DSMVQWIX3LMV43URDJONRXK43TNFXW4Q3PNVWWK3TUHMYTEOJQGYZTCMI. You are receiving this because you were mentioned.Message ID: @.***>
- Glenn JocherUltralytics(bearbeitet)
@Beautifulboy111 150ms inference latency with NCNN on Raspberry Pi 5 is higher than expected. Here are some steps to reduce it:
-
Use a smaller YOLO26 model - our benchmarks show YOLO26n is significantly faster than YOLO26s with NCNN on Pi 5 (67ms vs 173ms)
-
Reduce input resolution - try 320x320 instead of 640x640, which can cut inference time by up to 70%
-
Optimize memory allocation by running without GUI (Raspberry Pi OS Lite)
-
Ensure you're using proper cooling for sustained performance when overclocked
-
Consider processing at lower FPS if your application allows it
Regarding @zyt2011's suggestion, while accelerators like Hailo can boost performance, they're a separate investment. I'd recommend optimizing your current setup first using the techniques in our Raspberry Pi guide.
What's your specific use case? This would help us provide more targeted optimization advice.
-
Beautifulboy111
Why does my Raspberry Pi 5 have a high inference latency of 150ms when using NCNN for video recognition, even after overclocking? How can I reduce the inference time?