Posenschätzung mit Ultralytics YOLO
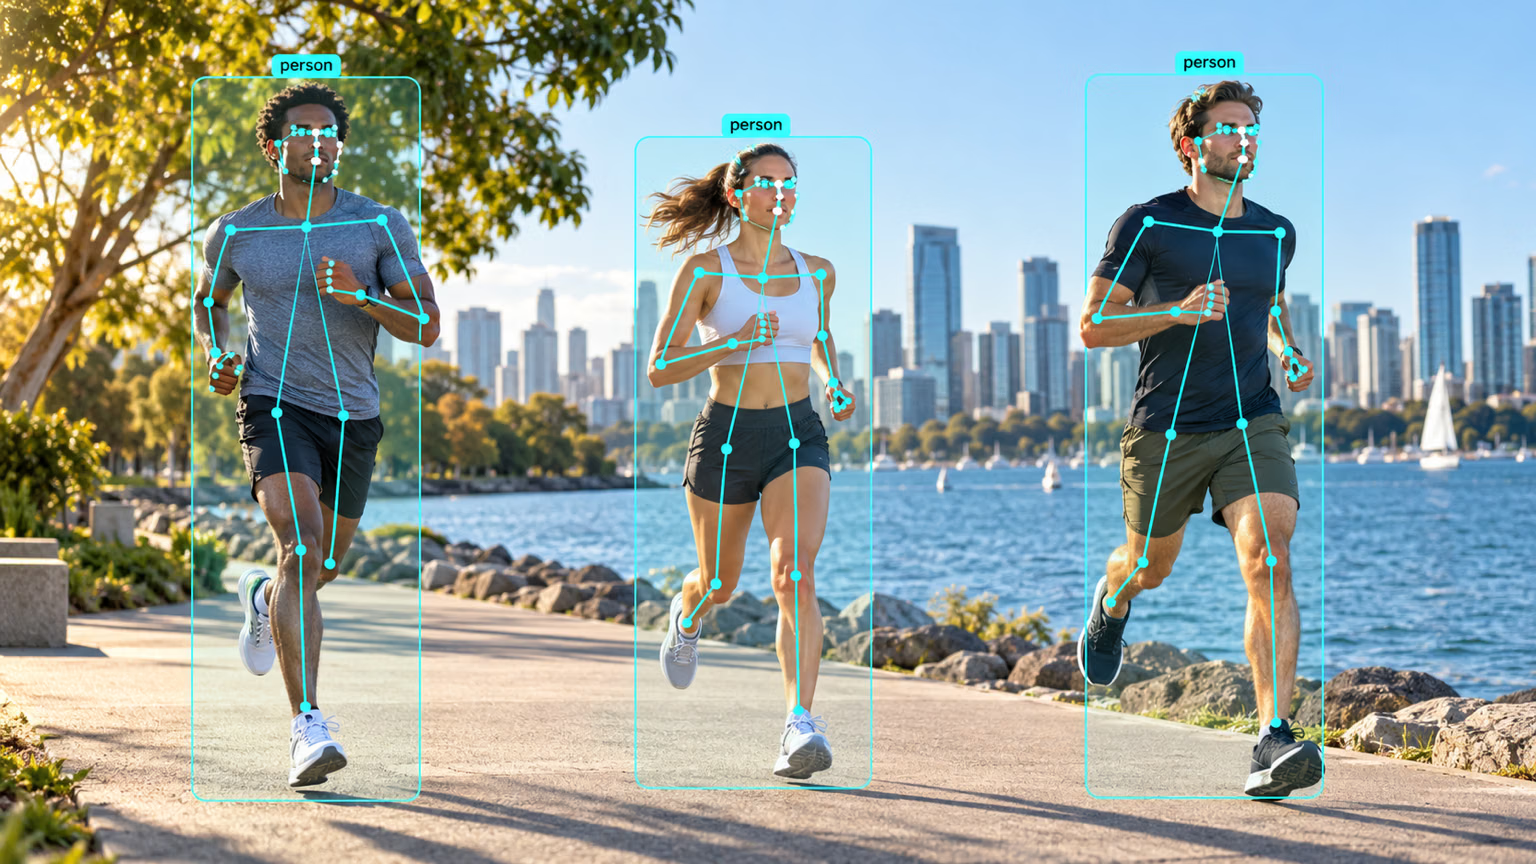
Pose-Schätzung ist eine Aufgabe, bei der bestimmte Punkte in einem Bild lokalisiert werden. Diese werden üblicherweise als Schlüsselpunkte bezeichnet. Die Schlüsselpunkte können verschiedene Teile des Objekts darstellen, etwa Gelenke, Orientierungspunkte oder andere charakteristische Merkmale. Die Positionen der Schlüsselpunkte werden üblicherweise als Menge von 2D-Koordinaten [x, y] dargestellt, optional mit einer Sichtbarkeitsmarkierung [x, y, visible].
Das Ergebnis eines Posenschätzungsmodells ist eine Reihe von Punkten, die die Keypoints eines Objekts im Bild darstellen, normalerweise zusammen mit den Konfidenzwerten für jeden Punkt. Posenschätzung eignet sich gut, wenn du bestimmte Teile eines Objekts in einer Szene und ihre relative Position zueinander erkennen musst.
Ansehen: So führst du mit Ultralytics YOLO26 eine Posenschätzung in Echtzeit aus | Verfolgung und Extraktion von Schlüsselpunkten 🕺
YOLO26-Pose-Modelle verwenden das Suffix -pose, z. B. yolo26n-pose.pt, und sind mit COCO-Schlüsselpunkten vortrainiert.
Modelle#
Die mit dem Datensatz COCO-Keypoints vortrainierten YOLO26-Pose-Modelle sind unten aufgeführt.
Modelle werden bei der ersten Verwendung automatisch aus der neuesten Ultralytics-Version heruntergeladen.
| Modell | Größe (Pixel) | mAPpose50-95 (e2e) | mAPpose50 (e2e) | Geschwindigkeit CPU ONNX (ms) | Geschwindigkeit T4 TensorRT10 (ms) | Parameter (M) | FLOPs (B) |
|---|---|---|---|---|---|---|---|
| YOLO26n-pose | 640 | 57.2 | 83.3 | 40.3 ± 0.5 | 1.8 ± 0.0 | 2.9 | 7.6 |
| YOLO26s-pose | 640 | 63.0 | 86.6 | 85.3 ± 0.9 | 2.7 ± 0.0 | 10.4 | 24.1 |
| YOLO26m-pose | 640 | 68.8 | 89.6 | 218.0 ± 1.5 | 5.0 ± 0.1 | 21.5 | 73.3 |
| YOLO26l-pose | 640 | 70.4 | 90.5 | 275.4 ± 2.4 | 6.5 ± 0.1 | 25.9 | 91.7 |
| YOLO26x-pose | 640 | 71.6 | 91.6 | 565.4 ± 3.0 | 12.2 ± 0.2 | 57.6 | 202.3 |
- Die Werte mAPval gelten für ein einzelnes Modell mit einer einzelnen Skalierung auf dem Datensatz COCO Keypoints val2017.
Mityolo pose val data=coco-pose.yaml device=0 nms=Falsereproduzieren - Geschwindigkeit: Durchschnitt über COCO-val-Bilder mit ONNX auf einer CPU und TensorRT10 auf einer NVIDIA-T4-GPU.
Mityolo pose val data=coco-pose.yaml batch=1 device=0|cpu nms=Falsereproduzieren - Die Werte für Parameter und FLOPs gelten für zusammengeführte Modelle nach dem Zusammenführen von Conv/BatchNorm und dem Entfernen des ungenutzten Erkennungszweigs. Vortrainierte Prüfpunkte behalten die vollständige Trainingsarchitektur bei und können daher höhere Werte aufweisen.
Vorläufige Ergebnisse für COCO-Keypoints findest du in der unveröffentlichten YOLO27-Vorschau.
Trainieren#
Trainiere ein YOLO26n-pose-Modell 100 Epochen lang mit Bildgröße 640 auf dem COCO8-pose-Datensatz.
from ultralytics import YOLO

# Ein Modell laden
model = YOLO("yolo26n-pose.yaml")  # ein neues Modell aus YAML erstellen
model = YOLO("yolo26n-pose.pt")  # ein vortrainiertes Modell laden (für das Training empfohlen)
model = YOLO("yolo26n-pose.yaml").load("yolo26n-pose.pt")  # aus YAML erstellen und Gewichte übertragen

# Das Modell trainieren
results = model.train(data="coco8-pose.yaml", epochs=100, imgsz=640)
Ausführliche Informationen zum Modus train findest du auf der Seite Trainieren. Pose-Modelle lassen sich auch mit dem Cloud-Training der Ultralytics Platform trainieren.
Datensatzformat#
Ausführliche Informationen zum YOLO-Pose-Datensatzformat findest du im Datensatzleitfaden. Um einen vorhandenen JSON-Datensatz mit COCO-Keypoints in das YOLO-Format umzuwandeln, verwende die integrierte Funktion convert_coco mit use_keypoints=True, wie im Leitfaden zur Umwandlung von COCO in YOLO beschrieben. Die Annotation in der Ultralytics Platform unterstützt ebenfalls Pose-Labels mit integrierten Skelettvorlagen für Personen, Hände, Gesichter und benutzerdefinierte Keypoint-Anordnungen.
Für spezielle Posenschätzungsaufgaben kannst du auch spezialisierte Datensätze erkunden, etwa Tiger-Pose zur Posenschätzung bei Tieren, Hand Keypoints zur Handverfolgung oder Dog-Pose zur Analyse der Körperhaltung von Hunden.
Validieren#
Validiere die Genauigkeit des trainierten Modells YOLO26n-pose, gemessen als mittlere durchschnittliche Präzision (mAP). Es sind keine Argumente erforderlich, da model die Trainings-data und Argumente als Modellattribute beibehält: path/to/best.pt aus dem Beispiel Trainieren validiert auf COCO8-pose. In den offiziellen Gewichten ist ein Trainingsdatensatzpfad gespeichert, der auf deinem Computer nicht existiert. Daher wird mit einer Warnung auf den Aufgabenstandardwert coco8-pose.yaml zurückgegriffen. Übergib data, um einen anderen Datensatz für die Validierung zu verwenden.
from ultralytics import YOLO

# Ein Modell laden
model = YOLO("yolo26n-pose.pt")  # Ein offizielles Modell laden
model = YOLO("path/to/best.pt")  # Ein benutzerdefiniertes Modell laden

# Das Modell validieren
metrics = model.val()  # Keine Argumente erforderlich, Datensatz und Einstellungen werden gespeichert
metrics.box.map  # map50-95
metrics.box.map50  # map50
metrics.box.map75  # map75
metrics.box.maps  # mAP50-95 pro Klasse; Klassen, die im Validierungsdatensatz fehlen, erhalten den Gesamtwert für mAP
metrics.box.ap_class_index  # tatsächlich ausgewertete Klassenindizes
metrics.box.image_metrics  # Metrikwörterbuch pro Bild für die Box mit Präzision, Trefferquote, F1, TP, FP und FN
metrics.pose.map  # map50-95(P)
metrics.pose.map50  # map50(P)
metrics.pose.map75  # map75(P)
metrics.pose.maps  # mAP50-95(P) pro Klasse; Klassen, die im Validierungsdatensatz fehlen, erhalten den Gesamtwert für mAP(P)
metrics.pose.ap_class_index  # tatsächlich ausgewertete Klassenindizes
metrics.pose.image_metrics # Metrikwörterbuch pro Bild für die Pose mit Präzision, Trefferquote, F1, TP, FP und FNVorhersagen#
Verwende ein trainiertes YOLO26n-pose-Modell, um Vorhersagen für Bilder zu treffen.
from ultralytics import YOLO

# Ein Modell laden
model = YOLO("yolo26n-pose.pt")  # Ein offizielles Modell laden
model = YOLO("path/to/best.pt")  # Ein benutzerdefiniertes Modell laden

# Mit dem Modell Vorhersagen erstellen
results = model("https://ultralytics.com/images/bus.jpg")  # Eine Vorhersage für ein Bild erstellen

# Auf die Ergebnisse zugreifen
for result in results:
    xy = result.keypoints.xy  # x- und y-Koordinaten
    xyn = result.keypoints.xyn  # normalized
    kpts = result.keypoints.data  # x, y, Sichtbarkeit (falls verfügbar)
Ausführliche Informationen zum Modus predict findest du auf der Seite Vorhersagen.
Ausgabe der Ergebnisse#
Die Posenschätzung gibt pro Bild ein Results-Objekt zurück. Die wichtigsten Vorhersagefelder sind result.keypoints für Posekoordinaten und result.boxes für die erkannten Instanzen, zu denen diese Keypoints gehören.
| Attribut | Typ | Form | Beschreibung |
|---|---|---|---|
result.keypoints | Keypoints | (N) | Schlüsselpunkte. |
result.keypoints.data | torch.float32 | (N,K,2/3) | x,y sowie optional Sichtbarkeit/Konfidenz. |
result.keypoints.xy | torch.float32 | (N,K,2) | Schlüsselpunkte in Pixelkoordinaten. |
result.keypoints.xyn | torch.float32 | (N,K,2) | Normalisierte Schlüsselpunkte. |
result.boxes | Boxes | (N) | Instanzboxen. |
Task-spezifische Results-Felder für alle Aufgaben findest du im Abschnitt Vorhersageergebnisse nach Aufgabe.
Keypoint-Indexzuordnung#
Die Standardmodelle YOLO26 Pose sagen die 17 COCO-Keypoints voraus. Der Index k in result.keypoints.xy[:, k] steht daher für:
- Nase
- Linkes Auge
- Rechtes Auge
- Linkes Ohr
- Rechtes Ohr
- Linke Schulter
- Rechte Schulter
- Linker Ellbogen
- Rechter Ellbogen
- Linkes Handgelenk
- Rechtes Handgelenk
- Linke Hüfte
- Rechte Hüfte
- Linkes Knie
- Rechtes Knie
- Linker Knöchel
- Rechter Knöchel
Exportieren#
Ein YOLO26n-pose-Modell in ein anderes Format wie ONNX, CoreML usw. exportieren.
from ultralytics import YOLO

# Ein Modell laden
model = YOLO("yolo26n-pose.pt")  # Ein offizielles Modell laden
model = YOLO("path/to/best.pt")  # Ein benutzerdefiniertes Modell laden

# Modell exportieren
model.export(format="onnx")
Die verfügbaren Exportformate für YOLO26-pose sind in der folgenden Tabelle aufgeführt. Du kannst mit dem Argument format in jedes Format exportieren, z. B. mit format='onnx' oder format='engine'. Du kannst Vorhersagen direkt mit exportierten Modellen erstellen oder sie validieren, zum Beispiel mit yolo predict model=yolo26n-pose.onnx. Nach Abschluss des Exports werden Anwendungsbeispiele für dein Modell angezeigt.
| Format | Argument format | Modell | Metadaten | Argumente |
|---|---|---|---|---|
| PyTorch | - | yolo26n-pose.pt | ✅ | - |
| TorchScript | torchscript | yolo26n-pose.torchscript | ✅ | imgsz, quantize, dynamic, nms, batch, device |
| ONNX | onnx | yolo26n-pose.onnx | ✅ | imgsz, quantize, dynamic, simplify, opset, nms, batch, data, fraction, device |
| OpenVINO | openvino | yolo26n-pose_openvino_model/ | ✅ | imgsz, quantize, dynamic, nms, batch, data, fraction, device |
| TensorRT | engine | yolo26n-pose.engine | ✅ | imgsz, quantize, dynamic, simplify, opset, workspace, nms, batch, data, fraction, device |
| CoreML | coreml | yolo26n-pose.mlpackage | ✅ | imgsz, dynamic, quantize, nms, batch, device |
| Apple Core AI | coreai | yolo26n-pose.aimodel | ✅ | imgsz, batch, quantize |
| TF SavedModel | saved_model | yolo26n-pose_saved_model/ | ✅ | imgsz, quantize, opset, nms, batch, data, fraction, device |
| TF GraphDef | pb | yolo26n-pose.pb | ❌ | imgsz, opset, batch, device |
| TF Edge TPU | edgetpu | yolo26n-pose_edgetpu.tflite | ✅ | imgsz, quantize, opset, data, fraction, device |
| LiteRT | litert | yolo26n-pose.tflite | ✅ | imgsz, quantize, batch, data, fraction, device |
| PaddlePaddle | paddle | yolo26n-pose_paddle_model/ | ✅ | imgsz, batch, device |
| MNN | mnn | yolo26n-pose.mnn | ✅ | imgsz, batch, dynamic, quantize, simplify, opset, nms, device |
| NCNN | ncnn | yolo26n-pose_ncnn_model/ | ✅ | imgsz, quantize, device |
| IMX500 | imx | yolo11n_imx_model/ | ✅ | imgsz, quantize, data, fraction, nms, device |
| RKNN | rknn | yolo26n-pose_rknn_model/ | ✅ | imgsz, batch, name, quantize, simplify, opset, data, fraction, device |
| ExecuTorch | executorch | yolo26n-pose_executorch_model/ | ✅ | imgsz, quantize, batch, data, fraction, device |
| Axelera | axelera | yolo26n-pose_axelera_model/ | ✅ | imgsz, batch, quantize, data, fraction, device |
| DEEPX | deepx | yolo26n-pose_deepx_model/ | ✅ | imgsz, quantize, simplify, opset, data, optimize, device |
| Qualcomm QNN | qnn | yolo26n-pose_qnn.onnx | ✅ | imgsz, batch, name, quantize, simplify, opset, data, fraction, device |
| Hailo | hailo | yolo26n-pose_hailo_model/ | ✅ | imgsz, name, quantize, data, fraction, simplify, conf, iou, device |
| Huawei Ascend | ascend | yolo26n-pose_ascend_model/ | ✅ | imgsz, batch, name, quantize, opset, simplify, nms, device |
| AMD Xilinx | xilinx | yolo26n-pose_xilinx_model/ | ✅ | imgsz, name, quantize, data, fraction, opset, simplify, device |
| NXP | nxp | yolo26n-pose_nxp.tflite | ✅ | imgsz, quantize, data, fraction, device |
| ST Edge AI | stedgeai | yolo26n-pose_stedgeai.onnx | ✅ | imgsz, quantize, data, fraction, opset, simplify, device |
nms=None gibt standardmäßig Rohdaten für externe NMS aus (YOLO26 behält seinen Kopf ohne NMS auf Axelera). Setze nms=False, um einen verfügbaren Kopf ohne NMS auszuwählen; nicht unterstützte Formate greifen auf ihren nativen Ausgabepfad zurück. Die oben aufgeführten Einträge für nms kennzeichnen Formate, die NMS mit nms=True einbetten können.
Ausführliche Informationen zu export findest du auf der Seite Export.
Häufig gestellte Fragen#
Bei der Pose-Schätzung mit Ultralytics YOLO26 werden bestimmte Punkte, sogenannte Schlüsselpunkte, in einem Bild lokalisiert. Diese Schlüsselpunkte stellen üblicherweise Gelenke oder andere wichtige Merkmale des Objekts dar. Die Ausgabe enthält die Koordinaten
[x, y]und Konfidenzwerte für jeden Punkt. YOLO26-pose-Modelle wurden speziell für diese Aufgabe entwickelt und verwenden das Suffix-pose, zum Beispielyolo26n-pose.pt. Diese Modelle sind mit Datensätzen wie COCO-Schlüsselpunkten vortrainiert und können für verschiedene Pose-Schätzungsaufgaben verwendet werden. Die Standardmodelle sagen die 17 COCO-Schlüsselpunkte voraus.Um ein YOLO26-pose-Modell mit einem benutzerdefinierten Datensatz zu trainieren, musst du zunächst ein Modell laden – entweder ein neues, in einer YAML-Datei definiertes Modell oder ein vortrainiertes Modell. Anschließend kannst du den Trainingsprozess mit deinem angegebenen Datensatz und deinen Parametern starten.
Beispielfrom ultralytics import YOLO # Ein Modell laden model = YOLO("yolo26n-pose.yaml") # ein neues Modell aus YAML erstellen model = YOLO("yolo26n-pose.pt") # ein vortrainiertes Modell laden (für das Training empfohlen) # Das Modell trainieren results = model.train(data="your-dataset.yaml", epochs=100, imgsz=640)Ausführliche Informationen zum Training findest du im Abschnitt Trainieren. Für einen Ansatz ohne Programmierung kannst du auch das Cloud-Training der Ultralytics Platform verwenden, um benutzerdefinierte Posenschätzungsmodelle zu trainieren.
Bei der Validierung eines YOLO26-pose-Modells wird seine Genauigkeit anhand derselben Datensatzparameter bewertet, die beim Training gespeichert wurden. Hier ein Beispiel:
Beispielfrom ultralytics import YOLO # Ein Modell laden model = YOLO("yolo26n-pose.pt") # Ein offizielles Modell laden model = YOLO("path/to/best.pt") # Ein benutzerdefiniertes Modell laden # Das Modell validieren metrics = model.val() # Keine Argumente erforderlich, Datensatz und Einstellungen werden gespeichertWeitere Informationen findest du im Abschnitt Val.
Ja, du kannst ein YOLO26-pose-Modell in verschiedene Formate wie ONNX, CoreML, TensorRT und weitere exportieren. Das geht mit Python oder über die Befehlszeilenschnittstelle (CLI).
Beispielfrom ultralytics import YOLO # Ein Modell laden model = YOLO("yolo26n-pose.pt") # Ein offizielles Modell laden model = YOLO("path/to/best.pt") # Ein benutzerdefiniertes Modell laden # Modell exportieren model.export(format="onnx")Weitere Informationen findest du im Abschnitt Export. Exportierte Modelle lassen sich auf Edge-Geräten für Echtzeitanwendungen wie Fitness-Tracking, Sportanalysen oder Robotik einsetzen.
Ultralytics YOLO26 bietet verschiedene vortrainierte Pose-Modelle, darunter YOLO26n-pose, YOLO26s-pose und YOLO26m-pose. Diese Modelle unterscheiden sich in Größe, Genauigkeit (mAP) und Geschwindigkeit. Die vollständige Liste mit mAP für COCO-Keypoints, Geschwindigkeit, Parametern und FLOPs pro Modell findest du im Abschnitt Modelle.


Kommentare465
Stell eine Frage, teile deine Ergebnisse oder hilf jemand anderem.
3300299472
import pygetwindow as gw import pyautogui from ultralytics import YOLO import cv2
Load the model
model = YOLO("model/best.onnx")
while True: # Get the handle of the application window app_window = gw.getWindowsWithTitle('Chess Game')[0] app_window.activate()
# Move the window to the top-left corner of the screen
app_window.moveTo(0, 0)

# Set the window size to (929, 721)
app_window.resizeTo(929, 721)

# Get the window position
left, top, width, height = app_window.left, app_window.top, app_window.width, app_window.height

# Take a screenshot in the background
screenshot = pyautogui.screenshot(region=(left, top, width, height))
screenshot.save('screenshot.png')

# Read the screenshot and convert it to OpenCV format
img = cv2.imread('screenshot.png')

# Perform inference
results = model.predict(source=img, show=True)
I need help, who will help me? I have successfully identified the object in the program through the ONNX model, but I don't know how to obtain coordinates. I need to obtain coordinates and then control the mouse to move to the coordinates for clicking operations. Can someone show me the reference code? Thank you
1 Glenn JocherUltralytics(bearbeitet)
@3300299472 hello! It's great to hear that you've successfully used the ONNX model for object detection. To obtain the coordinates of the detected objects and control the mouse accordingly, you can extract the bounding box coordinates from the
resultsobject and use them to move the mouse. Here's a quick example on how you can do this:from ultralytics import YOLO import pyautogui # Load the model model = YOLO("model/best.onnx") # Perform inference results = model.predict(source=img, show=True) # Get bounding box coordinates for x1, y1, x2, y2 in results[0].boxes.xyxy.tolist(): # detections in the first image # Calculate the center of the bounding box x_center = int((x1 + x2) / 2) y_center = int((y1 + y2) / 2) # Move mouse to the center of the bounding box pyautogui.moveTo(x_center, y_center) # Optionally, perform a click pyautogui.click()This code snippet will move the mouse to the center of each detected object and perform a click. Make sure to adjust the coordinates based on your specific screen resolution and application window size if necessary. Happy coding! 😊
AdadAlShabab
Hi. I want to measure the length of detected line after running the pose detection model. How can I do it? Please let me know.
1- Glenn JocherUltralytics
Hi! To measure the length of a detected line after running the pose detection model, you can compute the Euclidean distance between keypoints. If you have keypoints' coordinates, you can use the following Python code example:
import numpy as np

def calculate_distance(pt1, pt2):
    return np.sqrt((pt2[0] - pt1[0])**2 + (pt2[1] - pt1[1])**2)

# Example keypoints coordinates
keypoint1 = [x1, y1]  # Replace x1, y1 with your actual coordinates
keypoint2 = [x2, y2]  # Replace x2, y2 with your actual coordinates

# Calculate distance
length = calculate_distance(keypoint1, keypoint2)
print('The length of the line is:', length)
Just replace
x1, y1, x2, y2with the actual coordinates of your keypoints. This will give you the length between these two points which can represent a line in your use case. Hope this helps! 😊
Pakorn-02(bearbeitet)
Can i only detect the first person entering the camera? And from the source code, can I correctly convert from key point coordinates (x, y) to position coordinates (x, y, z) in Unity?
#My Source Code
import requests
import cv2
import numpy as np
from ultralytics import YOLO

model = YOLO('yolov8n-pose.pt')
cap = cv2.VideoCapture(0)

server_url = 'http://localhost:3000/keypoints'

while True:
    success, frame = cap.read()
    results = model(frame)

    # Simulate depth data (replace this with actual depth estimation)
    depth_data = np.random.rand(frame.shape[0], frame.shape[1])

    # Access the xy attribute and convert it to a list
    keypoints = results[0].keypoints.xy.cpu().numpy().tolist()
    # data = {'keypoints': keypoints}

    #Extract only the keypoints for the right hand
    right_hand_keypoints = [keypoints[0][10]]

    # Combine 2D keypoints with simulated depth data to obtain 3D keypoints
    keypoints_3d = [(x, y, depth_data[int(y), int(x)]) for x, y in right_hand_keypoints]

    data = {'keypoints': keypoints_3d}

    # Send keypoint data to the Node.js server
    response = requests.post(server_url, json=data)
    print(response.text)  # Print server response

    annotated_image = results[0].plot()
    cv2.imshow('frame', annotated_image)
    cv2.waitKey(1)

cap.release()
cv2.destroyAllWindows()
1 Paula DerrengerUltralytics
Hi there! Regarding your question about detecting only the first person entering the camera, YOLOv8 models by default will detect all instances of persons in each frame. However, you can modify the behavior to track the first detected person by managing the IDs of detected persons and only processing the first ID observed across frames.
As for converting from 2D keypoint coordinates (x, y) to 3D position coordinates (x, y, z) in Unity, the conversion depends on getting a real depth measurement. Your approach of simulating depth data and combining it with the keypoints is a common technique. If you have access to a depth sensor or can derive depth from stereo cameras, that would provide more accurate 3D coordinates. Just ensure that the coordinate system alignment between the AI model output and Unity's coordinate system is correctly calibrated for accurate placements in Unity.
Here's a refined approach considering depth measurements:
# Assuming depth_data contains actual depth measurements
keypoints_3d = [(x, y, depth_data[int(y), int(x)]) for x, y in right_hand_keypoints]
Keep refining your method to handle actual depth, and ensure coordinate transformations align with Unity's requirements. Good luck! 🚀
How can i convert 2D Key point value (x, y) to Position (x, y, z) on each bone in the body (3D Model) in Unity? Thanks
1- Glenn JocherUltralytics
Converting 2D keypoints to a 3D model position in Unity requires some form of depth estimation since 2D keypoints captured from images or video only provide information on the x and y axes. To add the z-axis (depth), you'll typically need additional data or a model that can infer depth from the given information.
While Ultralytics YOLOv8 specializes in pose estimation providing 2D [x, y] keypoints, integrating these with a 3D model in Unity to achieve the desired [x, y, z] positioning might involve:
- Using stereo vision techniques if you have images from multiple angles.
- Applying a separate depth estimation model that can predict the z-coordinate based on the 2D image.
- Utilizing additional sensors data (like Lidar or structured light sensors) that provides depth information.
Once you have the depth information, you can map the 2D keypoints [x, y] from YOLOv8 to 3D [x, y, z] coordinates in Unity by aligning the keypoints with the depth information.
Here's a conceptual snippet for understanding:
# Example for converting (x, y) keypoints to (x, y, z)
# This assumes you have a method to retrieve 'z' (depth)
depth_data = get_depth_information() # Custom method to obtain depth
keypoints_2d = [(x, y) for x, y in detected_keypoints]  # from YOLOv8
keypoints_3d = [(x, y, depth_data[x, y]) for x, y in keypoints_2d]
In Unity, you would then apply these 3D coordinates to position the joints or bones of your model accordingly. Note that exact implementation details would depend on how you're structuring your Unity project and the source of your depth data.
Remember, working with 3D models and real-world positioning introduces complexities, especially concerning coordinate systems alignment and scale adjustments across different frameworks and data sources. 🎮🕵️♂️
leonidasavila
How can i calculate angle position between three points? Thanks
1- Paula DerrengerUltralytics
@leonidasavila hey there! 👋 To calculate the angle between three points, you can use the law of cosines. Here's a quick example in Python:
import numpy as np

def calculate_angle(p1, p2, p3):
    # p1, p2, p3 are the points in format [x, y]
    # Calculate the vectors
    v1 = np.array(p1) - np.array(p2)
    v2 = np.array(p3) - np.array(p2)

    # Calculate the angle in radians
    angle_rad = np.arccos(np.dot(v1, v2) / (np.linalg.norm(v1) * np.linalg.norm(v2)))

    # Convert to degrees
    angle_deg = np.degrees(angle_rad)

    return angle_deg

# Example points
p1 = [0, 0]
p2 = [1, 0]
p3 = [1, 1]

angle = calculate_angle(p1, p2, p3)
print(f"The angle is {angle} degrees")
This calculates the angle at
p2formed by the line segmentsp1p2andp2p3. Hope this helps! Let me know if you have any other questions. 😊1 Thanks @pderrenger, for your quickly response! I´m trying to migrate our startup app from mediapipe to yolo 😍
Do you have any tutorial or short example to define specifics landmarks to make calculates? (4 example push-up)
Best regards! Leonidas
- Paula DerrengerUltralytics
Hey Leonidas! 🌟
It's awesome to hear about your transition from MediaPipe to YOLO for your startup app! For specific landmark detection like push-ups, you can leverage our YOLOv8 pose models. Here's a quick example to get you started:
from ultralytics import YOLO

# Load a pretrained pose model
model = YOLO('yolov8n-pose.pt')

# Predict keypoints on an image
results = model('path/to/your/image.jpg')

# Access keypoints
keypoints = results[0].keypoints

# Now, you can use these keypoints to calculate angles or any other metrics you need
This snippet loads a pretrained YOLOv8 pose model and predicts keypoints on your image. You can then use these keypoints for further calculations, like angles between joints during push-ups.
For more detailed guidance, check out our Pose Estimation page. If you have any more questions or need further assistance, feel free to ask. Happy coding! 😊
ozankavcu38
By the way sir after loading the model how could we dissapear the pose estimatet lines like boxes=False argument
- Paula DerrengerUltralytics(bearbeitet)
Hey there! 😊 To hide the pose estimation lines (similar to using
boxes=Falsefor bounding boxes), you can simply not plot them. When you're working with the results from the pose estimation model, you have control over what gets visualized. Here's a quick example on how to display the keypoints without drawing the connecting lines:from ultralytics import YOLO # Load your pose model model = YOLO('yolov8n-pose.pt') # Run prediction results = model('path/to/image.jpg') # Access keypoints keypoints = results[0].keypoints # Now, you can visualize keypoints without drawing lines between them # This part depends on how you're visualizing. For example, using OpenCV to plot keypoints: import cv2 image = cv2.imread('path/to/image.jpg') for person in keypoints.xy: # one (17, 2) tensor per detected person for x, y in person.tolist(): cv2.circle(image, (int(x), int(y)), radius=3, color=(0, 255, 0), thickness=-1) cv2.imshow("Keypoints without lines", image) cv2.waitKey(0) cv2.destroyAllWindows()This way, you'll see the keypoints on your image without the estimated pose lines. Hope this helps, and good luck with your app migration! If you have any more questions, feel free to ask. 🚀
1 Kindstep
I am currently using Yolo11 for my thesis in software engineering. Regarding the calculation of angles using keypoints, what is the correct way to access the detected keypoints directly in the code? assuming the indexing the same as in:
0: Nose 1: Left Eye 2: Right Eye 3: Left Ear 4: Right Ear 5: Left Shoulder 6: Right Shoulder 7: Left Elbow 8: Right Elbow 9: Left Wrist 10: Right Wrist 11: Left Hip 12: Right Hip 13: Left Knee 14: Right Knee 15: Left Ankle 16: Right Ankle
So assuming i use a similar function as you proposed, to calculate the angle of the right elbow joint a live feed (e.g. webcam) and the code is something like this:
model = YOLO('yolo11x-pose.pt')
results = model(frame, show=True, conf=conf, device=device, save=True)
keypoints = results[0].keypoints
angle = calculate_angle(keypoints6, keypoints8, keypoints10) # print(f"The angle is {angle} degrees")
What is the correct way to access each keypoint? Is it indexed in a array like keypoints[6] or what would be the correct way to go forward?
I hope my question is not too messy. It's getting quite late, but I am enjopying my time working with Yolo11.
1Whoops, was not meant to be edited like that :D
- Glenn JocherUltralytics
To access specific keypoints in YOLO11 pose estimation, you can index the
keypointsarray directly using the indices corresponding to each body part. For example, to calculate the angle at the right elbow, you can usekeypoints[6],keypoints[8], andkeypoints[10]for the right shoulder, right elbow, and right wrist, respectively. Let me know if you need further assistance! Okay, i Already figured it out now that I had time to try it. Seems I was on the right track. :)
Have a great weekend everybody!
1@kindstep thanks for sharing. Good luck with your thesis, it's will be fine! Currently, we are using YOLO8 and we are studying to migrate YOLO11... I hope the deploy of hand pose very soon!
Cosophia
What task does line annotation correspond to? what I know is : rectangle -> detection point -> pose polygon -> Segment
- Paula DerrengerUltralytics
A line annotation does not map to a standalone Ultralytics task. Use pose estimation when the line represents connections between labeled keypoints, or segmentation when you need the line’s pixel-level shape; please continue dropping questions here so the Ultralytics team can assist.
yacinehrb
Is it possible to use byte tracking with YoloPose26 ?
- Glenn JocherUltralytics
Yes — Ultralytics YOLO26 pose models can be used with ByteTrack through Track mode; feel free to post any follow-up details here so the Ultralytics team can see them, and the pose docs and Track mode docs cover the supported workflow.
JC3
Ok... but where is the documentation on how to actually run the model and access the results? Seems to be missing.
- Glenn JocherUltralytics
You can run a pose model via Python or CLI; the returned
resultsobjects expose keypoints directly—see the usage pattern on the Pose Estimation docs (and feel free to drop any follow-up questions here so the Ultralytics team can see them).from ultralytics import YOLO model = YOLO("yolo26n-pose.pt") results = model("path/to/image.jpg") # or a video path / 0 for webcam r = results[0] xy = r.keypoints.xy # (n, k, 2) pixel coords xyn = r.keypoints.xyn # (n, k, 2) normalized coords kpts = r.keypoints.data # (n, k, 3) x, y, visible/conf (if available)yolo pose predict model=yolo26n-pose.pt source=path/to/image.jpg
shayan-mesdaghi
Hello everyone, I trained a YOLO model on a dataset I created myself. The training went well, but I have a major problem: why isn't the skeleton (landmarks connections) displayed on my images and videos, and only the keypoints are shown? I performed the labelling process using Roboflow. I should mention that when I use a pre-trained YOLO model, the skeleton is displayed, but when I train the dataset myself, only the keypoints are present. Please guide me, thank you.
- Glenn JocherUltralytics
@shayan-mesdaghi skeleton lines are auto-drawn only for the COCO 17‑keypoint human schema; custom keypoint counts/orders show dots unless you render your own connections. If you’re not using the COCO 17 order, set your skeleton at draw time like this:
from ultralytics import YOLO
from ultralytics.utils.plotting import Annotator

# 1-based COCO-17 pairs; adjust to your schema as needed
skeleton = [(16,14),(14,12),(17,15),(15,13),(12,13),(6,12),(7,13),(6,7),
            (6,8),(7,9),(8,10),(9,11),(2,3),(1,2),(1,3),(2,4),(3,5),(4,6),(5,7)]

model = YOLO("best.pt")
for r in model("image_or_video.mp4"):
    im = r.orig_img.copy()
    ann = Annotator(im)
    ann.skeleton = skeleton  # 1-based indices
    for k in r.keypoints.xy:
        ann.kpts(k, kpt_line=True)
    im_out = ann.result()
If you edited
plotting.py, restart your Python session/notebook so changes load. Method details are in the Annotator.kpts reference, which notes the human‑only default forkpt_linesee Annotator.kpts, and the dataset YAML fields for pose (e.g.,kpt_shape) are shown in the Pose datasets overview.
mobin3399
Hi, I’ve trained a custom YOLOv8-pose model with two object classes. One class occupies more than 80% of the image area (large object), while the other one is much smaller. Interestingly, the smaller object produces much more accurate keypoint predictions, while the large object shows poor keypoint localization — even though both classes have precise annotations, balanced samples, and consistent lighting/camera setup.
I have already tried:
- Careful labeling (pixel-level accurate keypoints)
- Strong data augmentation
- Adjusting loss weights for keypoints and bounding boxes
- Different model scales (YOLOv8n-pose, YOLOv8m-pose)
However, the issue remains: pose accuracy drops significantly for the larger object, despite good detection and validation metrics.
From my analysis, this might be related to:
- The OKS-based keypoint loss being scale-dependent (large objects are penalized less for the same absolute error).
- The receptive field or feature resolution in the pose head being insufficient for very large objects.
- Bounding box coverage (close to image borders) affecting normalized keypoint coordinates.
Has anyone else observed this behavior in YOLOv8-pose or YOLOv9-pose? And is there a recommended way to make keypoint accuracy more scale-invariant (for example, by modifying the OKS loss or normalization strategy)?
Any guidance or similar experiences would be greatly appreciated!
pratikbariya
Ok, you have done proper annotation, augmentation, loss weight adjustments, and tried different models. See, there is an issue regarding YOLOV8-POSE for large objects. I think you have to focus on the KPT loss also. If it is low, then try to improve that by making changes in loss (by overriding or code changes).
If possible, share an image of the object and model matrix. That will help understand the issue.
1- Glenn JocherUltralytics(bearbeitet)
@pratikbariya @mobin3399 adding a few concrete levers you can try for the “large object → poorer keypoint localization” case: train/val at higher resolution and lighter augments for pose, e.g.
imgsz=1280 mosaic=0.0 degrees=0 translate=0.05 scale=0.5 fliplr=0.5, and prefer images where the large object isn’t hard‑clipped by borders (pad or pre-crop so it fills the frame); if you’re not using the COCO 17‑kpt schema, note our evaluator defaults to uniform OKS sigmas which can bias big objects—set explicit sigmas for your keypoints or adopt the COCO set; details and usage are in the Pose docs and PoseValidator notes.yolo pose train model=yolo26x-pose.pt data=your.yaml imgsz=1280 mosaic=0.0 degrees=0 translate=0.05 scale=0.5 fliplr=0.5See the Pose Estimation guide for end‑to‑end training tips and keypoint ordering, and the PoseValidator reference for how OKS is computed. Pose Estimation – Ultralytics YOLO • PoseValidator reference (OKS/sigma behavior)
1 Thank you for your response. I followed your suggestion, and it helped me resolve the issue to a large extent. I really appreciate your guidance and support.