Guía de ajuste de hiperparámetros de Ultralytics YOLO
El ajuste de hiperparámetros en Ultralytics YOLO es una búsqueda automatizada e iterativa que optimiza configuraciones —como la tasa de aprendizaje, los pesos de la función de pérdida y la intensidad de las aumentaciones— para maximizar métricas de rendimiento de un modelo de aprendizaje automático, como la exactitud, la precisión y la exhaustividad. En lugar de probar estos valores a mano, Ultralytics YOLO explora el espacio de hiperparámetros mediante un algoritmo genético que modifica y evalúa configuraciones candidatas en muchas ejecuciones de entrenamiento cortas.
Ver: Cómo ajustar los hiperparámetros para mejorar el rendimiento del modelo 🚀
¿Qué son los hiperparámetros?#
Los hiperparámetros son parámetros estructurales de alto nivel del algoritmo. Se establecen antes de la fase de entrenamiento y permanecen constantes durante esta. Estos son algunos hiperparámetros que suelen ajustarse en Ultralytics YOLO:
- Tasa de aprendizaje
lr0: determina el tamaño del paso en cada iteración al avanzar hacia un mínimo de la función de pérdida. - Tamaño del lote
batch: Número de imágenes procesadas simultáneamente en una pasada hacia delante. - Número de épocas
epochs: Una época es una pasada completa hacia delante y hacia atrás por todos los ejemplos de entrenamiento. - Detalles de la arquitectura: Como el número de canales, el número de capas, los tipos de funciones de activación, etc. Estos parámetros se encuentran en la configuración YAML del modelo, no en los argumentos de entrenamiento.
De estos cuatro elementos, solo la tasa de aprendizaje forma parte del espacio de búsqueda predeterminado: batch, epochs y la arquitectura permanecen fijos. El optimizador también modifica el programa de aprendizaje, los coeficientes de pérdida y las aumentaciones que se indican a continuación.
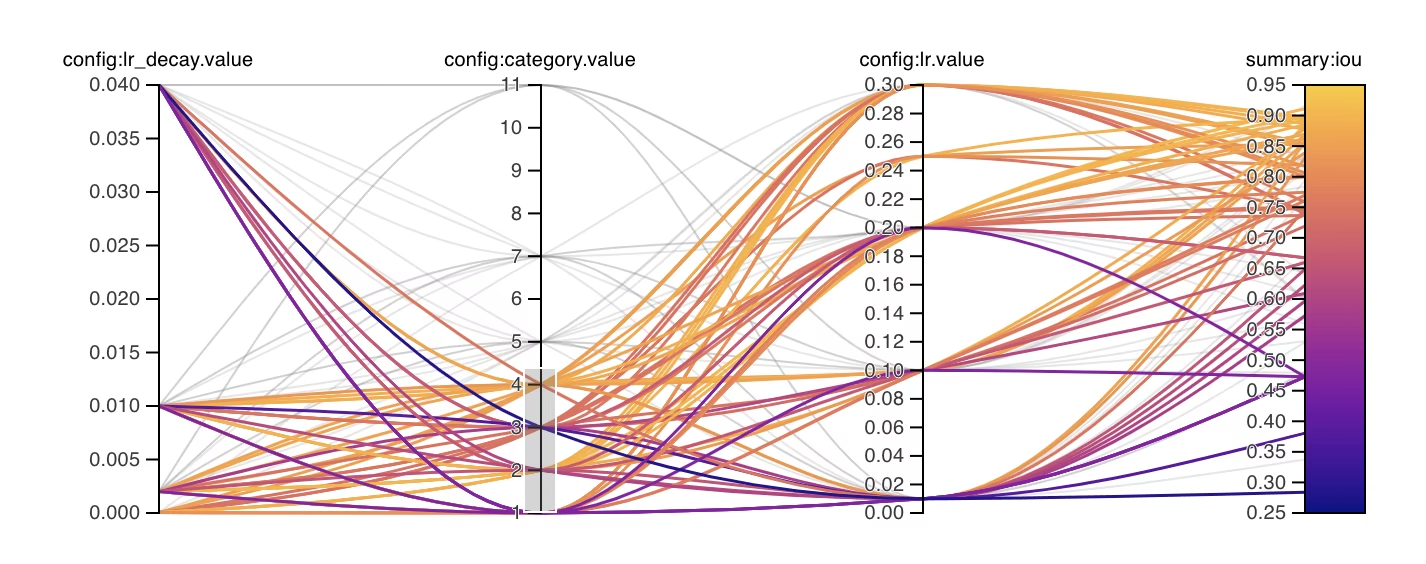
Evolución genética y mutación#
Ultralytics YOLO usa algoritmos genéticos, una familia de algoritmos evolutivos, para optimizar los hiperparámetros. Los algoritmos genéticos se inspiran en el mecanismo de la selección natural y la genética.
- Selección: En cada iteración se selecciona una de hasta nueve configuraciones con mayor aptitud, ponderadas según su aptitud. Tras 30 resultados, el 20 % de los mejores resultados (hasta 30) también permite estimar la covarianza de los parámetros, cuya influencia aumenta a medida que se acumulan evidencias de las configuraciones mejor valoradas.
- Mutación: En cada iteración se muta aproximadamente la mitad de los parámetros mediante pasos gaussianos normalizados según sus rangos de búsqueda. Cuando la covarianza está activa, una proporción ponderada por la confianza, de hasta el 40 %, usa pasos correlacionados; la reflexión mantiene esos pasos dentro de los límites sin acumular valores recortados. A medida que se acumulan pruebas sin mejoras, el tamaño de los pasos se reduce linealmente hasta un 20 % a lo largo de 25 pruebas y se restablece cuando se encuentra un nuevo mejor resultado. La iteración 1 no tiene configuración parental y usa los hiperparámetros de entrenamiento predeterminados como referencia.
Preparación para el ajuste de hiperparámetros#
Antes de iniciar el proceso de ajuste, es importante que:
- Identifica las métricas: el ajustador integrado (
use_ray=False) ordena los ensayos según la puntuaciónfitnessde la tarea, mientras queuse_ray=Trueutiliza la métrica de la tarea. Decide qué métricas secundarias vas a revisar, como AP50 o la puntuación F1. - Establece el presupuesto de ajuste: Define cuántos recursos computacionales estás dispuesto a asignar. El ajuste de hiperparámetros puede requerir mucho cálculo.
Cómo funciona el ciclo de ajuste#
En cada iteración, el optimizador integrado repite el siguiente ciclo:
- Inicializar los hiperparámetros — parte de una configuración de referencia razonable, ya sean los hiperparámetros predeterminados de Ultralytics YOLO o valores basados en tus conocimientos del dominio o en experimentos anteriores.
- Mutar los hiperparámetros — la clase
Tunergenera automáticamente un nuevo conjunto de hiperparámetros a partir del conjunto existente mediante el método_mutate. - Entrenar el modelo — entrena con los hiperparámetros mutados y, después, evalúa el rendimiento del entrenamiento con las métricas que hayas elegido.
- Evaluar el modelo — el proceso de evaluación genera la puntuación de aptitud de la iteración, que se compara con las iteraciones anteriores para determinar si los hiperparámetros actuales suponen una mejora.
- Registrar los resultados — guarda las métricas de rendimiento junto con los hiperparámetros correspondientes para consultarlos más adelante. Ultralytics YOLO guarda estos resultados automáticamente en formato NDJSON.
- Repetir — continúa hasta alcanzar el número de iteraciones establecido; cada iteración aprovecha los conocimientos obtenidos en las ejecuciones anteriores. El optimizador integrado ejecuta todos los
iterations; Ray Tune informa de las métricas después de cada época de ajuste, lo que permite a ASHA detener las pruebas poco prometedoras una vez transcurrido su periodo de gracia.
Iteraciones y tamaño de la población#
Con el optimizador integrado (use_ray=False), iterations controla el número total de pruebas secuenciales y su valor predeterminado es 300. Cada prueba entrena un modelo con una configuración de hiperparámetros; por ejemplo, iterations=40 con epochs=50 programa 40 ejecuciones de entrenamiento independientes de 50 épocas, no una única ejecución de 50 épocas con una población aparte de 40 candidatos.
El algoritmo genético integrado no tiene un parámetro explícito para el tamaño de la población. Cuando ya hay pruebas anteriores, selecciona entre un máximo de nueve configuraciones con mayor aptitud y muta una candidata por iteración.
Para ejecutar pruebas en paralelo o usar estrategias de búsqueda más avanzadas, configura use_ray=True para usar Ray Tune, que también tiene un valor predeterminado de 300 pruebas y recibe iterations como num_samples. Consulta la guía de integración de Ray Tune para obtener más información.
Espacio de búsqueda predeterminado#
La siguiente tabla enumera los parámetros del espacio de búsqueda predeterminado para el ajuste de hiperparámetros en YOLO26. Cada parámetro tiene un rango de valores específico definido mediante una tupla (min, max).
| Parámetro | Tipo | Rango de valores | Descripción |
|---|---|---|---|
lr0 | float | (1e-5, 1e-2) | Tasa de aprendizaje inicial al comienzo del entrenamiento. Los valores más bajos proporcionan un entrenamiento más estable, pero una convergencia más lenta. |
lrf | float | (0.01, 1.0) | Factor de la tasa de aprendizaje final como fracción de lr0. Controla cuánto disminuye la tasa de aprendizaje durante el entrenamiento. |
momentum | float | (0.7, 0.98) | Factor de momentum de SGD. Los valores más altos ayudan a mantener una dirección del gradiente constante y pueden acelerar la convergencia. |
weight_decay | float | (0.0, 0.001) | Factor de regularización L2 para evitar el sobreajuste. Los valores más altos aplican una regularización más intensa. |
warmup_epochs | float | (0.0, 5.0) | Número de épocas de calentamiento de la tasa de aprendizaje lineal. Ayuda a evitar la inestabilidad al principio del entrenamiento. |
warmup_momentum | float | (0.0, 0.95) | Momentum inicial durante la fase de calentamiento. Aumenta gradualmente hasta alcanzar el valor final de momentum. |
box | float | (1.0, 20.0) | Peso de la pérdida de la caja delimitadora en la función de pérdida total. Equilibra la regresión de cajas y la clasificación. |
cls | float | (0.1, 4.0) | Peso de la pérdida de clasificación en la función de pérdida total. Los valores más altos dan más importancia a la predicción correcta de la clase. |
cls_pw | float | (0.0, 1.0) | Potencia de ponderación de clases para gestionar el desequilibrio entre clases. Los valores más altos aumentan el peso de las clases poco frecuentes. |
dfl | float | (0.4, 12.0) | Peso del término de regresión de la distancia de la caja. YOLO26 sin DFL aplica esta ganancia a una pérdida L1 sobre las distancias normalizadas de la caja; los valores más altos dan más importancia a la precisión de la localización. |
hsv_h | float | (0.0, 0.1) | Rango del aumento aleatorio del tono en el espacio de color HSV. Ayuda al modelo a generalizar ante variaciones de color. |
hsv_s | float | (0.0, 0.9) | Rango del aumento aleatorio de la saturación en el espacio HSV. Simula distintas condiciones de iluminación. |
hsv_v | float | (0.0, 0.9) | Rango del aumento aleatorio del valor (brillo). Ayuda al modelo a gestionar distintos niveles de exposición. |
degrees | float | (0.0, 45.0) | Rotación máxima del aumento, en grados. Ayuda al modelo a ser invariante a la orientación de los objetos. |
translate | float | (0.0, 0.9) | Traslación máxima del aumento como fracción del tamaño de la imagen. Mejora la robustez ante cambios en la posición de los objetos. |
scale | float | (0.0, 0.95) | Rango del aumento aleatorio de escala. Ayuda al modelo a detectar objetos de distintos tamaños. |
shear | float | (0.0, 10.0) | Cizallamiento máximo del aumento, en grados. Añade distorsiones similares a las de perspectiva a las imágenes de entrenamiento. |
perspective | float | (0.0, 0.001) | Rango del aumento aleatorio de perspectiva. Simula distintos ángulos de visión. |
flipud | float | (0.0, 1.0) | Probabilidad de voltear verticalmente la imagen durante el entrenamiento. Útil para imágenes aéreas o tomadas desde arriba. |
fliplr | float | (0.0, 1.0) | Probabilidad de voltear horizontalmente la imagen. Ayuda al modelo a ser invariante a la dirección de los objetos. |
bgr | float | (0.0, 1.0) | Probabilidad de aplicar el aumento BGR, que intercambia los canales de color. Puede ayudar a conseguir invariancia al color. |
mosaic | float | (0.0, 1.0) | Probabilidad de aplicar el aumento mosaico, que combina 4 imágenes. Especialmente útil para detectar objetos pequeños. |
mixup | float | (0.0, 1.0) | Probabilidad de aplicar el aumento mixup, que mezcla dos imágenes. Puede mejorar la robustez del modelo. |
cutmix | float | (0.0, 1.0) | Probabilidad de aplicar el aumento cutmix. Combina regiones de imágenes y conserva las características locales. |
copy_paste | float | (0.0, 1.0) | En el modo flip, la fracción de objetos aptos que se copia; en el modo mixup, también la probabilidad de aplicarlo. |
close_mosaic | int | (0.0, 10.0) | Desactiva el mosaico durante las últimas N épocas para estabilizar el entrenamiento antes de que termine. Se muta como un valor decimal y luego se redondea a un número entero de épocas. |
Ejemplo de espacio de búsqueda personalizado#
En el ejemplo siguiente se define un espacio de búsqueda y se llama a model.tune(), que ejecuta la clase Tuner, para ajustar YOLO26n con COCO8 durante 30 épocas con el optimizador AdamW. Se omiten los gráficos, los puntos de control y la validación, salvo en la última época, para acelerar el ajuste.
Este ejemplo es solo para demostración. Los hiperparámetros obtenidos en ejecuciones de ajuste breves o a pequeña escala rara vez son óptimos para el entrenamiento en condiciones reales. En la práctica, el ajuste debe realizarse con una configuración similar a la del entrenamiento completo —incluidos conjuntos de datos, épocas y aumentos de datos comparables— para garantizar resultados fiables y transferibles. Un ajuste rápido puede sesgar los parámetros hacia una convergencia más rápida o mejoras a corto plazo en la validación que no se generalicen.
from ultralytics import YOLO

# Inicializa el modelo YOLO
model = YOLO("yolo26n.pt")

# Define el espacio de búsqueda
search_space = {
    "lr0": (1e-5, 1e-2),
    "degrees": (0.0, 45.0),
}

# Ajusta los hiperparámetros con COCO8 durante 30 épocas
model.tune(
    data="coco8.yaml",
    epochs=30,
    iterations=300,
    optimizer="AdamW",
    space=search_space,
    plots=False,
    save=False,
    val=False,
)
Reanudar una sesión interrumpida de ajuste de hiperparámetros#
Puedes reanudar una sesión interrumpida de ajuste de hiperparámetros pasando resume=True. Opcionalmente, puedes pasar el directorio name usado en runs/{task} para reanudar la sesión. Si no indicas name, se reanuda el directorio llamado literalmente tune, que es el nombre predeterminado y no el de la sesión ejecutada más recientemente. Por tanto, pasa name si iniciaste una ejecución con un nombre personalizado. También debes proporcionar todos los argumentos de entrenamiento anteriores, incluidos data, epochs, iterations y space.
from ultralytics import YOLO

# Define un modelo YOLO
model = YOLO("yolo26n.pt")

# Define el espacio de búsqueda
search_space = {
    "lr0": (1e-5, 1e-2),
    "degrees": (0.0, 45.0),
}

# Reanuda la ejecución anterior
results = model.tune(data="coco8.yaml", epochs=50, iterations=300, space=search_space, resume=True)

# Reanuda la ejecución de ajuste con el nombre 'tune_exp'
results = model.tune(data="coco8.yaml", epochs=50, iterations=300, space=search_space, name="tune_exp", resume=True)Resultados#
Cuando hayas completado correctamente el proceso de ajuste de hiperparámetros, obtendrás varios archivos y directorios que contienen los resultados del ajuste. A continuación se describe cada uno:
Estructura de archivos#
Esta es la estructura de directorios que tendrán los resultados. Los directorios de barrido, como multitrain/ y multitrain-2/, contienen iteraciones de ajuste individuales; es decir, un modelo entrenado por conjunto de datos con un conjunto de hiperparámetros, en un subdirectorio con el nombre de cada conjunto de datos. Para ahorrar espacio, el optimizador elimina los directorios de ejecución por conjunto de datos de las iteraciones que no son las mejores actuales. El directorio tune/ contiene los resultados del ajuste de todos los entrenamientos individuales de modelos:
runs/
└── detect/
    ├── multitrain/
    │   └── coco8/
    ├── multitrain-2/
    ├── ...
    └── tune/
        ├── best_hyperparameters.yaml
        ├── tune_fitness.png
        ├── tune_results.ndjson
        ├── tune_scatter_plots.png
        └── weights/
            ├── last.pt
            └── best.pt
Descripciones de los archivos#
best_hyperparameters.yaml#
Este archivo YAML contiene los hiperparámetros con mejor rendimiento obtenidos durante el proceso de ajuste. Puedes usar este archivo para inicializar futuros entrenamientos con estos parámetros optimizados.
-
Formato: YAML
-
Uso: Resultados de hiperparámetros
-
Ejemplo:
# 558/900 iterations complete ✅ (45536.81s)
# Results saved to /usr/src/ultralytics/runs/detect/tune
# Best fitness=0.64297 observed at iteration 498
# Best fitness metrics are {'metrics/precision(B)': 0.87247, 'metrics/recall(B)': 0.71387, 'metrics/mAP50(B)': 0.79106, 'metrics/mAP50-95(B)': 0.62651, 'val/box_loss': 2.79884, 'val/cls_loss': 2.72386, 'val/l1_loss': 0.68503, 'fitness': 0.64297}
# Best fitness model is /usr/src/ultralytics/runs/detect/tune/weights
# Best fitness hyperparameters are printed below.

lr0: 0.00269
lrf: 0.00288
momentum: 0.73375
weight_decay: 0.00015
warmup_epochs: 1.22935
warmup_momentum: 0.1525
box: 18.27875
cls: 1.32899
dfl: 0.56016
hsv_h: 0.01148
hsv_s: 0.53554
hsv_v: 0.13636
degrees: 0.0
translate: 0.12431
scale: 0.07643
shear: 0.0
perspective: 0.0
flipud: 0.0
fliplr: 0.08631
mosaic: 0.42551
mixup: 0.0
copy_paste: 0.0
tune_fitness.png#
Este gráfico muestra la aptitud en función del número de iteraciones. Te ayuda a visualizar el rendimiento del algoritmo genético a lo largo del tiempo.
- Formato: PNG
- Uso: Visualización del rendimiento
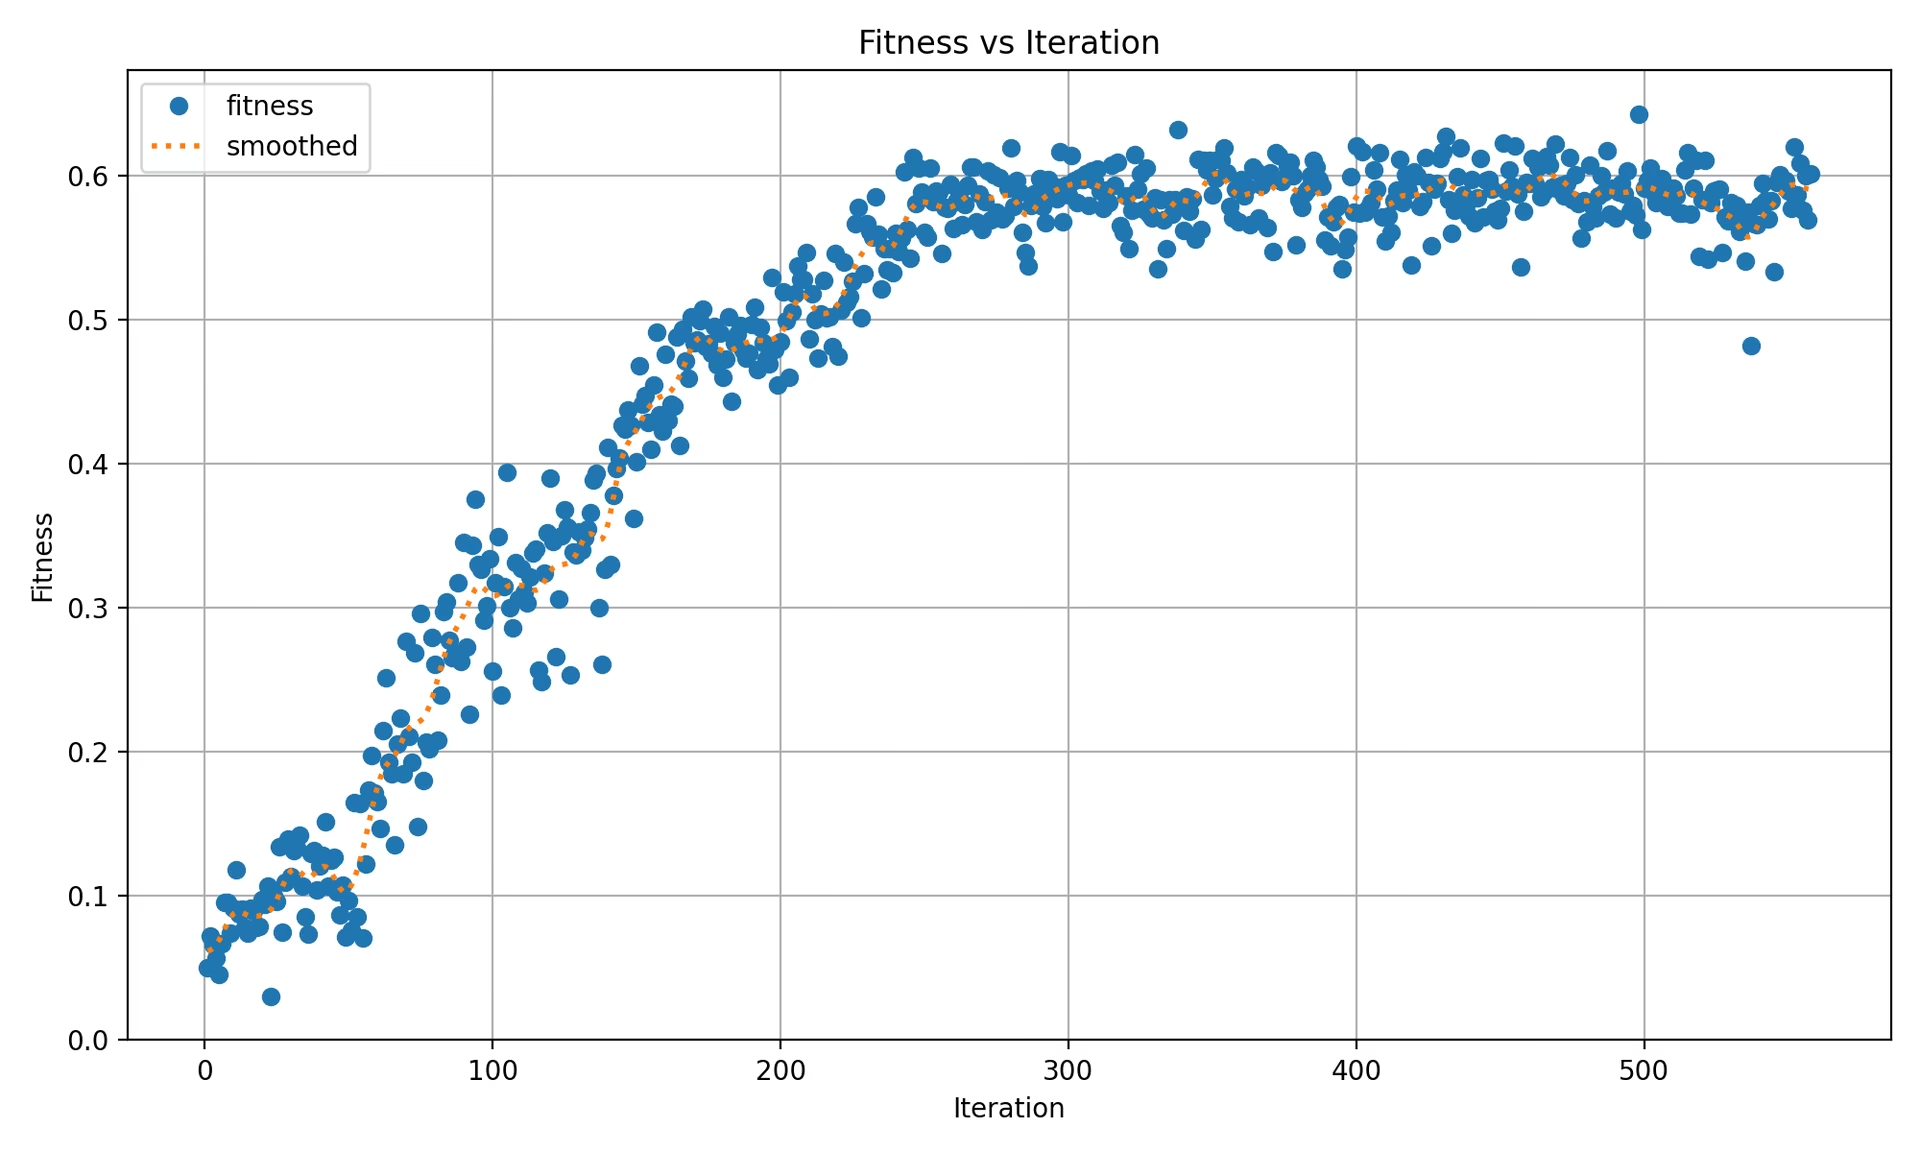
El gráfico contiene:
- Un marcador por iteración y conjunto de datos, por lo que una ejecución con un solo conjunto de datos muestra un punto por iteración y una ejecución con varios conjuntos muestra un punto por cada conjunto de datos e iteración.
- Una línea de «media suavizada» de puntos calculada mediante un suavizado gaussiano (
sigma=3) de los valores de aptitud de nivel superior de cada iteración.
tune_results.ndjson#
Un archivo NDJSON que contiene los resultados detallados de cada iteración del ajuste. Cada línea es un objeto JSON con la aptitud agregada, los hiperparámetros ajustados y las métricas de cada conjunto de datos. El ajuste con uno o varios conjuntos de datos utiliza el mismo formato de archivo.
- Formato: NDJSON
- Uso: Seguimiento de resultados por iteración.
- Ejemplo:
A continuación se muestra un ejemplo con formato legible; en el archivo real .ndjson, cada objeto se guarda en una sola línea.
{
    "iteration": 1,
    "fitness": 0.48628,
    "hyperparameters": {
        "lr0": 0.01,
        "lrf": 0.01,
        "momentum": 0.937,
        "weight_decay": 0.0005
    },
    "datasets": {
        "coco8": {
            "metrics/precision(B)": 0.65666,
            "metrics/recall(B)": 0.85,
            "metrics/mAP50(B)": 0.85086,
            "metrics/mAP50-95(B)": 0.64104,
            "val/box_loss": 1.57958,
            "val/cls_loss": 1.04986,
            "val/l1_loss": 1.32641,
            "fitness": 0.64104
        },
        "coco8-grayscale": {
            "metrics/precision(B)": 0.6582,
            "metrics/recall(B)": 0.51667,
            "metrics/mAP50(B)": 0.59106,
            "metrics/mAP50-95(B)": 0.33152,
            "val/box_loss": 1.95424,
            "val/cls_loss": 1.64059,
            "val/l1_loss": 1.70226,
            "fitness": 0.33152
        }
    },
    "save_dirs": {
        "coco8": "runs/detect/multitrain/coco8",
        "coco8-grayscale": "runs/detect/multitrain/coco8-grayscale"
    }
}
El fitness de nivel superior es la media aritmética de los valores fitness de cada conjunto de datos. En el ajuste con un solo conjunto de datos, el diccionario datasets tiene una entrada cuyo fitness es igual al fitness de nivel superior. Se registra un objeto JSON por cada iteración completada. Las rutas reales de save_dirs son absolutas; arriba se han abreviado para facilitar la lectura.
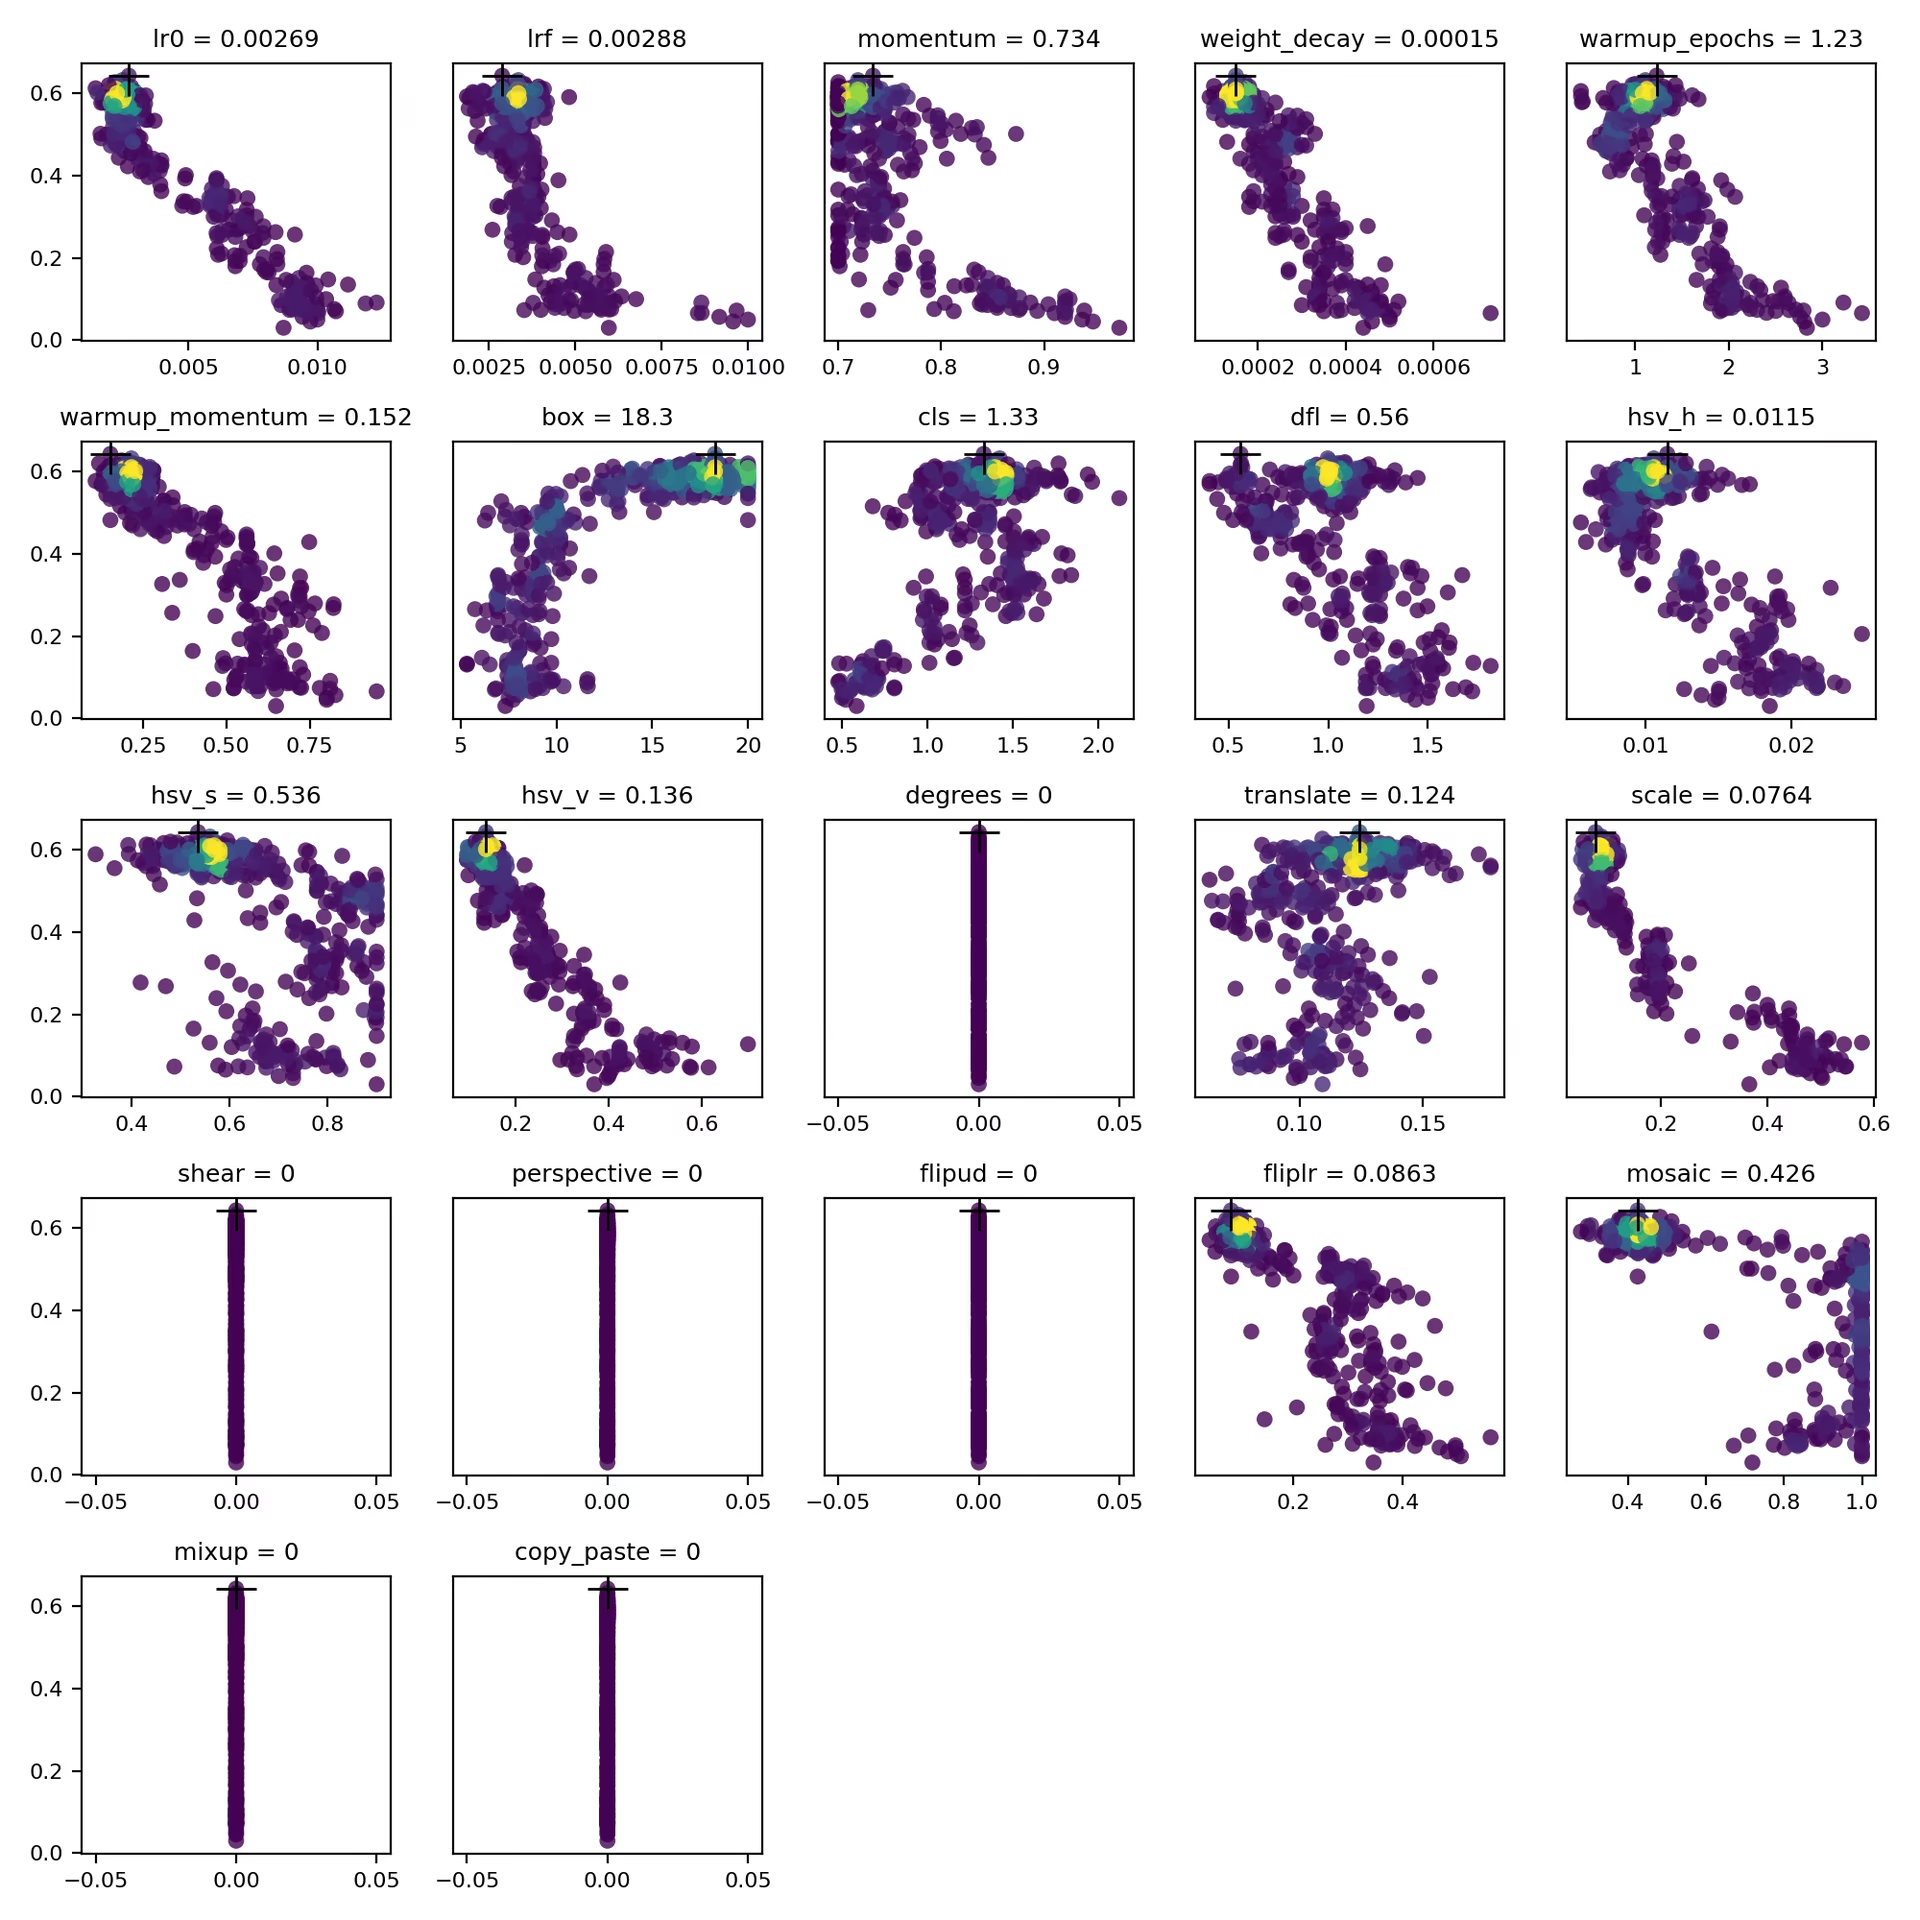
tune_scatter_plots.png#
Este archivo contiene gráficos de dispersión generados a partir de tune_results.ndjson, que te ayudan a visualizar las relaciones entre los distintos hiperparámetros y las métricas de rendimiento. La mutación utiliza el rango configurado para cada hiperparámetro, por lo que los valores pueden evolucionar a partir de valores predeterminados de cero, como degrees y shear.
- Formato: PNG
- Uso: Análisis exploratorio de datos
weights/#
Este directorio contiene los modelos PyTorch guardados de la iteración del ajuste con mejor aptitud. Ambos archivos proceden de esa misma iteración:
last.pt: pesos de la última época de entrenamiento de esa iteración.best.pt: pesos de la época con mejor aptitud en el entrenamiento de esa iteración.
Con estos resultados, puedes tomar decisiones mejor fundamentadas para futuros entrenamientos y análisis de modelos.
Conclusión#
El ajuste de hiperparámetros en Ultralytics YOLO es fácil de iniciar y potente por dentro, ya que utiliza una selección ponderada por aptitud y mutaciones normalizadas por rango en un algoritmo genético. Si sigues el ciclo descrito en esta guía, podrás ajustar sistemáticamente tu modelo para mejorar su rendimiento y reutilizar después el best_hyperparameters.yaml resultante para inicializar futuras ejecuciones de entrenamiento. Para ampliar el ajuste a ensayos en paralelo y algoritmos de búsqueda más avanzados, continúa con la guía de integración de Ray Tune o ejecuta trabajos gestionados con hiperparámetros configurables y seguimiento de métricas en tiempo real en Ultralytics Platform mediante el entrenamiento en la nube.
Para los ajustes que no estén disponibles mediante ningún argumento, como las tasas de aprendizaje por capa o una métrica de aptitud personalizada, crea una subclase del entrenador. Para profundizar, explora el código fuente de la clase Tuner. Si tienes preguntas o quieres solicitar una función, ponte en contacto con nosotros en GitHub o Discord.
Preguntas frecuentes#
Establece un valor inicial con el parámetro
lr0—los valores habituales van de0.001a0.01— y deja que el ajuste lo modifique para encontrar el valor óptimo. Puedes automatizarlo con el métodomodel.tune(). Por ejemplo:Ejemplofrom ultralytics import YOLO # Inicializa el modelo YOLO model = YOLO("yolo26n.pt") # Ajusta los hiperparámetros con COCO8 durante 30 épocas model.tune(data="coco8.yaml", epochs=30, iterations=300, optimizer="AdamW", plots=False, save=False, val=False)Para obtener más información, consulta la página de configuración de Ultralytics YOLO.
Los algoritmos genéticos ofrecen a Ultralytics YOLO26 una forma robusta de explorar el espacio de hiperparámetros sin recurrir a pruebas y errores manuales. Estas son algunas de sus principales ventajas:
- Búsqueda eficiente: la selección ponderada por aptitud conserva las configuraciones más sólidas, mientras que la mutación normalizada por rango explora nuevos candidatos.
- Evitar mínimos locales: Las mutaciones aleatorias ayudan a que la búsqueda escape de los mínimos locales en los que podría quedar atrapada una búsqueda puramente voraz.
- Métricas de rendimiento: se adaptan en función de una puntuación de aptitud específica para cada tarea (mAP50-95 para detección).
Para ver cómo los algoritmos genéticos pueden optimizar los hiperparámetros, consulta la guía sobre la evolución de hiperparámetros.
El tiempo necesario para ajustar los hiperparámetros con Ultralytics YOLO depende en gran medida de varios factores, como el tamaño del conjunto de datos, la complejidad de la arquitectura del modelo, el número de iteraciones y los recursos computacionales disponibles. Por ejemplo, ajustar YOLO26n con un conjunto de datos como COCO8 durante 30 épocas puede llevar desde varias horas hasta varios días, según el hardware.
Para gestionar eficazmente el tiempo de ajuste, define de antemano un presupuesto claro, tal como se explica en Preparación para el ajuste de hiperparámetros. Esto ayuda a equilibrar la asignación de recursos y los objetivos de optimización.
Al evaluar el rendimiento del modelo durante el ajuste de hiperparámetros en YOLO, puedes usar varias métricas clave:
- AP50: precisión media con un umbral de IoU de 0,50.
- Puntuación F1: la media armónica de la precisión y la exhaustividad.
- Precisión y exhaustividad: métricas individuales que indican la exactitud del modelo al identificar verdaderos positivos frente a falsos positivos y falsos negativos.
Estas métricas te ayudan a comprender distintos aspectos del rendimiento del modelo.
Sí. Ultralytics YOLO26 se integra con Ray Tune para realizar una optimización avanzada de hiperparámetros. Ray Tune ofrece algoritmos de búsqueda como la optimización bayesiana y Hyperband, además de opciones de ejecución en paralelo para acelerar el proceso de ajuste.
Para usar Ray Tune con YOLO26, establece el parámetro
use_ray=Trueen la llamada al métodomodel.tune().


Comentarios152
Haz una pregunta, comparte tus resultados o ayuda a otra persona.
GengBin414(editado)
I tuned my defect detection dataset ,which are composed of 8000+ images, this is my tune code: model.tune( data="../data/data20260420_line_scan_merged_6ch.yaml", epochs=300, iterations=300, #space=search_space, #optimizer="AdamW", optimizer="MuSGD", lr0=0.01, momentum=0.9, shear=1, degrees=1, perspective=0.0001, mixup=0.1, cutmix=0.1, batch=20 )
I got the best mAP 0.586 at iteration 5 after tuned 30+ iterations, then I retrain the dataset with the following code: model.train( data="../data/data20260420_line_scan_merged_6ch.yaml", epochs=300, batch=20, imgsz=640, device=0, workers=16, optimizer="MuSGD", lr0=0.00721, lrf=0.01267, momentum=0.81816, weight_decay=0.00077, warmup_epochs=3.31429, warmup_momentum=0.95, box=7.11682, cls=0.48318, dfl=0.9397, hsv_h=0.00364, hsv_s=0.9, hsv_v=0.29751, degrees=0.99922, translate=0.07662, scale=0.51303, shear=0.76723, perspective=0.0, flipud=0.00019, fliplr=0.57639, bgr=0.00634, mosaic=0.62424, mixup=0.11307, cutmix=0.13007, copy_paste=0.00583, close_mosaic=10 #cfg="best_hyperparameters_map0.586.yaml" )
I copied the hyperparameters from best_hyperparameters_map0.586.yaml, but I got the best mAP 0.568, what cause the discrepancy?Can sb help me out? Thanks.
 Glenn JocherUltralytics
A small gap like
0.586 -> 0.568is usually expected becausetune()saves the best single stochastic run, while your latertrain()is a fresh run with different randomness and augmentation order; please first validate the tuning checkpointruns/detect/tune/weights/best.pt, then retrain with the exact same args plusseed=0anddeterministic=True, and make sure you are comparing the same metric (fitness/mAP50-95) described in the Hyperparameter Tuning guide. If the gap still looks too large, please share the text output from validating that checkpoint and the matching row fromtune_results.ndjsonhere in Discussions so the team can compare them directly.Thank you for your timely reply, I validated the tuning checkpoint, here is the text output from validating that checkpoint: (yolo26) ps@ps:~/Desktop/GB/ultralytics$ python val.py Ultralytics 8.4.26 🚀 Python-3.11.15 torch-2.5.1 CUDA:0 (NVIDIA GeForce RTX 4090 D, 24208MiB) YOLO26x summary (fused): 190 layers, 55,645,380 parameters, 0 gradients, 193.9 GFLOPs val: Fast image access ✅ (ping: 0.0±0.0 ms, read: 10744.4±1424.6 MB/s, size: 734.1 KB) val: Scanning /home/ps/Desktop/GB/ultralytics/datasets/Merged_6Chanel_20260420/imagesH/val.cache... 786 images, 47 backgrounds, 0 corrupt: 100% ━━━━━━━━━━━━ 786/786 412.1Mit/s 0.0s Class Images Instances Box(P R mAP50 mAP50-95): 100% ━━━━━━━━━━━━ 50/50 6.9it/s 7.2s all 786 1363 0.843 0.69 0.765 0.585 black 45 47 0.914 0.677 0.828 0.648 crack 120 145 0.681 0.517 0.55 0.334 edge 184 195 0.916 0.899 0.94 0.833 line 116 147 0.809 0.646 0.736 0.544 pit 73 89 0.775 0.543 0.642 0.447 raw 279 318 0.861 0.745 0.81 0.644 white 95 106 0.9 0.623 0.712 0.46 yellow 299 316 0.884 0.873 0.9 0.773 Speed: 0.9ms preprocess, 7.3ms inference, 0.0ms loss, 0.0ms postprocess per image Results saved to /home/ps/Desktop/GB/ultralytics/runs/detect/val81
I checked my retrain args, it show that seed=0 and deterministic=True already set: python train.py New https://pypi.org/project/ultralytics/8.4.53 available 😃 Update with 'pip install -U ultralytics' Ultralytics 8.4.26 🚀 Python-3.11.15 torch-2.5.1 CUDA:0 (NVIDIA GeForce RTX 4090 D, 24208MiB) engine/trainer: agnostic_nms=False, amp=True, angle=1.0, augment=False, auto_augment=randaugment, batch=20, bgr=0.00634, box=7.11682, cache=False, cfg=None, classes=None, close_mosaic=10, cls=0.48318, compile=False, conf=None, copy_paste=0.00583, copy_paste_mode=flip, cos_lr=False, cutmix=0.13007, data=../data/data20260420_line_scan_merged_6ch.yaml, degrees=0.99922, deterministic=True, device=0, dfl=0.9397, dnn=False, dropout=0.0, dynamic=False, embed=None, end2end=None, epochs=500, erasing=0.4, exist_ok=False, fliplr=0.57639, flipud=0.00019, format=torchscript, fraction=1.0, freeze=None, half=False, hsv_h=0.00364, hsv_s=0.9, hsv_v=0.29751, imgsz=640, int8=False, iou=0.7, keras=False, kobj=1.0, line_width=None, lr0=0.00721, lrf=0.01267, mask_ratio=4, max_det=300, mixup=0.11307, mode=train, model=yolo26x.pt, momentum=0.81816, mosaic=0.62424, multi_scale=0.0, name=train137, nbs=64, nms=False, opset=None, optimize=False, optimizer=MuSGD, overlap_mask=True, patience=100, perspective=0.0, plots=True, pose=12.0, pretrained=True, profile=False, project=None, rect=False, resume=False, retina_masks=False, rle=1.0, save=True, save_conf=False, save_crop=False, save_dir=/home/ps/Desktop/GB/ultralytics/runs/detect/train137, save_frames=False, save_json=False, save_period=-1, save_txt=False, scale=0.51303, seed=0, shear=0.76723, show=False, show_boxes=True, show_conf=True, show_labels=True, simplify=True, single_cls=False, source=None, split=val, stream_buffer=False, task=detect, time=None, tracker=botsort.yaml, translate=0.07662, val=True, verbose=True, vid_stride=1, visualize=False, warmup_bias_lr=0.1, warmup_epochs=3.31429, warmup_momentum=0.95, weight_decay=0.00077, workers=16, workspace=None
And here is the train output: Epoch GPU_mem box_loss cls_loss dfl_loss Instances Size 260/300 20.8G 0.4503 0.4947 0.004246 50 640: 100% ━━━━━━━━━━━━ 354/354 2.7it/s 2:10 Class Images Instances Box(P R mAP50 mAP50-95): 100% ━━━━━━━━━━━━ 20/20 4.5it/s 4.4s all 786 1363 0.841 0.682 0.751 0.564 EarlyStopping: Training stopped early as no improvement observed in last 100 epochs. Best results observed at epoch 160, best model saved as best.pt. To update EarlyStopping(patience=100) pass a new patience value, i.e.
patience=300or usepatience=0to disable EarlyStopping.260 epochs completed in 9.792 hours. Optimizer stripped from /home/ps/Desktop/GB/ultralytics/runs/detect/train138/weights/last.pt, 118.4MB Optimizer stripped from /home/ps/Desktop/GB/ultralytics/runs/detect/train138/weights/best.pt, 118.4MB
Validating /home/ps/Desktop/GB/ultralytics/runs/detect/train138/weights/best.pt... Ultralytics 8.4.26 🚀 Python-3.11.15 torch-2.5.1 CUDA:0 (NVIDIA GeForce RTX 4090 D, 24208MiB) YOLO26x summary (fused): 190 layers, 55,645,380 parameters, 0 gradients, 193.9 GFLOPs Class Images Instances Box(P R mAP50 mAP50-95): 100% ━━━━━━━━━━━━ 20/20 4.9it/s 4.1s all 786 1363 0.826 0.685 0.758 0.568 black 45 47 0.882 0.634 0.773 0.579 crack 120 145 0.675 0.559 0.577 0.314 edge 184 195 0.925 0.885 0.949 0.824 line 116 147 0.785 0.667 0.714 0.52 pit 73 89 0.84 0.528 0.662 0.447 raw 279 318 0.812 0.72 0.804 0.638 white 95 106 0.802 0.611 0.674 0.434 yellow 299 316 0.888 0.877 0.911 0.787 Speed: 0.1ms preprocess, 4.4ms inference, 0.0ms loss, 0.0ms postprocess per image Results saved to /home/ps/Desktop/GB/ultralytics/runs/detect/train138
And I don't know where to find tune_results.ndjson mentioned in your reply. I guess you mean the matching row from tune_results.csv then here is: fitness lr0 lrf momentum weight_decay warmup_epochs warmup_momentum box cls dfl hsv_h hsv_s hsv_v degrees translate scale shear perspective flipud fliplr bgr mosaic mixup cutmix copy_paste close_mosaic 0.58582 0.00721 0.01267 0.81816 0.00077 3.31429 0.95 7.11682 0.48318 0.9397 0.00364 0.9 0.29751 0.99922 0.07662 0.51303 0.76723 0 0.00019 0.57639 0.00634 0.62424 0.11307 0.13007 0.00583 10
- Glenn JocherUltralytics
The main issue I see is that your retrain is not matching the tuned trial: the runtime log shows
epochs=500rather than300, so the schedule driven bylr0andlrfis different and that alone can explain0.585 -> 0.568; the current Hyperparameter Tuning guide writestune_results.ndjsonunderruns/detect/tune/, but in your older8.4.26install the equivalent may betune_results.csv, so please rerun with the exact runtime args from the best trial, especiallyepochs=300and the samepatience, and if it still printsepochs=500then another override is being applied. Sorry, after hyperparameter tuning, I retrained first with epochs=500, observed mAP=0.57, then I changed epochs=300, observed mAP=0.568. In the previous reply, I mistakenly copied the retrain args from the epochs=500 run. But the train output is correctly copied from the epochs=300 run, you can tell this out from the EarlyStopping output: Epoch GPU_mem box_loss cls_loss dfl_loss Instances Size 260/300 20.8G 0.4503 0.4947 0.004246 50 640: 100% ━━━━━━━━━━━━ 354/354 2.7it/s 2:10 Class Images Instances Box(P R mAP50 mAP50-95): 100% ━━━━━━━━━━━━ 20/20 4.5it/s 4.4s all 786 1363 0.841 0.682 0.751 0.564 EarlyStopping: Training stopped early as no improvement observed in last 100 epochs. Best results observed at epoch 160, best model saved as best.pt. To update EarlyStopping(patience=100) pass a new patience value, i.e. patience=300 or use patience=0 to disable EarlyStopping.
And the retrain args of the epochs=300 run, it shows that seed=0 and deterministic=True already set: python train.py New https://pypi.org/project/ultralytics/8.4.53 available 😃 Update with 'pip install -U ultralytics' Ultralytics 8.4.26 🚀 Python-3.11.15 torch-2.5.1 CUDA:0 (NVIDIA GeForce RTX 4090 D, 24208MiB) engine/trainer: agnostic_nms=False, amp=True, angle=1.0, augment=False, auto_augment=randaugment, batch=20, bgr=0.00634, box=7.11682, cache=False, cfg=None, classes=None, close_mosaic=10, cls=0.48318, compile=False, conf=None, copy_paste=0.00583, copy_paste_mode=flip, cos_lr=False, cutmix=0.13007, data=../data/data20260420_line_scan_merged_6ch.yaml, degrees=0.99922, deterministic=True, device=0, dfl=0.9397, dnn=False, dropout=0.0, dynamic=False, embed=None, end2end=None, epochs=300, erasing=0.4, exist_ok=False, fliplr=0.57639, flipud=0.00019, format=torchscript, fraction=1.0, freeze=None, half=False, hsv_h=0.00364, hsv_s=0.9, hsv_v=0.29751, imgsz=640, int8=False, iou=0.7, keras=False, kobj=1.0, line_width=None, lr0=0.00721, lrf=0.01267, mask_ratio=4, max_det=300, mixup=0.11307, mode=train, model=yolo26x.pt, momentum=0.81816, mosaic=0.62424, multi_scale=0.0, name=train138, nbs=64, nms=False, opset=None, optimize=False, optimizer=MuSGD, overlap_mask=True, patience=100, perspective=0.0, plots=True, pose=12.0, pretrained=True, profile=False, project=None, rect=False, resume=False, retina_masks=False, rle=1.0, save=True, save_conf=False, save_crop=False, save_dir=/home/ps/Desktop/GB/ultralytics/runs/detect/train138, save_frames=False, save_json=False, save_period=-1, save_txt=False, scale=0.51303, seed=0, shear=0.76723, show=False, show_boxes=True, show_conf=True, show_labels=True, simplify=True, single_cls=False, source=None, split=val, stream_buffer=False, task=detect, time=None, tracker=botsort.yaml, translate=0.07662, val=True, verbose=True, vid_stride=1, visualize=False, warmup_bias_lr=0.1, warmup_epochs=3.31429, warmup_momentum=0.95, weight_decay=0.00077, workers=16, workspace=None
 Murat Raimbekov
quick check on what is likely going on, framed generally: tune saves the best of N stochastic trials, and a single retrain is one new stochastic draw with the same hyperparameters. bit-exact reproduction between the two is not guaranteed even with
seed=0, deterministic=True. ourinit_seeds(deterministic=True)setstorch.use_deterministic_algorithms(True, warn_only=True)inultralytics/utils/torch_utils.py, matching the pytorch reproducibility notes - cuda ops without a deterministic alternative still run non-deterministically with just a warning. over many epochs on a real dataset that variance can compound.a few practical takeaways before assuming the gap is a tuning bug:
- your trial weights at
runs/detect/tune/weights/best.ptalready validate to 0.585, so the trial result is real and reusable - if you need exactly that performance for deployment, use that checkpoint directly. - the recommended way to reuse tuned hyperparameters in a fresh train run is
cfg="runs/detect/tune/best_hyperparameters.yaml"(the commented-out line in your script). that file contains the exact values the trial used and matches the workflow described in the hyperparameter tuning guide. - to bound run-to-run variance, retrain a few times with
seed=0,seed=1,seed=2and compare the mean against the tune's reported best, not a single retrain.
unrelated, you are on ultralytics 8.4.26 and the current release is 8.4.53; for new tuning runs it is worth updating.
- your trial weights at
 User
Hi, I have a question about Hyperparameter Tuning. What value of
epochsanditerationsshould I pass to model.tune(). Default value of epochs is 100, and iterations is 10. Are the default values OK, or should I change them ? My dataset is about 10,000 images.- Glenn JocherUltralytics
For a 10k-image dataset, the defaults are fine for a quick sanity check, but for useful tuning you should set
epochsclose to your real training length becauseepochsis per trial, whileiterationsis how many different trials are tested; a practical starting point isepochs=50to100withiterations=30to100depending on your compute budget, then retrain once with the best settings frombest_hyperparameters.yamlas shown in the Hyperparameter Tuning guide.1 - User
Thank you very much ! I will try to search the best hyperparameters !
- Glenn JocherUltralytics
You're welcome — sounds good; if anything looks off during tuning, please share your
model.tune()call plus the resultingbest_hyperparameters.yamlortune_results.ndjsonhere, and we can help compare it against the expected outputs in the Hyperparameter Tuning guide.
harunemrekiran61
You’ve shown the box range as 0.02 to 0.2, but the default value appears to be 7.5. Is there a mistake here? Could you please check?
- Glenn JocherUltralytics
Good catch —
boxis a loss gain (default7.5during training), so the0.02–0.2range shown in the docs table is outdated/incorrect; the current built-in tuner boundsboxto1.0–20.0(see the Tuner class reference), and you can always override it viaspace={...}as shown in the Hyperparameter Tuning guide.
Larry-zhai
How can I directly apply the optimized best_hyperparameters.yaml to my training? In fact, when I use code similar to the following: from ultralytics import YOLO model = YOLO("yolov8n.pt") model.train(data="data.yaml", hyp="hyp.yaml") an error occurs: SyntaxError: 'hyp' is not a valid YOLO argument.
 J.Q. Pan
Hi I have used the above code to apply the tuning but neither the diagram nor the models will be saved. I only get a single tune folder with all tuning details. I may ask if someone else has also the same problem.
BrianNieuwenhuis
When running the code below the model.tune() call does not recognize my model specification. Could someone explain to me what I am doing wrong. I am using model.overrides so that I can also tune the shear and perspective parameters that are otherwise initialized at 0.
from ultralytics import YOLO import wandb from ultralytics import settings settings.update({"wandb": True})
import argparse
def main(): # parse command-line args if needed parser = argparse.ArgumentParser() parser.add_argument("--gpus", type=int, default=1) parser.add_argument("--workers", type=int, default=4) args = parser.parse_args()
# Define a YOLO model
model = YOLO("yolo11x.pt")

# Dynamically assign GPUs based on --gpus argument
device = list(range(args.gpus))  # e.g., [0, 1, 2, 3] if args.gpus = 4

# Define search space
search_space = {
    "lr0": (1e-5, 1e-1),
    "lrf": (0.01, 1.0),
    "momentum": (0.6, 0.98),
    "weight_decay": (0.0, 0.001),
    "warmup_epochs": (0, 5),
    "warmup_momentum": (0.0,0.95),
    "box": (0.02, 0.2),
    "cls": (0.2, 4.0),
    "hsv_h": (0.0, 0.1),
    "hsv_s": (0.0, 0.9),
    "hsv_v": (0.0, 0.9),
    "translate":(0.0, 0.9),
    "scale": (0.0, 0.9),
    "shear": (0.0, 10.0),
    "perspective": (0.0, 0.001),
    "mosaic": (0.0,1.0),
    "mixup": (0.0, 1.0),
    "copy_paste": (0.0, 1.0)
}

# Manually initialize certain hperparameters that would not be tuned otherwise
model.overrides = {
    'shear': 1,
    'perspective': 0.001,
    'mixup': 0.01,
    'copy_paste' : 0.01,

}

# tune the model
results = model.tune(project='./tune/crop1344',name="tune_default_batch16_v100", use_ray = False,
    data="data.yaml",
    #hyp="custom_hyp.yaml", # this does not seem to work work for tune scripts!!
    batch = 16,
    imgsz = 1344,
    device = device,
    workers = args.workers,

    degrees = 180, #these parameters are fixed in the model tune
    flipud = 0.5,
    fliplr = 0.5,
    bgr = 0,
    auto_augment = None,
    #erasing = 0,

    epochs = 100,
    iterations=10,
    space=search_space,
    optimizer="AdamW",
    resume=False,  #start over or resume previous checkpoint
    plots=False,  # don't make plots etc to save time until last timepoint
    save=False,
    val=False,
    verbose=False)
if name == "main": main()
yyagmurkyaa
Hello again, I have trained new models using the parameters you provided and by organizing my datasets. However, a common issue across all of them is that the models mistakenly classify objects like myself or nearby computer screens as the traffic sign "turn right ahead" (which is one of the labeled classes in my dataset). I have checked my dataset and confirmed that there are no such unrelated objects in the background.
Additionally, the models sometimes confuse left and right directional signs.
Why might these errors be occurring, and how can I fix them? Thank you in advance for your help.
- Glenn JocherUltralytics(editado)
@Fatima-khanjar to balance precision and recall in your over-predicting model, try these adjustments:
- Increase confidence threshold during inference (not training) to filter out low-confidence predictions
- Adjust IoU threshold in NMS to reduce duplicate detections
- Increase classification loss weight with
cls=1.0or higher to improve class discrimination - Check annotation quality in your dataset, especially for small or ambiguous objects
- Add hard negative examples to your dataset - images with objects similar to your classes but not actually part of them
These changes should help improve precision without significantly sacrificing your excellent recall. For implementation details, see our NMS documentation for confidence thresholding examples.
@yyagmurkyaa for your traffic sign confusion issues:
-
For the model detecting unrelated objects as "turn right ahead" signs:
- Add "hard negative" examples to your training set (images with computers, people, but no traffic signs)
- Increase
cls=1.0or higher to improve classification accuracy - Check if the "turn right ahead" sign has visual similarities to these false positives
-
For left/right confusion:
- Create specific augmentations for directional signs without flipping (as you noted)
- Ensure balanced examples of both directional types
- Consider using a slightly larger model like YOLO26m for better feature discrimination
These targeted adjustments should help address the specific confusion patterns you're seeing.
Fatima-khanjar
Hello again!!
First of all, thank you so much for your help @glenn-jocher __ you've truly helped me a lot, and I really appreciate it!
I have a question regarding fine-tuning a pre-trained YOLO model (e.g., trained on the COCO dataset) for my custom use case. My dataset includes a combination of both new classes (not present in COCO) and some of the existing COCO classes , but with different layouts or contexts.
What I’d like to do is the following:
Add my new classes starting from index 80, while still leveraging the pre-trained weights for the existing COCO classes.
Ideally, I want to preserve the learned knowledge for the COCO classes (especially the ones shared with my dataset), and only train the model further on the new classes.
Is it possible to:
Fine-tune the model in such a way that it uses the pre-trained weights for the common classes, and only learns new classes from scratch starting from a different index?
Retain and benefit from the original COCO knowledge while introducing and training on new class definitions?
Also, I’ve noticed that when I fine-tune a pre-trained model and define my own data.yaml file — completely different from coco.yaml — I redefine the class names and indexes based on my custom dataset, completely removing the COCO classes not present in my data. In this case, what really happens during fine-tuning or transfer learning under the hood? Is the model discarding unused class weights? Are shared class weights still used effectively?
I'd greatly appreciate any clarification or guidance on how to approach this setup properly.
Best regards,
- Glenn JocherUltralytics
@Fatima-khanjar great question about fine-tuning with mixed COCO and custom classes!
Yes, you can leverage pre-trained COCO weights while adding new classes. Here's how:
-
When fine-tuning a YOLO model, the model's detection head is automatically resized to accommodate your new class count. The weights for existing classes are preserved where possible.
-
For classes that overlap with COCO, the model will leverage transfer learning from those pre-trained weights, while new classes will be initialized with random weights.
-
You don't need to explicitly start from index 80 - just define your classes in your data.yaml file, and the model will handle the mapping automatically.
-
During fine-tuning, the model doesn't discard unused class weights but rather reshapes the classification head to match your class count. Weights for classes that exist in both datasets are transferred and further optimized for your specific data.
For best results with mixed classes, I recommend using a smaller learning rate initially (e.g.,
lr0=0.001) to preserve the knowledge in the pre-trained weights while allowing the model to adapt to your new classes. -
Hello! @glenn-jocher thank you so much for your explanation!
I have a follow-up question regarding class index matching. Let's say the person class in the COCO dataset is indexed as 0, but in my data.yaml file, I assign person to index 5. In this case, the model will not treat the person at index 5 as the same class as COCO’s index 0, correct?
So, to benefit from the pretrained weights of shared classes, do the class indices in my custom dataset need to match the COCO indices exactly?
Best regards,
- Glenn JocherUltralytics(editado)
@Fatima-khanjar you're asking a crucial question about class mapping during transfer learning!
You no longer need to keep COCO's class indices. With
cls_remap=True(the default), training copies the pretrained classification-head rows by class name, so a class such aspersonkeeps its pretrained weights at whatever index it has in your dataset, while new classes such astraffic_signstart from fresh weights. Training printsRemapped N/M cls head rows from pretrained weights by class namewhen rows are copied, andcls_remap=Falsedisables it. For example, thisdata.yamlworks:names: 0: person 1: car 2: traffic_signJust make sure the shared classes use the same names as in COCO. See the Fine-Tuning Guide for details.
@glenn-jocher Hello again!!!
Thank you so much for your clarification! I have a quick follow-up question.
Let’s say the COCO dataset defines the following class indices in its YAML file: 0: person, 2: car, 3: cat.
In my own dataset, I share only the person and car classes with COCO — I don’t want to include cat. If I define my shared classes using the same indices as COCO (i.e., 0: person, 2: car), but then replace the COCO class cat at index 3 with a new class (e.g., 3: animal), will I still benefit from the pretrained weights for the shared classes (person and car)?
Or will assigning a new class at an index previously used by COCO (like 3) cause any issues?
best regards,
- Glenn JocherUltralytics(editado)
@Fatima-khanjar great question about reusing COCO indices for new classes!
With
cls_remap=True(the default), pretrained classification-head rows are matched by class name, not by index. Shared classes such aspersonandcarkeep their pretrained weights wherever they sit in your dataset. A new class like "animal" at index 3 does not inherit the pretrained "cat" row, because the names do not match, so it starts from fresh weights. Reusing a COCO index therefore neither helps nor hurts the shared classes.If a new class is close to a pretrained one, give it that class's name so its row is copied. Using a lower learning rate initially (e.g.,
lr0=0.001) also helps preserve the pretrained features while the model adapts to your new classes.1
Thank you for your feedback. I trained my dataset using YOLOv11s. Although I didn’t experience severe overfitting with the current parameters, I couldn’t achieve optimal performance either. Some traffic signs were misclassified or not detected at all.
While searching for the best hyperparameters, I realized that I hadn't applied data augmentation—except for the flip parameter. I have an example parameter file, and I plan to include all relevant augmentation options except for flipping.
I would really appreciate your help in finding the most suitable parameters for my dataset, as I’m planning to participate in a competition soon. I need to enhance my model by adjusting the parameters properly to achieve the best possible performance.
Thank you in advance for your support.
On Sun, Apr 20, 2025 at 1:51 PM phatima khanjar @.***> wrote:
Hello,
I hope this message finds you well.
image.png (view on web) https://github.com/user-attachments/assets/be6db84b-fe0d-4356-ba77-9b4426c253ee
I fine-tuned YOLOv11s on my custom dataset, which is relatively small (1,156 images split into 75% training, 15% validation, and 10% test). The dataset consists of 41 classes, with each class containing between 200 and 300 images. I experimented with three different sets of hyperparameters: the default values, those optimized using Ray Tune, and others obtained through a Genetic Algorithm. In all cases, I observed oscillations in the validation dfl and box losses, which may indicate signs of overfitting. I would appreciate any suggestions or insights on how to address this issue, particularly given the small size of the dataset, and how to improve model generalization.
best regards,
— Reply to this email directly, view it on GitHub https://github.com/orgs/ultralytics/discussions/9536#discussioncomment-12889695, or unsubscribe https://github.com/notifications/unsubscribe-auth/BPQ7ZLAQ2G7ZL434FN3WFYD22N345AVCNFSM6AAAAABFVXPSL2VHI2DSMVQWIX3LMV43URDJONRXK43TNFXW4Q3PNVWWK3TUHMYTEOBYHE3DSNI . You are receiving this because you were mentioned.Message ID: @.*** com>
- Glenn JocherUltralytics(editado)
@yyagmurkyaa for traffic sign detection and classification with YOLO26s, I recommend focusing on these specific augmentation and training parameters:
from ultralytics import YOLO

model = YOLO("yolo26s.pt")
model.train(
    data="your_traffic_signs.yaml",
    epochs=100,
    patience=25,
    batch=16,
    imgsz=640,  # Consider 800+ for small traffic signs
    hsv_h=0.015,  # Color augmentation helps with varying lighting conditions
    hsv_s=0.7,
    hsv_v=0.4,
    scale=0.5,  # Scale augmentation critical for varying distances
    translate=0.1,  # Helps with signs at different positions
    mosaic=1.0,  # Excellent for object detection tasks
    mixup=0.1,  # Light mixup can help with generalization
    perspective=0.0005,  # Slight perspective change for different viewing angles
    weight_decay=0.0005,  # Regularization to reduce overfitting
    optimizer="AdamW",
    lr0=0.001,
    lrf=0.01,
    cos_lr=True  # Cosine learning rate scheduler
)
For traffic sign detection specifically:
- Increase image size to better detect small signs
- Focus on color-preserving augmentations as colors are critical for traffic signs
- Use perspective transformations to simulate different viewing angles
- Enable strong scale/translate augmentations to handle varying distances
Consider running
model.tune()with these parameters as starting points to find the optimal configuration for your competition. You might also need to address class imbalance if some signs appear less frequently in your dataset. You're very welcome! I wasn't expecting such a quick response either. I'm excited to hear that you'll be training with these parameters and look forward to seeing the results as soon as possible. Thank you again for your support!
- Glenn JocherUltralytics(editado)
@Fatima-khanjar for a small dataset (1,156 images) with 41 classes, oscillations in validation losses often indicate overfitting. Here are specific recommendations to improve generalization:
-
Strengthen regularization:
- Increase
weight_decayto 0.001-0.003 - Add dropout with
dropout=0.1to reduce co-adaptation
- Increase
-
Enhance data augmentation:
- Maximize augmentations:
mosaic=1.0,mixup=0.2,copy_paste=0.1 - Use strong geometric transforms:
translate=0.2,scale=0.5
- Maximize augmentations:
-
Training modifications:
- Reduce model complexity by using YOLO26n instead of YOLO26s
- Implement gradual unfreezing (
freezelayers at first) - Enable
cos_lr=Truefor smoother learning rate decay
-
Consider transfer learning modifications:
- Start with a model pre-trained on a domain similar to yours
- Use fewer epochs with higher
patiencefor early stopping
With 41 classes and limited samples per class, these techniques should help stabilize training and improve generalization. You might also benefit from training ensembles of multiple models if computational resources allow. For more details, refer to our Model Training Tips.
-
Hello,
Thank you for your advice! Your instructions have improved my model’s performance compared to before. I have now achieved the following metrics:
Mean Precision: 0.794 Mean Recall: 0.99 Mean F1 Score: 0.881 mAP@0.5: 0.938 mAP@0.5-0.95: 0.827
After analyzing these results, it seems that the model is over-predicting. Do you have any suggestions on how I can better balance precision and recall?
best regards,
Hello,
I hope this message finds you well.
I fine-tuned YOLOv11s on my custom dataset, which is relatively small (1,156 images split into 75% training, 15% validation, and 10% test). The dataset consists of 41 classes, with each class containing between 200 and 300 images. I experimented with three different sets of hyperparameters: the default values, those optimized using Ray Tune, and others obtained through a Genetic Algorithm. In all cases, I observed oscillations in the validation dfl and box losses, which may indicate signs of overfitting. I would appreciate any suggestions or insights on how to address this issue, particularly given the small size of the dataset, and how to improve model generalization.
best regards,
Hello, I am training a model using YOLOv11, and the dataset consists of traffic signs. There are 22 classes, and each class has 400 labeled images. I’m not sure what parameters I should use for training. What parameters should I set to prevent overfitting, and what are the correct values? Could you help me with this?
- Glenn JocherUltralytics(editado)
@yyagmurkyaa your dataset of 22 classes with 400 images per class should provide a good foundation for traffic sign detection. To prevent overfitting with YOLO26, I'd recommend:
- Start with hyperparameter tuning using the
model.tune()method to find optimal values:
from ultralytics import YOLO model = YOLO("yolo26n.pt") # Start with a smaller model for faster tuning model.tune( data="your_traffic_signs.yaml", epochs=30, iterations=100, weight_decay=0.0005, # Try higher values like 0.001-0.005 to increase regularization patience=15, # Early stopping val=True )-
Key hyperparameters to prevent overfitting:
- Increase
weight_decay(0.001-0.005) - Enable strong data augmentation (
hsv_h,hsv_s,translate,scale,fliplr,mosaic) - Use early stopping with reasonable
patience - Consider reducing model capacity (use n or s model variants)
- Increase
-
Monitor validation metrics to detect overfitting (when training accuracy continues improving but validation metrics plateau or decline)
The automated tuning process should help identify the optimal parameter values for your specific dataset. For more details, check out our Hyperparameter Tuning Guide.
- Start with hyperparameter tuning using the
Thank you for your feedback. I trained my dataset using YOLOv11s. Although I didn’t experience severe overfitting with the current parameters, I couldn’t achieve optimal performance either. Some traffic signs were misclassified or not detected at all.
While searching for the best hyperparameters, I realized that I hadn't applied data augmentation—except for the flip parameter. I have an example parameter file, and I plan to include all relevant augmentation options except for flipping.
I would really appreciate your help in finding the most suitable parameters for my dataset, as I’m planning to participate in a competition soon. I need to enhance my model by adjusting the parameters properly to achieve the best possible performance.
Thank you in advance for your support.