YOLOv9: un gran avance en la tecnología de detección de objetos
YOLOv9 impulsó la detección de objetos en tiempo real al introducir la información de gradiente programable (PGI) y la red generalizada de agregación eficiente de capas (GELAN). En el momento de su lanzamiento, mejoró la eficiencia y la precisión de los detectores anteriores en tiempo real en el conjunto de datos MS COCO. El proyecto YOLOv9 fue desarrollado por un equipo independiente de código abierto y se basa en el código de Ultralytics YOLOv5.
Ver: Entrenamiento de YOLOv9 con datos personalizados mediante Ultralytics | Conjunto de datos de paquetes industriales
Introducción a YOLOv9#
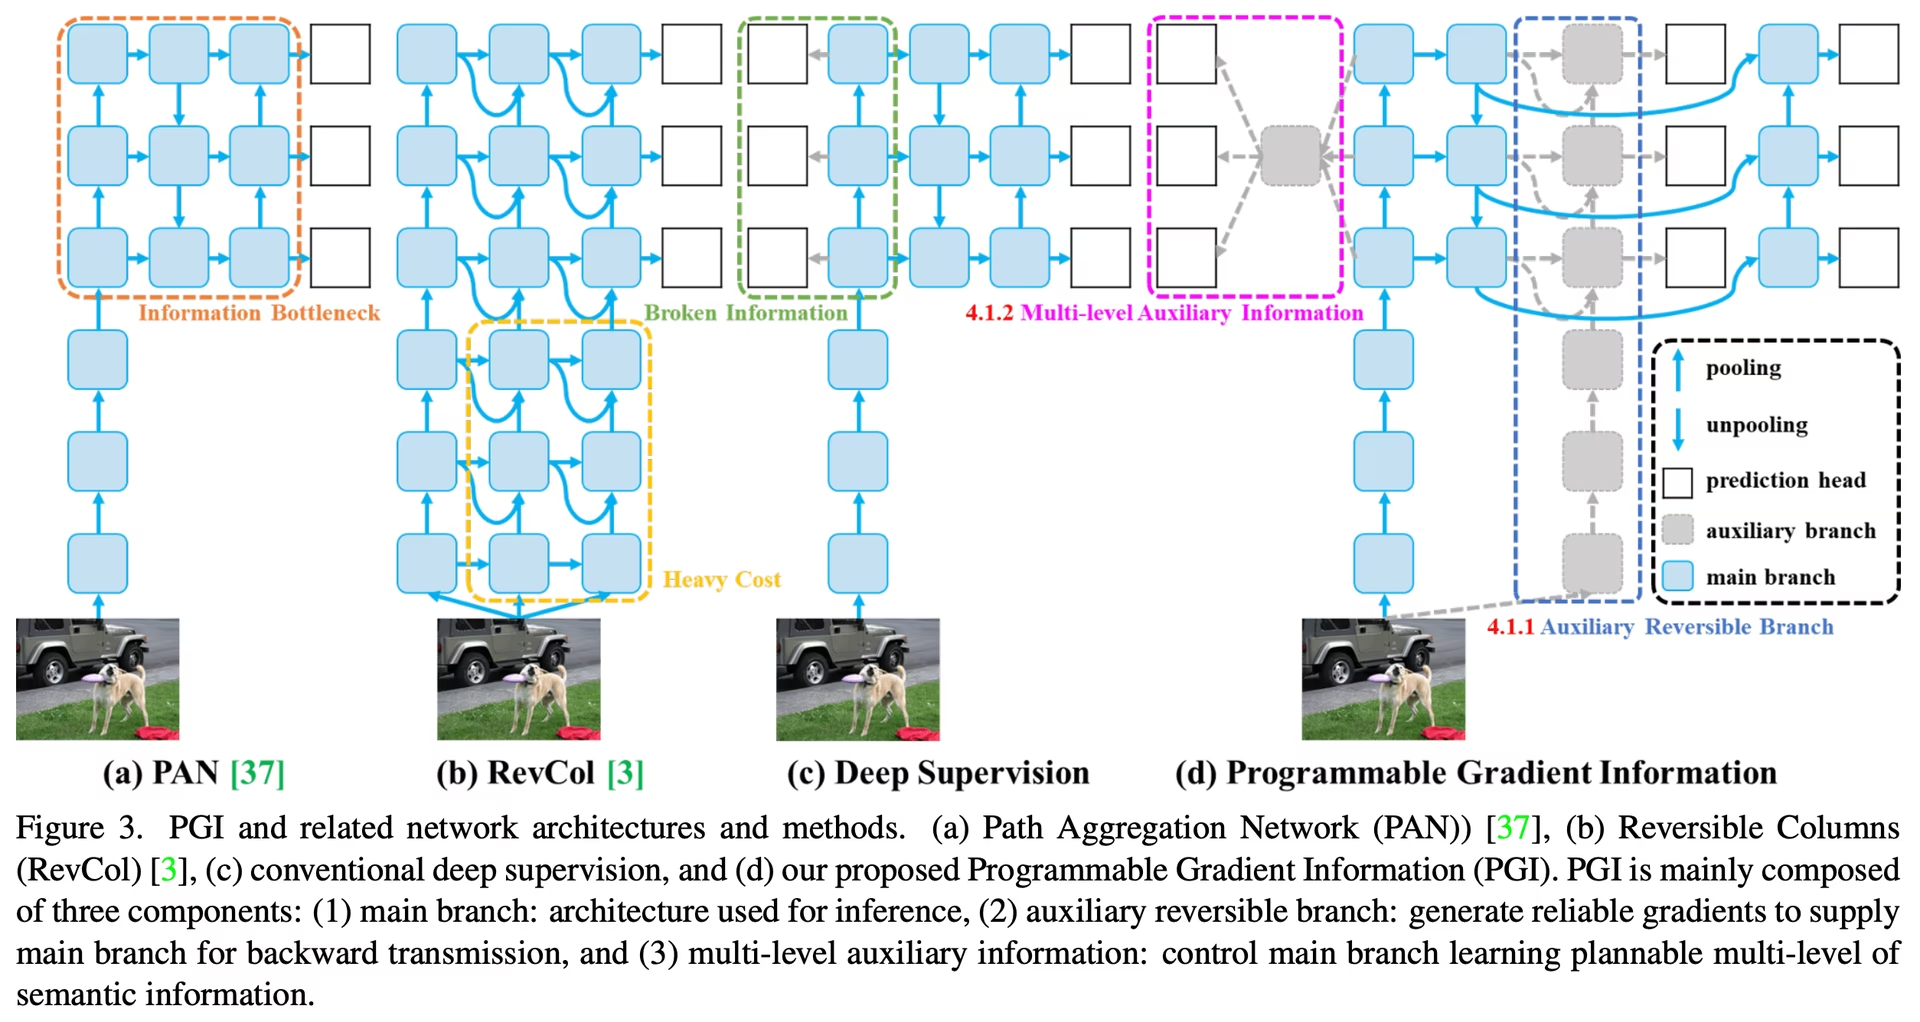
YOLOv9 aborda la pérdida de información inherente a las redes neuronales profundas. Al integrar PGI y la arquitectura GELAN, YOLOv9 aumenta la capacidad de aprendizaje del modelo y conserva información crucial durante el proceso de detección, lo que mejora tanto la precisión como la eficiencia.
Innovaciones principales de YOLOv9#
El diseño de YOLOv9 aborda la pérdida de información en las redes neuronales profundas. El principio del cuello de botella de información y el uso de funciones reversibles son fundamentales en su diseño y ayudan a YOLOv9 a mantener una alta eficiencia y precisión.
Principio del cuello de botella de información#
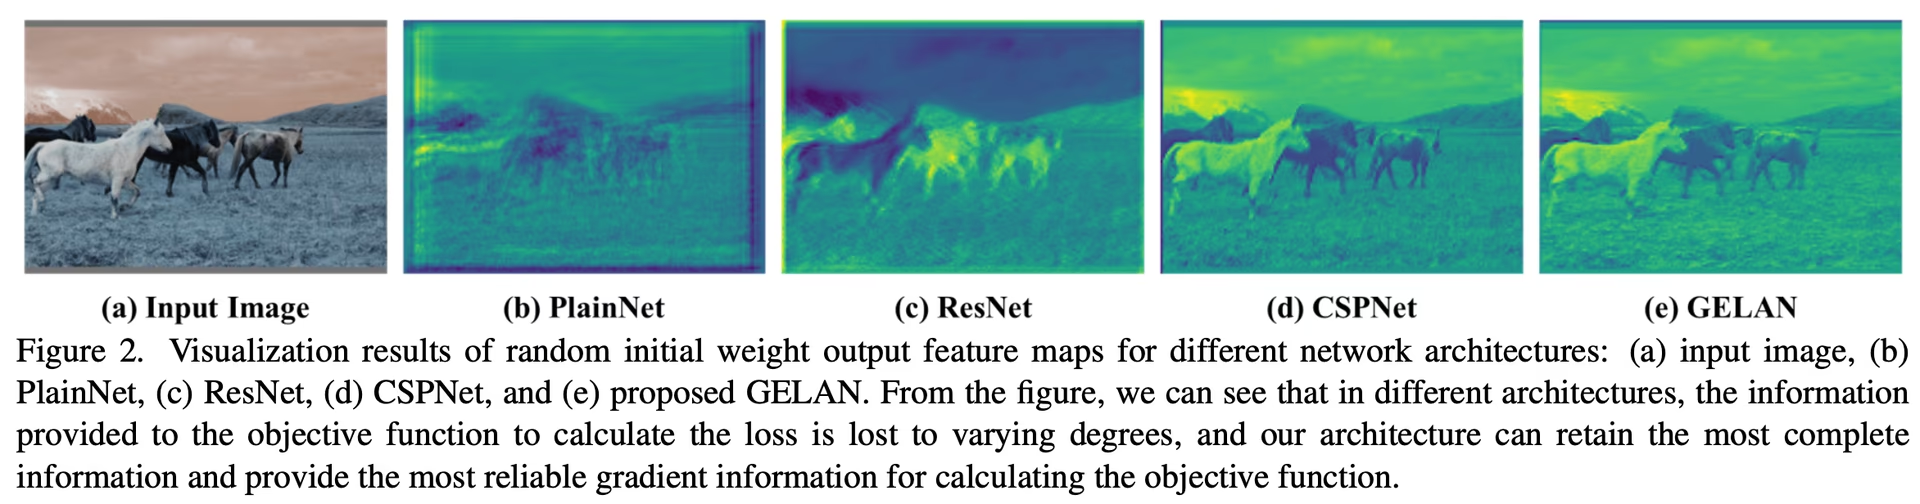
El principio del cuello de botella de información pone de manifiesto un reto fundamental del aprendizaje profundo: a medida que los datos pasan por las sucesivas capas de una red, aumenta la posibilidad de que se pierda información. Este fenómeno se representa matemáticamente así:
I(X, X) >= I(X, f_theta(X)) >= I(X, g_phi(f_theta(X)))donde I representa la información mutua, y f y g representan funciones de transformación con los parámetros theta y phi, respectivamente. YOLOv9 contrarresta este problema mediante la información de gradiente programable (PGI), que ayuda a conservar los datos esenciales a lo largo de la profundidad de la red, garantiza una generación de gradientes más fiable y, por consiguiente, mejora la convergencia y el rendimiento del modelo.
Funciones reversibles#
El concepto de funciones reversibles es otro de los pilares del diseño de YOLOv9. Una función se considera reversible si puede invertirse sin perder información, tal como se expresa a continuación:
X = v_zeta(r_psi(X))con psi y zeta como parámetros de la función reversible y de su inversa, respectivamente. Esta propiedad es crucial para las arquitecturas de aprendizaje profundo, ya que permite que la red mantenga un flujo de información completo y, por tanto, actualice los parámetros del modelo con mayor precisión. YOLOv9 incorpora funciones reversibles en su arquitectura para mitigar el riesgo de degradación de la información, especialmente en las capas más profundas, y garantizar la conservación de datos fundamentales para las tareas de detección de objetos.
Impacto en los modelos ligeros#
Abordar la pérdida de información es especialmente importante en los modelos ligeros, que suelen tener pocos parámetros y son propensos a perder información significativa durante el proceso de propagación hacia delante. Gracias al uso de PGI y funciones reversibles, la arquitectura de YOLOv9 garantiza que se conserve y aproveche eficazmente la información esencial para detectar objetos con precisión, incluso en un modelo simplificado.
Información de gradiente programable (PGI)#
PGI es un concepto novedoso que YOLOv9 introduce para combatir el problema del cuello de botella de información y garantizar la conservación de datos esenciales en las capas profundas de la red. Esto permite generar gradientes fiables, facilita actualizaciones precisas del modelo y mejora el rendimiento general de detección.
Red de agregación eficiente de capas generalizada (GELAN)#
GELAN es una arquitectura que mejora el aprovechamiento de parámetros y la eficiencia computacional de YOLOv9. Su diseño permite integrar de forma flexible diversos bloques computacionales, lo que hace que YOLOv9 se adapte a una amplia gama de aplicaciones sin sacrificar velocidad ni precisión.
Pruebas de rendimiento de YOLOv9#
Evaluar YOLOv9 con el modo Benchmark de Ultralytics implica medir el rendimiento de tu modelo entrenado y validado en situaciones reales. Este proceso incluye:
- Evaluación del rendimiento: Evaluar la velocidad y la precisión del modelo.
- Formatos de exportación: Probar el modelo con distintos formatos de exportación para garantizar que cumple los estándares necesarios y funciona bien en diversos entornos.
- Compatibilidad con el framework: realizar estas evaluaciones dentro del paquete Ultralytics para obtener resultados coherentes y fiables.
Las pruebas de rendimiento te permiten asegurarte de que tu modelo no solo funciona bien en entornos de prueba controlados, sino que también mantiene un alto rendimiento en aplicaciones prácticas del mundo real.
Ver: Cómo comparar el rendimiento del modelo YOLOv9 con el paquete Ultralytics Python
Rendimiento en el conjunto de datos MS COCO#
En el momento de su lanzamiento, YOLOv9 estableció nuevas marcas en el conjunto de datos COCO en distintos tamaños de modelo. La tabla siguiente recoge la precisión, los parámetros y los FLOPs de cada modelo YOLOv9 disponible en Ultralytics.
Las variantes de YOLOv9, desde el modelo diminuto t hasta el modelo grande e, mejoran la precisión (mAP) y mantienen o reducen el número de parámetros y los cálculos (FLOPs) en comparación con las versiones anteriores y los modelos de la competencia.
En comparación con otros detectores en tiempo real, YOLOv9 ofrece las siguientes mejoras:
- Modelos ligeros: YOLOv9s supera a YOLO MS-S en eficiencia de parámetros y carga computacional, y mejora el AP en un 0,4∼0,6 %.
- Modelos medianos y grandes: YOLOv9m y YOLOv9e mejoran el equilibrio entre la complejidad del modelo y el rendimiento de detección, reducen los parámetros y los cálculos, y aumentan la precisión.
El modelo YOLOv9c funciona con un 42 % menos de parámetros y un 21 % menos de cálculos que YOLOv7 AF, y alcanza una precisión comparable. El modelo YOLOv9e utiliza un 15 % menos de parámetros y un 25 % menos de cálculos que YOLOv8x, y mejora el AP en un 1,7 %.
Estos resultados muestran que YOLOv9 mejoró la eficiencia computacional sin renunciar a la precisión necesaria para la detección de objetos en tiempo real y otras tareas de visión artificial.
Conclusión#
YOLOv9, lanzado en febrero de 2024, mejoró la eficiencia y la precisión de la detección de objetos en tiempo real. Al abordar la pérdida de información con PGI y GELAN, YOLOv9 estableció nuevos referentes en el momento de su lanzamiento. Desde entonces, modelos más recientes como YOLO26 y YOLO11 han incorporado nuevas mejoras, pero las innovaciones arquitectónicas de YOLOv9 siguen influyendo en el sector.
Ejemplos de uso#
Este ejemplo ofrece ejemplos sencillos de entrenamiento e inferencia con YOLOv9.
Se pueden pasar modelos *.pt preentrenados de PyTorch, así como archivos de configuración *.yaml, a la clase YOLO() para crear una instancia del modelo en Python:
from ultralytics import YOLO

# Crea un modelo YOLOv9c desde cero
model = YOLO("yolov9c.yaml")

# Crea un modelo YOLOv9c a partir de pesos preentrenados
model = YOLO("yolov9c.pt")

# Mostrar información del modelo (opcional)
model.info()

# Entrena el modelo durante 100 épocas con el conjunto de datos de ejemplo COCO8
results = model.train(data="coco8.yaml", epochs=100, imgsz=640)

# Ejecuta una inferencia con el modelo YOLOv9c en la imagen 'bus.jpg'
results = model("path/to/bus.jpg")
Tareas y modos compatibles#
La serie YOLOv9 ofrece diversos modelos para la detección de objetos y la segmentación de instancias, que cubren distintos presupuestos computacionales y requisitos de precisión.
| Modelo | Nombres de archivo | Tareas | Entrenamiento | Validación | Inferencia | Exportar |
|---|---|---|---|---|---|---|
| YOLOv9 | yolov9t.pt yolov9s.pt yolov9m.pt yolov9c.pt yolov9e.pt | Detección de objetos | ✅ | ✅ | ✅ | ✅ |
| YOLOv9-seg | yolov9c-seg.pt yolov9e-seg.pt | Segmentación de instancias | ✅ | ✅ | ✅ | ✅ |
Esta tabla resume las variantes del modelo YOLOv9 y su compatibilidad con los modos de entrenamiento, validación, inferencia y exportación.
Entrenar modelos YOLOv9 requiere más recursos y lleva más tiempo que entrenar un modelo YOLOv8 de tamaño equivalente.
Citas y agradecimientos#
Queremos reconocer las importantes contribuciones de los autores de YOLOv9 al campo de la detección de objetos en tiempo real:
@inproceedings{wang2024yolov9,
  title={YOLOv9: Learning What You Want to Learn Using Programmable Gradient Information},
  author={Wang, Chien-Yao and Yeh, I-Hau and Liao, Hong-Yuan Mark},
  booktitle={Computer Vision -- ECCV 2024},
  pages={1--21},
  year={2024},
  organization={Springer Nature Switzerland}
}
El artículo oficial de YOLOv9 se publicó en las actas de Springer ECCV 2024, y su prepublicación está disponible en arXiv. Los autores han publicado su trabajo y el código fuente puede consultarse en GitHub. Agradecemos sus esfuerzos por impulsar este campo y poner su trabajo al alcance de toda la comunidad.
Preguntas frecuentes#
YOLOv9 introduce dos técnicas principales: la información de gradiente programable (PGI) y la red de agregación de capas eficiente generalizada (GELAN). Estas innovaciones abordan los problemas de pérdida de información en redes neuronales profundas y garantizan una gran eficiencia, precisión y adaptabilidad. PGI conserva los datos esenciales en las distintas capas de la red, mientras que GELAN optimiza el uso de parámetros y la eficiencia computacional.
En el momento de su lanzamiento, YOLOv9 superaba a otros detectores de objetos de vanguardia en tiempo real en precisión y eficiencia. En el conjunto de datos COCO, los modelos YOLOv9 consiguen puntuaciones mAP más altas con distintos tamaños, a la vez que mantienen o reducen la sobrecarga computacional. Por ejemplo, YOLOv9c consigue una precisión comparable con un 42 % menos de parámetros y un 21 % menos de demanda computacional que YOLOv7 AF.
Puedes entrenar un modelo YOLOv9 tanto con Python como con comandos de la CLI. En Python, crea una instancia del modelo con la clase
YOLOy llama al métodotrain:from ultralytics import YOLO # Crea un modelo YOLOv9c a partir de pesos preentrenados y entrénalo model = YOLO("yolov9c.pt") results = model.train(data="coco8.yaml", epochs=100, imgsz=640)Para entrenarlo con la CLI, ejecuta:
yolo train model=yolov9c.yaml data=coco8.yaml epochs=100 imgsz=640Descubre más ejemplos de uso para el entrenamiento y la inferencia.
YOLOv9 está diseñado para mitigar la pérdida de información, algo especialmente importante en los modelos ligeros, que suelen perder información significativa. Al integrar información de gradiente programable (PGI) y funciones reversibles, YOLOv9 garantiza la conservación de los datos esenciales y mejora la precisión y la eficiencia del modelo. Esto lo hace idóneo para aplicaciones que requieren modelos compactos de alto rendimiento. Para obtener más información, consulta la sección sobre el impacto de YOLOv9 en los modelos ligeros.
YOLOv9 admite la detección de objetos y la segmentación de instancias en los modos de entrenamiento, validación, inferencia y exportación.


Comentarios482
Haz una pregunta, comparte tus resultados o ayuda a otra persona.
vuvanhieu
to load a YOLOv5 model def load_yolov5_model(yolo_model_path): device = torch.device('cuda' if torch.cuda.is_available() else 'cpu') model = torch.hub.load('ultralytics/yolov5', 'custom', path=yolo_model_path, force_reload=True).to(device) return model
How in yolov8, yolov9?
1 Paula DerrengerUltralytics
To load a YOLOv8 or YOLOv9 model, you can use the
YOLOclass from the Ultralytics package. Here's a concise way to do it:from ultralytics import YOLO # Load a YOLOv8 model model_v8 = YOLO("yolov8n.pt") # Load a YOLOv9 model model_v9 = YOLO("yolov9c.pt")For more details, you can refer to the YOLOv9 documentation: https://docs.ultralytics.com/models/yolov9/.
MoAbbasid
@glenn-jocher @pderrenger any idea of when the lightweight models can be used in ultralytics?
1 Glenn JocherUltralytics(editado)
Hi there! 😊
Lightweight models are available in Ultralytics. YOLOv9 ships
yolov9t.pt,yolov9s.ptandyolov9m.ptalongsideyolov9c.ptandyolov9e.pt. For new projects we recommend YOLO26, whose smallest modelyolo26n.ptis built for efficiency.To try a lightweight model:
yolo train model=yolo26n.pt data=coco128.yaml epochs=100If you're tinkering with custom lightweight designs, copy an existing model YAML from the Ultralytics repo and adjust its layers or scales. Contributions or insights are welcome.
Happy detecting!
deepanalyticszlc
Very exciting! Is there a schedule for release of lightweight models?
1- Paula DerrengerUltralytics(editado)
@deepanalyticszlc hey there! 😊
Lightweight YOLOv9 models are now available:
yolov9t.pt,yolov9s.ptandyolov9m.pt, alongsideyolov9c.ptandyolov9e.pt. For the latest releases, see the Ultralytics GitHub releases.Here's a little snippet on how to load and use YOLOv9 for predictions:
from ultralytics import YOLO

# Load YOLOv9 model
model = YOLO('yolov9t.pt')  # Replace 'yolov9t.pt' with your model file

# Run inference on an image
results = model('path/to/your/image.jpg')

# Display results
results[0].show()
For new projects, we recommend YOLO26, which also comes in small sizes like
yolo26n.pt. ⏰
DolapoSalim(editado)
@glenn-jocher Kindly assist with this TypeError: TypeError: ERROR C:\path_to_custom_model/yolov9c.pt appears to be an Ultralytics YOLOv5 model originally trained with https://github.com/ultralytics/yolov5. This model is NOT forwards compatible with YOLOv8 at https://github.com/ultralytics/ultralytics. Recommend fixes are to train a new model using the latest 'ultralytics' package or to run a command with an official Ultralytics model, i.e. 'yolo predict model=yolo11n.pt'
Here is my code:
from ultralytics import YOLO

model = YOLO(path_to_YOLOV9.pt )

results = model.predict(source="IMAGE_SOURCE", show=True, conf=0.10)
Note, I am actually working with a custom trained YOLOV9
- Glenn JocherUltralytics
@DolapoSalim to resolve the YOLOv5/YOLOv9 compatibility error when using custom-trained models, please ensure you're using the latest
ultralytics>=8.2.0package and retrain your YOLOv9 model using the official YOLOv9 configuration files from our documentation. For custom training guidance, see the YOLOv9 Training section in our docs.This error typically occurs when using older model formats - newer versions maintain full backward compatibility when models are trained with current Ultralytics implementations.
1
gusreic
This article claims that Yolov9 is based on Yolov5. The Yolov9 paper claims that v9 is based on Yolov7 which is also not based on 5. Is there any other way that would explain this claim? Otherwise maybe adjust the article.
- Glenn JocherUltralytics
@gusreic yes that's correct. YOLOv9 repo is a fork of my YOLOv5 repo. I know this because I wrote nearly all the files in the YOLOv9 repo myself. Unfortunately the author has failed to make this clear, though he did include a (hidden) acknowledgement at the bottom of the README.
1 Oh, that is really unfortunate, thank you for clearing it up since it is not directly apparent. Do you think that YOLOv9 is based on YOLOv5 only with respect to the structure of the repository or would you say that the architecture of the model itself is also based on the architecture of YOLOv5?
- Glenn JocherUltralytics
@gusreic thank you for your question! YOLOv9's repository structure is indeed based on Ultralytics YOLOv5, while its architecture introduces novel components like Programmable Gradient Information (PGI) and GELAN as described in the YOLOv9 documentation. The model itself represents an independent advancement building on broader YOLO research. We'll clarify this distinction in our article! 😊
ghost
Hello,
Thanks for the great documentation!
Quick question: Is the code licensed under AGPLv3 (Ultralytics) or GPLv3 (Wang, Chien-Yao and Liao, Hong-Yuan Mark Github)?
Thanks!
- Glenn JocherUltralytics
@ProfessorHT the YOLOv9 project codebase, developed by Wang, Chien-Yao and Liao, Hong-Yuan Mark, is available on GitHub and licensed under GPLv3, while Ultralytics models and software use the AGPL-3.0 license.
Thank you for your quick response. So to be sure if I use Yolov9 from this documentation with the ultralytics library i will be under the AGPLv3 license and i should buy a license?
- Glenn JocherUltralytics
Yes, if you use YOLOv9 models from the Ultralytics library, you are under the AGPL-3.0 license and would need an Enterprise License for commercial use, unless you open-source your entire project under AGPL-3.0.
 liuweiqing
Does it support automatic downloading of pretrained weights?
- Glenn JocherUltralytics
@14790897 yes, YOLOv9 supports automatic downloading of pretrained weights when using the
YOLO()class in Python or CLI commands, as long as the specified weights file (e.g.,yolov9c.pt) is available in the Ultralytics repository. You can find more details in the YOLOv9 documentation.
jane7166
Hello. I have retrained the YOLOv9 model, and I would like to deploy it as an API. How should I proceed?
- Glenn JocherUltralytics
@jane7166 to deploy your retrained YOLOv9 model as an API, you can use frameworks like FastAPI or Flask to build an endpoint and load your model using the Ultralytics Python package. Refer to the YOLOv9 documentation for guidance on inference, which can be integrated into your API logic. Let us know if you have further questions!
Gnoot01
I'm getting the following errors despite latest torch and ultralytics installs. Kindly assist
File "C:\Users\.venv\lib\site-packages\ultralytics\engine\model.py", line 547, in predict self.predictor.setup_model(model=self.model, verbose=is_cli) File "C:\Users\.venv\lib\site-packages\ultralytics\engine\predictor.py", line 303, in setup_model self.model = AutoBackend( File "C:\Users\.venv\lib\site-packages\torch\utils\_contextlib.py", line 116, in decorate_context return func(*args, **kwargs) File "C:\Users\.venv\lib\site-packages\ultralytics\nn\autobackend.py", line 145, in __init__ model = model.fuse(verbose=verbose) TypeError: BaseModel.fuse() got an unexpected keyword argument 'verbose'- Glenn JocherUltralytics
@Gnoot01 it seems like there's a compatibility issue with the
fusemethod. Please ensure you're using the latest version of the Ultralytics package. If the issue persists, consider checking for any updates or changes in the repository that might address this. For further assistance, you can explore the YOLOv9 documentation. @glenn-jocher Hi, I'm using the latest ultralytics 8.3.24 and latest torch. However, still facing this issue. Any suggestions?
- Glenn JocherUltralytics
@Gnoot01 i'm sorry you're experiencing this issue. Please ensure your Ultralytics package is up-to-date. If the problem persists, try reinstalling the package or checking for any recent updates in the repository. For more details, you can refer to the YOLOv9 documentation.
foskyblue
I'm having issues with my Yolov9 model exported to tflite. Model was successfully exported to tflite but I cannot get the right bounding boxes. I'm following the steps listed here: https://stackoverflow.com/questions/76381317/yolov8-tflite-python-predictions-and-interpreting-output (for folov8) to make inference for my yolov9 tflite model.
1Step 1: Resizing and Padding (Letterboxing) Step 2: Non-Maximum Suppression (NMS) Step 3: Rescaling Bounding Boxes
However, when I draw the outputed bounding boxes on my image the boxes don't fit the objects in the image correctly.
The code I'm using can be seen below:
from tflite_runtime.interpreter import Interpreter from PIL import Image import numpy as np from glob import glob from typing import Tuple, List interpreter = None input_shape = (320, 576) # Input tensor dimensions (width, height) in pixels input_index = 0 # Input tensor index (from input details in model signature) output_index = 409 model_path = 'model/saved_model.tflite' def load_model(): interpreter = None interpreter = Interpreter(model_path=model_path, num_threads=2) interpreter.allocate_tensors() input_details = interpreter.get_input_details() global input_shape input_shape = tuple(input_details[0]['shape'][1:3]) global input_index input_index = input_details[0]['index'] output_details = interpreter.get_output_details() global output_index output_index = output_details[0]['index'] return interpreter def letter_box(img: np.ndarray, new_shape: Tuple[int, int]) -> np.ndarray: """ Resizes an image to fit within a new shape while maintaining the aspect ratio, and pads the remaining space with a constant value. Args: img (np.ndarray): The input image as a NumPy array. new_shape (Tuple[int, int]): The desired output shape (height, width). Returns: np.ndarray: The resized and padded image. """ shape = img.shape[:2] # Calculate the scaling ratio to fit the image within the new shape r = min(new_shape[0] / shape[0], new_shape[1] / shape[1]) # Calculate the new unpadded dimensions new_unpad = int(round(shape[1] * r)), int(round(shape[0] * r)) # Calculate the padding required on each side dw, dh = new_shape[1] - new_unpad[0], new_shape[0] - new_unpad[1] dw, dh = dw / 2, dh / 2 # Resize the image if necessary if shape[::-1] != new_unpad: img = Image.fromarray(img).resize(new_unpad, Image.Resampling.BILINEAR) img = np.array(img) # Calculate the top, bottom, left, and right padding values top, bottom = int(round(dh - 0.1)), int(round(dh + 0.1)) left, right = int(round(dw - 0.1)), int(round(dw + 0.1)) # Add padding to the image img = np.pad(img, ((top, bottom), (left, right), (0, 0)), mode='constant', constant_values=114) return img def non_max_suppression( prediction: np.ndarray, conf_thres: float = 0.25, iou_thres: float = 0.45, max_det: int = 300, max_wh: int = 7680, ): """ Perform non-maximum suppression (NMS) on a single image prediction. Args: prediction (np.ndarray): A numpy array of shape (1, num_boxes, num_classes + 4 + num_masks) containing the predicted boxes, classes, and masks. conf_thres (float): Confidence threshold for filtering boxes (0.0 to 1.0). iou_thres (float): IoU threshold for NMS (0.0 to 1.0). max_det (int): Maximum number of boxes to keep after NMS. max_wh (int): Maximum box width and height in pixels. Returns: np.ndarray: Array containing kept boxes with format (x1, y1, x2, y2, confidence, class, mask1, mask2, ...). """ # Input validation (can be removed if you're sure of your input) if 0 > conf_thres > 1: raise ValueError(f"Invalid Confidence threshold {conf_thres}, valid values are between 0.0 and 1.0") if 0 > iou_thres > 1: raise ValueError(f"Invalid IoU {iou_thres}, valid values are between 0.0 and 1.0") # Extract dimensions and metadata directly _, _, dims = prediction.shape nc = dims - 4 - prediction.shape[1] # number of classes nm = dims - nc - 4 # number of masks mi = 4 + nc # mask start index # Process the single image in the batch x = prediction[0] # Extract the single image data # Move class scores to last axis and threshold x = np.transpose(x, (1, 0)) xc = x[..., 4:mi].max(axis=-1) > conf_thres x = x[xc] if not x.shape[0]: # No boxes left after confidence thresholding return np.zeros((0, 6 + nm)) # Convert xywh to xyxy directly on the filtered boxes x[..., :4] = xywh2xyxy(x[..., :4]) # Split and process boxes, classes, and masks # pylint: disable=unbalanced-tuple-unpacking box, cls, mask = np.split(x, (4, mi), 1) conf = cls.max(1) j = cls.argmax(1) x = np.concatenate((box, conf[:, None], j[:, None].astype(float), mask), 1) x = x[conf > conf_thres] n = x.shape[0] if not n: # No boxes left after additional confidence thresholding return np.zeros((0, 6 + nm)) # NMS (simplified since we're dealing with a single image) c = x[:, 5:6] * max_wh boxes, scores = x[:, :4] + c, x[:, 4] i = numpy_nms(boxes, scores, iou_thres) i = i[:max_det] return x[i] def numpy_nms(boxes: np.ndarray, scores: np.ndarray, iou_threshold: float = 0.5) -> np.ndarray: """ Perform Non-Maximum Suppression (NMS) on a set of bounding boxes. Args: boxes (np.ndarray): Array of shape (N, 4) representing N bounding boxes. Each box is [x1, y1, x2, y2]. scores (np.ndarray): Array of shape (N,) representing the confidence scores for each box. iou_threshold (float): IoU threshold for suppressing overlapping boxes. Defaults to 0.5. Returns: np.ndarray: Boolean array of shape (N,) indicating which boxes to keep. """ # Sort boxes by score in descending order order = scores.argsort()[::-1] keep = np.ones(len(boxes), dtype=bool) # Calculate IoU matrix ious = box_iou_batch(boxes, boxes) np.fill_diagonal(ious, 0) # Set self-IoU to 0 for i, idx in enumerate(order): if not keep[idx]: continue # Suppress boxes with IoU > threshold overlap = ious[idx] > iou_threshold keep[order[i + 1:]] &= ~overlap[order[i + 1:]] return keep def box_iou_batch(boxes_a: np.ndarray, boxes_b: np.ndarray) -> np.ndarray: """ Calculate the Intersection over Union (IoU) between two sets of bounding boxes. Args: boxes_a (np.ndarray): Array of shape (N, 4) representing N bounding boxes. boxes_b (np.ndarray): Array of shape (M, 4) representing M bounding boxes. Returns: np.ndarray: Array of shape (N, M) containing IoU values for each pair of boxes. Note: Each bounding box is represented as [x1, y1, x2, y2], where (x1, y1) is the top-left corner and (x2, y2) is the bottom-right corner. """ # Calculate areas of boxes_a area_a = (boxes_a[:, 2] - boxes_a[:, 0]) * (boxes_a[:, 3] - boxes_a[:, 1]) # Calculate areas of boxes_b area_b = (boxes_b[:, 2] - boxes_b[:, 0]) * (boxes_b[:, 3] - boxes_b[:, 1]) # Calculate intersection coordinates top_left = np.maximum(boxes_a[:, None, :2], boxes_b[:, :2]) bottom_right = np.minimum(boxes_a[:, None, 2:], boxes_b[:, 2:]) # Calculate intersection area area_inter = np.prod(np.clip(bottom_right - top_left, a_min=0, a_max=None), 2) # Calculate IoU return area_inter / (area_a[:, None] + area_b - area_inter) def xywh2xyxy(box: np.ndarray) -> np.ndarray: """ Convert bounding box coordinates from (x, y, width, height) format to (x1, y1, x2, y2) format where (x1, y1) is the top-left corner and (x2, y2) is the bottom-right corner. Args: x (np.ndarray): The input bounding box coordinates in (x, y, width, height) format. Returns: np.ndarray: The bounding box coordinates in (x1, y1, x2, y2) format. """ if box.shape[-1] != 4: raise ValueError(f"input shape last dimension expected 4 but input shape is {box.shape}") # pylint: disable=unbalanced-tuple-unpacking xy, wh = np.split(box, [2], axis=-1) wh_half = wh / 2 return np.concatenate([xy - wh_half, xy + wh_half], axis=-1) def preprocess_image(pil_image: Image.Image, input_size: Tuple[int, int]) -> np.ndarray: """ Preprocesses an image for inference with a TFLite model. Args: image_path (str): Path to the image file. input_size (Tuple[int, int]): Desired input size (height, width) for the model. Returns: np.ndarray: Preprocessed image as a NumPy array, ready for inference. """ if pil_image.mode != "RGB": pil_image = pil_image.convert("RGB") im = np.asarray(pil_image) im = letter_box(im, new_shape=input_size) im = np.expand_dims(im, axis=0) # goal is to have the format (number of images, size of image, number of channnels) im = im.astype(np.float32) / 255.0 # Normalize to 0.0 - 1.0 return im def postprocess_results(output: np.ndarray, model_input_size: Tuple[int, int], image_original_size: Tuple[int, int]) -> np.ndarray: """ Postprocesses the raw outputs from a TFLite model, including scaling bounding boxes back to the original image size. Args: output (np.ndarray): List of output tensors from the TFLite model. model_input_size (Tuple[int, int]): Desired input size (height, width) for the model. image_original_size (Tuple[int, int]): Original size (height, width) of the input image. Returns: np.ndarray: Postprocessed results with bounding boxes adjusted to original image size. """ predictions = non_max_suppression(output, conf_thres=0.25, iou_thres=0.45, max_det=300, max_wh=1) return scale_boxes(image_original_size, predictions, model_input_size) def scale_boxes(image_original_size: Tuple[int, int], boxes: np.ndarray, model_input_size: Tuple[int, int]): """ Rescales bounding boxes (in the format of xyxy by default) from the shape of the image they were originally specified in (img1_shape) to the shape of a different image (img0_shape). Args: image_original_size (Tuple[int, int]): The shape of the image that the bounding boxes are for, in the format of (height, width). boxes (np.ndarray): the bounding boxes of the objects in the image, in the format of (x1, y1, x2, y2) model_input_size (Tuple[int, int]): the shape of the target image, in the format of (height, width). Returns: np.ndarray: The scaled bounding boxes, in the format of (x1, y1, x2, y2) """ # calculate from img0_shape gain = min(model_input_size[0] / image_original_size[0], model_input_size[1] / image_original_size[1]) # gain = old / new pad = ( round((model_input_size[1] - image_original_size[1] * gain) / 2 - 0.1) / model_input_size[1], round((model_input_size[0] - image_original_size[0] * gain) / 2 - 0.1) / model_input_size[0], ) # wh padding inner_image_scale = ( (1 - pad[0] * 2), (1 - pad[1] * 2), ) # wh scale boxes[..., 0] = (boxes[..., 0] - pad[0]) / inner_image_scale[0] # x padding boxes[..., 1] = (boxes[..., 1] - pad[1]) / inner_image_scale[1] # y padding boxes[..., 2] = (boxes[..., 2] - pad[0]) / inner_image_scale[0] # x padding boxes[..., 3] = (boxes[..., 3] - pad[1]) / inner_image_scale[1] # y padding boxes[..., [0, 2]] = boxes[..., [0, 2]].clip(0, 1) # x1, x2 boxes[..., [1, 3]] = boxes[..., [1, 3]].clip(0, 1) # y1, y2 return boxes def prepare_input(image_pil): # Input image must match input shape (ex: 640x640 pixels) [note: only use BILINEAR here] resized = image_pil.copy().resize(input_shape, resample=Image.Resampling.BILINEAR) # SSD Mobilenet V2 FPNLite take as input pixels between [-1.0, 1.0] expanded = np.expand_dims(np.asarray(resized, dtype=np.float32) * 2. / 255. - 1., axis=0) del resized # Enforce garbage collection sooner than later return expanded def predict(tmp_images_dir): interpreter = load_model() model_predictions = [] for img_path in tmp_images_dir: pil_image = Image.open(img_path) input_data = preprocess_image(pil_image, input_shape) interpreter.set_tensor(input_index, input_data) interpreter.invoke() output_data = interpreter.get_tensor(output_index) preds = postprocess_results(output_data, input_shape, (pil_image.size[1], pil_image.size[0])) model_predictions.append({ 'detection_classes': (preds[:, 5] + 1).tolist(), # Class values are offset by +1.0 'detection_boxes': preds[:, 0:4].tolist(), 'detection_scores': preds[:, 4].tolist(), }) print(model_predictions) images_path = glob('utilities/images/*.JPG') predict(images_path)- Glenn JocherUltralytics
@foskyblue it seems like the issue might be related to the scaling and padding logic when converting bounding boxes. Ensure that the
scale_boxesfunction correctly rescales the boxes to the original image size. For more detailed guidance, please refer to the YOLOv9 documentation: https://docs.ultralytics.com/models/yolov9/. Hi Glen thanks for your response. Unfortunately I find it difficult to correctly scale the bounding boxes from the example script I mentioned above: https://stackoverflow.com/questions/76381317/yolov8-tflite-python-predictions-and-interpreting-output.
How can I implement the YOLOv9 TFLite model with an input ape of [1, 320, 576, 3] and output shape of [1, 19, 3780] in Python?
- Glenn JocherUltralytics
To correctly scale bounding boxes for your YOLOv9 TFLite model, ensure your
scale_boxesfunction accurately adjusts the coordinates based on the original image size and model input size. Verify that padding and scaling calculations align with your preprocessing steps. For further details, please refer to the YOLOv9 documentation.