Comment isoler des objets segmentés avec Ultralytics YOLO
La segmentation d’instances produit un masque précis au pixel près pour chaque objet détecté, ce qui te permet d’extraire chaque objet individuellement d’une image. Ce guide t’explique comment convertir les résultats de segmentation Ultralytics YOLO en objets isolés à l’aide du mode prédiction et d’OpenCV, avec un arrière-plan noir uni ou transparent pour l’enregistrement au format PNG.
À regarder : Comment isoler des objets segmentés avec Ultralytics YOLO26 | Tutoriel Python | VisionAI 🚀
Pourquoi isoler des objets segmentés ?#
Extraire des objets individuels d’une image ouvre la voie à divers flux de travail en aval :
- Suppression de l’arrière-plan pour les photos de produits, les catalogues ou la retouche créative.
- Recadrages par objet pour créer des jeux de données de classification à partir de tes détections.
- Traitement ciblé pour que les étapes suivantes, comme l’OCR, l’analyse des couleurs ou la mesure, ne portent que sur l’objet et non sur la scène environnante.
- Exportation PNG avec transparence pour placer les objets sur de nouveaux arrière-plans.
Cette méthode fonctionne avec n’importe quel modèle de segmentation Ultralytics YOLO et comporte quatre étapes : exécuter l’inférence → extraire chaque contour → isoler l’objet → enregistrer le résultat.
Exécuter l’inférence de segmentation#
Installe les bibliothèques requises, puis charge un modèle de segmentation comme YOLO26n-seg (le suffixe -seg est requis pour produire des masques) et lance une prédiction sur ton image source :
from ultralytics import YOLO

# Charger un modèle de segmentation
model = YOLO("yolo26n-seg.pt")

# Exécuter l’inférence sur une source
results = model.predict(source="path/to/image.jpg")Si tu appelles model.predict() sans source, Ultralytics utilise les images d’exemple fournies avec le paquet (bus.jpg et zidane.jpg), ce qui est pratique pour tester rapidement le flux de travail.
Extraire les contours des objets#
Chaque élément de results correspond à une image, et parcourir un résultat renvoie une détection à la fois. Pour chaque détection, copie l’image d’origine, lis l’étiquette de classe et trace le contour du masque de l’objet sur un masque binaire vierge. La zone blanche de ce masque indique précisément les pixels appartenant à l’objet.
Les extraits de code de cette section et de la suivante s’exécutent à l’intérieur de la boucle de détection ci-dessous ; le script complet, prêt à copier-coller, se trouve dans Exemple complet.
from pathlib import Path

import cv2
import numpy as np

for r in results:
    img = np.copy(r.orig_img)
    img_name = Path(r.path).stem  # nom de base de l’image source

    # Parcourir chaque objet détecté dans l’image
    for ci, c in enumerate(r):
        label = c.names[c.boxes.cls.tolist().pop()]  # nom de la classe

        # Créer un masque binaire et y tracer le contour de l’objet
        b_mask = np.zeros(img.shape[:2], np.uint8)
        contour = c.masks.xy[0].astype(np.int32).reshape(-1, 1, 2)
cv2.drawContours(b_mask, [contour], -1, (255, 255, 255), cv2.FILLED)c.masks.xy[0]renvoie le contour du masque sous forme de coordonnées de points(x, y)pour l’objet dans ce résultat de détection unique..astype(np.int32)convertit les points defloat32, quedrawContours()d’OpenCV ne prend pas en charge..reshape(-1, 1, 2)remet les points en forme selon la disposition[N, 1, 2]attendue pardrawContours(), oùNcorrespond au nombre de points du contour.
En transmettant [contour] avec l’indice -1, tu traces tous les points du contour fourni, et cv2.FILLED remplit en blanc chaque pixel à l’intérieur du contour.
Isoler l’objet#
Une fois le masque binaire prêt, combine-le avec l’image d’origine. Il existe deux méthodes courantes, selon l’arrière-plan souhaité :
Convertis le masque en trois canaux et conserve uniquement les pixels qui recouvrent l’objet. Tout ce qui se trouve à l’extérieur du contour devient noir :
# Isoler l’objet avec un arrière-plan noir
mask3ch = cv2.cvtColor(b_mask, cv2.COLOR_GRAY2BGR)
isolated = cv2.bitwise_and(mask3ch, img)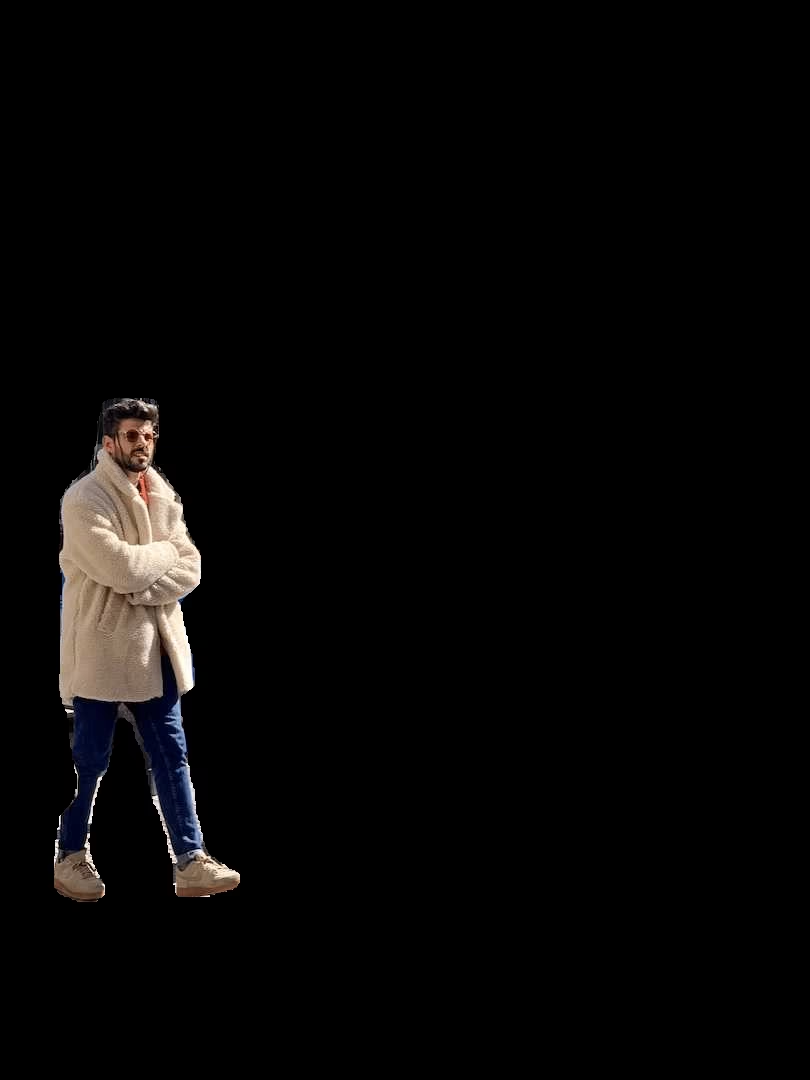
Pour ne conserver que la région de l’objet au lieu de l’image entière, découpe l’image selon la boîte englobante de la détection :
# Coordonnées de la boîte englobante
x1, y1, x2, y2 = c.boxes.xyxy.cpu().numpy().squeeze().astype(np.int32)
# Recadrer l’image isolée à la région de l’objet
iso_crop = isolated[y1:y2, x1:x2]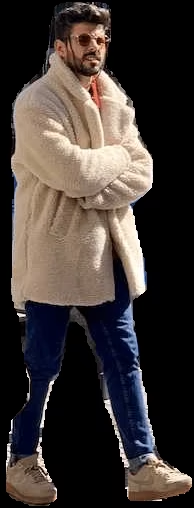
Cette fonction est intégrée. Passe save_crop=True à predict() et Ultralytics enregistre automatiquement les recadrages des boîtes englobantes, sans masque.
Enregistrer le résultat (facultatif)#
Tu es libre de choisir quoi faire de chaque objet isolé. Une étape suivante courante consiste à l’écrire sur le disque pour une utilisation ultérieure :
# Save the isolated object to file
cv2.imwrite(f"{img_name}_{label}-{ci}.png", isolated)
Ici, img_name correspond au nom de base de l’image source, label au nom de la classe et ci à l’indice de détection ; ainsi, plusieurs instances d’une même classe obtiennent des noms de fichier uniques. Remplace isolated par iso_crop si tu as effectué le recadrage facultatif ci-dessus.
Exemple complet#
Le script ci-dessous regroupe toutes les étapes dans un seul bloc exécutable. Il utilise un arrière-plan noir par défaut ; remplace la ligne indiquée par np.dstack([img, b_mask]) pour obtenir plutôt un PNG transparent :
from pathlib import Path

import cv2
import numpy as np

from ultralytics import YOLO

model = YOLO("yolo26n-seg.pt")
results = model.predict(source="path/to/image.jpg")

for r in results:
    img = np.copy(r.orig_img)
    img_name = Path(r.path).stem

    for ci, c in enumerate(r):
        label = c.names[c.boxes.cls.tolist().pop()]

        # Build a binary mask from the object contour
        b_mask = np.zeros(img.shape[:2], np.uint8)
        contour = c.masks.xy[0].astype(np.int32).reshape(-1, 1, 2)
        cv2.drawContours(b_mask, [contour], -1, (255, 255, 255), cv2.FILLED)

        # Isolate the object (black background)
        mask3ch = cv2.cvtColor(b_mask, cv2.COLOR_GRAY2BGR)
        isolated = cv2.bitwise_and(mask3ch, img)  # transparent PNG: isolated = np.dstack([img, b_mask])

        # Save or add your custom post-processing here
        cv2.imwrite(f"{img_name}_{label}-{ci}.png", isolated)

        # Optional: crop to the bounding box before saving
        # x1, y1, x2, y2 = c.boxes.xyxy.cpu().numpy().squeeze().astype(np.int32)
        # cv2.imwrite(f"{img_name}_{label}-{ci}.png", isolated[y1:y2, x1:x2])
Pour une utilisation répétée, place le corps de la boucle dans une fonction afin de pouvoir l’appeler pour de nombreuses images.
Conclusion#
Tu disposes maintenant d’une méthode complète pour isoler des objets segmentés avec Ultralytics YOLO : exécuter l’inférence, créer un masque binaire à partir de chaque contour, puis extraire l’objet sur un arrière-plan noir ou transparent et, éventuellement, le recadrer selon sa boîte englobante. Consulte la documentation complète sur la tâche Segment et le mode Predict pour adapter le flux de travail à tes propres classes.
FAQ#
Charge un modèle de segmentation, lance l’inférence, crée un masque binaire à partir du contour de chaque détection, puis combine-le avec l’image d’origine :
import cv2
import numpy as np

from ultralytics import YOLO

model = YOLO("yolo26n-seg.pt")
results = model.predict(source="path/to/your/image.jpg")

img = np.copy(results[0].orig_img)
b_mask = np.zeros(img.shape[:2], np.uint8)
contour = results[0].masks.xy[0].astype(np.int32).reshape(-1, 1, 2)
cv2.drawContours(b_mask, [contour], -1, (255, 255, 255), cv2.FILLED)

mask3ch = cv2.cvtColor(b_mask, cv2.COLOR_GRAY2BGR)
isolated = cv2.bitwise_and(mask3ch, img)
Consulte l’exemple complet pour voir la boucle complète sur chaque détection.
Il existe deux méthodes principales. Pour un arrière-plan noir, convertis le masque en trois canaux et utilise
cv2.bitwise_and(). Pour un arrière-plan transparent (lors de l’enregistrement au format PNG), empile le masque en tant que quatrième canal alpha avecnp.dstack([img, b_mask]). Les deux méthodes sont présentées dans Isoler l’objet.Lis les coordonnées de la boîte englobante dans la détection et découpe l’image isolée :
x1, y1, x2, y2 = results[0].boxes.xyxy[0].cpu().numpy().astype(np.int32)
iso_crop = isolated[y1:y2, x1:x2]
Pour en savoir plus sur les résultats des boîtes englobantes, consulte la documentation du mode Predict.
Ultralytics YOLO fournit une segmentation d’instances rapide et en temps réel, avec une génération précise de masques et de boîtes englobantes, ainsi qu’une API Python simple qui transforme les résultats d’inférence en objets isolés en quelques lignes de code OpenCV.
Oui. Utilise l’argument
save_cropdanspredict()pour enregistrer des recadrages de boîtes englobantes avec leur arrière-plan d’origine :results = model.predict(source="path/to/your/image.jpg", save_crop=True)Pour en savoir plus, consulte la section Arguments d’inférence du mode Predict.


Commentaires16
Pose une question, partage tes résultats ou aide quelqu’un d’autre.
cordonballas
wow thanx that's exactly what i've been looking for.
 Glenn JocherUltralytics
@cordonballas thank you for your positive feedback! We're glad the segmentation isolation guide was helpful. If you have any further questions, feel free to ask—the YOLO community and our team are here to help. 😊
For continued support, check our Segment Task documentation and Predict Mode guide.
AbdulGhofur23
How can I extract a mask from a TIFF (Tag Image File Format) so that the mask's coordinates align with the projection of the TIFF image?
- Glenn JocherUltralytics
To extract masks from a TIFF image while aligning the mask's coordinates with the image's projection, you can use the segmentation results from Ultralytics YOLO. Generate the mask using
results.masks.xyfor contour points and overlay it on the TIFF image. Ensure alignment by maintaining the original image dimensions during processing. For more, refer to the Isolating Segmentation Objects Guide. Let us know if you need further assistance!1
vedhanayagan9626
I used yolo v11n seg model , i got a segmented image as output with bounding boxes in those some of predictions are overlapped like a bounding box on two items as single so i try to remove a rectangle and associated segmentation from an image and add new rectangle by hold and drag functionality its looks likw working but i cant get optimized result. Is there any way to remove and add new bounding boxes after a segmentation result?
- Glenn JocherUltralytics
@vedhanayagan9626 to address overlapping predictions, you can manually refine results by manipulating masks and bounding boxes post-inference. Use the mask and bounding box coordinates from
results[0].masksandresults[0].boxesto remove or modify specific predictions. For new bounding boxes, you might need to create and integrate them into your results structure manually. Refer to the Isolating Segmentation Objects guide for detailed steps. For optimized results, ensure adequate data quality and model tuning.
SerhiiPostupaiev
Hello, can you please explain how the YOLOv8 performs upscaling? For example, my input images are 854x480, YOLOv8 scales them up to 864x512. How does it exactly performs upscaling? Does it use padding or some other approaches?
 Paula DerrengerUltralytics
@SerhiiPostupaiev hello! In YOLOv8, images are scaled up or down to a specific model input size, optimally a square format (like 640x640) or a dimension supported by the model (such as 864x512 in your case). The upscaling for images that do not exactly match the input dimensions typically involves:
- Resizing the image to the closest dimension that maintains the aspect ratio.
- Padding the resized image to reach the required input size, ensuring that the aspect ratio is preserved.
For instance, for an image of 854x480, YOLOv8 may:
- Resize the image to fit the model's width of 864 while maintaining the aspect ratio, which adjusts the height accordingly.
- Pad the height to the nearest model-supported dimension (like 512), adding pixel values (usually zeros) to the top and bottom or sides of the image to reach the required size.
Here’s a rough example in Python using OpenCV for how padding might be handled:
import cv2
import numpy as np

# Example image load
image = cv2.imread('input.jpg')
# Resizing the image
resized_image = cv2.resize(image, (864, keep_aspect_ratio_height))  # Example variable for illustration

# Padding the resized image
top_padding = (512 - resized_image.shape[0]) // 2
bottom_padding = 512 - resized_image.shape[0] - top_padding
padded_image = cv2.copyMakeBorder(resized_image, top_padding, bottom_padding, 0, 0, cv2.BORDER_CONSTANT, value=[0, 0, 0])
This ensures the entire image is used during prediction without distorting its original aspect ratio. 😊
EnricoMendez
Hello, I run this code example but it only display one object's mask, is it posible to join all the objects' masks in a single frame?
- Glenn JocherUltralytics
Hey there! 😊 Absolutely, you can combine all the objects' masks into a single frame. Just modify the section where you're drawing the contours onto the mask. Instead of creating a new binary mask
b_maskfor each object, you initialize one common mask before iterating through the objects and draw every object's contour on this common mask. Here's a quick example to illustrate:# Initialize one common binary mask for all objects b_mask_all = np.zeros(img.shape[:2], np.uint8) for ci, c in enumerate(r): # Your contour extraction remains the same contour = c.masks.xy.pop().astype(np.int32).reshape(-1, 1, 2) # Draw each contour onto the common mask cv2.drawContours(b_mask_all, [contour], -1, (255, 255, 255), cv2.FILLED) # After the loop, you can use `b_mask_all` which contains all objects' masksJust keep in mind, with
b_mask_all, you'll have all the detected objects' masks on one mask. If the objects overlap in your image, their masks will also overlap inb_mask_all. Hope this helps! Let us know if you have more questions. 😊
mariamg03
hi is there a way I can apply the edits on the binary image then revert back to the original with the mask part edited?
- Paula DerrengerUltralytics
Hey there! 👋 Yes, you can certainly make edits on a binary mask and then apply those changes back to the original image, essentially modifying only the parts that the mask covers. Here's a quick outline of how you could achieve this with an example focusing on segmentation tasks:
-
After segmenting your image and obtaining the binary mask (let's say
b_mask), you can perform any edits you like on this mask. For example, inverting the mask, dilating, or eroding. -
To apply the edited mask back to the original image (
orig_img), you would use the mask to isolate the area of interest in the original image and then apply your edits.
Here's a code snippet demonstrating this with a simple inversion edit:
import cv2
import numpy as np

# Assuming 'b_mask' is your binary mask and 'orig_img' is your original image
# Let's say you inverted the binary mask
edited_mask = 255 - b_mask  # Inverting mask

# Convert the single channel binary mask to a 3 channel mask to match the original image
edited_mask_3ch = cv2.cvtColor(edited_mask, cv2.COLOR_GRAY2BGR)

# Apply the edited mask back to the original image
# This line performs bitwise-and operation to only keep parts of the image where the mask is white
edited_image = cv2.bitwise_and(orig_img, edited_mask_3ch)

# At this point, 'edited_image' contains the original image with edits applied to the segmented part
This is a simplified example to show the concept. Depending on the edits you've made to
b_mask, you might need to adjust how you applyedited_maskback toorig_img.Remember, after editing the mask, you can always revert it back to its original form if you've kept a copy before editing, or you can apply the inverse of your edits.
I hope this helps! Let me know if you have more questions. Happy coding! 😊
-
Safiislamian
Hi sir, thanku for your response does load dataset will work or not. As the dataset is in yolo form where we have different folders and subfolders like train having images and labels etc
On Wed, Mar 27, 2024, 7:03 AM Glenn Jocher @.***> wrote:
Hey there! 👋 Glad to see you're interested in applying YOLOv8 for instance segmentation with a dataset from Roboflow. Below is a quick guide to help you get started with applying YOLOv8 for detection and then using masks for the dataset based on class. Step 1: Install Ultralytics YOLO
First, ensure you have Ultralytics installed:
pip install ultralytics
Step 2: Load Your Model
from ultralytics import YOLOmodel = YOLO('yolov8n-seg.pt') # Use yolov8n-seg.pt for segmentation models
Step 3: Predict and Isolate Objects
Now, for predicting and isolating objects based on their classes, you'll dive into the prediction results to access and manipulate the segmentation masks:
results = model.predict(source='path/to/your/dataset')for result in results: for detection in result: class_name = detection.names[detection.boxes.cls.tolist().pop()] # Create a binary mask from detection binary_mask = np.zeros(result.orig_img.shape[:2], np.uint8) contour = detection.masks.xy.pop().astype(np.int32).reshape(-1, 1, 2) cv2.drawContours(binary_mask, [contour], -1, (255, 255, 255), cv2.FILLED) # Example to save or further process the mask
Note: Replace 'path/to/your/dataset' with the actual path to your images. Step 4: Saving or Processing the Masks
You may wish to save each mask based on its class for processing later. You can modify the loop to save each binary mask to a file using cv2.imwrite() method.
cv2.imwrite(f'{class_name}_mask.jpg', binary_mask)
This will save each mask with its respective class name as part of the filename, allowing for easy organization by class.
Hope this helps! 😊 Let us know if you need further assistance or have more questions. Happy coding!
— Reply to this email directly, view it on GitHub https://github.com/orgs/ultralytics/discussions/9334#discussioncomment-8922405, or unsubscribe https://github.com/notifications/unsubscribe-auth/AUP75TG3RFWAL7YRMWDR66DY2ILE5AVCNFSM6AAAAABFJ334B2VHI2DSMVQWIX3LMV43SRDJONRXK43TNFXW4Q3PNVWWK3TUHM4DSMRSGQYDK . You are receiving this because you commented.Message ID: @.*** com>
- Paula DerrengerUltralytics(modifié)
Hi there! 😄
Absolutely, loading a dataset structured in YOLO format (with separate folders for train/test images and labels) works well with YOLO26. You can specify the dataset structure in a YAML file and provide this file when initiating training or validation processes. Here's an example
data.yamlfile structure for your dataset:train: /path/to/dataset/train/images # path to images folder val: /path/to/dataset/val/images # path to validation images # Classes nc: 80 # number of classes names: ['class1', 'class2', ...] # class namesAnd here's how you might start training with your dataset:
yolo detect train data=data.yaml model=yolo26n.ptMake sure to replace
/path/to/dataset/train/imagesand/path/to/dataset/val/imageswith the actual paths to your dataset and similarly update thenc(number of classes) andnames(class labels) accordingly.If you have any more questions or need further assistance, feel free to ask. Happy to help! 🚀
There is a dataset on roboflow for instance segmentation, i want to apply first yolov8 and then masks for all the dataset arranged on the basis of their classes. please provide me details and code for that Thank you...
- Glenn JocherUltralytics(modifié)
Hey there! 👋 Glad to see you're interested in applying YOLO26 for instance segmentation with a dataset from Roboflow. Below is a quick guide to help you get started with applying YOLO26 for detection and then using masks for the dataset based on class.
Step 1: Install Ultralytics YOLO
First, ensure you have Ultralytics installed:
pip install ultralyticsStep 2: Load Your Model
from ultralytics import YOLO
model = YOLO('yolo26n-seg.pt')  # Use yolo26n-seg.pt for segmentation models
Step 3: Predict and Isolate Objects
Now, for predicting and isolating objects based on their classes, you'll dive into the prediction results to access and manipulate the segmentation masks:
results = model.predict(source='path/to/your/dataset')
for result in results:
    for detection in result:
        class_name = detection.names[detection.boxes.cls.tolist().pop()]
        # Create a binary mask from detection
        binary_mask = np.zeros(result.orig_img.shape[:2], np.uint8)
        contour = detection.masks.xy.pop().astype(np.int32).reshape(-1, 1, 2)
        cv2.drawContours(binary_mask, [contour], -1, (255, 255, 255), cv2.FILLED)
        # Example to save or further process the mask
Note: Replace
'path/to/your/dataset'with the actual path to your images.Step 4: Saving or Processing the Masks
You may wish to save each mask based on its class for processing later. You can modify the loop to save each binary mask to a file using
cv2.imwrite()method.cv2.imwrite(f'{class_name}_mask.jpg', binary_mask)This will save each mask with its respective class name as part of the filename, allowing for easy organization by class.
Hope this helps! 😊 Let us know if you need further assistance or have more questions. Happy coding!