Guide de démarrage rapide : Raspberry Pi avec Ultralytics YOLO26
Raspberry Pi est un petit ordinateur abordable qui exécute Ultralytics YOLO26 pour la détection d’objets en temps réel à la périphérie — aucun GPU n’est nécessaire. Ce guide t’accompagne dans le déploiement de YOLO26 sur Raspberry Pi 4 et 5 : le flashage de l’OS, l’installation d’Ultralytics, l’exportation au format NCNN pour obtenir une inférence aussi rapide que possible sur ARM et l’exécution de prédictions sur le flux vidéo en direct d’une caméra. Il comprend également des tests de performance sur huit formats d’exportation afin que tu puisses choisir le meilleur compromis entre vitesse et précision pour ton matériel.
Accède directement à la section configuration d’Ultralytics, exportation vers NCNN et exécution de l’inférence, benchmarks ou inférence par caméra.
À regarder : Mises à jour et améliorations du Raspberry Pi 5.
Ce guide a été testé avec Raspberry Pi 4 et Raspberry Pi 5 sous la dernière version de Raspberry Pi OS Bookworm (Debian 12). Il devrait également fonctionner sur les anciens appareils Raspberry Pi, comme le Raspberry Pi 3, à condition que la même version de Raspberry Pi OS Bookworm soit installée.
Qu’est-ce que Raspberry Pi ?#
Raspberry Pi est un ordinateur monocarte petit et abordable. Il est devenu populaire pour de nombreux projets et applications, de la domotique amateur aux usages industriels. Les cartes Raspberry Pi peuvent exécuter différents systèmes d’exploitation et disposent de broches GPIO (entrées/sorties à usage général) qui facilitent l’intégration de capteurs, d’actionneurs et d’autres composants matériels. Elles existent en différents modèles aux caractéristiques variées, mais partagent toutes la même philosophie de conception : être peu coûteuses, compactes et polyvalentes.
Comparaison des modèles Raspberry Pi#
| Raspberry Pi 3 | Raspberry Pi 4 | Raspberry Pi 5 | |
|---|---|---|---|
| CPU | SoC Broadcom BCM2837, Cortex-A53 64 bits | SoC Broadcom BCM2711, Cortex-A72 64 bits | SoC Broadcom BCM2712, Cortex-A76 64 bits |
| Fréquence maximale du CPU | 1.4GHz | 1.8GHz | 2.4GHz |
| GPU | VideoCore IV | VideoCore VI | VideoCore VII |
| Fréquence maximale du GPU | 400MHz | 500MHz | 800MHz |
| Mémoire | 1GB de SDRAM LPDDR2 | 1GB, 2GB, 4GB, 8GB de SDRAM LPDDR4-3200 | 2GB, 4GB, 8GB, 16GB de SDRAM LPDDR4X-4267 |
| PCIe | S. O. | S. O. | Interface PCIe 2.0 1x |
| Consommation électrique maximale | 2.5A@5V | 3A@5V | 5A@5V (PD activé) |
Qu'est-ce que Raspberry Pi OS ?#
Raspberry Pi OS (anciennement appelé Raspbian) est un système d'exploitation de type Unix basé sur la distribution Debian GNU/Linux, conçu pour la famille d'ordinateurs compacts à carte unique Raspberry Pi distribués par la Raspberry Pi Foundation. Raspberry Pi OS est hautement optimisé pour le Raspberry Pi doté de CPU ARM et utilise un environnement de bureau léger qui fonctionne par défaut avec Wayland sur Raspberry Pi 4 et 5. Raspberry Pi OS est activement développé, avec pour objectif d'améliorer autant que possible la stabilité et les performances des paquets Debian sur Raspberry Pi.
Flasher Raspberry Pi OS sur Raspberry Pi#
La première chose à faire après avoir pris possession d’un Raspberry Pi est de flasher une carte micro-SD avec Raspberry Pi OS, de l’insérer dans l’appareil et de démarrer le système d’exploitation. Suis la documentation de démarrage de Raspberry Pi détaillée pour préparer ton appareil à sa première utilisation.
Configurer Ultralytics#
Tu peux configurer le paquet Ultralytics sur Raspberry Pi de deux façons pour ton prochain projet de vision par ordinateur :
Commencer avec Docker#
Le moyen le plus rapide de démarrer avec Ultralytics YOLO26 sur Raspberry Pi consiste à utiliser une image Docker précompilée pour Raspberry Pi.
Exécute la commande ci-dessous pour récupérer le conteneur Docker et le lancer sur Raspberry Pi. Il est basé sur l’image officielle Python 3.13-slim, qui exécute Python 3.13 sur la dernière version de Debian.
t=ultralytics/ultralytics:latest-arm64
sudo docker pull $t && sudo docker run -it --ipc=host $t
L'image Docker inclut déjà Ultralytics ; tu peux donc passer directement à l'exportation de ton modèle vers NCNN.
Commencer sans Docker#
Installer le package Ultralytics#
Nous allons installer ici le paquet Ultralytics sur Raspberry Pi. Les dépendances nécessaires à l'exportation vers des formats tels que NCNN sont installées automatiquement lors de la première exportation d'un modèle PyTorch ; seul le paquet de base est donc nécessaire ici.
-
Mettre à jour la liste des packages, installer pip et le mettre à niveau vers la dernière version
sudo apt update sudo apt install python3-pip -y pip install -U pip -
Installer le package pip
ultralyticspip install ultralytics -
Redémarrer l’appareil
sudo reboot
Utiliser NCNN sur Raspberry Pi#
Parmi tous les formats d’export pris en charge par Ultralytics, NCNN offre les meilleures performances d’inférence sur les appareils Raspberry Pi, car il est fortement optimisé pour les plateformes mobiles et embarquées telles que ARM. Convertis ton modèle YOLO26n PyTorch en NCNN, puis exécute l’inférence avec le modèle exporté :
from ultralytics import YOLO

# Charger un modèle YOLO26n PyTorch
model = YOLO("yolo26n.pt")

# Exporter le modèle au format NCNN
model.export(format="ncnn")  # creates 'yolo26n_ncnn_model'

# Charger le modèle exporté au format NCNN
ncnn_model = YOLO("yolo26n_ncnn_model")

# Exécuter l’inférence
results = ncnn_model("https://ultralytics.com/images/bus.jpg")Pour plus de détails sur les options d'exportation prises en charge, consulte le guide des options de déploiement des modèles.
Améliorations des performances de YOLO26 par rapport à YOLO11#
YOLO26 est spécialement conçu pour fonctionner sur des appareils aux ressources matérielles limitées, comme le Raspberry Pi 5. Par rapport à YOLO11n, YOLO26n offre une augmentation de ~15 % du nombre d’images par seconde (6.79 → 7.79), tout en obtenant un mAP supérieur (40.1 contre 39.5), avec une taille d’entrée de 640 et des modèles exportés au format ONNX sur Raspberry Pi 5. Le tableau et le graphique ci-dessous illustrent cette comparaison.
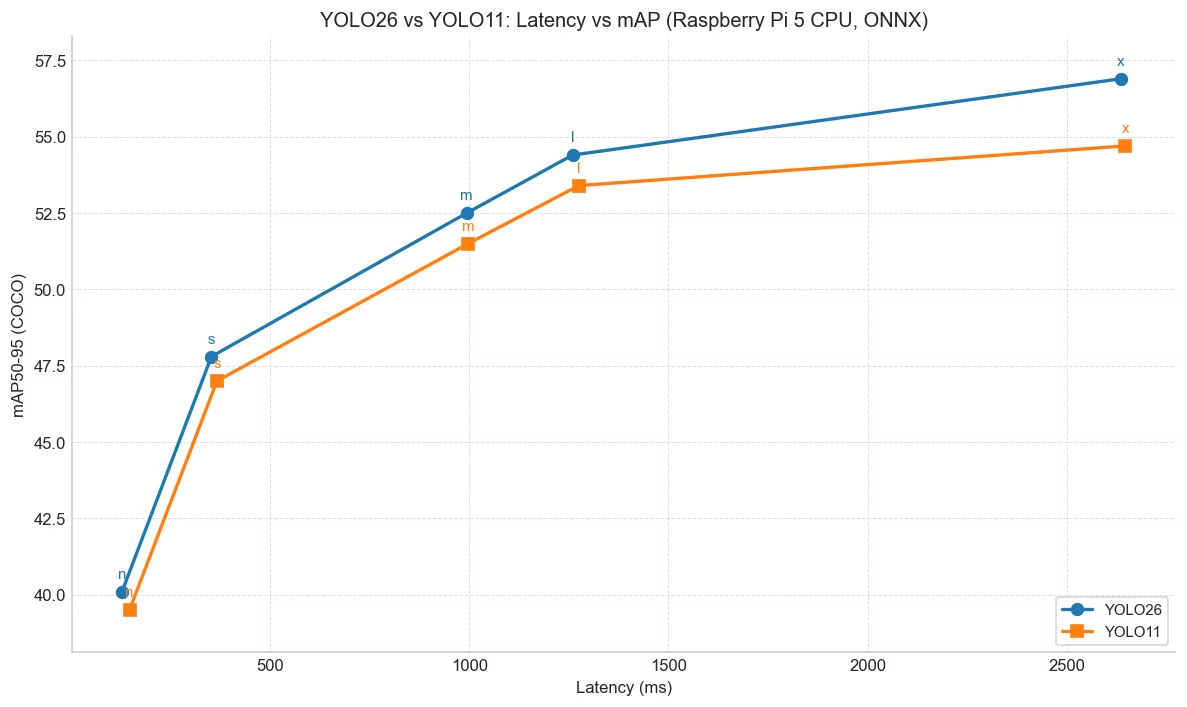
| Modèle | mAP50-95(B) | Temps d’inférence (ms/im) |
|---|---|---|
| YOLO26n | 40.1 | 128.42 |
| YOLO26s | 47.8 | 352.84 |
| YOLO26m | 52.5 | 993.78 |
| YOLO26l | 54.4 | 1259.46 |
| YOLO26x | 56.9 | 2636.26 |
Évalué avec Ultralytics 8.4.14.
Résultats des benchmarks de YOLO26 sur Raspberry Pi 5#
L’équipe Ultralytics a réalisé des benchmarks YOLO26 sur huit formats de modèle différents, en mesurant la vitesse et la précision : PyTorch, TorchScript, ONNX, OpenVINO, LiteRT, MNN, NCNN et ExecuTorch. Les benchmarks ont été réalisés sur un Raspberry Pi 5 en précision FP32, avec la taille d’image d’entrée par défaut de 640.
Graphique comparatif#
Seuls YOLO26n et YOLO26s sont inclus, car les modèles plus grands sont trop lents pour être utilisés concrètement sur Raspberry Pi.
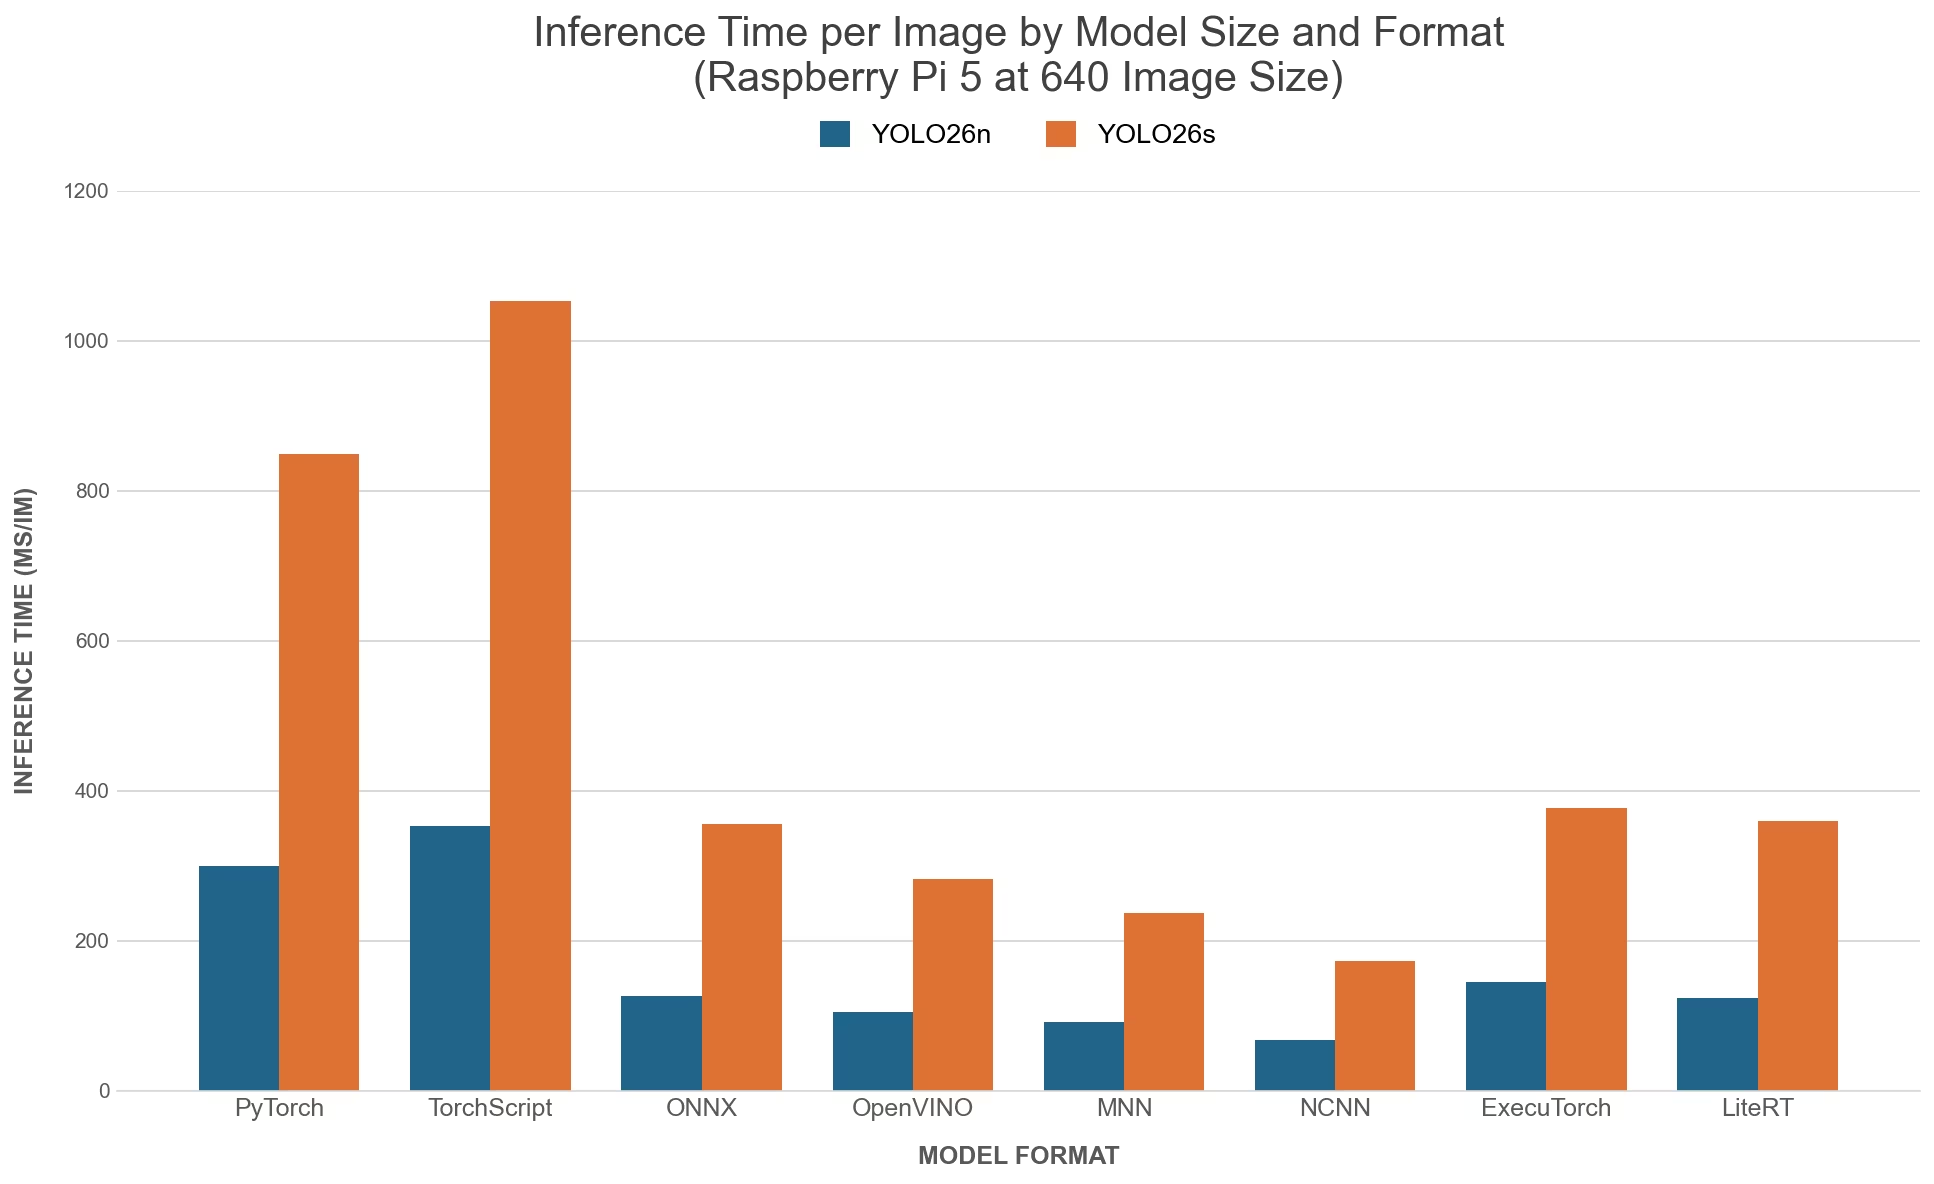
Tableau comparatif détaillé#
Le tableau ci-dessous présente les résultats du benchmark de deux modèles différents (YOLO26n, YOLO26s) sur huit formats différents (PyTorch, TorchScript, ONNX, OpenVINO, LiteRT, MNN, NCNN, ExecuTorch), exécutés sur un Raspberry Pi 5. Pour chaque combinaison, il indique le statut, la taille, la métrique mAP50-95(B) et le temps d’inférence.
| Format | Statut | Taille sur le disque (MB) | mAP50-95(B) | Temps d’inférence (ms/im) |
|---|---|---|---|---|
| PyTorch | ✅ | 5.3 | 0.4760 | 299.09 |
| TorchScript | ✅ | 9.8 | 0.4734 | 353.20 |
| ONNX | ✅ | 9.5 | 0.4734 | 125.99 |
| OpenVINO | ✅ | 9.6 | 0.4734 | 104.55 |
| LiteRT | ✅ | 9.8 | 0.4730 | 123.30 |
| MNN | ✅ | 9.4 | 0.4749 | 91.87 |
| NCNN | ✅ | 9.4 | 0.4784 | 67.03 |
| ExecuTorch | ✅ | 9.4 | 0.4772 | 144.83 |
Évalué avec Ultralytics 8.4.108
Le temps d’inférence n’inclut pas le prétraitement ni le post-traitement.
Reproduire nos résultats#
Pour reproduire les benchmarks Ultralytics ci-dessus sur tous les formats d'exportation, exécute ce code :
from ultralytics import YOLO

# Charger un modèle YOLO26n PyTorch
model = YOLO("yolo26n.pt")

# Évaluer la vitesse et la précision de YOLO26n sur le jeu de données COCO128 dans tous les formats d’exportation
results = model.benchmark(data="coco128.yaml", imgsz=640)
Note que les résultats du benchmark peuvent varier selon la configuration matérielle et logicielle précise d’un système, ainsi que sa charge au moment de l’exécution des benchmarks. Pour obtenir les résultats les plus fiables, utilise un jeu de données contenant un grand nombre d’images, par exemple data='coco.yaml' (5000 images de validation).
L'exportation format=litert (via litert-torch) est prise en charge uniquement sous Linux x86_64 et macOS, et non sur Raspberry Pi. Exporte le modèle .tflite sur une machine Linux x86_64 ou un Mac, copie-le sur Raspberry Pi et utilise le Pi pour l'inférence.
Utiliser la caméra Raspberry Pi#
Les projets de vision par ordinateur sur Raspberry Pi nécessitent souvent des flux vidéo en temps réel pour l’inférence. Le connecteur MIPI CSI intégré au Raspberry Pi permet de brancher les modules caméra officiels Raspberry Pi. Dans ce guide, nous avons utilisé un Raspberry Pi Camera Module 3 pour capturer les flux vidéo et effectuer l’inférence avec des modèles YOLO26.
Découvre-en plus sur les différents modules de caméra proposés par Raspberry Pi et sur la prise en main des modules de caméra Raspberry Pi.
Raspberry Pi 5 utilise des connecteurs CSI plus petits que Raspberry Pi 4 (22 broches contre 15), tu auras donc besoin d'un câble adaptateur 15 broches vers 22 broches pour brancher une caméra Raspberry Pi.
Tester la caméra#
Exécute la commande rpicam-hello suivante après avoir connecté la caméra au Raspberry Pi. Le flux vidéo en direct de la caméra devrait s’afficher pendant environ 5 secondes.
rpicam-helloInférence avec une caméra#
Il existe deux méthodes pour utiliser la caméra Raspberry Pi afin d'effectuer l'inférence avec des modèles YOLO26.
Utilise picamera2, préinstallé avec Raspberry Pi OS, pour accéder à la caméra et exécuter l’inférence avec des modèles YOLO26.
import cv2
from picamera2 import Picamera2

from ultralytics import YOLO

# Initialiser Picamera2
picam2 = Picamera2()
picam2.preview_configuration.main.size = (1280, 720)
picam2.preview_configuration.main.format = "RGB888"
picam2.preview_configuration.align()
picam2.configure("preview")
picam2.start()

# Charger le modèle YOLO26
model = YOLO("yolo26n.pt")

while True:
    # Capturer image par image
    frame = picam2.capture_array()

    # Exécuter l'inférence YOLO26 sur l'image
    results = model(frame)

    # Visualiser les résultats sur l’image
    annotated_frame = results[0].plot()

    # Afficher l'image résultante
    cv2.imshow("Camera", annotated_frame)

    # Interrompre la boucle si « q » est pressé
    if cv2.waitKey(1) == ord("q"):
        break

# Libérer les ressources et fermer les fenêtres
cv2.destroyAllWindows()
Bonnes pratiques pour l'utilisation de Raspberry Pi#
Suis ces bonnes pratiques pour tirer le maximum de performances de YOLO26 sur Raspberry Pi.
-
Utiliser un SSD
Pour un fonctionnement continu 24 h/24 et 7 j/7, utilise un SSD pour le système, car une carte SD peut s’user ou tomber en panne à force d’écritures continues. Grâce au connecteur PCIe intégré au Raspberry Pi 5, tu peux brancher des SSD à l’aide d’un adaptateur tel que le NVMe Base for Raspberry Pi 5.
-
Flasher sans interface graphique
Lorsque tu flashes Raspberry Pi OS, tu peux choisir de ne pas installer l'environnement de bureau (Raspberry Pi OS Lite), ce qui permet d'économiser un peu de RAM sur l'appareil et de laisser davantage de ressources disponibles pour le traitement de la vision par ordinateur.
-
Surcadencer Raspberry Pi
Si tu souhaites obtenir un léger gain de performances lors de l'exécution des modèles Ultralytics YOLO26 sur Raspberry Pi 5, tu peux surcadencer le CPU de sa fréquence de base de 2.4GHz à 3.0GHz et le GPU de 800MHz à 1GHz. Si le système devient instable ou plante, réduis les valeurs de surcadencement par incréments de 100MHz. Veille à assurer un refroidissement adéquat, car le surcadencement augmente la chaleur produite et peut entraîner une limitation thermique.
a. Mettre à jour les logiciels
sudo apt update && sudo apt dist-upgradeb. Ouvrir le fichier de configuration pour le modifier
sudo nano /boot/firmware/config.txtc. Ajouter les lignes suivantes à la fin du fichier
arm_freq=3000
gpu_freq=1000
force_turbo=1
d. Enregistrer et quitter en appuyant sur CTRL + X, puis sur Y, et enfin sur ENTER
e. Redémarrer Raspberry Pi
Étapes suivantes#
Tu as correctement configuré YOLO26 sur ton Raspberry Pi. Pour aller plus loin, découvre le mode Predict et ses options d'inférence supplémentaires, le mode Export et ses formats de déploiement supplémentaires, ou le guide NVIDIA Jetson si tu as besoin de davantage de puissance de calcul en périphérie. Pour consulter la documentation complète, rends-toi sur la documentation Ultralytics YOLO26.
Remerciements et citations#
Ce guide a été initialement créé par Daan Eeltink pour Kashmir World Foundation, une organisation qui se consacre à l'utilisation de YOLO pour la préservation des espèces menacées. Nous saluons son travail pionnier et son engagement éducatif dans le domaine des technologies de détection d'objets.
Pour en savoir plus sur les activités de Kashmir World Foundation, tu peux consulter son site web.
FAQ#
Pour configurer Ultralytics YOLO26 sur un Raspberry Pi sans Docker, suis ces étapes :
- Mettre à jour la liste des paquets et installer
pip:sudo apt update sudo apt install python3-pip -y pip install -U pip - Installer le paquet Ultralytics :
pip install ultralytics - Redémarrer l'appareil pour appliquer les modifications :
sudo reboot
Pour obtenir des instructions détaillées, consulte la section Commencer sans Docker.
- Mettre à jour la liste des paquets et installer
NCNN est hautement optimisé pour les plateformes mobiles et embarquées, ce qui en fait un excellent choix pour exécuter YOLO26 sur les appareils Raspberry Pi. Ses noyaux optimisés pour ARM assurent une inférence plus rapide sur le Pi que les autres formats d’export présentés dans les benchmarks ci-dessus.
Tu peux convertir un modèle YOLO26 PyTorch au format NCNN avec Python ou des commandes CLI :
Exemplefrom ultralytics import YOLO # Charger un modèle YOLO26n PyTorch model = YOLO("yolo26n.pt") # Exporter le modèle au format NCNN model.export(format="ncnn") # creates 'yolo26n_ncnn_model' # Charger le modèle exporté au format NCNN ncnn_model = YOLO("yolo26n_ncnn_model") # Exécuter l’inférence results = ncnn_model("https://ultralytics.com/images/bus.jpg")Pour plus de détails, consulte la section Utiliser NCNN sur Raspberry Pi.
Les principales différences sont les suivantes :
- CPU : Raspberry Pi 4 utilise un SoC 64 bits Broadcom BCM2711 Cortex-A72, tandis que Raspberry Pi 5 utilise un SoC 64 bits Broadcom BCM2712 Cortex-A76.
- Fréquence maximale du CPU : la fréquence maximale de Raspberry Pi 4 est de 1.8GHz, tandis que celle de Raspberry Pi 5 atteint 2.4GHz.
- Mémoire : le Raspberry Pi 4 offre jusqu’à 8 Go de SDRAM LPDDR4-3200, tandis que le Raspberry Pi 5 est équipé d’une SDRAM LPDDR4X-4267, disponible en versions 2 Go, 4 Go, 8 Go et 16 Go.
Ces améliorations contribuent aux meilleurs résultats des modèles YOLO26 sur Raspberry Pi 5 par rapport au Raspberry Pi 4. Consulte le tableau Comparaison des séries Raspberry Pi pour en savoir plus.
Il existe deux méthodes pour configurer une caméra Raspberry Pi pour l’inférence avec YOLO26 :
-
Avec
picamera2:import cv2 from picamera2 import Picamera2 from ultralytics import YOLO picam2 = Picamera2() picam2.preview_configuration.main.size = (1280, 720) picam2.preview_configuration.main.format = "RGB888" picam2.preview_configuration.align() picam2.configure("preview") picam2.start() model = YOLO("yolo26n.pt") while True: frame = picam2.capture_array() results = model(frame) annotated_frame = results[0].plot() cv2.imshow("Camera", annotated_frame) if cv2.waitKey(1) == ord("q"): break cv2.destroyAllWindows() -
Avec un flux TCP :
rpicam-vid -n -t 0 --inline --listen -o tcp://127.0.0.1:8888from ultralytics import YOLO model = YOLO("yolo26n.pt") results = model("tcp://127.0.0.1:8888")
Pour obtenir des instructions détaillées sur la configuration, consulte la section Inférence avec une caméra.
-


Commentaires134
Pose une question, partage tes résultats ou aide quelqu’un d’autre.
smhty
Works great on Raspberry Pi 5. A tutorial for the AI kit that comes with Raspberry Pi 5 would be great as well: https://www.raspberrypi.com/products/ai-kit/
1 Glenn JocherUltralytics(modifié)
Hi there!
Thank you for your feedback and for sharing your positive experience on the Raspberry Pi 5! 😊
Creating a tutorial for the AI kit that comes with the Raspberry Pi 5 is a fantastic idea. In the meantime, you can refer to our comprehensive Quick Start Guide for Raspberry Pi with Ultralytics YOLO26, which provides detailed instructions on setting up and running YOLO on Raspberry Pi devices, including performance benchmarks.
For those interested in using the AI kit, the setup process should be quite similar. Here’s a quick overview to get you started:
-
Flash Raspberry Pi OS: Ensure you have the latest Raspberry Pi OS Bookworm (Debian 12) installed. Follow the Getting Started Documentation by Raspberry Pi to prepare your device.
-
Set Up Ultralytics:
- With Docker:
t=ultralytics/ultralytics:latest-arm64 && sudo docker pull $t && sudo docker run -it --ipc=host $t - Without Docker:
sudo apt update sudo apt install python3-pip -y pip install -U pip pip install ultralytics[export] sudo reboot
- With Docker:
-
Use NCNN for Best Performance: Convert your YOLO26 model to NCNN format for optimal performance on Raspberry Pi:
from ultralytics import YOLO # Load a YOLO26n PyTorch model model = YOLO("yolo26n.pt") # Export the model to NCNN format model.export(format="ncnn") # creates 'yolo26n_ncnn_model' # Load the exported NCNN model ncnn_model = YOLO("yolo26n_ncnn_model") # Run inference results = ncnn_model("https://ultralytics.com/images/bus.jpg") -
Using the Raspberry Pi Camera: For real-time video feeds, you can use the
picamera2library or set up a TCP stream:-
Using
picamera2:import cv2 from picamera2 import Picamera2 from ultralytics import YOLO picam2 = Picamera2() picam2.preview_configuration.main.size = (1280, 720) picam2.preview_configuration.main.format = "RGB888" picam2.preview_configuration.align() picam2.configure("preview") picam2.start() model = YOLO("yolo26n.pt") while True: frame = picam2.capture_array() results = model(frame) annotated_frame = results[0].plot() cv2.imshow("Camera", annotated_frame) if cv2.waitKey(1) == ord("q"): break cv2.destroyAllWindows() -
Using TCP Stream:
rpicam-vid -n -t 0 --inline --listen -o tcp://127.0.0.1:8888from ultralytics import YOLO model = YOLO("yolo26n.pt") results = model("tcp://127.0.0.1:8888")
-
We hope this helps you get started with the AI kit on your Raspberry Pi 5. For more detailed instructions and additional resources, please visit our Raspberry Pi Guide.
Happy coding! 🚀
-
wnelis
Today I've installed module ultralytics on a Raspberry Pi 4 with 4 [GiB] memory running Trixie. Some remarks about what I've learned: . Use the 64-bit variant of Raspberry OS; . Use an microSD card of at least 32 [GiB]; . Disable /tmp becoming a file system in memory (tmpfs):
sudo systemctl mask tmp.mount; . OpenCV is installed using apt, module ultralytics is installed in a virtual Python environment: 'python -m venv --system-site-packages `.It is found that YOLO runs into a hardware error: "Illegal instruction". This can be reproduced by using the Python script shown above to export the model in NCNN format. The output is:
Downloading https://github.com/ultralyti…: 100% ━━━━━━━━━━━━ 5.3MB 1.4MB/s 3.8s Ultralytics 8.4.191 🚀 Python-3.13.5 torch-2.14.1+cu130 CPU (aarch64) Illegal instruction
How can this issue be solved?
 Paula DerrengerUltralytics
@wnelis the most likely cause is a native PyTorch binary using instructions unsupported by the Pi 4’s CPU, rather than faulty hardware; similar crashes are documented in Ultralytics #19091 and upstream PyTorch, although your exact version is not confirmed affected. (github.com) Your log shows a CUDA build (
+cu130); first replace it with the matching official CPU-only packages inside your activated virtual environment, then retry the export: (pytorch.org)python -m pip install --force-reinstall torch==2.14.1 torchvision==0.29.1 --index-url https://download.pytorch.org/whl/cpuIf it still crashes, please share the text output of
yolo checksandpython -m pip show torch torchvisionfrom that same environment so we can identify package/path conflicts.
hm-zeroone(modifié)
"We haven’t validated Orbit OS yet, but if it supports tflite or onnx runtimes you should be able to deploy an exported Ultralytics YOLO26 model there using Export mode and the deployment options guide; if you try it, please share the exact device, export format, and any text error logs here in Discussions so the Ultralytics team can take a look."
Hi @glenn-jocher,
I added a new feature to my Orbit OS app to test YOLO models directly on edge devices, in this case a Raspberry Pi. The app now allows adding new models, and by default includes YOLO v8, v11 and v26.
We also introduced a benchmark mode, where you can select an image and run all models to compare performance and results.
In the example shown in the image, YOLOv8 achieved the highest number of correct object detections by time.
This demo video shows the remote deployment, no SSH, no Docker, of the app in action on Raspberry Pi 5 vs Arduino UNO Q and a comparison (“VS”) between the RPi 5 and UNO Q running YOLO v8. https://youtu.be/aiFJmosYVAI?si=v3Jo_TbswU3n-sZU
- Glenn JocherUltralytics
Thanks for sharing the Orbit OS benchmark; for a fair cross-model comparison please include the exact export/runtime backend,
imgsz, confidence/IoU thresholds, and per-image latency/FPS, since on Raspberry Pi CPU deployments NCNN is usually the best baseline for YOLO26. Hey! Thanks for the feedback. All models were tested under the same conditions — TFlite runtime, same image, same thresholds (conf=0.50, IoU=0.45), same imgsz 640×640 with letterbox preprocessing.
Everything runs through the OrbitOS SDK which currently has TFLite and ONNX embedded. NCNN is something we'll look into adding in a future release.
Quick question — for RPi deployments, would you recommend INT8 or float16 as the default export format?
Orbit OS SDK 26.0.1 Inference example.
Orbit OS is multi-language — For now only Go SDK is available, Python, Java and C++ SDKs are coming soon.
model, _ := device.AIManager.UploadAndLoadModel( "yolo8n", "models/yolo26n_float16.tflite", aiv26.ModelBackend_TFLITE, aiv26.ExecutionMode_EXEC_HIGH_THREADS, ) resp, _ := model.Infer(ctx, tensor.Data, tensor.Shape, tensor.Dtype) fmt.Println(resp.GetOutputShape()) // [1 84 8400] fmt.Println(resp.GetLatencyUs()) // e.g. 528000- Glenn JocherUltralytics(modifié)
For plain Raspberry Pi CPU deployment with
LiteRT(.tflite), I’d usually default toINT8for the best speed and memory savings, and usefloat16only if quantization hurts accuracy too much or your runtime performs better with FP kernels; if you benchmark both, the LiteRT export guide is the right reference, while our Raspberry Pi guide showsNCNNas the strongest baseline once you add that backend.1
safdarhamid64-cpu
when i write in raspberry pi terminal : from ultralytics import yolo error msg illegal instruction pops up , i have trained model and even i have first created environment and installed pip install ultralytics but still i am not able to run model yolo11n on my Raspberry Pi 4 , Guide me plzz
- Glenn JocherUltralytics
That
Illegal instructionon Raspberry Pi usually means an incompatible binary wheel (most oftentorch/numpypulled for the wrong arch/OS), and also note the correct import isfrom ultralytics import YOLO(capitalized), notyolo; please paste the text output ofyolo checksplus the full traceback here in this discussion, and confirmuname -m+ whether you’re on Raspberry Pi OS Bookworm 64-bit as in the Raspberry Pi YOLO26 guide; as a quick way to rule out env issues you can also try our ARM64 Docker flow from that guide:```bash t=ultralytics/ultralytics:latest-arm64 sudo docker pull $t && sudo docker run -it --ipc=host $t python -c "from ultralytics import YOLO; YOLO('yolo11n.pt')"
inuropix
Hi.. I get an error when implement botsort with reid is True and the model is ncnn(exported from yolo26n-cls.pt)
Here’s the full traceback from the error:
    self.tracks = self.model.track(
                  ^^^^^^^^^^^^^^^^^
 File "/home/sbr/people_counting/lib/python3.11/site-packages/ultralytics/engine/model.py", line 579, in track
    return self.predict(source=source, stream=stream, **kwargs)
           ^^^^^^^^^^^^^^^^^^^^^^^^^^^^^^^^^^^^^^^^^^^^^^^^^^^^
  File "/home/sbr/people_counting/lib/python3.11/site-packages/ultralytics/engine/model.py", line 536, in predict
    return self.predictor.predict_cli(source=source) if is_cli else self.predictor(source=source, stream=stream)
                                                                    ^^^^^^^^^^^^^^^^^^^^^^^^^^^^^^^^^^^^^^^^^^^^
  File "/home/sbr/people_counting/lib/python3.11/site-packages/ultralytics/engine/predictor.py", line 225, in __call__
    return list(self.stream_inference(source, model, *args, **kwargs))  # merge list of Results into one
           ^^^^^^^^^^^^^^^^^^^^^^^^^^^^^^^^^^^^^^^^^^^^^^^^^^^^^^^^^^^
  File "/home/sbr/people_counting/lib/python3.11/site-packages/torch/utils/_contextlib.py", line 40, in generator_context
    response = gen.send(None)
               ^^^^^^^^^^^^^^
  File "/home/sbr/people_counting/lib/python3.11/site-packages/ultralytics/engine/predictor.py", line 338, in stream_inference
    self.run_callbacks("on_predict_postprocess_end")
  File "/home/sbr/people_counting/lib/python3.11/site-packages/ultralytics/engine/predictor.py", line 509, in run_callbacks
    callback(self)
  File "/home/sbr/people_counting/lib/python3.11/site-packages/ultralytics/trackers/track.py", line 93, in on_predict_postprocess_end
    tracks = tracker.update(det, result.orig_img, getattr(result, "feats", None))
             ^^^^^^^^^^^^^^^^^^^^^^^^^^^^^^^^^^^^^^^^^^^^^^^^^^^^^^^^^^^^^^^^^^^^
  File "/home/sbr/people_counting/lib/python3.11/site-packages/ultralytics/trackers/byte_tracker.py", line 361, in update
    dists = self.get_dists(unconfirmed, detections)
            ^^^^^^^^^^^^^^^^^^^^^^^^^^^^^^^^^^^^^^^
  File "/home/sbr/people_counting/lib/python3.11/site-packages/ultralytics/trackers/bot_sort.py", line 220, in get_dists
    emb_dists = matching.embedding_distance(tracks, detections) / 2.0
                ^^^^^^^^^^^^^^^^^^^^^^^^^^^^^^^^^^^^^^^^^^^^^^^
  File "/home/sbr/people_counting/lib/python3.11/site-packages/ultralytics/trackers/utils/matching.py", line 128, in embedding_distance
    cost_matrix = np.maximum(0.0, cdist(track_features, det_features, metric))  # Normalized features
                                  ^^^^^^^^^^^^^^^^^^^^^^^^^^^^^^^^^^^^^^^^^^^
  File "/home/sbr/people_counting/lib/python3.11/site-packages/scipy/spatial/distance.py", line 2903, in cdist
    raise ValueError('XA must be a 2-dimensional array.')
ValueError: XA must be a 2-dimensional array.
Any idea?
- Glenn JocherUltralytics
That traceback usually means BoT-SORT didn’t get valid (2D) ReID embeddings; also note that
.track()should run with a Detect/Seg/Pose model, whileyolo26n-clsis only meant to be the ReID feature extractor configured insidebotsort.yaml(viawith_reid/model). (docs.ultralytics.com)yolo track model=yolo26n.pt source=path/to/video.mp4 tracker="botsort.yaml"# in a copy of botsort.yaml with_reid: True model: yolo26n-cls.pt # first confirm this works before swapping to an exported backendIf you just need stable tracking on Raspberry Pi, try
tracker="bytetrack.yaml"(no ReID); if you still hit this, please paste yourbotsort.yamland the output ofyolo checksso we can reproduce from the same environment. (docs.ultralytics.com)
hananabuzainab
I can't install ultralytics on rasspbery pi 5...with python 3.11 version,why??
I used: pip install ultralytics
How can i fix this problem ??
- Glenn JocherUltralytics
Can you paste the full
pip install ultralyticserror text (as text, not a screenshot) and the output ofpython3 -Vhere so we can pinpoint what’s failing? On Raspberry Pi 5 this is most often a Python/pip mismatch or non-Bookworm/32-bit setup—please also confirm you’re on Raspberry Pi OS Bookworm 64-bit as in the Raspberry Pi with Ultralytics YOLO26 guide.python3 -V python3 -m pip install -U pip setuptools wheel python3 -m venv .venv source .venv/bin/activate python -m pip install -U pip python -m pip install ultralytics
avasanjesh
Hi,
I want to use python version of raspberry pi 32 bit OS. can you please tell me if i can export yolo detection model in 32 bit raspberry pi?
Edward-YS
Hello,I'm wondering if there is Benchmarking Results of Two Different Models (YOLO8n, YOLO8s) Across Ten Formats: PyTorch, TF, ONNX, OpenVINO, TF SavedModel, TF GraphDef, TF Lite, PaddlePaddle, MNN, NCNN.
zyt2011
Installing a single Hailo-5 is sufficient.
发件人: Beautifulboy111 @.> 发送时间: 2025年4月22日 14:24 收件人: ultralytics/ultralytics @.> 抄送: zyt2011 @.>; Mention @.> 主题: Re: [ultralytics/ultralytics] zh/guides/raspberry-pi/ (Discussion #19489)
Why does my Raspberry Pi 5 have a high inference latency of 150ms when using NCNN for video recognition, even after overclocking? How can I reduce the inference time?
― Reply to this email directly, view it on GitHubhttps://github.com/orgs/ultralytics/discussions/19489#discussioncomment-12906311, or unsubscribehttps://github.com/notifications/unsubscribe-auth/BJ7DFR53TAD7QVJNO3TTXJL22XOAJAVCNFSM6AAAAABYEEJCHCVHI2DSMVQWIX3LMV43URDJONRXK43TNFXW4Q3PNVWWK3TUHMYTEOJQGYZTCMI. You are receiving this because you were mentioned.Message ID: @.***>
- Glenn JocherUltralytics(modifié)
@Beautifulboy111 150ms inference latency with NCNN on Raspberry Pi 5 is higher than expected. Here are some steps to reduce it:
-
Use a smaller YOLO26 model - our benchmarks show YOLO26n is significantly faster than YOLO26s with NCNN on Pi 5 (67ms vs 173ms)
-
Reduce input resolution - try 320x320 instead of 640x640, which can cut inference time by up to 70%
-
Optimize memory allocation by running without GUI (Raspberry Pi OS Lite)
-
Ensure you're using proper cooling for sustained performance when overclocked
-
Consider processing at lower FPS if your application allows it
Regarding @zyt2011's suggestion, while accelerators like Hailo can boost performance, they're a separate investment. I'd recommend optimizing your current setup first using the techniques in our Raspberry Pi guide.
What's your specific use case? This would help us provide more targeted optimization advice.
-
Beautifulboy111
Why does my Raspberry Pi 5 have a high inference latency of 150ms when using NCNN for video recognition, even after overclocking? How can I reduce the inference time?