Link to this sectionUltralytics Platform#
Ultralytics Platform is a comprehensive end-to-end computer vision platform that streamlines the entire ML workflow from data preparation to model deployment. Built for teams and individuals who need production-ready computer vision solutions without the infrastructure complexity.
Link to this sectionWhat is Ultralytics Platform?#
Ultralytics Platform brings dataset management and annotation, experiment tracking, cloud and remote training, model export, dedicated inference endpoints, and deployment monitoring into one workspace. It has native support for YOLO26 and YOLO11 models.
Link to this sectionWorkflow: Upload → Annotate → Train → Export → Deploy#
The Platform provides an end-to-end workflow:
graph LR
    subgraph Data["📁 Data"]
        A[Upload]:::start --> B[Annotate]:::proc
        B --> C[Analyze]:::proc
    end
    subgraph Train["🚀 Train"]
        D[Configure]:::proc --> E[Train on GPU]:::proc
        E --> F[View Metrics]:::out
    end
    subgraph Deploy["🌐 Deploy"]
        G[Export]:::proc --> H[Deploy Endpoint]:::proc
        H --> I[Monitor]:::out
    end
    Data --> Train --> Deploy

    classDef start fill:#4CAF50,color:#fff
    classDef proc fill:#2196F3,color:#fff
classDef out fill:#9C27B0,color:#fff| Stage | Features |
|---|---|
| Upload | Images (50MB), videos (1GB), and dataset files (ZIP, TAR including .tar.gz/.tgz, NDJSON) with automatic processing |
| Annotate | Manual tools for all 6 task types, plus Smart Annotation with SAM and YOLO models for detect, segment, semantic, and OBB (see supported tasks) |
| Train | Cloud GPUs (24 on all plans + 2 Pro/Enterprise-only: B200, B300), real-time metrics, project organization |
| Export | 20 deployment formats (ONNX, TensorRT, CoreML, LiteRT, Hailo, Ascend, etc.; see supported formats) |
| Deploy | 42 global regions with dedicated endpoints, scale-to-zero by default (single active instance), and monitoring |
What you can do:
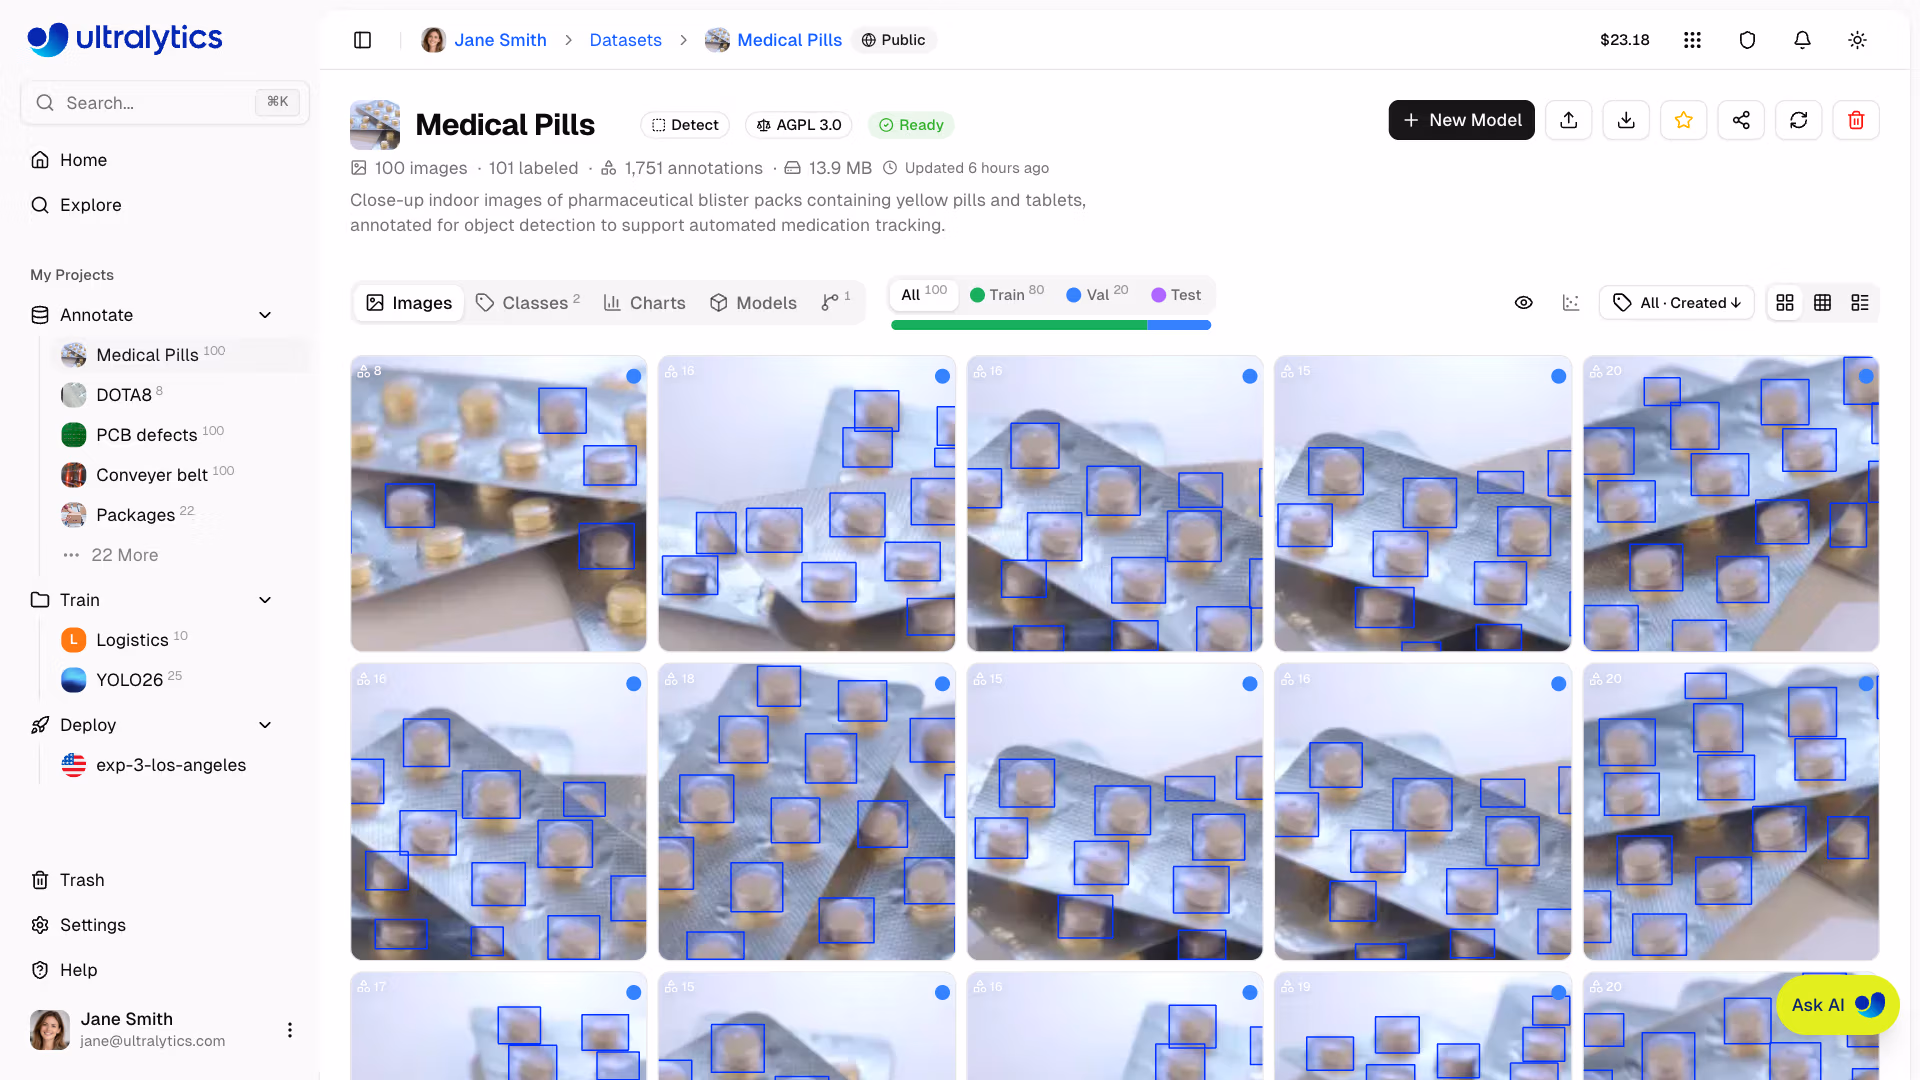
- Upload images, videos, and dataset files to create training datasets
- Visualize annotations with interactive overlays for all 6 YOLO task types (see supported tasks)
- Train models on cloud GPUs (24 on all plans, 26 with Pro or Enterprise for B200 and B300) with real-time metrics
- Export to 20 deployment formats (ONNX, TensorRT, CoreML, LiteRT, Hailo, Ascend, etc.)
- Deploy to 42 global regions with one-click dedicated endpoints
- Monitor training progress, deployment health, and usage metrics
- Collaborate by making projects and datasets public for the community
Link to this sectionMulti-Region Infrastructure#
Your data stays in your region. Ultralytics Platform operates infrastructure in three global regions:
| Region | Label | Location | Best For |
|---|---|---|---|
| US | Americas | Iowa, USA | Americas users, fastest for Americas |
| EU | Europe, Middle East & Africa | Belgium, Europe | European users, GDPR compliance |
| AP | Asia Pacific | Taiwan, Asia-Pacific | Asia-Pacific users, lowest APAC latency |
You select your data region during onboarding. Datasets, models, and managed training data remain in that region. Dedicated endpoints are deployed separately to a region you choose from the global deployment map.
You cannot change your data region yourself after account creation. During onboarding, the Platform measures latency to each region and recommends the closest one. Contact support if you later need to request a region change. This applies to dataset and model content; account-level data such as profile, billing, and activity records is processed globally, as described in our Privacy Policy and Data Processing Agreement.
Link to this sectionKey Features#
Link to this sectionData Preparation#
- Dataset Management: Upload images, videos, or dataset files with automatic processing
- Annotation Editor: Manual annotation for all 6 YOLO task types (detect, segment, semantic, pose, OBB, classify; see supported tasks)
- Skeleton Templates: Built-in (Person, Hand, Face, Dog, Box) and custom skeleton templates for one-click pose annotation
- Smart Annotation: Use SAM 2.1 (Tiny, Small, Base, Large), SAM 3, pretrained Ultralytics YOLO models, or your own fine-tuned YOLO models from the annotation toolbar for detect, segment, semantic, and OBB tasks
- Dataset Versioning: Create numbered NDJSON snapshots with descriptions for reproducible training
- Statistics: Class distribution, location heatmaps, and dimension analysis
graph LR
    A[Upload Dataset/Images/Video]:::start --> B[Auto-Process]:::proc
    B --> C[Browse & Filter]:::proc
    C --> D{Annotate}:::decide
    D --> E[Manual Tools]:::proc
    D --> F[SAM Smart]:::proc
    D --> G[YOLO Auto-Label]:::proc
    E --> H[Train-Ready Dataset]:::out
    F --> H
    G --> H

    classDef start fill:#4CAF50,color:#fff
    classDef proc fill:#2196F3,color:#fff
    classDef decide fill:#FF9800,color:#fff
classDef out fill:#9C27B0,color:#fffLink to this sectionModel Training#
- Cloud Training: Train on cloud GPUs (24 on all plans, 26 with Pro or Enterprise for B200 and B300) with real-time metrics
- Remote Training: Train anywhere and stream metrics to Ultralytics Platform
- Project Organization: Group related models, compare experiments, track activity
- 20 Export Formats: ONNX, TensorRT, CoreML, LiteRT, Hailo, Ascend, and more (see supported formats)
 You can train models either through the web UI (cloud training) or from your own machine (remote training):
- Navigate to your project
- Click
New Model - Select dataset, model, GPU, and epochs
- Monitor real-time loss curves and metrics
Link to this sectionDeployment#
- Inference Testing: Test models directly in the browser with custom images
- Dedicated Endpoints: Deploy to 42 global regions with scale-to-zero by default (single active instance)
- Monitoring: Real-time metrics, request logs, and performance dashboards
graph LR
    A[Trained Model]:::start --> B{Action}:::decide
    B --> C[Browser Predict]:::proc
    B --> D[Export Format]:::proc
    B --> E[Deploy Endpoint]:::proc
    D --> F[ONNX / TensorRT / CoreML / LiteRT / ...]:::out
    E --> G[42 Global Regions]:::proc
    G --> H[API Endpoint URL]:::proc
    H --> I[Monitor & Scale]:::out

    classDef start fill:#4CAF50,color:#fff
    classDef proc fill:#2196F3,color:#fff
    classDef decide fill:#FF9800,color:#fff
    classDef out fill:#9C27B0,color:#fff
Once deployed, call your endpoint from any language:
import requests

url = "https://your-endpoint-url/predict"
headers = {"Authorization": "Bearer YOUR_API_KEY"}

with open("image.jpg", "rb") as f:
    response = requests.post(url, headers=headers, files={"file": f})

print(response.json())
Link to this sectionAccount Management#
- Teams & Organizations: Collaborate with team members, manage roles and invites
- API Keys: Secure key management for remote training and API access
- Credits & Billing: Pay-as-you-go training with transparent pricing
- Activity Feed: Track all account events and actions
- Trash & Restore: 30-day soft delete with item recovery
- GDPR Compliance: Data export and account deletion
See the canonical Free, Pro, and Enterprise comparison for current limits, GPU access, collaboration, and licensing.
Link to this sectionQuick Links#
Get started with these resources:
- Quickstart: Create your first project and train a model in minutes
- Datasets: Upload and manage your training data
- Annotation: Label your data with manual and AI-assisted tools
- Projects: Organize your models and experiments
- Cloud Training: Train on cloud GPUs
- Inference: Test your models
- Endpoints: Deploy models to production
- Monitoring: Track deployment performance
- API Keys: Manage API access
- Billing: Credits and payment
- Activity: Track account events
- Trash: Recover deleted items
- REST API: API reference
Link to this sectionFAQ#
Link to this sectionHow do I get started with Ultralytics Platform?#
To get started with Ultralytics Platform:
- Sign Up: Create an account at platform.ultralytics.com
- Select Region: Choose your data region (US, EU, or AP) during onboarding
- Upload Dataset: Open
Annotatein the sidebar and upload your data - Train Model: Create a project and start training on cloud GPUs
- Deploy: Test your model and deploy to a dedicated endpoint
For a detailed guide, see the Quickstart page.
Link to this sectionWhat are the benefits of Ultralytics Platform?#
Ultralytics Platform offers:
- Unified Workflow: Data, training, and deployment in one place
- Multi-Region: Data residency in US, EU, or AP regions
- No-Code Training: Train advanced YOLO models without writing code
- Real-Time Metrics: Stream training progress and monitor deployments
- 42 Deploy Regions: Deploy models close to your users worldwide
- 7 Task Types: Support for detection, instance segmentation, semantic segmentation, depth estimation (models and prediction today; depth datasets coming soon), pose, OBB, and classification (see task docs)
- AI-Assisted Annotation: Smart annotation with SAM and YOLO models to speed up data preparation
Link to this sectionWhat GPU options are available for cloud training?#
Ultralytics Platform supports multiple GPU types for cloud training:
| GPU | Generation | VRAM | Cost/Hour | Best For |
|---|---|---|---|---|
| RTX 2000 Ada | Ada | 16 GB | $0.24 | Small datasets, testing |
| RTX A4500 | Ampere | 20 GB | $0.25 | Small-medium datasets |
| RTX 4000 Ada | Ada | 20 GB | $0.26 | Medium datasets |
| RTX A5000 | Ampere | 24 GB | $0.27 | Medium datasets |
| L4 | Ada | 24 GB | $0.39 | Inference optimized |
| A40 | Ampere | 48 GB | $0.44 | Larger batch sizes |
| RTX 3090 | Ampere | 24 GB | $0.46 | General training |
| RTX A6000 | Ampere | 48 GB | $0.49 | Large models |
| RTX PRO 4000 | Blackwell | 24 GB | $0.57 | Budget Blackwell |
| RTX PRO 4500 | Blackwell | 32 GB | $0.64 | Great price/performance |
| RTX 4090 | Ada | 24 GB | $0.69 | Best price/performance |
| RTX 6000 Ada | Ada | 48 GB | $0.77 | Large batch training |
| L40S | Ada | 48 GB | $0.86 | Large batch training |
| RTX PRO 5000 | Blackwell | 48 GB | $0.96 | Large batch training |
| RTX 5090 | Blackwell | 32 GB | $0.99 | Latest consumer generation |
| L40 | Ada | 48 GB | $0.99 | Large models |
| A100 PCIe | Ampere | 80 GB | $1.39 | Production training |
| A100 SXM | Ampere | 80 GB | $1.49 | Production training |
| RTX PRO 6000 | Blackwell | 96 GB | $2.09 | Recommended default |
| H100 PCIe | Hopper | 80 GB | $2.89 | High-performance training |
| H100 NVL | Hopper | 94 GB | $3.19 | Maximum performance |
| H100 SXM | Hopper | 80 GB | $3.29 | Fastest training |
| H200 NVL | Hopper | 143 GB | $3.39 | Maximum memory |
| H200 SXM | Hopper | 141 GB | $4.39 | Maximum performance |
| B200 | Blackwell | 180 GB | $5.89 | Large models (Pro+) |
| B300 | Blackwell | 288 GB | $7.39 | Largest models (Pro+) |
See Cloud Training for complete pricing and GPU options.
Link to this sectionHow does remote training work?#
You can train models on your own hardware and stream real-time metrics to Ultralytics Platform.
Platform integration requires ultralytics>=8.4.104. Lower versions will NOT work with Platform.
pip install "ultralytics>=8.4.104"# Set your API key
export ULTRALYTICS_API_KEY="YOUR_API_KEY"
# Train with project/name to stream metrics
yolo train model=yolo26n.pt data=coco.yaml epochs=100 project=username/my-project name=exp1See Cloud Training for more details on remote training.
Link to this sectionWhat annotation tools are available?#
The Platform includes a full-featured annotation editor supporting:
- Manual Tools: Bounding boxes, polygons, keypoints with skeleton templates, oriented boxes, classification
- Skeleton Templates: Place all keypoints at once using built-in (Person, Hand, Face, Dog, Box) or custom templates
- Smart Annotation: Use SAM 2.1 or SAM 3 for click-based annotation, or run pretrained Ultralytics YOLO models and your own fine-tuned YOLO models from the toolbar for detect, segment, semantic, and OBB
- Keyboard Shortcuts: Efficient workflows with hotkeys
| Shortcut | Action |
|---|---|
V | Manual (draw) mode |
S | Smart mode (SAM or YOLO model) |
A | Toggle auto-apply (in Smart mode) |
1 - 9 | Select class by number |
Delete | Delete selected annotation |
Ctrl+Z | Undo |
Ctrl+Y | Redo |
Escape | Save / deselect / exit |
See Annotation for the complete guide.
Link to this sectionWhat export formats are supported?#
The Platform supports the same 20 deployment formats as Ultralytics Export mode. PyTorch is the source format; each row with a format argument is an export target.
| Format | format Argument | Model | Metadata | Arguments |
|---|---|---|---|---|
| PyTorch | - | yolo26n.pt | ✅ | - |
| TorchScript | torchscript | yolo26n.torchscript | ✅ | imgsz, quantize, dynamic, nms, batch, device |
| ONNX | onnx | yolo26n.onnx | ✅ | imgsz, quantize, dynamic, simplify, opset, nms, batch, data, fraction, device |
| OpenVINO | openvino | yolo26n_openvino_model/ | ✅ | imgsz, quantize, dynamic, nms, batch, data, fraction, device |
| TensorRT | engine | yolo26n.engine | ✅ | imgsz, quantize, dynamic, simplify, opset, workspace, nms, batch, data, fraction, device |
| CoreML | coreml | yolo26n.mlpackage | ✅ | imgsz, dynamic, quantize, nms, batch, device |
| TF SavedModel | saved_model | yolo26n_saved_model/ | ✅ | imgsz, keras, quantize, opset, nms, batch, data, fraction, device |
| TF GraphDef | pb | yolo26n.pb | ❌ | imgsz, opset, batch, device |
| TF Edge TPU | edgetpu | yolo26n_edgetpu.tflite | ✅ | imgsz, quantize, opset, data, fraction, device |
| PaddlePaddle | paddle | yolo26n_paddle_model/ | ✅ | imgsz, batch, device |
| MNN | mnn | yolo26n.mnn | ✅ | imgsz, batch, dynamic, quantize, simplify, opset, nms, device |
| NCNN | ncnn | yolo26n_ncnn_model/ | ✅ | imgsz, quantize, batch, device |
| IMX500 | imx | yolo26n_imx_model/ | ✅ | imgsz, quantize, data, fraction, nms, device |
| RKNN | rknn | yolo26n_rknn_model/ | ✅ | imgsz, batch, name, quantize, simplify, opset, data, fraction, device |
| ExecuTorch | executorch | yolo26n_executorch_model/ | ✅ | imgsz, batch, device |
| Axelera | axelera | yolo26n_axelera_model/ | ✅ | imgsz, batch, quantize, data, fraction, device |
| DEEPX | deepx | yolo26n_deepx_model/ | ✅ | imgsz, quantize, simplify, opset, data, optimize, device |
| Qualcomm QNN | qnn | yolo26n_qnn.onnx | ✅ | imgsz, batch, name, quantize, simplify, opset, data, fraction, device |
| LiteRT | litert | yolo26n.tflite | ✅ | imgsz, quantize, batch, data, fraction, device |
| Hailo | hailo | yolo26n_hailo_model/ | ✅ | imgsz, name, quantize, data, fraction, simplify, conf, iou |
| Huawei Ascend | ascend | yolo26n_ascend_model/ | ✅ | imgsz, batch, name, quantize, opset, simplify, nms |
See Models Export, the Export mode guide, and the Integrations index for format-specific options.
Link to this sectionTroubleshooting#
Link to this sectionDataset Issues#
| Problem | Solution |
|---|---|
| Dataset won't process | Check file format is supported (JPEG, PNG, WebP, TIFF, HEIC, AVIF, BMP, JP2, DNG, MPO for images). Max file size: images 50 MB, videos 1 GB, dataset archives 10 GB (Free) / 20 GB (Pro) / 50 GB (Enterprise) |
| Missing annotations | Verify labels are in YOLO format with .txt files matching image filenames, or upload COCO JSON |
| "Train split required" | Add train/ folder to your dataset structure, or redistribute splits via the split bar |
| Class names undefined | Add a data.yaml file with names: list (see YOLO format), or define classes in the Classes tab |
Link to this sectionTraining Issues#
| Problem | Solution |
|---|---|
| Training won't start | Check credit balance in Settings > Billing. Positive balance required |
| Out of memory error | Reduce batch size, use smaller model (n/s), or select GPU with more VRAM |
| Poor metrics | Check dataset quality, increase epochs, try data augmentation, verify class balance |
| Training slow | Select faster GPU, reduce image size, check dataset isn't bottlenecked |
Link to this sectionDeployment Issues#
| Problem | Solution |
|---|---|
| Endpoint not responding | Check endpoint status (Ready vs Stopped). Cold start may take 5-15 seconds |
| 401 Unauthorized | Verify the API key is active and copied correctly |
| Slow inference | Check model size, consider TensorRT export, select closer region |
| Export failed | Some formats require specific model architectures. Try ONNX for broadest compatibility |
Link to this sectionCommon Questions#
Can I change my username after signup?
No, usernames are permanent and cannot be changed. Choose carefully during signup.
Can I change my data region?
Your data region is selected during onboarding and can't be changed yourself. To switch regions, contact support to request a region change.
How do I get more credits?
Go to Settings > Billing and click Top Up. Purchase credits from $5 to $1,000. Purchased credits never expire.
What happens if training fails?
If cloud compute had started, elapsed GPU time is charged. Failures before a GPU starts have no compute usage charge.
Can I download my trained model?
Yes. Click the download icon on a model page for its .pt weights, or open the Export tab for completed exported formats.
How do I share my work publicly?
Open the project or dataset, click its Private badge in the top navigation bar, and confirm Make Public. Public content appears on the Explore page.
What are the file size limits?
Images: 50MB, Videos: 1GB, datasets: 10GB on Free, 20GB on Pro, 50GB on Enterprise. For larger files, split into multiple uploads.
How long are deleted items kept in Trash?
30 days. After that, items are permanently deleted and cannot be recovered.
Can I use Platform models commercially?
Free and Pro plans use the AGPL license. For commercial use without AGPL requirements, see Ultralytics Licensing.