Ultralyticsで行うK分割交差検証
はじめに#
このガイドでは、UltralyticsエコシステムでK分割交差検証を物体検出データセット向けに実装する方法を説明します。YOLOの検出形式と、scikit-learn、pandas、PyYAMLなどのPythonライブラリを使用して、セットアップ、特徴ベクトルの生成、K分割法によるデータセット分割の実行手順を順に説明します。
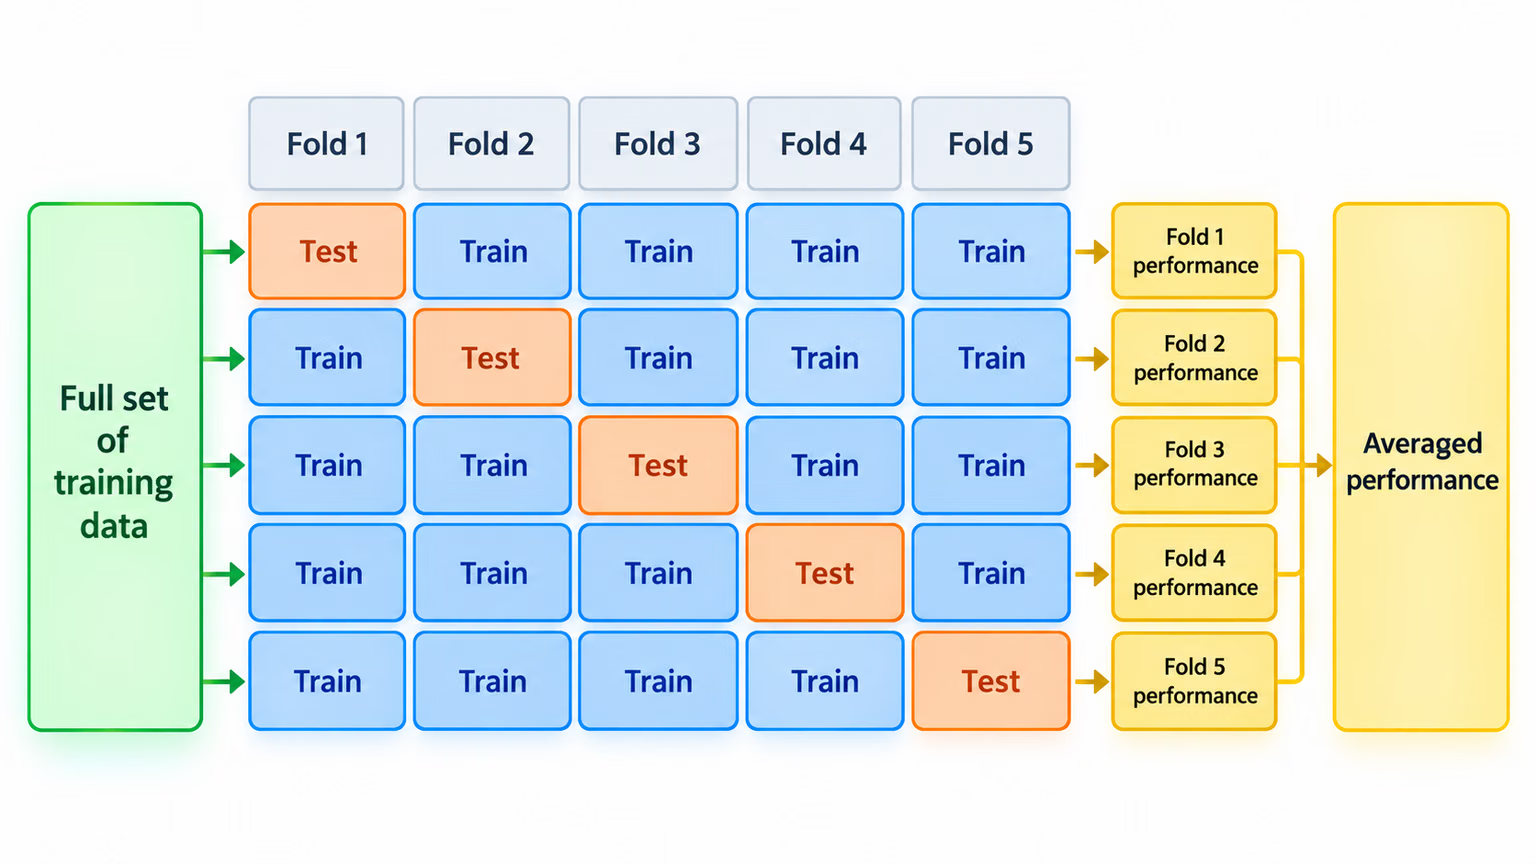
プロジェクトでFruit Detectionデータセットを使用する場合でも、カスタムデータソースを使用する場合でも、このチュートリアルはK分割交差検証を理解して適用し、機械学習モデルの信頼性と堅牢性を高めるのに役立ちます。このチュートリアルではk=5分割で進めていますが、最適な分割数はデータセットやプロジェクトの詳細によって異なる場合がある点に留意してください。データセットの規模が小さい場合、ノイズが多い場合、または変動が大きい場合にはK分割交差検証が最も効果を発揮する一方、大規模で多様なデータセットでは、通常、適切に構成された学習・検証・テストデータの分割で十分です。
セットアップ#
-
アノテーションはYOLO検出フォーマットに従っている必要があります。
-
このガイドでは、アノテーションファイルがローカルで利用可能であることを前提とします。
-
このデモでは、Fruit Detectionデータセットを使用します。
- このデータセットには合計8479枚の画像が含まれています。
- 6つのクラスラベルが含まれており、それぞれのインスタンス数を以下に示します。
| クラスラベル | インスタンス数 |
|---|---|
| リンゴ | 7049 |
| ブドウ | 7202 |
| パイナップル | 1613 |
| オレンジ | 15549 |
| バナナ | 3536 |
| スイカ | 1976 |
-
必要なPythonパッケージは次のとおりです。
ultralyticssklearnpandaspyyaml
-
このチュートリアルでは
k=5個のfoldを使用します。ただし、使用するデータセットに最適なfold数はご自身で判断してください。
-
プロジェクト用に新しいPython仮想環境(
venv)を作成して有効化します。pip(または任意のパッケージマネージャー)を使って、次のものをインストールします。- Ultralyticsライブラリ:
pip install -U ultralytics。または、公式リポジトリをクローンできます。 - Scikit-learn、pandas、PyYAML:
pip install -U scikit-learn pandas pyyaml。
- Ultralyticsライブラリ:
-
アノテーションがYOLO検出フォーマットに従っていることを確認します。
- このチュートリアルでは、すべてのアノテーションファイルが
Fruit-Detection/labelsディレクトリにあるものとします。
- このチュートリアルでは、すべてのアノテーションファイルが
物体検出データセットの特徴ベクトルを生成する#
-
まず、以下の手順を記述する新しいPythonファイル
example.pyを作成します。 -
Ultralyticsの
YOLODatasetクラスを使って、データセットYAMLに記載された学習用画像と検証用画像を読み込みます。テスト分割には手を加えません。from pathlib import Path from ultralytics.data.dataset import YOLODataset from ultralytics.data.utils import check_det_dataset yaml_file = "path/to/data.yaml" data = check_det_dataset(yaml_file) dataset_path = Path(data["path"]) sources = [] for split in ("train", "val"): source = data.get(split) if source: sources.extend(source if isinstance(source, list) else [source]) dataset = YOLODataset(sources, data=data, augment=False) images = [Path(p) for p in dataset.im_files] -
次に、データセットのYAMLファイルの内容を読み込み、クラスラベルのインデックスを抽出します。
classes = data["names"] cls_idx = sorted(classes.keys()) -
空の
pandasDataFrameを初期化します。import pandas as pd labels_df = pd.DataFrame(0.0, columns=cls_idx, index=images) -
アノテーションファイルに含まれる各クラスラベルのインスタンス数を数えます。
from collections import Counter for image, label in zip(images, dataset.labels): lbl_counter = Counter(label["cls"].flatten().astype(int)) labels_df.loc[image, list(lbl_counter)] = list(lbl_counter.values()) -
データを格納したDataFrameの例を以下に示します。
                                                       0    1    2    3    4    5
'0000a16e4b057580_jpg.rf.00ab48988370f64f5ca8ea4...'  0.0  0.0  0.0  0.0  0.0  7.0
'0000a16e4b057580_jpg.rf.7e6dce029fb67f01eb19aa7...'  0.0  0.0  0.0  0.0  0.0  7.0
'0000a16e4b057580_jpg.rf.bc4d31cdcbe229dd022957a...'  0.0  0.0  0.0  0.0  0.0  7.0
'00020ebf74c4881c_jpg.rf.508192a0a97aa6c4a3b6882...'  0.0  0.0  0.0  1.0  0.0  0.0
'00020ebf74c4881c_jpg.rf.5af192a2254c8ecc4188a25...'  0.0  0.0  0.0  1.0  0.0  0.0
 ...                                                  ...  ...  ...  ...  ...  ...
'ff4cd45896de38be_jpg.rf.c4b5e967ca10c7ced3b9e97...'  0.0  0.0  0.0  0.0  0.0  2.0
'ff4cd45896de38be_jpg.rf.ea4c1d37d2884b3e3cbce08...'  0.0  0.0  0.0  0.0  0.0  2.0
'ff5fd9c3c624b7dc_jpg.rf.bb519feaa36fc4bf630a033...'  1.0  0.0  0.0  0.0  0.0  0.0
'ff5fd9c3c624b7dc_jpg.rf.f0751c9c3aa4519ea3c9d6a...'  1.0  0.0  0.0  0.0  0.0  0.0
'fffe28b31f2a70d4_jpg.rf.7ea16bd637ba0711c53b540...'  0.0  6.0  0.0  0.0  0.0  0.0
各行には画像の絶対パスを使用し、各列はクラスラベルのインデックスに対応します。ラベルがない場合は、すべてゼロの背景行として残します。このデータ構造により、物体検出データセットにK分割交差検証を適用できます。
K分割データセット分割#
-
次に、
sklearn.model_selectionのKFoldクラスを使用して、データセットをk個に分割します。- 重要:
shuffle=Trueを設定すると、分割内のクラスがランダムに分布します。Mに任意の整数を指定してrandom_state=Mを設定すると、再現可能な結果を得られます。
from sklearn.model_selection import KFold ksplit = 5 kf = KFold(n_splits=ksplit, shuffle=True, random_state=20) # 再現可能な結果を得るためにrandom_stateを設定 kfolds = list(kf.split(labels_df)) - 重要:
-
データセットは
k個のfoldに分割され、各foldにはtrainとvalのインデックスのリストが含まれます。結果をわかりやすく表示するために、DataFrameを作成します。folds = [f"split_{n}" for n in range(1, ksplit + 1)] folds_df = pd.DataFrame(index=labels_df.index, columns=folds) for i, (train, val) in enumerate(kfolds, start=1): folds_df.loc[labels_df.index[train], f"split_{i}"] = "train" folds_df.loc[labels_df.index[val], f"split_{i}"] = "val" -
次に、各foldのクラスラベルの分布を、
valに含まれるクラス数に対するtrainに含まれるクラス数の比率として計算します。fold_lbl_distrb = pd.DataFrame(index=folds, columns=cls_idx) for n, (train_indices, val_indices) in enumerate(kfolds, start=1): train_totals = labels_df.iloc[train_indices].sum() val_totals = labels_df.iloc[val_indices].sum() # To avoid division by zero, we add a small value (1E-7) to the denominator ratio = val_totals / (train_totals + 1e-7) fold_lbl_distrb.loc[f"split_{n}"] = ratio理想的には、各分割およびクラス間で、すべてのクラス比率がある程度近い値になります。ただし、これはデータセットの特性によって異なります。
-
各分割の画像リストとデータセットYAMLを作成します。テキストリストを使用すると、データセットを
k回複製せずに済みます。import yaml save_path = dataset_path.parent / f"{ksplit}-Fold_Cross-val" save_path.mkdir(parents=True, exist_ok=True) ds_yamls = [] for split in folds_df.columns: for partition in ("train", "val"): split_images = folds_df.index[folds_df[split] == partition] paths = "\n".join(map(str, split_images)) (save_path / f"{split}_{partition}.txt").write_text(f"{paths}\n") dataset_yaml = save_path / f"{split}.yaml" ds_yamls.append(dataset_yaml) with open(dataset_yaml, "w") as ds_y: yaml.safe_dump( { "path": save_path.as_posix(), "train": f"{split}_train.txt", "val": f"{split}_val.txt", "names": classes, }, ds_y, )
レコードの保存(任意)#
任意で、K分割の分割結果とラベル分布のDataFrameをCSVファイルとして保存し、後から参照できます。
folds_df.to_csv(save_path / "kfold_datasplit.csv")
fold_lbl_distrb.to_csv(save_path / "kfold_label_distribution.csv")K分割データ分割を使用してYOLOを学習する#
-
まず、YOLOモデルを読み込みます。
from ultralytics import YOLO weights_path = "path/to/weights.pt" # 小型モデルにはyolo26n.ptを使用 model = YOLO(weights_path, task="detect") -
次に、データセットYAMLファイルを順に処理して学習を実行します。結果は、
project引数とname引数で指定したディレクトリに保存されます。デフォルトのディレクトリはruns/detect/train#で、#は整数のインデックスです。results = {} # Define your additional arguments here batch = 16 project = "kfold_demo" epochs = 100 for k, dataset_yaml in enumerate(ds_yamls): model = YOLO(weights_path, task="detect") results[k] = model.train( data=dataset_yaml, epochs=epochs, batch=batch, project=project, name=f"fold_{k + 1}" ) # include any additional train arguments -
データセットを自動的に分割するには、Ultralyticsのautosplit関数も使用できます。
from ultralytics.data.split import autosplit

# データセットをtrain/val/testに自動分割
autosplit(path="path/to/images", weights=(0.8, 0.2, 0.0), annotated_only=True)
結論#
このガイドでは、YOLO物体検出モデルの学習にK分割交差検証を使用する手順を説明しました。学習用と検証用のデータをK個の分割に分ける方法と、生成された比率テーブルを使ってランダム分割後のクラスバランスを確認する方法を紹介しました。
さらに、データ分割や各分割のラベル分布を可視化するレポート用DataFrameの作成手順も確認しました。これにより、学習セットと検証セットの構成を明確に把握できます。
任意で、後から参照できるようにレコードを保存しました。これは大規模プロジェクトやモデルのパフォーマンスのトラブルシューティングで特に役立つ場合があります。
最後に、各分割をループ処理して実際にモデルを学習し、さらなる分析や比較に使えるよう学習結果を保存しました。
K分割交差検証は、利用可能なデータを最大限に活用する堅牢な方法であり、異なるデータサブセット間でモデルのパフォーマンスが信頼でき、一貫したものになるように役立ちます。その結果、特定のデータパターンに過学習しにくく、汎化性能と信頼性の高いモデルを得られます。
このガイドではYOLOを使用しましたが、これらの手順の大部分は他の機械学習モデルにも応用できます。これらの手順を理解すれば、ご自身の機械学習プロジェクトで交差検証を効果的に適用できます。
よくある質問#
K分割交差検証は、データセットを「k」個のサブセット(fold)に分割し、モデルのパフォーマンスをより信頼性高く評価する手法です。各foldは学習データと検証データの両方として機能します。物体検出では、K分割交差検証を使用すると、異なるデータ分割間でUltralytics YOLOモデルのパフォーマンスが堅牢で汎化可能であることを確認し、信頼性を高められます。Ultralytics YOLOでK分割交差検証を設定する詳しい手順については、Ultralyticsで行うK分割交差検証を参照してください。
Ultralytics YOLOでK分割交差検証を実装するには、次の手順に従います。
- アノテーションがYOLO検出フォーマットに従っていることを確認します。
sklearn、pandas、pyyamlなどのPythonライブラリを使用します。- データセットから特徴ベクトルを作成します。
sklearn.model_selectionのKFoldを使用してデータセットを分割します。- 各分割でYOLOモデルを学習します。
包括的なガイドについては、ドキュメントのK分割データセット分割のセクションを参照してください。
このガイドのワークフローはYOLO検出フォーマットを対象としていますが、同じ方法をすべてのYOLOタスクに応用できます。タスクによって変わるのはfoldの構成方法であり、交差検証が有効かどうかではありません。
タスク foldの設計 detect画像単位で分割し、fold間でオブジェクトとクラスの分布を均衡させます。関連する画像(同じ患者、動画シーケンス、カメラ、または場所の画像)は、同じfold内にまとめます。 segment検出と同じ画像単位の方法を使い、さらに各foldでマスクとクラスの網羅性を維持します。 classify学習データと検証データ間でクラスの頻度が均衡するよう、層化foldを優先します。 pose被験者またはシーケンス単位で分割し、同じ人物や動物がfoldの両側に現れないようにします。 obb画像単位で分割し、特に航空画像では、同じシーンのタイルやクロップを同じfoldにまとめます。 タスクの種類にかかわらず、ほぼ同一のサンプルや関連性の高いサンプルが別々のフォールドに分かれないようにしてください。この種のデータリークがあると、検証指標が本番環境でモデルが達成する値を大幅に上回ります。
Ultralytics YOLOは、高い精度と効率を備えた最先端のリアルタイム物体検出を提供します。検出、インスタンスセグメンテーション、セマンティックセグメンテーション、分類など、複数のコンピュータービジョンタスクに対応する汎用性を備えています。さらに、コード不要のモデルのトレーニングとデプロイを可能にするUltralytics Platformなどのツールと統合できます。
アノテーションはYOLO検出フォーマットに従う必要があります。各アノテーションファイルには、オブジェクトのクラスと、画像内のバウンディングボックスの座標を記述します。YOLOフォーマットにより、物体検出モデルの学習に向けたデータ処理を効率化し、標準化できます。適切なアノテーション形式について詳しくは、YOLO検出フォーマットガイドをご覧ください。
はい、アノテーションがYOLO検出フォーマットに従っていれば、任意のカスタムデータセットでK分割交差検証を使用できます。データセットのパスとクラスラベルを、カスタムデータセットに固有のものに置き換えてください。この柔軟性により、あらゆる物体検出プロジェクトでK分割交差検証を用いた堅牢なモデル評価が可能になります。実例については、特徴ベクトルの生成のセクションをご覧ください。


コメント23
質問したり、結果を共有したり、ほかの人をサポートしたりできます。
 chenxin liao
我有一个理论性的问题想咨询,文章最后谈到 “这样可以得到泛化能力更强、可靠性更高的模型,降低模型对特定数据模式过拟合的可能性。” ,那么K折交叉验证到底是验证并展示模型的稳健性,还是用于增强模型的泛化能力(扩充训练集)?依据我的理解更偏向于前者,谢谢!
 Paula DerrengerUltralytics
你的理解是对的:K 折交叉验证主要用于估计训练方案在未见数据上的表现,并观察结果对数据划分有多敏感。它轮换使用同一批样本,不会扩充训练集,也不会直接提升模型的泛化能力。文章结尾更准确的说法是:交叉验证可以帮助选出在不同划分下表现更稳定的模型配置或超参数;最终模型是否真的泛化得更好,仍需用未参与训练和调参的独立测试集来评估。
jingieboy
does this work with yolov8-cls? if so how would the folder structure look like? how are the data splits
 Glenn JocherUltralytics(編集済み)
Yes—K‑Fold works the same for classification; use the standard ImageNet-style layout per fold, and train each fold separately (YOLO infers classes from folder names). For YOLO26 (recommended) you can do:
dataset/
  split_1/
    train/
      class_a/ ...
      class_b/ ...
    val/
      class_a/ ...
      class_b/ ...
  split_2/
    train/...
    val/...
  ...
from ultralytics import YOLO weights = "yolo26n-cls.pt" # swap to 'yolov8n-cls.pt' if you prefer YOLOv8 splits = ["dataset/split_1", "dataset/split_2", "dataset/split_3"] for d in splits: model = YOLO(weights) model.train(data=d, epochs=20, batch=16) # d must contain 'train/' and 'val/' subfoldersFor building folds, use
StratifiedKFoldon image-level labels derived from parent folder names to keep class balance, or use the random splitter shown in the autosplit reference if stratification isn’t required. Classification usage details are in the classification task docs.thank you for this! I have also notice that everytime I run model.val(), the accuracies and confusion matrix values are slightly different this time. Is this normal or during evaluation, there is a small randomness when calling the function.
- Glenn JocherUltralytics
@jingieboy minor variations can occur from non-deterministic CUDA ops or multi-threading; validation itself doesn’t add randomness by default—set seeds and force deterministic ops to lock results:
import random, numpy as np, torch

seed = 0
random.seed(seed); np.random.seed(seed); torch.manual_seed(seed)
torch.backends.cudnn.deterministic = True
torch.backends.cudnn.benchmark = False

model.val()  # run evaluation
If differences are still large, double-check your eval args in the validation mode docs.
Nehasq
Hi, I am applying K-fold validation using the leave-one-out technique. My dataset consists of a single class and includes 21 images in total. For each split, I use 20 images for training and 1 image for testing. I am implementing the leave-one-out technique with the code above, setting ksplit=21.
I am not using a separate validation dataset, only training and testing data. Here is the code I am using:
results = {}
Define additional arguments here
batch = 16 project = "kfold_demo" epochs = 100
for k in range(ksplit): dataset_yaml = ds_yamls[k] model = YOLO(weights_path, task="detect") model.train(data=dataset_yaml, epochs=epochs, batch=batch, project=project) # Include any train arguments results[k] = model.metrics # Save output metrics for further analysis
In my data.yaml file, I have provided the validation path as the test set. When it trains and validates on the "1 test data," does this mean the model is being tested on data it has never seen during training? This is my first point of confusion.
my data.yaml file for each split looks like this: names:
- pothole path: ../ 2024-12-10_21-Fold_Cross-val/split_1 train: train val: test
My second question is about calculating the final performance. When I ran the above code, it calculated scores for each individual split. Do I need to calculate the final performance metrics manually, or is there any functionality in YOLOv8 to compute the aggregated performance automatically?
- Glenn JocherUltralytics
@Nehasq to address your first question, yes, the model is being tested on unseen data during each split, as the test set (1 image) is excluded from training and only used for validation. Regarding your second question, YOLO does not automatically aggregate metrics across splits. You need to compute the final performance metrics manually by averaging the results from all splits. For reference, you can review the K-Fold Cross Validation guide.
Thanks for your reply. I understand your point. So, are you saying that, for example, in my case, where I have 21 scores (precision, recall, etc.), I should simply add all the precision values together and divide the sum by 21 to get the final precision of the model? Is that correct?
Also, in y case of 20 images( training) and 1 images for test, what batch size would you suggest?
- Glenn JocherUltralytics
Yes, to calculate the final precision (or any metric), you average the values across all splits, i.e., sum all precision scores and divide by the number of splits (21 in your case). As for the batch size, given your small dataset, you could keep it low (e.g., 1 or 2) to ensure efficient utilization of the data while avoiding overfitting.
Thanks, that really helps! With a batch size of 1, I am keeping the epochs at 10. Should it be fewer? Also, to check for overfitting, I need to review the result graphs for each split. However, I can't definitively determine if it is overfitting since each split is separate, right?
- Glenn JocherUltralytics
Keeping epochs at 10 with a batch size of 1 is reasonable given your small dataset size. To check for overfitting, reviewing result graphs from each split can help, but overfitting may be harder to detect since each split involves different training and test data. Consider comparing trends across splits for consistent insights. For further details, you can reference the K-Fold Cross Validation guide.
semyon-v-dot
After the loop:
for ext in supported_extensions:
    images.extend(sorted((dataset_path / "images").rglob(f"*{ext}")))
Should be this line of code:
images = sorted(images)For
imagesmatching withlabelslist:labels = sorted(dataset_path.rglob("*labels/*.txt"))Otherwise the script creates background images because some images missing their labels.
- Glenn JocherUltralytics
@semyon-v-dot thank you for your suggestion. Sorting the
imageslist after extending it with supported extensions is a good practice to ensure alignment with thelabelslist. This helps prevent issues with missing labels.1
 sangeun jo
K-폴드 데이터 세트 분할 4번에서
images.extend(sorted((dataset_path / "images").rglob(f"*{ext}")))이 코드를images.extend(sorted(dataset_path.rglob(f"*images/*{ext}")))로 변환해야 작동했습니다.- Glenn JocherUltralytics
@sangeun-jo thank you for pointing that out. Your modification to
images.extend(sorted(dataset_path.rglob(f"*images/*{ext}")))is indeed correct and ensures the code works as intended. If you have any further questions or need additional assistance, feel free to ask!
kh-diab
is it usefult to use this k fold approach when I just have one class only but my issue is the class is detected as background or vice versa as per the attached Confusion matrix
- Glenn JocherUltralytics
@kh-diab using K-Fold Cross Validation can still be beneficial even with a single class. It helps ensure that your model's performance is robust and not overly dependent on a particular subset of the data. This can be particularly useful if you're experiencing issues with class detection accuracy, as it allows you to validate the model's performance across multiple splits and identify any inconsistencies. If your class is being detected as background or vice versa, K-Fold Cross Validation can help diagnose whether this issue is consistent across different data splits or specific to certain subsets. For more details, you can refer to our guide on K-Fold Cross Validation: https://docs.ultralytics.com/guides/kfold-cross-validation/.
alexander-sony
Good guide, consider adding it in a colab notebook.
In section "Train YOLO using K-Fold Data Splits", model should be re-initialized foe every k, i.e. it should be inside the for-loop: for k in range(ksplit).
- Glenn JocherUltralytics
@alexander-sony thank you for your feedback and suggestion! 😊
You're absolutely right about re-initializing the model within the loop for each fold to ensure a fresh start for every training iteration. This can help avoid any potential carryover effects from previous folds. Here's the corrected code snippet for the training section:
from ultralytics import YOLO

weights_path = "path/to/weights.pt"
results = {}

# Define your additional arguments here
batch = 16
project = "kfold_demo"
epochs = 100

for k in range(ksplit):
    model = YOLO(weights_path, task="detect")  # Re-initialize the model inside the loop
    dataset_yaml = ds_yamls[k]
    model.train(data=dataset_yaml, epochs=epochs, batch=batch, project=project)  # include any train arguments
    results[k] = model.metrics  # save output metrics for further analysis
Regarding your suggestion to add this guide to a Colab notebook, that's a fantastic idea! It would make the process more interactive and accessible for users. We'll consider creating a Colab version of this guide in the future.
For more details on K-Fold Cross Validation, you can refer to our comprehensive guide.
Thanks again for your valuable input! If you have any more suggestions or questions, feel free to share. Happy coding! 🚀
Likhith-Sugganahalli
@alexander-sony
woudnt that be a new model trained on each split, giving us n different models trained on 1/nth of the dataset?
 Fazri Gading
Is there any way to implement Stratified K-Fold Cross Validation with YOLOv8?
- Paula DerrengerUltralytics
Yes, you can implement Stratified K-Fold Cross Validation with YOLOv8! Stratified K-Fold ensures that each fold has a similar distribution of class labels, which can be particularly useful for imbalanced datasets.
To achieve this, you can use
StratifiedKFoldfromsklearn.model_selectioninstead ofKFold. Here's a brief example of how to modify the K-Fold implementation:from sklearn.model_selection import StratifiedKFold # Assuming labels_df is your DataFrame with class counts ksplit = 5 skf = StratifiedKFold(n_splits=ksplit, shuffle=True, random_state=20) # Generate stratified splits kfolds = list(skf.split(labels_df, labels_df.idxmax(axis=1))) # The rest of the process remains the sameFor a detailed guide on K-Fold Cross Validation, please refer to the Ultralytics documentation. If you have any more questions, feel free to ask! 😊
1