Link to this section사전 훈련된 YOLO 모델을 Ultralytics와 함께 Vertex AI에 배포하여 추론 수행하기#
이 가이드에서는 Ultralytics를 사용하여 사전 훈련된 YOLO26 모델을 컨테이너화하고, 이를 위한 FastAPI 추론 서버를 구축한 뒤, 해당 모델과 추론 서버를 Google Cloud Vertex AI에 배포하는 방법을 설명합니다. 이 예제 구현은 YOLO26의 객체 탐지 유스케이스를 다루지만, 다른 YOLO 모드를 사용할 때에도 동일한 원칙이 적용됩니다.
시작하기 전에 Google Cloud Platform (GCP) 프로젝트를 생성해야 합니다. 신규 사용자는 300달러 상당의 GCP 크레딧을 무료로 받을 수 있으며, 이 금액은 나중에 학습, 배치 및 스트리밍 추론을 포함한 다른 모든 YOLO26 유스케이스로 확장할 수 있는 실행 환경을 테스트하기에 충분합니다.
Link to this section학습 내용#
- FastAPI를 사용하여 Ultralytics YOLO26 모델을 위한 추론 백엔드 생성하기.
- Docker 이미지를 저장할 GCP Artifact Registry 리포지토리 생성하기.
- 모델이 포함된 Docker 이미지를 빌드하여 Artifact Registry에 푸시하기.
- Vertex AI에 모델 가져오기.
- Vertex AI 엔드포인트를 생성하고 모델 배포하기.
- Ultralytics를 통한 완전한 모델 제어: 전처리, 후처리 및 응답 형식 지정에 대해 완벽하게 제어할 수 있는 사용자 지정 추론 로직을 사용할 수 있습니다.
- Vertex AI가 나머지 작업을 처리: 자동 확장을 지원하면서도 컴퓨팅 리소스, 메모리 및 GPU 구성을 설정하는 데 유연성을 제공합니다.
- 네이티브 GCP 통합 및 보안: Cloud Storage, BigQuery, Cloud Functions, VPC 제어, IAM 정책 및 감사 로그를 통해 원활하게 설정할 수 있습니다.
Link to this section사전 요구 사항#
- 컴퓨터에 Docker를 설치합니다.
- Google Cloud SDK를 설치하고 gcloud CLI 사용을 위한 인증을 수행합니다.
- 이 가이드를 따라가는 동안 공식 Ultralytics Docker 이미지를 확장해야 하므로, Docker Quickstart Guide for Ultralytics를 먼저 확인하시는 것을 강력히 권장합니다.
Link to this sectionFastAPI로 추론 백엔드 생성하기#
먼저 YOLO26 모델 추론 요청을 처리할 FastAPI 애플리케이션을 생성해야 합니다. 이 애플리케이션은 모델 로딩, 이미지 전처리 및 추론(예측) 로직을 처리합니다.
Link to this sectionVertex AI 규정 준수 기본 사항#
Vertex AI는 컨테이너가 두 가지 특정 엔드포인트를 구현할 것을 요구합니다.
-
Health 엔드포인트 (
/health): 서비스가 준비되면 HTTP 상태200 OK를 반환해야 합니다. -
Predict 엔드포인트(
/predict): base64로 인코딩된 이미지와 선택적 파라미터를 포함한 구조화된 예측 요청을 수락합니다. 엔드포인트 유형에 따라 페이로드 크기 제한이 적용됩니다./predict엔드포인트에 대한 요청 페이로드는 다음 JSON 구조를 따라야 합니다.{ "instances": [{ "image": "base64_encoded_image" }], "parameters": { "confidence": 0.5 } }
Link to this section프로젝트 폴더 구조#
대부분의 빌드 작업은 Docker 컨테이너 내부에서 이루어지며, Ultralytics가 사전 훈련된 YOLO26 모델을 로드하므로 로컬 폴더 구조는 간단하게 유지할 수 있습니다.
YOUR_PROJECT/
├── src/
│   ├── __init__.py
│   ├── app.py              # Core YOLO26 inference logic
│   └── main.py             # FastAPI inference server
├── tests/
├── .env                    # Environment variables for local development
├── Dockerfile              # Container configuration
├── LICENSE                 # AGPL-3.0 License
└── pyproject.toml # Python dependencies and project configUltralytics YOLO26 모델 및 프레임워크는 AGPL-3.0 라이선스를 따르며, 여기에는 중요한 준수 요구 사항이 있습니다. 라이선스 조항 준수 방법에 관한 Ultralytics 문서를 반드시 읽어보시기 바랍니다.
Link to this section종속성과 함께 pyproject.toml 생성하기#
프로젝트를 편리하게 관리하려면 다음 종속성이 포함된 pyproject.toml 파일을 생성하십시오.
[project]
name = "YOUR_PROJECT_NAME"
version = "0.0.1"
description = "YOUR_PROJECT_DESCRIPTION"
requires-python = ">=3.10,<3.13"
dependencies = [
   "ultralytics>=8.3.0",
   "fastapi[all]>=0.89.1",
   "uvicorn[standard]>=0.20.0",
   "pillow>=9.0.0",
]

[build-system]
requires = ["setuptools>=61.0"]
build-backend = "setuptools.build_meta"uvicorn은 FastAPI 서버를 실행하는 데 사용됩니다.pillow는 이미지 처리에 사용되지만, PIL 이미지로만 국한되지 않습니다. Ultralytics는 다른 많은 형식을 지원합니다.
Link to this sectionUltralytics YOLO26으로 추론 로직 생성하기#
이제 프로젝트 구조와 종속성이 설정되었으므로 핵심 YOLO26 추론 로직을 구현할 수 있습니다. Ultralytics Python API를 사용하여 모델 로딩, 이미지 처리 및 예측을 처리할 src/app.py 파일을 생성하십시오.
# src/app.py

from ultralytics import YOLO

# Model initialization and readiness state
model_yolo = None
_model_ready = False

def _initialize_model():
    """Initialize the YOLO model."""
    global model_yolo, _model_ready

    try:
        # Use pretrained YOLO26n model from Ultralytics base image
        model_yolo = YOLO("yolo26n.pt")
        _model_ready = True

    except Exception as e:
        print(f"Error initializing YOLO model: {e}")
        _model_ready = False
        model_yolo = None

# Initialize model on module import
_initialize_model()

def is_model_ready() -> bool:
    """Check if the model is ready for inference."""
    return _model_ready and model_yolo is not None
이렇게 하면 컨테이너가 시작될 때 모델이 한 번 로드되며, 해당 모델은 모든 요청에서 공유됩니다. 모델이 무거운 추론 부하를 처리하게 될 경우, 나중에 Vertex AI에서 모델을 가져올 때 메모리가 더 많은 머신 유형을 선택하는 것을 권장합니다.
다음으로 pillow를 사용하여 입력 및 출력 이미지를 처리하는 두 가지 유틸리티 함수를 생성하십시오. YOLO26은 PIL 이미지를 기본적으로 지원합니다.
def get_image_from_bytes(binary_image: bytes) -> Image.Image:
    """Convert image from bytes to PIL RGB format."""
    input_image = Image.open(io.BytesIO(binary_image)).convert("RGB")
    return input_image
def get_bytes_from_image(image: Image.Image) -> bytes:
"""Convert PIL image to bytes."""
return_image = io.BytesIO()
image.save(return_image, format="JPEG", quality=85)
return_image.seek(0)
return return_image.getvalue()마지막으로, 객체 탐지를 처리할 run_inference 함수를 구현하십시오. 이 예제에서는 모델 예측에서 바운딩 박스, 클래스 이름, 신뢰도 점수를 추출합니다. 이 함수는 추가 처리나 주석을 위해 탐지 결과와 원시 결과가 포함된 딕셔너리를 반환합니다.
def run_inference(input_image: Image.Image, confidence_threshold: float = 0.5) -> Dict[str, Any]:
    """Run inference on an image using YOLO26n model."""
    global model_yolo

    # Check if model is ready
    if not is_model_ready():
        print("Model not ready for inference")
        return {"detections": [], "results": None}

    try:
        # Make predictions and get raw results
        results = model_yolo.predict(
            imgsz=640, source=input_image, conf=confidence_threshold, save=False, augment=False, verbose=False
        )

        # Extract detections (bounding boxes, class names, and confidences)
        detections = []
        if results and len(results) > 0:
            result = results[0]
            if result.boxes is not None and len(result.boxes.xyxy) > 0:
                boxes = result.boxes

                # Convert tensors to numpy for processing
                xyxy = boxes.xyxy.cpu().numpy()
                conf = boxes.conf.cpu().numpy()
                cls = boxes.cls.cpu().numpy().astype(int)

                # Create detection dictionaries
                for i in range(len(xyxy)):
                    detection = {
                        "xmin": float(xyxy[i][0]),
                        "ymin": float(xyxy[i][1]),
                        "xmax": float(xyxy[i][2]),
                        "ymax": float(xyxy[i][3]),
                        "confidence": float(conf[i]),
                        "class": int(cls[i]),
                        "name": model_yolo.names.get(int(cls[i]), f"class_{int(cls[i])}"),
                    }
                    detections.append(detection)

        return {
            "detections": detections,
            "results": results,  # Keep raw results for annotation
        }
    except Exception as e:
        # If there's an error, return empty structure
        print(f"Error in YOLO detection: {e}")
        return {"detections": [], "results": None}
선택적으로 Ultralytics에 내장된 플로팅 메서드를 사용하여 바운딩 박스와 라벨로 이미지를 주석 처리하는 함수를 추가할 수 있습니다. 이는 예측 응답에 주석이 달린 이미지를 반환하려는 경우 유용합니다.
def get_annotated_image(results: list) -> Image.Image:
    """Get annotated image using Ultralytics built-in plot method."""
    if not results or len(results) == 0:
        raise ValueError("No results provided for annotation")

    result = results[0]
    # Use Ultralytics built-in plot method with PIL output
    return result.plot(pil=True)
Link to this sectionFastAPI로 HTTP 추론 서버 생성하기#
이제 핵심 YOLO26 추론 로직이 준비되었으므로 이를 서비스할 FastAPI 애플리케이션을 생성할 수 있습니다. 여기에는 Vertex AI에서 요구하는 상태 확인 및 예측 엔드포인트가 포함됩니다.
먼저 import를 추가하고 Vertex AI를 위한 로깅을 구성하십시오. Vertex AI는 stderr를 오류 출력으로 처리하므로 로그를 stdout으로 파이프하는 것이 좋습니다.
import sys

from loguru import logger

# Configure logger
logger.remove()
logger.add(
    sys.stdout,
    colorize=True,
    format="<green>{time:HH:mm:ss}</green> | <level>{message}</level>",
    level=10,
)
logger.add("log.log", rotation="1 MB", level="DEBUG", compression="zip")
완벽한 Vertex AI 규정 준수를 위해 필요한 엔드포인트를 환경 변수에 정의하고 요청에 대한 크기 제한을 설정하십시오. 프로덕션 배포에는 비공개 Vertex AI 엔드포인트를 사용하는 것이 좋습니다. 이를 통해 더 높은 요청 페이로드 제한(공용 엔드포인트의 1.5MB 대신 10MB)과 함께 강력한 보안 및 액세스 제어를 확보할 수 있습니다.
# Vertex AI environment variables
AIP_HTTP_PORT = int(os.getenv("AIP_HTTP_PORT", "8080"))
AIP_HEALTH_ROUTE = os.getenv("AIP_HEALTH_ROUTE", "/health")
AIP_PREDICT_ROUTE = os.getenv("AIP_PREDICT_ROUTE", "/predict")

# Request size limit (10 MB for private endpoints, 1.5 MB for public)
MAX_REQUEST_SIZE = 10 * 1024 * 1024  # 10 MB in bytes
요청 및 응답을 검증하기 위한 두 가지 Pydantic 모델을 추가하십시오.
# Pydantic models for request/response
class PredictionRequest(BaseModel):
    instances: list
    parameters: Optional[Dict[str, Any]] = None

class PredictionResponse(BaseModel):
    predictions: list
모델 준비 상태를 확인하기 위한 상태 확인 엔드포인트를 추가하십시오. 이는 Vertex AI에서 중요합니다. 전용 상태 확인이 없으면 오케스트레이터가 임의의 소켓을 핑(ping)하게 되어 모델이 추론 준비가 되었는지 판단할 수 없습니다. 확인 로직은 성공 시 200 OK, 실패 시 503 Service Unavailable을 반환해야 합니다.
# Health check endpoint
@app.get(AIP_HEALTH_ROUTE, status_code=status.HTTP_200_OK)
def health_check():
    """Health check endpoint for Vertex AI."""
    if not is_model_ready():
        raise HTTPException(status_code=503, detail="Model not ready")
    return {"status": "healthy"}
이제 추론 요청을 처리할 예측 엔드포인트를 구현할 모든 준비가 되었습니다. 이 엔드포인트는 이미지 파일을 받아 추론을 실행하고 결과를 반환합니다. 이미지는 base64로 인코딩되어야 하며, 이로 인해 페이로드 크기가 최대 33%까지 증가할 수 있습니다.
@app.post(AIP_PREDICT_ROUTE, response_model=PredictionResponse)
async def predict(request: PredictionRequest):
    """Prediction endpoint for Vertex AI."""
    try:
        predictions = []

        for instance in request.instances:
            if isinstance(instance, dict):
                if "image" in instance:
                    image_data = base64.b64decode(instance["image"])
                    input_image = get_image_from_bytes(image_data)
                else:
                    raise HTTPException(status_code=400, detail="Instance must contain 'image' field")
            else:
                raise HTTPException(status_code=400, detail="Invalid instance format")

            # Extract YOLO26 parameters if provided
            parameters = request.parameters or {}
            confidence_threshold = parameters.get("confidence", 0.5)
            return_annotated_image = parameters.get("return_annotated_image", False)

            # Run inference with YOLO26n model
            result = run_inference(input_image, confidence_threshold=confidence_threshold)
            detections_list = result["detections"]

            # Format predictions for Vertex AI
            detections = []
            for detection in detections_list:
                formatted_detection = {
                    "class": detection["name"],
                    "confidence": detection["confidence"],
                    "bbox": {
                        "xmin": detection["xmin"],
                        "ymin": detection["ymin"],
                        "xmax": detection["xmax"],
                        "ymax": detection["ymax"],
                    },
                }
                detections.append(formatted_detection)

            # Build prediction response
            prediction = {"detections": detections, "detection_count": len(detections)}

            # Add annotated image if requested and detections exist
            if (
                return_annotated_image
                and result["results"]
                and result["results"][0].boxes is not None
                and len(result["results"][0].boxes) > 0
            ):
                import base64

                annotated_image = get_annotated_image(result["results"])
                img_bytes = get_bytes_from_image(annotated_image)
                prediction["annotated_image"] = base64.b64encode(img_bytes).decode("utf-8")

            predictions.append(prediction)

        logger.info(
            f"Processed {len(request.instances)} instances, found {sum(len(p['detections']) for p in predictions)} total detections"
        )

        return PredictionResponse(predictions=predictions)

    except HTTPException:
        # Re-raise HTTPException as-is (don't catch and convert to 500)
        raise
    except Exception as e:
        logger.error(f"Prediction error: {e}")
        raise HTTPException(status_code=500, detail=f"Prediction failed: {e}")
마지막으로 FastAPI 서버를 실행할 애플리케이션 진입점을 추가하십시오.
if __name__ == "__main__":
    import uvicorn

    logger.info(f"Starting server on port {AIP_HTTP_PORT}")
    logger.info(f"Health check route: {AIP_HEALTH_ROUTE}")
    logger.info(f"Predict route: {AIP_PREDICT_ROUTE}")
    uvicorn.run(app, host="0.0.0.0", port=AIP_HTTP_PORT)
이제 YOLO26 추론 요청을 서비스할 수 있는 완전한 FastAPI 애플리케이션이 준비되었습니다. 종속성을 설치하고 uv 등을 사용하여 서버를 실행함으로써 로컬에서 테스트할 수 있습니다.
# Install dependencies
uv pip install -e .

# Run the FastAPI server directly
uv run src/main.py
서버를 테스트하려면 cURL을 사용하여 /health 및 /predict 엔드포인트를 모두 쿼리할 수 있습니다. tests 폴더에 테스트 이미지를 넣은 다음 터미널에서 다음 명령어를 실행하십시오.
# Test health endpoint
curl http://localhost:8080/health

# Test predict endpoint with base64 encoded image
curl -X POST -H "Content-Type: application/json" -d "{\"instances\": [{\"image\": \"$(base64 -i tests/test_image.jpg)\"}]}" http://localhost:8080/predict
탐지된 객체가 포함된 JSON 응답을 받아야 합니다. 첫 번째 요청 시에는 Ultralytics가 YOLO26 모델을 가져와 로드해야 하므로 짧은 지연이 발생할 수 있습니다.
Link to this section애플리케이션과 함께 Ultralytics Docker 이미지 확장하기#
Ultralytics는 애플리케이션 이미지의 기반으로 사용할 수 있는 여러 Docker 이미지를 제공합니다. Docker는 Ultralytics와 필요한 GPU 드라이버를 설치합니다.
Ultralytics YOLO 모델의 전체 기능을 사용하려면 GPU 추론을 위해 CUDA 최적화 이미지를 선택해야 합니다. 그러나 CPU 추론으로 충분한 작업이라면 CPU 전용 이미지를 선택하여 컴퓨팅 리소스를 절약할 수도 있습니다.
- Dockerfile: YOLO26 단일/다중 GPU 학습 및 추론을 위한 CUDA 최적화 이미지.
- Dockerfile-cpu: YOLO26 추론을 위한 CPU 전용 이미지.
Link to this section애플리케이션을 위한 Docker 이미지 생성하기#
다음 내용으로 프로젝트 루트에 Dockerfile을 생성하십시오.
# Extends official Ultralytics Docker image for YOLO26
FROM ultralytics/ultralytics:latest

ENV PYTHONUNBUFFERED=1 \
    PYTHONDONTWRITEBYTECODE=1

# Install FastAPI and dependencies
RUN uv pip install fastapi[all] uvicorn[standard] loguru

WORKDIR /app
COPY src/ ./src/
COPY pyproject.toml ./

# Install the application package
RUN uv pip install -e .

RUN mkdir -p /app/logs
ENV PYTHONPATH=/app/src

# Port for Vertex AI
EXPOSE 8080

# Start the inference server
ENTRYPOINT ["python", "src/main.py"]
이 예제에서는 공식 Ultralytics Docker 이미지인 ultralytics:latest를 베이스로 사용합니다. 여기에는 이미 YOLO26 모델과 모든 필수 종속성이 포함되어 있습니다. 서버의 진입점은 로컬에서 FastAPI 애플리케이션을 테스트할 때 사용한 것과 동일합니다.
Link to this sectionDocker 이미지 빌드 및 테스트하기#
이제 다음 명령어로 Docker 이미지를 빌드할 수 있습니다.
docker build --platform linux/amd64 -t IMAGE_NAME:IMAGE_VERSION .IMAGE_NAME과 IMAGE_VERSION을 yolo26-fastapi:0.1과 같이 원하는 값으로 바꾸십시오. Vertex AI에 배포하는 경우 linux/amd64 아키텍처용으로 빌드해야 함을 유의하십시오. Apple Silicon Mac이나 기타 비 x86 아키텍처에서 이미지를 빌드하는 경우 --platform 매개변수를 명시적으로 설정해야 합니다.
이미지 빌드가 완료되면 로컬에서 Docker 이미지를 테스트할 수 있습니다.
docker run --platform linux/amd64 -p 8080:8080 IMAGE_NAME:IMAGE_VERSIONDocker 컨테이너가 이제 포트 8080에서 FastAPI 서버를 실행 중이며 추론 요청을 받을 준비가 되었습니다. 이전과 동일한 cURL 명령어를 사용하여 /health 및 /predict 엔드포인트를 테스트할 수 있습니다.
# Test health endpoint
curl http://localhost:8080/health

# Test predict endpoint with base64 encoded image
curl -X POST -H "Content-Type: application/json" -d "{\"instances\": [{\"image\": \"$(base64 -i tests/test_image.jpg)\"}]}" http://localhost:8080/predict
Link to this sectionGCP Artifact Registry에 Docker 이미지 업로드하기#
컨테이너화된 모델을 Vertex AI로 가져오려면 Docker 이미지를 Google Cloud Artifact Registry에 업로드해야 합니다. 아직 Artifact Registry 리포지토리가 없다면 먼저 생성해야 합니다.
Link to this sectionGoogle Cloud Artifact Registry에 리포지토리 생성하기#
Google Cloud Console에서 Artifact Registry 페이지를 엽니다. Artifact Registry를 처음 사용하는 경우 먼저 Artifact Registry API를 사용 설정하라는 메시지가 표시될 수 있습니다.

- 리포지토리 만들기를 선택하십시오.
- 리포지토리 이름을 입력하십시오. 원하는 리전을 선택하고, 특별히 변경할 필요가 없다면 다른 옵션은 기본 설정을 사용하십시오.
리전 선택은 머신의 가용성 및 비엔터프라이즈 사용자에 대한 특정 컴퓨팅 제한에 영향을 미칠 수 있습니다. 자세한 내용은 Vertex AI 공식 문서인 Vertex AI 할당량 및 제한에서 확인할 수 있습니다.
- 리포지토리가 생성되면 PROJECT_ID, 위치(리전) 및 리포지토리 이름을 비밀 저장소나
.env파일에 저장하십시오. 나중에 Docker 이미지를 태그하고 Artifact Registry로 푸시할 때 필요합니다.
Link to this sectionArtifact Registry에 대해 Docker 인증하기#
방금 생성한 Artifact Registry 리포지토리에 대해 Docker 클라이언트를 인증하십시오. 터미널에서 다음 명령어를 실행하십시오.
gcloud auth configure-docker YOUR_REGION-docker.pkg.devLink to this sectionArtifact Registry에 이미지 태그 및 푸시하기#
Docker 이미지를 Google Artifact Registry로 태그하고 푸시하십시오.
이미지를 업데이트할 때마다 고유한 태그를 사용하는 것을 권장합니다. Vertex AI를 포함한 대부분의 GCP 서비스는 자동 버전 관리 및 확장을 위해 이미지 태그에 의존하므로 시맨틱 버전 관리나 날짜 기반 태그를 사용하는 것이 좋은 관행입니다.
Artifact Registry 리포지토리 URL로 이미지에 태그를 지정하십시오. 자리 표시자를 이전에 저장한 값으로 바꾸십시오.
docker tag IMAGE_NAME:IMAGE_VERSION YOUR_REGION-docker.pkg.dev/YOUR_PROJECT_ID/YOUR_REPOSITORY_NAME/IMAGE_NAME:IMAGE_VERSION태그가 지정된 이미지를 Artifact Registry 리포지토리에 푸시하십시오.
docker push YOUR_REGION-docker.pkg.dev/YOUR_PROJECT_ID/YOUR_REPOSITORY_NAME/IMAGE_NAME:IMAGE_VERSION프로세스가 완료될 때까지 기다리십시오. 이제 Artifact Registry 리포지토리에서 이미지를 확인할 수 있어야 합니다.
Artifact Registry에서 이미지로 작업하는 방법에 대한 자세한 지침은 Artifact Registry 문서인 이미지 푸시 및 풀을 참조하십시오.
Link to this sectionVertex AI에 모델 가져오기#
방금 푸시한 Docker 이미지를 사용하여 이제 Vertex AI에서 모델을 가져올 수 있습니다.
- Google Cloud 탐색 메뉴에서 Vertex AI > 모델 레지스트리로 이동합니다. 또는 Google Cloud Console 상단의 검색창에서 "Vertex AI"를 검색하십시오.


Link to this sectionVertex AI 엔드포인트 생성 및 모델 배포하기#
Vertex AI 용어에서 엔드포인트는 배포된 모델을 의미합니다. 이는 추론 요청을 보내는 HTTP 엔드포인트를 나타내며, 모델은 모델 레지스트리에 저장된 훈련된 ML 아티팩트를 의미합니다.
모델을 배포하려면 Vertex AI에서 엔드포인트를 생성해야 합니다.
- Vertex AI 탐색 메뉴에서 엔드포인트로 이동합니다. 모델을 가져올 때 사용한 리전을 선택합니다. 만들기를 클릭하십시오.

특정 리전은 컴퓨팅 할당량이 매우 제한되어 있어 해당 리전에서 특정 머신 유형이나 GPU를 선택할 수 없을 수도 있다는 점을 기억하십시오. 이것이 중요한 경우 배포 리전을 더 큰 할당량을 가진 리전으로 변경하십시오. 자세한 내용은 Vertex AI 공식 문서인 Vertex AI 할당량 및 제한에서 확인할 수 있습니다.
- 머신 유형이 선택되면 계속을 클릭하십시오. 이 단계에서 모델의 성능을 추적하고 동작에 대한 통찰력을 제공하는 추가 서비스인 Vertex AI 모델 모니터링을 활성화할 수 있습니다. 이는 선택 사항이며 추가 비용이 발생하므로 필요에 따라 선택하십시오. 만들기를 클릭하십시오.
Vertex AI가 모델을 배포하는 데 몇 분(일부 리전에서는 최대 30분)이 소요됩니다. 배포가 완료되면 이메일 알림을 받게 됩니다.
Link to this section배포된 모델 테스트하기#
배포가 완료되면 Vertex AI가 모델을 테스트할 수 있는 샘플 API 인터페이스를 제공합니다.
원격 추론을 테스트하려면 제공된 cURL 명령어를 사용하거나 배포된 모델에 요청을 보낼 다른 Python 클라이언트 라이브러리를 생성할 수 있습니다. /predict 엔드포인트로 이미지를 보내기 전에 반드시 이미지를 base64로 인코딩해야 함을 유의하십시오.
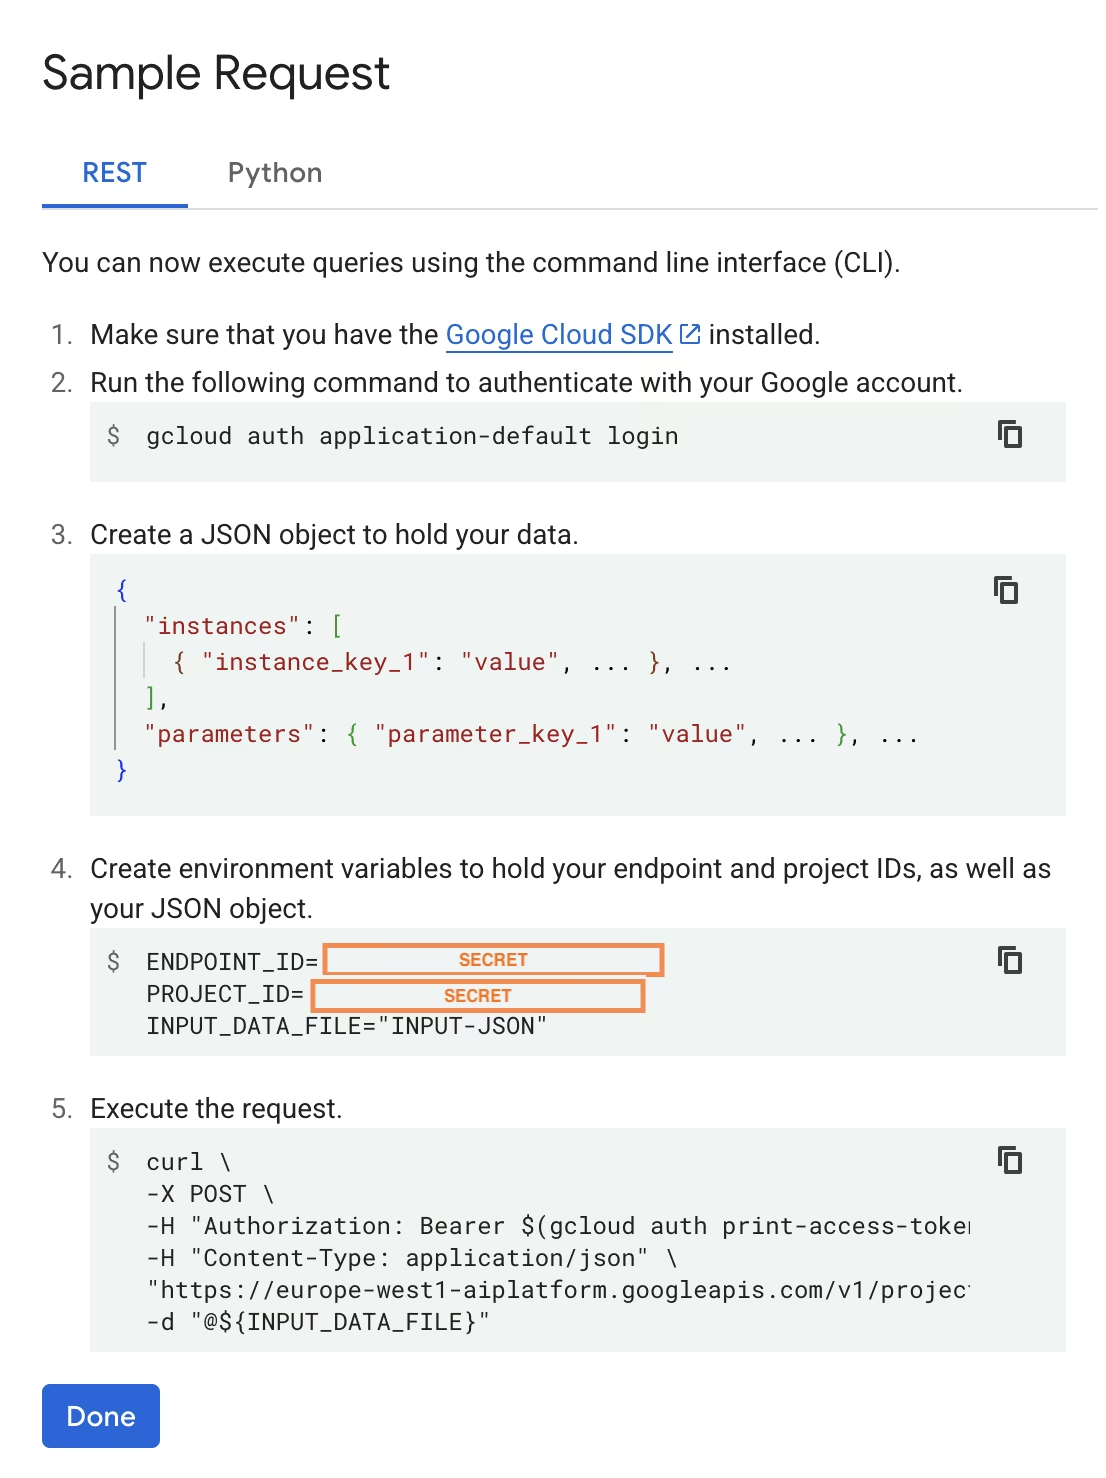
로컬 테스트와 마찬가지로, Ultralytics가 실행 중인 컨테이너에서 YOLO26 모델을 가져와 로드해야 하므로 첫 번째 요청 시 짧은 지연이 발생할 수 있습니다.
Google Cloud Vertex AI에 Ultralytics와 함께 사전 훈련된 YOLO26 모델을 성공적으로 배포했습니다.
Link to this sectionFAQ#
Link to this sectionDocker 없이 Vertex AI에서 Ultralytics YOLO 모델을 사용할 수 있나요?#
예, 가능합니다. 하지만 먼저 모델을 TensorFlow, Scikit-learn 또는 XGBoost와 같이 Vertex AI와 호환되는 형식으로 내보내야 합니다. Google Cloud는 변환 과정에 대한 개요와 함께 Vertex에서 .pt 모델을 실행하는 방법에 대한 가이드를 제공합니다: Vertex AI에서 PyTorch 모델 실행하기.
결과적인 설정은 Vertex AI 표준 서빙 계층에만 의존하며 고급 Ultralytics 프레임워크 기능은 지원하지 않는다는 점에 유의하십시오. Vertex AI는 컨테이너화된 모델을 완벽하게 지원하고 배포 구성에 따라 자동으로 확장할 수 있으므로, 다른 형식으로 변환할 필요 없이 Ultralytics YOLO 모델의 모든 기능을 활용할 수 있습니다.
Link to this sectionFastAPI가 YOLO26 추론 서비스를 제공하기에 좋은 선택인 이유는 무엇입니까?#
FastAPI는 추론 워크로드에 대해 높은 처리량을 제공합니다. 비동기(Async) 지원을 통해 메인 스레드를 차단하지 않고 다수의 동시 요청을 처리할 수 있으며, 이는 컴퓨터 비전 모델을 서비스할 때 중요합니다.
FastAPI의 자동 요청/응답 유효성 검사는 프로덕션 추론 서비스에서 런타임 오류를 줄여줍니다. 이는 입력 형식의 일관성이 중요한 객체 탐지 API에 특히 유용합니다.
FastAPI는 추론 파이프라인에 최소한의 컴퓨팅 오버헤드만을 추가하므로, 모델 실행 및 이미지 처리 작업에 더 많은 리소스를 할당할 수 있습니다.
FastAPI는 또한 SSE (Server-Sent Events)를 지원하며, 이는 추론 스트리밍 시나리오에 유용합니다.
Link to this section왜 리전을 여러 번 선택해야 합니까?#
이는 Google Cloud Platform의 범용성을 위한 기능으로, 사용하는 모든 서비스마다 리전을 선택해야 합니다. Vertex AI에 컨테이너화된 모델을 배포할 때 가장 중요한 리전 선택은 Model Registry를 위한 것입니다. 이 선택에 따라 모델 배포를 위한 머신 유형과 할당량의 가용성이 결정됩니다.
또한, 설정을 확장하여 예측 데이터나 결과를 Cloud Storage 또는 BigQuery에 저장하는 경우, 지연 시간을 최소화하고 데이터 접근 시 높은 처리량을 보장하기 위해 Model Registry와 동일한 리전을 사용해야 합니다.