Cloud Training#
Ultralytics Platform Cloud Training offers single-click training on cloud GPUs, making model training accessible without complex setup. Train YOLO models with real-time metrics streaming and automatic checkpoint saving.
Training Dialog#
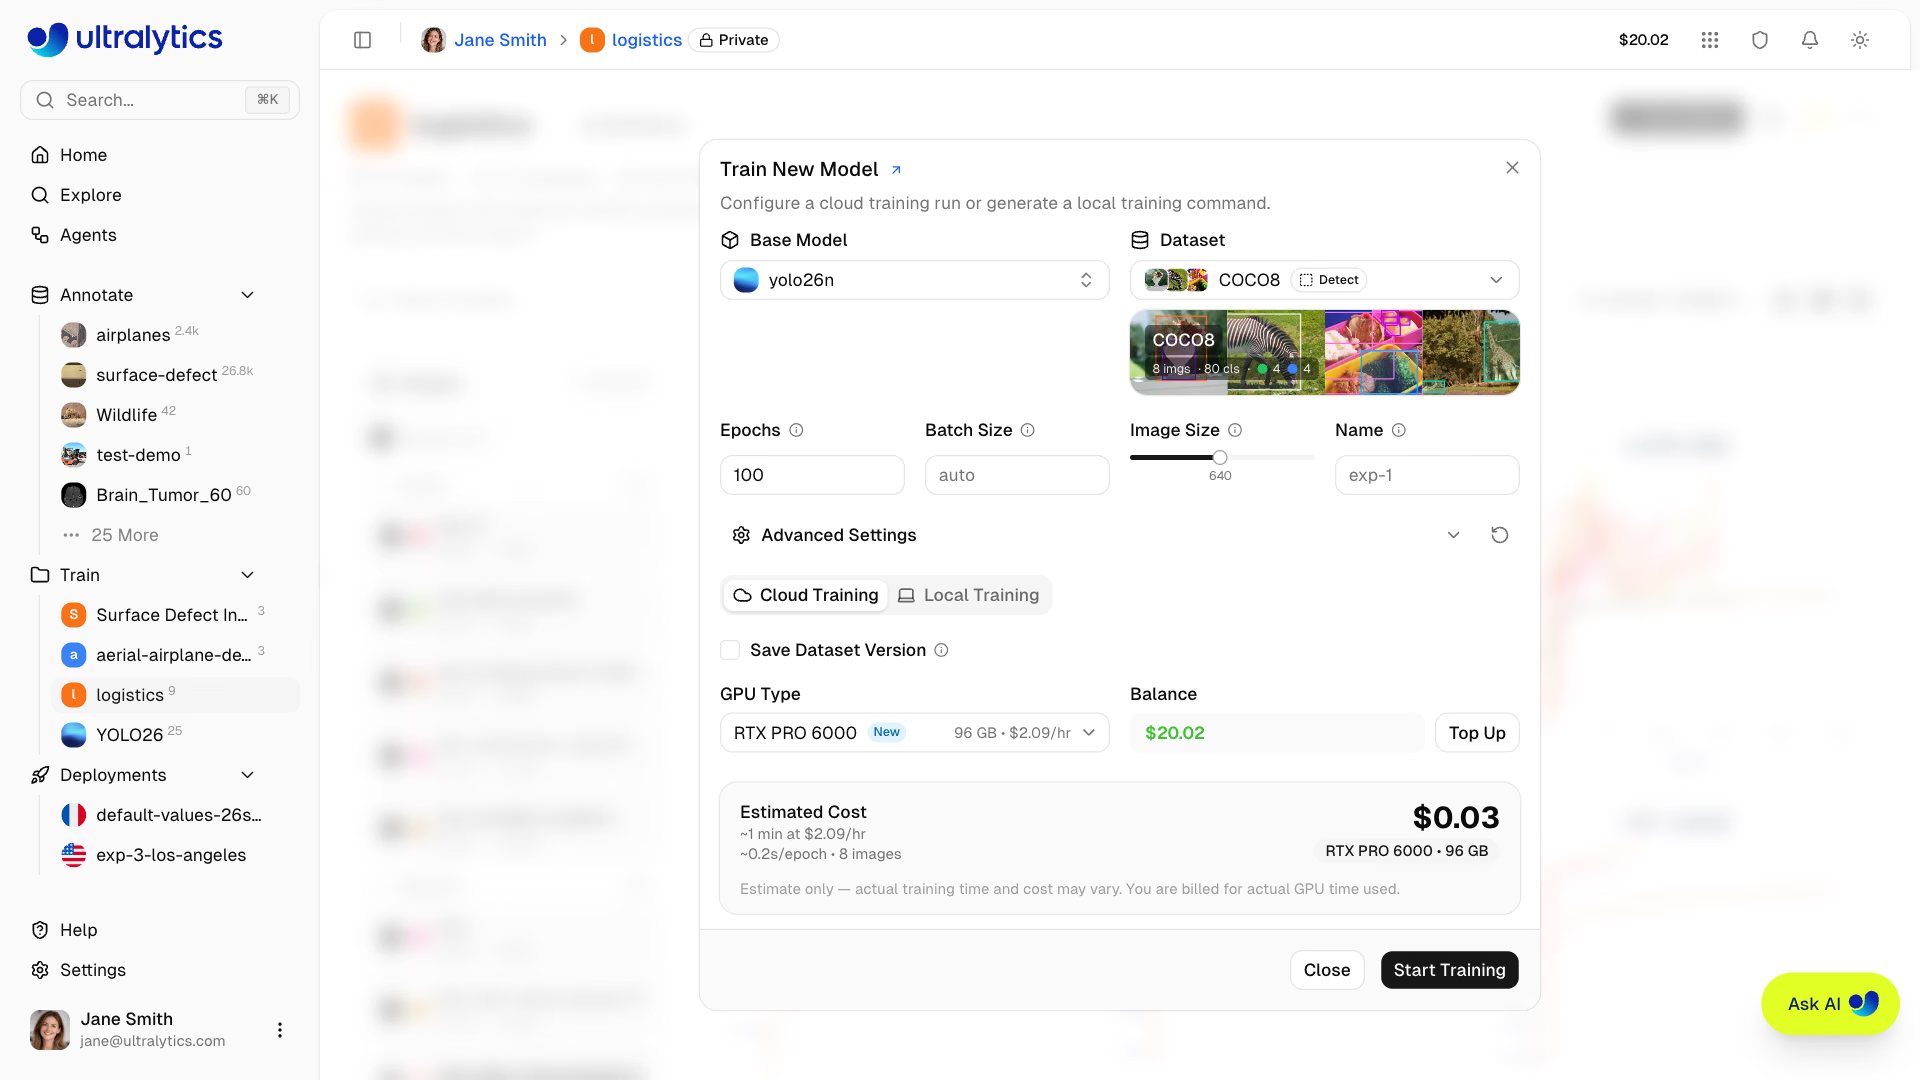
Start training from the platform UI by clicking New Model on any project or dataset page. The training dialog has two tabs: Cloud Training and Local Training. When the selected dataset lives on an On Premise host, the first tab becomes On Premise and the Local Training tab is hidden — that dataset can only be trained on its own host, which requires an Enterprise plan and a connected, online worker.
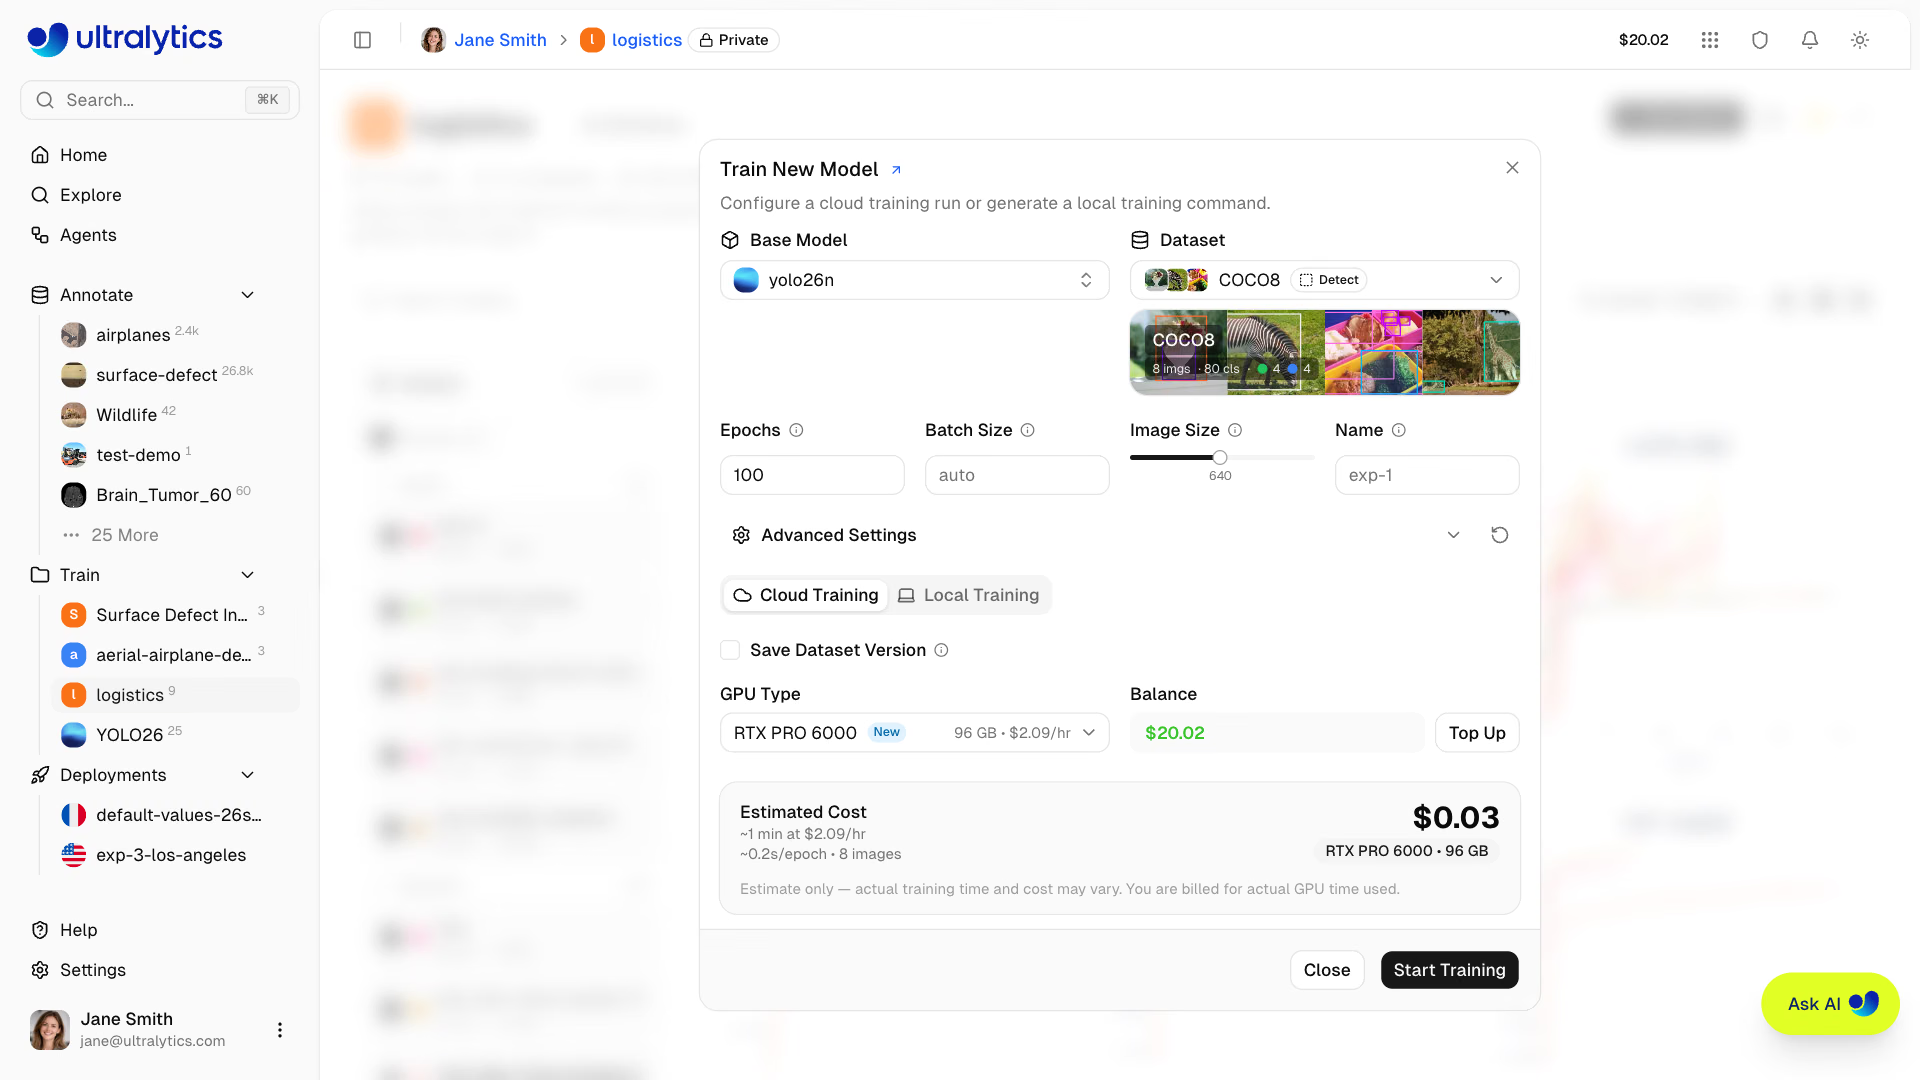
The dialog remembers the base model and any non-default parameters it held when you last closed it, per dataset task and workspace in the current browser, and restores them the next time you open it for that task. The GPU selection is not remembered, and Retry Training on a failed run restores that run's own arguments instead.
Step 1: Select Base Model#
Choose an official Ultralytics model or one of your own completed models:
| Tab | Description |
|---|---|
| Official | YOLO26 (recommended), YOLO11, YOLOv8, and YOLOv5 project models |
| My Models | Your completed or uploaded models, grouped by project, for fine-tuning |
Within each tab, models are grouped by task in canonical order and sorted by size. Both tabs list only models whose task can train the selected dataset. YOLO26 includes Detect, Segment, Semantic, Depth, Classify, Pose, and OBB variants in sizes from nano to xlarge.
Depth datasets can be uploaded with float NPY targets in meters or uint16 PNG targets using the dataset's
depth_scale. See the depth dataset format. Depth models
default to a fine-tuning recipe (optimizer: AdamW, lr0: 0.0001, warmup_bias_lr: 0.0001) unless you set
those parameters yourself.
Step 2: Select Dataset#
Choose a dataset to train on (see Datasets):
| Option | Description |
|---|---|
| Official | Curated datasets from Ultralytics |
| My Datasets | Datasets in your workspace |
Datasets must be in ready status with at least 1 image in the train split, 1 image in the validation or test
split, at least 1 labeled image, and at least one class name. Classification datasets additionally require the
train-split image to be labeled, and pose datasets must define a keypoint shape. Depth datasets instead require one
paired map in train and two in val; unpaired images are excluded.
A task mismatch warning appears when the selected model cannot train the dataset task, and Start Training remains disabled until you choose a compatible model. A segment dataset accepts segment or semantic models; other dataset tasks require the matching model task. See the task guides.
Step 3: Configure Parameters#
Set core training parameters:
| Parameter | Description | Default |
|---|---|---|
| Epochs | Number of training iterations (1-10000) | 100 |
| Batch Size | Samples per iteration (-1 auto-fits available VRAM, or a fixed image count) | -1 (auto) |
| Image Size | Input resolution slider, 32-1280 in steps of 32 | 640 |
| Name | Optional name for the training run | auto |
Values typed outside a parameter's range are clamped when the field loses focus.
The slider stops at 1280, but the YAML editor accepts sizes up to 4096. A warning appears above 1280 because larger resolutions substantially increase GPU memory use, training time, and cost.
Step 4: Advanced Settings (Optional)#
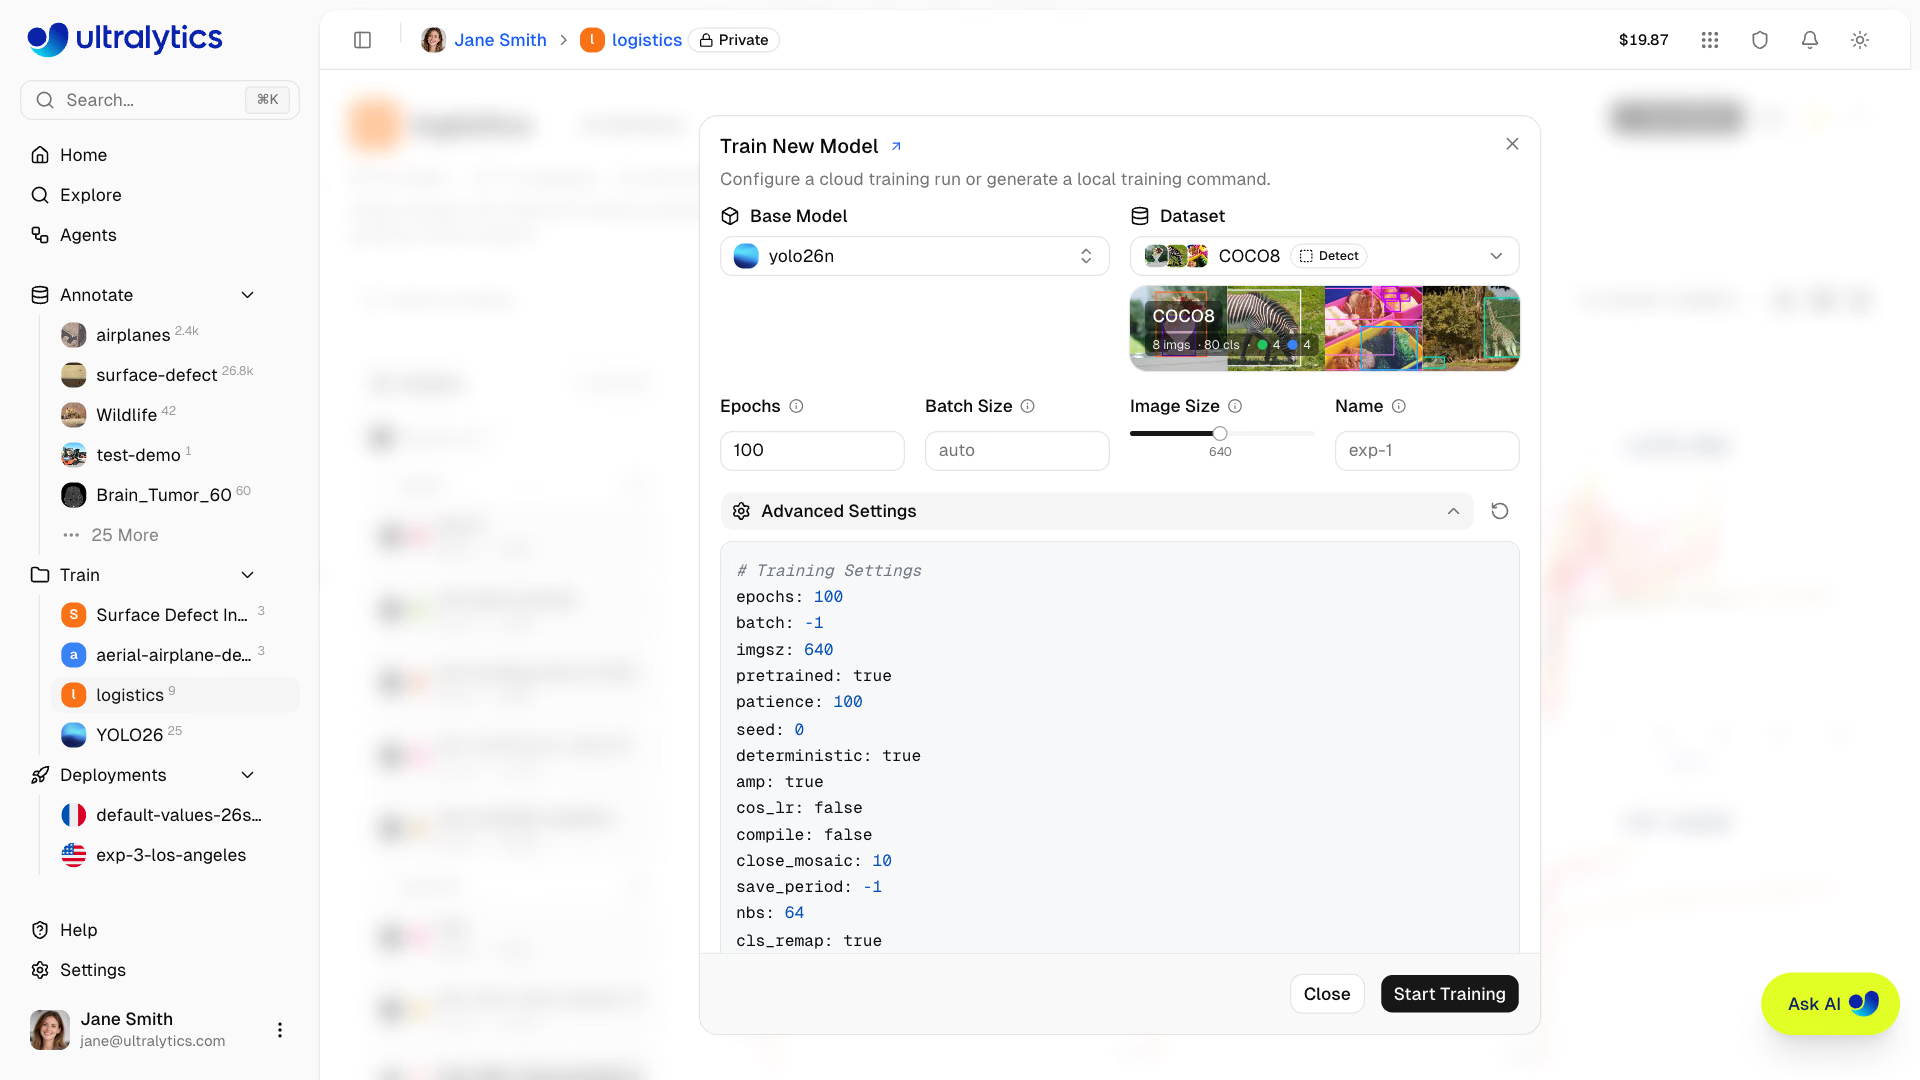
Expand Advanced Settings to access the YAML-based parameter editor with 50+ training parameters under Training Settings and Image Augmentations sections (see configuration reference):
| Group | Parameters |
|---|---|
| Learning Rate | lr0, lrf, momentum, weight_decay, warmup_epochs, warmup_momentum, warmup_bias_lr |
| Optimizer | auto (default), SGD, MuSGD, Adam, AdamW, NAdam, RAdam, RMSProp, Adamax |
| Loss Weights | box, cls, cls_pw, dfl, pose, kobj, rle, angle, dlog, dgrad, dlam |
| Color Augmentation | hsv_h, hsv_s, hsv_v |
| Geometric Augmentation | degrees, translate, scale, shear, perspective |
| Flip & Mix Augmentation | flipud, fliplr, mosaic, mixup, copy_paste, bgr, cutmix, copy_paste_mode, auto_augment, erasing |
| Training Control | epochs, batch, imgsz, pretrained, patience, seed, deterministic, amp, cos_lr, compile, close_mosaic, save_period, nbs, cls_remap, channels_last, profile, overlap_mask, mask_ratio |
| Dataset | fraction, freeze, single_cls, rect, multi_scale, resume |
| Validation | max_det |
Parameters are task-aware (e.g., copy_paste only shows for segment, semantic, and OBB tasks, pose/kobj only for pose tasks, auto_augment/erasing only for classify). The editor omits device, cache, workers, iou, dropout, val, and time, and ignores them in pasted or dropped configurations; set them in your own yolo train command when training locally. A Modified badge appears when values differ from defaults, and you can reset all to defaults with the reset button. Only non-default advanced values are sent to the training job (the basic epochs, batch, and image size parameters are always included), so the resulting command stays readable.
Example: Tuning Augmentation for Small Datasets
For small datasets (<1000 images), increase augmentation to reduce overfitting:
mosaic: 1.0       # Keep mosaic on
mixup: 0.3        # Add mixup blending
copy_paste: 0.3   # Add copy-paste (segment, semantic, OBB)
fliplr: 0.5       # Horizontal flip
degrees: 10.0     # Slight rotation
scale: 0.9        # Aggressive scaling
Save Dataset Version (Optional)#
Enable Save Dataset Version to link the model to an immutable version of a Platform-hosted dataset. The Platform checks whether the dataset contents changed, reuses a matching version when they did not, and creates a new numbered version only when needed. Training then uses that exact NDJSON snapshot and records its version number and content hash on the model.
This preserves the data used for the run even if you later add or remove images, edit annotations, or change dataset splits. You can find the linked version in the dataset's Models and Versions tabs.
Save Dataset Version is unavailable for connected cloud storage and On Premise datasets. You can also create snapshots manually from the Versions tab.
Step 5: Select GPU (Cloud Tab)#
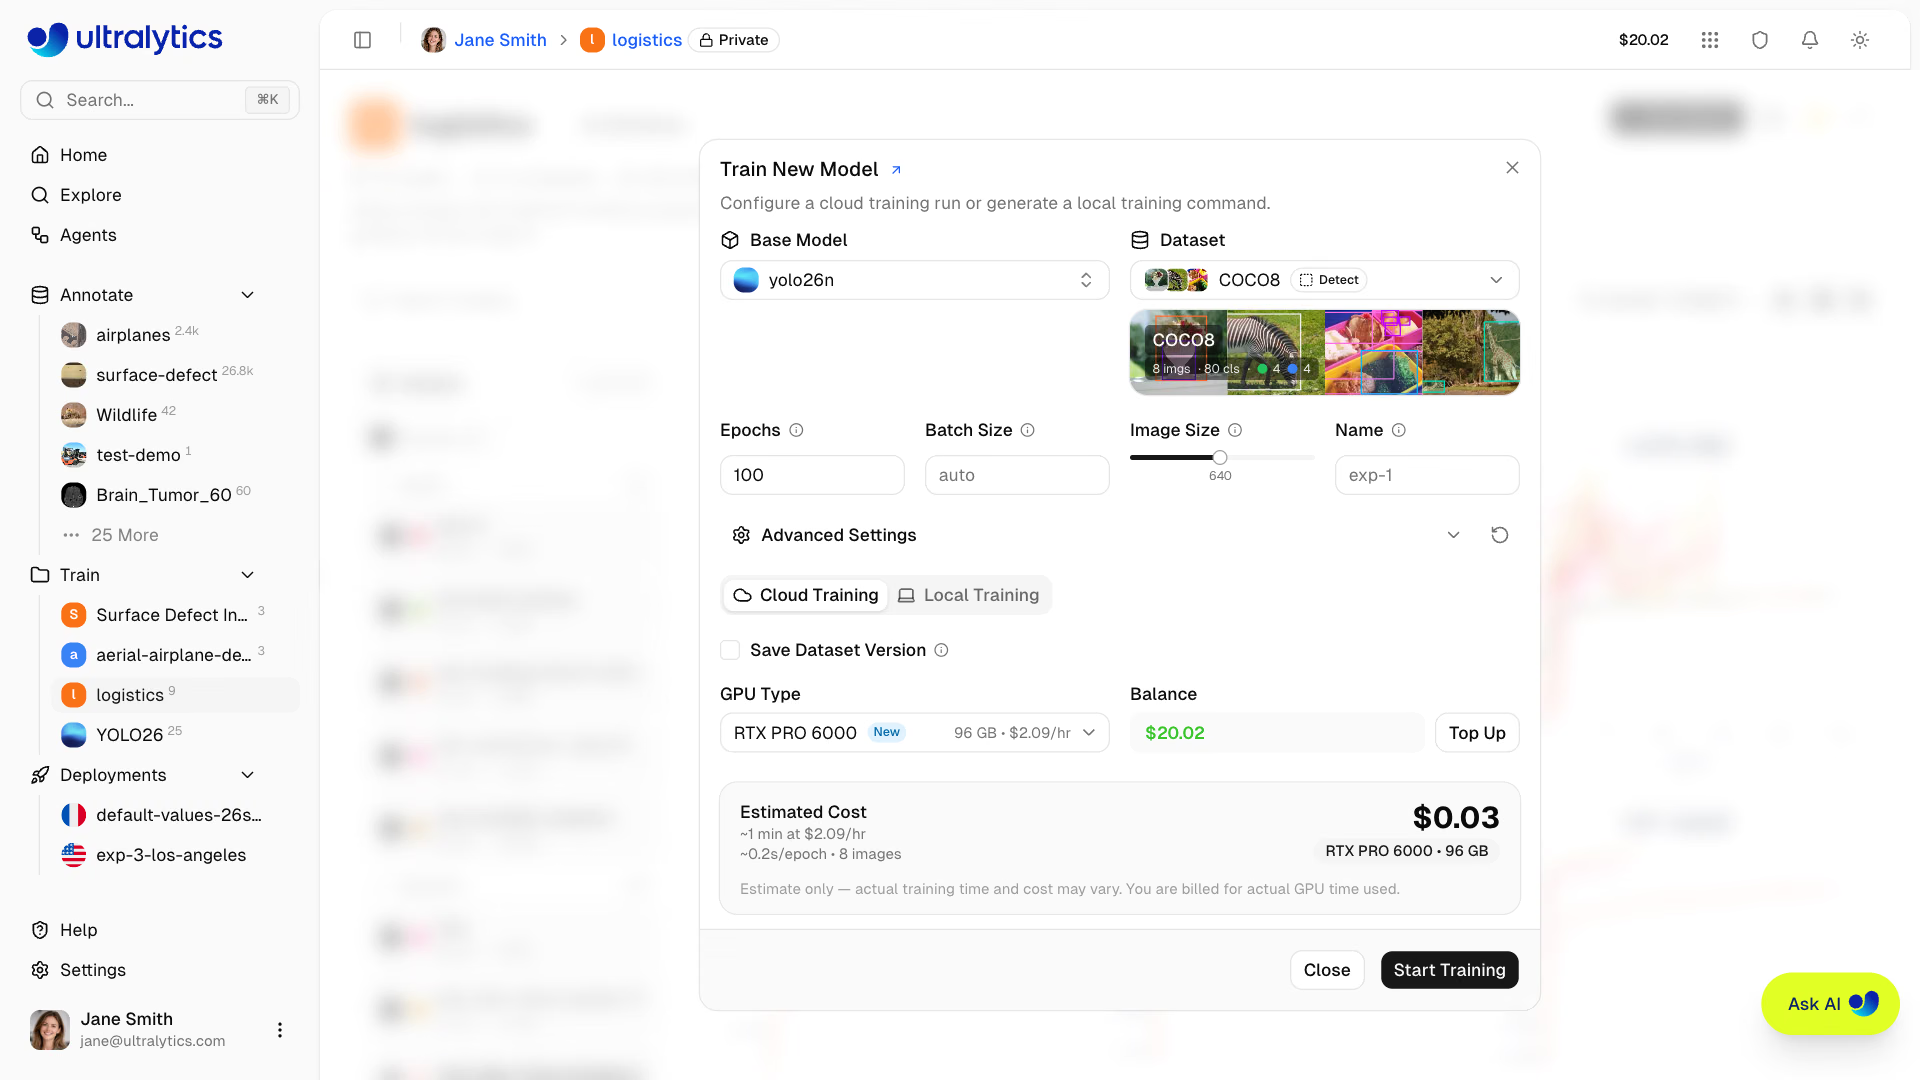
Choose your GPU from Ultralytics Cloud:
| GPU | Generation | VRAM | Cost/Hour | Best For |
|---|---|---|---|---|
| RTX 2000 Ada | Ada | 16 GB | $0.24 | Small datasets, testing |
| RTX A4500 | Ampere | 20 GB | $0.25 | Small-medium datasets |
| RTX 4000 Ada | Ada | 20 GB | $0.26 | Medium datasets |
| RTX A5000 | Ampere | 24 GB | $0.27 | Medium datasets |
| L4 | Ada | 24 GB | $0.39 | Inference optimized |
| A40 | Ampere | 48 GB | $0.44 | Larger batch sizes |
| RTX 3090 | Ampere | 24 GB | $0.46 | General training |
| RTX A6000 | Ampere | 48 GB | $0.49 | Large models |
| RTX PRO 4000 | Blackwell | 24 GB | $0.57 | Budget Blackwell |
| RTX PRO 4500 | Blackwell | 32 GB | $0.64 | Great price/performance |
| RTX 4090 | Ada | 24 GB | $0.69 | Best price/performance |
| RTX 6000 Ada | Ada | 48 GB | $0.77 | Large batch training |
| L40S | Ada | 48 GB | $0.86 | Large batch training |
| RTX PRO 5000 | Blackwell | 48 GB | $0.96 | Large batch training |
| RTX 5090 | Blackwell | 32 GB | $0.99 | Latest consumer generation |
| L40 | Ada | 48 GB | $0.99 | Large models |
| A100 PCIe | Ampere | 80 GB | $1.39 | Production training |
| A100 SXM | Ampere | 80 GB | $1.49 | Production training |
| RTX PRO 6000 | Blackwell | 96 GB | $2.09 | Recommended default |
| H100 PCIe | Hopper | 80 GB | $2.89 | High-performance training |
| H100 NVL | Hopper | 94 GB | $3.19 | Maximum performance |
| H100 SXM | Hopper | 80 GB | $3.29 | Fastest training |
| H200 NVL | Hopper | 143 GB | $3.39 | Maximum memory |
| H200 SXM | Hopper | 141 GB | $4.39 | Maximum performance |
| B200 | Blackwell | 180 GB | $5.89 | Large models (Pro+) |
| B300 | Blackwell | 288 GB | $7.39 | Largest models (Pro+) |
- RTX PRO 6000: 96 GB Blackwell, recommended default for most jobs
- A100 SXM: 80 GB HBM2e — strong choice for large batch sizes or bigger models
- H100 PCIe / H100 SXM / H100 NVL: 80–94 GB Hopper for time-sensitive training (available on all plans)
- H200 NVL / H200 SXM: 141–143 GB Hopper for high-memory workloads (available on all plans)
- B200 / B300: 180–288 GB NVIDIA Blackwell for cutting-edge workloads — requires Pro or Enterprise
The dialog shows your current balance and a Top Up button. The cost card estimates the total duration and price for your configuration (model size, dataset images, epochs, image size, batch size, optimizer, and GPU speed) and also reports the estimated seconds per epoch and the dataset image count.
The GPU picker reflects live cloud stock, so options that are out of capacity are marked. If a job still cannot be placed on the GPU you picked, the Platform reports the shortage and switches your selection to the closest available GPU — matching VRAM first, then speed, then price — and tells you the new VRAM and hourly rate so you can start immediately or choose differently.
Selecting a GPU cheaper than the RTX PRO 6000 makes your job eligible for Ultralytics-managed infrastructure. When that capacity is free, the run executes on an RTX PRO 6000 but is still billed at your selected GPU's rate, so a run can finish faster and cost less than it would have on your selected GPU — the upgrade itself never makes a run slower or more expensive.
Step 6: Start Training#
Click Start Training to launch your job. The Platform:
- Resolves the immutable dataset version when Save Dataset Version is enabled
- Provisions a GPU instance
- Downloads your dataset
- Begins training
- Streams metrics in real-time
Retraining an existing model reuses the same model page and clears the previous run's charts, console output, system metrics, and error state once the new job is created. A run that fails before compute is provisioned leaves the earlier results untouched.
Training Job Lifecycle#
Training jobs progress through the following statuses:
| Status | Description |
|---|---|
| Starting | Job submitted, provisioning GPU, downloading dataset and model |
| Running | Training in progress, metrics streaming in real-time |
| Completed | Training finished successfully |
| Failed | Training failed (see console logs for details) |
| Cancelled | Training was cancelled by the user |
A fatal Python error in the console stream — a traceback, a CUDA out-of-memory error, or a failed CUDA initialization — ends the run immediately rather than waiting for a timeout, and the extracted message appears in an error banner on the model page with View full console logs and Retry Training actions. Runs that stop reporting activity for 4 hours are automatically marked failed, and their compute is released.
To receive the completed and failed results without keeping this page open, connect Slack alerts.
New accounts receive signup credits — $5 for personal emails and $25 for company emails. Check your balance in Settings > Billing.
Monitor Training#
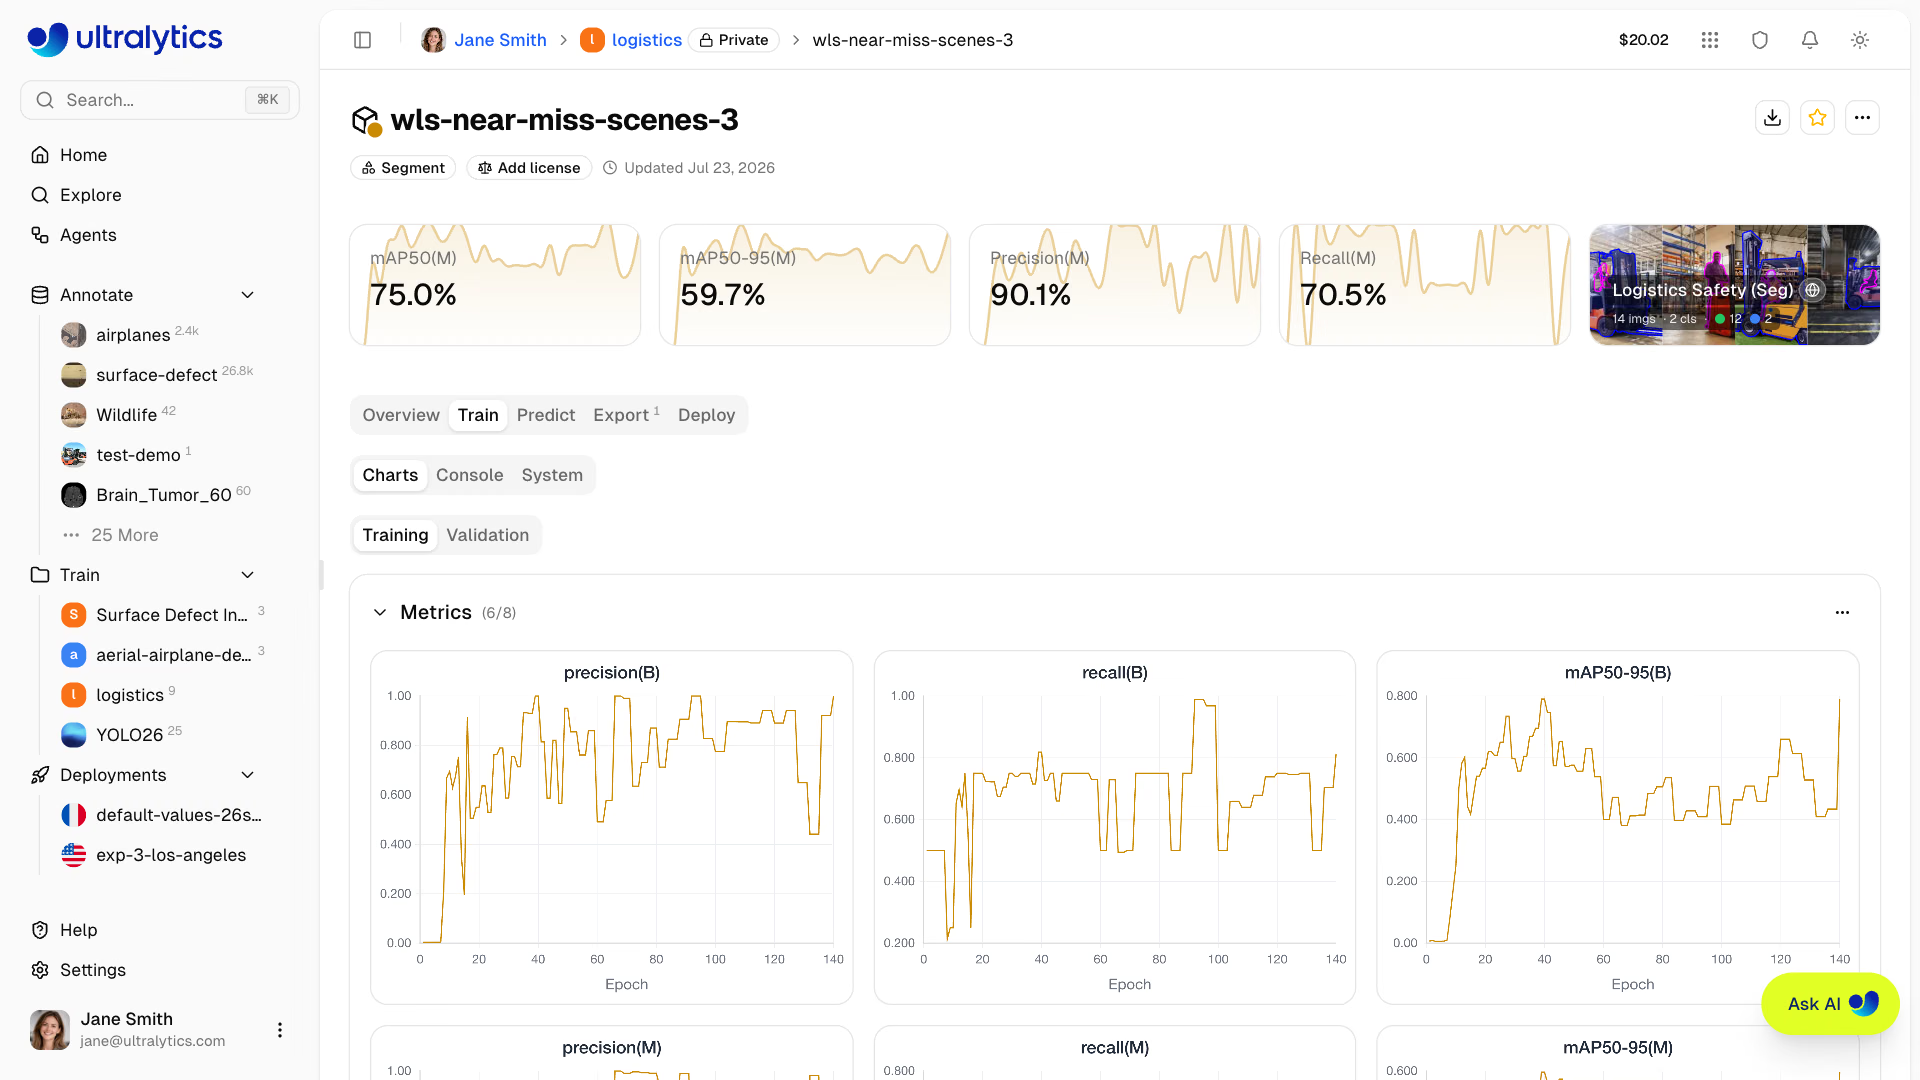
View real-time training progress on the model page's Train tab:
Charts Subtab#
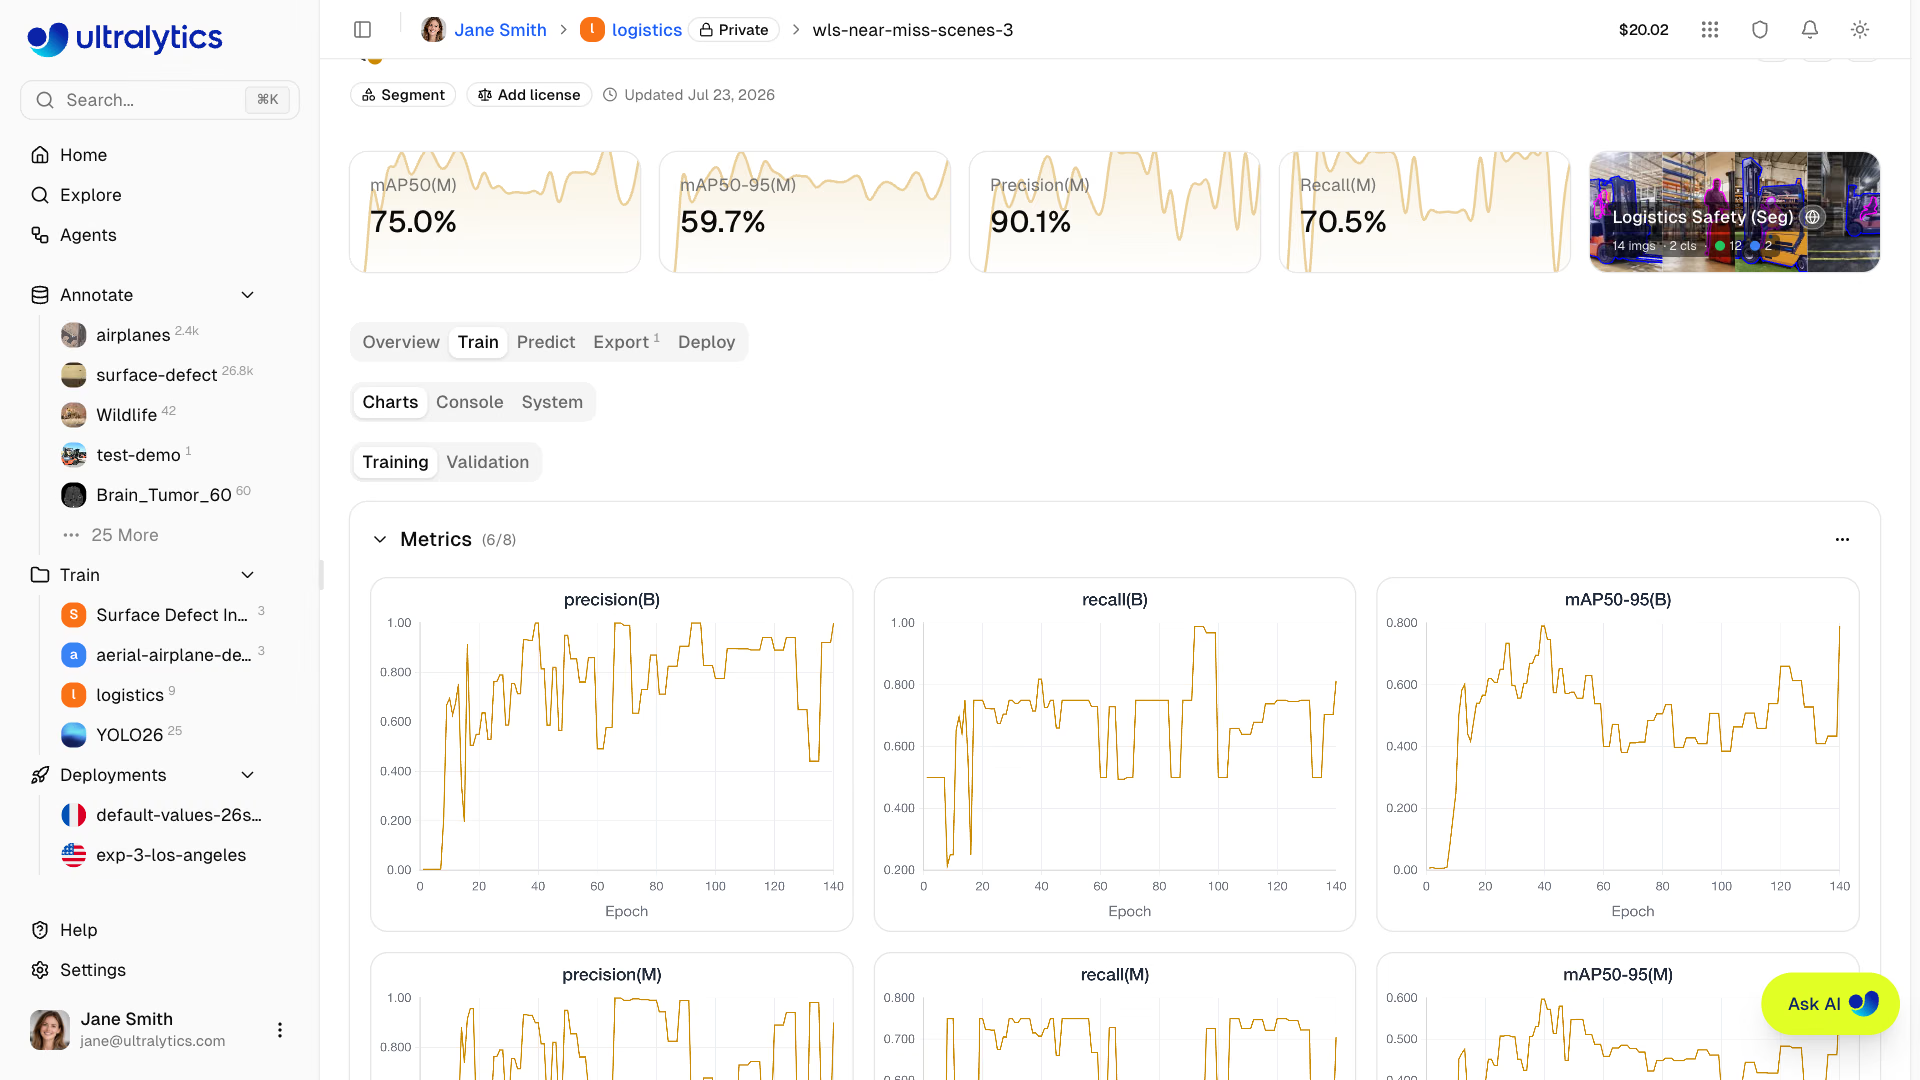
Charts are grouped by metric family, and the groups that appear depend on what the run reports:
| Group | Contents |
|---|---|
| Metrics | Task metrics — mAP50, mAP50-95, precision, and recall for detection; see Models for other tasks |
| Loss | One chart per loss component, with the training series solid and the validation series dashed |
| Learning Rate | lr/pg0, lr/pg1, lr/pg2 |
Each group can be collapsed, individual charts can be hidden or shown from the group menu, and charts can be dragged and resized — the layout is remembered for next time.
Console Subtab#
Live console output with ANSI color support, progress bars, and fatal-error detection. The last 2000 lines are retained, timestamps can be toggled on, and the whole log can be copied as plain text.
System Subtab#
A live host card (hostname, CPU, GPU, RAM, and disk totals) plus per-epoch charts for CPU and RAM usage, GPU utilization and memory, GPU temperature, network I/O, and disk I/O.
Checkpoints#
The best checkpoint (best.pt) is uploaded to the Platform periodically during training and again when the run ends, so download, export, and deployment always use the best epoch produced so far. If the run is cancelled, the checkpoint uploaded before cancellation is kept.
Cancel Training#
Click Cancel in the Run Information card on the model page and confirm the action. For cloud training, the Platform stops the job, releases its compute, and charges the elapsed GPU time used before cancellation. For local training, cancellation signals the process to stop at the next epoch boundary and preserves partial results — the run uploads what it has before exiting.
Remote Training#
Train on your own hardware while streaming metrics to the platform.
Platform integration requires Python>=3.11 and ultralytics>=8.4.120. Lower versions will not work with Platform.
pip install -U ultralyticsSetup API Key#
- Go to
Settings > API Keys - Create a new key (or the platform auto-creates one when you open the Local Training tab)
- Set the environment variable:
export ULTRALYTICS_API_KEY="YOUR_API_KEY"Train with Streaming#
Use the project and name parameters to stream metrics:
yolo train model=yolo26n.pt data=coco.yaml epochs=100 \
  project=username/my-project name=experiment-1
The Local Training tab in the training dialog shows a pre-configured command with your API key, selected parameters, and advanced arguments included.
Using Platform Datasets#
Train with datasets stored on the platform using the ul:// URI format:
yolo train model=yolo26n.pt data=ul://username/datasets/my-dataset epochs=100 \
  project=username/my-project name=exp1
The ul:// URI format automatically downloads and configures your dataset. The model is automatically linked to the dataset on the platform (see Using Platform Datasets).
Billing#
Training costs are based on GPU usage:
Cost Estimation#
Before training starts, the platform estimates the total duration and cost from your dataset size, model size, image size, batch size, epochs, and selected GPU. Estimates are approximate; actual usage is what gets billed.
Factors affecting cost:
| Factor | Impact |
|---|---|
| Dataset Size | More images = longer training time (compute scales roughly linearly with dataset size) |
| Model Size | Larger models (m, l, x) train slower than (n, s) |
| Number of Epochs | Direct multiplier on training time |
| Image Size | Larger imgsz substantially increases computation — 1280px costs several times more than 640px |
| Batch Size | Larger batches train more efficiently than small ones |
| GPU Speed | Faster GPUs reduce training time, partially offsetting their higher hourly rate |
| Optimizer | MuSGD takes roughly twice as long as the other optimizers |
| Startup Overhead | Up to 5 minutes for instance initialization, data download, and warmup (scales with dataset size) |
Estimates are based on real cloud training runs, and the estimate always uses the GPU you selected — so a job routed to faster Ultralytics infrastructure finishes ahead of its estimate.
Cost Examples#
Cost estimates are approximate and depend on many factors. The training dialog shows a real-time estimate before you start training.
| Scenario | GPU | Estimated Cost |
|---|---|---|
| 500 images, YOLO26n, 50 epochs | RTX 4090 | ~$0.03 |
| 1000 images, YOLO26n, 100 epochs | RTX PRO 6000 | ~$0.23 |
| 5000 images, YOLO26s, 100 epochs | H100 SXM | ~$1.56 |
Billing Flow#
Cloud training billing flow:
- Estimate: Cost calculated before training starts
- Balance Check: Available credits are checked before launch
- Train and Meter: The job runs on the selected compute, and accrued GPU time is debited from your balance in steps while it runs
- Settle: At the terminal state the remaining tail is debited and a single Training transaction is written for the whole run
Billing tracks actual GPU time, including partial runs that are cancelled or fail after a cloud GPU has started.
Billing by Job Status#
| Status | Charged? |
|---|---|
| Completed | Yes — actual GPU time used |
| Cancelled | Yes — GPU time from start to cancellation |
| Failed | Yes, when cloud compute started — elapsed GPU time used |
| Stuck | Yes — elapsed GPU time until automatic termination |
A run that stops reporting activity for 4 hours is automatically marked failed; the instance is terminated and the elapsed GPU time settled. Remote runs on your own hardware are simply marked failed with nothing to charge.
A validation or launch failure before a cloud GPU starts has no compute usage to charge. Once a GPU is running, completed, cancelled, failed, and automatically terminated jobs are settled from elapsed wall-clock GPU time.
Payment Methods#
Cloud training is paid from your Platform credit balance.
Training start requires a positive available balance and enough credits for the estimated job cost, where every estimate reserves at least 15 minutes of GPU time. With several runs active at once, the check also accounts for the unbilled remainder of those runs.
View Training Costs#
Before starting a cloud job, the training dialog shows your current credit balance and estimates the job duration and cost from the selected model, dataset, epochs, image size, and GPU. The estimate is informational; actual usage is charged for the GPU time consumed. Afterward, review the resulting credit transaction in Settings > Billing.
Training Tips#
Choose the Right Model Size#
| Model | Parameters | Best For |
|---|---|---|
| YOLO26n | 2.4M | Real-time, edge devices |
| YOLO26s | 9.5M | Balanced speed/accuracy |
| YOLO26m | 20.4M | Higher accuracy |
| YOLO26l | 24.8M | Production accuracy |
| YOLO26x | 55.7M | Maximum accuracy |
Optimize Training Time#
- Start small: Test with 10-20 epochs on a budget GPU to verify your dataset and config work
- Use appropriate GPU: RTX PRO 6000 handles most workloads well
- Validate dataset: Fix labeling issues before spending on training
- Monitor early: Cancel training if loss plateaus — you only pay for compute time used
Troubleshooting#
| Issue | Solution |
|---|---|
| Training stuck at 0% | Check dataset format, retry |
| Out of memory | Reduce batch size or use larger GPU |
| Poor accuracy | Increase epochs, check data quality |
| Training slow | Consider faster GPU |
| Task mismatch error | Ensure model and dataset tasks match |
Training Parameters Reference#
| Parameter | Type | Default | Range | Description |
|---|---|---|---|---|
epochs | int | 100 | 1-10000 | Number of training epochs |
batch | int/float | -1 (auto) | -1, 0-1, or >=1 | Batch size (-1 = auto-fit to available VRAM, 0-1 = GPU memory fraction) |
imgsz | int | 640 | 32-4096 | Input image size |
pretrained | bool | True | - | Start from pretrained weights instead of random init |
patience | int | 100 | 0-1000 | Early stopping patience (0 disables) |
time | float | null | 0.1-720 | Wall-clock training limit in hours, overrides epochs |
seed | int | 0 | 0-2147483647 | Random seed for reproducibility |
deterministic | bool | True | - | Deterministic training mode |
amp | bool/str | True | true/false/fp16/bf16/fp32 | Training precision |
compile | bool | False | - | Compile with torch.compile (slower first epoch) |
close_mosaic | int | 10 | >=0 | Disable mosaic in final N epochs |
save_period | int | -1 | >=-1 | Save checkpoint every N epochs |
device | select | auto | auto/0/cpu/mps | Training device |
workers | int | 8 | 0-64 | Dataloader workers |
cache | select | false | ram/disk/false | Cache images |
dropout | float | 0.0 | 0.0-1.0 | Classification head dropout (classify only) |
iou | float | 0.7 | 0.1-0.9 | IoU threshold for NMS during validation |
max_det | int | 300 | 1-10000 | Maximum detections per image |
Some parameters only apply to specific tasks:
- Detect, segment, pose, and OBB:
box,cls,dfl,single_cls,iou,max_det - Every task except depth and classify (detect, segment, semantic, pose, obb):
mosaic,mixup,close_mosaic - Every task except classify (detect, segment, semantic, depth, pose, obb):
degrees,translate,shear,perspective - Segment, semantic, and OBB:
copy_paste - Depth only:
dlog,dgrad,dlam - Classify only:
dropout - Pose only:
pose(loss weight),kobj(keypoint objectness),rle - OBB only:
angle
FAQ#
Training time depends on:
- Dataset size
- Model size
- Number of epochs
- GPU selected
Typical times (1000 images, 100 epochs):
Model RTX PRO 6000 A100 SXM YOLO26n ~6 min ~5 min YOLO26m ~15 min ~12 min YOLO26x ~30 min ~25 min Approximate TimesTraining times are approximate and vary with dataset complexity, augmentation settings, and batch size. Use the training dialog's cost estimate for more accurate predictions.
Yes. Training can run unattended while it remains funded, and the Platform records a completion or failure event. If metering drives the balance below zero, active paid cloud runs stop and settle the GPU time already used.
Cloud usage is metered as training progresses. If a charge pushes your balance below zero, active paid cloud training runs are stopped and settled for the GPU time already used. Add credits or enable auto top-up to keep long-running jobs funded.
Negative BalanceA zero or negative balance prevents new paid cloud training jobs. A negative metered balance also triggers shutdown of active paid cloud training runs.
Cost estimates are approximate — actual training time may vary due to factors like data loading speed, GPU warmup, and model convergence behavior. If actual usage exhausts the available balance, the Platform stops active paid cloud runs after the balance goes negative.
To manage costs:
- Monitor training progress in real-time and cancel early if needed
- Enable auto top-up to automatically replenish credits
- Start with shorter runs (fewer epochs) to calibrate expectations
Yes, expand the Advanced Settings section in the training dialog to access a YAML editor with 50+ configurable parameters. Non-default values are included in both cloud and local training commands.
The YAML editor also supports importing configurations from previous training runs:
- Copy from existing model: On any completed model's page, the Training Configuration card has an Export data menu with Copy JSON. Paste the JSON directly into the YAML editor — it auto-detects JSON format and imports all parameters. The same menu downloads the configuration as CSV or JSON.
- Paste YAML or JSON: Paste any valid YAML or JSON training configuration into the editor. Parameters are validated automatically, with out-of-range values clamped and warnings displayed.
- Drag and drop files: Drag a
.yamlor.jsonfile directly into the editor to import its parameters.
This makes it easy to reproduce or iterate on previous training configurations without manually re-entering each parameter.
With the default
optimizer: auto, training picks the optimizer and initial learning rate for you and ignores yourlr0. To use your ownlr0, choose a specific optimizer such asSGDorAdamWin Advanced Settings. The training console logs the optimizer and learning rate the run selected; the Training Configuration card shows the arguments you submitted, so withautoit can still list yourlr0.Yes. A failed model shows an error banner with a Retry Training action that reopens the training dialog with the same base model, dataset, and parameters, so you can adjust one value and start again. Retrying reuses the same model page: the previous run's charts, console output, system metrics, and error are cleared once the new job is created, and its weights are replaced when the new run produces a better checkpoint.
Yes, the New Model button on dataset pages opens the training dialog with the dataset preselected and locked. You then select a project and model to begin training.