Как изолировать объекты сегментации с помощью Ultralytics YOLO#
Сегментация экземпляров создаёт маску с точностью до пикселя для каждого обнаруженного объекта, поэтому каждый объект можно извлечь из изображения отдельно. В этом руководстве показано, как преобразовать результаты сегментации Ultralytics YOLO в отдельные объекты с помощью режима Predict и OpenCV, используя сплошной чёрный или прозрачный фон для сохранения в формате PNG.
Смотри: Как удалить фон и выделить объекты с помощью сегментации Ultralytics YOLO и OpenCV в Python 🚀
Зачем изолировать объекты сегментации?#
Извлечение отдельных объектов из изображения открывает множество возможностей для дальнейшей обработки:
- Удаление фона на фотографиях товаров, в каталогах или при творческой обработке.
- Кадрирование отдельных объектов для создания наборов данных классификации на основе результатов детекции.
- Целевая обработка, чтобы на следующих этапах, например при OCR, анализе цвета или измерениях, обрабатывался только объект, а не окружающая сцена.
- Экспорт в PNG с прозрачностью, чтобы разместить объекты на новом фоне.
Этот способ подходит для любой модели сегментации Ultralytics YOLO и состоит из четырёх этапов: выполни инференс → извлеки каждый контур → изолируй объект → сохрани результат.
Выполнение инференса сегментации#
Установи необходимые библиотеки, затем загрузи модель сегментации, например YOLO26n-seg (суффикс -seg необходим для создания масок) и запусти предсказание для исходного изображения:
from ultralytics import YOLO

# Загрузи модель сегментации
model = YOLO("yolo26n-seg.pt")

# Выполни инференс для исходного изображения
results = model.predict(source="path/to/image.jpg")Если вызвать model.predict() без source, Ultralytics использует примеры изображений, поставляемые вместе с пакетом (bus.jpg и zidane.jpg). Это удобно для быстрой проверки рабочего процесса.
Извлечение контуров объектов#
Каждый элемент results соответствует одному изображению, а при переборе результатов возвращается по одной детекции за раз. Для каждой детекции скопируй исходное изображение, прочитай метку класса и нарисуй контур маски объекта на пустой бинарной маске. Белая область этой маски точно показывает, какие пиксели принадлежат объекту.
Фрагменты кода в этом и следующем разделах выполняются внутри цикла детекции ниже; полный скрипт, который можно скопировать и запустить, приведён в разделе Полный пример.
from pathlib import Path

import cv2
import numpy as np

for r in results:
    img = np.copy(r.orig_img)
    img_name = Path(r.path).stem  # базовое имя исходного изображения

    # Перебери все обнаруженные объекты на изображении
    for ci, c in enumerate(r):
        label = c.names[c.boxes.cls.tolist().pop()]  # имя класса

        # Создай бинарную маску и нарисуй на ней контур объекта
        b_mask = np.zeros(img.shape[:2], np.uint8)
        contour = c.masks.xy[0].astype(np.int32).reshape(-1, 1, 2)
cv2.drawContours(b_mask, [contour], -1, (255, 255, 255), cv2.FILLED)c.masks.xy[0]возвращает контур маски в виде координат точек(x, y)объекта в результате с одной детекцией..astype(np.int32)преобразует точки изfloat32, которые OpenCVdrawContours()не принимает..reshape(-1, 1, 2)изменяет форму массива точек, приводя его к формату[N, 1, 2], который ожидаетdrawContours(), гдеN— количество точек контура.
Передача [contour] с индексом -1 рисует все точки указанного контура, а cv2.FILLED закрашивает белым каждый пиксель внутри него.
Изоляция объекта#
Когда бинарная маска готова, объедини её с исходным изображением. В зависимости от желаемого фона обычно используют один из двух вариантов:
Преобразуй маску в три канала и оставь только пиксели, которые пересекаются с объектом. Всё за пределами контура станет чёрным:
# Изолируй объект на чёрном фоне
mask3ch = cv2.cvtColor(b_mask, cv2.COLOR_GRAY2BGR)
isolated = cv2.bitwise_and(mask3ch, img)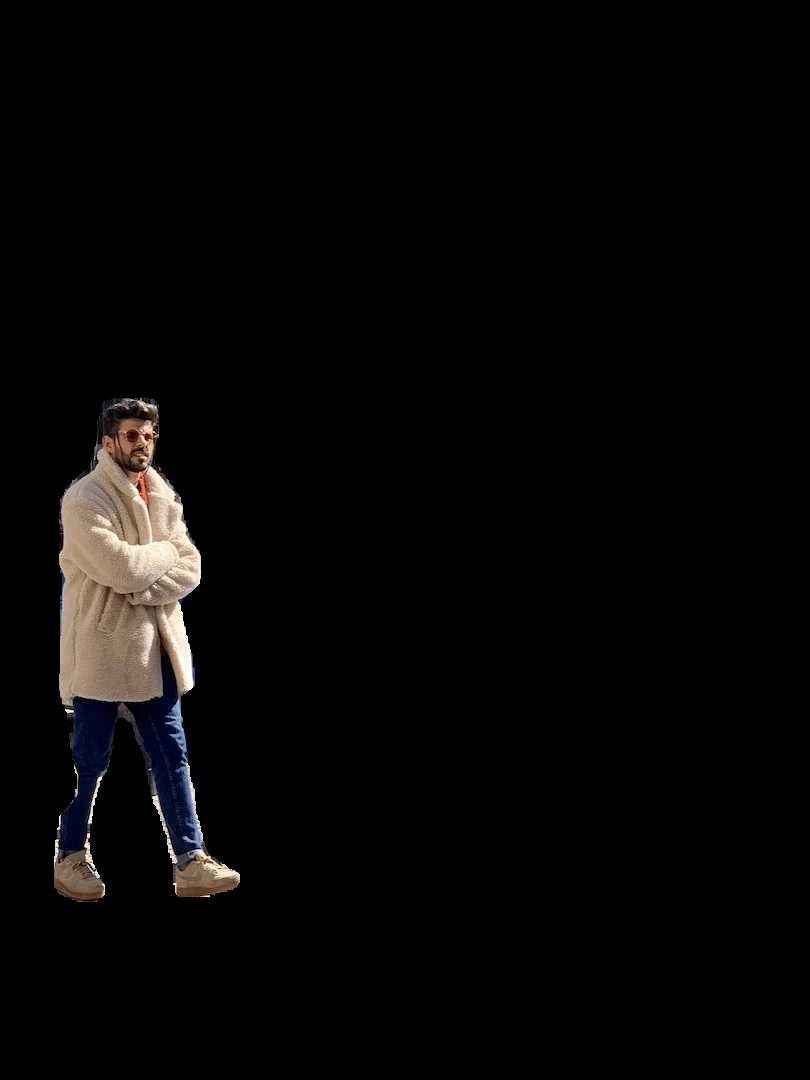
Чтобы оставить только область объекта, а не изображение целиком, обрежь его по ограничивающей рамке детекции:
# Координаты ограничивающей рамки
x1, y1, x2, y2 = c.boxes.xyxy.cpu().numpy().squeeze().astype(np.int32)
# Обрежь изолированное изображение по области объекта
iso_crop = isolated[y1:y2, x1:x2]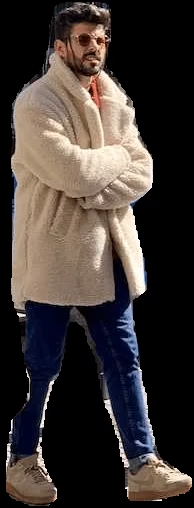
Эта возможность встроена. Передай save_crop=True в predict(), и Ultralytics автоматически сохранит обрезанные области по ограничивающим рамкам — маска не нужна.
Сохранение результата (необязательно)#
Что делать с каждым изолированным объектом — решать тебе. Часто его записывают на диск для дальнейшего использования:
# Save the isolated object to file
cv2.imwrite(f"{img_name}_{label}-{ci}.png", isolated)
Здесь img_name — основная часть имени исходного изображения, label — имя класса, а ci — индекс детекции, поэтому экземпляры одного класса получают уникальные имена файлов. Замени isolated на iso_crop, если выше ты применил необязательную обрезку.
Полный пример#
Приведённый ниже скрипт объединяет все этапы в один готовый к запуску блок. По умолчанию он использует чёрный фон; замени отмеченную строку на np.dstack([img, b_mask]), чтобы вместо этого получить PNG с прозрачностью:
from pathlib import Path

import cv2
import numpy as np

from ultralytics import YOLO

model = YOLO("yolo26n-seg.pt")
results = model.predict(source="path/to/image.jpg")

for r in results:
    img = np.copy(r.orig_img)
    img_name = Path(r.path).stem

    for ci, c in enumerate(r):
        label = c.names[c.boxes.cls.tolist().pop()]

        # Build a binary mask from the object contour
        b_mask = np.zeros(img.shape[:2], np.uint8)
        contour = c.masks.xy[0].astype(np.int32).reshape(-1, 1, 2)
        cv2.drawContours(b_mask, [contour], -1, (255, 255, 255), cv2.FILLED)

        # Isolate the object (black background)
        mask3ch = cv2.cvtColor(b_mask, cv2.COLOR_GRAY2BGR)
        isolated = cv2.bitwise_and(mask3ch, img)  # transparent PNG: isolated = np.dstack([img, b_mask])

        # Save or add your custom post-processing here
        cv2.imwrite(f"{img_name}_{label}-{ci}.png", isolated)

        # Optional: crop to the bounding box before saving
        # x1, y1, x2, y2 = c.boxes.xyxy.cpu().numpy().squeeze().astype(np.int32)
        # cv2.imwrite(f"{img_name}_{label}-{ci}.png", isolated[y1:y2, x1:x2])
Если ты собираешься использовать этот код многократно, оберни тело цикла в функцию, чтобы вызывать её для множества изображений.
Заключение#
Теперь у тебя есть полный способ изолировать сегментированные объекты с помощью Ultralytics YOLO: выполни инференс, создай бинарную маску по каждому контуру, а затем извлеки объект на чёрном или прозрачном фоне и при желании обрежь его по ограничивающей рамке. Изучи полную документацию по задаче сегментации и режиму Predict, чтобы адаптировать рабочий процесс к своим классам.
Часто задаваемые вопросы#
Загрузи модель сегментации, выполни инференс, создай бинарную маску по контуру каждой детекции и объедини её с исходным изображением:
import cv2
import numpy as np

from ultralytics import YOLO

model = YOLO("yolo26n-seg.pt")
results = model.predict(source="path/to/your/image.jpg")

img = np.copy(results[0].orig_img)
b_mask = np.zeros(img.shape[:2], np.uint8)
contour = results[0].masks.xy[0].astype(np.int32).reshape(-1, 1, 2)
cv2.drawContours(b_mask, [contour], -1, (255, 255, 255), cv2.FILLED)

mask3ch = cv2.cvtColor(b_mask, cv2.COLOR_GRAY2BGR)
isolated = cv2.bitwise_and(mask3ch, img)
Полный цикл для каждой детекции приведён в разделе Полный пример.
Есть два основных способа. Для чёрного фона преобразуй маску в три канала и используй
cv2.bitwise_and(). Для прозрачного фона (при сохранении в PNG) добавь маску четвёртым альфа-каналом с помощьюnp.dstack([img, b_mask]). Оба способа показаны в разделе Изоляция объекта.Прочитай координаты ограничивающей рамки из детекции и обрежь изолированное изображение:
x1, y1, x2, y2 = results[0].boxes.xyxy[0].cpu().numpy().astype(np.int32)
iso_crop = isolated[y1:y2, x1:x2]
Подробнее о результатах с ограничивающими рамками читай в документации по режиму Predict.
Ultralytics YOLO обеспечивает быструю сегментацию экземпляров в реальном времени с точным созданием масок и ограничивающих рамок, а простой Python API позволяет выделять объекты по результатам инференса всего несколькими строками кода OpenCV.
Да. Используй аргумент
save_cropвpredict(), чтобы сохранять фрагменты ограничивающих рамок с исходным фоном:results = model.predict(source="path/to/your/image.jpg", save_crop=True)Подробнее см. в разделе Аргументы инференса в режиме Predict.
Комментарии16
Задай вопрос, поделись результатами или помоги кому-нибудь.
cordonballas
wow thanx that's exactly what i've been looking for.
 Glenn JocherUltralytics
@cordonballas thank you for your positive feedback! We're glad the segmentation isolation guide was helpful. If you have any further questions, feel free to ask—the YOLO community and our team are here to help. 😊
For continued support, check our Segment Task documentation and Predict Mode guide.
AbdulGhofur23
How can I extract a mask from a TIFF (Tag Image File Format) so that the mask's coordinates align with the projection of the TIFF image?
- Glenn JocherUltralytics
To extract masks from a TIFF image while aligning the mask's coordinates with the image's projection, you can use the segmentation results from Ultralytics YOLO. Generate the mask using
results.masks.xyfor contour points and overlay it on the TIFF image. Ensure alignment by maintaining the original image dimensions during processing. For more, refer to the Isolating Segmentation Objects Guide. Let us know if you need further assistance!1
vedhanayagan9626
I used yolo v11n seg model , i got a segmented image as output with bounding boxes in those some of predictions are overlapped like a bounding box on two items as single so i try to remove a rectangle and associated segmentation from an image and add new rectangle by hold and drag functionality its looks likw working but i cant get optimized result. Is there any way to remove and add new bounding boxes after a segmentation result?
- Glenn JocherUltralytics
@vedhanayagan9626 to address overlapping predictions, you can manually refine results by manipulating masks and bounding boxes post-inference. Use the mask and bounding box coordinates from
results[0].masksandresults[0].boxesto remove or modify specific predictions. For new bounding boxes, you might need to create and integrate them into your results structure manually. Refer to the Isolating Segmentation Objects guide for detailed steps. For optimized results, ensure adequate data quality and model tuning.
SerhiiPostupaiev
Hello, can you please explain how the YOLOv8 performs upscaling? For example, my input images are 854x480, YOLOv8 scales them up to 864x512. How does it exactly performs upscaling? Does it use padding or some other approaches?
 Paula DerrengerUltralytics
@SerhiiPostupaiev hello! In YOLOv8, images are scaled up or down to a specific model input size, optimally a square format (like 640x640) or a dimension supported by the model (such as 864x512 in your case). The upscaling for images that do not exactly match the input dimensions typically involves:
- Resizing the image to the closest dimension that maintains the aspect ratio.
- Padding the resized image to reach the required input size, ensuring that the aspect ratio is preserved.
For instance, for an image of 854x480, YOLOv8 may:
- Resize the image to fit the model's width of 864 while maintaining the aspect ratio, which adjusts the height accordingly.
- Pad the height to the nearest model-supported dimension (like 512), adding pixel values (usually zeros) to the top and bottom or sides of the image to reach the required size.
Here’s a rough example in Python using OpenCV for how padding might be handled:
import cv2
import numpy as np

# Example image load
image = cv2.imread('input.jpg')
# Resizing the image
resized_image = cv2.resize(image, (864, keep_aspect_ratio_height))  # Example variable for illustration

# Padding the resized image
top_padding = (512 - resized_image.shape[0]) // 2
bottom_padding = 512 - resized_image.shape[0] - top_padding
padded_image = cv2.copyMakeBorder(resized_image, top_padding, bottom_padding, 0, 0, cv2.BORDER_CONSTANT, value=[0, 0, 0])
This ensures the entire image is used during prediction without distorting its original aspect ratio. 😊
EnricoMendez
Hello, I run this code example but it only display one object's mask, is it posible to join all the objects' masks in a single frame?
- Glenn JocherUltralytics
Hey there! 😊 Absolutely, you can combine all the objects' masks into a single frame. Just modify the section where you're drawing the contours onto the mask. Instead of creating a new binary mask
b_maskfor each object, you initialize one common mask before iterating through the objects and draw every object's contour on this common mask. Here's a quick example to illustrate:# Initialize one common binary mask for all objects b_mask_all = np.zeros(img.shape[:2], np.uint8) for ci, c in enumerate(r): # Your contour extraction remains the same contour = c.masks.xy.pop().astype(np.int32).reshape(-1, 1, 2) # Draw each contour onto the common mask cv2.drawContours(b_mask_all, [contour], -1, (255, 255, 255), cv2.FILLED) # After the loop, you can use `b_mask_all` which contains all objects' masksJust keep in mind, with
b_mask_all, you'll have all the detected objects' masks on one mask. If the objects overlap in your image, their masks will also overlap inb_mask_all. Hope this helps! Let us know if you have more questions. 😊
mariamg03
hi is there a way I can apply the edits on the binary image then revert back to the original with the mask part edited?
- Paula DerrengerUltralytics
Hey there! 👋 Yes, you can certainly make edits on a binary mask and then apply those changes back to the original image, essentially modifying only the parts that the mask covers. Here's a quick outline of how you could achieve this with an example focusing on segmentation tasks:
-
After segmenting your image and obtaining the binary mask (let's say
b_mask), you can perform any edits you like on this mask. For example, inverting the mask, dilating, or eroding. -
To apply the edited mask back to the original image (
orig_img), you would use the mask to isolate the area of interest in the original image and then apply your edits.
Here's a code snippet demonstrating this with a simple inversion edit:
import cv2
import numpy as np

# Assuming 'b_mask' is your binary mask and 'orig_img' is your original image
# Let's say you inverted the binary mask
edited_mask = 255 - b_mask  # Inverting mask

# Convert the single channel binary mask to a 3 channel mask to match the original image
edited_mask_3ch = cv2.cvtColor(edited_mask, cv2.COLOR_GRAY2BGR)

# Apply the edited mask back to the original image
# This line performs bitwise-and operation to only keep parts of the image where the mask is white
edited_image = cv2.bitwise_and(orig_img, edited_mask_3ch)

# At this point, 'edited_image' contains the original image with edits applied to the segmented part
This is a simplified example to show the concept. Depending on the edits you've made to
b_mask, you might need to adjust how you applyedited_maskback toorig_img.Remember, after editing the mask, you can always revert it back to its original form if you've kept a copy before editing, or you can apply the inverse of your edits.
I hope this helps! Let me know if you have more questions. Happy coding! 😊
-
Safiislamian
Hi sir, thanku for your response does load dataset will work or not. As the dataset is in yolo form where we have different folders and subfolders like train having images and labels etc
On Wed, Mar 27, 2024, 7:03 AM Glenn Jocher @.***> wrote:
Hey there! 👋 Glad to see you're interested in applying YOLOv8 for instance segmentation with a dataset from Roboflow. Below is a quick guide to help you get started with applying YOLOv8 for detection and then using masks for the dataset based on class. Step 1: Install Ultralytics YOLO
First, ensure you have Ultralytics installed:
pip install ultralytics
Step 2: Load Your Model
from ultralytics import YOLOmodel = YOLO('yolov8n-seg.pt') # Use yolov8n-seg.pt for segmentation models
Step 3: Predict and Isolate Objects
Now, for predicting and isolating objects based on their classes, you'll dive into the prediction results to access and manipulate the segmentation masks:
results = model.predict(source='path/to/your/dataset')for result in results: for detection in result: class_name = detection.names[detection.boxes.cls.tolist().pop()] # Create a binary mask from detection binary_mask = np.zeros(result.orig_img.shape[:2], np.uint8) contour = detection.masks.xy.pop().astype(np.int32).reshape(-1, 1, 2) cv2.drawContours(binary_mask, [contour], -1, (255, 255, 255), cv2.FILLED) # Example to save or further process the mask
Note: Replace 'path/to/your/dataset' with the actual path to your images. Step 4: Saving or Processing the Masks
You may wish to save each mask based on its class for processing later. You can modify the loop to save each binary mask to a file using cv2.imwrite() method.
cv2.imwrite(f'{class_name}_mask.jpg', binary_mask)
This will save each mask with its respective class name as part of the filename, allowing for easy organization by class.
Hope this helps! 😊 Let us know if you need further assistance or have more questions. Happy coding!
— Reply to this email directly, view it on GitHub https://github.com/orgs/ultralytics/discussions/9334#discussioncomment-8922405, or unsubscribe https://github.com/notifications/unsubscribe-auth/AUP75TG3RFWAL7YRMWDR66DY2ILE5AVCNFSM6AAAAABFJ334B2VHI2DSMVQWIX3LMV43SRDJONRXK43TNFXW4Q3PNVWWK3TUHM4DSMRSGQYDK . You are receiving this because you commented.Message ID: @.*** com>
- Paula DerrengerUltralytics(изменено)
Hi there! 😄
Absolutely, loading a dataset structured in YOLO format (with separate folders for train/test images and labels) works well with YOLO26. You can specify the dataset structure in a YAML file and provide this file when initiating training or validation processes. Here's an example
data.yamlfile structure for your dataset:train: /path/to/dataset/train/images # path to images folder val: /path/to/dataset/val/images # path to validation images # Classes nc: 80 # number of classes names: ['class1', 'class2', ...] # class namesAnd here's how you might start training with your dataset:
yolo detect train data=data.yaml model=yolo26n.ptMake sure to replace
/path/to/dataset/train/imagesand/path/to/dataset/val/imageswith the actual paths to your dataset and similarly update thenc(number of classes) andnames(class labels) accordingly.If you have any more questions or need further assistance, feel free to ask. Happy to help! 🚀
There is a dataset on roboflow for instance segmentation, i want to apply first yolov8 and then masks for all the dataset arranged on the basis of their classes. please provide me details and code for that Thank you...
- Glenn JocherUltralytics(изменено)
Hey there! 👋 Glad to see you're interested in applying YOLO26 for instance segmentation with a dataset from Roboflow. Below is a quick guide to help you get started with applying YOLO26 for detection and then using masks for the dataset based on class.
Step 1: Install Ultralytics YOLO
First, ensure you have Ultralytics installed:
pip install ultralyticsStep 2: Load Your Model
from ultralytics import YOLO
model = YOLO('yolo26n-seg.pt')  # Use yolo26n-seg.pt for segmentation models
Step 3: Predict and Isolate Objects
Now, for predicting and isolating objects based on their classes, you'll dive into the prediction results to access and manipulate the segmentation masks:
results = model.predict(source='path/to/your/dataset')
for result in results:
    for detection in result:
        class_name = detection.names[detection.boxes.cls.tolist().pop()]
        # Create a binary mask from detection
        binary_mask = np.zeros(result.orig_img.shape[:2], np.uint8)
        contour = detection.masks.xy.pop().astype(np.int32).reshape(-1, 1, 2)
        cv2.drawContours(binary_mask, [contour], -1, (255, 255, 255), cv2.FILLED)
        # Example to save or further process the mask
Note: Replace
'path/to/your/dataset'with the actual path to your images.Step 4: Saving or Processing the Masks
You may wish to save each mask based on its class for processing later. You can modify the loop to save each binary mask to a file using
cv2.imwrite()method.cv2.imwrite(f'{class_name}_mask.jpg', binary_mask)This will save each mask with its respective class name as part of the filename, allowing for easy organization by class.
Hope this helps! 😊 Let us know if you need further assistance or have more questions. Happy coding!