Cách tách riêng đối tượng phân đoạn bằng Ultralytics YOLO
Phân đoạn đối tượng tạo ra mask chính xác đến từng pixel cho mỗi đối tượng được phát hiện, nhờ đó bạn có thể tách riêng từng đối tượng khỏi ảnh. Hướng dẫn này trình bày cách chuyển kết quả phân đoạn Ultralytics YOLO thành các đối tượng tách biệt bằng Predict Mode và OpenCV, với nền đen đặc hoặc nền trong suốt để lưu dưới dạng PNG.
Xem: Cách tách riêng các đối tượng đã phân đoạn bằng Ultralytics YOLO26 | Hướng dẫn Python | VisionAI 🚀
Tại sao cần tách riêng đối tượng phân đoạn?#
Tách từng đối tượng khỏi ảnh mở ra nhiều quy trình xử lý tiếp theo:
- Xóa nền cho ảnh sản phẩm, catalog hoặc chỉnh sửa sáng tạo.
- Cắt riêng từng đối tượng để tạo dataset phân loại từ các kết quả phát hiện.
- Xử lý tập trung để các bước tiếp theo như OCR, phân tích màu hoặc đo lường chỉ xử lý đối tượng, không phải cảnh xung quanh.
- Xuất PNG trong suốt để ghép đối tượng lên nền mới.
Quy trình này áp dụng cho mọi model phân đoạn Ultralytics YOLO và gồm bốn giai đoạn: chạy inference → trích xuất từng đường bao → tách riêng đối tượng → lưu kết quả.
Chạy inference phân đoạn#
Cài đặt các thư viện cần thiết, sau đó tải một model phân đoạn như YOLO26n-seg (cần có hậu tố -seg để tạo mask) và chạy dự đoán trên ảnh nguồn:
from ultralytics import YOLO

# Tải model phân đoạn
model = YOLO("yolo26n-seg.pt")

# Chạy inference trên ảnh nguồn
results = model.predict(source="path/to/image.jpg")Nếu gọi model.predict() mà không có source, Ultralytics sẽ dùng các ảnh ví dụ được đóng gói cùng thư viện (bus.jpg và zidane.jpg), rất tiện để kiểm thử nhanh quy trình.
Trích xuất đường bao đối tượng#
Mỗi mục trong results tương ứng với một ảnh; duyệt qua một kết quả sẽ lần lượt trả về từng phát hiện. Với mỗi phát hiện, hãy sao chép ảnh gốc, đọc nhãn lớp và vẽ đường bao mask của đối tượng lên một mask nhị phân trống. Vùng trắng của mask này đánh dấu chính xác các pixel thuộc về đối tượng.
Các đoạn mã trong phần này và phần tiếp theo chạy bên trong vòng lặp phát hiện bên dưới; script hoàn chỉnh có thể sao chép và chạy được nằm trong Ví dụ đầy đủ.
from pathlib import Path

import cv2
import numpy as np

for r in results:
    img = np.copy(r.orig_img)
    img_name = Path(r.path).stem  # tên cơ sở của ảnh nguồn

    # Duyệt qua từng đối tượng được phát hiện trong ảnh
    for ci, c in enumerate(r):
        label = c.names[c.boxes.cls.tolist().pop()]  # tên lớp

        # Tạo mask nhị phân và vẽ đường bao đối tượng lên mask
        b_mask = np.zeros(img.shape[:2], np.uint8)
        contour = c.masks.xy[0].astype(np.int32).reshape(-1, 1, 2)
cv2.drawContours(b_mask, [contour], -1, (255, 255, 255), cv2.FILLED)c.masks.xy[0]trả về đường bao mask dưới dạng tọa độ điểm(x, y)của đối tượng trong kết quả chỉ có một phát hiện này..astype(np.int32)chuyển đổi các điểm từfloat32, định dạng màdrawContours()của OpenCV không chấp nhận..reshape(-1, 1, 2)định hình lại các điểm thành bố cụcdrawContours()mà[N, 1, 2]mong đợi, trong đóNlà số điểm trên đường bao.
Truyền [contour] cùng chỉ số -1 sẽ vẽ tất cả các điểm của đường bao được cung cấp, còn cv2.FILLED sẽ tô trắng mọi pixel nằm bên trong.
Tách riêng đối tượng#
Khi đã có mask nhị phân, hãy kết hợp mask với ảnh gốc. Có hai kiểu phổ biến, tùy theo nền bạn muốn:
Chuyển mask thành ba kênh và chỉ giữ lại các pixel chồng lấp với đối tượng. Mọi vùng bên ngoài đường bao sẽ chuyển thành màu đen:
# Tách đối tượng với nền đen
mask3ch = cv2.cvtColor(b_mask, cv2.COLOR_GRAY2BGR)
isolated = cv2.bitwise_and(mask3ch, img)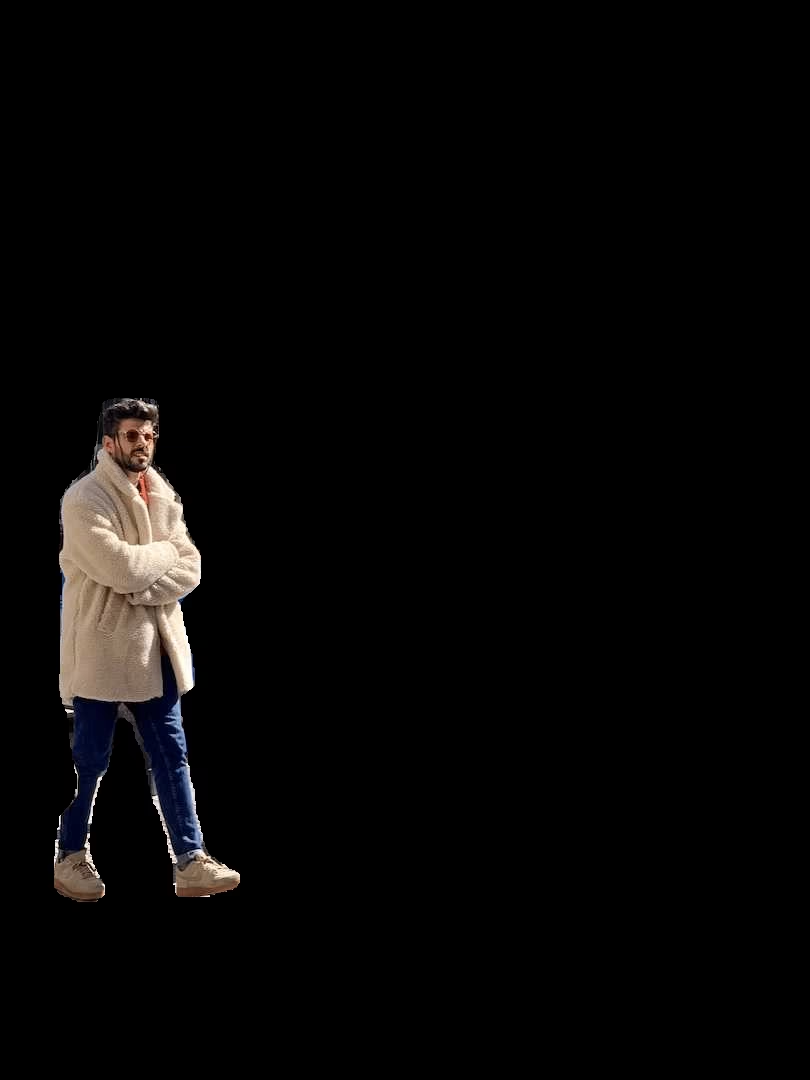
Để chỉ giữ lại vùng của đối tượng thay vì toàn bộ ảnh, hãy cắt ảnh theo bounding box của phát hiện:
# Tọa độ bounding box
x1, y1, x2, y2 = c.boxes.xyxy.cpu().numpy().squeeze().astype(np.int32)
# Cắt ảnh đã tách riêng theo vùng đối tượng
iso_crop = isolated[y1:y2, x1:x2]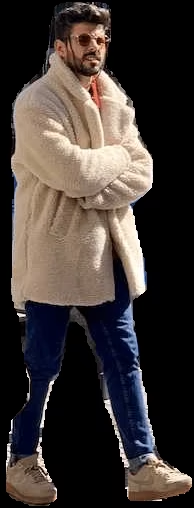
Tính năng này đã được tích hợp sẵn. Truyền save_crop=True vào predict(), Ultralytics sẽ tự động lưu các ảnh crop theo bounding box mà không cần tạo mask.
Lưu kết quả (không bắt buộc)#
Bạn có thể tùy ý xử lý từng đối tượng đã tách riêng. Một bước tiếp theo phổ biến là ghi đối tượng ra đĩa để sử dụng sau:
# Save the isolated object to file
cv2.imwrite(f"{img_name}_{label}-{ci}.png", isolated)
Ở đây, img_name là tên gốc của ảnh nguồn, label là tên lớp và ci là chỉ số phát hiện, nhờ đó nhiều instance cùng lớp sẽ có tên file duy nhất. Thay isolated bằng iso_crop nếu bạn đã thực hiện bước crop tùy chọn ở trên.
Ví dụ đầy đủ#
Script dưới đây gộp tất cả các bước thành một khối mã có thể chạy ngay. Theo mặc định, script dùng nền đen; hãy đổi dòng được đánh dấu duy nhất thành np.dstack([img, b_mask]) để thay bằng PNG trong suốt:
from pathlib import Path

import cv2
import numpy as np

from ultralytics import YOLO

model = YOLO("yolo26n-seg.pt")
results = model.predict(source="path/to/image.jpg")

for r in results:
    img = np.copy(r.orig_img)
    img_name = Path(r.path).stem

    for ci, c in enumerate(r):
        label = c.names[c.boxes.cls.tolist().pop()]

        # Build a binary mask from the object contour
        b_mask = np.zeros(img.shape[:2], np.uint8)
        contour = c.masks.xy[0].astype(np.int32).reshape(-1, 1, 2)
        cv2.drawContours(b_mask, [contour], -1, (255, 255, 255), cv2.FILLED)

        # Isolate the object (black background)
        mask3ch = cv2.cvtColor(b_mask, cv2.COLOR_GRAY2BGR)
        isolated = cv2.bitwise_and(mask3ch, img)  # transparent PNG: isolated = np.dstack([img, b_mask])

        # Save or add your custom post-processing here
        cv2.imwrite(f"{img_name}_{label}-{ci}.png", isolated)

        # Optional: crop to the bounding box before saving
        # x1, y1, x2, y2 = c.boxes.xyxy.cpu().numpy().squeeze().astype(np.int32)
        # cv2.imwrite(f"{img_name}_{label}-{ci}.png", isolated[y1:y2, x1:x2])
Nếu cần sử dụng nhiều lần, hãy đóng gói phần thân vòng lặp vào một hàm để có thể gọi hàm đó cho nhiều ảnh.
Kết luận#
Giờ đây bạn đã có quy trình hoàn chỉnh để tách riêng các đối tượng đã phân đoạn bằng Ultralytics YOLO: chạy inference, tạo mask nhị phân từ từng đường bao, sau đó trích xuất đối tượng trên nền đen hoặc trong suốt và tùy chọn cắt theo bounding box. Hãy tham khảo tài liệu đầy đủ về tác vụ Segment và Predict Mode để điều chỉnh quy trình cho các lớp của riêng bạn.
Câu hỏi thường gặp#
Tải model phân đoạn, chạy inference, tạo mask nhị phân từ đường bao của từng phát hiện và kết hợp mask với ảnh gốc:
import cv2
import numpy as np

from ultralytics import YOLO

model = YOLO("yolo26n-seg.pt")
results = model.predict(source="path/to/your/image.jpg")

img = np.copy(results[0].orig_img)
b_mask = np.zeros(img.shape[:2], np.uint8)
contour = results[0].masks.xy[0].astype(np.int32).reshape(-1, 1, 2)
cv2.drawContours(b_mask, [contour], -1, (255, 255, 255), cv2.FILLED)

mask3ch = cv2.cvtColor(b_mask, cv2.COLOR_GRAY2BGR)
isolated = cv2.bitwise_and(mask3ch, img)
Xem Ví dụ đầy đủ để biết vòng lặp hoàn chỉnh xử lý từng phát hiện.
Có hai kiểu chính. Với nền đen, hãy chuyển mask thành ba kênh và dùng
cv2.bitwise_and(). Với nền trong suốt (khi lưu dưới dạng PNG), hãy ghép mask thành kênh alpha thứ tư bằngnp.dstack([img, b_mask]). Cả hai cách đều được trình bày trong phần Tách riêng đối tượng.Đọc tọa độ bounding box từ phát hiện rồi cắt ảnh đã tách riêng:
x1, y1, x2, y2 = results[0].boxes.xyxy[0].cpu().numpy().astype(np.int32)
iso_crop = isolated[y1:y2, x1:x2]
Tìm hiểu thêm về kết quả bounding box trong tài liệu Predict Mode.
Ultralytics YOLO cung cấp khả năng instance segmentation nhanh theo thời gian thực, tạo mask và bounding box chính xác, cùng Python API đơn giản giúp chuyển kết quả inference thành các đối tượng được tách riêng chỉ với vài dòng mã OpenCV.
Có. Dùng đối số
save_croptrongpredict()để lưu các crop theo bounding box cùng với nền gốc:results = model.predict(source="path/to/your/image.jpg", save_crop=True)Đọc thêm trong phần Các đối số inference của Predict Mode.


Bình luận16
Đặt câu hỏi, chia sẻ kết quả hoặc giúp đỡ người khác.
cordonballas
wow thanx that's exactly what i've been looking for.
 Glenn JocherUltralytics
@cordonballas thank you for your positive feedback! We're glad the segmentation isolation guide was helpful. If you have any further questions, feel free to ask—the YOLO community and our team are here to help. 😊
For continued support, check our Segment Task documentation and Predict Mode guide.
AbdulGhofur23
How can I extract a mask from a TIFF (Tag Image File Format) so that the mask's coordinates align with the projection of the TIFF image?
- Glenn JocherUltralytics
To extract masks from a TIFF image while aligning the mask's coordinates with the image's projection, you can use the segmentation results from Ultralytics YOLO. Generate the mask using
results.masks.xyfor contour points and overlay it on the TIFF image. Ensure alignment by maintaining the original image dimensions during processing. For more, refer to the Isolating Segmentation Objects Guide. Let us know if you need further assistance!1
vedhanayagan9626
I used yolo v11n seg model , i got a segmented image as output with bounding boxes in those some of predictions are overlapped like a bounding box on two items as single so i try to remove a rectangle and associated segmentation from an image and add new rectangle by hold and drag functionality its looks likw working but i cant get optimized result. Is there any way to remove and add new bounding boxes after a segmentation result?
- Glenn JocherUltralytics
@vedhanayagan9626 to address overlapping predictions, you can manually refine results by manipulating masks and bounding boxes post-inference. Use the mask and bounding box coordinates from
results[0].masksandresults[0].boxesto remove or modify specific predictions. For new bounding boxes, you might need to create and integrate them into your results structure manually. Refer to the Isolating Segmentation Objects guide for detailed steps. For optimized results, ensure adequate data quality and model tuning.
SerhiiPostupaiev
Hello, can you please explain how the YOLOv8 performs upscaling? For example, my input images are 854x480, YOLOv8 scales them up to 864x512. How does it exactly performs upscaling? Does it use padding or some other approaches?
 Paula DerrengerUltralytics
@SerhiiPostupaiev hello! In YOLOv8, images are scaled up or down to a specific model input size, optimally a square format (like 640x640) or a dimension supported by the model (such as 864x512 in your case). The upscaling for images that do not exactly match the input dimensions typically involves:
- Resizing the image to the closest dimension that maintains the aspect ratio.
- Padding the resized image to reach the required input size, ensuring that the aspect ratio is preserved.
For instance, for an image of 854x480, YOLOv8 may:
- Resize the image to fit the model's width of 864 while maintaining the aspect ratio, which adjusts the height accordingly.
- Pad the height to the nearest model-supported dimension (like 512), adding pixel values (usually zeros) to the top and bottom or sides of the image to reach the required size.
Here’s a rough example in Python using OpenCV for how padding might be handled:
import cv2
import numpy as np

# Example image load
image = cv2.imread('input.jpg')
# Resizing the image
resized_image = cv2.resize(image, (864, keep_aspect_ratio_height))  # Example variable for illustration

# Padding the resized image
top_padding = (512 - resized_image.shape[0]) // 2
bottom_padding = 512 - resized_image.shape[0] - top_padding
padded_image = cv2.copyMakeBorder(resized_image, top_padding, bottom_padding, 0, 0, cv2.BORDER_CONSTANT, value=[0, 0, 0])
This ensures the entire image is used during prediction without distorting its original aspect ratio. 😊
EnricoMendez
Hello, I run this code example but it only display one object's mask, is it posible to join all the objects' masks in a single frame?
- Glenn JocherUltralytics
Hey there! 😊 Absolutely, you can combine all the objects' masks into a single frame. Just modify the section where you're drawing the contours onto the mask. Instead of creating a new binary mask
b_maskfor each object, you initialize one common mask before iterating through the objects and draw every object's contour on this common mask. Here's a quick example to illustrate:# Initialize one common binary mask for all objects b_mask_all = np.zeros(img.shape[:2], np.uint8) for ci, c in enumerate(r): # Your contour extraction remains the same contour = c.masks.xy.pop().astype(np.int32).reshape(-1, 1, 2) # Draw each contour onto the common mask cv2.drawContours(b_mask_all, [contour], -1, (255, 255, 255), cv2.FILLED) # After the loop, you can use `b_mask_all` which contains all objects' masksJust keep in mind, with
b_mask_all, you'll have all the detected objects' masks on one mask. If the objects overlap in your image, their masks will also overlap inb_mask_all. Hope this helps! Let us know if you have more questions. 😊
mariamg03
hi is there a way I can apply the edits on the binary image then revert back to the original with the mask part edited?
- Paula DerrengerUltralytics
Hey there! 👋 Yes, you can certainly make edits on a binary mask and then apply those changes back to the original image, essentially modifying only the parts that the mask covers. Here's a quick outline of how you could achieve this with an example focusing on segmentation tasks:
-
After segmenting your image and obtaining the binary mask (let's say
b_mask), you can perform any edits you like on this mask. For example, inverting the mask, dilating, or eroding. -
To apply the edited mask back to the original image (
orig_img), you would use the mask to isolate the area of interest in the original image and then apply your edits.
Here's a code snippet demonstrating this with a simple inversion edit:
import cv2
import numpy as np

# Assuming 'b_mask' is your binary mask and 'orig_img' is your original image
# Let's say you inverted the binary mask
edited_mask = 255 - b_mask  # Inverting mask

# Convert the single channel binary mask to a 3 channel mask to match the original image
edited_mask_3ch = cv2.cvtColor(edited_mask, cv2.COLOR_GRAY2BGR)

# Apply the edited mask back to the original image
# This line performs bitwise-and operation to only keep parts of the image where the mask is white
edited_image = cv2.bitwise_and(orig_img, edited_mask_3ch)

# At this point, 'edited_image' contains the original image with edits applied to the segmented part
This is a simplified example to show the concept. Depending on the edits you've made to
b_mask, you might need to adjust how you applyedited_maskback toorig_img.Remember, after editing the mask, you can always revert it back to its original form if you've kept a copy before editing, or you can apply the inverse of your edits.
I hope this helps! Let me know if you have more questions. Happy coding! 😊
-
Safiislamian
Hi sir, thanku for your response does load dataset will work or not. As the dataset is in yolo form where we have different folders and subfolders like train having images and labels etc
On Wed, Mar 27, 2024, 7:03 AM Glenn Jocher @.***> wrote:
Hey there! 👋 Glad to see you're interested in applying YOLOv8 for instance segmentation with a dataset from Roboflow. Below is a quick guide to help you get started with applying YOLOv8 for detection and then using masks for the dataset based on class. Step 1: Install Ultralytics YOLO
First, ensure you have Ultralytics installed:
pip install ultralytics
Step 2: Load Your Model
from ultralytics import YOLOmodel = YOLO('yolov8n-seg.pt') # Use yolov8n-seg.pt for segmentation models
Step 3: Predict and Isolate Objects
Now, for predicting and isolating objects based on their classes, you'll dive into the prediction results to access and manipulate the segmentation masks:
results = model.predict(source='path/to/your/dataset')for result in results: for detection in result: class_name = detection.names[detection.boxes.cls.tolist().pop()] # Create a binary mask from detection binary_mask = np.zeros(result.orig_img.shape[:2], np.uint8) contour = detection.masks.xy.pop().astype(np.int32).reshape(-1, 1, 2) cv2.drawContours(binary_mask, [contour], -1, (255, 255, 255), cv2.FILLED) # Example to save or further process the mask
Note: Replace 'path/to/your/dataset' with the actual path to your images. Step 4: Saving or Processing the Masks
You may wish to save each mask based on its class for processing later. You can modify the loop to save each binary mask to a file using cv2.imwrite() method.
cv2.imwrite(f'{class_name}_mask.jpg', binary_mask)
This will save each mask with its respective class name as part of the filename, allowing for easy organization by class.
Hope this helps! 😊 Let us know if you need further assistance or have more questions. Happy coding!
— Reply to this email directly, view it on GitHub https://github.com/orgs/ultralytics/discussions/9334#discussioncomment-8922405, or unsubscribe https://github.com/notifications/unsubscribe-auth/AUP75TG3RFWAL7YRMWDR66DY2ILE5AVCNFSM6AAAAABFJ334B2VHI2DSMVQWIX3LMV43SRDJONRXK43TNFXW4Q3PNVWWK3TUHM4DSMRSGQYDK . You are receiving this because you commented.Message ID: @.*** com>
- Paula DerrengerUltralytics(đã chỉnh sửa)
Hi there! 😄
Absolutely, loading a dataset structured in YOLO format (with separate folders for train/test images and labels) works well with YOLO26. You can specify the dataset structure in a YAML file and provide this file when initiating training or validation processes. Here's an example
data.yamlfile structure for your dataset:train: /path/to/dataset/train/images # path to images folder val: /path/to/dataset/val/images # path to validation images # Classes nc: 80 # number of classes names: ['class1', 'class2', ...] # class namesAnd here's how you might start training with your dataset:
yolo detect train data=data.yaml model=yolo26n.ptMake sure to replace
/path/to/dataset/train/imagesand/path/to/dataset/val/imageswith the actual paths to your dataset and similarly update thenc(number of classes) andnames(class labels) accordingly.If you have any more questions or need further assistance, feel free to ask. Happy to help! 🚀
There is a dataset on roboflow for instance segmentation, i want to apply first yolov8 and then masks for all the dataset arranged on the basis of their classes. please provide me details and code for that Thank you...
- Glenn JocherUltralytics(đã chỉnh sửa)
Hey there! 👋 Glad to see you're interested in applying YOLO26 for instance segmentation with a dataset from Roboflow. Below is a quick guide to help you get started with applying YOLO26 for detection and then using masks for the dataset based on class.
Step 1: Install Ultralytics YOLO
First, ensure you have Ultralytics installed:
pip install ultralyticsStep 2: Load Your Model
from ultralytics import YOLO
model = YOLO('yolo26n-seg.pt')  # Use yolo26n-seg.pt for segmentation models
Step 3: Predict and Isolate Objects
Now, for predicting and isolating objects based on their classes, you'll dive into the prediction results to access and manipulate the segmentation masks:
results = model.predict(source='path/to/your/dataset')
for result in results:
    for detection in result:
        class_name = detection.names[detection.boxes.cls.tolist().pop()]
        # Create a binary mask from detection
        binary_mask = np.zeros(result.orig_img.shape[:2], np.uint8)
        contour = detection.masks.xy.pop().astype(np.int32).reshape(-1, 1, 2)
        cv2.drawContours(binary_mask, [contour], -1, (255, 255, 255), cv2.FILLED)
        # Example to save or further process the mask
Note: Replace
'path/to/your/dataset'with the actual path to your images.Step 4: Saving or Processing the Masks
You may wish to save each mask based on its class for processing later. You can modify the loop to save each binary mask to a file using
cv2.imwrite()method.cv2.imwrite(f'{class_name}_mask.jpg', binary_mask)This will save each mask with its respective class name as part of the filename, allowing for easy organization by class.
Hope this helps! 😊 Let us know if you need further assistance or have more questions. Happy coding!