Link to this section使用 Ultralytics 在 Vertex AI 上部署预训练的 YOLO 模型以进行推理#
本指南将向你展示如何使用 Ultralytics 将预训练的 YOLO26 模型容器化,为其构建 FastAPI 推理服务器,并在 Google Cloud Vertex AI 上部署带有推理服务器的模型。示例实现将涵盖 YOLO26 的目标检测用例,但同样的原则也适用于使用 其他 YOLO 模式。
在开始之前,你需要创建一个 Google Cloud Platform (GCP) 项目。作为新用户,你将获得 300 美元的免费 GCP 额度,这足以测试一个运行中的设置,你稍后可以将其扩展到任何其他 YOLO26 用例,包括训练,或批量和流式推理。
Link to this section你将学到什么#
- 使用 FastAPI 为 Ultralytics YOLO26 模型创建推理后端。
- 创建 GCP Artifact Registry 存储库以存储你的 Docker 镜像。
- 构建并将带有模型的 Docker 镜像推送到 Artifact Registry。
- 在 Vertex AI 中导入你的模型。
- 创建 Vertex AI 端点并部署模型。
- 通过 Ultralytics 实现全面的模型控制:你可以使用自定义推理逻辑,完全控制预处理、后处理和响应格式化。
- Vertex AI 处理其余部分:它支持自动扩缩容,同时在配置计算资源、内存和 GPU 配置方面提供了灵活性。
- 原生 GCP 集成与安全性:与 Cloud Storage、BigQuery、Cloud Functions、VPC 控制、IAM 策略和审计日志无缝设置。
Link to this section前提条件#
- 在你的机器上安装 Docker。
- 安装 Google Cloud SDK 并 进行 gcloud CLI 身份验证。
- 强烈建议你先阅读 Ultralytics Docker 快速入门指南,因为在按照本指南操作时,你需要扩展其中一个官方 Ultralytics Docker 镜像。
Link to this section使用 FastAPI 创建推理后端#
首先,你需要创建一个 FastAPI 应用程序来处理 YOLO26 模型的推理请求。此应用程序将处理模型加载、图像预处理和推理(预测)逻辑。
Link to this sectionVertex AI 合规性基础#
Vertex AI 要求你的容器实现两个特定的端点:
-
健康检查端点 (
/health):当服务就绪时,必须返回 HTTP 状态200 OK。 -
Predict 端点 (
/predict):接受带有 base64 编码图像和可选参数的结构化预测请求。有效负载大小限制根据端点类型而定。/predict端点的请求负载应遵循此 JSON 结构:{ "instances": [{ "image": "base64_encoded_image" }], "parameters": { "confidence": 0.5 } }
Link to this section项目文件夹结构#
我们构建的大部分内容将在 Docker 容器内进行,Ultralytics 也将加载预训练的 YOLO26 模型,因此你可以保持本地文件夹结构简单:
YOUR_PROJECT/
├── src/
│   ├── __init__.py
│   ├── app.py              # Core YOLO26 inference logic
│   └── main.py             # FastAPI inference server
├── tests/
├── .env                    # Environment variables for local development
├── Dockerfile              # Container configuration
├── LICENSE                 # AGPL-3.0 License
└── pyproject.toml # Python dependencies and project configUltralytics YOLO26 模型和框架采用 AGPL-3.0 许可,具有重要的合规性要求。请务必阅读 Ultralytics 关于 如何遵守许可条款 的文档。
Link to this section创建带有依赖项的 pyproject.toml#
为了方便管理你的项目,创建一个带有以下依赖项的 pyproject.toml 文件:
[project]
name = "YOUR_PROJECT_NAME"
version = "0.0.1"
description = "YOUR_PROJECT_DESCRIPTION"
requires-python = ">=3.10,<3.13"
dependencies = [
   "ultralytics>=8.3.0",
   "fastapi[all]>=0.89.1",
   "uvicorn[standard]>=0.20.0",
   "pillow>=9.0.0",
]

[build-system]
requires = ["setuptools>=61.0"]
build-backend = "setuptools.build_meta"uvicorn将用于运行 FastAPI 服务器。pillow将用于图像处理,但你不仅限于使用 PIL 图像——Ultralytics 支持 许多其他格式。
Link to this section使用 Ultralytics YOLO26 创建推理逻辑#
现在你已经设置好了项目结构和依赖项,可以实现核心的 YOLO26 推理逻辑了。创建一个 src/app.py 文件,该文件将使用 Ultralytics Python API 处理模型加载、图像处理和预测。
# src/app.py

from ultralytics import YOLO

# Model initialization and readiness state
model_yolo = None
_model_ready = False

def _initialize_model():
    """Initialize the YOLO model."""
    global model_yolo, _model_ready

    try:
        # Use pretrained YOLO26n model from Ultralytics base image
        model_yolo = YOLO("yolo26n.pt")
        _model_ready = True

    except Exception as e:
        print(f"Error initializing YOLO model: {e}")
        _model_ready = False
        model_yolo = None

# Initialize model on module import
_initialize_model()

def is_model_ready() -> bool:
    """Check if the model is ready for inference."""
    return _model_ready and model_yolo is not None
这将在容器启动时加载一次模型,并且该模型将在所有请求之间共享。如果你的模型将处理繁重的推理负载,建议在稍后导入模型时选择内存更大的机器类型。
接下来,为 pillow 输入和输出图像处理创建两个实用函数。YOLO26 原生支持 PIL 图像。
def get_image_from_bytes(binary_image: bytes) -> Image.Image:
    """Convert image from bytes to PIL RGB format."""
    input_image = Image.open(io.BytesIO(binary_image)).convert("RGB")
    return input_image
def get_bytes_from_image(image: Image.Image) -> bytes:
"""Convert PIL image to bytes."""
return_image = io.BytesIO()
image.save(return_image, format="JPEG", quality=85)
return_image.seek(0)
return return_image.getvalue()最后,实现将处理目标检测的 run_inference 函数。在本例中,我们将从模型预测中提取边界框、类别名称和置信度分数。该函数将返回一个包含检测结果和原始结果的字典,以供进一步处理或注释。
def run_inference(input_image: Image.Image, confidence_threshold: float = 0.5) -> Dict[str, Any]:
    """Run inference on an image using YOLO26n model."""
    global model_yolo

    # Check if model is ready
    if not is_model_ready():
        print("Model not ready for inference")
        return {"detections": [], "results": None}

    try:
        # Make predictions and get raw results
        results = model_yolo.predict(
            imgsz=640, source=input_image, conf=confidence_threshold, save=False, augment=False, verbose=False
        )

        # Extract detections (bounding boxes, class names, and confidences)
        detections = []
        if results and len(results) > 0:
            result = results[0]
            if result.boxes is not None and len(result.boxes.xyxy) > 0:
                boxes = result.boxes

                # Convert tensors to numpy for processing
                xyxy = boxes.xyxy.cpu().numpy()
                conf = boxes.conf.cpu().numpy()
                cls = boxes.cls.cpu().numpy().astype(int)

                # Create detection dictionaries
                for i in range(len(xyxy)):
                    detection = {
                        "xmin": float(xyxy[i][0]),
                        "ymin": float(xyxy[i][1]),
                        "xmax": float(xyxy[i][2]),
                        "ymax": float(xyxy[i][3]),
                        "confidence": float(conf[i]),
                        "class": int(cls[i]),
                        "name": model_yolo.names.get(int(cls[i]), f"class_{int(cls[i])}"),
                    }
                    detections.append(detection)

        return {
            "detections": detections,
            "results": results,  # Keep raw results for annotation
        }
    except Exception as e:
        # If there's an error, return empty structure
        print(f"Error in YOLO detection: {e}")
        return {"detections": [], "results": None}
你还可以选择添加一个函数,使用 Ultralytics 内置的绘图方法用边界框和标签标注图像。如果你希望在预测响应中返回标注后的图像,这将非常有用。
def get_annotated_image(results: list) -> Image.Image:
    """Get annotated image using Ultralytics built-in plot method."""
    if not results or len(results) == 0:
        raise ValueError("No results provided for annotation")

    result = results[0]
    # Use Ultralytics built-in plot method with PIL output
    return result.plot(pil=True)
Link to this section使用 FastAPI 创建 HTTP 推理服务器#
现在你有了核心的 YOLO26 推理逻辑,可以创建一个 FastAPI 应用程序来提供服务。这将包括 Vertex AI 所需的健康检查和预测端点。
首先,添加导入并为 Vertex AI 配置日志记录。由于 Vertex AI 将 stderr 视为错误输出,因此将日志通过管道传输到 stdout 是合理的。
import sys

from loguru import logger

# Configure logger
logger.remove()
logger.add(
    sys.stdout,
    colorize=True,
    format="<green>{time:HH:mm:ss}</green> | <level>{message}</level>",
    level=10,
)
logger.add("log.log", rotation="1 MB", level="DEBUG", compression="zip")
为了完全符合 Vertex AI 的合规性,请在环境变量中定义所需的端点并设置请求大小限制。建议在生产部署中使用 私有 Vertex AI 端点。这样你将获得更高的请求有效负载限制(10 MB,而公共端点为 1.5 MB),以及强大的安全性和访问控制。
# Vertex AI environment variables
AIP_HTTP_PORT = int(os.getenv("AIP_HTTP_PORT", "8080"))
AIP_HEALTH_ROUTE = os.getenv("AIP_HEALTH_ROUTE", "/health")
AIP_PREDICT_ROUTE = os.getenv("AIP_PREDICT_ROUTE", "/predict")

# Request size limit (10 MB for private endpoints, 1.5 MB for public)
MAX_REQUEST_SIZE = 10 * 1024 * 1024  # 10 MB in bytes
添加两个用于验证请求和响应的 Pydantic 模型:
# Pydantic models for request/response
class PredictionRequest(BaseModel):
    instances: list
    parameters: Optional[Dict[str, Any]] = None

class PredictionResponse(BaseModel):
predictions: list添加健康检查端点以验证模型就绪状态。这对 Vertex AI 很重要,因为如果没有专门的健康检查,它的协调器将对随机套接字进行 ping 操作,并且无法确定模型是否准备好进行推理。你的检查必须为成功返回 200 OK,为失败返回 503 Service Unavailable:
# Health check endpoint
@app.get(AIP_HEALTH_ROUTE, status_code=status.HTTP_200_OK)
def health_check():
    """Health check endpoint for Vertex AI."""
    if not is_model_ready():
        raise HTTPException(status_code=503, detail="Model not ready")
    return {"status": "healthy"}
你现在已具备实现处理推理请求的预测端点所需的一切。它将接收图像文件,运行推理,并返回结果。请注意,图像必须是 base64 编码的,这会额外增加高达 33% 的负载大小。
@app.post(AIP_PREDICT_ROUTE, response_model=PredictionResponse)
async def predict(request: PredictionRequest):
    """Prediction endpoint for Vertex AI."""
    try:
        predictions = []

        for instance in request.instances:
            if isinstance(instance, dict):
                if "image" in instance:
                    image_data = base64.b64decode(instance["image"])
                    input_image = get_image_from_bytes(image_data)
                else:
                    raise HTTPException(status_code=400, detail="Instance must contain 'image' field")
            else:
                raise HTTPException(status_code=400, detail="Invalid instance format")

            # Extract YOLO26 parameters if provided
            parameters = request.parameters or {}
            confidence_threshold = parameters.get("confidence", 0.5)
            return_annotated_image = parameters.get("return_annotated_image", False)

            # Run inference with YOLO26n model
            result = run_inference(input_image, confidence_threshold=confidence_threshold)
            detections_list = result["detections"]

            # Format predictions for Vertex AI
            detections = []
            for detection in detections_list:
                formatted_detection = {
                    "class": detection["name"],
                    "confidence": detection["confidence"],
                    "bbox": {
                        "xmin": detection["xmin"],
                        "ymin": detection["ymin"],
                        "xmax": detection["xmax"],
                        "ymax": detection["ymax"],
                    },
                }
                detections.append(formatted_detection)

            # Build prediction response
            prediction = {"detections": detections, "detection_count": len(detections)}

            # Add annotated image if requested and detections exist
            if (
                return_annotated_image
                and result["results"]
                and result["results"][0].boxes is not None
                and len(result["results"][0].boxes) > 0
            ):
                import base64

                annotated_image = get_annotated_image(result["results"])
                img_bytes = get_bytes_from_image(annotated_image)
                prediction["annotated_image"] = base64.b64encode(img_bytes).decode("utf-8")

            predictions.append(prediction)

        logger.info(
            f"Processed {len(request.instances)} instances, found {sum(len(p['detections']) for p in predictions)} total detections"
        )

        return PredictionResponse(predictions=predictions)

    except HTTPException:
        # Re-raise HTTPException as-is (don't catch and convert to 500)
        raise
    except Exception as e:
        logger.error(f"Prediction error: {e}")
        raise HTTPException(status_code=500, detail=f"Prediction failed: {e}")
最后,添加应用程序入口点以运行 FastAPI 服务器。
if __name__ == "__main__":
    import uvicorn

    logger.info(f"Starting server on port {AIP_HTTP_PORT}")
    logger.info(f"Health check route: {AIP_HEALTH_ROUTE}")
    logger.info(f"Predict route: {AIP_PREDICT_ROUTE}")
    uvicorn.run(app, host="0.0.0.0", port=AIP_HTTP_PORT)
你现在拥有一个完整的 FastAPI 应用程序,可以处理 YOLO26 推理请求。你可以通过安装依赖项并运行服务器(例如使用 uv)在本地测试它。
# Install dependencies
uv pip install -e .

# Run the FastAPI server directly
uv run src/main.py
要测试服务器,你可以使用 cURL 查询 /health 和 /predict 端点。将测试图像放入 tests 文件夹中。然后,在终端中运行以下命令:
# Test health endpoint
curl http://localhost:8080/health

# Test predict endpoint with base64 encoded image
curl -X POST -H "Content-Type: application/json" -d "{\"instances\": [{\"image\": \"$(base64 -i tests/test_image.jpg)\"}]}" http://localhost:8080/predict
你应该会收到一个包含检测对象的 JSON 响应。首次请求时请预留一点延迟,因为 Ultralytics 需要拉取并加载 YOLO26 模型。
Link to this section使用你的应用程序扩展 Ultralytics Docker 镜像#
Ultralytics 提供了多个 Docker 镜像,你可以将其用作应用程序镜像的基础。Docker 将安装 Ultralytics 和必要的 GPU 驱动程序。
要使用 Ultralytics YOLO 模型的全部功能,你应该选择针对 GPU 推理优化的 CUDA 镜像。但是,如果 CPU 推理足以满足你的任务需求,你也可以通过选择仅 CPU 的镜像来节省计算资源:
- Dockerfile:用于 YOLO26 单/多 GPU 训练和推理的 CUDA 优化镜像。
- Dockerfile-cpu:用于 YOLO26 推理的仅 CPU 镜像。
Link to this section为你的应用程序创建 Docker 镜像#
在项目根目录下创建一个 Dockerfile,内容如下:
# Extends official Ultralytics Docker image for YOLO26
FROM ultralytics/ultralytics:latest

ENV PYTHONUNBUFFERED=1 \
    PYTHONDONTWRITEBYTECODE=1

# Install FastAPI and dependencies
RUN uv pip install fastapi[all] uvicorn[standard] loguru

WORKDIR /app
COPY src/ ./src/
COPY pyproject.toml ./

# Install the application package
RUN uv pip install -e .

RUN mkdir -p /app/logs
ENV PYTHONPATH=/app/src

# Port for Vertex AI
EXPOSE 8080

# Start the inference server
ENTRYPOINT ["python", "src/main.py"]
在此示例中,使用了官方的 Ultralytics Docker 镜像 ultralytics:latest 作为基础。它已经包含了 YOLO26 模型和所有必要的依赖项。服务器的入口点与我们用于在本地测试 FastAPI 应用程序的入口点相同。
Link to this section构建并测试 Docker 镜像#
现在你可以使用以下命令构建 Docker 镜像:
docker build --platform linux/amd64 -t IMAGE_NAME:IMAGE_VERSION .将 IMAGE_NAME 和 IMAGE_VERSION 替换为你想要的值,例如 yolo26-fastapi:0.1。请注意,如果你要在 Vertex AI 上部署,必须为 linux/amd64 架构构建镜像。如果你是在 Apple Silicon Mac 或任何其他非 x86 架构上构建镜像,则需要显式设置 --platform 参数。
镜像构建完成后,你可以在本地测试该 Docker 镜像:
docker run --platform linux/amd64 -p 8080:8080 IMAGE_NAME:IMAGE_VERSION你的 Docker 容器现在正在端口 8080 上运行 FastAPI 服务器,准备接收推理请求。你可以使用与之前相同的 cURL 命令测试 /health 和 /predict 端点:
# Test health endpoint
curl http://localhost:8080/health

# Test predict endpoint with base64 encoded image
curl -X POST -H "Content-Type: application/json" -d "{\"instances\": [{\"image\": \"$(base64 -i tests/test_image.jpg)\"}]}" http://localhost:8080/predict
Link to this section将 Docker 镜像上传到 GCP Artifact Registry#
要将容器化模型导入 Vertex AI,你需要将 Docker 镜像上传到 Google Cloud Artifact Registry。如果你还没有 Artifact Registry 存储库,则需要先创建一个。
Link to this section在 Google Cloud Artifact Registry 中创建存储库#
在 Google Cloud Console 中打开 Artifact Registry 页面。如果你是第一次使用 Artifact Registry,系统可能会提示你先启用 Artifact Registry API。

- 选择“创建存储库”。
- 输入存储库名称。选择所需的区域,并使用其他选项的默认设置,除非你需要对其进行专门更改。
区域选择可能会影响机器的可用性以及非 Enterprise 用户的某些计算限制。你可以在 Vertex AI 官方文档中找到更多信息:Vertex AI 配额和限制
- 存储库创建完成后,将你的 PROJECT_ID、位置(区域)和存储库名称保存到你的密码库或
.env文件中。稍后你将需要它们来标记并将你的 Docker 镜像推送到 Artifact Registry。
Link to this section将 Docker 身份验证到 Artifact Registry#
将你的 Docker 客户端身份验证到你刚创建的 Artifact Registry 存储库。在终端中运行以下命令:
gcloud auth configure-docker YOUR_REGION-docker.pkg.devLink to this section标记并将你的镜像推送到 Artifact Registry#
将 Docker 镜像标记并推送到 Google Artifact Registry。
建议每次更新镜像时都使用唯一标签。大多数 GCP 服务(包括 Vertex AI)都依赖镜像标签进行自动版本控制和扩缩容,因此使用语义版本控制或基于日期的标签是一个好习惯。
使用 Artifact Registry 存储库 URL 标记你的镜像。将占位符替换为你之前保存的值。
docker tag IMAGE_NAME:IMAGE_VERSION YOUR_REGION-docker.pkg.dev/YOUR_PROJECT_ID/YOUR_REPOSITORY_NAME/IMAGE_NAME:IMAGE_VERSION将标记后的镜像推送到 Artifact Registry 存储库。
docker push YOUR_REGION-docker.pkg.dev/YOUR_PROJECT_ID/YOUR_REPOSITORY_NAME/IMAGE_NAME:IMAGE_VERSION等待过程完成。你现在应该能在你的 Artifact Registry 存储库中看到该镜像。
有关如何使用 Artifact Registry 中镜像的更具体说明,请参阅 Artifact Registry 文档:推送和拉取镜像。
Link to this section在 Vertex AI 中导入你的模型#
使用你刚刚推送的 Docker 镜像,现在可以在 Vertex AI 中导入模型。
- 在 Google Cloud 导航菜单中,转到 Vertex AI > 模型注册表。或者,在 Google Cloud Console 顶部的搜索栏中搜索“Vertex AI”。


Link to this section创建 Vertex AI 端点并部署你的模型#
在 Vertex AI 术语中,端点指的是已部署的模型,因为它们代表你发送推理请求的 HTTP 端点,而模型是存储在模型注册表中的训练好的 ML 制品。
要部署模型,你需要在 Vertex AI 中创建一个端点。
- 在你的 Vertex AI 导航菜单中,转到端点。选择你导入模型时使用的区域。点击创建。

请记住,某些地区的计算配额非常有限,因此你可能无法在所在区域选择特定的机器类型或 GPU。如果这至关重要,请将部署区域更改为配额更大的区域。在 Vertex AI 官方文档中查找更多信息:Vertex AI 配额和限制。
- 选择机器类型后,你可以点击继续。此时,你可以选择在 Vertex AI 中启用模型监控——这是一项额外的服务,它将跟踪模型的性能并提供对其行为的见解。这是可选的,会产生额外费用,因此请根据你的需要进行选择。点击创建。
Vertex AI 将需要几分钟(在某些区域最长 30 分钟)来部署模型。部署完成后,你将收到一封电子邮件通知。
Link to this section测试你部署的模型#
部署完成后,Vertex AI 将为你提供一个示例 API 接口来测试你的模型。
要测试远程推理,你可以使用提供的 cURL 命令或创建另一个 Python 客户端库,将请求发送到已部署的模型。请记住,在发送到 /predict 端点之前,你需要将图像编码为 base64。
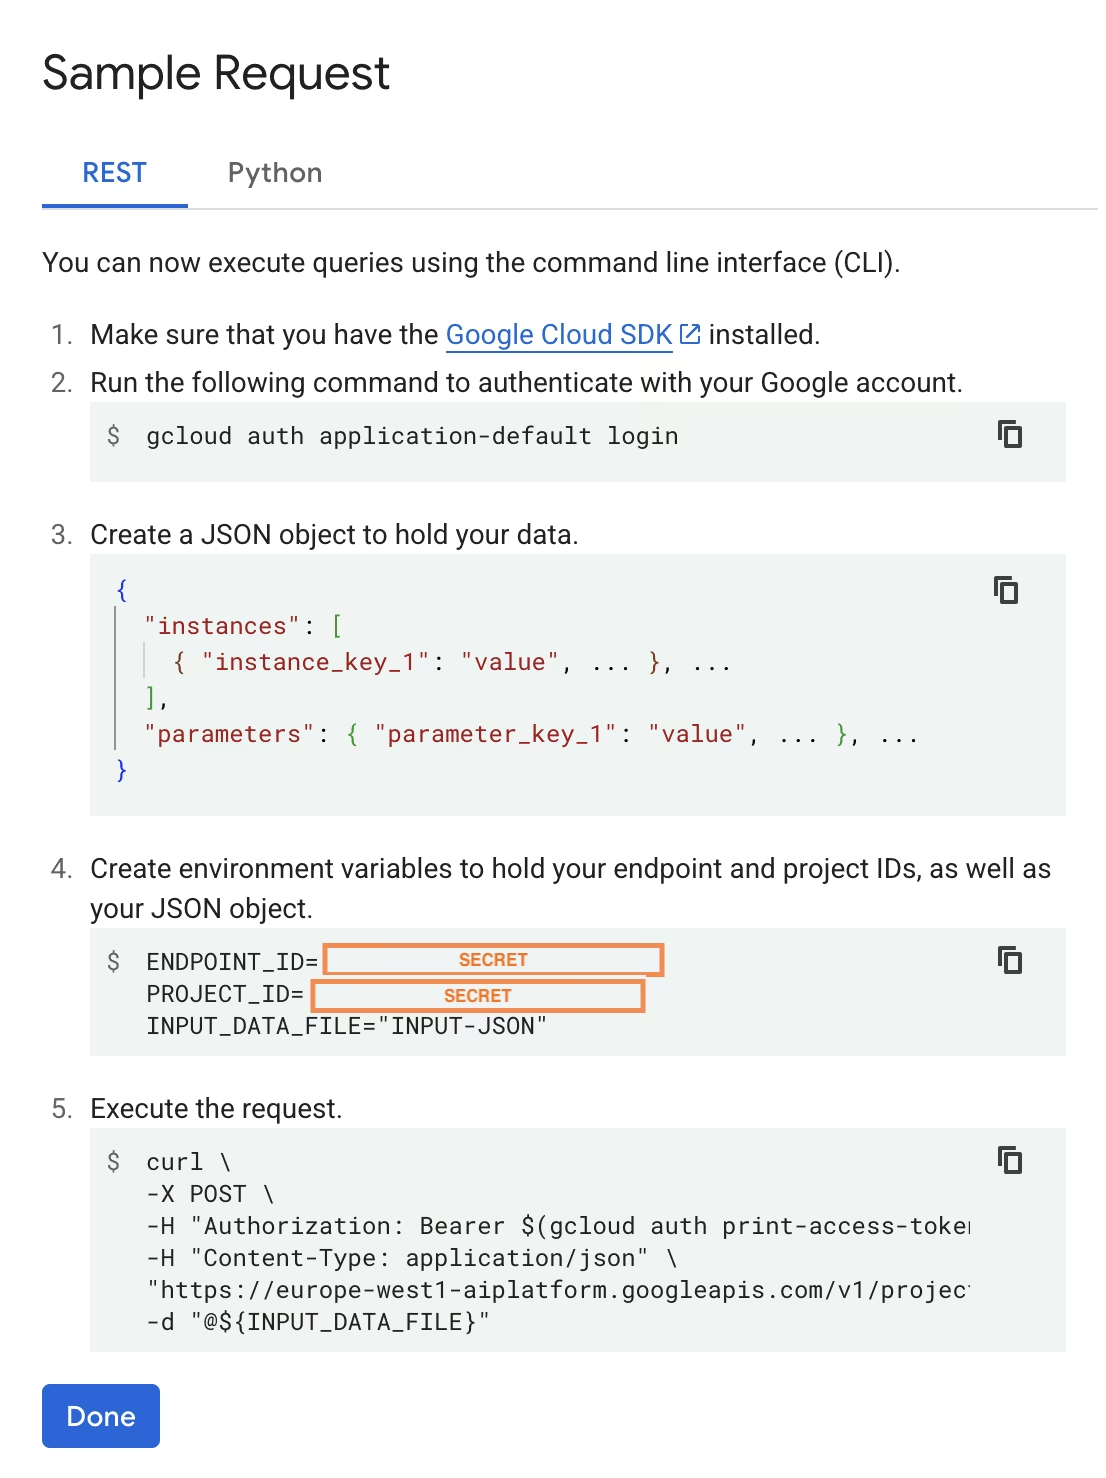
与本地测试类似,首次请求时请预留一点延迟,因为 Ultralytics 需要在运行的容器中拉取并加载 YOLO26 模型。
你已成功使用 Ultralytics 在 Google Cloud Vertex AI 上部署了预训练的 YOLO26 模型。
Link to this section常见问题解答#
Link to this section我可以在没有 Docker 的情况下在 Vertex AI 上使用 Ultralytics YOLO 模型吗?#
可以;但是,你首先需要将模型导出为 Vertex AI 兼容的格式,例如 TensorFlow、Scikit-learn 或 XGBoost。Google Cloud 提供了一份关于在 Vertex 上运行 .pt 模型的指南,其中完整概述了转换过程:在 Vertex AI 上运行 PyTorch 模型。
请注意,由此产生的设置将仅依赖于 Vertex AI 标准服务层,并且不支持高级的 Ultralytics 框架功能。由于 Vertex AI 完全支持容器化模型并可以根据你的部署配置自动对其进行扩缩容,它允许你利用 Ultralytics YOLO 模型的全部功能,而无需将其转换为不同的格式。
Link to this section为什么 FastAPI 是部署 YOLO26 推理的理想选择?#
FastAPI 为推理工作负载提供了高吞吐量。其异步支持允许在不阻塞主线程的情况下处理多个并发请求,这在部署计算机视觉模型时非常重要。
使用 FastAPI 进行自动请求/响应验证,可以减少生产环境推理服务中的运行时错误。对于输入格式一致性至关重要的目标检测 API 而言,这一点尤为宝贵。
FastAPI 对推理流程产生的计算开销极小,从而留出更多资源用于模型执行和图像处理任务。
FastAPI 还支持 SSE (Server-Sent Events),这对于流式推理场景非常有用。
Link to this section为什么我必须多次选择区域?#
这实际上是 Google Cloud Platform 的一项通用性功能,你需要为你使用的每项服务选择一个区域。对于在 Vertex AI 上部署容器化模型这一任务,你最重要的区域选择是针对 Model Registry 的那个。它将决定模型部署时的机器类型和配额的可用性。
此外,如果你要扩展此设置并将预测数据或结果存储在 Cloud Storage 或 BigQuery 中,则需要使用与 Model Registry 相同的区域,以最大限度地减少延迟并确保数据访问的高吞吐量。