Link to this sectionYOLOE:实时“看见一切”#
Link to this section简介#
YOLOE (实时看见一切) 是零样本、可提示 YOLO 模型的一项新进展,专为开放词汇检测和分割而设计。与以往局限于固定类别的 YOLO 模型不同,YOLOE 使用文本、图像或内部词汇提示,能够实时检测任何对象类别。YOLOE 构建于 YOLOv10 之上,并受到 YOLO-World 的启发,在几乎不影响速度和精度的情况下实现了最先进的零样本性能。
Watch: How to use Ultralytics YOLOE-26 (New) | Open Vocabulary & Real-Time Seeing Anything 🚀
与早期的 YOLO 模型相比,YOLOE 显著提高了效率和准确性。在 LVIS 上,它比 YOLO-Worldv2 的 mAP 提升了 +3.5,同时仅使用三分之一的训练资源,推理速度提升了 1.4 倍。在 COCO 上经过微调后,YOLOE-v8-large 超过 YOLOv8-L 0.1 mAP,且训练时间减少了近 4 倍。这展示了 YOLOE 在准确性、效率和通用性方面的卓越平衡。以下章节将探讨 YOLOE 的架构、基准对比以及与 Ultralytics 框架的集成。
Link to this section架构概述#

YOLOE 保留了标准的 YOLO 结构——用于特征提取的卷积骨干网络 (backbone)(例如 CSP-Darknet)、用于多尺度融合的颈部 (neck)(例如 PAN-FPN),以及(如 YOLOv8/YOLO11 中)预测目标性、类别和框的无锚点、解耦 (anchor-free, decoupled) 检测头部 (head)。YOLOE 引入了三个新颖模块以实现开放词汇检测:
-
可重参数化区域-文本对齐 (RepRTA):通过小型辅助网络细化文本 embeddings(例如来自 CLIP),从而支持文本提示检测。在推理时,该网络被折叠进主模型中,确保零开销。因此,YOLOE 可以检测任意文本标注的对象(例如未见过的“红绿灯”),而不会产生运行时惩罚。
-
语义激活视觉提示编码器 (SAVPE):通过轻量级嵌入分支实现视觉提示检测。给定一张参考图像,SAVPE 对语义和激活特征进行编码,使模型能够检测视觉上相似的对象——这是一种对于 Logo 或特定零件非常有用的一次性检测能力。
-
延迟区域-提示对比 (LRPC):在无提示模式下,YOLOE 使用在大规模词汇表(来自 LVIS 和 Objects365 的 1200 多个类别)上训练的内部嵌入执行开放集识别。无需外部提示或编码器,YOLOE 通过嵌入相似度查找来识别对象,从而在推理时高效处理大规模标签空间。
此外,YOLOE 通过在检测头部扩展一个掩码预测分支(类似于 YACT 或 YOLOv8-Seg)集成了实时实例分割,产生的额外开销极小。
至关重要的是,当作为常规闭集 YOLO 使用时,YOLOE 的开放世界模块不会带来任何推理成本。训练完成后,YOLOE 参数可以重参数化为标准 YOLO 头部,从而保持相同的 FLOPs 和速度(例如与 YOLO11 完全匹配)。
Link to this section可用模型、支持的任务和操作模式#
本节详细介绍了可用的模型及其特定的预训练权重、它们支持的任务,以及它们与各种运行模式(例如 推理、验证、训练 和 导出)的兼容性,其中 ✅ 表示支持的模式,❌ 表示不支持的模式。
Link to this section文本/视觉提示模型#
| 模型类型 | 预训练权重 | 支持的任务 | 推理 | 验证 | 训练 | 导出 |
|---|---|---|---|---|---|---|
| YOLOE-11S | yoloe-11s-seg.pt | 实例分割 | ✅ | ✅ | ✅ | ✅ |
| YOLOE-11M | yoloe-11m-seg.pt | 实例分割 | ✅ | ✅ | ✅ | ✅ |
| YOLOE-11L | yoloe-11l-seg.pt | 实例分割 | ✅ | ✅ | ✅ | ✅ |
| YOLOE-v8S | yoloe-v8s-seg.pt | 实例分割 | ✅ | ✅ | ✅ | ✅ |
| YOLOE-v8M | yoloe-v8m-seg.pt | 实例分割 | ✅ | ✅ | ✅ | ✅ |
| YOLOE-v8L | yoloe-v8l-seg.pt | 实例分割 | ✅ | ✅ | ✅ | ✅ |
| YOLOE-26N | yoloe-26n-seg.pt | 实例分割 | ✅ | ✅ | ✅ | ✅ |
| YOLOE-26S | yoloe-26s-seg.pt | 实例分割 | ✅ | ✅ | ✅ | ✅ |
| YOLOE-26M | yoloe-26m-seg.pt | 实例分割 | ✅ | ✅ | ✅ | ✅ |
| YOLOE-26L | yoloe-26l-seg.pt | 实例分割 | ✅ | ✅ | ✅ | ✅ |
| YOLOE-26X | yoloe-26x-seg.pt | 实例分割 | ✅ | ✅ | ✅ | ✅ |
Link to this section无提示模型#
| 模型类型 | 预训练权重 | 支持的任务 | 推理 | 验证 | 训练 | 导出 |
|---|---|---|---|---|---|---|
| YOLOE-11S-PF | yoloe-11s-seg-pf.pt | 实例分割 | ✅ | ✅ | ✅ | ✅ |
| YOLOE-11M-PF | yoloe-11m-seg-pf.pt | 实例分割 | ✅ | ✅ | ✅ | ✅ |
| YOLOE-11L-PF | yoloe-11l-seg-pf.pt | 实例分割 | ✅ | ✅ | ✅ | ✅ |
| YOLOE-v8S-PF | yoloe-v8s-seg-pf.pt | 实例分割 | ✅ | ✅ | ✅ | ✅ |
| YOLOE-v8M-PF | yoloe-v8m-seg-pf.pt | 实例分割 | ✅ | ✅ | ✅ | ✅ |
| YOLOE-v8L-PF | yoloe-v8l-seg-pf.pt | 实例分割 | ✅ | ✅ | ✅ | ✅ |
| YOLOE-26N-PF | yoloe-26n-seg-pf.pt | 实例分割 | ✅ | ✅ | ✅ | ✅ |
| YOLOE-26S-PF | yoloe-26s-seg-pf.pt | 实例分割 | ✅ | ✅ | ✅ | ✅ |
| YOLOE-26M-PF | yoloe-26m-seg-pf.pt | 实例分割 | ✅ | ✅ | ✅ | ✅ |
| YOLOE-26L-PF | yoloe-26l-seg-pf.pt | 实例分割 | ✅ | ✅ | ✅ | ✅ |
| YOLOE-26X-PF | yoloe-26x-seg-pf.pt | 实例分割 | ✅ | ✅ | ✅ | ✅ |
| 模型 | 尺寸 (像素) | 提示类型 | mAPminival 50-95(e2e) | mAPminival 50-95 | mAPr | mAPc | mAPf | 参数量 (M) | FLOPs (B) |
|---|---|---|---|---|---|---|---|---|---|
| YOLOE-26n-seg | 640 | 文本/视觉 | 23.7 / 20.9 | 24.7 / 21.9 | 20.5 / 17.6 | 24.1 / 22.3 | 26.1 / 22.4 | 4.8 | 6.0 |
| YOLOE-26s-seg | 640 | 文本/视觉 | 29.9 / 27.1 | 30.8 / 28.6 | 23.9 / 25.1 | 29.6 / 27.8 | 33.0 / 29.9 | 13.1 | 21.7 |
| YOLOE-26m-seg | 640 | 文本/视觉 | 35.4 / 31.3 | 35.4 / 33.9 | 31.1 / 33.4 | 34.7 / 34.0 | 36.9 / 33.8 | 27.9 | 70.1 |
| YOLOE-26l-seg | 640 | 文本/视觉 | 36.8 / 33.7 | 37.8 / 36.3 | 35.1 / 37.6 | 37.6 / 36.2 | 38.5 / 36.1 | 32.3 | 88.3 |
| YOLOE-26x-seg | 640 | 文本/视觉 | 39.5 / 36.2 | 40.6 / 38.5 | 37.4 / 35.3 | 40.9 / 38.8 | 41.0 / 38.8 | 69.9 | 196.7 |
Link to this section使用示例#
YOLOE 模型可以轻松集成到你的 Python 应用程序中。Ultralytics 提供了用户友好的 Python API 和 CLI 命令 来简化开发。
Link to this section训练使用#
Link to this section在自定义数据集上进行微调#
你可以在自定义 YOLO 数据集上对任何 预训练 YOLOE 模型 进行微调,以执行检测和实例分割任务。
Watch: How to Train YOLOE on Car Parts Segmentation Dataset | Open-Vocabulary Model, Prediction & Export 🚀
实例分割
微调 YOLOE 预训练检查点主要遵循 标准 YOLO 训练流程。关键区别在于需要明确将 YOLOEPESegTrainer 作为 trainer 参数传递给 model.train():
from ultralytics import YOLOE
from ultralytics.models.yolo.yoloe import YOLOEPESegTrainer

model = YOLOE("yoloe-26s-seg.pt")

# Fine-tune on your segmentation dataset
results = model.train(
    data="coco128-seg.yaml",  # Segmentation dataset
    epochs=80,
    patience=10,
    trainer=YOLOEPESegTrainer,  # <- Important: use segmentation trainer
)
目标检测
所有 预训练 YOLOE 模型 默认执行实例分割。若要使用这些预训练检查点来训练检测模型,请使用 YAML 配置文件从头开始初始化一个检测模型,然后加载相同规模的预训练分割检查点。请注意,因为我们要训练的是检测模型,所以我们使用 YOLOEPETrainer 而不是 YOLOEPESegTrainer:
from ultralytics import YOLOE
from ultralytics.models.yolo.yoloe import YOLOEPETrainer

# Initialize a detection model from a config
model = YOLOE("yoloe-26s.yaml")

# Load weights from a pretrained segmentation checkpoint (same scale)
model.load("yoloe-26s-seg.pt")

# Fine-tune on your detection dataset
results = model.train(
    data="coco128.yaml",  # Detection dataset
    epochs=80,
    patience=10,
    trainer=YOLOEPETrainer,  # <- Important: use detection trainer
)
Link to this section预测使用#
YOLOE 支持文本提示和视觉提示。使用提示非常简单——只需按照如下所示通过 predict 方法传递它们即可:
文本提示允许你通过文本描述指定想要检测的类别。以下代码展示了如何使用 YOLOE 检测图像中的人和公交车:
from ultralytics import YOLOE

# Initialize a YOLOE model
model = YOLOE("yoloe-26l-seg.pt")  # or yoloe-26s/m-seg.pt for different sizes

# Set text prompt to detect person and bus. You only need to do this once after you load the model.
model.set_classes(["person", "bus"])

# Run detection on the given image
results = model.predict("path/to/image.jpg")

# Show results
results[0].show()
Link to this section验证使用#
数据集上的模型验证流程如下:
from ultralytics import YOLOE

# Create a YOLOE model
model = YOLOE("yoloe-26l-seg.pt")  # or yoloe-26s/m-seg.pt for different sizes

# Conduct model validation on the COCO128-seg example dataset
metrics = model.val(data="coco128-seg.yaml")
Link to this section导出用法#
导出过程与其他 YOLO 模型类似,并增加了处理文本和视觉提示的灵活性:
使用 set_classes()(或通过视觉提示的 refer_image)配置的类别会被烘焙到导出的权重中。一旦导出,模型就无法再接受新的提示:在加载的导出模型上调用 set_classes() 或将 visual_prompts=... 传递给 predict() 将会失败。若要更改检测类别,请使用配置的新提示从原始 .pt 检查点重新导出。导出后的文件表现得像一个标准的 YOLO 检测器,也可以使用 YOLO() 而不是 YOLOE() 进行加载。
from ultralytics import YOLOE

# Select yoloe-26s/m-seg.pt for different sizes
model = YOLOE("yoloe-26l-seg.pt")

# Configure the set_classes() before exporting the model
model.set_classes(["person", "bus"])

export_model = model.export(format="onnx")
model = YOLOE(export_model)

# Run detection on the given image
results = model.predict("path/to/image.jpg")

# Show results
results[0].show()
Link to this section训练官方模型#
Link to this section准备数据集#
训练官方 YOLOE 模型需要训练数据的分割标注。这是由官方团队提供的脚本,它利用 SAM2.1 models 将数据集转换为分割标注。或者,你可以直接在下表中下载官方团队提供的 Processed Segment Annotations。
- 训练数据
| 数据集 | 类型 | 样本 | 框 | 原始检测标注 | 已处理分割标注 |
|---|---|---|---|---|---|
| Objects365v1 | 检测 | 609k | 9621k | objects365_train.json | objects365_train_segm.json |
| GQA | Grounding | 621k | 3681k | final_mixed_train_no_coco.json | final_mixed_train_no_coco_segm.json |
| Flickr30k | Grounding | 149k | 641k | final_flickr_separateGT_train.json | final_flickr_separateGT_train_segm.json |
- 验证数据
| 数据集 | 类型 | 标注文件 |
|---|---|---|
| LVIS minival | 检测 | minival.txt |
Link to this section从零开始启动训练#
Visual Prompt 模型是在训练良好的 Text Prompt 模型基础上进行微调的。
from ultralytics import YOLOE
from ultralytics.models.yolo.yoloe import YOLOESegTrainerFromScratch

# Option 1: Use Python dictionary
data = dict(
    train=dict(
        yolo_data=["Objects365.yaml"],
        grounding_data=[
            dict(
                img_path="flickr/full_images/",
                json_file="flickr/annotations/final_flickr_separateGT_train_segm.json",
            ),
            dict(
                img_path="mixed_grounding/gqa/images",
                json_file="mixed_grounding/annotations/final_mixed_train_no_coco_segm.json",
            ),
        ],
    ),
    val=dict(yolo_data=["lvis.yaml"]),
)

# Option 2: Use YAML file (yoloe_data.yaml)
# train:
#   yolo_data:
#     - Objects365.yaml
#   grounding_data:
#     - img_path: flickr/full_images/
#       json_file: flickr/annotations/final_flickr_separateGT_train_segm.json
#     - img_path: mixed_grounding/gqa/images
#       json_file: mixed_grounding/annotations/final_mixed_train_no_coco_segm.json
# val:
#   yolo_data:
#     - lvis.yaml

model = YOLOE("yoloe-26l-seg.yaml")
model.train(
    data=data,  # or data="yoloe_data.yaml" if using YAML file
    batch=128,
    epochs=30,
    close_mosaic=2,
    optimizer="AdamW",
    lr0=2e-3,
    warmup_bias_lr=0.0,
    weight_decay=0.025,
    momentum=0.9,
    workers=4,
    trainer=YOLOESegTrainerFromScratch,
    device="0,1,2,3,4,5,6,7",
)
Link to this sectionYOLOE 性能对比#
YOLOE 在 COCO 和 LVIS 等标准基准测试中,在不牺牲速度或模型尺寸的前提下,能够匹配甚至超过封闭集 YOLO 模型的准确性。下表对比了 YOLOE-L(基于 YOLO11 构建)和 YOLOE26-L(基于 YOLO26 构建)与对应的封闭集模型:
| 模型 | COCO mAP50-95 | LVIS mAP50-95 | 推理速度 (T4) | 参数量 | GFLOPs (640px) |
|---|---|---|---|---|---|
| YOLOv8-L (封闭集) | 52.9% | - | 9.06 ms (110 FPS) | 43.7 M | 165.2 B |
| YOLO11-L (封闭集) | 53.5% | - | 6.2 ms (161 FPS) | 26.2 M | 86.9 B |
| YOLOE-L (开放词汇) | 52.6% | 35.2% | 6.2 ms (161 FPS) | 26.2 M | 86.9 B† |
| YOLOE26-L (开放词汇) | - | 36.8% | 6.2 ms (161 FPS) | 32.3 M | 88.3 B† |
† YOLOE-L 与 YOLO11-L 共享架构,YOLOE26-L 与 YOLO26-L 共享架构,因此推理速度和 GFLOPs 相近。
YOLOE26-L 可实现 36.8% LVIS mAP,参数量为 32.3M,计算量为 88.3B FLOPs,在 T4 GPU 上以 6.2 ms (161 FPS) 的速度处理 640×640 图像。相较于 YOLOE-L 的 35.2% LVIS mAP 有所提升,同时保持了相同的推理速度。关键在于,YOLOE 的开放词汇模块没有推理成本,展现了“无免费午餐权衡”的设计理念。
对于零样本任务,YOLOE26 显著优于先前的开放词汇检测器:在 LVIS 上,YOLOE26-S 达到了 29.9% mAP,超过 YOLO-World-S +11.4 AP;而 YOLOE26-L 达到了 36.8% mAP,超过 YOLO-World-L +10.0 AP。YOLOE26 在 T4 GPU 上保持了 161 FPS 的高效推理,非常适合实时开放词汇应用。
基准测试条件: YOLOE 的结果源于在 Objects365、GoldG 和 LVIS 上预训练的模型,随后在 COCO 上进行微调或评估。YOLOE 相较于 YOLOv8 的 mAP 轻微优势得益于广泛的预训练。若不进行此开放词汇训练,YOLOE 与同等规模的 YOLO 模型相当,证明了其在不牺牲性能的前提下具备 SOTA 的准确度和开放世界灵活性。
Link to this section与先前模型的对比#
YOLOE 在先前 YOLO 模型和开放词汇检测器的基础上引入了显著进步:
-
YOLOE 与 YOLOv5 的对比: YOLOv5 提供了良好的速度与精度平衡,但需要为新类别重新训练,且使用基于锚点(anchor-based)的检测头。相比之下,YOLOE 是**无锚点(anchor-free)**的,并能动态检测新类别。YOLOE 在 YOLOv8 的改进基础上,实现了更高的精度(COCO 上 52.6% vs. YOLOv5 的 ~50% mAP),并集成了实例分割功能,这是 YOLOv5 所不具备的。
-
YOLOE 与 YOLOv8 的对比: YOLOE 扩展了 YOLOv8 的重构架构,实现了相似或更优的精度(~26M 参数下 52.6% mAP vs. YOLOv8-L ~44M 参数下 52.9%)。得益于更强大的预训练,它显著缩短了训练时间。主要进步在于 YOLOE 的开放世界能力,可以通过提示检测未见过的物体(例如“bird scooter”或“peace symbol”),这与 YOLOv8 的封闭集设计不同。
-
YOLOE 与 YOLO11 的对比: YOLO11 在 YOLOv8 的基础上提高了效率并减少了参数量(约减少 22%)。YOLOE 直接继承了这些提升,在匹配 YOLO11 推理速度和参数量(~26M 参数)的同时,增加了开放词汇检测和分割功能。在封闭集场景下,YOLOE 等同于 YOLO11,但关键在于它增加了检测未见类别的适应性,在不牺牲速度的情况下实现了 YOLO11 + 开放世界能力。
-
YOLOE26 与 YOLOE (基于 YOLO11) 的对比: YOLOE26 基于 YOLO26 的架构,继承了其无需 NMS 的端到端设计,从而实现更快的推理。在 LVIS 上,YOLOE26-L 达到了 36.8% mAP,相较于 YOLOE-L 的 35.2% mAP 有所提升。与仅有三个模型规模 (S/M/L) 的 YOLOE 相比,YOLOE26 提供了所有五个模型规模 (N/S/M/L/X),为不同部署场景提供了更多灵活性。
-
YOLOE26 与先前开放词汇检测器的对比: 早期的开放词汇模型(GLIP、OWL-ViT、YOLO-World)严重依赖视觉-语言 transformers,导致推理速度缓慢。在 LVIS 上,YOLOE26-S 达到了 29.9% mAP(比 YOLO-World-S 高 +11.4 AP),YOLOE26-L 达到了 36.8% mAP(比 YOLO-World-L 高 +10.0 AP),同时在 T4 GPU 上保持了 161 FPS 的实时推理速度。与基于 transformer 的方法(如 GLIP)相比,YOLOE26 的推理速度快了几个数量级,有效地弥补了开放集检测中精度与效率之间的差距。
总之,YOLOE 和 YOLOE26 保持了 YOLO 著名的速度和效率,在精度上超越了前辈,集成了分割功能,并引入了强大的开放世界检测能力。YOLOE26 进一步通过 YOLO26 的无需 NMS 的端到端推理推进了架构发展,使其成为实时开放词汇应用的理想选择。
Link to this section用例与应用#
YOLOE 的开放词汇检测与分割功能实现了超越传统固定类别模型的多种应用:
-
开放世界目标检测: 非常适合机器人技术等动态场景,机器人可以利用提示识别从未见过的物体;或者安防系统无需重新训练即可快速适应新威胁(例如危险物品)。
-
少样本与单样本检测: 利用视觉提示 (SAVPE),YOLOE 可以从单张参考图像中快速学习新物体——非常适合工业检测(立即识别零件或缺陷)或定制监控,从而以最少的设置进行视觉搜索。
-
大词汇量与长尾识别: YOLOE 配备了 1000+ 类的词汇表,在生物多样性监测(检测稀有物种)、博物馆藏品、零售库存或电子商务等任务中表现出色,无需针对每个类别进行大量训练即可可靠地识别众多类别。
-
交互式检测与分割: YOLOE 支持实时交互式应用,例如可搜索的视频/图像检索、增强现实 (AR) 和直观的图像编辑,所有这些都由自然输入(文本或视觉提示)驱动。用户可以使用分割掩码动态且精确地分离、识别或编辑对象。
-
自动化数据标注与引导: YOLOE 通过提供初始边界框和分割标注来促进数据集的快速创建,显著减少了人工标注的工作量。在大型媒体合集的分析中尤为有价值,它可以自动识别存在的物体,协助更快地构建专用模型。
-
任意物体分割: 通过提示将分割能力扩展到任意物体,这对医学影像、显微镜检查或卫星图像分析非常有益,无需专门的预训练模型即可自动识别并精确分割结构。与 SAM 等模型不同,YOLOE 同时自动识别和分割物体,有助于内容创作或场景理解等任务。
在所有这些用例中,YOLOE 的核心优势在于多功能性,为动态场景下的检测、识别和分割提供了一个统一的模型。其效率确保了在资源受限设备上的实时性能,非常适合机器人、自动驾驶、国防等领域。
根据你的需求选择 YOLOE 模式:
- 封闭集模式: 用于固定类别任务(获得最高速度和精度)。
- 提示模式: 通过文本或视觉提示快速添加新对象。
- 免提示开放集模式: 跨众多类别的通用检测(适合编目和发现)。
通常,结合多种模式——例如先进行免提示发现,随后进行目标提示——可以充分发挥 YOLOE 的潜力。
Link to this section训练与推理#
YOLOE 与 Ultralytics Python API 和 CLI 无缝集成,与其他 YOLO 模型(YOLOv8, YOLO-World)类似。以下是快速入门方法:
from ultralytics import YOLO

# Load pretrained YOLOE model and train on custom data
model = YOLO("yoloe-26s-seg.pt")
model.train(data="path/to/data.yaml", epochs=50, imgsz=640)

# Run inference using text prompts ("person", "bus")
model.set_classes(["person", "bus"])
results = model.predict(source="test_images/street.jpg")
results[0].save()  # save annotated output
在此,YOLOE 默认表现为标准检测器,但通过指定类别 (set_classes) 可以轻松切换到提示检测。结果包含边界框、掩码和标签。
Link to this section其他支持的任务#
- 验证: 使用
model.val()或yolo val轻松评估准确度。 - 导出: 将 YOLOE 模型导出 (
model.export()) 为 ONNX, TensorRT 等格式,方便部署。 - 追踪: YOLOE 集成后支持物体追踪 (
yolo track),这对于追踪视频中的提示类别非常有用。
YOLOE 在推理结果中自动包含分割掩码 (results[0].masks),简化了像素级精确任务(如物体提取或测量),无需单独的模型。
Link to this section入门指南#
遵循以下步骤,使用 Ultralytics 快速设置 YOLOE:
-
安装: 安装或更新 Ultralytics 包:
pip install -U ultralytics -
下载 YOLOE 权重: 预训练的 YOLOE 模型(例如 YOLOE-v8-S/L, YOLOE-11 变体)可从 YOLOE GitHub 发布页面获取。只需下载你想要的
.pt文件即可加载到 Ultralytics YOLO 类中。 -
硬件要求:
- 推理:推荐 GPU(NVIDIA,显存 ≥4-8GB)。小型模型可在边缘 GPU(如 Jetson)或 CPU 上以较低分辨率高效运行。对于紧凑型工作站上的高性能推理,请参阅我们的 NVIDIA DGX Spark 指南。
- 训练:在自定义数据上微调 YOLOE 通常仅需一个 GPU。作者使用的广泛开放词汇预训练(LVIS/Objects365)需要相当大的计算资源(8× RTX 4090 GPU)。
-
配置: YOLOE 配置使用标准的 Ultralytics YAML 文件。默认配置(如
yoloe-26s-seg.yaml)通常足够,但你可以根据需要修改骨干网络、类别或图像尺寸。 -
运行 YOLOE:
-
快速推理(免提示):
yolo predict model=yoloe-26s-seg-pf.pt source="image.jpg" -
提示检测(文本提示示例):
from ultralytics import YOLO

model = YOLO("yoloe-26s-seg.pt")
model.set_classes(["bowl", "apple"])
results = model.predict("kitchen.jpg")
results[0].save()
-
-
集成建议:
- 类名:默认 YOLOE 输出使用 LVIS 类别;使用
set_classes()指定你自己的标签。 - 速度:除非使用提示,否则 YOLOE 没有额外开销。文本提示的影响极小;视觉提示影响稍大一些。
- NMS 行为:YOLOE 在预测期间自动使用
agnostic_nms=True,合并跨类别的重叠框。这可以防止当同一个物体匹配 YOLOE 大词汇表(1200+ LVIS 类)中的多个类别时产生重复检测。你可以通过显式传递agnostic_nms=False来覆盖此设置。 - 批次推理:直接支持 (
model.predict([img1, img2]))。对于特定的图像提示,请单独运行图像。
- 类名:默认 YOLOE 输出使用 LVIS 类别;使用
Ultralytics 文档提供了更多资源。YOLOE 让你可以轻松地在熟悉的 YOLO 生态系统中探索强大的开放世界功能。
专家提示: 为了最大化 YOLOE 的零样本准确度,建议从提供的检查点进行微调,而不是从零开始训练。使用与常见训练标签对齐的提示词(参见 LVIS 类别)以提高检测准确性。
Link to this section引用与致谢#
如果 YOLOE 对你的研究或项目有所帮助,请引用来自清华大学的 Ao Wang, Lihao Liu, Hui Chen, Zijia Lin, Jungong Han, and Guiguang Ding 的原始论文:
@misc{wang2025yoloerealtimeseeing,
      title={YOLOE: Real-Time Seeing Anything},
      author={Ao Wang and Lihao Liu and Hui Chen and Zijia Lin and Jungong Han and Guiguang Ding},
      year={2025},
      eprint={2503.07465},
      archivePrefix={arXiv},
      primaryClass={cs.CV},
      url={https://arxiv.org/abs/2503.07465},
}
欲了解更多信息,原始 YOLOE 论文可在 arXiv 获取。该项目的源代码和其他资源可以通过其 GitHub 仓库 访问。
Link to this section常见问题解答#
Link to this sectionYOLOE 与 YOLO-World 有何不同?#
尽管 YOLOE 和 YOLO-World 都支持开放词汇检测,但 YOLOE 具有多项优势。YOLOE 在 LVIS 上实现了高出 +3.5 AP 的准确度,同时使用的训练资源减少了 3 倍,运行速度比 YOLO-Worldv2 快 1.4 倍。YOLOE 还支持三种提示模式(文本、视觉和内部词汇),而 YOLO-World 主要关注文本提示。此外,YOLOE 内置了实例分割功能,为检测到的对象提供像素级精确的掩码,且没有额外开销。
Link to this section我能将 YOLOE 用作常规 YOLO 模型吗?#
是的,YOLOE 可以像标准 YOLO 模型一样运行,且没有任何性能损失。当在封闭集模式(无提示)下使用时,YOLOE 的开放词汇模块会被重参数化为标准检测头,从而实现与同等 YOLO11 模型一致的速度和准确度。这使得 YOLOE 极为通用——你可以将其作为传统检测器以获得最大速度,仅在需要时切换到开放词汇模式。
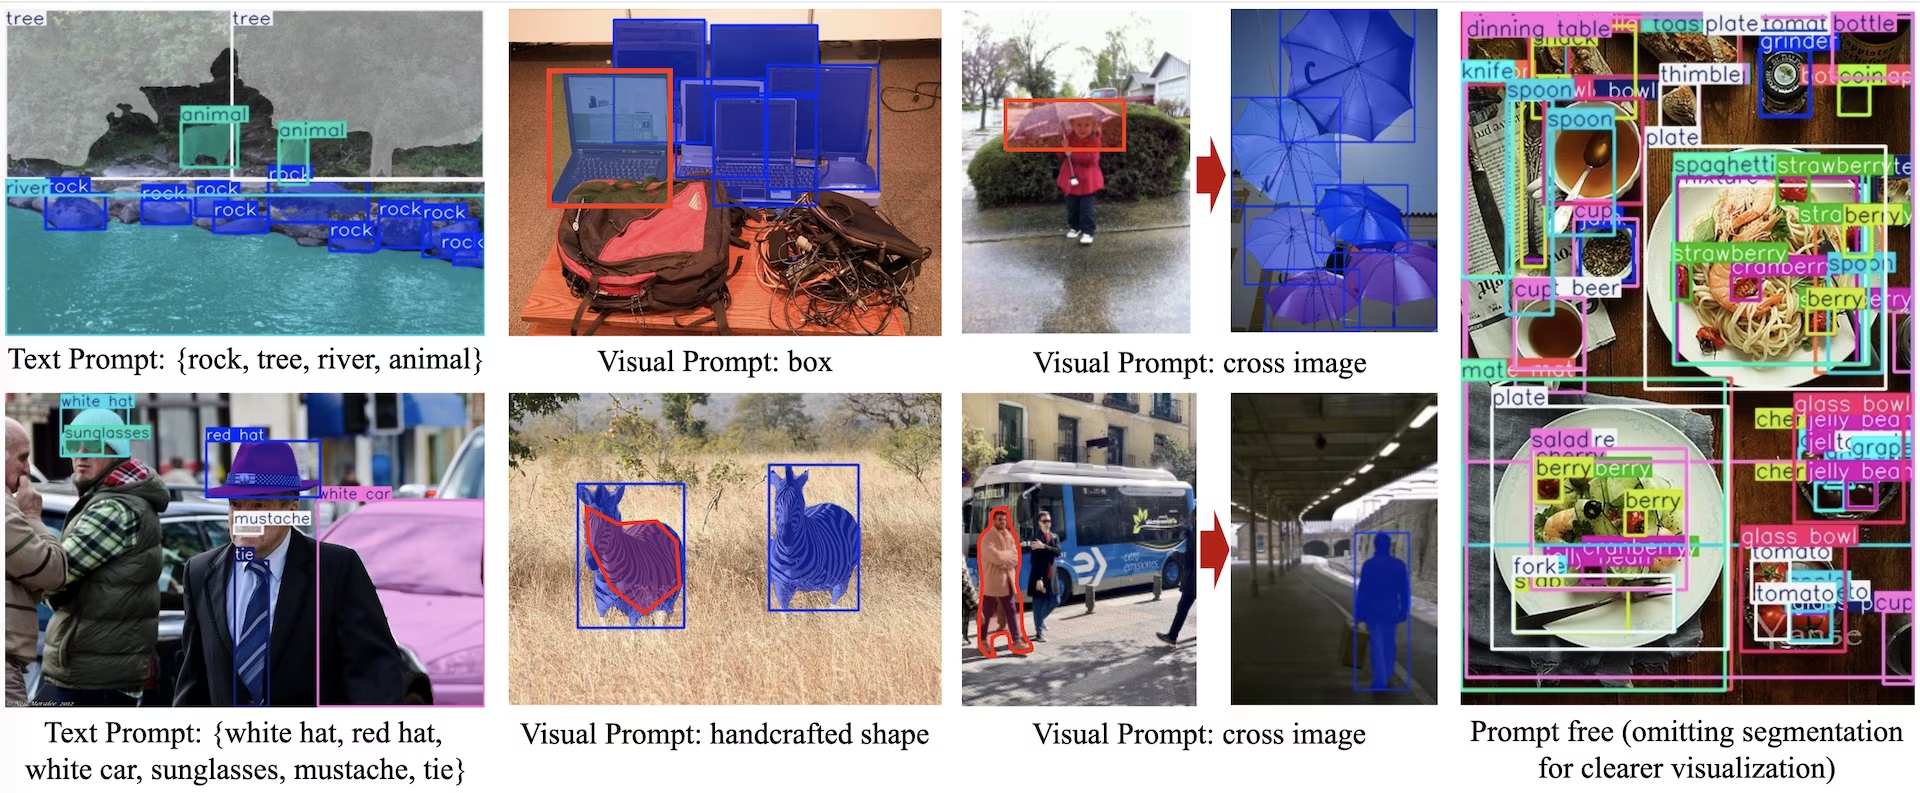
Link to this section我可以配合 YOLOE 使用哪些类型的提示?#
YOLOE 支持三种类型的提示:
- 文本提示:使用自然语言指定对象类别(例如“人”、“交通灯”、“鸟类滑板车”)
- 视觉提示:提供你要检测对象的参考图像
- 内部词汇:使用 YOLOE 内置的 1200+ 类别的词汇表,无需外部提示
这种灵活性使你无需重新训练模型即可使 YOLOE 适应各种场景,这在检测需求频繁变化的动态环境中特别有用。
Link to this sectionYOLOE 如何处理实例分割?#
YOLOE 通过在检测头中扩展掩码预测分支,将实例分割直接集成到了其架构中。这种方法与 YOLOv8-Seg 类似,但适用于任何提示的对象类别。分割掩码会自动包含在推理结果中,你可以通过 results[0].masks 进行访问。这种统一的方法消除了对独立检测和分割模型的需求,简化了需要像素级精确对象边界的应用工作流程。
Link to this sectionYOLOE 如何处理带有自定义提示的推理?#
与 YOLO-World 类似,YOLOE 支持利用离线词汇表来提高效率的“先提示后检测”策略。诸如标题或特定对象类别等自定义提示会被预编码并存储为离线词汇表嵌入。这种方法简化了检测流程,且无需重新训练。你可以在模型中动态设置这些提示,以针对特定的检测任务进行调整:
from ultralytics import YOLO

# Initialize a YOLOE model
model = YOLO("yoloe-26s-seg.pt")

# Define custom classes
model.set_classes(["person", "bus"])

# Execute prediction on an image
results = model.predict("path/to/image.jpg")

# Show results
results[0].show()